
                                   /\
                               _  / |
                              / \ |  \
                             |  |\|  |
                             |  | | /
                             | /| |/
                             |/ |/
                        ,/;  ;  ;
                     ,'/|; ,/,/,
                   ,'/ |;/,/,/,/|
                ,/;  |;|/,/,/,/,/|
              ,/';   |;|,/,/,/,/,/|
            ,/';     |;|/,/,/,/,/,/|,
           /  ;      |;|,/,/,/,/,/,/|
          / ,';      |;|/,/,/,/,/,/,/|
         /,/';       |;|,/,/,/,/,/,/,/|
        /;/ ';       |;|/,/,/,/,/,/,/,/|

     ██████╗ ███████╗ ██████╗  █████╗ ███████╗██╗   ██╗███████╗
     ██╔══██╗██╔════╝██╔════╝ ██╔══██╗██╔════╝██║   ██║██╔════╝
     ██████╔╝█████╗  ██║  ███╗███████║███████╗██║   ██║███████╗
     ██╔═══╝ ██╔══╝  ██║   ██║██╔══██║╚════██║██║   ██║╚════██║
     ██║     ███████╗╚██████╔╝██║  ██║███████║╚██████╔╝███████║
     ╚═╝     ╚══════╝ ╚═════╝ ╚═╝  ╚═╝╚══════╝ ╚═════╝ ╚══════╝
                    P E N T E S T   A R S E N A L
A comprehensive web application security testing toolkit that combines 10 powerful penetration testing features into one tool.
Identifies potential security Misconfigurations" title="Misconfigurations">misconfigurations
JWT Token Inspector
Detects common JWT vulnerabilities
Parameter Pollution Finder
Detects server-side parameter handling issues
CORS Misconfiguration Scanner
Detects credential exposure risks
Upload Bypass Tester
Identifies dangerous file type handling
Exposed .git Directory Finder
Tests for sensitive information disclosure
SSRF (Server Side Request Forgery) Detector
Includes cloud metadata endpoint tests
Blind SQL Injection Time Delay Detector
Identifies injectable parameters
Local File Inclusion (LFI) Mapper
Supports various encoding bypasses
Web Application Firewall (WAF) Fingerprinter
git clone https://github.com/sobri3195/pegasus-pentest-arsenal.git
cd pegasus-pentest-arsenal
python -m venv venv
source venv/bin/activate  # On Windows: venv\Scripts\activate
pip install -r requirements.txt
python pegasus_pentest.py
This project is licensed under the MIT License - see the LICENSE file for details.
This tool is provided for educational and authorized testing purposes only. Users are responsible for obtaining proper authorization before testing any target. The authors are not responsible for any misuse or damage caused by this tool.
SubGPT looks at subdomains you have already discovered for a domain and uses BingGPT to find more. Best part? It's free!
The following subdomains were found by this tool with these 30 subdomains as input.
call-prompts-staging.example.com
dclb02-dca1.prod.example.com
activedirectory-sjc1.example.com
iadm-staging.example.com
elevatenetwork-c.example.com
If you like my work, you can support me with as little as $1, here :)
pip install subgpt
git clone https://github.com/s0md3v/SubGPT && cd SubGPT && python setup.py install
cookies.json
Note: Any issues regarding BingGPT itself should be reported EdgeGPT, not here.
It is supposed to be used after you have discovered some subdomains using all other methods. The standard way to run SubGPT is as follows:
subgpt -i input.txt -o output.txt -c /path/to/cookies.json
If you don't specify an output file, the output will be shown in your terminal (stdout) instead.
To generate subdomains and not resolve them, use the --dont-resolve option. It's a great way to see all subdomains generated by SubGPT and/or use your own resolver on them.
![]()
Frogy 2.0 is an automated external reconnaissance and Attack Surface Management (ASM) toolkit designed to map out an organization's entire internet presence. It identifies assets, IP addresses, web applications, and other metadata across the public internet and then smartly prioritizes them with highest (most attractive) to lowest (least attractive) from an attacker's playground perspective.
Comprehensive recon:
Aggregate subdomains and assets using multiple tools (CHAOS, Subfinder, Assetfinder, crt.sh) to map an organization's entire digital footprint.
Live asset verification:
Validate assets with live DNS resolution and port scanning (using DNSX and Naabu) to confirm what is publicly reachable.
In-depth web recon:
Collect detailed HTTP response data (via HTTPX) including metadata, technology stack, status codes, content lengths, and more.
Smart prioritization:
Use a composite scoring system that considers homepage status, login identification, technology stack, and DNS data and much more to generate risk score for each assets helping bug bounty hunters and pentesters focus on the most promising targets to start attacks with.
Professional reporting:
Generate a dynamic, colour-coded HTML report with a modern design and dark/light theme toggle.
In this tool, risk scoring is based on the notion of asset attractiveness—the idea that certain attributes or characteristics make an asset more interesting to attackers. If we see more of these attributes, the overall score goes up, indicating a broader "attack surface" that adversaries could leverage. Below is an overview of how each factor contributes to the final risk score.
![]()
![]()
![]()
![]()
200 OK, it often means the page is legitimately reachable and responding with content. A 200 OK is more interesting to attackers than a 404 or a redirect—so a 200 status modestly increases the risk.Strict-Transport-Security (HSTS)X-Frame-OptionsContent-Security-PolicyX-XSS-ProtectionReferrer-PolicyPermissions-PolicyMissing or disabled headers mean an endpoint is more prone to common web exploits. Each absent header increments the score.
Each factor above contributes one or more points to the final risk score. For example:
Once all factors are tallied, we get a numeric risk score. Higher means more interesting and potentially gives more room for pentesters to test around to an attacker.
Why This Matters
This approach helps you quickly prioritize which assets warrant deeper testing. Subdomains with high counts of open ports, advanced internal usage, missing headers, or login panels are more complex, more privileged, or more likely to be misconfigured—therefore, your security team can focus on those first.
Clone the repository and run the installer script to set up all dependencies and tools:
chmod +x install.sh
./install.sh
chmod +x frogy.sh
./frogy.sh domains.txt
https://www.youtube.com/watch?v=LHlU4CYNj1M
![]()
Lobo Guará is a platform aimed at cybersecurity professionals, with various features focused on Cyber Threat Intelligence (CTI). It offers tools that make it easier to identify threats, monitor data leaks, analyze suspicious domains and URLs, and much more.
Allows identifying domains and subdomains that may pose a threat to organizations. SSL certificates issued by trusted authorities are indexed in real-time, and users can search using keywords of 4 or more characters.
Note: The current database contains certificates issued from September 5, 2024.
Allows the insertion of keywords for monitoring. When a certificate is issued and the common name contains the keyword (minimum of 5 characters), it will be displayed to the user.
Generates a link to capture device information from attackers. Useful when the security professional can contact the attacker in some way.
Performs a scan on a domain, displaying whois information and subdomains associated with that domain.
Allows performing a scan on a URL to identify URIs (web paths) related to that URL.
Performs a scan on a URL, generating a screenshot and a mirror of the page. The result can be made public to assist in taking down malicious websites.
Monitors a URL with no active application until it returns an HTTP 200 code. At that moment, it automatically initiates a URL scan, providing evidence for actions against malicious sites.
Centralizes intelligence news from various channels, keeping users updated on the latest threats.
The application installation has been approved on Ubuntu 24.04 Server and Red Hat 9.4 distributions, the links for which are below:
Lobo Guará Implementation on Ubuntu 24.04
Lobo Guará Implementation on Red Hat 9.4
There is a Dockerfile and a docker-compose version of Lobo Guará too. Just clone the repo and do:
docker compose up
Then, go to your web browser at localhost:7405.
Before proceeding with the installation, ensure the following dependencies are installed:
git clone https://github.com/olivsec/loboguara.git
cd loboguara/
nano server/app/config.py
Fill in the required parameters in the config.py file:
class Config:
    SECRET_KEY = 'YOUR_SECRET_KEY_HERE'
    SQLALCHEMY_DATABASE_URI = 'postgresql://guarauser:YOUR_PASSWORD_HERE@localhost/guaradb?sslmode=disable'
    SQLALCHEMY_TRACK_MODIFICATIONS = False

    MAIL_SERVER = 'smtp.example.com'
    MAIL_PORT = 587
    MAIL_USE_TLS = True
    MAIL_USERNAME = 'no-reply@example.com'
    MAIL_PASSWORD = 'YOUR_SMTP_PASSWORD_HERE'
    MAIL_DEFAULT_SENDER = 'no-reply@example.com'

    ALLOWED_DOMAINS = ['yourdomain1.my.id', 'yourdomain2.com', 'yourdomain3.net']

    API_ACCESS_TOKEN = 'YOUR_LOBOGUARA_API_TOKEN_HERE'
    API_URL = 'https://loboguara.olivsec.com.br/api'

    CHROME_DRIVER_PATH = '/opt/loboguara/bin/chromedriver'
    GOOGLE_CHROME_PATH = '/opt/loboguara/bin/google-chrome'
    FFUF_PATH = '/opt/loboguara/bin/ffuf'
    SUBFINDER_PATH = '/opt/loboguara/bin/subfinder'

    LOG_LEVEL = 'ERROR'
    LOG_FILE = '/opt/loboguara/logs/loboguara.log'
sudo chmod +x ./install.sh
sudo ./install.sh
sudo -u loboguara /opt/loboguara/start.sh
Access the URL below to register the Lobo Guará Super Admin
http://your_address:7405/admin
![]()
Access the Lobo Guará platform online: https://loboguara.olivsec.com.br/
![]()
Reconnaissance is the first phase of penetration testing which means gathering information before any real attacks are planned So Ashok is an Incredible fast recon tool for penetration tester which is specially designed for Reconnaissance" title="Reconnaissance">Reconnaissance phase. And in Ashok-v1.1 you can find the advanced google dorker and wayback crawling machine.
![]()
- Wayback Crawler Machine
- Google Dorking without limits
- Github Information Grabbing
- Subdomain Identifier
- Cms/Technology Detector With Custom Headers
~> git clone https://github.com/ankitdobhal/Ashok
~> cd Ashok
~> python3.7 -m pip3 install -r requirements.txt
A detailed usage guide is available on Usage section of the Wiki.
But Some index of options is given below:
Ashok can be launched using a lightweight Python3.8-Alpine Docker image.
$ docker pull powerexploit/ashok-v1.2
$ docker container run -it powerexploit/ashok-v1.2  --help
![]()
Howdy! My name is Harrison Richardson, or rs0n (arson) when I want to feel cooler than I really am. The code in this repository started as a small collection of scripts to help automate many of the common Bug Bounty hunting processes I found myself repeating. Over time, I built a simple web application with a MongoDB connection to manage my findings and identify valuable data points. After 5 years of Bug Bounty hunting, both part-time and full-time, I'm finally ready to package this collection of tools into a proper framework.
The Ars0n Framework is designed to provide aspiring Application Security Engineers with all the tools they need to leverage Bug Bounty hunting as a means to learn valuable, real-world AppSec concepts and make 💰 doing it! My goal is to lower the barrier of entry for Bug Bounty hunting by providing easy-to-use automation tools in combination with educational content and how-to guides for a wide range of Web-based and Cloud-based vulnerabilities. In combination with my YouTube content, this framework will help aspiring Application Security Engineers to quickly and easily understand real-world security concepts that directly translate to a high paying career in Cyber Security.
In addition to using this tool for Bug Bounty Hunting, aspiring engineers can also use this Github Repository as a canvas to practice collaborating with other developers! This tool was inspired by Metasploit and designed to be modular in a similar way. Each Script (Ex: wildfire.py or slowburn.py) is basically an algorithm that runs the Modules (Ex: fire-starter.py or fire-scanner.py) in a specific patter for a desired result. Because of this design, the community is free to build new Scripts to solve a specific use-case or Modules to expand the results of these Scripts. By learning the code in this framework and using Github to contribute your own code, aspiring engineers will continue to learn real-world skills that can be applied on the first day of a Security Engineer I position.
My hope is that this modular framework will act as a canvas to help share what I've learned over my career to the next generation of Security Engineers! Trust me, we need all the help we can get!!
Paste this code block into a clean installation of Kali Linux 2023.4 to download, install, and run the latest stable Alpha version of the framework:
sudo apt update && sudo apt-get update
sudo apt -y upgrade && sudo apt-get -y upgrade
wget https://github.com/R-s0n/ars0n-framework/releases/download/v0.0.2-alpha/ars0n-framework-v0.0.2-alpha.tar.gz
tar -xzvf ars0n-framework-v0.0.2-alpha.tar.gz
rm ars0n-framework-v0.0.2-alpha.tar.gz
cd ars0n-framework
./install.sh
wget https://github.com/R-s0n/ars0n-framework/releases/download/v0.0.2-alpha/ars0n-framework-v0.0.2-alpha.tar.gz
tar -xzvf ars0n-framework-v0.0.2-alpha.tar.gz
rm ars0n-framework-v0.0.2-alpha.tar.gz
The Ars0n Framework includes a script that installs all the necessary tools, packages, etc. that are needed to run the framework on a clean installation of Kali Linux 2023.4.
Please note that the only supported installation of this framework is on a clean installation of Kali Linux 2023.3. If you choose to try and run the framework outside of a clean Kali install, I will not be able to help troubleshoot if you have any issues.
./install.sh
This video shows exactly what to expect from a successful installation.
If you are using an ARM Processor, you will need to add the --arm flag to all Install/Run scripts
./install.sh --arm
You will be prompted to enter various API keys and tokens when the installation begins. Entering these is not required to run the core functionality of the framework. If you do not enter these API keys and tokens at the time of installation, simply hit enter at each of the prompts. The keys can be added later to the ~/.keys directory. More information about how to add these keys manually can be found in the Frequently Asked Questions section of this README.
Once the installation is complete, you will be given the option to run the application by entering Y. If you choose not the run the application immediately, or if you need to run the application after a reboot, simply navigate to the root directly and run the run.sh bash script.
./run.sh
If you are using an ARM Processor, you will need to add the --arm flag to all Install/Run scripts
./run.sh --arm
The Ars0n Framework's Core Modules are used to determine the basic scanning logic. Each script is designed to support a specific recon methodology based on what the user is trying to accomplish.
At this time, the Wildfire script is the most widely used Core Module in the Ars0n Framework. The purpose of this module is to allow the user to scan multiple targets that allow for testing on any subdomain discovered by the researcher.
How it works:
Most Wildfire scans take between 8 and 48 hours to complete against a single domain if all Sub-Modules are being run. Variations in this timing can be caused by a number of factors, including the target application and the machine running the framework.
Also, please note that most data will not show in the GUI until the scan has completed. It's best to try and run the scan overnight or over a weekend, depending on the number of domains being scanned, and return once the scan has complete to move from Recon to Enumeration.
Running Wildfire:
Wildfire can be run from the GUI using the Wildfire button on the dashboard. Once clicked, the front-end will use the checkboxes on the screen to determine what flags should be passed to the scanner.
Please note that running scans from the GUI still has a few bugs and edge cases that haven't been sorted out. If you have any issues, you can simply run the scan form the CLI.
All Core Modules for The Ars0n Framework are stored in the /toolkit directory. Simply navigate to the directory and run wildfire.py with the necessary flags. At least one Sub-Module flag must be provided.
python3 wildfire.py --start --cloud --scan
Unlike the Wildfire module, which requires the user to identify target domains to scan, the Slowburn module does that work for you. By communicating with APIs for various bug bounty hunting platforms, this script will identify all domains that allow for testing on any discovered subdomain. Once the data has been populated, Slowburn will randomly choose one domain at a time to scan in the same way Wildfire does.
Please note that the Slowburn module is still in development and is not considered part of the stable alpha release. There will likely be bugs and edge cases encountered by the user.
In order for Slowburn to identify targets to scan, it must first be initialized. This initialization step collects the necessary data from various API's and deposits them into a JSON file stored locally. Once this initialization step is complete, Slowburn will automatically begin selecting and scanning one target at a time.
To initalize Slowburn, simply run the following command:
python3 slowburn.py --initialize
Once the data has been collected, it is up to the user whether they want to re-initialize the tool upon the next scan.
Remember that the scope and targets on public bug bounty programs can change frequently. If you choose to run Slowburn without initializing the data, you may be scanning domains that are no longer in scope for the program. It is strongly recommended that Slowburn be re-initialized each time before running.
If you choose not to re-initialize the target data, you can run Slowburn using the previously collected data with the following command:
python3 slowburn.py
The Ars0n Framework's Sub-Modules are designed to be leveraged by the Core Modules to divide the Recon & Enumeration phases into specific tasks. The data collected in each Sub-Module is used by the others to expand your picture of the target's attack surface.
Fire-Starter is the first step to performing recon against a target domain. The goal of this script is to collect a wealth of information about the attack surface of your target. Once collected, this data will be used by all other Sub-Modules to help the user identify a specific URL that is potentially vulnerable.
Fire-Starter works by running a series of open-source tools to enumerate hidden subdomains, DNS records, and the ASN's to identify where those external entries are hosted. Currently, Fire-Starter works by chaining together the following widely used open-source tools:
These tools cover a wide range of techniques to identify hidden subdomains, including web scraping, brute force, and crawling to identify links and JavaScript URLs.
Once the scan is complete, the Dashboard will be updated and available to the user.
Most Sub-Modules in The Ars0n Framework requre the data collected from the Fire-Starter module to work. With this in mind, Fire-Starter must be included in the first scan against a target for any usable data to be collected.
Coming soon...
Fire-Scanner uses the results of Fire-Starter and Fire-Cloud to perform Wide-Band Scanning against all subdomains and cloud services that have been discovered from previous scans.
At this stage of development, this script leverages Nuclei almost exclusively for all scanning. Instead of simply running the tool, Fire-Scanner breaks the scan down into specific collections of Nuclei Templates and scans them one by one. This strategy helps ensure the scans are stable and produce consistent results, removes any unnecessary or unsafe scan checks, and produces actionable results.
The vast majority of issues installing and/or running the Ars0n Framework are caused by not installing the tool on a clean installation of Kali Linux.
It is important to remember that, at its core, the Ars0n Framework is a collection of automation scripts designed to run existing open-source tools. Each of these tools have their own ways of operating and can experience unexpected behavior if conflicts emerge with any existing service/tool running on the user's system. This complexity is the reason why running The Ars0n Framework should only be run on a clean installation of Kali Linux.
Another very common issue users experience is caused by MongoDB not successfully installing and/or running on their machine. The most common manifestation of this issue is the user is unable to add an initial FQDN and simply sees a broken GUI. If this occurs, please ensure that your machine has the necessary system requirements to run MongoDB. Unfortunately, there is no current solution if you run into this issue.
Coming soon...
![]()
Subdomain takeover is a common vulnerability that allows an attacker to gain control over a subdomain of a target domain and redirect users intended for an organization's domain to a website that performs malicious activities, such as phishing campaigns, stealing user cookies, etc. It occurs when an attacker gains control over a subdomain of a target domain. Typically, this happens when the subdomain has a CNAME in the DNS, but no host is providing content for it. Subhunter takes a given list of Subdomains" title="Subdomains">subdomains and scans them to check this vulnerability.
Download from releases
Build from source:
$ git clone https://github.com/Nemesis0U/Subhunter.git
$ go build subhunter.go
Usage of subhunter:
  -l string
        File including a list of hosts to scan
  -o string
        File to save results
  -t int
        Number of threads for scanning (default 50)
  -timeout int
        Timeout in seconds (default 20)
./Subhunter -l subdomains.txt -o test.txt

  ____            _       _                       _
 / ___|   _   _  | |__   | |__    _   _   _ __   | |_    ___   _ __
 \___ \  | | | | | '_ \  | '_ \  | | | | | '_ \  | __|  / _ \ | '__|
  ___) | | |_| | | |_) | | | | | | |_| | | | | | | |_  |  __/ | |
 |____/   \__,_| |_.__/  |_| |_|  \__,_| |_| |_|  \__|  \___| |_|


A fast subdomain takeover tool

Created by Nemesis

Loaded 88 fingerprints for current scan

-----------------------------------------------------------------------------

[+] Nothing found at www.ubereats.com: Not Vulnerable
[+] Nothing found at testauth.ubereats.com: Not Vulnerable
[+] Nothing found at apple-maps-app-clip.ubereats.com: Not Vulnerable
[+] Nothing found at about.ubereats.com: Not Vulnerable
[+] Nothing found at beta.ubereats.com: Not Vulnerable
[+] Nothing found at ewp.ubereats.com: Not Vulnerable
[+] Nothi   ng found at edgetest.ubereats.com: Not Vulnerable
[+] Nothing found at guest.ubereats.com: Not Vulnerable
[+] Google Cloud: Possible takeover found at testauth.ubereats.com: Vulnerable
[+] Nothing found at info.ubereats.com: Not Vulnerable
[+] Nothing found at learn.ubereats.com: Not Vulnerable
[+] Nothing found at merchants.ubereats.com: Not Vulnerable
[+] Nothing found at guest-beta.ubereats.com: Not Vulnerable
[+] Nothing found at merchant-help.ubereats.com: Not Vulnerable
[+] Nothing found at merchants-beta.ubereats.com: Not Vulnerable
[+] Nothing found at merchants-staging.ubereats.com: Not Vulnerable
[+] Nothing found at messages.ubereats.com: Not Vulnerable
[+] Nothing found at order.ubereats.com: Not Vulnerable
[+] Nothing found at restaurants.ubereats.com: Not Vulnerable
[+] Nothing found at payments.ubereats.com: Not Vulnerable
[+] Nothing found at static.ubereats.com: Not Vulnerable

Subhunter exiting...
   Results written to test.txt
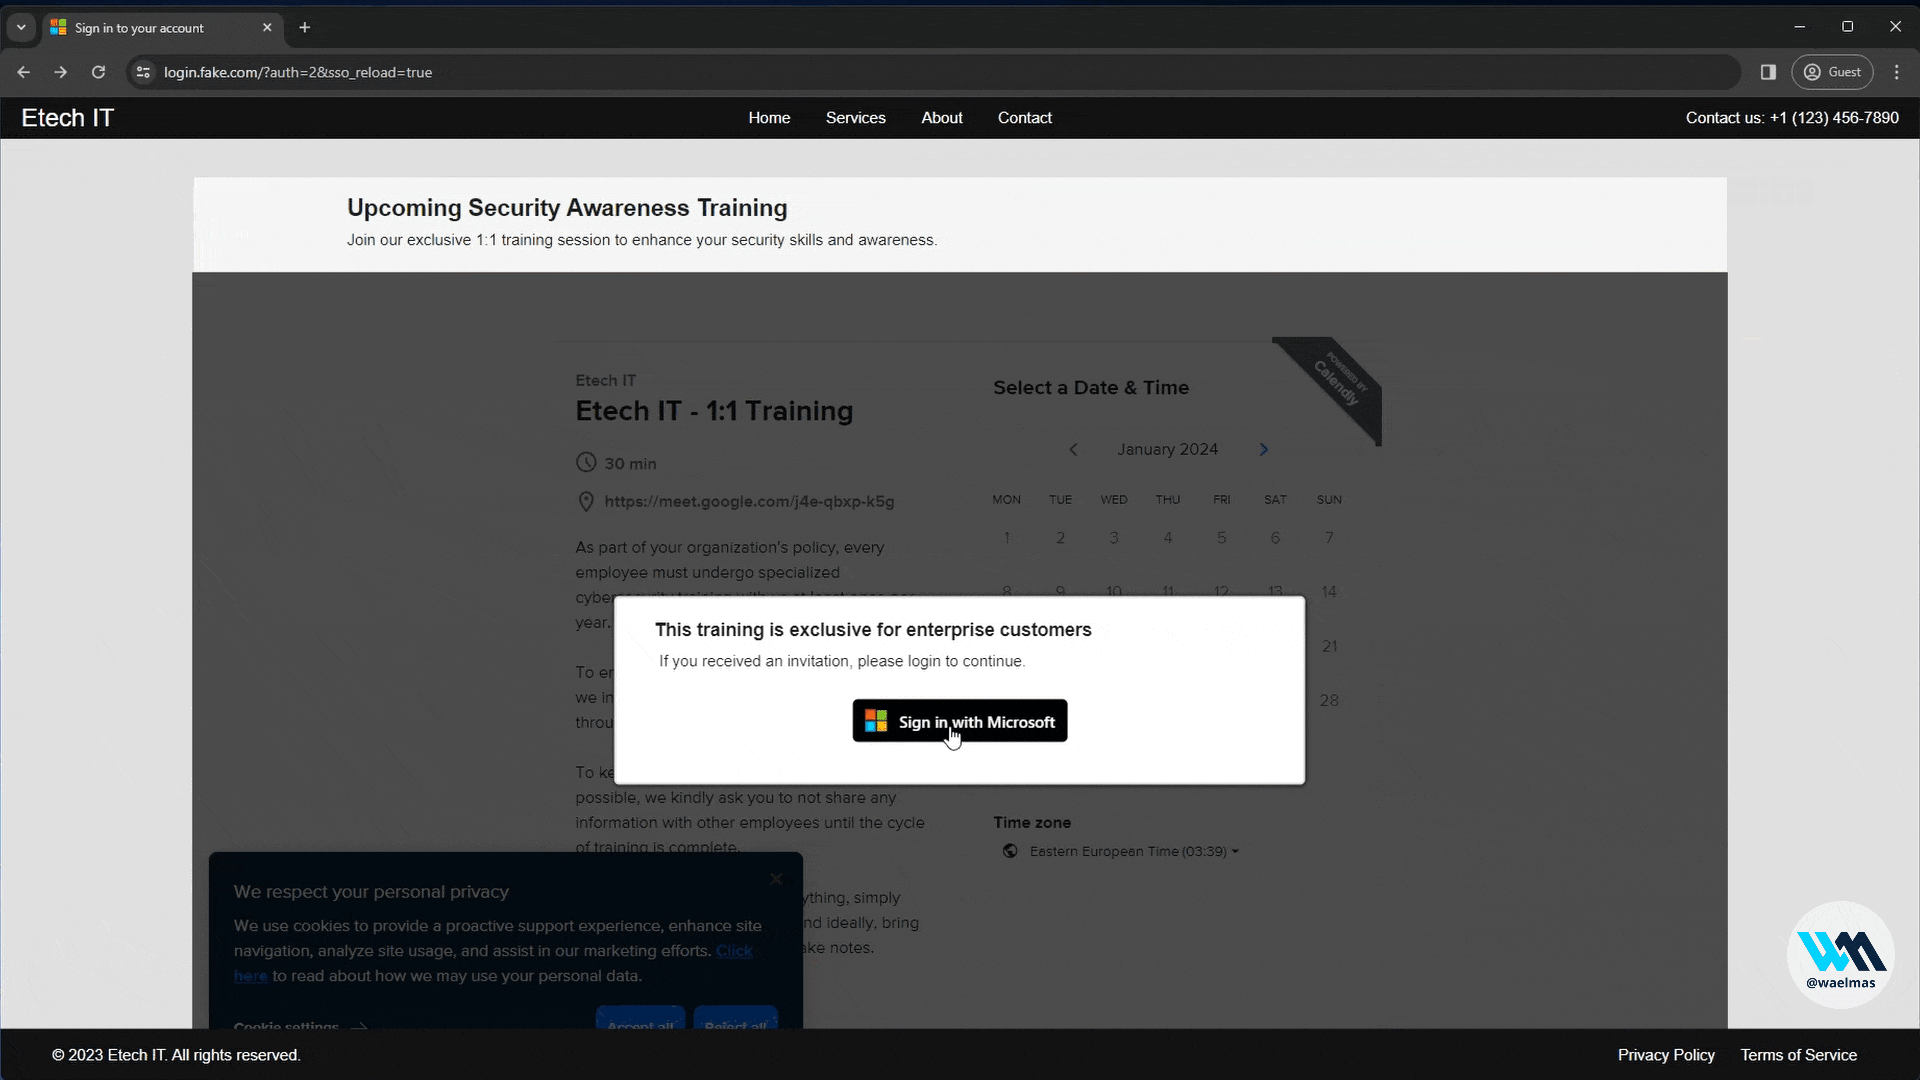
A new approach to Browser In The Browser (BITB) without the use of iframes, allowing the bypass of traditional framebusters implemented by login pages like Microsoft.
This POC code is built for using this new BITB with Evilginx, and a Microsoft Enterprise phishlet.
Before diving deep into this, I recommend that you first check my talk at BSides 2023, where I first introduced this concept along with important details on how to craft the "perfect" phishing attack. ▶ Watch Video
This tool is for educational and research purposes only. It demonstrates a non-iframe based Browser In The Browser (BITB) method. The author is not responsible for any misuse. Use this tool only legally and ethically, in controlled environments for cybersecurity defense testing. By using this tool, you agree to do so responsibly and at your own risk.
Over the past year, I've been experimenting with different tricks to craft the "perfect" phishing attack. The typical "red flags" people are trained to look for are things like urgency, threats, authority, poor grammar, etc. The next best thing people nowadays check is the link/URL of the website they are interacting with, and they tend to get very conscious the moment they are asked to enter sensitive credentials like emails and passwords.
That's where Browser In The Browser (BITB) came into play. Originally introduced by @mrd0x, BITB is a concept of creating the appearance of a believable browser window inside of which the attacker controls the content (by serving the malicious website inside an iframe). However, the fake URL bar of the fake browser window is set to the legitimate site the user would expect. This combined with a tool like Evilginx becomes the perfect recipe for a believable phishing attack.
The problem is that over the past months/years, major websites like Microsoft implemented various little tricks called "framebusters/framekillers" which mainly attempt to break iframes that might be used to serve the proxied website like in the case of Evilginx.
In short, Evilginx + BITB for websites like Microsoft no longer works. At least not with a BITB that relies on iframes.
A Browser In The Browser (BITB) without any iframes! As simple as that.
Meaning that we can now use BITB with Evilginx on websites like Microsoft.
Evilginx here is just a strong example, but the same concept can be used for other use-cases as well.
Framebusters target iframes specifically, so the idea is to create the BITB effect without the use of iframes, and without disrupting the original structure/content of the proxied page. This can be achieved by injecting scripts and HTML besides the original content using search and replace (aka substitutions), then relying completely on HTML/CSS/JS tricks to make the visual effect. We also use an additional trick called "Shadow DOM" in HTML to place the content of the landing page (background) in such a way that it does not interfere with the proxied content, allowing us to flexibly use any landing page with minor additional JS scripts.
Create a local Linux VM. (I personally use Ubuntu 22 on VMWare Player or Parallels Desktop)
Update and Upgrade system packages:
sudo apt update && sudo apt upgrade -y
Create a new evilginx user, and add user to sudo group:
sudo su
adduser evilginx
usermod -aG sudo evilginx
Test that evilginx user is in sudo group:
su - evilginx
sudo ls -la /root
Navigate to users home dir:
cd /home/evilginx
(You can do everything as sudo user as well since we're running everything locally)
Download and build Evilginx: Official Docs
Copy Evilginx files to /home/evilginx
Install Go: Official Docs
wget https://go.dev/dl/go1.21.4.linux-amd64.tar.gz
sudo tar -C /usr/local -xzf go1.21.4.linux-amd64.tar.gz
nano ~/.profile
ADD: export PATH=$PATH:/usr/local/go/bin
source ~/.profile
Check:
go version
Install make:
sudo apt install make
Build Evilginx:
cd /home/evilginx/evilginx2
make
Create a new directory for our evilginx build along with phishlets and redirectors:
mkdir /home/evilginx/evilginx
Copy build, phishlets, and redirectors:
cp /home/evilginx/evilginx2/build/evilginx /home/evilginx/evilginx/evilginx

cp -r /home/evilginx/evilginx2/redirectors /home/evilginx/evilginx/redirectors

cp -r /home/evilginx/evilginx2/phishlets /home/evilginx/evilginx/phishlets
Ubuntu firewall quick fix (thanks to @kgretzky)
sudo setcap CAP_NET_BIND_SERVICE=+eip /home/evilginx/evilginx/evilginx
On Ubuntu, if you get Failed to start nameserver on: :53 error, try modifying this file
sudo nano /etc/systemd/resolved.conf
edit/add the DNSStubListener to no > DNSStubListener=no
then
sudo systemctl restart systemd-resolved
Since we will be using Apache2 in front of Evilginx, we need to make Evilginx listen to a different port than 443.
nano ~/.evilginx/config.json
CHANGE https_port from 443 to 8443
Install Apache2:
sudo apt install apache2 -y
Enable Apache2 mods that will be used: (We are also disabling access_compat module as it sometimes causes issues)
sudo a2enmod proxy
sudo a2enmod proxy_http
sudo a2enmod proxy_balancer
sudo a2enmod lbmethod_byrequests
sudo a2enmod env
sudo a2enmod include
sudo a2enmod setenvif
sudo a2enmod ssl
sudo a2ensite default-ssl
sudo a2enmod cache
sudo a2enmod substitute
sudo a2enmod headers
sudo a2enmod rewrite
sudo a2dismod access_compat
Start and enable Apache:
sudo systemctl start apache2
sudo systemctl enable apache2
Try if Apache and VM networking works by visiting the VM's IP from a browser on the host machine.
Install git if not already available:
sudo apt -y install git
Clone this repo:
git clone https://github.com/waelmas/frameless-bitb
cd frameless-bitb
Make directories for the pages we will be serving:
sudo mkdir /var/www/home
sudo mkdir /var/www/primary
sudo mkdir /var/www/secondary
Copy the directories for each page:
sudo cp -r ./pages/home/ /var/www/

sudo cp -r ./pages/primary/ /var/www/

sudo cp -r ./pages/secondary/ /var/www/
Optional: Remove the default Apache page (not used):
sudo rm -r /var/www/html/
Copy the O365 phishlet to phishlets directory:
sudo cp ./O365.yaml /home/evilginx/evilginx/phishlets/O365.yaml
Optional: To set the Calendly widget to use your account instead of the default I have inside, go to pages/primary/script.js and change the CALENDLY_PAGE_NAME and CALENDLY_EVENT_TYPE.
Note on Demo Obfuscation: As I explain in the walkthrough video, I included a minimal obfuscation for text content like URLs and titles of the BITB. You can open the demo obfuscator by opening demo-obfuscator.html in your browser. In a real-world scenario, I would highly recommend that you obfuscate larger chunks of the HTML code injected or use JS tricks to avoid being detected and flagged. The advanced version I am working on will use a combination of advanced tricks to make it nearly impossible for scanners to fingerprint/detect the BITB code, so stay tuned.
Since we are running everything locally, we need to generate self-signed SSL certificates that will be used by Apache. Evilginx will not need the certs as we will be running it in developer mode.
We will use the domain fake.com which will point to our local VM. If you want to use a different domain, make sure to change the domain in all files (Apache conf files, JS files, etc.)
Create dir and parents if they do not exist:
sudo mkdir -p /etc/ssl/localcerts/fake.com/
Generate the SSL certs using the OpenSSL config file:
sudo openssl req -x509 -nodes -days 365 -newkey rsa:2048 \
-keyout /etc/ssl/localcerts/fake.com/privkey.pem -out /etc/ssl/localcerts/fake.com/fullchain.pem \
-config openssl-local.cnf
Modify private key permissions:
sudo chmod 600 /etc/ssl/localcerts/fake.com/privkey.pem
Copy custom substitution files (the core of our approach):
sudo cp -r ./custom-subs /etc/apache2/custom-subs
Important Note: In this repo I have included 2 substitution configs for Chrome on Mac and Chrome on Windows BITB. Both have auto-detection and styling for light/dark mode and they should act as base templates to achieve the same for other browser/OS combos. Since I did not include automatic detection of the browser/OS combo used to visit our phishing page, you will have to use one of two or implement your own logic for automatic switching.
Both config files under /apache-configs/ are the same, only with a different Include directive used for the substitution file that will be included. (there are 2 references for each file)
# Uncomment the one you want and remember to restart Apache after any changes:
#Include /etc/apache2/custom-subs/win-chrome.conf
Include /etc/apache2/custom-subs/mac-chrome.conf
Simply to make it easier, I included both versions as separate files for this next step.
Windows/Chrome BITB:
sudo cp ./apache-configs/win-chrome-bitb.conf /etc/apache2/sites-enabled/000-default.conf
Mac/Chrome BITB:
sudo cp ./apache-configs/mac-chrome-bitb.conf /etc/apache2/sites-enabled/000-default.conf
Test Apache configs to ensure there are no errors:
sudo apache2ctl configtest
Restart Apache to apply changes:
sudo systemctl restart apache2
Get the IP of the VM using ifconfig and note it somewhere for the next step.
We now need to add new entries to our hosts file, to point the domain used in this demo fake.com and all used subdomains to our VM on which Apache and Evilginx are running.
On Windows:
Open Notepad as Administrator (Search > Notepad > Right-Click > Run as Administrator)
Click on the File option (top-left) and in the File Explorer address bar, copy and paste the following:
C:\Windows\System32\drivers\etc\
Change the file types (bottom-right) to "All files".
Double-click the file named hosts
On Mac:
Open a terminal and run the following:
sudo nano /private/etc/hosts
Now modify the following records (replace [IP] with the IP of your VM) then paste the records at the end of the hosts file:
# Local Apache and Evilginx Setup
[IP] login.fake.com
[IP] account.fake.com
[IP] sso.fake.com
[IP] www.fake.com
[IP] portal.fake.com
[IP] fake.com
# End of section
Save and exit.
Now restart your browser before moving to the next step.
Note: On Mac, use the following command to flush the DNS cache:
sudo dscacheutil -flushcache; sudo killall -HUP mDNSResponder
This demo is made with the provided Office 365 Enterprise phishlet. To get the host entries you need to add for a different phishlet, use phishlet get-hosts [PHISHLET_NAME] but remember to replace the 127.0.0.1 with the actual local IP of your VM.
Since we are using self-signed SSL certificates, our browser will warn us every time we try to visit fake.com so we need to make our host machine trust the certificate authority that signed the SSL certs.
For this step, it's easier to follow the video instructions, but here is the gist anyway.
Open https://fake.com/ in your Chrome browser.
Ignore the Unsafe Site warning and proceed to the page.
Click the SSL icon > Details > Export Certificate IMPORTANT: When saving, the name MUST end with .crt for Windows to open it correctly.
Double-click it > install for current user. Do NOT select automatic, instead place the certificate in specific store: select "Trusted Route Certification Authorities".
On Mac: to install for current user only > select "Keychain: login" AND click on "View Certificates" > details > trust > Always trust
Now RESTART your Browser
You should be able to visit https://fake.com now and see the homepage without any SSL warnings.
At this point, everything should be ready so we can go ahead and start Evilginx, set up the phishlet, create our lure, and test it.
Optional: Install tmux (to keep evilginx running even if the terminal session is closed. Mainly useful when running on remote VM.)
sudo apt install tmux -y
Start Evilginx in developer mode (using tmux to avoid losing the session):
tmux new-session -s evilginx
cd ~/evilginx/
./evilginx -developer
(To re-attach to the tmux session use tmux attach-session -t evilginx)
Evilginx Config:
config domain fake.com
config ipv4 127.0.0.1
IMPORTANT: Set Evilginx Blacklist mode to NoAdd to avoid blacklisting Apache since all requests will be coming from Apache and not the actual visitor IP.
blacklist noadd
Setup Phishlet and Lure:
phishlets hostname O365 fake.com
phishlets enable O365
lures create O365
lures get-url 0
Copy the lure URL and visit it from your browser (use Guest user on Chrome to avoid having to delete all saved/cached data between tests).
Original iframe-based BITB by @mrd0x: https://github.com/mrd0x/BITB
Evilginx Mastery Course by the creator of Evilginx @kgretzky: https://academy.breakdev.org/evilginx-mastery
My talk at BSides 2023: https://www.youtube.com/watch?v=p1opa2wnRvg
How to protect Evilginx using Cloudflare and HTML Obfuscation: https://www.jackphilipbutton.com/post/how-to-protect-evilginx-using-cloudflare-and-html-obfuscation
Evilginx resources for Microsoft 365 by @BakkerJan: https://janbakker.tech/evilginx-resources-for-microsoft-365/
![]()
RepoReaper is a precision tool designed to automate the identification of exposed .git repositories across a list of domains and subdomains. By processing a user-provided text file with domain names, RepoReaper systematically checks each for publicly accessible .git files. This enables rapid assessment and protection against information leaks, making RepoReaper an essential resource for security teams and web developers.
.git repositories.Clone the repository and install the required dependencies:
git clone https://github.com/YourUsername/RepoReaper.git
cd RepoReaper
pip install -r requirements.txt
chmod +x RepoReaper.py
RepoReaper is executed from the command line and will prompt for the path to a file containing a list of domains or subdomains to be scanned.
To start RepoReaper, simply run:
./RepoReaper.py
  or
python3 RepoReaper.py
Upon execution, RepoReaper will ask for the path to the file containing the domains or subdomains: Enter the path of the file containing domains
Provide the path to your text file when prompted. The file should contain one domain or subdomain per line, like so:
example.com
subdomain.example.com
anotherdomain.com
RepoReaper will then proceed to scan the provided domains or subdomains for exposed .git repositories and report its findings.
This tool is intended for educational purposes and security research only. The user assumes all responsibility for any damages or misuse resulting from its use.
![]()
AzSubEnum is a specialized subdomain enumeration tool tailored for Azure services. This tool is designed to meticulously search and identify subdomains associated with various Azure services. Through a combination of techniques and queries, AzSubEnum delves into the Azure domain structure, systematically probing and collecting subdomains related to a diverse range of Azure services.
AzSubEnum operates by leveraging DNS resolution techniques and systematic permutation methods to unveil subdomains associated with Azure services such as Azure App Services, Storage Accounts, Azure Databases (including MSSQL, Cosmos DB, and Redis), Key Vaults, CDN, Email, SharePoint, Azure Container Registry, and more. Its functionality extends to comprehensively scanning different Azure service domains to identify associated subdomains.
With this tool, users can conduct thorough subdomain enumeration within Azure environments, aiding security professionals, researchers, and administrators in gaining insights into the expansive landscape of Azure services and their corresponding subdomains.
During my learning journey on Azure AD exploitation, I discovered that the Azure subdomain tool, Invoke-EnumerateAzureSubDomains from NetSPI, was unable to run on my Debian PowerShell. Consequently, I created a crude implementation of that tool in Python.
➜  AzSubEnum git:(main) ✗ python3 azsubenum.py --help
usage: azsubenum.py [-h] -b BASE [-v] [-t THREADS] [-p PERMUTATIONS]

Azure Subdomain Enumeration

options:
  -h, --help            show this help message and exit
  -b BASE, --base BASE  Base name to use
  -v, --verbose         Show verbose output
  -t THREADS, --threads THREADS
                        Number of threads for concurrent execution
  -p PERMUTATIONS, --permutations PERMUTATIONS
                        File containing permutations
Basic enumeration:
python3 azsubenum.py -b retailcorp --thread 10
Using permutation wordlists:
python3 azsubenum.py -b retailcorp --thread 10 --permutation permutations.txt
With verbose output:
python3 azsubenum.py -b retailcorp --thread 10 --permutation permutations.txt --verbose

Legba is a multiprotocol credentials bruteforcer / password sprayer and enumerator built with Rust and the Tokio asynchronous runtime in order to achieve better performances and stability while consuming less resources than similar tools (see the benchmark below).
For the building instructions, usage and the complete list of options check the project Wiki.
AMQP (ActiveMQ, RabbitMQ, Qpid, JORAM and Solace), Cassandra/ScyllaDB, DNS subdomain enumeration, FTP, HTTP (basic authentication, NTLMv1, NTLMv2, multipart form, custom requests with CSRF support, files/folders enumeration, virtual host enumeration), IMAP, Kerberos pre-authentication and user enumeration, LDAP, MongoDB, MQTT, Microsoft SQL, MySQL, Oracle, PostgreSQL, POP3, RDP, Redis, SSH / SFTP, SMTP, STOMP (ActiveMQ, RabbitMQ, HornetQ and OpenMQ), TCP port scanning, Telnet, VNC.
Here's a benchmark of legba versus thc-hydra running some common plugins, both targeting the same test servers on localhost. The benchmark has been executed on a macOS laptop with an M1 Max CPU, using a wordlist of 1000 passwords with the correct one being on the last line. Legba was compiled in release mode, Hydra compiled and installed via brew formula.
Far from being an exhaustive benchmark (some legba features are simply not supported by hydra, such as CSRF token grabbing), this table still gives a clear idea of how using an asynchronous runtime can drastically improve performances.
| Test Name | Hydra Tasks | Hydra Time | Legba Tasks | Legba Time |
|---|---|---|---|---|
| HTTP basic auth | 16 | 7.100s | 10 | 1.560s ( 4.5x faster) |
| HTTP POST login (wordpress) | 16 | 14.854s | 10 | 5.045s ( 2.9x faster) |
| SSH | 16 | 7m29.85s * | 10 | 8.150s ( 55.1x faster) |
| MySQL | 4 ** | 9.819s | 4 ** | 2.542s ( 3.8x faster) |
| Microsoft SQL | 16 | 7.609s | 10 | 4.789s ( 1.5x faster) |
* While this result would suggest a default delay between connection attempts used by Hydra. I've tried to study the source code to find such delay but to my knowledge there's none. For some reason it's simply very slow.
** For MySQL hydra automatically reduces the amount of tasks to 4, therefore legba's concurrency level has been adjusted to 4 as well.
Legba is released under the GPL 3 license. To see the licenses of the project dependencies, install cargo license with cargo install cargo-license and then run cargo license.

APIDetector is a powerful and efficient tool designed for testing exposed Swagger endpoints in various subdomains with unique smart capabilities to detect false-positives. It's particularly useful for security professionals and developers who are engaged in API testing and vulnerability scanning.
Before running APIDetector, ensure you have Python 3.x and pip installed on your system. You can download Python here.
Clone the APIDetector repository to your local machine using:
git clone https://github.com/brinhosa/apidetector.git
cd apidetector
pip install requests Run APIDetector using the command line. Here are some usage examples:
Common usage, scan with 30 threads a list of subdomains using a Chrome user-agent and save the results in a file:
python apidetector.py -i list_of_company_subdomains.txt -o results_file.txt -t 30 -ua "Mozilla/5.0 (Windows NT 10.0; Win64; x64) AppleWebKit/537.36 (KHTML, like Gecko) Chrome/90.0.4430.212 Safari/537.36"To scan a single domain:
python apidetector.py -d example.comTo scan multiple domains from a file:
python apidetector.py -i input_file.txtTo specify an output file:
python apidetector.py -i input_file.txt -o output_file.txtTo use a specific number of threads:
python apidetector.py -i input_file.txt -t 20To scan with both HTTP and HTTPS protocols:
python apidetector.py -m -d example.comTo run the script in quiet mode (suppress verbose output):
python apidetector.py -q -d example.comTo run the script with a custom user-agent:
python apidetector.py -d example.com -ua "Mozilla/5.0 (Windows NT 10.0; Win64; x64) AppleWebKit/537.36 (KHTML, like Gecko) Chrome/90.0.4430.212 Safari/537.36"-d, --domain: Single domain to test.-i, --input: Input file containing subdomains to test.-o, --output: Output file to write valid URLs to.-t, --threads: Number of threads to use for scanning (default is 10).-m, --mixed-mode: Test both HTTP and HTTPS protocols.-q, --quiet: Disable verbose output (default mode is verbose).-ua, --user-agent: Custom User-Agent string for requests.Exposing Swagger or OpenAPI documentation endpoints can present various risks, primarily related to information disclosure. Here's an ordered list based on potential risk levels, with similar endpoints grouped together APIDetector scans:
'/swagger-ui.html', '/swagger-ui/', '/swagger-ui/index.html', '/api/swagger-ui.html', '/documentation/swagger-ui.html', '/swagger/index.html', '/api/docs', '/docs', '/api/swagger-ui', '/documentation/swagger-ui'
'/openapi.json', '/swagger.json', '/api/swagger.json', '/swagger.yaml', '/swagger.yml', '/api/swagger.yaml', '/api/swagger.yml', '/api.json', '/api.yaml', '/api.yml', '/documentation/swagger.json', '/documentation/swagger.yaml', '/documentation/swagger.yml'
'/v2/api-docs', '/v3/api-docs', '/api/v2/swagger.json', '/api/v3/swagger.json', '/api/v1/documentation', '/api/v2/documentation', '/api/v3/documentation', '/api/v1/api-docs', '/api/v2/api-docs', '/api/v3/api-docs', '/swagger/v2/api-docs', '/swagger/v3/api-docs', '/swagger-ui.html/v2/api-docs', '/swagger-ui.html/v3/api-docs', '/api/swagger/v2/api-docs', '/api/swagger/v3/api-docs'
'/swagger-resources', '/swagger-resources/configuration/ui', '/swagger-resources/configuration/security', '/api/swagger-resources', '/api.html'
Contributions to APIDetector are welcome! Feel free to fork the repository, make changes, and submit pull requests.
The use of APIDetector should be limited to testing and educational purposes only. The developers of APIDetector assume no liability and are not responsible for any misuse or damage caused by this tool. It is the end user's responsibility to obey all applicable local, state, and federal laws. Developers assume no responsibility for unauthorized or illegal use of this tool. Before using APIDetector, ensure you have permission to test the network or systems you intend to scan.
This project is licensed under the MIT License.
![]()
CloakQuest3r is a powerful Python tool meticulously crafted to uncover the true IP address of websites safeguarded by Cloudflare, a widely adopted web security and performance enhancement service. Its core mission is to accurately discern the actual IP address of web servers that are concealed behind Cloudflare's protective shield. Subdomain scanning is employed as a key technique in this pursuit. This tool is an invaluable resource for penetration testers, security professionals, and web administrators seeking to perform comprehensive security assessments and identify vulnerabilities that may be obscured by Cloudflare's security measures.
Key Features:
Real IP Detection: CloakQuest3r excels in the art of discovering the real IP address of web servers employing Cloudflare's services. This crucial information is paramount for conducting comprehensive penetration tests and ensuring the security of web assets.
Subdomain Scanning: Subdomain scanning is harnessed as a fundamental component in the process of finding the real IP address. It aids in the identification of the actual server responsible for hosting the website and its associated subdomains.
Threaded Scanning: To enhance efficiency and expedite the real IP detection process, CloakQuest3r utilizes threading. This feature enables scanning of a substantial list of subdomains without significantly extending the execution time.
Detailed Reporting: The tool provides comprehensive output, including the total number of subdomains scanned, the total number of subdomains found, and the time taken for the scan. Any real IP addresses unveiled during the process are also presented, facilitating in-depth analysis and penetration testing.
With CloakQuest3r, you can confidently evaluate website security, unveil hidden vulnerabilities, and secure your web assets by disclosing the true IP address concealed behind Cloudflare's protective layers.
- Still in the development phase, sometimes it can't detect the real Ip.

- CloakQuest3r combines multiple indicators to uncover real IP addresses behind Cloudflare. While subdomain scanning is a part of the process, we do not assume that all subdomains' A records point to the target host. The tool is designed to provide valuable insights but may not work in every scenario. We welcome any specific suggestions for improvement.

1. False Negatives: CloakReveal3r may not always accurately identify the real IP address behind Cloudflare, particularly for websites with complex network configurations or strict security measures.

2. Dynamic Environments: Websites' infrastructure and configurations can change over time. The tool may not capture these changes, potentially leading to outdated information.

3. Subdomain Variation: While the tool scans subdomains, it doesn't guarantee that all subdomains' A records will point to the pri   mary host. Some subdomains may also be protected by Cloudflare.
How to Use:
Run CloudScan with a single command-line argument: the target domain you want to analyze.
git clone https://github.com/spyboy-productions/CloakQuest3r.git
cd CloakQuest3r
pip3 install -r requirements.txt
python cloakquest3r.py example.com
The tool will check if the website is using Cloudflare. If not, it will inform you that subdomain scanning is unnecessary.
If Cloudflare is detected, CloudScan will scan for subdomains and identify their real IP addresses.
You will receive detailed output, including the number of subdomains scanned, the total number of subdomains found, and the time taken for the scan.
Any real IP addresses found will be displayed, allowing you to conduct further analysis and penetration testing.
CloudScan simplifies the process of assessing website security by providing a clear, organized, and informative report. Use it to enhance your security assessments, identify potential vulnerabilities, and secure your web assets.
Run it online on replit.com : https://replit.com/@spyb0y/CloakQuest3r
![]()
Web Path Finder is a Python program that provides information about a website. It retrieves various details such as page title, last updated date, DNS information, subdomains, firewall names, technologies used, certificate information, and more.
Clone the repository:
git clone https://github.com/HalilDeniz/PathFinder.git
Install the required packages:
pip install -r requirements.txt
This will install all the required modules and their respective versions.
Run the program using the following command:
┌──(root💀denizhalil)-[~/MyProjects/]
└─# python3 web-info-explorer.py --help
usage: wpathFinder.py [-h] url

Web Information Program

positional arguments:
  url         Enter the site URL

options:
  -h, --help  show this help message and exit
Replace <url> with the URL of the website you want to explore.
Here is an example output of running the program:
┌──(root💀denizhalil)-[~/MyProjects/]
└─# python3 pathFinder.py https://www.facebook.com/
    Site Information:
    Title:  Facebook - Login or Register
    Last Updated Date:  None
    First Creation Date:  1997-03-29 05:00:00
    Dns Information:  []
    Sub Branches:  ['157']
Firewall Names:  []
    Technologies Used:  javascript, php, css, html, react
    Certificate Information:
    Certificate Issuer: US
    Certificate Start Date: 2023-02-07 00:00:00
    Certificate Expiration Date: 2023-05-08 23:59:59
    Certificate Validity Period (Days): 90
    Bypassed JavaScript content:
Contributions are welcome! To contribute to PathFinder, follow these steps:
This project is licensed under the MIT License - see the LICENSE file for details.
For any inquiries or further information, you can reach me through the following channels:
Nodesub is a command-line tool for finding subdomains in bug bounty programs. It supports various subdomain enumeration techniques and provides flexible options for customization.
To install Nodesub, use the following command:
npm install -g nodesub
NOTE:
~/.config/nodesub/config.ini
nodesub -h
This will display help for the tool. Here are all the switches it supports.
Enumerate subdomains for a single domain:
nodesub -u example.com
Enumerate subdomains for a list of domains from a file:
nodesub -l domains.txt
Perform subdomain enumeration using CIDR:
node nodesub.js -c 192.168.0.0/24 -o subdomains.txt
node nodesub.js -c CIDR.txt -o subdomains.txt
Perform subdomain enumeration using ASN:
node nodesub.js -a AS12345 -o subdomains.txt
node nodesub.js -a ASN.txt -o subdomains.txt
Enable recursive subdomain enumeration and output the results to a JSON file:
nodesub -u example.com -r -o output.json -f json
The tool provides various output formats for the results, including:
The output file contains the resolved subdomains, failed resolved subdomains, or all subdomains based on the options chosen.
![]()
surf allows you to filter a list of hosts, returning a list of viable SSRF candidates. It does this by sending a HTTP request from your machine to each host, collecting all the hosts that did not respond, and then filtering them into a list of externally facing and internally facing hosts.
You can then attempt these hosts wherever an SSRF vulnerability may be present. Due to most SSRF filters only focusing on internal or restricted IP ranges, you'll be pleasantly surprised when you get SSRF on an external IP that is not accessible via HTTP(s) from your machine.
Often you will find that large companies with cloud environments will have external IPs for internal web apps. Traditional SSRF filters will not capture this unless these hosts are specifically added to a blacklist (which they usually never are). This is why this technique can be so powerful.
This tool requires go 1.19 or above as we rely on httpx to do the HTTP probing.
It can be installed with the following command:
go install github.com/assetnote/surf/cmd/surf@latestConsider that you have subdomains for bigcorp.com inside a file named bigcorp.txt, and you want to find all the SSRF candidates for these subdomains. Here are some examples:
# find all ssrf candidates (including external IP addresses via HTTP probing)
surf -l bigcorp.txt
# find all ssrf candidates (including external IP addresses via HTTP probing) with timeout and concurrency settings
surf -l bigcorp.txt -t 10 -c 200
# find all ssrf candidates (including external IP addresses via HTTP probing), and just print all hosts
surf -l bigcorp.txt -d
# find all hosts that point to an internal/private IP address (no HTTP probing)
surf -l bigcorp.txt -x
The full list of settings can be found below:
❯ surf -h

███████╗██╗   ██╗██████╗ ███████╗
██╔════╝██║   ██║██╔══██╗██╔════╝
███████╗██║   ██║██████╔╝█████╗
╚════██║██║   ██║██╔══██╗██╔══╝
███████║╚██████╔ ██║  ██║██║
╚══════╝ ╚═════╝ ╚═╝  ╚═╝╚═╝

by shubs @ assetnote

Usage: surf [--hosts FILE] [--concurrency CONCURRENCY] [--timeout SECONDS] [--retries RETRIES] [--disablehttpx] [--disableanalysis]

Options:
  --hosts FILE, -l FILE
                         List of assets (hosts or subdomains)
  --concurrency CONCURRENCY, -c CONCURRENCY
                         Threads (passed down to httpx) - default 100 [default: 100]
  --timeout SECONDS, -t SECONDS
                         Timeout in seconds (passed down to httpx) - default 3 [default: 3]
  --retries RETRIES, -r RETRIES
                         Retries on failure (passed down to httpx) - default    2 [default: 2]
  --disablehttpx, -x     Disable httpx and only output list of hosts that resolve to an internal IP address - default false [default: false]
  --disableanalysis, -d
                         Disable analysis and only output list of hosts - default false [default: false]
  --help, -h             display this help and exit
When running surf, it will print out the SSRF candidates to stdout, but it will also save two files inside the folder it is ran from:
external-{timestamp}.txt - Externally resolving, but unable to send HTTP requests to from your machineinternal-{timestamp}.txt - Internally resolving, and obviously unable to send HTTP requests from your machineThese two files will contain the list of hosts that are ideal SSRF candidates to try on your target. The external target list has higher chances of being viable than the internal list.
Under the hood, this tool leverages httpx to do the HTTP probing. It captures errors returned from httpx, and then performs some basic analysis to determine the most viable candidates for SSRF.
This tool was created as a result of a live hacking event for HackerOne (H1-4420 2023).

Columbus Project is an API first subdomain discovery service, blazingly fast subdomain enumeration service with advanced features.
Columbus returned 638 subdomains of tesla.com in 0.231 sec.
By default Columbus returns only the subdomains in a JSON string array:
curl 'https://columbus.elmasy.com/lookup/github.com'But we think of the bash lovers, so if you don't want to mess with JSON and a newline separated list is your wish, then include the Accept: text/plain header.
DOMAIN="github.com"

curl -s -H "Accept: text/plain" "https://columbus.elmasy.com/lookup/$DOMAIN" | \
while read SUB
do
        if [[ "$SUB" == "" ]]
        then
                HOST="$DOMAIN"
        else
                HOST="${SUB}.${DOMAIN}"
        fi
        echo "$HOST"
done
For more, check the features or the API documentation.
Currently, entries are got from Certificate Transparency.
Usage of columbus-server:
  -check
    	Check for updates.
  -config string
    	Path to the config file.
  -version
    	Print version informations.
-check: Check the lates version on GitHub. Prints up-to-date and returns 0 if no update required. Prints the latest tag (eg.: v0.9.1) and returns 1 if new release available. In case of error, prints the error message and returns 2.
git clone https://github.com/elmasy-com/columbus-server
make buildCreate a new user:
adduser --system --no-create-home --disabled-login columbus-serverCreate a new group:
addgroup --system columbusAdd the new user to the new group:
usermod -aG columbus columbus-serverCopy the binary to /usr/bin/columbus-server.
Make it executable:
chmod +x /usr/bin/columbus-serverCreate a directory:
mkdir /etc/columbusCopy the config file to /etc/columbus/server.conf.
Set the permission to 0600.
chmod -R 0600 /etc/columbusSet the owner of the config file:
chown -R columbus-server:columbus /etc/columbusInstall the service file (eg.: /etc/systemd/system/columbus-server.service).
cp columbus-server.service /etc/systemd/system/Reload systemd:
systemctl daemon-reloadStart columbus:
systemctl start columbus-server
If you want to columbus start automatically:
systemctl enable columbus-server