Reading view

Reddit Hacked? How to Regain Access and What to Change Immediately

Woman gamer confused at computer

It usually starts with a small, uneasy moment. 

A password reset email you don’t remember requesting. A login alert that doesn’t make sense. Strange comments showing up under your username that you swear you didn’t write. 

Sometimes you don’t notice at all…until someone messages you asking why you’re suddenly promoting crypto giveaways, posting spam links, or commenting across random subreddits. 

A hacked Reddit account isn’t just embarrassing. It can be a real security risk. Attackers often use compromised accounts to spread scams, steal personal information, or take advantage of your reputation in online communities. 

This guide walks you through exactly what to do if your Reddit account has been compromised: how to spot the warning signs, how to regain control, and what security steps to take so it doesn’t happen again. 

Signs Your Reddit Account May Be Compromised 

Reddit account takeovers don’t always look dramatic at first. The earliest warning signs often feel subtle. 

Watch for these red flags: 

Password or email changes you didn’t make: You may receive an email from Reddit saying your password or email address was updated. 

Posts, comments, votes, or chat messages you don’t recognize: Hackers often use your account to upvote scam content or spam communities. 

Authorized apps you don’t remember approving: Some attackers compromise accounts through unsafe third-party apps or browser extensions. 

Unusual login activity or unfamiliar IP history: Reddit allows you to review recent account activity, which may show logins from locations you’ve never visited. 

Sudden account lock or forced reset notice: In some cases, Reddit may lock your account or prompt a password reset as a security precaution. 

If any of these are happening, assume your Reddit account is compromised and start recovery steps immediately. 

What to Change Immediately If Your Reddit Account Was Hacked 

If your Reddit account was hacked, assume your login details may have been stolen. 

That means simply getting back into your account isn’t enough, you also need to update the passwords and settings attackers could still use. 

Here’s what to change right away: 

  • Change your Reddit password 
  • Change the password for the email account connected to Reddit 
  • Update any other accounts that share the same password 
  • Remove suspicious authorized apps 
  • Log out of all active sessions/devices 
  • Turn on two-factor authentication (2FA) 
  • Update your recovery options (email, phone, backup codes) 

If you think the hack started from malware or a phishing link, it’s also smart to update passwords for other sensitive accounts, like banking, payment apps, or your Apple/Google account. Using a password manager like McAfee’s can help you create strong, unique passwords for every account, and store them securely in one place. 

Step-by-Step: How to Recover a Hacked Reddit Account 

Step  What to Do  Why It Matters 
1. Reset your password immediately  Use Reddit’s password reset flow and create a strong new password.  This is the fastest way to cut off unauthorized access. Resetting your password can also log you out across devices. 
2. Check your inbox for Reddit security emails  Look for emails saying your password or email address was changed. Follow any “this wasn’t me” instructions if available.  If a hacker changed your account details, Reddit’s security email may be your best chance to reverse it quickly. 
3. Review account activity and active sessions  Check where your account is logged in and log out of unfamiliar sessions/devices.  Hackers often stay logged in even after making changes, especially if you don’t remove active sessions. 
4. Remove suspicious authorized apps  Review connected apps and revoke access for anything you don’t recognize or no longer use.  Some account takeovers happen through unsafe third-party apps, not password guessing. 
5. Scan your device for malware  Run a trusted security scan to check for spyware, password-stealing malware, or malicious browser extensions. McAfee offers a free antivirus scan service.  If your device is compromised, attackers can steal your new password(s) immediately. 
6. Secure the email account tied to Reddit  Change your email password and enable 2FA. Check recovery settings to make sure they’re yours.  If your email is compromised, the attacker can keep resetting your Reddit account and locking you out. 
7. Contact Reddit support if you’re still locked out  Submit a request and choose: Security problems → I think my account has been hacked. Include your username and details.  Reddit may be able to help restore access or reverse changes if self-recovery doesn’t work. 


Watch for Phishing “Reddit Support” Scams 

One of the most common ways accounts get compromised is through phishing. 

Scammers impersonate: 

  • Reddit moderators 
  • Reddit admin messages 
  • Security alerts 
  • Fake “copyright violation” notices 

They try to trick you into clicking a link and logging in on a fake site. 

If you receive a suspicious message, don’t click. 

Instead, open Reddit directly in your browser or app and check your account settings from there. 

Final Tips: Recovering From a Reddit Hack 

A hacked Reddit account can feel strangely personal, because your profile reflects your interests, communities, and identity online. 

The most important steps are: 

  • Act quickly 
  • Secure your email account first 
  • Reset your password and log out of all sessions 
  • Remove suspicious authorized apps 
  • Enable two-factor authentication (2FA) 
  • Scan your device for malware 

And if you’re still locked out or something doesn’t look right, follow Reddit’s official recovery guidance and contact Reddit support directly. 

Reddit may be able to confirm suspicious activity, restore access, or help reverse account changes. 

Frequently Asked Questions 

Q: How do I know if my Reddit account was hacked?

A: Common signs include password or email changes you didn’t request, unfamiliar authorized apps, unusual IP history, and posts/comments/votes you don’t remember making. If any of these appear, treat your account as compromised. 

Q: Will resetting my Reddit password log out the hacker?    

A: In many cases, yes. Reddit notes that resetting your password can log you out across devices, which is one of the fastest ways to cut off unauthorized access. 

Q: What if my Reddit email address was changed?  

A: Check your email inbox for a message from Reddit. Reddit may provide instructions to reverse the change, but you’ll typically need to input the original email address associated with the account. 

Q: What should I do if I can’t get my account back?  

A: Submit a support request and select: Security problems → I think my account has been hacked. Include your username and explain what suspicious activity you noticed. Reddit also suggests checking r/help for additional guidance. 

Q: Should I remove authorized apps after a hack?  

A: Yes. Reddit specifically warns that unsafe authorized apps can lead to account compromise. Remove anything you don’t recognize or no longer use. 

Q: What’s the biggest mistake people make after a Reddit hack?  

A: Only changing their Reddit password. If your email account or device is compromised, attackers can regain access quickly. You should secure your email, scan your device, and update reused passwords. 


The post Reddit Hacked? How to Regain Access and What to Change Immediately appeared first on McAfee Blog.

  •  

Was My TikTok Hacked? How to Get Back Into Your Account and Lock Down Sessions

It usually starts with a small, uneasy moment. A notification you don’t recognize. A login code you didn’t request. A friend texting to ask why you just posted something… weird. 

If you’re staring at your phone wondering whether your TikTok account was hacked, you’re not alone, and you’re not being paranoid.  

Account takeovers often don’t look dramatic at first. They show up as subtle changes: a password that suddenly doesn’t work, a new device logged in overnight, or settings you swear you never touched. 

This guide walks you through exactly what to do if your TikTok account has been compromised: how to spot the warning signs, how to recover access if you’re locked out, and how to lock down active sessions so it doesn’t happen again.  

Signs Your TikTok Account May Be Compromised 

When someone else gets into your account, things usually start behaving in ways that don’t feel like you. Pay attention to changes like these: 

Profile or settings changes you didn’t make
Your display name, bio, password, linked email, phone number, or privacy settings look different, even though you never touched them. 

Content or activity you don’t recognize
Videos you didn’t post. Comments or DMs you didn’t send. New follows or likes that don’t match how you use the app. 

Login alerts that come out of nowhere
Notifications about a new device, verification codes you didn’t request, or emails confirming changes you didn’t initiate. 

Other warning signs include being locked out of your usual login method, missing recovery options, or friends telling you your account is sending strange messages. 

How to Regain Access to Your TikTok Account 

Speed matters here. The longer someone has access, the more they can change, or use your account to scam others. 

If you can still log in 

Secure the account immediately. 

  1. Change your password: Use the “Forgot password?” option if needed and choose a strong, unique password you haven’t used anywhere else. 
  2. Check your account details: Confirm the email address and phone number are yours. Remove anything you don’t recognize. 
  3. Look for unfamiliar devices or sessions: You’ll deal with this more thoroughly below, but flag anything that looks off. 

If you’re locked out 

Start TikTok’s recovery process right away. 

  1. On the login screen, tap “Report a problem” or visit the Help Center. 
  2. Be ready to prove ownership. That usually includes: 
  3. Your username 
  4. A previous email or phone number linked to the account 
  5. Devices you’ve used to log in before 
  6. Screenshots of changes, if you have them 

TikTok uses this information to verify that the account is yours and roll back unauthorized changes. 

Secure your email and phone, too 

This step is critical and often overlooked. 

  • Change the password on the email account linked to TikTok.  If someone controls your email, they can keep resetting your social accounts. 
  • Confirm your phone number is correct and remove any unfamiliar contact info. 

Once you regain access, clean up anything the attacker touched, delete suspicious posts, undo profile changes, and revoke access for any apps you don’t recognize. 

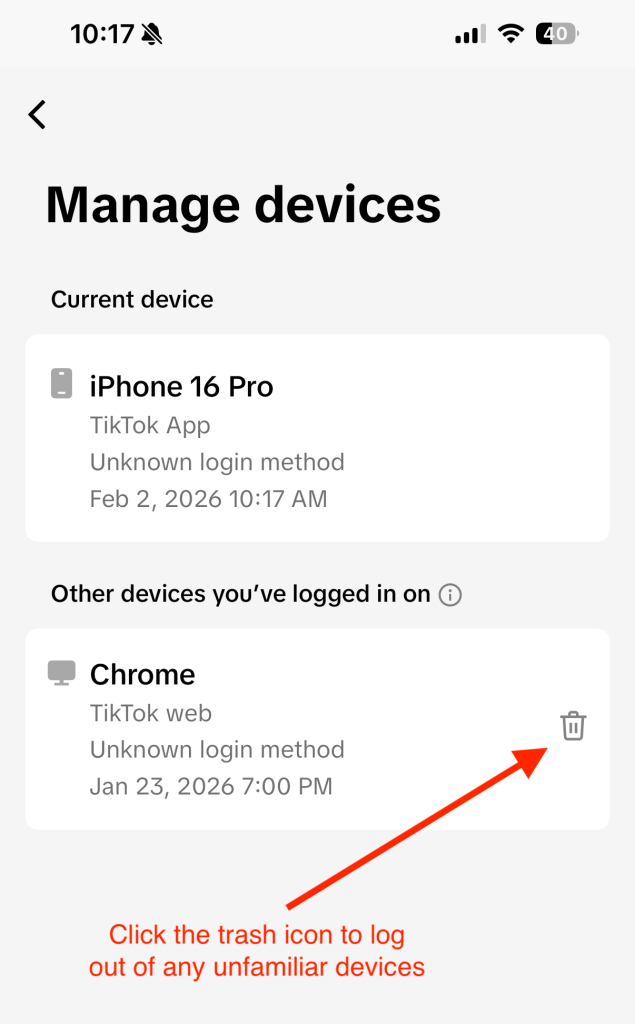
Figure 1: How to remove TikTok logins from other devices.

Figure 1: How to remove TikTok logins from other devices. 

Lock Down Sessions and Strengthen Your TikTok Security 

Getting back in is only half the job. The next step is making sure whoever got in can’t come back. 

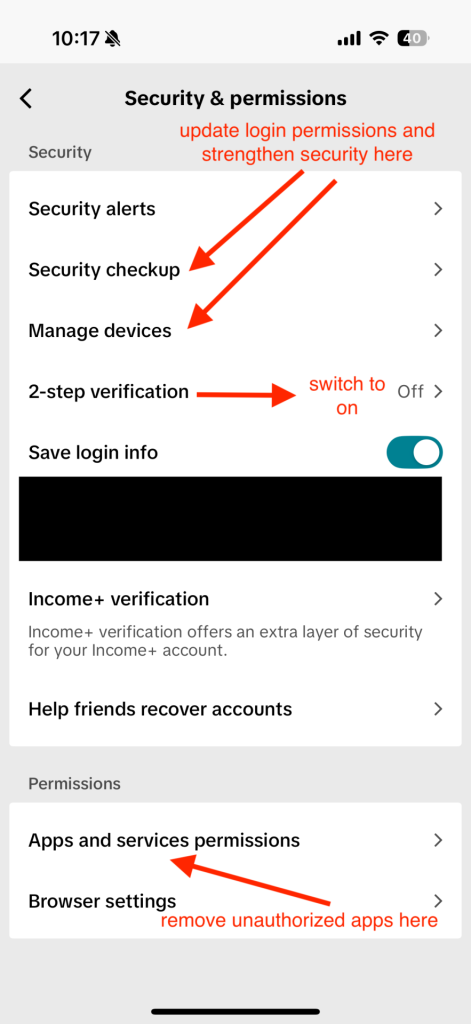
Turn on two-step verification 

In Settings & Privacy, enable two-factor verification (2FA) and choose your preferred method. An authenticator app offers the strongest protection, but SMS or email is still far better than nothing. 

Review active sessions and devices 

Head to Security and look for Manage devices or Active sessions. 

  • Remove any devices you don’t recognize. 
  • If available, use “Log out of all devices” to force everyone, including an attacker, out at once. 

Revoke third-party app access 

Check which apps or tools are connected to your TikTok account and remove anything you don’t use or trust. 

Use a strong, unique password 

Keep your app and phone updated 

Updates often include security fixes. Running outdated software makes it easier for attackers to exploit known issues. 

Be cautious with links and messages 

Unexpected DMs, “copyright warnings,” fake verification notices, or links asking you to log in again are common hacker tactics. When in doubt, don’t click, open the app directly instead. 

Figure 2: Where in “Security & permissions” to find security updates and 2FA.  

Figure 2: Where in “Security & permissions” to find security updates and 2FA. 

How to Report an Impersonation Account on TikTok 

Discovering a fake account that’s using your name, photos, or videos can feel like a second violation on top of having your account hacked.  

Luckily, TikTok has a way to flag these imposters, both from inside the app and, in some regions, through an official web form. 

  1. Open the impostor’s profile: Head to the account that’s pretending to be you. 
  2. Tap the share icon: On mobile, this is usually the arrow at  the top of the profile. 
  3. Select “Report”: Choose the option to report the account. 
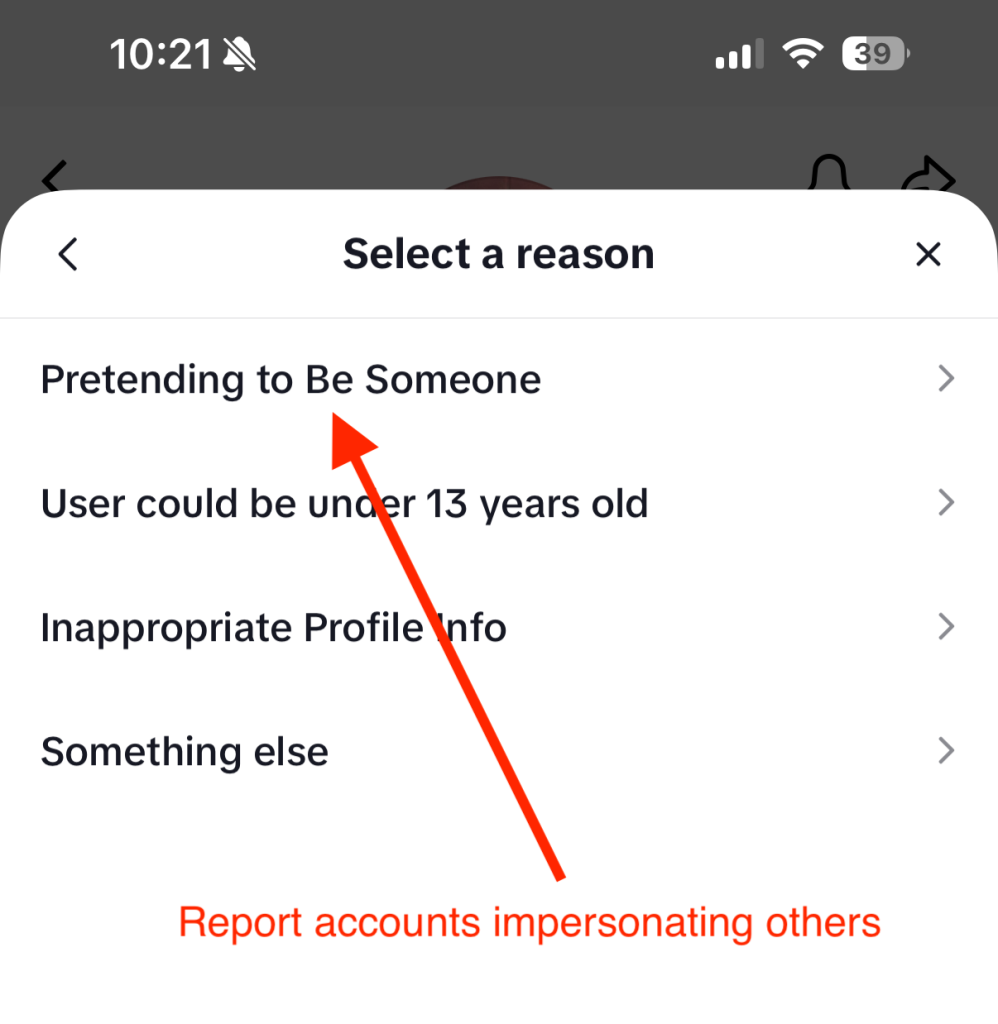
  4. Choose “Report account” → “Pretending to Be Someone”: That’s TikTok’s way of flagging impersonation specifically. 
  5. Indicate who is being impersonated: Select Me if it’s your identity, or Celebrity/Another person if it’s someone else. Then submit.  
Figure 3: A screenshot showing where in TikTok you report fake profiles.

Figure 3: A screenshot showing where in TikTok you report fake profiles. 

If you’re in the U.S. and the fake profile is doing real damage, for example, scamming your followers or using official business assets, TikTok also offers a dedicated impersonation report form online: 

  • Choose whether you’re reporting or appealing an impersonation. 
  • Enter your email and country. 
  • Upload valid ID or other proof that you’re who you say you are. 
  • Confirm the statements and submit the form.  

For accounts outside the U.S., the public Help Center form lets you select Report a potential violation → Account violation → Impersonation and walk through similar steps.


Frequently Asked Questions 

Q: How do I lock down sessions on TikTok?
A: Go to Settings & Privacy → Security, then open Manage devices or Active sessions. Remove unfamiliar devices, log out of all sessions if possible, change your password, and enable two-step verification. 
Q: Can I recover my account if the email and phone number were changed?
A: Yes. Start an account recovery request through TikTok support and provide proof of ownership, including previous contact details and device information. 
Q: What if I keep getting verification codes I didn’t request?
A: That’s a sign someone is trying to get in. Change your password immediately, enable two-step verification, and review active sessions. If it continues, contact TikTok support 
Q: Should I warn my followers?
A: If your account posted or messaged others without your permission, yes. Let people know your account was compromised so they don’t engage with scam links or requests. 


The post Was My TikTok Hacked? How to Get Back Into Your Account and Lock Down Sessions appeared first on McAfee Blog.

  •  

How to Delete or Deactivate Your Instagram Account

Deleting vs. Deactivating Instagram: Key Differences

When considering leaving Instagram, you have two main options: deactivating or deleting your account. Understanding the distinctions is key to making the right choice for your privacy and digital presence. Deactivation is a temporary measure. Your profile, photos, comments, and likes are hidden from other users, including your followers, as if your account doesn’t exist.

However, Instagram stores all your information, allowing you to reactivate your account at any time by logging back in. Your direct messages will still be visible to recipients. This option is ideal if you need a break or want to temporarily reduce your online visibility without losing your data or account history. If you are looking for how to deactivate an Instagram account, this is a reversible step.

On the other hand, learning how to delete an Instagram account permanently is the final step. Once you request deletion and a 30-day grace period passes (during which you can cancel by logging back in), your account and all associated data – photos, videos, followers, messages (from your end), and profile information – are permanently erased from Instagram’s main servers.

While some data may remain in backups for longer to support disaster recovery, you won’t be able to access it or recover your account. This is the choice if you want to permanently remove your footprint from the platform. Understanding how to delete your Instagram account is crucial if that is your goal.

Quick Comparison: Deactivating vs. Deleting Your Instagram Account

  • Visibility: Deactivation hides your profile; Deletion permanently removes it after a grace period.
  • Data (Photos, Profile, etc.): Deactivation preserves data (hidden); Deletion permanently erases data.
  • Messages: Deactivation keeps sent messages visible to recipients; Deletion removes your access, but recipients may still see past messages, often attributed to an “Instagram User”.
  • Follower Visibility: Deactivation makes your profile invisible to followers; Deletion removes you from their lists and your content from their view.
  • Permanence: Deactivation is temporary; Deletion is permanent.
  • Recovery Options: Deactivated accounts can be reactivated by logging in; Deleted accounts cannot be recovered after 30 days.
  • Data Retention by Instagram (Post-Action): Deactivation means Instagram retains all data for reactivation. Deletion means data is removed from active systems (usually within 90 days), though backups may exist longer.

Should You Deactivate or Delete? Factors to Consider

  • Mental Health Breaks: If you’re feeling overwhelmed by social media and need a pause for your mental well-being, deactivation is an excellent choice. It allows you to step away without the finality of deletion, and you can return when you feel ready.
  • Job Search Privacy: When actively job hunting, you might want to limit what potential employers can see. Temporarily deactivating your account hides your profile. Alternatively, you can make your account private.
  • Serious Security Concerns or Harassment: If you’re facing persistent harassment or bullying, or believe your account security has been severely compromised, permanently deleting your Instagram account may be necessary for your safety and peace of mind. In less severe cases, blocking users and reporting content, coupled with deactivation, might suffice.
  • Long-Term Digital Footprint Reduction: If your goal is to minimize your online presence and permanently remove your data from Instagram, then opting to delete Instagram account is the appropriate action. This is a long-term decision aimed at reducing your overall digital footprint.
  • Quick Self-Assessment Questions:
    • Do you plan to use your current Instagram profile, including its photos and connections, in the future? If yes, consider deactivation.
    • Is your primary concern data privacy, and do you want Meta to remove your information? If yes, and you’re sure you don’t want to return, consider permanent deletion.
    • Are you simply looking for a temporary escape from notifications and social pressures? If yes, deactivation is likely sufficient.
  • Recommendation Based on Goals: If you need a temporary pause, want to hide your profile for a while, or think you might return, learning how to deactivate your Instagram account is your best approach. If your objective is to sever ties and permanently remove your data, deleting your Instagram account is the right path.

How to Temporarily Disable Your Instagram Account

  1. Via Mobile App (iOS or Android):
    1. Open the Instagram app and navigate to your profile page.
    2. Tap the menu icon (three horizontal lines) located in the top-right corner.
    3. Select Settings and privacy from the menu.
    4. Tap on Accounts Center, which is usually the first option.
    5. Under the “Account settings” section, tap on Personal details.
    6. Choose Account ownership and control.
    7. Tap on Deactivation or deletion.
    8. Select the Instagram account you wish to deactivate if multiple accounts are listed.
    9. Ensure Deactivate account is selected and tap Continue.
    10. You will be prompted to enter your Instagram password for verification. Enter it and tap Continue.
    11. Instagram will ask for a reason for deactivation. Choose one from the list and tap Continue.
    12. Finally, confirm your decision by tapping Deactivate Account.
  2. Via Web Browser (Desktop or Mobile):
    1. Navigate to Instagram.com in your preferred web browser and log in to your account.
    2. Click on More (represented by three horizontal lines) in the bottom-left menu.
    3. Select Settings from the menu that appears.
    4. You should be directed to the Accounts Center. If not, click on it.
    5. Under “Account settings,” click Personal details.
    6. Click Account ownership and control.
    7. Choose Deactivation or deletion.
    8. Select your account, ensure Deactivate account is chosen, and click Continue.
    9. Enter your password when prompted and click Continue.
    10. Provide a reason for deactivating and then confirm the deactivation.
  3. Time Limits for Reactivation: There is no specific time limit imposed by Instagram for how long an account can remain deactivated. You can reactivate it at any time by logging back into your account with your username and password.
  4. Data Visibility During Deactivation: When your Instagram account is deactivated, your profile, photos, videos, Stories, comments, and likes will be hidden from all other users, including your followers. It will essentially appear as though your account does not exist. However, your information is not deleted from Instagram’s servers. Messages you have previously sent to other users may still be visible to them.

Step by Step: Permanently Delete Your Instagram Account

If you’ve decided to permanently delete your Instagram account, follow these steps carefully:

  1. Log in via a browser: Log into your Instagram account. Account deletion must be completed through a web browser on your mobile phone or personal computer.
  2. Go to Accounts Center: Click your profile picture at the top and navigate to Settings & Privacy > Accounts Center.
  3. Inside Accounts Center: Navigate to Personal Details > Account Ownership and Control. Select Deactivation or Deletion.
  4. Select the account you want to delete: If you manage multiple accounts, make sure you choose the correct one.
  5. Click Delete Account: Select Delete Account, then click Continue.
  6. Confirm your decision: Instagram will ask you to select a reason and re-enter your password. Once confirmed, your account will be scheduled for deletion.

Important to Know

  • Instagram provides a 30-day grace period. If you log back in during this time, the deletion request is canceled.
  • After 30 days, your account and data are permanently removed.
  • This process cannot be reversed once the grace period ends, so make sure you’re fully certain before proceeding.
  • Consider downloading your data, including photos, videos, messages, before deleting your account.

Back Up Your Instagram Photos and Data Before You Leave

Before you take the irreversible step of deleting your Instagram account, it is highly recommended that you back up your data. This ensures that you retain a copy of your photos, videos, messages, and other information you’ve shared on the platform.

Once an Instagram account is deleted, this data cannot be recovered. Instagram provides a built-in tool, often referred to as Meta’s “Download Your Information” feature, that lets you request a complete copy of your data. This includes content types such as your photos (including feed posts, Stories, and Reels you’ve archived or posted), videos, comments you’ve made, your profile information, and direct messages (DMs).

While some users might have manually saved individual photos or videos to their devices over time, using Instagram’s official download tool is the most comprehensive method to secure a full archive. This is a vital step before you learn how to delete Instagram and commit to removing your presence.

Request and Download a Copy of Your Instagram Data

  1. Requesting Your Data (iOS and Android Devices):
    1. Open the Instagram app on your mobile device and navigate to your profile by tapping your profile picture in the bottom-right corner.
    2. Tap the menu icon (three horizontal lines) in the top-right corner of your profile page.
    3. From the menu, select Your activity.
    4. Scroll down to the bottom of the “Your activity” screen and tap on Download your information.
    5. Tap Request a download. If you have multiple accounts linked through Accounts Center, select your Instagram profile.
    6. You’ll have the option to request a Complete copy of your data or to Select types of information if you only need specific data.
    7. Configure your file options: choose a format (HTML is generally easier for viewing, while JSON is better for transferring data to another service), select media quality (e.g., high, medium, low), and specify a date range if you don’t want all your data.
    8. Ensure your email address is correct, as this is where the download link will be sent. Tap Submit request.
  2. Requesting Your Data (Desktop/Web Browser):
    1. Open your web browser, go to Instagram.com, and log in to your account.
    2. Click on the More option (represented by three horizontal lines) found in the menu on the bottom-left side of the page.
    3. From the popup menu, select Your activity.
    4. Click on Download your information.
    5. Click the Request a download button. You’ll then follow similar prompts as on the mobile app: select the profile (if applicable), choose between a complete copy or specific types of information, and set your file options (format, media quality, date range). Submit the request.
  3. Email Delivery Times, File Formats: Instagram (Meta) states that it may take up to 14 days to collect your information and prepare it for download, though for many users, this process is much faster, often completed within a few hours or even minutes, especially for accounts with less data. You will receive an email at the address associated with your account containing a link to download your data. This link is typically valid for only a few days for security reasons, so download it promptly. The data is usually delivered as a ZIP file. Inside, you’ll find your information organized in folders, typically in HTML (for easy viewing in a browser) or JSON (a structured data format useful for developers or data transfer).
  4. How to Interpret the Archive Once Received: After downloading and unzipping the file, if you selected the HTML format, look for an `index.html` file. Opening this file in a web browser provides a navigable interface to view your data, including posts, messages, profile information, and more. Photos and videos will typically be in separate folders, often organized by date, in their original formats (e.g., JPG for photos, MP4 for videos). If you choose JSON, the files will contain raw data that can be parsed programmatically.

Troubleshooting: Why Can’t I Delete My Instagram Account?

  • Forgotten Password: To confirm your identity and proceed with account deletion, Instagram requires your current password. If you’ve forgotten it, use the “Forgot password?” option on the login page to reset it before attempting to delete your Instagram account again.
  • Two-Factor Authentication (2FA) Loops: If you have 2FA enabled but are unable to receive security codes, or your backup codes are not working, this can prevent you from completing the deletion process. Try to resolve the 2FA issue first, which might involve checking your SMS, authentication app, or using recovery codes. Refer to Instagram’s Help Center for 2FA troubleshooting.
  • Active Advertisements or Boosted Posts: If your Instagram account is running active ad campaigns or has recently boosted posts, you may need to pause these activities or wait for them to complete before the system allows deletion. Check your settings in Meta Ads Manager.
  • Linked Business Pages or Third-Party Applications: Connections to Facebook Business Pages, or certain third-party app integrations, might sometimes interfere with the Instagram delete account process. Review your linked accounts and app permissions, and consider unlinking them if necessary. Ensure your Instagram account isn’t the sole admin for a critical business asset.
  • Using an Incorrect Deletion Path: Ensure you are navigating through the correct menu options, typically via Accounts Center > Personal Details > Account Ownership and Control > Deactivation or Deletion, and specifically selecting “Delete account” rather than “Deactivate account.” The steps for how to delete instagram can sometimes change slightly with app updates.
  • Temporary System Glitches: Occasionally, the inability to delete might be due to temporary glitches or server-side issues on Instagram’s end. In such cases, waiting a few hours and trying again, or using a different device or web browser, can resolve the issue.
  • If you’ve tried these steps and still can’t delete your account, the most reliable source for assistance is Meta’s Instagram Help Center, which provides detailed guidance and solutions for common account issues.

How Long Does the Deletion Process Take?

When you submit a request to delete an Instagram account permanently, the removal isn’t immediate. Instagram implements a 30-day grace period starting from the moment you confirm your deletion request. During this 30-day window, your account, along with all your information like photos, videos, and profile details, becomes invisible to other users on the platform.

However, it’s not yet entirely deleted. If you change your mind and log back into your account at any time within these 30 days, the deletion request will be automatically cancelled, and your account will be reinstated. If you do not log in during this period, your account will be permanently deleted after the 30 days conclude.

Following this, Instagram states that the complete deletion of your data from their backend systems and servers can take up to an additional 90 days. Therefore, the entire process from request to potential full backend deletion can span up to 120 days.

It’s also important to note that even after the 90-day backend deletion window, copies of some of your content may remain in backup storage that Instagram uses for disaster recovery, software errors, or other data loss events, though this data is generally not accessible. Cached copies of your profile might also briefly appear in search engine results until their indexes are updated.

What Happens After You Delete Your Account?

After you successfully delete your Instagram account and the 30-day grace period has passed, your account is permanently removed from the platform. This means your profile, including all photos, videos, comments, likes, and followers, will be permanently removed.

You will no longer be able to log in or reactivate that specific account. Your username might become available for others to use in the future, although Instagram may have policies that prevent immediate reuse. Any Direct Messages (DMs) you sent will typically remain visible to the recipients; however, they will usually be attributed to a generic “Instagram User” or a similar placeholder, without any link back to your deleted profile or your profile picture.

Tags of your former account on other users’ photos will persist, but they will become inactive text rather than a clickable link to a profile. If you had embedded Instagram posts on external websites or blogs, these embeds will likely stop displaying your content or show an error message.

Any third-party applications or services that were connected to your Instagram account will lose their access and will no longer function with that account. While Instagram aims to delete your data, its policy notes that copies of some information (such as log records) may remain in its database but are disassociated from personal identifiers.

Furthermore, advertisers and Meta may retain aggregated, anonymized engagement metrics (e.g., if you clicked on an ad), but this data would not be linked to your specific, now-deleted, account.

Can You Recover or Reactivate a Deleted or Disabled Account?

Whether you can recover an Instagram account depends on whether it was disabled (deactivated) or permanently deleted. If you chose to deactivate your Instagram account, this is a temporary measure. You can reactivate a disabled account at any time simply by logging back in with your username and password. Upon reactivation, your profile, photos, comments, and likes will be restored to their previous state.

However, if you followed the steps to permanently delete an Instagram account, the situation is different. After you request deletion, Meta provides a 30-day window during which your account is hidden but not yet permanently erased. If you log back into your account within 30 days, the deletion request is cancelled, and your account is restored. If these 30 days lapse without your logging in, your account and all associated data will be permanently deleted and cannot be recovered by you or Instagram support. There is no way to get it back once this point is reached.

While you might be able to create a new account, you generally cannot reuse the same username immediately, as Instagram may hold it for a period, or it could be claimed by someone else. If you attempt recovery after the 30-day window for a permanently deleted account, it will fail.

Will Your Followers Know If You Leave Instagram?

Instagram does not send out a direct notification to your followers informing them that you have decided to delete your Instagram account or even if you’ve chosen to deactivate your Instagram account. However, your followers will notice your absence in different ways depending on your action. If you deactivate your account, your profile, along with all your posts, comments, and likes, becomes completely invisible on the platform.

If a follower searches for your username, they won’t find your account. It will appear as if you’ve vanished or your account never existed, until you decide to reactivate it by logging back in. If you proceed to delete your Instagram account permanently, after the 30-day grace period, your profile and all its content are permanently removed.

For your followers, this means they will no longer see your account in their follower lists or following lists. Any past comments or likes you made on their posts might disappear or become attributed to a generic “Instagram User.”

Essentially, your digital presence on Instagram ceases to exist. If you wish to leave quietly without drawing attention, both deactivation and deletion provide formal notification.

However, a sudden disappearance will likely be noticed by those who regularly interact with you or check your profile. You may choose to inform close friends or followers directly before deleting your Instagram account to manage their expectations.

Alternative to Deleting: Make Your Account Private and Protect Your Data

  1. Switching to a Private Profile on Mobile (iOS & Android):
    1. Open the Instagram app and go to your profile by tapping your profile picture.
    2. Tap the menu icon (three horizontal lines) in the top-right corner.
    3. Select Settings and privacy from the menu.
    4. Scroll down to the “Who can see your content” section and tap on Account privacy.
    5. Toggle the Private account switch to the on position. You may need to confirm your choice.
  2. Switching to a Private Profile on Web Browser:
    1. Go to Instagram.com and log in to your account.
    2. Click on More (three horizontal lines) in the menu on the bottom-left side of the screen.
    3. Select Settings from the pop-up menu.
    4. In the left navigation bar, click on Settings and privacy (or it may directly show “Account privacy” options).
    5. Under “Who can see your content,” find the Account privacy section and check the box next to Private Account.
  3. Privacy Trade-offs and Benefits: Making your account private means only your approved followers can see your posts, Stories, Reels, and list of followers/following. People who want to follow you must send a request, which you can approve or deny. This significantly increases your control over who views your content. Your bio and profile picture remain public. This doesn’t remove your data from Instagram’s servers like deletion would, but it limits public access to your shared content.
  4. How It Limits Data Sharing: While Instagram still collects your data as per its privacy policy, a private account restricts other users from easily accessing, sharing, or misusing your content. Your posts won’t appear in public hashtag searches or on the Explore page for non-followers.
  5. Why It May Be a Middle-Ground Solution: If your primary concern is controlling your audience and enhancing privacy without permanently leaving the platform or losing your content and connections, setting your account to private is an excellent alternative to deactivation or deletion. It offers a significant degree of control over your content’s visibility, making it a good middle-ground solution if you’re not ready to fully delete your Instagram account.

The post How to Delete or Deactivate Your Instagram Account appeared first on McAfee Blog.

  •  

What is Doxing?

Imagine someone putting your personal information out online for thousands of strangers to see—your home address, phone number, even details about your family members or workplace. This invasive practice, known as doxing, has become a significant concern in the digital age. It’s not just about privacy anymore; it’s about the potential for real-world harm. This article explains what doxing is and how to prevent it from happening to you.

Key Takeaways

  • Doxxing is the act of publicly exposing someone’s personal information online without their consent.
  • Doxxing is often intended to harass or intimidate victims online and in real life and can result in serious personal, professional, and safety-related harm.
  • Doxxing is not always illegal, sharing publicly available information is generally permissible, but hacking or sharing stolen, confidential data is illegal.
  • Protect yourself from doxxing by reducing your online personal information and using strong passwords, a VPN, and antivirus protection.
  • Use preventive habits to safeguard your privacy.

What is doxing?

Doxing (or “doxxing”) is the practice of revealing another individual’s personal information (home address, full name, phone number, place of work, and more) in an online public space without the person’s consent.

The term “doxing” comes from the hacker world and references the act of “dropping dox” (as in “docs”) with malicious intent to the victim. The severity of the personal data leak may also go beyond phone numbers and addresses to include releasing private photos, Social Security numbers (SSNs), financial details, personal texts, and other more invasive attacks.

What’s an example of doxing?

One of the first incidents of doxing took place back in the late 1990s when users of the online forum Usenet circulated a list of suspected neo-Nazis. The list included the suspected individuals’ email accounts, phone numbers, and addresses.

One of the most infamous examples of doxing was during 2014’s Gamergate controversy, involving issues of sexism and misogyny in the video game industry. Female video game developers and journalists were subjected to relentless harassment and doxing, placing their personal safety in jeopardy.

Several high-profile cases of celebrity doxing have made headlines over the years, serving as stark reminders of the dangers of online harassment and privacy invasion. In 2017, a woman hacked Selena Gomez’s email and leaked her Los Angeles-area home address online. In 2021, rapper Kanye West famously doxed Drake when he tweeted the star’s home address.

Is doxing illegal?

While doxing can hurt people, it’s not necessarily a crime. In some cases, a doxer finds publicly available information and shares it broadly. Since the data is public record, it’s not illegal to share it. A doxer might invite others to visit the home or workplace of their target rather than taking a specific action.

That said, it is illegal to hack a device or computer without permission from the owner — even if the information collected is never used. The legality of doxing must be taken on a case-by-case basis, and law enforcement must build its case based on existing applicable laws. For example, if the doxer attempted to apply for a credit card using your private data, they could be prosecuted for fraud or identity theft.

How to protect yourself from doxing

You can follow a few critical practices to help protect yourself from doxing. Start by limiting what you share online, using strong passwords, and taking advantage of secure technologies like virtual private networks (VPNs).

Limit the personal information you share online

Limiting the amount of personal information you share online is one of the best ways to protect yourself from doxing. Avoid oversharing personal details of your life (like your child’s name, pet’s name, or place of work), and maintain the highest possible privacy settings for any social media app or website.

You should also take caution when tagging friends, locations, and photos, as this may give doxers more access to your data. Check out our Ultimate Guide to Safely Sharing Online to learn more.

Check data broker websites for your information

Data brokers are companies that mine the internet and public records for financial and credit reports, social media accounts, and more. They then sell that data to advertisers, companies, or even individuals who may use it to dox somebody.

You might be surprised to see the amount of sensitive information available to anyone who wants it with an online search. Data brokers often have contact information, including real names, current and former addresses, birth dates, phone numbers, social media profiles, political affiliations, and other information that most consider private.

While you can remove your private information from many data broker sites, they tend to make the process tedious and frustrating. McAfee Personal Data Cleanup makes the process much easier. All you have to do is enter your name, date of birth, and home address, and we’ll scan it across high-risk data broker sites. We’ll then help you remove it.

Use strong passwords and keep them secure

Having strong passwords can make you less vulnerable to hackers and doxers. Keep yourself more secure by following a few simple rules.

  • Have long and strong passwords (at least eight to 10 characters).
  • Don’t create passwords that include any words from your social media sites (like pet or child names).
  • Change your passwords frequently — at least every three months.
  • Don’t use the same password for multiple online accounts — unique passwords only.
  • Use random sequences of letters and numbers without identifiable words.
  • Turn on two-factor or multi-factor authentication (MFA) for critical accounts (Gmail, LinkedIn, Facebook, online banking).
  • Don’t write down passwords (or keep them in a secure location if you must).

Make password management much easier by using a password manager and generator tool. True Key uses the strongest encryption available to decrypt your existing passwords and can help generate new strong passwords.

Use a virtual private network

When browsing on public Wi-Fi networks like those at airports and coffee shops, your data is at greater risk of being compromised by cybercriminals who may lift sensitive information for personal gain.

A virtual private network (VPN) service (like the one found in McAfee+) gives you an additional layer of protection by hiding your IP address and browsing activities when you’re on an unsecured network.

Protect your device with antivirus protection

Scammers, doxers, and hackers work hard to get personal information every day. With McAfee+, you can use the internet with confidence knowing you have the support of award-winning antivirus software to keep you and your family members safe online.

Get real-time threat protection through malware detection, quarantine, and removal, and schedule real-time or on-demand file and application scanning. You’ll also benefit from an advanced firewall for home network security.

Keep your online information secure with McAfee

We all increasingly rely on the internet to manage our lives. As a result, it’s important to address the risks that come with the rewards.

Comprehensive cybersecurity tools like those that come with McAfee+ can help you avoid scams, doxing attacks, identity theft, phishing, and malware. We can also help keep your sensitive information off the dark web with our Personal Data Cleanup.

With McAfee’s experts on your side, you can enjoy everything the web offers with the confidence of total protection.

The post What is Doxing? appeared first on McAfee Blog.

  •  

How To Create The Strongest Passwords

Some of the strongest passwords you can use are the ones you don’t have to remember. While that may sound strange, it’s true. The key is using a password manager, a tool that creates and securely stores strong, unique passwords for each of your accounts.

Remembering dozens of different passwords seems like an impossible task. This leads many people to create simple, predictable passwords or reuse the same one across multiple accounts. A 2025 study by Cybernews revealed that of 19 million breached passwords, 94% were reused, with “123456” and “password” still being the most-used passwords.

Hackers count on this. When you create short or reused passwords, a single data breach can unlock your entire digital life, from email to online banking. This guide will cover the latest advice on password security for 2026, so you can learn how to protect your digital accounts effectively.

Key Takeaways

  • NIST updated 2026 guidance: Prioritize password length (12-16+ characters) over complexity. Avoid forced special character use and frequent changes.
  • Use passphrases: Combine 3–4 random words (e.g., “SunnyBeach2026Walking”) to create memorable but unpredictable credentials that are harder to crack.
  • Enabling multi-factor authentication adds an essential layer of protection beyond passwords alone.
  • Reusing passwords is a top security threat: Use a password manager to securely store, generate, and autofill passwords for all your accounts.

The Risks of a Weak Password

Weak passwords remain a top cause of security incidents. When attackers gain access to an account, the impact can be severe, leading to identity theft or financial fraud. These incidents are more common than you might think. We’ve seen massive data leaks exposing millions of customer records, often because people reused the same password across different platforms.

It’s not just about your personal accounts. When your local school district, healthcare provider, or utility company suffers a password-related breach, your personal information could be exposed. Strong passwords create a baseline of security that protects entire communities, not just individual users.

The Latest Advice for Strong Passwords in 2026

Password guidance has changed significantly. Passwords that were previously considered “strong” aren’t strong anymore. Decades of data proved that old rules, like forcing frequent password changes, often led to weaker habits. Research and updated recommendations from authorities like the National Institute of Standards and Technology (NIST) now point to a simpler, more effective approach.

The new focus is on length over complexity.

The old requirement to include a symbol, number, and capital letter often resulted in predictable patterns like “P@ssw0rd!1”. Today, NIST encourages using longer passphrases of 12-16 characters or more. This approach is much harder for attackers to crack.

The updated guidance recommends:

  • Focusing on length, with support for passphrases.
  • Allowing up to 64 characters, including spaces.
  • Dropping forced, periodic password changes unless there is evidence of a compromise.

→ Related: The Difference Between Passwords and Passphrases

Strong vs Weak Passwords

Strong Passwords:

  • Long: At least 12–16 characters (the longer, the better).
  • Unique: A different password for each account.
  • Unpredictable: Uses random words, not personal info or common phrases.
  • May include: Numbers, symbols, and both lowercase & uppercase letters.

Weak Passwords:

  • Short: Fewer than 12 characters.
  • Reused: The same password across multiple accounts.
  • Predictable: Includes personal details (like birthdays or pet names), common words, or easily guessed patterns (like “123456” or “password”).
  • Minimal variation: Simple substitutions (like “P@ssw0rd”) that are easily cracked.

A strong password protects your account even in the face of automated hacking tools, while a weak password can be guessed in seconds.

Tips to Build a Strong Password or Passphrase

Creating a strong password doesn’t have to be a headache. A passphrase strings together several random words, making it easy for you to remember but difficult for an attacker to guess.

1. Aim for 15+ Characters

A passphrase with 16 or more characters is significantly harder to crack than a short, complex password. The key is to create a story or image that is memorable to you but not obvious to others. For example, “CorrectHorseBatteryStaple” is much stronger than “P@ssw0rd!”.

2. Choose 3 to 4 Random Words That Aren’t Commonly Paired

String together random words to create your passphrase. Instead of a random string like “xK9$mPz2#qL,” you might create something like “SunnyBeach2026Walking!” or “Coffee-Morning-Mountain-Trail15.”

3. Add Numbers or Symbols That Mean Something to You

Find a number with meaning to help you remember it but make sure it’s only meaningful and memorable to you. It could be the total number of your mother’s siblings, or the number of minutes it takes you to commute from your home to the office, or the number of steps down the stairs from your apartment floor to the ground floor. “123456” is not acceptable.

4. Make It Unique for Each Account

Uniqueness is non-negotiable. If your password is unique, a breach at one site doesn’t put your other accounts at risk. You can create a base phrase and modify it slightly for each service in a way that isn’t obvious. For example, “TealElephantIndia602~RollerbladinG,” with the final “G” standing for your Gmail account.

5. Use a Password Manager

Maintaining unique, long passphrases for all your accounts is nearly impossible without help. A password manager is an essential tool. It generates strong, random passwords, stores them securely in an encrypted vault, and autofills them for you. You only need to remember one strong master passphrase, and the manager handles the rest. Many also alert you if your passwords appear in known data breaches.

6. Add Multi-Factor Authentication

Even the strongest passphrase can be compromised. A multi-factor authentication (MFA) adds protection by requiring the user to key in a second factor. A stolen passphrase alone won’t grant an attacker access. Enable MFA on all your important accounts: email, banking, social media, and your password manager itself.

Want more tips? Read 15 Tips for Better Password Security.

Your 2026 Passphrase Action Plan

Knowing what to do is only half the battle. This action plan breaks the process into manageable steps, helping you strengthen your most important accounts first and build better password habits over time.

Week 1: Secure Your Vault

  • Choose a reputable password manager and install it on your devices.
  • Create a strong master passphrase of 15+ characters to secure your manager.
  • Enable MFA on your password manager account.

Week 2: Protect Your Most Important Accounts

  • Prioritize your primary email, banking, and financial accounts.
  • Use your password manager to generate and save a new, unique passphrase for each one.
  • Enable MFA for each account, preferably using an authenticator app.

Weeks 3-4: Work Through Secondary Accounts

  • Move on to shopping sites (especially those with saved payment methods), work-related accounts, and social media platforms.
  • Update each with a unique passphrase stored in your manager.

Ongoing: Make it a Habit

  • Add new accounts and passphrases to your manager as you create them.
  • Review your password manager’s security dashboard monthly for weak or reused passwords.
  • Act immediately on any breach alerts.

For ongoing guidance, our comprehensive guide to keeping your passwords secure provides year-round support.

Family Guidance

Teaching young children and teens about passphrase security is also teaching them life skills in the digital age. Start them early with age-appropriate lessons, adding more lessons as they grow.

  • Elementary age: Allow them to create simple passphrases they can remember, and introduce basic privacy concepts. Remind them never to share passwords, passphrases, and other personal information.
  • Middle school: Introduce them to a trusted password manager tool, explaining why reusing passwords is risky and reminding them about the principles of creating passphrases and MFA. Consider family password managers that let you share certain credentials securely while maintaining individual vaults.
  • High school: At this stage, they should be well-versed in full passphrase hygiene and MFA. They should have, at the very least, an awareness of phishing attempts and other online scams.

Final Thoughts

Passwords may seem inconsequential, but they are important components of your digital security. By focusing on length, uniqueness, and the right tools, you can significantly strengthen your password and safeguard your data.

Managing dozens of unique, strong passwords across all your accounts is challenging, but a password manager makes it easy. By generating and securely storing complex passwords for every account, a password manager saves you time and ensures your credentials stay protected. With features like encrypted storage, secure autofill, and the ability to update passwords quickly, your accounts remain both secure and convenient to access. McAfee’s Password Manager offers industry-leading protection, including advanced encryption and multi-factor authentication, helping you safeguard your digital identity with confidence.

The post How To Create The Strongest Passwords appeared first on McAfee Blog.

  •  

Mobile Spyware: How Hackers Hijack Phones Through App Spyware

Key Takeaways

  • App spyware often disguises itself as everyday apps (e.g., flashlight, wallpaper, gaming), then embed malicious code to secretly access your camera, mic, contacts, location, and more.
  • Excessive permission requests are a red flag, legitimate apps request only what they need. Apps asking for unrelated permissions (e.g., a game accessing contacts or microphone) are likely invasive.
  • Learn how to spot and remove invasive apps quickly in your permission settings.
  • Deleting beats restricting. Even disabled permissions may not stop an invasive app from collecting data. Full removal is the safest option.
  • Use preventive habits to safeguard your privacy.

Some crooks and shady characters will invade your privacy simply by asking for your permission to snoop—through app spyware you install on your phone.

Invasive apps look like legitimate apps, yet they have an ulterior motive. They use a phone’s permission settings to spy on its user by accessing the phone’s camera, microphone, and more.

At the heart of any smartphone app you’ll find permissions, which allow apps to use certain features of your phone. A messaging app might ask for access to your camera and microphone to send video and voice messages. It might ask for permission to access your photos if you want to send pictures. Likewise, a navigation or rideshare app will ask for permission to access your phone’s location services.

In short, permissions make apps work. And broadly speaking, most apps out there are legitimate. Yet what about a game that asks for permissions to access your contact list? Or a flashlight app that wants to use your microphone? How about a run-of-the-mill wallpaper app that wants to know your location? These are all examples of invasive apps. And the creators behind them want your personal information and to invade your privacy as well.

Luckily, app spyware is easy to spot and remove.

Invasive apps and mobile spyware

Both invasive apps and mobile spyware snoop on you and your phone, yet invasive apps work differently than mobile spyware. Invasive apps use a phone’s built-in functionality to spy and gather information on you. Spyware is malware that can maliciously steal information by working secretly in the background. This can make an invasive app much easier to spot because it asks for broad permissions—permissions it doesn’t need to work.

Invasive apps might ask for permission to:

  • Use your camera.
  • Access your microphone.
  • Track your location.
  • Access and modify your contacts.
  • Read your calendar.

Requests for permissions such as these aren’t a sign of an invasive app in and of themselves. Some apps require them to work. The telltale sign of an invasive app is when the app asks for permissions it doesn’t need. Think like the flashlight app that wants access to your microphone.

The tricky bit with invasive apps is that many people quickly click through the user agreements and permission screens when they get a new app. Sometimes without reading carefully. That can particularly be the case with children grabbing a new app. However, it’s never too late to spot an invasive app. And remove it.

How to Spot and Remove Invasive Apps to Prevent Mobile Spyware

With a quick trip to your phone’s settings, you can spot and remove invasive apps.

How to Check and Control App Permissions on iOS

1. Go to Settings > Privacy & Security.
2. Tap Safety Check. Here you can see which apps use the permissions you granted them and make changes to those permissions as needed.

You can also run an App Privacy Report, which records data and sensor access on an app-by-app level.

1. Go to Settings > Privacy & Security.
2. Tap App Privacy Report. You can adjust your permissions from there as well.

How to Check and Control App Permissions on Android

  1. On your device, open the Settings app.
  2. Tap Apps. Tap the app you want to change. If you can’t find it, tap See all apps.
  3. Select your app.
  4. Tap Permissions. If you allowed or denied any permissions for the app, you’ll find them here.
  5. To change the permission setting, tap it, then select Allow or Don’t allow. For location, camera, and microphone permissions, you might be able to select:
    • All the time: For location only. The app can use the permission at any time, even when you’re not using the app.
    • Allow only while using the app: The app can use the permission only when you’re using that app.
    • Ask every time: Every time you open the app, it’ll ask to use the permission. It can use the permission until you’re done with the app.
    • Don’t allow: The app can’t use the permission, even when you’re using the app.

Invasive app? You might just want to delete it.

Rather than pare back permissions on an invasive app, your best and safest bet is to delete the app altogether. Even with excessive permissions turned off, the app might collect other information and send it to the company who developed it. Further, they might share it with others. In short, an invasive app is a bad app all around. Get rid of it and go with something legitimate.

More ways to keep app spyware off your phone

1. Update your phone’s operating system.

Along with installing security software, keeping your phone’s operating system up to date can greatly improve your security. Updates can fix vulnerabilities that hackers rely on to pull off their malware-based attacks. It’s another tried-and-true method of keeping yourself safe—and for keeping your phone running great too.

2. Avoid third-party app stores.

Google Play and Apple’s App Store have measures in place to review and vet apps to help ensure that they are safe and secure. Third-party sites might very well not, and they might intentionally host malicious apps as part of a front. Further, Google and Apple are quick to remove malicious apps from their stores when discovered, making shopping there safer still.

3. Review apps carefully.

Check out the developer—have they published several other apps with many downloads and good reviews? A legit app typically has quite a few reviews, whereas malicious apps might have only a handful of (phony) five-star reviews. Lastly, look for typos and poor grammar in both the app description and screenshots. They might be a sign that a hacker slapped the app together and quickly deployed it.

4. Go with a strong recommendation.

Yet better than combing through user reviews yourself is getting a recommendation from a trusted source, like a well-known publication or from app store editors themselves. In this case, much of the vetting work has been done for you by an established reviewer. A quick online search like “best fitness apps” or “best apps for travelers” should turn up articles from legitimate sites that can suggest good options and describe them in detail before you download.

5. Protect your phone.

Comprehensive online protection software can secure your phone in the same ways that it secures your laptops and computers. Installing it can protect your privacy, keep you safe from attacks on public Wi-Fi, and automatically block unsafe websites and links, just to name a few things it can do.

Be stingy with your apps and their permissions

Permissions make for powerful apps that can help you hail a ride, get a pizza delivered to your door, and map your afternoon run. In the wrong hands, they can also snoop on your activities. If an app ever feels like it’s asking for too many permissions to do its job, you might have an invasive app on your hands. Yet the trick is that some invasive apps still slip through and end up on our phones. Quickly accepting terms and permissions is one reason. For extra protection, consider running a quick app audit. Check the apps and permissions on your phone as noted above and delete any suspicious apps.

Be stingy when it comes to giving your permission. Roll back the permissions so that the app works with the bare minimum of permissions. Set location services so that they’re only used when the app is in use. With social and messaging apps, select which photos you allow them to share rather than giving the app blanket access to your entire photo library.

And lastly, if an app seems like it’s asking for too much, it probably is. Avoid it altogether.

The post Mobile Spyware: How Hackers Hijack Phones Through App Spyware appeared first on McAfee Blog.

  •  

How to Check If a Website Is Safe: Simple Tips for Secure Browsing

It’s important to know that not all websites are safe to visit. In fact, some sites may contain malicious software (malware) that can harm your computer or steal your personal contact information or credit card numbers.

Phishing is another common type of web-based attack where scammers try to trick you into giving them your personal information, and you can be susceptible to this if you visit a suspicious site.

Identity theft is a serious problem, so it’s important to protect yourself when browsing the web. Online security threats can be a big issue for internet users, especially when visiting new websites or following site links.

So how can you tell if you’re visiting a safe website or an unsafe website? You can use a few different methods. This page discusses key things to look for in a website so you can stay safe online.

Key signs a website is safe

When you’re visiting a website, a few key indicators can help determine whether the site is safe. This section explores how to check the URL for two specific signs of a secure website.

Check for ”Https:” in the website URL

“Https” in a website URL indicates that the website is safe to visit. The “s” stands for “secure,” and it means that the website uses SSL (Secure Sockets Layer) encryption to protect your information. A verified SSL certificate tells your browser that the website is secure. This is especially important when shopping online or entering personal information into a website.

When you see “https” in a URL, the site is using a protocol that encrypts information before it’s sent from your computer to the website’s server. This helps prevent anyone from intercepting and reading your sensitive information as it’s transmitted.

There is a lock icon near your browser’s URL field

The padlock icon near your browser’s URL field is another indicator that a webpage is safe to visit. This icon usually appears in the address bar and means the site uses SSL encryption. Security tools and icon and warning appearances depend on the web browser.

Let’s explore the cybersecurity tools on the three major web browsers:

  • Safari. In the Safari browser on a Mac, you can simply look for the lock icon next to the website’s URL in the address bar. The lock icon will be either locked or unlocked, depending on whether the site uses SSL encryption. If it’s an unsafe website, Safari generates a red-text warning in the address bar saying “Not Secure” or “Website Not Secure” when trying to enter information in fields meant for personal data or credit card numbers. Safari may also generate an on-page security warning stating, “Your connection is not private” or “Your connection is not secure.”
  • Google Chrome. In Google Chrome, you’ll see a gray lock icon (it was green in previous Chrome versions) on the left of the URL when you’re on a site with a verified SSL certificate. Chrome has additional indicator icons, such as a lowercase “i” with a circle around it. Click this icon to read pertinent information on the site’s cybersecurity. Google Safe Browsing uses security tools to alert you when visiting an unsafe website. A red caution symbol may appear to the left of the URL saying “Not secure.” You may also see an on-page security message saying the site is unsafe due to phishing or malware.
  • Firefox. Like Chrome, Mozilla’s Firefox browser will tag all sites without encryption with a distinctive marker. A padlock with a warning triangle indicates that the website is only partially encrypted and may not prevent cybercriminals from eavesdropping. A padlock with a red strike over it indicates an unsafe website. If you click on a field on the website, it’ll prompt you with a text warning stating, “This connection is not secure.”

Look for website trust seals

When you’re browsing the web, it’s important to be able to trust the websites you’re visiting. One way to determine if a website is trustworthy is to look for trust seals. Trust seals are logos or badges that indicate a website is safe and secure. They usually appear on the homepage or checkout page of a website.

There are many types of trust seals, but some of the most common include the Better Business Bureau (BBB) seal, VeriSign secure seal, and the McAfee secure seal. These seals indicate that a third-party organization has verified the website as safe and secure.

While trust seals can help determine whether a website is trustworthy, it’s important to remember that they are not foolproof. Website owners can create a fake trust seal, so it’s always important to do your own research to ensure a website is safe before entering personal information.

In-depth ways to check a website’s safety and security

Overall, the ”https” and the locked padlock icon are good signs that your personal data will be safe when you enter it on a website. But you can ensure a website’s security is up to par in other ways. This section will explore five in-depth methods for checking website safety.

Use McAfee WebAdvisor

McAfee WebAdvisor is a free toolbar that helps keep you safe online. It works with your existing antivirus software to provide an extra layer of protection against online threats. WebAdvisor also blocks unsafe websites and lets you know if a site is known for phishing or other malicious activity. In addition, it can help you avoid online scams and prevent you from accidentally downloading malware. Overall, McAfee WebAdvisor is a useful tool that can help you stay safe while browsing the web.

Check for a privacy policy

Another way to determine if a website is safe to visit is to check for a privacy policy. A privacy policy is a document that outlines how a website collects and uses personal information. It should also state how the site protects your data from being accessed or shared by scammers, hackers, or other unauthorized individuals.

If a website doesn’t have a privacy policy, that’s a red flag that you shouldn’t enter any personal information on the site. Even if a website does have a privacy policy, it’s important to read it carefully so you understand how the site uses your personal data.

Check third-party reviews

It’s important to do some preliminary research before visiting a new website, especially if you’re shopping online or entering personal data like your address, credit card, or phone number. One way to determine if a website is safe and trustworthy is to check third-party reviews. Several websites provide reviews of other websites, so you should be able to find several reviews for any given site.

Trustpilot is one example of a website that provides reviews of other websites.Look for common themes when reading reviews. If most of the reviews mention that a website is safe and easy to use, it’s likely that the site is indeed safe to visit. However, if a lot of negative reviews mention problems with viruses or malware, you might want to avoid the site.

Look over the website design

You can also analyze the website design when deciding whether a website is safe to visit. Look for spelling errors, grammatical mistakes, and anything that appears off. If a website looks like it was made in a hurry or doesn’t seem to be well-designed, that’s usually a red flag that the site might not be safe.

Be especially careful of websites that have a lot of pop-ups. These sites are often spammy or contain malware. Don’t download anything from a website unless you’re absolutely sure it’s safe. These malicious websites rarely show up on the top of search engine results, so consider using a search engine to find what you’re looking for rather than a link that redirects you to an unknown website.

Download McAfee WebAdvisor for free and stay safe while browsing

If you’re unsure whether a website is safe to visit, download McAfee WebAdvisor for free. McAfee WebAdvisor is a program that helps protect you from online threats, such as malware and viruses. It also blocks pop-ups and other intrusive ads so you can browse the web without worry. Plus, it’s completely free to download and use.

Download McAfee WebAdvisor now and stay safe while browsing the web.

The post How to Check If a Website Is Safe: Simple Tips for Secure Browsing appeared first on McAfee Blog.

  •  

Blue Whale Challenge: What Parents Need to Know!

TikTok Challenge

Parents are waking up to this new online threat to their kids: ‘The Blue Whale Challenge’ which in extreme steps leads children to commit suicide. Fingers are flying fast on WhatsApp, Facebook and Twitter sharing ‘facts’ about the challenge, tips about mentoring kids, and opinions of experts that are adding to the confusion.

“What is the Blue Whale Challenge?”, “Is it a game or an app?”, “Where is it available?”,  “How can I know if my child is playing it?” These and similar questions are now circulating, understandably, as concerned parents are trying their best to get a grip on the issue.

The Facts First:

Alternate names: A Blue Whale/ A Quiet House/ A Silent House/ A Sea of Whales/ Wake Me Up at 4:20 am.

The background: The Blue Whale Challenge was developed by a Russian who is currently behind bars. The game had an app but now it has been removed. HOWEVER, if anyone has backed up data and saved the app, it may still be there on their devices. It may also be shared in unregulated groups.

The game: The game consists of a series of dares, and every time the player completes a challenge, a new one is assigned to him/her. This happens over a period of 50 days (According to some reports, this includes carving a Blue Whale on the hand). The last one is supposed to be one that is potentially life-threatening. Not only that, the participant has to livestream or share the suicide on Facebook.

The modus operandi: How does the moderator get the participants to accept and complete challenges? Simply by goading them on; shaming them or belittling them if they show hesitation. They already have the phone numbers and email addresses of the participants, so it’s easy for the moderator to contact the participants. The participants are also threatened not to keep records of any mails or messages or else their family member’s personal information would be hacked and made public.

Origin: There are contradictory reports about existence of an app and now it’s been removed from online stores. Social media and forums are recognized means which have helped proliferate the same.

What Can Parents Do?

This is not a case of malware or virus attacks. It is more related to human psychology and banks on the child’s naiveté, lack of self-esteem and acceptance to a group. Such games have existed and continue to exist and bans won’t prevent their creation. Just like there are fun challenges like the ice bucket challenge and the pink whale challenge, there are also potentially harmful ones that include taking selfies in front of running trains and other dangerous acts. Children by nature are adventurous and dares, no matter how small or big, could satisfy this need for excitement.

  1. Open Conversation: Like in the real world where you guide your child, likewise your child needs guidance in the online world too which can only be given by you until they attain maturity. Have regular and informal conversation so they share without the fear of being reprimanded. Encourage questions, address their curiosity and guide them in a friendly manner rather than leaving up to them to figure things on their own Also, its recommended to impart knowledge to break free from peer pressure and not be negative online. A strong, confident child will be able to make better decisions and this is the skill as parents you can teach your children.
  2. Stranger Danger: According to McAfee’s ‘Connected Family’ study in 2017, 49% of Indian parents are concerned about their child potentially interacting with a social predator or cybercriminal online. Education and open conversations within families are critical as kids are curious and give trust easily. Highlight incidents about how strangers try to earn trust falsely for their own agenda which can extend from cybercrime to physical theft when you are not home. Insist that they should avoid entering into any form of communication, sharing or confiding with strangers including calling, emailing, texting or meeting people they don’t know well in person.
  3. Balance: Set daily internet time when they can surf online and do school work. Also, make the rule -Absolutely NO devices go to bed with your child. If you notice your child is online more often than usual you should investigate.
  4. Monitor: Even if you are not a tech-savvy person, there is nothing like a parent’s concern to keep children on the right path. It’s suggested you use the parental control features available in reputed security software which makes it easy and simple to help keep your children safe online.
  5. Do your part: Discuss with your child about how to identify such online dangers and report it if they encounter any. It’s our duty to keep the ecosystem safe for everyone as we would expect from our neighbor.

Monitoring your child’s online experience until they get a sense of judgement is something I have always advocated for, and is now more important than ever. Do your part and help make the internet a safer place for everyone.

Final Thoughts

The Blue Whale Challenge is a grim reminder that not all online threats come in the form of a virus or malicious download. Sometimes, the real danger lies in manipulation, peer pressure, and psychological coercion. As parents, you cannot control every corner of the internet, but you can teach your children effective ways to navigate it.

Your role in your child’s life is more powerful than any app or algorithm. Open conversations, emotional support, clear digital boundaries, and active involvement in your child’s online activities constitute the strongest defense. When children feel heard, valued, and confident, they are far less likely to fall prey to harmful online challenges or strangers seeking to exploit them.

Parental guidance should also be supported by practical safeguards. Just as you lock your doors at night, your child’s digital world deserves protection too. Using trusted parental control tools can help you monitor their online activity, manage screen time, filter inappropriate content, and receive alerts about potential risks without invading your child’s sense of independence.

With the McAfee+ Family Plan, you are empowered with comprehensive parental controls, identity monitoring, and multi-device protection to help you support, guide, and protect your child as they grow in a connected world.

The post Blue Whale Challenge: What Parents Need to Know! appeared first on McAfee Blog.

  •  
❌