
This project is a command line tool and python library that uses Wappalyzer extension (and its fingerprints) to detect technologies. Other projects emerged after discontinuation of the official open source project are using outdated fingerpints and lack accuracy when used on dynamic web-apps, this project bypasses those limitations.
Before installing wappalyzer, you will to install Firefox and geckodriver/releases">geckodriver. Below are detailed steps for setting up geckodriver but you may use google/youtube for help.
geckodriver-vX.XX.X-win64.zip
geckodriver-vX.XX.X-macos.tar.gz
geckodriver-vX.XX.X-linux64.tar.gz
To ensure Selenium can locate the GeckoDriver executable: - Windows: 1. Move the geckodriver.exe to a directory (e.g., C:\WebDrivers\). 2. Add this directory to the system's PATH: - Open Environment Variables. - Under System Variables, find and select the Path variable, then click Edit. - Click New and enter the directory path where geckodriver.exe is stored. - Click OK to save. - macOS/Linux: 1. Move the geckodriver file to /usr/local/bin/ or another directory in your PATH. 2. Use the following command in the terminal: bash sudo mv geckodriver /usr/local/bin/ Ensure /usr/local/bin/ is in your PATH.
pipx install wappalyzer
To use it as a library, install it with pip inside an isolated container e.g. venv or docker. You may also --break-system-packages to do a 'regular' install but it is not recommended.
git clone https://github.com/s0md3v/wappalyzer-next.git
cd wappalyzer-next
docker compose up -d
To scan URLs using the Docker container:
Scan a single URL:
docker compose run --rm wappalyzer -i https://example.com
docker compose run --rm wappalyzer -i https://example.com -oJ output.json
Some common usage examples are given below, refer to list of all options for more information.
wappalyzer -i https://example.com
wappalyzer -i urls.txt -t 10
wappalyzer -i https://example.com -c "sessionid=abc123; token=xyz789"
wappalyzer -i https://example.com -oJ results.json
Note: For accuracy use 'full' scan type (default). 'fast' and 'balanced' do not use browser emulation.
-i: Input URL or file containing URLs (one per line)--scan-type: Scan type (default: 'full')fast: Quick HTTP-based scan (sends 1 request)balanced: HTTP-based scan with more requestsfull: Complete scan using wappalyzer extension-t, --threads: Number of concurrent threads (default: 5)-oJ: JSON output file path-oC: CSV output file path-oH: HTML output file path-c, --cookie: Cookie header string for authenticated scansThe python library is a available on pypi as wappalyzer and can be imported with the same name.
The main function you'll interact with is analyze():
from wappalyzer import analyze

# Basic usage
results = analyze('https://example.com')

# With options
results = analyze(
    url='https://example.com',
    scan_type='full',  # 'fast', 'balanced', or 'full'
    threads=3,
    cookie='sessionid=abc123'
)
url (str): The URL to analyzescan_type (str, optional): Type of scan to perform'fast': Quick HTTP-based scan'balanced': HTTP-based scan with more requests'full': Complete scan including JavaScript execution (default)threads (int, optional): Number of threads for parallel processing (default: 3)cookie (str, optional): Cookie header string for authenticated scansReturns a dictionary with the URL as key and detected technologies as value:
{
  "https://github.com": {
    "Amazon S3": {"version": "", "confidence": 100, "categories": ["CDN"], "groups": ["Servers"]},
    "lit-html": {"version": "1.1.2", "confidence": 100, "categories": ["JavaScript libraries"], "groups": ["Web development"]},
    "React Router": {"version": "6", "confidence": 100, "categories": ["JavaScript frameworks"], "groups": ["Web development"]},
  "https://google.com" : {},
  "https://example.com" : {},
}}
Firefox extensions are .xpi files which are essentially zip files. This makes it easier to extract data and slightly modify the extension to make this tool work.
A clever malware deployment scheme first spotted in targeted attacks last year has now gone mainstream. In this scam, dubbed “ClickFix,” the visitor to a hacked or malicious website is asked to distinguish themselves from bots by pressing a combination of keyboard keys that causes Microsoft Windows to download password-stealing malware.
ClickFix attacks mimic the “Verify You are a Human” tests that many websites use to separate real visitors from content-scraping bots. This particular scam usually starts with a website popup that looks something like this:

This malware attack pretends to be a CAPTCHA intended to separate humans from bots.
Clicking the “I’m not a robot” button generates a pop-up message asking the user to take three sequential steps to prove their humanity.

Executing this series of keypresses prompts Windows to download password-stealing malware.
Step 1 involves simultaneously pressing the keyboard key with the Windows icon and the letter “R,” which opens a Windows “Run” prompt that will execute any specified program that is already installed on the system.
Step 2 asks the user to press the “CTRL” key and the letter “V” at the same time, which pastes malicious code from the site’s virtual clipboard.
Step 3 — pressing the “Enter” key — causes Windows to download and launch malicious code through “mshta.exe,” a Windows program designed to run Microsoft HTML application files.
“This campaign delivers multiple families of commodity malware, including XWorm, Lumma stealer, VenomRAT, AsyncRAT, Danabot, and NetSupport RAT,” Microsoft wrote in a blog post on Thursday. “Depending on the specific payload, the specific code launched through mshta.exe varies. Some samples have downloaded PowerShell, JavaScript, and portable executable (PE) content.”
According to Microsoft, hospitality workers are being tricked into downloading credential-stealing malware by cybercriminals impersonating Booking.com. The company said attackers have been sending malicious emails impersonating Booking.com, often referencing negative guest reviews, requests from prospective guests, or online promotion opportunities — all in a bid to convince people to step through one of these ClickFix attacks.
In November 2024, KrebsOnSecurity reported that hundreds of hotels that use booking.com had been subject to targeted phishing attacks. Some of those lures worked, and allowed thieves to gain control over booking.com accounts. From there, they sent out phishing messages asking for financial information from people who’d just booked travel through the company’s app.
Earlier this month, the security firm Arctic Wolf warned about ClickFix attacks targeting people working in the healthcare sector. The company said those attacks leveraged malicious code stitched into the widely used physical therapy video site HEP2go that redirected visitors to a ClickFix prompt.
An alert (PDF) released in October 2024 by the U.S. Department of Health and Human Services warned that the ClickFix attack can take many forms, including fake Google Chrome error pages and popups that spoof Facebook.
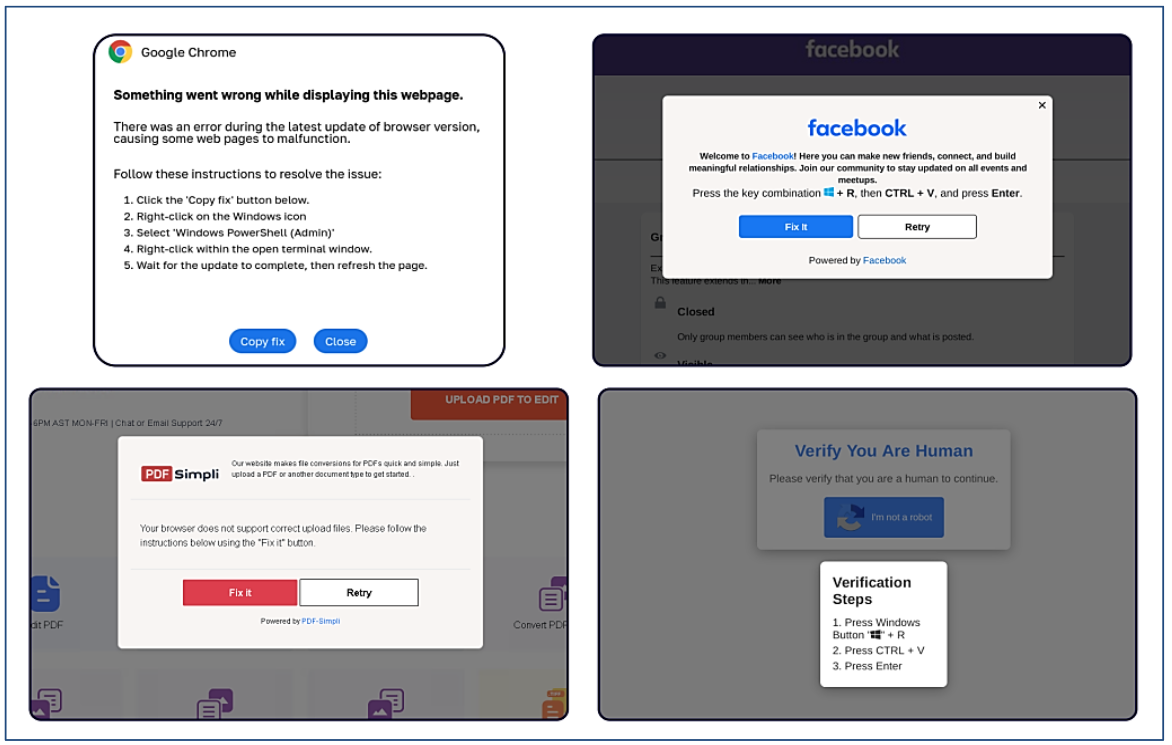
ClickFix tactic used by malicious websites impersonating Google Chrome, Facebook, PDFSimpli, and reCAPTCHA. Source: Sekoia.
The ClickFix attack — and its reliance on mshta.exe — is reminiscent of phishing techniques employed for years that hid exploits inside Microsoft Office macros. Malicious macros became such a common malware threat that Microsoft was forced to start blocking macros by default in Office documents that try to download content from the web.
Alas, the email security vendor Proofpoint has documented plenty of ClickFix attacks via phishing emails that include HTML attachments spoofing Microsoft Office files. When opened, the attachment displays an image of Microsoft Word document with a pop-up error message directing users to click the “Solution” or “How to Fix” button.
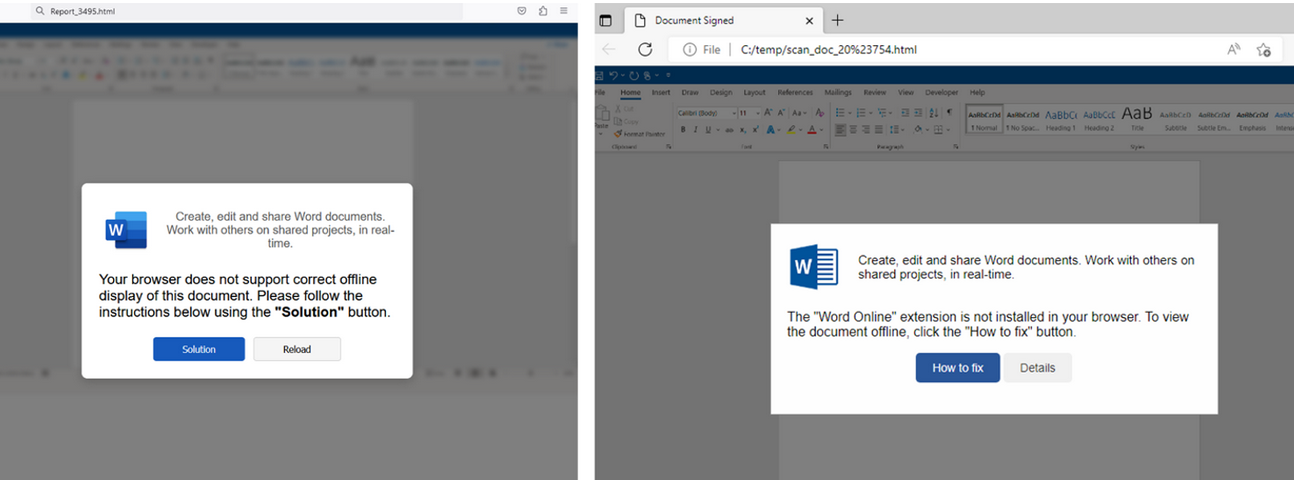
HTML files containing ClickFix instructions. Examples for attachments named “Report_” (on the left) and “scan_doc_” (on the right). Image: Proofpoint.
Organizations that wish to do so can take advantage of Microsoft Group Policy restrictions to prevent Windows from executing the “run” command when users hit the Windows key and the “R” key simultaneously.

sttr is command line software that allows you to quickly run various transformation operations on the string.
// With input prompt
sttr

// Direct input
sttr md5 "Hello World"

// File input
sttr md5 file.text
sttr base64-encode image.jpg

// Reading from different processor like cat, curl, printf etc..
echo "Hello World" | sttr md5
cat file.txt | sttr md5

// Writing output to a file
sttr yaml-json file.yaml > file-output.json
You can run the below curl to install it somewhere in your PATH for easy use. Ideally it will be installed at ./bin folder
curl -sfL https://raw.githubusercontent.com/abhimanyu003/sttr/main/install.sh | sh
curl -sS https://webi.sh/sttr | sh
curl.exe https://webi.ms/sttr | powershell
See here
If you are on macOS and using Homebrew, you can install sttr with the following:
brew tap abhimanyu003/sttr
brew install sttr
sudo snap install sttr
yay -S sttr-bin
scoop bucket add sttr https://github.com/abhimanyu003/scoop-bucket.git
scoop install sttr
go install github.com/abhimanyu003/sttr@latest
Download the pre-compiled binaries from the Release! page and copy them to the desired location.
sttr command.// For interactive menu
sttr
// Provide your input
// Press two enter to open operation menu
// Press `/` to filter various operations.
// Can also press UP-Down arrows select various operations.
sttr -h

// Example
sttr zeropad -h
sttr md5 -h
sttr {command-name} {filename}

sttr base64-encode image.jpg
sttr md5 file.txt
sttr md-html Readme.md
sttr yaml-json file.yaml > file-output.json
curl https: //jsonplaceholder.typicode.com/users | sttr json-yaml
sttr md5 hello | sttr base64-encode

echo "Hello World" | sttr base64-encode | sttr md5
These are the few locations where sttr was highlighted, many thanks to all of you. Please feel free to add any blogs/videos you may have made that discuss sttr to the list.
To install headerpwn, run the following command:
go install github.com/devanshbatham/headerpwn@v0.0.3
headerpwn allows you to test various headers on a target URL and analyze the responses. Here's how to use the tool:
-url flag.-headers flag to specify the path to this file.Example usage:
headerpwn -url https://example.com -headers my_headers.txt
my_headers.txt should be like below:Proxy-Authenticate: foobar
Proxy-Authentication-Required: foobar
Proxy-Authorization: foobar
Proxy-Connection: foobar
Proxy-Host: foobar
Proxy-Http: foobar
Follow following steps to proxy requests through Burp Suite:
Export Burp's Certificate:
127.0.0.1:8080
Install Burp's Certificate:
You should be all set:
headerpwn -url https://example.com -headers my_headers.txt -proxy 127.0.0.1:8080
The headers.txt file is compiled from various sources, including the SecLists">Seclists project. These headers are used for testing purposes and provide a variety of scenarios for analyzing how servers respond to different headers.
An open-source, prototype implementation of property graphs for JavaScript based on the esprima parser, and the EsTree SpiderMonkey Spec. JAW can be used for analyzing the client-side of web applications and JavaScript-based programs.
This project is licensed under GNU AFFERO GENERAL PUBLIC LICENSE V3.0. See here for more information.
JAW has a Github pages website available at https://soheilkhodayari.github.io/JAW/.
Release Notes:
JAW-V2 branch.JAW-V1 branch.The architecture of the JAW is shown below.

JAW can be used in two distinct ways:
Arbitrary JavaScript Analysis: Utilize JAW for modeling and analyzing any JavaScript program by specifying the program's file system path.
Web Application Analysis: Analyze a web application by providing a single seed URL.
Use the collected web resources to create a Hybrid Program Graph (HPG), which will be imported into a Neo4j database.
Optionally, supply the HPG construction module with a mapping of semantic types to custom JavaScript language tokens, facilitating the categorization of JavaScript functions based on their purpose (e.g., HTTP request functions).
Query the constructed Neo4j graph database for various analyses. JAW offers utility traversals for data flow analysis, control flow analysis, reachability analysis, and pattern matching. These traversals can be used to develop custom security analyses.
JAW also includes built-in traversals for detecting client-side CSRF, DOM Clobbering and request hijacking vulnerabilities.
The outputs will be stored in the same folder as that of input.
The installation script relies on the following prerequisites: - Latest version of npm package manager (node js) - Any stable version of python 3.x - Python pip package manager
Afterwards, install the necessary dependencies via:
$ ./install.sh
For detailed installation instructions, please see here.
You can run an instance of the pipeline in a background screen via:
$ python3 -m run_pipeline --conf=config.yaml
The CLI provides the following options:
$ python3 -m run_pipeline -h

usage: run_pipeline.py [-h] [--conf FILE] [--site SITE] [--list LIST] [--from FROM] [--to TO]

This script runs the tool pipeline.

optional arguments:
  -h, --help            show this help message and exit
  --conf FILE, -C FILE  pipeline configuration file. (default: config.yaml)
  --site SITE, -S SITE  website to test; overrides config file (default: None)
  --list LIST, -L LIST  site list to test; overrides config file (default: None)
  --from FROM, -F FROM  the first entry to consider when a site list is provided; overrides config file (default: -1)
  --to TO, -T TO        the last entry to consider when a site list is provided; overrides config file (default: -1)
Input Config: JAW expects a .yaml config file as input. See config.yaml for an example.
Hint. The config file specifies different passes (e.g., crawling, static analysis, etc) which can be enabled or disabled for each vulnerability class. This allows running the tool building blocks individually, or in a different order (e.g., crawl all webapps first, then conduct security analysis).
For running a quick example demonstrating how to build a property graph and run Cypher queries over it, do:
$ python3 -m analyses.example.example_analysis --input=$(pwd)/data/test_program/test.js
This module collects the data (i.e., JavaScript code and state values of web pages) needed for testing. If you want to test a specific JavaScipt file that you already have on your file system, you can skip this step.
JAW has crawlers based on Selenium (JAW-v1), Puppeteer (JAW-v2, v3) and Playwright (JAW-v3). For most up-to-date features, it is recommended to use the Puppeteer- or Playwright-based versions.
This web crawler employs foxhound, an instrumented version of Firefox, to perform dynamic taint tracking as it navigates through webpages. To start the crawler, do:
$ cd crawler
$ node crawler-taint.js --seedurl=https://google.com --maxurls=100 --headless=true --foxhoundpath=<optional-foxhound-executable-path>
The foxhoundpath is by default set to the following directory: crawler/foxhound/firefox which contains a binary named firefox.
Note: you need a build of foxhound to use this version. An ubuntu build is included in the JAW-v3 release.
To start the crawler, do:
$ cd crawler
$ node crawler.js --seedurl=https://google.com --maxurls=100 --browser=chrome --headless=true
See here for more information.
To start the crawler, do:
$ cd crawler/hpg_crawler
$ vim docker-compose.yaml # set the websites you want to crawl here and save
$ docker-compose build
$ docker-compose up -d
Please refer to the documentation of the hpg_crawler here for more information.
To generate an HPG for a given (set of) JavaScript file(s), do:
$ node engine/cli.js  --lang=js --graphid=graph1 --input=/in/file1.js --input=/in/file2.js --output=$(pwd)/data/out/ --mode=csv

optional arguments:
  --lang:   language of the input program
  --graphid:  an identifier for the generated HPG
  --input:  path of the input program(s)
  --output:     path of the output HPG, must be i
  --mode:   determines the output format (csv or graphML)
To import an HPG inside a neo4j graph database (docker instance), do:
$ python3 -m hpg_neo4j.hpg_import --rpath=<path-to-the-folder-of-the-csv-files> --id=<xyz> --nodes=<nodes.csv> --edges=<rels.csv>
$ python3 -m hpg_neo4j.hpg_import -h

usage: hpg_import.py [-h] [--rpath P] [--id I] [--nodes N] [--edges E]

This script imports a CSV of a property graph into a neo4j docker database.

optional arguments:
  -h, --help  show this help message and exit
  --rpath P   relative path to the folder containing the graph CSV files inside the `data` directory
  --id I      an identifier for the graph or docker container
  --nodes N   the name of the nodes csv file (default: nodes.csv)
  --edges E   the name of the relations csv file (default: rels.csv)
In order to create a hybrid property graph for the output of the hpg_crawler and import it inside a local neo4j instance, you can also do:
$ python3 -m engine.api <path> --js=<program.js> --import=<bool> --hybrid=<bool> --reqs=<requests.out> --evts=<events.out> --cookies=<cookies.pkl> --html=<html_snapshot.html>
Specification of Parameters:
<path>: absolute path to the folder containing the program files for analysis (must be under the engine/outputs folder).--js=<program.js>: name of the JavaScript program for analysis (default: js_program.js).--import=<bool>: whether the constructed property graph should be imported to an active neo4j database (default: true).--hybrid=bool: whether the hybrid mode is enabled (default: false). This implies that the tester wants to enrich the property graph by inputing files for any of the HTML snapshot, fired events, HTTP requests and cookies, as collected by the JAW crawler.--reqs=<requests.out>: for hybrid mode only, name of the file containing the sequence of obsevered network requests, pass the string false to exclude (default: request_logs_short.out).--evts=<events.out>: for hybrid mode only, name of the file containing the sequence of fired events, pass the string false to exclude (default: events.out).--cookies=<cookies.pkl>: for hybrid mode only, name of the file containing the cookies, pass the string false to exclude (default: cookies.pkl).--html=<html_snapshot.html>: for hybrid mode only, name of the file containing the DOM tree snapshot, pass the string false to exclude (default: html_rendered.html).For more information, you can use the help CLI provided with the graph construction API:
$ python3 -m engine.api -h
The constructed HPG can then be queried using Cypher or the NeoModel ORM.
You should place and run your queries in analyses/<ANALYSIS_NAME>.
You can use the NeoModel ORM to query the HPG. To write a query:
example_query_orm.py in the analyses/example folder.$ python3 -m analyses.example.example_query_orm
For more information, please see here.
You can use Cypher to write custom queries. For this:
example_query_cypher.py in the analyses/example folder.$ python3 -m analyses.example.example_query_cypher
For more information, please see here.
This section describes how to configure and use JAW for vulnerability detection, and how to interpret the output. JAW contains, among others, self-contained queries for detecting client-side CSRF and DOM Clobbering
Step 1. enable the analysis component for the vulnerability class in the input config.yaml file:
request_hijacking:
  enabled: true
  # [...]
  #
domclobbering:
  enabled: false
  # [...]

cs_csrf:
  enabled: false
  # [...]
Step 2. Run an instance of the pipeline with:
$ python3 -m run_pipeline --conf=config.yaml
Hint. You can run multiple instances of the pipeline under different screens:
$ screen -dmS s1 bash -c 'python3 -m run_pipeline --conf=conf1.yaml; exec sh'
$ screen -dmS s2 bash -c 'python3 -m run_pipeline --conf=conf2.yaml; exec sh'
$ # [...]
To generate parallel configuration files automatically, you may use the generate_config.py script.
The outputs will be stored in a file called sink.flows.out in the same folder as that of the input. For Client-side CSRF, for example, for each HTTP request detected, JAW outputs an entry marking the set of semantic types (a.k.a, semantic tags or labels) associated with the elements constructing the request (i.e., the program slices). For example, an HTTP request marked with the semantic type ['WIN.LOC'] is forgeable through the window.location injection point. However, a request marked with ['NON-REACH'] is not forgeable.
An example output entry is shown below:
[*] Tags: ['WIN.LOC']
[*] NodeId: {'TopExpression': '86', 'CallExpression': '87', 'Argument': '94'}
[*] Location: 29
[*] Function: ajax
[*] Template: ajaxloc + "/bearer1234/"
[*] Top Expression: $.ajax({ xhrFields: { withCredentials: "true" }, url: ajaxloc + "/bearer1234/" })

1:['WIN.LOC'] variable=ajaxloc
    0 (loc:6)- var ajaxloc = window.location.href
This entry shows that on line 29, there is a $.ajax call expression, and this call expression triggers an ajax request with the url template value of ajaxloc + "/bearer1234/, where the parameter ajaxloc is a program slice reading its value at line 6 from window.location.href, thus forgeable through ['WIN.LOC'].
In order to streamline the testing process for JAW and ensure that your setup is accurate, we provide a simple node.js web application which you can test JAW with.
First, install the dependencies via:
$ cd tests/test-webapp
$ npm install
Then, run the application in a new screen:
$ screen -dmS jawwebapp bash -c 'PORT=6789 npm run devstart; exec sh'
For more information, visit our wiki page here. Below is a table of contents for quick access.
Pull requests are always welcomed. This project is intended to be a safe, welcoming space, and contributors are expected to adhere to the contributor code of conduct.
If you use the JAW for academic research, we encourage you to cite the following paper:
@inproceedings{JAW,
  title = {JAW: Studying Client-side CSRF with Hybrid Property Graphs and Declarative Traversals},
  author= {Soheil Khodayari and Giancarlo Pellegrino},
  booktitle = {30th {USENIX} Security Symposium ({USENIX} Security 21)},
  year = {2021},
  address = {Vancouver, B.C.},
  publisher = {{USENIX} Association},
}
JAW has come a long way and we want to give our contributors a well-deserved shoutout here!
@tmbrbr, @c01gide, @jndre, and Sepehr Mirzaei.

Pentest Muse is an AI assistant tailored for cybersecurity professionals. It can help penetration testers brainstorm ideas, write payloads, analyze code, and perform reconnaissance. It can also take actions, execute command line codes, and iteratively solve complex tasks.
In addition to this command-line tool, we are excited to introduce the Pentest Muse Web Application! The web app has access to the latest online information, and would be a good AI assistant for your pentesting job.
This tool is intended for legal and ethical use only. It should only be used for authorized security testing and educational purposes. The developers assume no liability and are not responsible for any misuse or damage caused by this program.
requirements.txt
git clone https://github.com/pentestmuse-ai/PentestMuse cd PentestMuse
pip install -r requirements.txt
Install Pentest Muse as a Python Package:
pip install .
In the chat mode, you can chat with pentest muse and ask it to help you brainstorm ideas, write payloads, and analyze code. Run the application with:
python run_app.py
or
pmuse
You can also give Pentest Muse more control by asking it to take actions for you with the agent mode. In this mode, Pentest Muse can help you finish a simple task (e.g., 'help me do sql injection test on url xxx'). To start the program with agent model, you can use:
python run_app.py agent
or
pmuse agent
You can use Pentest Muse with our managed APIs after signing up at www.pentestmuse.ai/signup. After creating an account, you can simply start the pentest muse cli, and the program will prompt you to login.
Alternatively, you can also choose to use your own OpenAI API keys. To do this, you can simply add argument --openai-api-key=[your openai api key] when starting the program.
For any feedback or suggestions regarding Pentest Muse, feel free to reach out to us at contact@pentestmuse.ai or join our discord. Your input is invaluable in helping us improve and evolve.

GTFOcli it's a Command Line Interface for easy binaries search commands that can be used to bypass local security restrictions in misconfigured systems.
Using go:
go install github.com/cmd-tools/gtfocli@latest
Using homebrew:
brew tap cmd-tools/homebrew-tap
brew install gtfocli
Using docker:
docker pull cmdtoolsowner/gtfocli
Search for binary tar:
gtfocli search tar
Search for binary tar from stdin:
echo "tar" | gtfocli search
Search for binaries located into file;
cat myBinaryList.txt
/bin/bash
/bin/sh
tar
arp
/bin/tail

gtfocli search -f myBinaryList.txt
Search for binary Winget.exe:
gtfocli search Winget --os windows
Search for binary Winget from stdin:
echo "Winget" | gtfocli search --os windows
Search for binaries located into file:
cat windowsExecutableList.txt
Winget
c:\\Users\\Desktop\\Ssh
Stordiag
Bash
c:\\Users\\Runonce.exe
Cmdkey
c:\dir\subDir\Users\Certreq.exe

gtfocli search -f windowsExecutableList.txt --os windows
Search for binary Winget and print output in yaml format (see -h for available formats):
gtfocli search Winget -o yaml --os windows
Examples:
Search for binary Winget and print output in yaml format:
docker run -i cmdtoolsowner/gtfocli search Winget -o yaml --os windows
Search for binary tar and print output in json format:
echo 'tar' | docker run -i cmdtoolsowner/gtfocli search -o json
Search for binaries located into file mounted as volume in the container:
cat myBinaryList.txt
/bin/bash
/bin/sh
tar
arp
/bin/tail

docker run -i -v $(pwd):/tmp cmdtoolsowner/gtfocli search -f /tmp/myBinaryList.txt
An example of common use case for gtfocli is together with find:
find / -type f \( -perm 04000 -o -perm -u=s \) -exec gtfocli search {} \; 2>/dev/null
or
find / -type f \( -perm 04000 -o -perm -u=s \) 2>/dev/null | gtfocli search
Thanks to GTFOBins and LOLBAS, without these projects gtfocli would never have come to light.
You want to contribute to this project? Wow, thanks! So please just fork it and send a pull request.
SpeedyTest is a powerful command-line tool for measuring internet speed. With its advanced features and intuitive interface, it provides accurate and comprehensive speed test results. Whether you're a network administrator, developer, or simply want to monitor your internet connection, SpeedyTest is the perfect tool for the job.
git clone https://github.com/HalilDeniz/SpeedyTest.git
Before you can use SpeedyTest, you need to make sure that you have the necessary requirements installed. You can install these requirements by running the following command:
pip install -r requirements.txt
Run the following command to perform a speed test:
python3 speendytest.py
Receiving data \
Speed test completed!
Speed test time: 20.22 second
Server    : Farknet - Konya
IP Address: speedtest.farknet.com.tr:8080
Country   : Turkey
City      : Konya
Ping      : 20.41 ms
Download  : 90.12 Mbps
Loading   : 20 Mbps
Contributions are welcome! To contribute to SpeedyTest, follow these steps:
If you have any questions, comments, or suggestions about PrivacyNet, please feel free to contact me:
SpeedyTest is released under the MIT License. See LICENSE for details.
Mass bruteforce network protocols
Simple personal script to quickly mass bruteforce common services in a large scale of network.
It will check for default credentials on ftp, ssh, mysql, mssql...etc.
This was made for authorized red team penetration testing purpose only.
masscan(faster than nmap) to find alive hosts with common ports from network segment.masscan result.hydra commands to automatically bruteforce supported network services on devices.Kali linux or any preferred linux distributionPython 3.10+# Clone the repo
git clone https://github.com/opabravo/mass-bruter
cd mass-bruter
# Install required tools for the script
apt update && apt install seclists masscan hydraPrivate ip range :
10.0.0.0/8,192.168.0.0/16,172.16.0.0/12
Save masscan results under ./result/masscan/, with the format masscan_<name>.<ext>
Ex: masscan_192.168.0.0-16.txt
Example command:
masscan -p 3306,1433,21,22,23,445,3389,5900,6379,27017,5432,5984,11211,9200,1521 172.16.0.0/12 | tee ./result/masscan/masscan_test.txtExample Resume Command:
masscan --resume paused.conf | tee -a ./result/masscan/masscan_test.txtCommand Options
┌──(root㉿root)-[~/mass-bruter]
└─# python3 mass_bruteforce.py
Usage:  [OPTIONS]

  Mass Bruteforce Script

Options:
  -q, --quick           Quick mode (Only brute telnet, ssh, ftp , mysql,
                        mssql, postgres, oracle)
  -a, --all             Brute all services(Very Slow)
  -s, --show            Show result with successful login
  -f, --file-path PATH  The directory or file that contains masscan result
                        [default: ./result/masscan/]
  --help                Show this message and exit.
Quick Bruteforce Example:
python3 mass_bruteforce.py -q -f ~/masscan_script.txtFetch cracked credentials:
python3 mass_bruteforce.py -sdpl4hydra
Any contributions are welcomed!
Welcome to CryptChat - where conversations remain truly private. Built on the robust Python ecosystem, our application ensures that every word you send is wrapped in layers of encryption. Whether you're discussing sensitive business details or sharing personal stories, CryptChat provides the sanctuary you need in the digital age. Dive in, and experience the next level of secure messaging!
Clone the repository:
git clone https://github.com/HalilDeniz/CryptoChat.gitNavigate to the project directory:
cd CryptoChatInstall the required dependencies:
pip install -r requirements.txt$ python3 server.py --help
usage: server.py [-h] [--host HOST] [--port PORT]
Start the chat server.
options:
-h, --help show this help message and exit
--host HOST The IP address to bind the server to.
--port PORT The port number to bind the server to.
--------------------------------------------------------------------------
$ python3 client.py --help
usage: client.py [-h] [--host HOST] [--port PORT]
Connect to the chat server.
options:
-h, --help show this help message and exit
--host HOST The server's IP address.
--port PORT The port number of the server.$ python3 serverE.py --help
usage: serverE.py [-h] [--host HOST] [--port PORT] [--key KEY]
Start the chat server.
options:
-h, --help show this help message and exit
--host HOST The IP address to bind the server to. (Default=0.0.0.0)
--port PORT The port number to bind the server to. (Default=12345)
--key KEY The secret key for encryption. (Default=mysecretpassword)
--------------------------------------------------------------------------
$ python3 clientE.py --help
usage: clientE.py [-h] [--host HOST] [--port PORT] [--key KEY]
Connect to the chat server.
options:
-h, --help show this help message and exit
--host HOST The IP address to bind the server to. (Default=127.0.0.1)
--port PORT The port number to bind the server to. (Default=12345)
--key KEY The secret key for encr yption. (Default=mysecretpassword)--help: show this help message and exit--host: The IP address to bind the server.--port: The port number to bind the server.--key : The secret key for encryptionContributions are welcome! If you find any issues or have suggestions for improvements, feel free to open an issue or submit a pull request.
If you have any questions, comments, or suggestions about CryptChat, please feel free to contact me:

Author:: TW-D
Version:: 1.3.7
Copyright:: Copyright (c) 2022 TW-D
License:: Distributes under the same terms as Ruby
Doc:: https://hak5.github.io/mk7-docs/docs/rest/rest/
Requires:: Ruby >= 2.7.0p0 and Pineapple Mark VII >= 2.1.0-stable
Installation (Debian, Ubuntu, Raspbian)::
sudo apt-get install build-essential curl g++ ruby ruby-dev
sudo gem install net-ssh rest-client tty-progressbar
Library allowing the automation of active or passive attack operations.
Note : "Issues" and "Pull Request" are welcome.
In "./payloads/" directory, you will find :
| COMMAND and CONTROL | Author | Usage |
|---|---|---|
| Hak5 Key Croc - Real-time recovery of keystrokes from a keyboard | TW-D | (edit) ruby ./hak5_key-croc.rb |
| Maltronics WiFi Deauther - Spam beacon frames | TW-D | (edit) ruby ./maltronics_wifi-deauther.rb |
| DEFENSE | Author | Usage |
|---|---|---|
| Hak5 Pineapple Spotter | TW-D with special thanks to @DrSKiZZ, @cribb-it, @barry99705 and @dark_pyrro | (edit) ruby ./hak5-pineapple_spotter.rb |
| DoS | Author | Usage |
|---|---|---|
| Deauthentication of clients available on the access points | TW-D | (edit) ruby ./deauthentication-clients.rb |
| EXPLOITATION | Author | Usage |
|---|---|---|
| Evil WPA Access Point | TW-D | (edit) ruby ./evil-wpa_access-point.rb |
| Fake Access Points | TW-D | (edit) ruby ./fake_access-points.rb |
| Mass Handshakes | TW-D | (edit) ruby ./mass-handshakes.rb |
| Rogue Access Points | TW-D | (edit) ruby ./rogue_access-points.rb |
| Twin Access Points | TW-D | (edit) ruby ./twin_access-points.rb |
| GENERAL | Author | Usage |
|---|---|---|
| System Status, Disk Usage, ... | TW-D | (edit) ruby ./dashboard-stats.rb |
| Networking Interfaces | TW-D | (edit) ruby ./networking-interfaces.rb |
| System Logs | TW-D | (edit) ruby ./system-logs.rb |
| RECON | Author | Usage |
|---|---|---|
| Access Points and Clients on 2.4GHz and 5GHz (with a supported adapter) | TW-D | (edit) ruby ./access-points_clients_5ghz.rb |
| Access Points and Clients | TW-D | (edit) ruby ./access-points_clients.rb |
| MAC Addresses of Access Points | TW-D | (edit) ruby ./access-points_mac-addresses.rb |
| Tagged Parameters of Access Points | TW-D | (edit) ruby ./access-points_tagged-parameters.rb |
| Access Points and Wireless Network Mapping with WiGLE | TW-D | (edit) ruby ./access-points_wigle.rb |
| MAC Addresses of Clients | TW-D | (edit) ruby ./clients_mac-addresses.rb |
| OPEN Access Points | TW-D | (edit) ruby ./open_access-points.rb |
| WEP Access Points | TW-D | (edit) ruby ./wep_access-points.rb |
| WPA Access Points | TW-D | (edit) ruby ./wpa_access-points.rb |
| WPA2 Access Points | TW-D | (edit) ruby ./wpa2_access-points.rb |
| WPA3 Access Points | TW-D | (edit) ruby ./wpa3_access-points.rb |
| WARDRIVING | Author | Usage |
|---|---|---|
| Continuous Recon on 2.4GHz and 5GHz (with a supported adapter) | TW-D | (edit) ruby ./continuous-recon_5ghz.rb [CTRL+c] |
| Continuous Recon for Handshakes Capture | TW-D | (edit) ruby ./continuous-recon_handshakes.rb [CTRL+c] |
| Continuous Recon | TW-D | (edit) ruby ./continuous-recon.rb [CTRL+c] |
#
# Title:            <TITLE>
#
# Description:      <DESCRIPTION>
#
#
# Author:           <AUTHOR>
# Version:          <VERSION>
# Category:         <CATEGORY>
#
# STATUS
# ======================
# <SHORT-DESCRIPTION> ... SETUP
# <SHORT-DESCRIPTION> ... ATTACK
# <SHORT-DESCRIPTION> ... SPECIAL
# <SHORT-DESCRIPTION> ... FINISH
# <SHORT-DESCRIPTION> ... CLEANUP
# <SHORT-DESCRIPTION> ... OFF
#

require_relative('<PATH-TO>/classes/PineappleMK7.rb')

system_authentication = PineappleMK7::System::Authentication.new
system_authentication.host = "<PINEAPPLE-IP-ADDRESS>"
system_authentication.port = 1471
system_authentication.mac = "<PINEAPPLE-MAC-ADDRESS>"
system_authentication.password = "<ROOT-ACCOUNT-PASSWORD>"

if (system_authentication.login)

    led =    PineappleMK7::System::LED.new

    # SETUP
    #
    led.setup

    #
    # [...]
    #

    # ATTACK
    #
    led.attack

    #
    # [...]
    #

    # SPECIAL
    #
    led.special

    #
    # [...]
    #

    # FINISH
    #
    led.finish

    #
    # [...]
    #

    # CLEANUP
    #
    led.cleanup

    #
    # [...]
    #

    # OFF
    #
    led.off

end
Note : Don't hesitate to take inspiration from the payloads directory.
system_authentication = PineappleMK7::System::Authentication.new

system_authentication.host = (string) "<PINEAPPLE-IP-ADDRESS>"
system_authentication.port = (integer) 1471
system_authentication.mac = (string) "<PINEAPPLE-MAC-ADDRESS>"
system_authentication.password = (string) "<ROOT-ACCOUNT-PASSWORD>"

system_authentication.login()led = PineappleMK7::System::LED.new
led.setup()
led.failed()
led.attack()
led.special()
led.cleanup()
led.finish()
led.off()dashboard_notifications = PineappleMK7::Modules::Dashboard::Notifications.new
dashboard_notifications.clear()dashboard_stats = PineappleMK7::Modules::Dashboard::Stats.new
dashboard_stats.output()logging_system = PineappleMK7::Modules::Logging::System.new
logging_system.output()pineap_clients = PineappleMK7::Modules::PineAP::Clients.new
pineap_clients.connected_clients()
pineap_clients.previous_clients()
pineap_clients.kick( (string) mac )
pineap_clients.clear_previous()evil_wpa = PineappleMK7::Modules::PineAP::EvilWPA.new
evil_wpa.ssid = (string default:'PineAP_WPA')
evil_wpa.bssid = (string default:'00:13:37:BE:EF:00')
evil_wpa.auth = (string default:'psk2+ccmp')
evil_wpa.password = (string default:'pineapplesareyummy')
evil_wpa.hidden = (boolean default:false)
evil_wpa.enabled = (boolean default:false)
evil_wpa.capture_handshakes = (boolean default:false)
evil_wpa.save()pineap_filtering = PineappleMK7::Modules::PineAP::Filtering.new
pineap_filtering.client_filter( (string) 'allow' | 'deny' )
pineap_filtering.add_client( (string) mac )
pineap_filtering.clear_clients()
pineap_filtering.ssid_filter( (string) 'allow' | 'deny' )pineap_impersonation = PineappleMK7::Modules::PineAP::Impersonation.new
pineap_impersonation.output()
pineap_impersonation.add_ssid( (string) ssid )
pineap_impersonation.clear_pool()open_ap = PineappleMK7::Modules::PineAP::OpenAP.new
open_ap.output()pineap_settings = PineappleMK7::Modules::PineAP::Settings.new
pineap_settings.enablePineAP = (boolean default:true)
pineap_settings.autostartPineAP = (boolean default:true)
pineap_settings.armedPineAP = (boolean default:false)
pineap_settings.ap_channel = (string default:'11')
pineap_settings.karma = (boolean default:false)
pineap_settings.logging = (boolean default:false)
pineap_settings.connect_notifications = (boolean default:false)
pineap_settings.disconnect_notifications = (boolean default:false)
pineap_settings.capture_ssids = (boolean default:false)
pineap_settings.beacon_responses = (boolean default:false)
pineap_settings.broadcast_ssid_pool = (boolean default:false)
pineap_settings.broadcast_ssid_pool_random = (boolean default:false)
pineap_settings.pineap_mac = (string default:system_authentication.mac)
pineap_settings.target_mac = (string default:'FF:FF:FF:FF:FF:FF')< br/>pineap_settings.beacon_response_interval = (string default:'NORMAL')
pineap_settings.beacon_interval = (string default:'NORMAL')
pineap_settings.save()recon_handshakes = PineappleMK7::Modules::Recon::Handshakes.new
recon_handshakes.start( (object) ap )
recon_handshakes.stop()
recon_handshakes.output()
recon_handshakes.download( (object) handshake, (string) destination )
recon_handshakes.clear()recon_scanning = PineappleMK7::Modules::Recon::Scanning.new
recon_scanning.start( (integer) scan_time )
recon_scanning.start_continuous( (boolean) autoHandshake )
recon_scanning.stop_continuous()
recon_scanning.output( (integer) scanID )
recon_scanning.tags( (object) ap )
recon_scanning.deauth_ap( (object) ap )
recon_scanning.delete( (integer) scanID )settings_networking = PineappleMK7::Modules::Settings::Networking.new
settings_networking.interfaces()
settings_networking.client_scan( (string) interface )
settings_networking.client_connect( (object) network, (string) interface )
settings_networking.client_disconnect( (string) interface )
settings_networking.recon_interface( (string) interface )Welcome to HackBot, an AI-powered cybersecurity chatbot designed to provide helpful and accurate answers to your cybersecurity-related queries and also do code analysis and scan analysis. Whether you are a security researcher, an ethical hacker, or just curious about cybersecurity, HackBot is here to assist you in finding the information you need.
HackBot utilizes the powerful language model Meta-LLama2 through the "LlamaCpp" library. This allows HackBot to respond to your questions in a coherent and relevant manner. Please make sure to keep your queries in English and adhere to the guidelines provided to get the best results from HackBot.
Before you proceed with the installation, ensure you have the following prerequisites:
pip package managerVisual studio Code - Follow the steps in this link llama-cpp-prereq-install-instructions
cmakegit clone https://github.com/morpheuslord/hackbot.git
cd hackbotpip install -r requirements.txtpython hackbot.pyThe first time you run HackBot, it will check for the AI model required for the chatbot. If the model is not present, it will be automatically downloaded and saved as "llama-2-7b-chat.ggmlv3.q4_0.bin" in the project directory.
To start a conversation with HackBot, run the following command:
python hackbot.pyHackBot will display a banner and wait for your input. You can ask cybersecurity-related questions, and HackBot will respond with informative answers. To exit the chat, simply type "quit_bot" in the input prompt.
Here are some additional commands you can use:
clear_screen: Clears the console screen for better readability.quit_bot: This is used to quit the chat applicationbot_banner: Prints the default bots banner.contact_dev: Provides my contact information.save_chat: Saves the current sessions interactions.vuln_analysis: Does a Vuln analysis using the scan data or log file.static_code_analysis: Does a Static code analysis using the scan data or log file.Note: I am working on more addons and more such commands to give a more chatGPT experience
Please Note: HackBot's responses are based on the Meta-LLama2 AI model, and its accuracy depends on the quality of the queries and data provided to it.
I am also working on AI training by which I can teach it how to be more accurately tuned to work for hackers on a much more professional level.
We welcome contributions to improve HackBot's functionality and accuracy. If you encounter any issues or have suggestions for enhancements, please feel free to open an issue or submit a pull request. Follow these steps to contribute:
main branch of this repository.Please maintain a clean commit history and adhere to the project's coding guidelines.
If anyone with the know-how of training text generation models can help improve the code.
For any questions, feedback, or inquiries related to HackBot, feel free to contact the project maintainer:
python3 based multi clients reverse shell.
1. Don't Upload Any Payloads To VirusTotal.com Bcz This tool will not work
   with Time.
2. Virustotal Share Signatures With AV Comapnies.
3. Again Don't be an Idiot!
1. git clone https://github.com/machine1337/pyFUD
2. python3 server.py (enter your ip,port and start the server)
3. client.py (Edit IP AND PORT To Put Your Own IP,Port)
1. python3 server.py
2. Now Compile client.py to exe (make sure change ip and port in it)
1. Very Simple And Fully Undectable Reverse Shell
2. Multi Client Handling
3. Persistent  Shell
3. auto-reconnect
5. U can Convert client.py to exe using pyinstaller tool in windows.
Use this tool Only for Educational Purpose And I will Not be Responsible For ur cruel act.


![]()
![]()
![]()


