                                   /\
                               _  / |
                              / \ |  \
                             |  |\|  |
                             |  | | /
                             | /| |/
                             |/ |/
                        ,/;  ;  ;
                     ,'/|; ,/,/,
                   ,'/ |;/,/,/,/|
                ,/;  |;|/,/,/,/,/|
              ,/';   |;|,/,/,/,/,/|
            ,/';     |;|/,/,/,/,/,/|,
           /  ;      |;|,/,/,/,/,/,/|
          / ,';      |;|/,/,/,/,/,/,/|
         /,/';       |;|,/,/,/,/,/,/,/|
        /;/ ';       |;|/,/,/,/,/,/,/,/|

     ██████╗ ███████╗ ██████╗  █████╗ ███████╗██╗   ██╗███████╗
     ██╔══██╗██╔════╝██╔════╝ ██╔══██╗██╔════╝██║   ██║██╔════╝
     ██████╔╝█████╗  ██║  ███╗███████║███████╗██║   ██║███████╗
     ██╔═══╝ ██╔══╝  ██║   ██║██╔══██║╚════██║██║   ██║╚════██║
     ██║     ███████╗╚██████╔╝██║  ██║███████║╚██████╔╝███████║
     ╚═╝     ╚══════╝ ╚═════╝ ╚═╝  ╚═╝╚══════╝ ╚═════╝ ╚══════╝
                    P E N T E S T   A R S E N A L
A comprehensive web application security testing toolkit that combines 10 powerful penetration testing features into one tool.
Identifies potential security Misconfigurations" title="Misconfigurations">misconfigurations
JWT Token Inspector
Detects common JWT vulnerabilities
Parameter Pollution Finder
Detects server-side parameter handling issues
CORS Misconfiguration Scanner
Detects credential exposure risks
Upload Bypass Tester
Identifies dangerous file type handling
Exposed .git Directory Finder
Tests for sensitive information disclosure
SSRF (Server Side Request Forgery) Detector
Includes cloud metadata endpoint tests
Blind SQL Injection Time Delay Detector
Identifies injectable parameters
Local File Inclusion (LFI) Mapper
Supports various encoding bypasses
Web Application Firewall (WAF) Fingerprinter
git clone https://github.com/sobri3195/pegasus-pentest-arsenal.git
cd pegasus-pentest-arsenal
python -m venv venv
source venv/bin/activate  # On Windows: venv\Scripts\activate
pip install -r requirements.txt
python pegasus_pentest.py
This project is licensed under the MIT License - see the LICENSE file for details.
This tool is provided for educational and authorized testing purposes only. Users are responsible for obtaining proper authorization before testing any target. The authors are not responsible for any misuse or damage caused by this tool.
Thank you for following me! https://cybdetective.com
| Name | Link | Description | Price |
|---|---|---|---|
| Shodan | https://developer.shodan.io | Search engine for Internet connected host and devices | from $59/month |
| Netlas.io | https://netlas-api.readthedocs.io/en/latest/ | Search engine for Internet connected host and devices. Read more at Netlas CookBook | Partly FREE |
| Fofa.so | https://fofa.so/static_pages/api_help | Search engine for Internet connected host and devices | ??? |
| Censys.io | https://censys.io/api | Search engine for Internet connected host and devices | Partly FREE |
| Hunter.how | https://hunter.how/search-api | Search engine for Internet connected host and devices | Partly FREE |
| Fullhunt.io | https://api-docs.fullhunt.io/#introduction | Search engine for Internet connected host and devices | Partly FREE |
| IPQuery.io | https://ipquery.io | API for ip information such as ip risk, geolocation data, and asn details | FREE |
| Name | Link | Description | Price |
|---|---|---|---|
| Social Links | https://sociallinks.io/products/sl-api | Email info lookup, phone info lookup, individual and company profiling, social media tracking, dark web monitoring and more. Code example of using this API for face search in this repo | PAID. Price per request |
| Name | Link | Description | Price |
|---|---|---|---|
| Numverify | https://numverify.com | Global Phone Number Validation & Lookup JSON API. Supports 232 countries. | 250 requests FREE |
| Twillo | https://www.twilio.com/docs/lookup/api | Provides a way to retrieve additional information about a phone number | Free or $0.01 per request (for caller lookup) |
| Plivo | https://www.plivo.com/lookup/ | Determine carrier, number type, format, and country for any phone number worldwide | from $0.04 per request |
| GetContact | https://github.com/kovinevmv/getcontact | Find info about user by phone number | from $6,89 in months/100 requests |
| Veriphone | https://veriphone.io/ | Phone number validation & carrier lookup | 1000 requests/month FREE |
| Name | Link | Description | Price |
|---|---|---|---|
| Global Address | https://rapidapi.com/adminMelissa/api/global-address/ | Easily verify, check or lookup address | FREE |
| US Street Address | https://smartystreets.com/docs/cloud/us-street-api | Validate and append data for any US postal address | FREE |
| Google Maps Geocoding API | https://developers.google.com/maps/documentation/geocoding/overview | convert addresses (like "1600 Amphitheatre Parkway, Mountain View, CA") into geographic coordinates | 0.005 USD per request |
| Postcoder | https://postcoder.com/address-lookup | Find adress by postcode | £130/5000 requests |
| Zipcodebase | https://zipcodebase.com | Lookup postal codes, calculate distances and much more | 5000 requests FREE |
| Openweathermap geocoding API | https://openweathermap.org/api/geocoding-api | get geographical coordinates (lat, lon) by using name of the location (city name or area name) | 60 calls/minute 1,000,000 calls/month |
| DistanceMatrix | https://distancematrix.ai/product | Calculate, evaluate and plan your routes | $1.25-$2 per 1000 elements |
| Geotagging API | https://geotagging.ai/ | Predict geolocations by texts | Freemium |
| Name | Link | Description | Price |
|---|---|---|---|
| Approuve.com | https://appruve.co | Allows you to verify the identities of individuals, businesses, and connect to financial account data across Africa | Paid |
| Onfido.com | https://onfido.com | Onfido Document Verification lets your users scan a photo ID from any device, before checking it's genuine. Combined with Biometric Verification, it's a seamless way to anchor an account to the real identity of a customer. India | Paid |
| Superpass.io | https://surepass.io/passport-id-verification-api/ | Passport, Photo ID and Driver License Verification in India | Paid |
| Name | Link | Description | Price |
|---|---|---|---|
| Open corporates | https://api.opencorporates.com | Companies information | Paid, price upon request |
| Linkedin company search API | https://docs.microsoft.com/en-us/linkedin/marketing/integrations/community-management/organizations/company-search?context=linkedin%2Fcompliance%2Fcontext&tabs=http | Find companies using keywords, industry, location, and other criteria | FREE |
| Mattermark | https://rapidapi.com/raygorodskij/api/Mattermark/ | Get companies and investor information | free 14-day trial, from $49 per month |
| Name | Link | Description | Price |
|---|---|---|---|
| API OSINT DS | https://github.com/davidonzo/apiosintDS | Collect info about IPv4/FQDN/URLs and file hashes in md5, sha1 or sha256 | FREE |
| InfoDB API | https://www.ipinfodb.com/api | The API returns the location of an IP address (country, region, city, zipcode, latitude, longitude) and the associated timezone in XML, JSON or plain text format | FREE |
| Domainsdb.info | https://domainsdb.info | Registered Domain Names Search | FREE |
| BGPView | https://bgpview.docs.apiary.io/# | allowing consumers to view all sort of analytics data about the current state and structure of the internet | FREE |
| DNSCheck | https://www.dnscheck.co/api | monitor the status of both individual DNS records and groups of related DNS records | up to 10 DNS records/FREE |
| Cloudflare Trace | https://github.com/fawazahmed0/cloudflare-trace-api | Get IP Address, Timestamp, User Agent, Country Code, IATA, HTTP Version, TLS/SSL Version & More | FREE |
| Host.io | https://host.io/ | Get info about domain | FREE |
| Name | Link | Description | Price |
|---|---|---|---|
| BeVigil OSINT API | https://bevigil.com/osint-api | provides access to millions of asset footprint data points including domain intel, cloud services, API information, and third party assets extracted from millions of mobile apps being continuously uploaded and scanned by users on bevigil.com | 50 credits free/1000 credits/$50 |
| Name | Link | Description | Price |
|---|---|---|---|
| WebScraping.AI | https://webscraping.ai/ | Web Scraping API with built-in proxies and JS rendering | FREE |
| ZenRows | https://www.zenrows.com/ | Web Scraping API that bypasses anti-bot solutions while offering JS rendering, and rotating proxies apiKey Yes Unknown | FREE |
| Name | Link | Description | Price |
|---|---|---|---|
| Whois freaks | https://whoisfreaks.com/ | well-parsed and structured domain WHOIS data for all domain names, registrars, countries and TLDs since the birth of internet | $19/5000 requests |
| WhoisXMLApi | https://whois.whoisxmlapi.com | gathers a variety of domain ownership and registration data points from a comprehensive WHOIS database | 500 requests in month/FREE |
| IPtoWhois | https://www.ip2whois.com/developers-api | Get detailed info about a domain | 500 requests/month FREE |
| Name | Link | Description | Price |
|---|---|---|---|
| Ipstack | https://ipstack.com | Detect country, region, city and zip code | FREE |
| Ipgeolocation.io | https://ipgeolocation.io | provides country, city, state, province, local currency, latitude and longitude, company detail, ISP lookup, language, zip code, country calling code, time zone, current time, sunset and sunrise time, moonset and moonrise | 30 000 requests per month/FREE |
| IPInfoDB | https://ipinfodb.com/api | Free Geolocation tools and APIs for country, region, city and time zone lookup by IP address | FREE |
| IP API | https://ip-api.com/ | Free domain/IP geolocation info | FREE |
| Name | Link | Description | Price |
|---|---|---|---|
| Mylnikov API | https://www.mylnikov.org | public API implementation of Wi-Fi Geo-Location database | FREE |
| Wigle | https://api.wigle.net/ | get location and other information by SSID | FREE |
| Name | Link | Description | Price |
|---|---|---|---|
| PeetingDB | https://www.peeringdb.com/apidocs/ | Database of networks, and the go-to location for interconnection data | FREE |
| PacketTotal | https://packettotal.com/api.html | .pcap files analyze | FREE |
| Name | Link | Description | Price |
|---|---|---|---|
| Binlist.net | https://binlist.net/ | get information about bank by BIN | FREE |
| FDIC Bank Data API | https://banks.data.fdic.gov/docs/ | institutions, locations and history events | FREE |
| Amdoren | https://www.amdoren.com/currency-api/ | Free currency API with over 150 currencies | FREE |
| VATComply.com | https://www.vatcomply.com/documentation | Exchange rates, geolocation and VAT number validation | FREE |
| Alpaca | https://alpaca.markets/docs/api-documentation/api-v2/market-data/alpaca-data-api-v2/ | Realtime and historical market data on all US equities and ETFs | FREE |
| Swiftcodesapi | https://swiftcodesapi.com | Verifying the validity of a bank SWIFT code or IBAN account number | $39 per month/4000 swift lookups |
| IBANAPI | https://ibanapi.com | Validate IBAN number and get bank account information from it | Freemium/10$ Starter plan |
| Name | Link | Description | Price |
|---|---|---|---|
| EVA | https://eva.pingutil.com/ | Measuring email deliverability & quality | FREE |
| Mailboxlayer | https://mailboxlayer.com/ | Simple REST API measuring email deliverability & quality | 100 requests FREE, 5000 requests in month — $14.49 |
| EmailCrawlr | https://emailcrawlr.com/ | Get key information about company websites. Find all email addresses associated with a domain. Get social accounts associated with an email. Verify email address deliverability. | 200 requests FREE, 5000 requets — $40 |
| Voila Norbert | https://www.voilanorbert.com/api/ | Find anyone's email address and ensure your emails reach real people | from $49 in month |
| Kickbox | https://open.kickbox.com/ | Email verification API | FREE |
| FachaAPI | https://api.facha.dev/ | Allows checking if an email domain is a temporary email domain | FREE |
| Name | Link | Description | Price |
|---|---|---|---|
| Genderize.io | https://genderize.io | Instantly answers the question of how likely a certain name is to be male or female and shows the popularity of the name. | 1000 names/day free |
| Agify.io | https://agify.io | Predicts the age of a person given their name | 1000 names/day free |
| Nataonalize.io | https://nationalize.io | Predicts the nationality of a person given their name | 1000 names/day free |
| Name | Link | Description | Price |
|---|---|---|---|
| HaveIBeenPwned | https://haveibeenpwned.com/API/v3 | allows the list of pwned accounts (email addresses and usernames) | $3.50 per month |
| Psdmp.ws | https://psbdmp.ws/api | search in Pastebin | $9.95 per 10000 requests |
| LeakPeek | https://psbdmp.ws/api | searc in leaks databases | $9.99 per 4 weeks unlimited access |
| BreachDirectory.com | https://breachdirectory.com/api_documentation | search domain in data breaches databases | FREE |
| LeekLookup | https://leak-lookup.com/api | search domain, email_address, fullname, ip address, phone, password, username in leaks databases | 10 requests FREE |
| BreachDirectory.org | https://rapidapi.com/rohan-patra/api/breachdirectory/pricing | search domain, email_address, fullname, ip address, phone, password, username in leaks databases (possible to view password hashes) | 50 requests in month/FREE |
| Name | Link | Description | Price |
|---|---|---|---|
| Wayback Machine API (Memento API, CDX Server API, Wayback Availability JSON API) | https://archive.org/help/wayback_api.php | Retrieve information about Wayback capture data | FREE |
| TROVE (Australian Web Archive) API | https://trove.nla.gov.au/about/create-something/using-api | Retrieve information about TROVE capture data | FREE |
| Archive-it API | https://support.archive-it.org/hc/en-us/articles/115001790023-Access-Archive-It-s-Wayback-index-with-the-CDX-C-API | Retrieve information about archive-it capture data | FREE |
| UK Web Archive API | https://ukwa-manage.readthedocs.io/en/latest/#api-reference | Retrieve information about UK Web Archive capture data | FREE |
| Arquivo.pt API | https://github.com/arquivo/pwa-technologies/wiki/Arquivo.pt-API | Allows full-text search and access preserved web content and related metadata. It is also possible to search by URL, accessing all versions of preserved web content. API returns a JSON object. | FREE |
| Library Of Congress archive API | https://www.loc.gov/apis/ | Provides structured data about Library of Congress collections | FREE |
| BotsArchive | https://botsarchive.com/docs.html | JSON formatted details about Telegram Bots available in database | FREE |
| Name | Link | Description | Price |
|---|---|---|---|
| MD5 Decrypt | https://md5decrypt.net/en/Api/ | Search for decrypted hashes in the database | 1.99 EURO/day |
| Name | Link | Description | Price |
|---|---|---|---|
| BTC.com | https://btc.com/btc/adapter?type=api-doc | get information about addresses and transanctions | FREE |
| Blockchair | https://blockchair.com | Explore data stored on 17 blockchains (BTC, ETH, Cardano, Ripple etc) | $0.33 - $1 per 1000 calls |
| Bitcointabyse | https://www.bitcoinabuse.com/api-docs | Lookup bitcoin addresses that have been linked to criminal activity | FREE |
| Bitcoinwhoswho | https://www.bitcoinwhoswho.com/api | Scam reports on the Bitcoin Address | FREE |
| Etherscan | https://etherscan.io/apis | Ethereum explorer API | FREE |
| apilayer coinlayer | https://coinlayer.com | Real-time Crypto Currency Exchange Rates | FREE |
| BlockFacts | https://blockfacts.io/ | Real-time crypto data from multiple exchanges via a single unified API, and much more | FREE |
| Brave NewCoin | https://bravenewcoin.com/developers | Real-time and historic crypto data from more than 200+ exchanges | FREE |
| WorldCoinIndex | https://www.worldcoinindex.com/apiservice | Cryptocurrencies Prices | FREE |
| WalletLabels | https://www.walletlabels.xyz/docs | Labels for 7,5 million Ethereum wallets | FREE |
| Name | Link | Description | Price |
|---|---|---|---|
| VirusTotal | https://developers.virustotal.com/reference | files and urls analyze | Public API is FREE |
| AbuseLPDB | https://docs.abuseipdb.com/#introduction | IP/domain/URL reputation | FREE |
| AlienVault Open Threat Exchange (OTX) | https://otx.alienvault.com/api | IP/domain/URL reputation | FREE |
| Phisherman | https://phisherman.gg | IP/domain/URL reputation | FREE |
| URLScan.io | https://urlscan.io/about-api/ | Scan and Analyse URLs | FREE |
| Web of Thrust | https://support.mywot.com/hc/en-us/sections/360004477734-API- | IP/domain/URL reputation | FREE |
| Threat Jammer | https://threatjammer.com/docs/introduction-threat-jammer-user-api | IP/domain/URL reputation | ??? |
| Name | Link | Description | Price |
|---|---|---|---|
| Search4faces | https://search4faces.com/api.html | Detect and locate human faces within an image, and returns high-precision face bounding boxes. Face⁺⁺ also allows you to store metadata of each detected face for future use. | $21 per 1000 requests |
## Face Detection
| Name | Link | Description | Price |
|---|---|---|---|
| Face++ | https://www.faceplusplus.com/face-detection/ | Search for people in social networks by facial image | from 0.03 per call |
| BetaFace | https://www.betafaceapi.com/wpa/ | Can scan uploaded image files or image URLs, find faces and analyze them. API also provides verification (faces comparison) and identification (faces search) services, as well able to maintain multiple user-defined recognition databases (namespaces) | 50 image per day FREE/from 0.15 EUR per request |
## Reverse Image Search
| Name | Link | Description | Price |
|---|---|---|---|
| Google Reverse images search API | https://github.com/SOME-1HING/google-reverse-image-api/ | This is a simple API built using Node.js and Express.js that allows you to perform Google Reverse Image Search by providing an image URL. | FREE (UNOFFICIAL) |
| TinEyeAPI | https://services.tineye.com/TinEyeAPI | Verify images, Moderate user-generated content, Track images and brands, Check copyright compliance, Deploy fraud detection solutions, Identify stock photos, Confirm the uniqueness of an image | Start from $200/5000 searches |
| Bing Images Search API | https://www.microsoft.com/en-us/bing/apis/bing-image-search-api | With Bing Image Search API v7, help users scour the web for images. Results include thumbnails, full image URLs, publishing website info, image metadata, and more. | 1,000 requests free per month FREE |
| MRISA | https://github.com/vivithemage/mrisa | MRISA (Meta Reverse Image Search API) is a RESTful API which takes an image URL, does a reverse Google image search, and returns a JSON array with the search results | FREE? (no official) |
| PicImageSearch | https://github.com/kitUIN/PicImageSearch | Aggregator for different Reverse Image Search API | FREE? (no official) |
## AI Geolocation
| Name | Link | Description | Price |
|---|---|---|---|
| Geospy | https://api.geospy.ai/ | Detecting estimation location of uploaded photo | Access by request |
| Picarta | https://picarta.ai/api | Detecting estimation location of uploaded photo | 100 request/day FREE |
| Name | Link | Description | Price |
|---|---|---|---|
| Twitch | https://dev.twitch.tv/docs/v5/reference | ||
| YouTube Data API | https://developers.google.com/youtube/v3 | ||
| https://www.reddit.com/dev/api/ | |||
| Vkontakte | https://vk.com/dev/methods | ||
| Twitter API | https://developer.twitter.com/en | ||
| Linkedin API | https://docs.microsoft.com/en-us/linkedin/ | ||
| All Facebook and Instagram API | https://developers.facebook.com/docs/ | ||
| Whatsapp Business API | https://www.whatsapp.com/business/api | ||
| Telegram and Telegram Bot API | https://core.telegram.org | ||
| Weibo API | https://open.weibo.com/wiki/API文档/en | ||
| https://dev.xing.com/partners/job_integration/api_docs | |||
| Viber | https://developers.viber.com/docs/api/rest-bot-api/ | ||
| Discord | https://discord.com/developers/docs | ||
| Odnoklassniki | https://ok.ru/apiok | ||
| Blogger | https://developers.google.com/blogger/ | The Blogger APIs allows client applications to view and update Blogger content | FREE |
| Disqus | https://disqus.com/api/docs/auth/ | Communicate with Disqus data | FREE |
| Foursquare | https://developer.foursquare.com/ | Interact with Foursquare users and places (geolocation-based checkins, photos, tips, events, etc) | FREE |
| HackerNews | https://github.com/HackerNews/API | Social news for CS and entrepreneurship | FREE |
| Kakao | https://developers.kakao.com/ | Kakao Login, Share on KakaoTalk, Social Plugins and more | FREE |
| Line | https://developers.line.biz/ | Line Login, Share on Line, Social Plugins and more | FREE |
| TikTok | https://developers.tiktok.com/doc/login-kit-web | Fetches user info and user's video posts on TikTok platform | FREE |
| Tumblr | https://www.tumblr.com/docs/en/api/v2 | Read and write Tumblr Data | FREE |
!WARNING Use with caution! Accounts may be blocked permanently for using unofficial APIs.
| Name | Link | Description | Price |
|---|---|---|---|
| TikTok | https://github.com/davidteather/TikTok-Api | The Unofficial TikTok API Wrapper In Python | FREE |
| Google Trends | https://github.com/suryasev/unofficial-google-trends-api | Unofficial Google Trends API | FREE |
| YouTube Music | https://github.com/sigma67/ytmusicapi | Unofficial APi for YouTube Music | FREE |
| Duolingo | https://github.com/KartikTalwar/Duolingo | Duolingo unofficial API (can gather info about users) | FREE |
| Steam. | https://github.com/smiley/steamapi | An unofficial object-oriented Python library for accessing the Steam Web API. | FREE |
| https://github.com/ping/instagram_private_api | Instagram Private API | FREE | |
| Discord | https://github.com/discordjs/discord.js | JavaScript library for interacting with the Discord API | FREE |
| Zhihu | https://github.com/syaning/zhihu-api | FREE Unofficial API for Zhihu | FREE |
| Quora | https://github.com/csu/quora-api | Unofficial API for Quora | FREE |
| DnsDumbster | https://github.com/PaulSec/API-dnsdumpster.com | (Unofficial) Python API for DnsDumbster | FREE |
| PornHub | https://github.com/sskender/pornhub-api | Unofficial API for PornHub in Python | FREE |
| Skype | https://github.com/ShyykoSerhiy/skyweb | Unofficial Skype API for nodejs via 'Skype (HTTP)' protocol. | FREE |
| Google Search | https://github.com/aviaryan/python-gsearch | Google Search unofficial API for Python with no external dependencies | FREE |
| Airbnb | https://github.com/nderkach/airbnb-python | Python wrapper around the Airbnb API (unofficial) | FREE |
| Medium | https://github.com/enginebai/PyMedium | Unofficial Medium Python Flask API and SDK | FREE |
| https://github.com/davidyen1124/Facebot | Powerful unofficial Facebook API | FREE | |
| https://github.com/tomquirk/linkedin-api | Unofficial Linkedin API for Python | FREE | |
| Y2mate | https://github.com/Simatwa/y2mate-api | Unofficial Y2mate API for Python | FREE |
| Livescore | https://github.com/Simatwa/livescore-api | Unofficial Livescore API for Python | FREE |
| Name | Link | Description | Price |
|---|---|---|---|
| Google Custom Search JSON API | https://developers.google.com/custom-search/v1/overview | Search in Google | 100 requests FREE |
| Serpstack | https://serpstack.com/ | Google search results to JSON | FREE |
| Serpapi | https://serpapi.com | Google, Baidu, Yandex, Yahoo, DuckDuckGo, Bint and many others search results | $50/5000 searches/month |
| Bing Web Search API | https://www.microsoft.com/en-us/bing/apis/bing-web-search-api | Search in Bing (+instant answers and location) | 1000 transactions per month FREE |
| WolframAlpha API | https://products.wolframalpha.com/api/pricing/ | Short answers, conversations, calculators and many more | from $25 per 1000 queries |
| DuckDuckgo Instant Answers API | https://duckduckgo.com/api | An API for some of our Instant Answers, not for full search results. | FREE |
| Memex Marginalia | https://memex.marginalia.nu/projects/edge/api.gmi | An API for new privacy search engine | FREE |
| Name | Link | Description | Price |
|---|---|---|---|
| MediaStack | https://mediastack.com/ | News articles search results in JSON | 500 requests/month FREE |
| Name | Link | Description | Price |
|---|---|---|---|
| Darksearch.io | https://darksearch.io/apidoc | search by websites in .onion zone | FREE |
| Onion Lookup | https://onion.ail-project.org/ | onion-lookup is a service for checking the existence of Tor hidden services and retrieving their associated metadata. onion-lookup relies on an private AIL instance to obtain the metadata | FREE |
| Name | Link | Description | Price |
|---|---|---|---|
| Jackett | https://github.com/Jackett/Jackett | API for automate searching in different torrent trackers | FREE |
| Torrents API PY | https://github.com/Jackett/Jackett | Unofficial API for 1337x, Piratebay, Nyaasi, Torlock, Torrent Galaxy, Zooqle, Kickass, Bitsearch, MagnetDL,Libgen, YTS, Limetorrent, TorrentFunk, Glodls, Torre | FREE |
| Torrent Search API | https://github.com/Jackett/Jackett | API for Torrent Search Engine with Extratorrents, Piratebay, and ISOhunt | 500 queries/day FREE |
| Torrent search api | https://github.com/JimmyLaurent/torrent-search-api | Yet another node torrent scraper (supports iptorrents, torrentleech, torrent9, torrentz2, 1337x, thepiratebay, Yggtorrent, TorrentProject, Eztv, Yts, LimeTorrents) | FREE |
| Torrentinim | https://github.com/sergiotapia/torrentinim | Very low memory-footprint, self hosted API-only torrent search engine. Sonarr + Radarr Compatible, native support for Linux, Mac and Windows. | FREE |
| Name | Link | Description | Price |
|---|---|---|---|
| National Vulnerability Database CVE Search API | https://nvd.nist.gov/developers/vulnerabilities | Get basic information about CVE and CVE history | FREE |
| OpenCVE API | https://docs.opencve.io/api/cve/ | Get basic information about CVE | FREE |
| CVEDetails API | https://www.cvedetails.com/documentation/apis | Get basic information about CVE | partly FREE (?) |
| CVESearch API | https://docs.cvesearch.com/ | Get basic information about CVE | by request |
| KEVin API | https://kevin.gtfkd.com/ | API for accessing CISA's Known Exploited Vulnerabilities Catalog (KEV) and CVE Data | FREE |
| Vulners.com API | https://vulners.com | Get basic information about CVE | FREE for personal use |
| Name | Link | Description | Price |
|---|---|---|---|
| Aviation Stack | https://aviationstack.com | get information about flights, aircrafts and airlines | FREE |
| OpenSky Network | https://opensky-network.org/apidoc/index.html | Free real-time ADS-B aviation data | FREE |
| AviationAPI | https://docs.aviationapi.com/ | FAA Aeronautical Charts and Publications, Airport Information, and Airport Weather | FREE |
| FachaAPI | https://api.facha.dev | Aircraft details and live positioning API | FREE |
| Name | Link | Description | Price |
|---|---|---|---|
| Windy Webcams API | https://api.windy.com/webcams/docs | Get a list of available webcams for a country, city or geographical coordinates | FREE with limits or 9990 euro without limits |
## Regex
| Name | Link | Description | Price |
|---|---|---|---|
| Autoregex | https://autoregex.notion.site/AutoRegex-API-Documentation-97256bad2c114a6db0c5822860214d3a | Convert English phrase to regular expression | from $3.49/month |
| Name | Link |
|---|---|
| API Guessr (detect API by auth key or by token) | https://api-guesser.netlify.app/ |
| REQBIN Online REST & SOAP API Testing Tool | https://reqbin.com |
| ExtendClass Online REST Client | https://extendsclass.com/rest-client-online.html |
| Codebeatify.org Online API Test | https://codebeautify.org/api-test |
| SyncWith Google Sheet add-on. Link more than 1000 APIs with Spreadsheet | https://workspace.google.com/u/0/marketplace/app/syncwith_crypto_binance_coingecko_airbox/449644239211?hl=ru&pann=sheets_addon_widget |
| Talend API Tester Google Chrome Extension | https://workspace.google.com/u/0/marketplace/app/syncwith_crypto_binance_coingecko_airbox/449644239211?hl=ru&pann=sheets_addon_widget |
| Michael Bazzel APIs search tools | https://inteltechniques.com/tools/API.html |
| Name | Link |
|---|---|
| Convert curl commands to Python, JavaScript, PHP, R, Go, C#, Ruby, Rust, Elixir, Java, MATLAB, Dart, CFML, Ansible URI or JSON | https://curlconverter.com |
| Curl-to-PHP. Instantly convert curl commands to PHP code | https://incarnate.github.io/curl-to-php/ |
| Curl to PHP online (Codebeatify) | https://codebeautify.org/curl-to-php-online |
| Curl to JavaScript fetch | https://kigiri.github.io/fetch/ |
| Curl to JavaScript fetch (Scrapingbee) | https://www.scrapingbee.com/curl-converter/javascript-fetch/ |
| Curl to C# converter | https://curl.olsh.me |
| Name | Link |
|---|---|
| Sheety. Create API frome GOOGLE SHEET | https://sheety.co/ |
| Postman. Platform for creating your own API | https://www.postman.com |
| Reetoo. Rest API Generator | https://retool.com/api-generator/ |
| Beeceptor. Rest API mocking and intercepting in seconds (no coding). | https://beeceptor.com |
| Name | Link |
|---|---|
| RapidAPI. Market your API for millions of developers | https://rapidapi.com/solution/api-provider/ |
| Apilayer. API Marketplace | https://apilayer.com |
| Name | Link | Description |
|---|---|---|
| Keyhacks | https://github.com/streaak/keyhacks | Keyhacks is a repository which shows quick ways in which API keys leaked by a bug bounty program can be checked to see if they're valid. |
| All about APIKey | https://github.com/daffainfo/all-about-apikey | Detailed information about API key / OAuth token for different services (Description, Request, Response, Regex, Example) |
| API Guessr | https://api-guesser.netlify.app/ | Enter API Key and and find out which service they belong to |
| Name | Link | Description |
|---|---|---|
| APIDOG ApiHub | https://apidog.com/apihub/ | |
| Rapid APIs collection | https://rapidapi.com/collections | |
| API Ninjas | https://api-ninjas.com/api | |
| APIs Guru | https://apis.guru/ | |
| APIs List | https://apislist.com/ | |
| API Context Directory | https://apicontext.com/api-directory/ | |
| Any API | https://any-api.com/ | |
| Public APIs Github repo | https://github.com/public-apis/public-apis |
If you don't know how to work with the REST API, I recommend you check out the Netlas API guide I wrote for Netlas.io.
There it is very brief and accessible to write how to automate requests in different programming languages (focus on Python and Bash) and process the resulting JSON data.
Thank you for following me! https://cybdetective.com
VulnKnox is a powerful command-line tool written in Go that interfaces with the KNOXSS API. It automates the process of testing URLs for Cross-Site Scripting (XSS) vulnerabilities using the advanced capabilities of the KNOXSS engine.
go install github.com/iqzer0/vulnknox@latest
Before using the tool, you need to set up your configuration:
API Key
Obtain your KNOXSS API key from knoxss.me.
On the first run, a default configuration file will be created at:
Linux/macOS: ~/.config/vulnknox/config.json
Windows: %APPDATA%\VulnKnox\config.json
Edit the config.json file and replace YOUR_API_KEY_HERE with your actual API key.
Discord Webhook (Optional)
If you want to receive notifications on Discord, add your webhook URL to the config.json file or use the -dw flag.
Usage of vulnknox:
-u Input URL to send to KNOXSS API
-i Input file containing URLs to send to KNOXSS API
-X GET HTTP method to use: GET, POST, or BOTH
-pd POST data in format 'param1=value¶m2=value'
-headers Custom headers in format 'Header1:value1,Header2:value2'
-afb Use Advanced Filter Bypass
-checkpoc Enable CheckPoC feature
-flash Enable Flash Mode
-o The file to save the results to
-ow Overwrite output file if it exists
-oa Output all results to file, not just successful ones
-s Only show successful XSS payloads in output
-p 3 Number of parallel processes (1-5)
-t 600 Timeout for API requests in seconds
-dw Discord Webhook URL (overrides config file)
-r 3 Number of retries for failed requests
-ri 30 Interval between retries in seconds
-sb 0 Skip domains after this many 403 responses
-proxy Proxy URL (e.g., http://127.0.0.1:8080)
-v Verbose output
-version Show version number
-no-banner Suppress the banner
-api-key KNOXSS API Key (overrides config file)
Test a single URL using GET method:
vulnknox -u "https://example.com/page?param=value"
Test a URL with POST data:
vulnknox -u "https://example.com/submit" -X POST -pd "param1=value1¶m2=value2"
Enable Advanced Filter Bypass and Flash Mode:
vulnknox -u "https://example.com/page?param=value" -afb -flash
Use custom headers (e.g., for authentication):
vulnknox -u "https://example.com/secure" -headers "Cookie:sessionid=abc123"
Process URLs from a file with 5 concurrent processes:
vulnknox -i urls.txt -p 5
Send notifications to Discord on successful XSS findings:
vulnknox -u "https://example.com/page?param=value" -dw "https://discord.com/api/webhooks/your/webhook/url"
Test both GET and POST methods with CheckPoC enabled:
vulnknox -u "https://example.com/page" -X BOTH -checkpoc
Use a proxy and increase the number of retries:
vulnknox -u "https://example.com/page?param=value" -proxy "http://127.0.0.1:8080" -r 5
Suppress the banner and only show successful XSS payloads:
vulnknox -u "https://example.com/page?param=value" -no-banner -s
[ XSS! ]: Indicates a successful XSS payload was found.
[ SAFE ]: No XSS vulnerability was found in the target.
[ ERR! ]: An error occurred during the request.
[ SKIP ]: The domain or URL was skipped due to multiple failed attempts (e.g., after receiving too many 403 Forbidden responses as specified by the -sb option).
[BALANCE]: Indicates your current API usage with KNOXSS, showing how many API calls you've used out of your total allowance.
The tool also provides a summary at the end of execution, including the number of requests made, successful XSS findings, safe responses, errors, and any skipped domains.
Contributions are welcome! If you have suggestions for improvements or encounter any issues, please open an issue or submit a pull request.
This project is licensed under the MIT License.

Mass Assigner is a powerful tool designed to identify and exploit mass assignment vulnerabilities in web applications. It achieves this by first retrieving data from a specified request, such as fetching user profile data. Then, it systematically attempts to apply each parameter extracted from the response to a second request provided, one parameter at a time. This approach allows for the automated testing and exploitation of potential mass assignment vulnerabilities.
This tool actively modifies server-side data. Please ensure you have proper authorization before use. Any unauthorized or illegal activity using this tool is entirely at your own risk.
Install requirements
pip3 install -r requirements.txt
Run the script
python3 mass_assigner.py --fetch-from "http://example.com/path-to-fetch-data" --target-req "http://example.com/path-to-probe-the-data"
Forbidden Buster accepts the following arguments:
  -h, --help            show this help message and exit
  --fetch-from FETCH_FROM
                        URL to fetch data from
  --target-req TARGET_REQ
                        URL to send modified data to
  -H HEADER, --header HEADER
                        Add a custom header. Format: 'Key: Value'
  -p PROXY, --proxy PROXY
                        Use Proxy, Usage i.e: http://127.0.0.1:8080.
  -d DATA, --data DATA  Add data to the request body. JSON is supported with escaping.
  --rate-limit RATE_LIMIT
                        Number of requests per second
  --source-method SOURCE_METHOD
                        HTTP method for the initial request. Default is GET.
  --target-method TARGET_METHOD
                        HTTP method for the modified request. Default is PUT.
  --ignore-params IGNORE_PARAMS
                        Parameters to ignore during modification, separated by comma.
Example Usage:
python3 mass_assigner.py --fetch-from "http://example.com/api/v1/me" --target-req "http://example.com/api/v1/me" --header "Authorization: Bearer XXX" --proxy "http://proxy.example.com" --data '{\"param1\": \"test\", \"param2\":true}'
DockerSpy searches for images on Docker Hub and extracts sensitive information such as authentication secrets, private keys, and more.
Docker is an open-source platform that automates the deployment, scaling, and management of applications using containerization technology. Containers allow developers to package an application and its dependencies into a single, portable unit that can run consistently across various computing environments. Docker simplifies the development and deployment process by ensuring that applications run the same way regardless of where they are deployed.
Docker Hub is a cloud-based repository where developers can store, share, and distribute container images. It serves as the largest library of container images, providing access to both official images created by Docker and community-contributed images. Docker Hub enables developers to easily find, download, and deploy pre-built images, facilitating rapid application development and deployment.
Open Source Intelligence (OSINT) on Docker Hub involves using publicly available information to gather insights and data from container images and repositories hosted on Docker Hub. This is particularly important for identifying exposed secrets for several reasons:
Security Audits: By analyzing Docker images, organizations can uncover exposed secrets such as API keys, authentication tokens, and private keys that might have been inadvertently included. This helps in mitigating potential security risks.
Incident Prevention: Proactively searching for exposed secrets in Docker images can prevent security breaches before they happen, protecting sensitive information and maintaining the integrity of applications.
Compliance: Ensuring that container images do not expose secrets is crucial for meeting regulatory and organizational security standards. OSINT helps verify that no sensitive information is unintentionally disclosed.
Vulnerability Assessment: Identifying exposed secrets as part of regular security assessments allows organizations to address these vulnerabilities promptly, reducing the risk of exploitation by malicious actors.
Enhanced Security Posture: Continuously monitoring Docker Hub for exposed secrets strengthens an organization's overall security posture, making it more resilient against potential threats.
Utilizing OSINT on Docker Hub to find exposed secrets enables organizations to enhance their security measures, prevent data breaches, and ensure the confidentiality of sensitive information within their containerized applications.
DockerSpy obtains information from Docker Hub and uses regular expressions to inspect the content for sensitive information, such as secrets.
To use DockerSpy, follow these steps:
git clone https://github.com/UndeadSec/DockerSpy.git && cd DockerSpy && make
dockerspy
To customize DockerSpy configurations, edit the following files: - Regular Expressions - Ignored File Extensions
DockerSpy is intended for educational and research purposes only. Users are responsible for ensuring that their use of this tool complies with applicable laws and regulations.
Contributions to DockerSpy are welcome! Feel free to submit issues, feature requests, or pull requests to help improve this tool.
DockerSpy is developed and maintained by Alisson Moretto (UndeadSec)
I'm a passionate cyber threat intelligence pro who loves sharing insights and crafting cybersecurity tools.
Consider following me:
![]()
![]()
![]()
Special thanks to @akaclandestine
A vulnerable application made using node.js, express server and ejs template engine. This application is meant for educational purposes only.
git clone https://github.com/4auvar/VulnNodeApp.git
npm install
CREATE USER 'vulnnodeapp'@'localhost' IDENTIFIED BY 'password';
create database vuln_node_app_db;
GRANT ALL PRIVILEGES ON vuln_node_app_db.* TO 'vulnnodeapp'@'localhost';
USE vuln_node_app_db;
create table users (id int AUTO_INCREMENT PRIMARY KEY, fullname varchar(255), username varchar(255),password varchar(255), email varchar(255), phone varchar(255), profilepic varchar(255));
insert into users(fullname,username,password,email,phone) values("test1","test1","test1","test1@test.com","976543210");
insert into users(fullname,username,password,email,phone) values("test2","test2","test2","test2@test.com","9887987541");
insert into users(fullname,username,password,email,phone) values("test3","test3","test3","test3@test.com","9876987611");
insert into users(fullname,username,password,email,phone) values("test4","test4","test4","test4@test.com","9123459876");
insert into users(fullname,username,password,email,phone) values("test5","test5","test   5","test5@test.com","7893451230");
npm start
You can reach me out at @4auvar
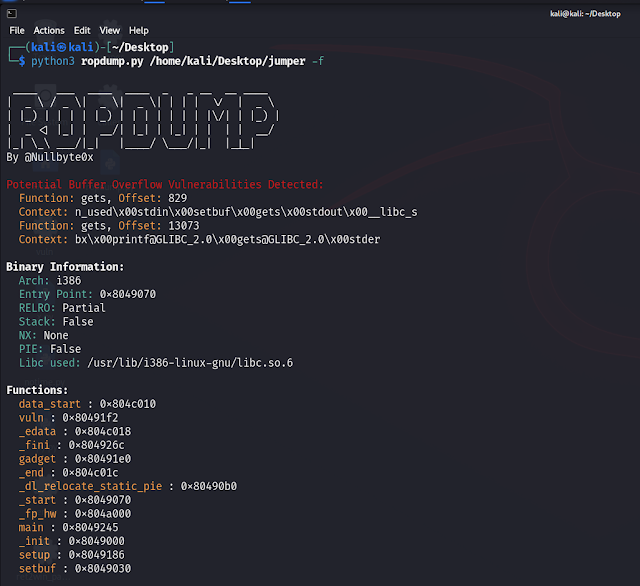
ROPDump is a tool for analyzing binary executables to identify potential Return-Oriented Programming (ROP) gadgets, as well as detecting potential buffer overflow and memory leak vulnerabilities.
<binary>: Path to the binary file for analysis.-s, --search SEARCH: Optional. Search for specific instruction patterns.-f, --functions: Optional. Print function names and addresses.python3 ropdump.py /path/to/binary
python3 ropdump.py /path/to/binary -s "pop eax"
python3 ropdump.py /path/to/binary -f


Presented at CODE BLUE 2023, this project titled Enhanced Vulnerability Hunting in WDM Drivers with Symbolic Execution and Taint Analysis introduces IOCTLance, a tool that enhances its capacity to detect various vulnerability types in Windows Driver Model (WDM) drivers. In a comprehensive evaluation involving 104 known vulnerable WDM drivers and 328 unknow n ones, IOCTLance successfully unveiled 117 previously unidentified vulnerabilities within 26 distinct drivers. As a result, 41 CVEs were reported, encompassing 25 cases of denial of service, 5 instances of insufficient access control, and 11 examples of elevation of privilege.
docker build .
dpkg --add-architecture i386
apt-get update
apt-get install git build-essential python3 python3-pip python3-dev htop vim sudo \
                openjdk-8-jdk zlib1g:i386 libtinfo5:i386 libstdc++6:i386 libgcc1:i386 \
                libc6:i386 libssl-dev nasm binutils-multiarch qtdeclarative5-dev libpixman-1-dev \
                libglib2.0-dev debian-archive-keyring debootstrap libtool libreadline-dev cmake \
                libffi-dev libxslt1-dev libxml2-dev

pip install angr==9.2.18 ipython==8.5.0 ipdb==0.13.9
# python3 analysis/ioctlance.py -h
usage: ioctlance.py [-h] [-i IOCTLCODE] [-T TOTAL_TIMEOUT] [-t TIMEOUT] [-l LENGTH] [-b BOUND]
                    [-g GLOBAL_VAR] [-a ADDRESS] [-e EXCLUDE] [-o] [-r] [-c] [-d]
                    path

positional arguments:
  path                  dir (including subdirectory) or file path to the driver(s) to analyze

optional arguments:
  -h, --help            show this help message and exit
  -i IOCTLCODE, --ioctlcode IOCTLCODE
                        analyze specified IoControlCode (e.g. 22201c)
  -T TOTAL_TIMEOUT, --total_timeout TOTAL_TIMEOUT
                        total timeout for the whole symbolic execution (default 1200, 0 to unlimited)
  -t TIMEOUT, --timeout TIMEOUT
                        timeout for analyze each IoControlCode (default 40, 0 to unlimited)
  -l LENGTH, --length LENGTH
                        the limit of number of instructions for technique L   engthLimiter (default 0, 0
                        to unlimited)
  -b BOUND, --bound BOUND
                        the bound for technique LoopSeer (default 0, 0 to unlimited)
  -g GLOBAL_VAR, --global_var GLOBAL_VAR
                        symbolize how many bytes in .data section (default 0 hex)
  -a ADDRESS, --address ADDRESS
                        address of ioctl handler to directly start hunting with blank state (e.g.
                        140005c20)
  -e EXCLUDE, --exclude EXCLUDE
                        exclude function address split with , (e.g. 140005c20,140006c20)
  -o, --overwrite       overwrite x.sys.json if x.sys has been analyzed (default False)
  -r, --recursion       do not kill state if detecting recursion (default False)
  -c, --complete        get complete base state (default False)
  -d, --debug           print debug info while analyzing (default False)
# python3 evaluation/statistics.py -h
usage: statistics.py [-h] [-w] path

positional arguments:
  path        target dir or file path

optional arguments:
  -h, --help  show this help message and exit
  -w, --wdm   copy the wdm drivers into <path>/wdm
APKDeepLens is a Python based tool designed to scan Android applications (APK files) for security vulnerabilities. It specifically targets the OWASP Top 10 mobile vulnerabilities, providing an easy and efficient way for developers, penetration testers, and security researchers to assess the security posture of Android apps.
APKDeepLens is a Python-based tool that performs various operations on APK files. Its main features include:
To use APKDeepLens, you'll need to have Python 3.8 or higher installed on your system. You can then install APKDeepLens using the following command:
git clone https://github.com/d78ui98/APKDeepLens/tree/main
cd /APKDeepLens
python3 -m venv venv
source venv/bin/activate
pip install -r requirements.txt
python APKDeepLens.py --help
git clone https://github.com/d78ui98/APKDeepLens/tree/main
cd \APKDeepLens
python3 -m venv venv
.\venv\Scripts\activate
pip install -r .\requirements.txt
python APKDeepLens.py --help
To simply scan an APK, use the below command. Mention the apk file with -apk argument. Once the scan is complete, a detailed report will be displayed in the console.
python3 APKDeepLens.py -apk file.apk
If you've already extracted the source code and want to provide its path for a faster scan you can use the below command. Mention the source code of the android application with -source parameter.
python3 APKDeepLens.py -apk file.apk -source <source-code-path>
To generate detailed PDF and HTML reports after the scan you can pass -report argument as mentioned below.
python3 APKDeepLens.py -apk file.apk -report
We welcome contributions to the APKDeepLens project. If you have a feature request, bug report, or proposal, please open a new issue here.
For those interested in contributing code, please follow the standard GitHub process. We'll review your contributions as quickly as possible :)

drozer (formerly Mercury) is the leading security testing framework for Android.
drozer allows you to search for security vulnerabilities in apps and devices by assuming the role of an app and interacting with the Dalvik VM, other apps' IPC endpoints and the underlying OS.
drozer provides tools to help you use, share and understand public Android exploits. It helps you to deploy a drozer Agent to a device through exploitation or social engineering. Using weasel (WithSecure's advanced exploitation payload) drozer is able to maximise the permissions available to it by installing a full agent, injecting a limited agent into a running process, or connecting a reverse shell to act as a Remote Access Tool (RAT).
drozer is a good tool for simulating a rogue application. A penetration tester does not have to develop an app with custom code to interface with a specific content provider. Instead, drozer can be used with little to no programming experience required to show the impact of letting certain components be exported on a device.
drozer is open source software, maintained by WithSecure, and can be downloaded from: https://labs.withsecure.com/tools/drozer/
To help with making sure drozer can be run on modern systems, a Docker container was created that has a working build of Drozer. This is currently the recommended method of using Drozer on modern systems.
Note: On Windows please ensure that the path to the Python installation and the Scripts folder under the Python installation are added to the PATH environment variable.
Note: On Windows please ensure that the path to javac.exe is added to the PATH environment variable.
git clone https://github.com/WithSecureLabs/drozer.git
cd drozer
python setup.py bdist_wheel
sudo pip install dist/drozer-2.x.x-py2-none-any.whl
git clone https://github.com/WithSecureLabs/drozer.git
cd drozer
make deb
sudo dpkg -i drozer-2.x.x.deb
git clone https://github.com/WithSecureLabs/drozer.git
cd drozer
make rpm
sudo rpm -I drozer-2.x.x-1.noarch.rpm
NOTE: Windows Defender and other Antivirus software will flag drozer as malware (an exploitation tool without exploit code wouldn't be much fun!). In order to run drozer you would have to add an exception to Windows Defender and any antivirus software. Alternatively, we recommend running drozer in a Windows/Linux VM.
git clone https://github.com/WithSecureLabs/drozer.git
cd drozer
python.exe setup.py bdist_msi
Run dist/drozer-2.x.x.win-x.msi
Drozer can be installed using Android Debug Bridge (adb).
Download the latest Drozer Agent here.
$ adb install drozer-agent-2.x.x.apk
You should now have the drozer Console installed on your PC, and the Agent running on your test device. Now, you need to connect the two and you're ready to start exploring.
We will use the server embedded in the drozer Agent to do this.
If using the Android emulator, you need to set up a suitable port forward so that your PC can connect to a TCP socket opened by the Agent inside the emulator, or on the device. By default, drozer uses port 31415:
$ adb forward tcp:31415 tcp:31415
Now, launch the Agent, select the "Embedded Server" option and tap "Enable" to start the server. You should see a notification that the server has started.
Then, on your PC, connect using the drozer Console:
On Linux:
$ drozer console connect
On Windows:
> drozer.bat console connect
If using a real device, the IP address of the device on the network must be specified:
On Linux:
$ drozer console connect --server 192.168.0.10
On Windows:
> drozer.bat console connect --server 192.168.0.10
You should be presented with a drozer command prompt:
selecting f75640f67144d9a3 (unknown sdk 4.1.1)
dz>
The prompt confirms the Android ID of the device you have connected to, along with the manufacturer, model and Android software version.
You are now ready to start exploring the device.
| Command | Description |
|---|---|
| run | Executes a drozer module |
| list | Show a list of all drozer modules that can be executed in the current session. This hides modules that you do not have suitable permissions to run. |
| shell | Start an interactive Linux shell on the device, in the context of the Agent process. |
| cd | Mounts a particular namespace as the root of session, to avoid having to repeatedly type the full name of a module. |
| clean | Remove temporary files stored by drozer on the Android device. |
| contributors | Displays a list of people who have contributed to the drozer framework and modules in use on your system. |
| echo | Print text to the console. |
| exit | Terminate the drozer session. |
| help | Display help about a particular command or module. |
| load | Load a file containing drozer commands, and execute them in sequence. |
| module | Find and install additional drozer modules from the Internet. |
| permissions | Display a list of the permissions granted to the drozer Agent. |
| set | Store a value in a variable that will be passed as an environment variable to any Linux shells spawned by drozer. |
| unset | Remove a named variable that drozer passes to any Linux shells that it spawns. |
drozer is released under a 3-clause BSD License. See LICENSE for full details.
drozer is Open Source software, made great by contributions from the community.
Bug reports, feature requests, comments and questions can be submitted here.
Exploitation and scanning tool specifically designed for Jenkins versions <= 2.441 & <= LTS 2.426.2. It leverages CVE-2024-23897 to assess and exploit vulnerabilities in Jenkins instances.
Ensure you have the necessary permissions to scan and exploit the target systems. Use this tool responsibly and ethically.
python CVE-2024-23897.py -t <target> -p <port> -f <file>
or
python CVE-2024-23897.py -i <input_file> -f <file>
Parameters: - -t or --target: Specify the target IP(s). Supports single IP, IP range, comma-separated list, or CIDR block. - -i or --input-file: Path to input file containing hosts in the format of http://1.2.3.4:8080/ (one per line). - -o or --output-file: Export results to file (optional). - -p or --port: Specify the port number. Default is 8080 (optional). - -f or --file: Specify the file to read on the target system.
-i INPUT_FILE). -o OUTPUT_FILE).Contributions are welcome. Please feel free to fork, modify, and make pull requests or report issues.
Alexander Hagenah - URL - Twitter
This tool is meant for educational and professional purposes only. Unauthorized scanning and exploiting of systems is illegal and unethical. Always ensure you have explicit permission to test and exploit any systems you target.
SploitScan is a powerful and user-friendly tool designed to streamline the process of identifying exploits for known vulnerabilities and their respective exploitation probability. Empowering cybersecurity professionals with the capability to swiftly identify and apply known and test exploits. It's particularly valuable for professionals seeking to enhance their security measures or develop robust detection strategies against emerging threats.
Regular:
python sploitscan.py CVE-YYYY-NNNNN
Enter one or more CVE IDs to fetch data. Separate multiple CVE IDs with spaces.
python sploitscan.py CVE-YYYY-NNNNN CVE-YYYY-NNNNN
Optional: Export the results to a JSON or CSV file. Specify the format: 'json' or 'csv'.
python sploitscan.py CVE-YYYY-NNNNN -e JSON
The Patching Prioritization System in SploitScan provides a strategic approach to prioritizing security patches based on the severity and exploitability of vulnerabilities. It's influenced by the model from CVE Prioritizer, with enhancements for handling publicly available exploits. Here's how it works:
This system assists users in making informed decisions on which vulnerabilities to patch first, considering both their potential impact and the likelihood of exploitation. Thresholds can be changed to your business needs.
Contributions are welcome. Please feel free to fork, modify, and make pull requests or report issues.
Alexander Hagenah - URL - Twitter
SqliSniper is a robust Python tool designed to detect time-based blind SQL injections in HTTP request headers. It enhances the security assessment process by rapidly scanning and identifying potential vulnerabilities using multi-threaded, ensuring speed and efficiency. Unlike other scanners, SqliSniper is designed to eliminates false positives through and send alerts upon detection, with the built-in Discord notification functionality.
git clone https://github.com/danialhalo/SqliSniper.git
cd SqliSniper
chmod +x sqlisniper.py
pip3 install -r requirements.txt
This will display help for the tool. Here are all the options it supports.
ubuntu:~/sqlisniper$ ./sqlisniper.py -h


███████╗ ██████╗ ██╗     ██╗    ███████╗███╗   ██╗██╗██████╗ ███████╗██████╗
██╔════╝██╔═══██╗██║     ██║    ██╔════╝████╗  ██║██║██╔══██╗██╔════╝██╔══██╗
 ██████╗██║   ██║██║     ██║    ███████╗██╔██╗ ██║██║██████╔╝█████╗  ██████╔╝
╚════██║██║▄▄ ██║██║     ██║    ╚════██║██║╚██╗██║██║██╔═══╝ ██╔══╝  ██╔══██╗
███████║╚██ ███╔╝███████╗██║    ███████║██║ ╚████║██║██║     ███████╗██║  ██║
╚══════╝ ╚══▀▀═╝ ╚══════╝╚═╝    ╚══════╝╚═╝  ╚═══╝╚═╝╚═╝     ╚══════╝╚═╝  ╚═╝

                            -: By Muhammad Danial :-

usage: sqlisniper.py [-h] [-u URL] [-r URLS_FILE] [-p] [--proxy PROXY] [--payload PA   YLOAD] [--single-payload SINGLE_PAYLOAD] [--discord DISCORD] [--headers HEADERS]
                     [--threads THREADS]

Detect SQL injection by sending malicious queries

options:
  -h, --help            show this help message and exit
  -u URL, --url URL     Single URL for the target
  -r URLS_FILE, --urls_file URLS_FILE
                        File containing a list of URLs
  -p, --pipeline        Read from pipeline
  --proxy PROXY         Proxy for intercepting requests (e.g., http://127.0.0.1:8080)
  --payload PAYLOAD     File containing malicious payloads (default is payloads.txt)
  --single-payload SINGLE_PAYLOAD
                        Single payload for testing
  --discord DISCORD     Discord Webhook URL
  --headers HEADERS     File containing headers (default is headers.txt)
  --threads THREADS     Number of threads
The url can be provided with -u flag for single site scan
./sqlisniper.py -u http://example.com
The -r flag allows SqliSniper to read a file containing multiple URLs for simultaneous scanning.
./sqlisniper.py -r url.txt
The SqliSniper can also worked with the pipeline input with -p flag
cat url.txt | ./sqlisniper.py -p
The pipeline feature facilitates seamless integration with other tools. For instance, you can utilize tools like subfinder and httpx, and then pipe their output to SqliSniper for mass scanning.
subfinder -silent -d google.com | sort -u | httpx -silent | ./sqlisniper.py -p
By default the SqliSniper use the payloads.txt file. However --payload flag can be used for providing custom payloads file.
./sqlisniper.py -u http://example.com --payload mssql_payloads.txt
While using the custom payloads file, ensure that you substitute the sleep time with %__TIME_OUT__%. SqliSniper dynamically adjusts the sleep time iteratively to mitigate potential false positives. The payloads file should look like this.
ubuntu:~/sqlisniper$ cat payloads.txt
0\"XOR(if(now()=sysdate(),sleep(%__TIME_OUT__%),0))XOR\"Z
"0"XOR(if(now()=sysdate()%2Csleep(%__TIME_OUT__%)%2C0))XOR"Z"
0'XOR(if(now()=sysdate(),sleep(%__TIME_OUT__%),0))XOR'Z
If you want to only test with the single payload --single-payload flag can be used. Make sure to replace the sleep time with %__TIME_OUT__%
./sqlisniper.py -r url.txt --single-payload "0'XOR(if(now()=sysdate(),sleep(%__TIME_OUT__%),0))XOR'Z"
Headers are saved in the file headers.txt for scanning custom header save the custom HTTP Request Header in headers.txt file.
ubuntu:~/sqlisniper$ cat headers.txt
User-Agent: Mozilla/5.0 (Windows NT 10.0; Win64; x64)
X-Forwarded-For: 127.0.0.1
SqliSniper also offers Discord alert notifications, enhancing its functionality by providing real-time alerts through Discord webhooks. This feature proves invaluable during large-scale scans, allowing prompt notifications upon detection.
./sqlisniper.py -r url.txt --discord <web_hookurl>
Threads can be defined with --threads flag
./sqlisniper.py -r url.txt --threads 10
Note: It is crucial to consider that employing a higher number of threads might lead to potential false positives or overlooking valid issues. Due to the nature of time-based SQL injection it is recommended to use lower thread for more accurate detection.
SqliSniper is made in python with lots of <3 by @Muhammad Danial.

This repo contains the code for our USENIX Security '23 paper "ARGUS: A Framework for Staged Static Taint Analysis of GitHub Workflows and Actions". Argus is a comprehensive security analysis tool specifically designed for GitHub Actions. Built with an aim to enhance the security of CI/CD workflows, Argus utilizes taint-tracking techniques and an impact classifier to detect potential vulnerabilities in GitHub Action workflows.
Visit our website - secureci.org for more information.
Taint-Tracking: Argus uses sophisticated algorithms to track the flow of potentially untrusted data from specific sources to security-critical sinks within GitHub Actions workflows. This enables the identification of vulnerabilities that could lead to code injection attacks.
Impact Classifier: Argus classifies identified vulnerabilities into High, Medium, and Low severity classes, providing a clearer understanding of the potential impact of each identified vulnerability. This is crucial in prioritizing mitigation efforts.
This Python script provides a command line interface for interacting with GitHub repositories and GitHub actions.
python argus.py --mode [mode] --url [url] [--output-folder path_to_output] [--config path_to_config] [--verbose] [--branch branch_name] [--commit commit_hash] [--tag tag_name] [--action-path path_to_action] [--workflow-path path_to_workflow]--mode: The mode of operation. Choose either 'repo' or 'action'. This parameter is required.--url: The GitHub URL. Use USERNAME:TOKEN@URL for private repos. This parameter is required.--output-folder: The output folder. The default value is '/tmp'. This parameter is optional.--config: The config file. This parameter is optional.--verbose: Verbose mode. If this option is provided, the logging level is set to DEBUG. Otherwise, it is set to INFO. This parameter is optional.--branch: The branch name. You must provide exactly one of: --branch, --commit, --tag. This parameter is optional.--commit: The commit hash. You must provide exactly one of: --branch, --commit, --tag. This parameter is optional.--tag: The tag. You must provide exactly one of: --branch, --commit, --tag. This parameter is optional.--action-path: The (relative) path to the action. You cannot provide --action-path in repo mode. This parameter is optional.--workflow-path: The (relative) path to the workflow. You cannot provide --workflow-path in action mode. This parameter is optional.To use this script to interact with a GitHub repo, you might run a command like the following:
python argus.py --mode repo --url https://github.com/username/repo.git --branch masterThis would run the script in repo mode on the master branch of the specified repository.
Argus can be run inside a docker container. To do so, follow the steps:
results folderYou can view SARIF results either through an online viewer or with a Visual Studio Code (VSCode) extension.
Online Viewer: The SARIF Web Viewer is an online tool that allows you to visualize SARIF files. You can upload your SARIF file (argus_report.sarif) directly to the website to view the results.
VSCode Extension: If you prefer to use VSCode, you can install the SARIF Viewer extension. After installing the extension, you can open your SARIF file (argus_report.sarif) in VSCode. The results will appear in the SARIF Explorer pane, which provides a detailed and navigable view of the results.
Remember to handle the SARIF file with care, especially if it contains sensitive information from your codebase.
If there is an issue with needing the Github authorization for running, you can provide username:TOKEN in the GITHUB_CREDS environment variable. This will be used for all the requests made to Github. Note, we do not store this information anywhere, neither create any thing in the Github account - we only use this for cloning the repositories.
Argus is an open-source project, and we welcome contributions from the community. Whether it's reporting a bug, suggesting a feature, or writing code, your contributions are always appreciated!
If you use Argus in your research, please cite our paper:
  @inproceedings{muralee2023Argus,
    title={ARGUS: A Framework for Staged Static Taint Analysis of GitHub Workflows and Actions},
    author={S. Muralee, I. Koishybayev, A. Nahapetyan, G. Tystahl, B. Reaves, A. Bianchi, W. Enck,
      A. Kapravelos, A. Machiry},
    booktitle={32st USENIX Security Symposium (USENIX Security 23)},
    year={2023},
}RAVEN (Risk Analysis and Vulnerability Enumeration for CI/CD) is a powerful security tool designed to perform massive scans for GitHub Actions CI workflows and digest the discovered data into a Neo4j database. Developed and maintained by the Cycode research team.
With Raven, we were able to identify and report security vulnerabilities in some of the most popular repositories hosted on GitHub, including:
We listed all vulnerabilities discovered using Raven in the tool Hall of Fame.
The tool provides the following capabilities to scan and analyze potential CI/CD vulnerabilities:
Possible usages for Raven:
This tool provides a reliable and scalable solution for CI/CD security analysis, enabling users to query bad configurations and gain valuable insights into their codebase's security posture.
In the past year, Cycode Labs conducted extensive research on fundamental security issues of CI/CD systems. We examined the depths of many systems, thousands of projects, and several configurations. The conclusion is clear – the model in which security is delegated to developers has failed. This has been proven several times in our previous content:
Each of the vulnerabilities above has unique characteristics, making it nearly impossible for developers to stay up to date with the latest security trends. Unfortunately, each vulnerability shares a commonality – each exploitation can impact millions of victims.
It was for these reasons that Raven was created, a framework for CI/CD security analysis workflows (and GitHub Actions as the first use case). In our focus, we examined complex scenarios where each issue isn't a threat on its own, but when combined, they pose a severe threat.
To get started with Raven, follow these installation instructions:
Step 1: Install the Raven package
pip3 install raven-cycodeStep 2: Setup a local Redis server and Neo4j database
docker run -d --name raven-neo4j -p7474:7474 -p7687:7687 --env NEO4J_AUTH=neo4j/123456789 --volume raven-neo4j:/data neo4j:5.12
docker run -d --name raven-redis -p6379:6379 --volume raven-redis:/data redis:7.2.1
Another way to setup the environment is by running our provided docker compose file:
git clone https://github.com/CycodeLabs/raven.git
cd raven
make setup
Step 3: Run Raven Downloader
Org mode:
raven download org --token $GITHUB_TOKEN --org-name RavenDemoCrawl mode:
raven download crawl --token $GITHUB_TOKEN --min-stars 1000Step 4: Run Raven Indexer
raven indexStep 5: Inspect the results through the reporter
raven report --format rawAt this point, it is possible to inspect the data in the Neo4j database, by connecting http://localhost:7474/browser/.
Raven is using two primary docker containers: Redis and Neo4j. make setup will run a docker compose command to prepare that environment.
The tool contains three main functionalities, download and index and report.
usage: raven download org [-h] --token TOKEN [--debug] [--redis-host REDIS_HOST] [--redis-port REDIS_PORT] [--clean-redis] --org-name ORG_NAME

options:
  -h, --help            show this help message and exit
  --token TOKEN         GITHUB_TOKEN to download data from Github API (Needed for effective rate-limiting)
  --debug               Whether to print debug statements, default: False
  --redis-host REDIS_HOST
                        Redis host, default: localhost
  --redis-port REDIS_PORT
                        Redis port, default: 6379
  --clean-redis, -cr    Whether to clean cache in the redis, default: False
--org-name ORG_NAME Organization name to download the workflowsusage: raven download crawl [-h] --token TOKEN [--debug] [--redis-host REDIS_HOST] [--redis-port REDIS_PORT] [--clean-redis] [--max-stars MAX_STARS] [--min-stars MIN_STARS]
options:
-h, --help show this help message and exit
--token TOKEN GITHUB_TOKEN to download data from Github API (Needed for effective rate-limiting)
--debug Whether to print debug statements, default: False
--redis-host REDIS_HOST
Redis host, default: localhost
--redis-port REDIS_PORT
Redis port, default: 6379
--clean-redis, -cr Whether to clean cache in the redis, default: False
--max-stars MAX_STARS
Maximum number of stars for a repository
--min-stars MIN_STARS
Minimum number of stars for a repository, default : 1000usage: raven index [-h] [--redis-host REDIS_HOST] [--redis-port REDIS_PORT] [--clean-redis] [--neo4j-uri NEO4J_URI] [--neo4j-user NEO4J_USER] [--neo4j-pass NEO4J_PASS]
[--clean-neo4j] [--debug]
options:
-h, --help show this help message and exit
--redis-host REDIS_HOST
Redis host, default: localhost
--redis-port REDIS_PORT
Redis port, default: 6379
--clean-redis, -cr Whether to clean cache in the redis, default: False
--neo4j-uri NEO4J_URI
Neo4j URI endpoint, default: neo4j://localhost:7687
--neo4j-user NEO4J_USER
Neo4j username, default: neo4j
--neo4j-pass NEO4J_PASS
Neo4j password, default: 123456789
--clean-neo4j, -cn Whether to clean cache, and index f rom scratch, default: False
--debug Whether to print debug statements, default: Falseusage: raven report [-h] [--redis-host REDIS_HOST] [--redis-port REDIS_PORT] [--clean-redis] [--neo4j-uri NEO4J_URI]
[--neo4j-user NEO4J_USER] [--neo4j-pass NEO4J_PASS] [--clean-neo4j]
[--tag {injection,unauthenticated,fixed,priv-esc,supply-chain}]
[--severity {info,low,medium,high,critical}] [--queries-path QUERIES_PATH] [--format {raw,json}]
{slack} ...
positional arguments:
{slack}
slack Send report to slack channel
options:
-h, --help show this help message and exit
--redis-host REDIS_HOST
Redis host, default: localhost
--redis-port REDIS_PORT
Redis port, default: 6379
--clean-redis, -cr Whether to clean cache in the redis, default: False
--neo4j-uri NEO4J_URI
Neo4j URI endpoint, default: neo4j://localhost:7687
--neo4j-user NEO4J_USER
Neo4j username, default: neo4j
--neo4j-pass NEO4J_PASS
Neo4j password, default: 123456789
--clean-neo4j, -cn Whether to clean cache, and index from scratch, default: False
--tag {injection,unauthenticated,fixed,priv-esc,supply-chain}, -t {injection,unauthenticated,fixed,priv-esc,supply-chain}
Filter queries with specific tag
--severity {info,low,medium,high,critical}, -s {info,low,medium,high,critical}
Filter queries by severity level (default: info)
--queries-path QUERIES_PATH, -dp QUERIES_PATH
Queries folder (default: library)
--format {raw,json}, -f {raw,json}
Report format (default: raw)Retrieve all workflows and actions associated with the organization.
raven download org --token $GITHUB_TOKEN --org-name microsoft --org-name google --debugScrape all publicly accessible GitHub repositories.
raven download crawl --token $GITHUB_TOKEN --min-stars 100 --max-stars 1000 --debugAfter finishing the download process or if interrupted using Ctrl+C, proceed to index all workflows and actions into the Neo4j database.
raven index --debugNow, we can generate a report using our query library.
raven report --severity high --tag injection --tag unauthenticatedFor effective rate limiting, you should supply a Github token. For authenticated users, the next rate limiting applies:
Dockerfile (without action.yml). Currently, this behavior isn't supported.docker://... URL. Currently, this behavior isn't supported.data. That action parameter may be used in a run command: - run: echo ${{ inputs.data }}, which creates a path for a code execution.GITHUB_ENV. This may utilize the previous taint analysis as well.actions/github-script has an interesting threat landscape. If it is, it can be modeled in the graph.If you liked Raven, you would probably love our Cycode platform that offers even more enhanced capabilities for visibility, prioritization, and remediation of vulnerabilities across the software delivery.
If you are interested in a robust, research-driven Pipeline Security, Application Security, or ASPM solution, don't hesitate to get in touch with us or request a demo using the form https://cycode.com/book-a-demo/.
Bugsy is a command-line interface (CLI) tool that provides automatic security vulnerability remediation for your code. It is the community edition version of Mobb, the first vendor-agnostic automated security vulnerability remediation tool. Bugsy is designed to help developers quickly identify and fix security vulnerabilities in their code.
Mobb is the first vendor-agnostic automatic security vulnerability remediation tool. It ingests SAST results from Checkmarx, CodeQL (GitHub Advanced Security), OpenText Fortify, and Snyk and produces code fixes for developers to review and commit to their code.
Bugsy has two modes - Scan (no SAST report needed) & Analyze (the user needs to provide a pre-generated SAST report from one of the supported SAST tools).
Scan
Analyze
This is a community edition version that only analyzes public GitHub repositories. Analyzing private repositories is allowed for a limited amount of time. Bugsy does not detect any vulnerabilities in your code, it uses findings detected by the SAST tools mentioned above.
You can simply run Bugsy from the command line, using npx:

WebCopilot is an automation tool designed to enumerate subdomains of the target and detect bugs using different open-source tools.
The script first enumerate all the subdomains of the given target domain using assetfinder, sublister, subfinder, amass, findomain, hackertarget, riddler and crt then do active subdomain enumeration using gobuster from SecLists wordlist then filters out all the live subdomains using dnsx then it extract titles of the subdomains using httpx & scans for subdomain takeover using subjack. Then it uses gauplus & waybackurls to crawl all the endpoints of the given subdomains then it use gf patterns to filters out xss, lfi, ssrf, sqli, open redirect & rce parameters from that given subdomains, and then it scans for vulnerabilities on the sub domains using different open-source tools (like kxss, dalfox, openredirex, nuclei, etc). Then it'll print out the result of the scan and save all the output in a specified directory.
g!2m0:~ webcopilot -h
                                ──────▄▀▄─────▄▀▄
                                ─────▄█░░▀▀▀▀▀░░█▄
                                ─▄▄──█░░░░░░░░░░░█──▄▄
                                █▄▄█─█░░▀░░┬░░▀░░█─█▄▄█
 ██╗░░░░░░░██╗███████╗██████╗░░█████╗░░█████╗░██████╗░██╗██╗░░░░░░█████╗░████████╗
░██║░░██╗░░██║██╔════╝██╔══██╗██╔══██╗██╔══██╗██╔══██╗██║██║░░░░░██╔══██╗╚══██╔══╝
░╚██╗████╗██╔╝█████╗░░██████╦╝██║░░╚═╝██║░░██║██████╔╝██║██║░░░░░██║░░██║░░░██║░░░
░░████╔═████║░██╔══╝░░██╔══██╗██║░░██╗██║░░██║██╔═══╝░██║██║ ░░░░██║░░██║░░░██║░░░
░░╚██╔╝░╚██╔╝░███████╗██████╦╝╚█████╔╝╚█████╔╝██║░░░░░██║███████╗╚█████╔╝░░░██║░░░
░░░╚═╝░░░╚═╝░░╚══════╝╚═════╝░░╚════╝ ░╚════╝░╚═╝░░░░░╚═╝╚══════╝░╚════╝░░░░╚═╝░░░
                                                      [●] @h4r5h1t.hrs | G!2m0

Usage:
webcopilot -d <target>
webcopilot -d <target> -s
webcopilot [-d target] [-o output destination] [-t threads] [-b blind server URL] [-x exclude domains]

Flags:
  -d        Add your target [Requried]
  -o        To save outputs in folder [Default: domain.com]
  -t        Number of threads [Default: 100]
  -b        Add your server for BXSS [Default: False]
  -x        Exclude out of scope domains [Default: False]
  -s        Run only Subdomain Enumeration [Default: False]
  -h        Show this help message

Example: webcopilot  -d domain.com -o domain -t 333 -x exclude.txt -b testServer.xss
Use https://xsshunter.com/ or https://interact.projectdiscovery.io/ to get your serverWebCopilot requires git to install successfully. Run the following command as a root to install webcopilot
git clone https://github.com/h4r5h1t/webcopilot && cd webcopilot/ && chmod +x webcopilot install.sh && mv webcopilot /usr/bin/ && ./install.shSubFinder • Sublist3r • Findomain • gf • OpenRedireX • dnsx • sqlmap • gobuster • assetfinder • httpx • kxss • qsreplace • Nuclei • dalfox • anew • jq • aquatone • urldedupe • Amass • gauplus • waybackurls • crlfuzz
To run the tool on a target, just use the following command.
g!2m0:~ webcopilot -d bugcrowd.comThe -o command can be used to specify an output dir.
g!2m0:~ webcopilot -d bugcrowd.com -o bugcrowdThe -s command can be used for only subdomain enumerations (Active + Passive and also get title & screenshots).
g!2m0:~ webcopilot -d bugcrowd.com -o bugcrowd -s The -t command can be used to add thrads to your scan for faster result.
g!2m0:~ webcopilot -d bugcrowd.com -o bugcrowd -t 333 The -b command can be used for blind xss (OOB), you can get your server from xsshunter or interact
g!2m0:~ webcopilot -d bugcrowd.com -o bugcrowd -t 333 -b testServer.xssThe -x command can be used to exclude out of scope domains.
g!2m0:~ echo out.bugcrowd.com > excludeDomain.txt
g!2m0:~ webcopilot -d bugcrowd.com -o bugcrowd -t 333 -x excludeDomain.txt -b testServer.xssDefault options looks like this:
g!2m0:~ webcopilot -d bugcrowd.com - bugcrowd ──────▄▀▄─────▄▀▄
─────▄█░░▀▀▀▀▀░░█▄
─▄▄──█░░░░░░░░░░░█──▄▄
█▄▄█─█░░▀░░┬░░▀░░█─█▄▄█
██╗░░░░░░░██╗███████╗██████╗░░█████╗░ █████╗░██████╗░██╗██╗░░░░░░█████╗░████████╗
░██║░░██╗░░██║██╔════╝██╔══██╗██╔══██╗██╔══██╗██╔══██╗██║██║░░░░░██╔══██╗╚══██╔══╝
░╚██╗████╗██╔╝█ ███╗░░██████╦╝██║░░╚═╝██║░░██║██████╔╝██║██║░░░░░██║░░██║░░░██║░░░
░░████╔═████║░██╔══╝░░██╔══██╗██║░░██╗██║░░██║██╔═══╝░██║██║░░░░░██║░░██║░░ ██║░░░
░░╚██╔╝░╚██╔╝░███████╗██████╦╝╚█████╔╝╚█████╔╝██║░░░░░██║███████╗╚█████╔╝░░░██║░░░
░░░╚═╝░░░╚═╝░░╚══════╝╚═════╝░░╚════╝░░╚════╝░╚═╝░░░ ░╚═╝╚══════╝░╚════╝░░░░╚═╝░░░
[●] @h4r5h1t.hrs | G!2m0
[❌] Warning: Use with caution. You are responsible for your own actions.
[❌] Developers assume no liability and are not responsible for any misuse or damage cause by this tool.
Target: bugcrowd.com
Output: /home/gizmo/targets/bugcrowd
Threads: 100
Server: False
Exclude: False
Mode: Running all Enumeration
Time: 30-08-2021 15:10:00
[!] Please wait while scanning...
[●] Subdoamin Scanning is in progress: Scanning subdomains of bugcrowd.com
[●] Subdoamin Scanned - [assetfinder✔] Subdomain Found: 34
[●] Subdoamin Scanned - [sublist3r✔] Subdomain Found: 29
[●] Subdoamin Scanned - [subfinder✔] Subdomain Found: 54
[●] Subdoamin Scanned - [amass✔] Subdomain Found: 43
[●] Subdoamin Scanned - [findomain✔] Subdomain Found: 27
[●] Active Subdoamin Scanning is in progress:
[!] Please be patient. This may take a while...
[●] Active Subdoamin Scanned - [gobuster✔] Subdomain Found: 11
[●] Active Subdoamin Scanned - [amass✔] Subdomain Found: 0
[●] Subdomain Scanning: Filtering out of scope subdomains
[●] Subdomain Scanning: Filtering Alive subdomains
[●] Subdomain Scanning: Getting titles of valid subdomains
[●] Visual inspection of Subdoamins is completed. Check: /subdomains/aquatone/
[●] Scanning Completed for Subdomains of bugcrowd.com Total: 43 | Alive: 30
[●] Endpoints Scanning Completed for Subdomains of bugcrowd.com Total: 11032
[●] Vulnerabilities Scanning is in progress: Getting all vulnerabilities of bugcrowd.com
[●] Vulnerabilities Scanned - [XSS✔] Found: 0
[●] Vulnerabilities Scanned - [SQLi✔] Found: 0
[●] Vulnerabilities Scanned - [LFI✔] Found: 0
[●] Vulnerabilities Scanned - [CRLF✔] Found: 0
[●] Vulnerabilities Scanned - [SSRF✔] Found: 0
[●] Vulnerabilities Scanned - [Sensitive Data✔] Found: 0
[●] Vulnerabilities Scanned - [Open redirect✔] Found: 0
[●] Vulnerabilities Scanned - [Subdomain Takeover✔] Found: 0
[●] Vulnerabilities Scanned - [Nuclie✔] Found: 0
[●] Vulnerabilities Scanning Completed for Subdomains of bugcrowd.com Check: /vulnerabilities/
▒█▀▀█ █▀▀ █▀▀ █░░█ █░░ ▀▀█▀▀
▒█▄▄▀ █▀▀ ▀▀█ █░░█ █░░ ░░█░░
▒█░▒█ ▀▀▀ ▀▀▀ ░▀▀▀ ▀▀▀ ░░▀░░
[+] Subdomains of bugcrowd.com
[+] Subdomains Found: 0
[+] Subdomains Alive: 0
[+] Endpoints: 11032
[+] XSS: 0
[+] SQLi: 0
[+] Open Redirect: 0
[+] SSRF: 0
[+] CRLF: 0
[+] LFI: 0
[+] Sensitive Data: 0
[+] Subdomain Takeover: 0
[+] Nuclei: 0WebCopilot is inspired from Garud & Pinaak by ROX4R.
@aboul3la @tomnomnom @lc @hahwul @projectdiscovery @maurosoria @shelld3v @devanshbatham @michenriksen @defparam @projectdiscovery @bp0lr @ameenmaali @sqlmapproject @dwisiswant0 @OWASP @OJ @Findomain @danielmiessler @1ndianl33t @ROX4R
| Warning: Developers assume no liability and are not responsible for any misuse or damage cause by this tool. So, please se with caution because you are responsible for your own actions. |
AcuAutomate is an unofficial Acunetix CLI tool that simplifies automated pentesting and bug hunting across extensive targets. It's a valuable aid during large-scale pentests, enabling the easy launch or stoppage of multiple Acunetix scans simultaneously. Additionally, its versatile functionality seamlessly integrates into enumeration wrappers or one-liners, offering efficient control through its pipeline capabilities.
git clone https://github.com/danialhalo/AcuAutomate.git
cd AcuAutomate
chmod +x AcuAutomate.py
pip3 install -r requirements.txt
Before using AcuAutomate, you need to set up the configuration file config.json inside the AcuAutomate folder:
{
    "url": "https://localhost",
    "port": 3443,
    "api_key": "API_KEY"
}
The help parameter (-h) can be used for accessing more detailed help for specific actions
    		                               __  _                 ___
    		  ____ ________  ______  ___  / /_(_)  __      _____/ (_)
    		 / __ `/ ___/ / / / __ \/ _ \/ __/ / |/_/_____/ ___/ / /
    		/ /_/ / /__/ /_/ / / / /  __/ /_/ />  </_____/ /__/ / /
    		\__,_/\___/\__,_/_/ /_/\___/\__/_/_/|_|      \___/_/_/

    		                   -: By Danial Halo :-


usage: AcuAutomate.py [-h] {scan,stop} ...

Launch or stop a scan using Acunetix API

positional arguments:
  {scan,stop}  Action to perform
    scan       Launch a scan use scan -h
    stop       Stop a scan

options:
  -h, --help   show this help message and exit
For launching the scan you need to use the scan actions:
xubuntu:~/AcuAutomate$ ./AcuAutomate.py scan -h

usage: AcuAutomate.py scan [-h] [-p] [-d DOMAIN] [-f FILE]
                           [-t {full,high,weak,crawl,xss,sql}]

options:
  -h, --help            show this help message and exit
  -p, --pipe            Read from pipe
  -d DOMAIN, --domain DOMAIN
                        Domain to scan
  -f FILE, --file FILE  File containing list of URLs to scan
  -t {full,high,weak,crawl,xss,sql}, --type {full,high,weak,crawl,xss,sql}
                        High Risk Vulnerabilities Scan, Weak Password Scan, Crawl Only,
XSS Scan, SQL Injection Scan, Full Scan (by default)The domain can be provided with -d flag for single site scan:
./AcuAutomate.py scan -d https://www.google.com
For scanning multiple domains the domains need to be added into the file and then specify the file name with -f flag:
./AcuAutomate.py scan -f domains.txt
The AcuAutomate can also worked with the pipeline input with -p flag:
cat domain.txt | ./AcuAutomate.py scan -p
This is Great as it can enable the AcuAutomate to work with other tools. For example we can use the subfinder , httpx and then pipe the output to AcuAutomate for mass scanning with acunetix:
subfinder -silent -d google.com | httpx -silent | ./AcuAutomate.py scan -p
The -t flag can be used to define the scan type. For example the following scan will only detect the SQL vulnerabilities:
./AcuAutomate.py scan -d https://www.google.com -t sql
AcuAutomate only accept the domains with http:// or https://
The stop action can be used for stoping the scan either with -d flag for stoping scan by specifing the domain or with -a flage for stopping all running scans.
xubuntu:~/AcuAutomate$ ./AcuAutomate.py stop -h


    		                               __  _                 ___
    		  ____ ________  ______  ___  / /_(_)  __      _____/ (_)
    		 / __ `/ ___/ / / / __ \/ _ \/ __/ / |/_/_____/ ___/ / /
    		/ /_/ / /__/ /_/ / / / /  __/ /_/ />  </_____/ /__/ / /
    		\__,_/\___/\__,_/_/ /_/\___/\__/_/_/|_|      \___/_/_/

    		                   -: By Danial Halo :-


usage: AcuAutomate.py stop [-h] [-d DOMAIN] [-a]

options:
  -h, --help            show this help message and exit
  -d DOMAIN, --domain DOMAIN
                        Domain of the scan to stop
  -a, --all             Stop all Running Scans
Please submit any bugs, issues, questions, or feature requests under "Issues" or send them to me on Twitter. @DanialHalo
Microsoft ICS Forensics Tools is an open source forensic framework for analyzing Industrial PLC metadata and project files.
it enables investigators to identify suspicious artifacts on ICS environment for detection of compromised devices during incident response or manual check.
open source framework, which allows investigators to verify the actions of the tool or customize it to specific needs.
These instructions will get you a copy of the project up and running on your local machine for development and testing purposes.
git clone https://github.com/microsoft/ics-forensics-tools.git
Install python requirements
pip install -r requirements.txt
| Args | Description | Required / Optional |
|---|---|---|
-h, --help
| show this help message and exit | Optional |
-s, --save-config
| Save config file for easy future usage | Optional |
-c, --config
| Config file path, default is config.json | Optional |
-o, --output-dir
| Directory in which to output any generated files, default is output | Optional |
-v, --verbose
| Log output to a file as well as the console | Optional |
-p, --multiprocess
| Run in multiprocess mode by number of plugins/analyzers | Optional |
| Args | Description | Required / Optional |
|---|---|---|
-h, --help
| show this help message and exit | Optional |
--ip | Addresses file path, CIDR or IP addresses csv (ip column required). add more columns for additional info about each ip (username, pass, etc...) | Required |
--port | Port number | Optional |
--transport | tcp/udp | Optional |
--analyzer | Analyzer name to run | Optional |
 python driver.py -s -v PluginName --ip ips.csv
 python driver.py -s -v PluginName --analyzer AnalyzerName
 python driver.py -s -v -c config.json --multiprocess
from forensic.client.forensic_client import ForensicClient
from forensic.interfaces.plugin import PluginConfig
forensic = ForensicClient()
plugin = PluginConfig.from_json({
    "name": "PluginName",
    "port": 123,
    "transport": "tcp",
    "addresses": [{"ip": "192.168.1.0/24"}, {"ip": "10.10.10.10"}],
    "parameters": {
    },
    "analyzers": []
})
forensic.scan([plugin])When developing locally make sure to mark src folder as "Sources root"
from pathlib import Path
from forensic.interfaces.plugin import PluginInterface, PluginConfig, PluginCLI
from forensic.common.constants.constants import Transport


class GeneralCLI(PluginCLI):
    def __init__(self, folder_name):
        super().__init__(folder_name)
        self.name = "General"
        self.description = "General Plugin Description"
        self.port = 123
        self.transport = Transport.TCP

    def flags(self, parser):
        self.base_flags(parser, self.port, self.transport)
        parser.add_argument('--general', help='General additional argument', metavar="")


class General(PluginInterface):
    def __init__(self, config: PluginConfig, output_dir: Path, verbose: bool):
        super().__init__(config, output_dir, verbose)

    def connect(self, address):
        self.logger.info(f"{self.config.name} connect")

    def export(self,    extracted):
        self.logger.info(f"{self.config.name} export")
__init__.py file under the plugins folderfrom pathlib import Path
from forensic.interfaces.analyzer import AnalyzerInterface, AnalyzerConfig
class General(AnalyzerInterface):
def __init__(self, config: AnalyzerConfig, output_dir: Path, verbose: bool):
super().__init__(config, output_dir, verbose)
self.plugin_name = 'General'
self.create_output_dir(self.plugin_name)
def analyze(self):
pass__init__.py file under the analyzers folderMicrosoft Defender for IoT is an agentless network-layer security solution that allows organizations to continuously monitor and discover assets, detect threats, and manage vulnerabilities in their IoT/OT and Industrial Control Systems (ICS) devices, on-premises and in Azure-connected environments.
Section 52 under MSRC blog
ICS Lecture given about the tool
Section 52 - Investigating Malicious Ladder Logic | Microsoft Defender for IoT Webinar - YouTube
This project welcomes contributions and suggestions. Most contributions require you to agree to a Contributor License Agreement (CLA) declaring that you have the right to, and actually do, grant us the rights to use your contribution. For details, visit https://cla.opensource.microsoft.com.
When you submit a pull request, a CLA bot will automatically determine whether you need to provide a CLA and decorate the PR appropriately (e.g., status check, comment). Simply follow the instructions provided by the bot. You will only need to do this once across all repos using our CLA.
This project has adopted the Microsoft Open Source Code of Conduct. For more information see the Code of Conduct FAQ or contact opencode@microsoft.com with any additional questions or comments.
This project may contain trademarks or logos for projects, products, or services. Authorized use of Microsoft trademarks or logos is subject to and must follow Microsoft's Trademark & Brand Guidelines. Use of Microsoft trademarks or logos in modified versions of this project must not cause confusion or imply Microsoft sponsorship. Any use of third-party trademarks or logos are subject to those third-party's policies.
A comprehensive tool that provides an insightful analysis of Microsoft's monthly security updates.
IF you are interested in seing all this data in a live website, visit:
PatchaPalooza uses the power of Microsoft's MSRC CVRF API to fetch, store, and analyze security update data. Designed for cybersecurity professionals, it offers a streamlined experience for those who require a quick yet detailed overview of vulnerabilities, their exploitation status, and more. This tool operates entirely offline once the data has been fetched, ensuring that your analyses can continue even without an internet connection.
Run PatchaPalooza without arguments to see an analysis of the current month's data:
python PatchaPalooza.pyFor a specific month's analysis:
python PatchaPalooza.py --month YYYY-MMMTo display a detailed view of a specific CVE:
python PatchaPalooza.py --detail CVE-IDTo update and store the latest data:
python PatchaPalooza.py --updateFor an overall statistical overview:
python PatchaPalooza.py --statsThis tool is built upon the Microsoft's MSRC CVRF API and is inspired by the work of @KevTheHermit.
Alexander Hagenah
This tool is meant for educational and professional purposes only. No license, so do with it whatever you like.

OSDP attack tool (and the Elvish word for friend)
OSDP supports, but doesn't strictly require, encryption. So your connection might not even be encrypted at all. Attack #1 is just to passively listen and see if you can read the card numbers on the wire.
Just because the controller and reader support encryption doesn't mean they're configured to require it be used. An attacker can modify the reader's capability reply message (osdp_PDCAP) to advertise that it doesn't support encryption. When this happens, some controllers will barrel ahead without encryption.
OSDP has a quasi-official “install mode” that applies to both readers and controllers. As the name suggests, it’s supposed to be used when first setting up a reader. What it does is essentially allow readers to ask the controller for what the base encryption key (the SCBK) is. If the controller is configured to be persistently in install-mode, then an attacker can show up on the wire and request the SCBK.
OSDP sample code often comes with hardcoded encryption keys. Clearly these are meant to be samples, where the user is supposed to generate keys in a secure way on their own. But this is not explained or made simple for the user, however. And anyone who’s been in security long enough knows that whatever’s the default is likely to be there in production.
So as an attack vector, when the link between reader and controller is encrypted, it’s worth a shot to enumerate some common weak keys. Now these are 128-bit AES keys, so we’re not going to be able to enumerate them all. Or even a meaningful portion of them. But what we can do is hit some common patterns that you see when someone hardcodes a key:
OSDP has no in-band mechansim for key exchange. What this means is that an attacker can:
You'll find proof-of-concept code for each of these attacks in attack_osdp.py. Checkout the --help command for more details on usage. This is a Python script, meant to be run from a laptop with USB<-->RS485 adapters like one of these. So you'll probably want to pick some of those up. Doesn't have to be that model, though.
If you have a controller you want to test, then great. Use that. If you don't, then we have an intentionally-vulnerable OSDP controller that you can use here: vulnserver.py.
Some of the attacks in attack_osdp.py will expect to be as a full MitM between a functioning reader and controller. To test these, you might need three USB<-->RS485 adapters, hooked together with a breadboard.
These issues are not, in isolation, exploitable but nonetheless represent a weakening of the protocol, implementation, or overall system.
Callisto is an intelligent automated binary vulnerability analysis tool. Its purpose is to autonomously decompile a provided binary and iterate through the psuedo code output looking for potential security vulnerabilities in that pseudo c code. Ghidra's headless decompiler is what drives the binary decompilation and analysis portion. The pseudo code analysis is initially performed by the Semgrep SAST tool and then transferred to GPT-3.5-Turbo for validation of Semgrep's findings, as well as potential identification of additional vulnerabilities.
This tool's intended purpose is to assist with binary analysis and zero-day vulnerability discovery. The output aims to help the researcher identify potential areas of interest or vulnerable components in the binary, which can be followed up with dynamic testing for validation and exploitation. It certainly won't catch everything, but the double validation with Semgrep to GPT-3.5 aims to reduce false positives and allow a deeper analysis of the program.
For those looking to just leverage the tool as a quick headless decompiler, the output.c file created will contain all the extracted pseudo code from the binary. This can be plugged into your own SAST tools or manually analyzed.
I owe Marco Ivaldi @0xdea a huge thanks for his publicly released custom Semgrep C rules as well as his idea to automate vulnerability discovery using semgrep and pseudo code output from decompilers. You can read more about his research here: Automating binary vulnerability discovery with Ghidra and Semgrep
Requirements:
pip install semgrep
pip install -r requirements.txt
config.txt fileTo Run: python callisto.py -b <path_to_binary> -ai -o <path_to_output_file>
-ai => enable OpenAI GPT-3.5-Turbo Analysis. Will require placing a valid OpenAI API key in the config.txt file-o => define an output file, if you want to save the output-ai and -o are optional parameters-all will run all functions through OpenAI Analysis, regardless of any Semgrep findings. This flag requires the prerequisite -ai flagpython callisto.py -b vulnProgram.exe -ai -o results.txt
python callisto.py -b vulnProgram.exe -ai -all -o results.txt
Program Output Example:
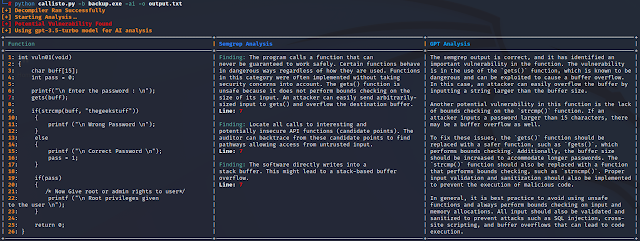
surf allows you to filter a list of hosts, returning a list of viable SSRF candidates. It does this by sending a HTTP request from your machine to each host, collecting all the hosts that did not respond, and then filtering them into a list of externally facing and internally facing hosts.
You can then attempt these hosts wherever an SSRF vulnerability may be present. Due to most SSRF filters only focusing on internal or restricted IP ranges, you'll be pleasantly surprised when you get SSRF on an external IP that is not accessible via HTTP(s) from your machine.
Often you will find that large companies with cloud environments will have external IPs for internal web apps. Traditional SSRF filters will not capture this unless these hosts are specifically added to a blacklist (which they usually never are). This is why this technique can be so powerful.
This tool requires go 1.19 or above as we rely on httpx to do the HTTP probing.
It can be installed with the following command:
go install github.com/assetnote/surf/cmd/surf@latestConsider that you have subdomains for bigcorp.com inside a file named bigcorp.txt, and you want to find all the SSRF candidates for these subdomains. Here are some examples:
# find all ssrf candidates (including external IP addresses via HTTP probing)
surf -l bigcorp.txt
# find all ssrf candidates (including external IP addresses via HTTP probing) with timeout and concurrency settings
surf -l bigcorp.txt -t 10 -c 200
# find all ssrf candidates (including external IP addresses via HTTP probing), and just print all hosts
surf -l bigcorp.txt -d
# find all hosts that point to an internal/private IP address (no HTTP probing)
surf -l bigcorp.txt -x
The full list of settings can be found below:
❯ surf -h

███████╗██╗   ██╗██████╗ ███████╗
██╔════╝██║   ██║██╔══██╗██╔════╝
███████╗██║   ██║██████╔╝█████╗
╚════██║██║   ██║██╔══██╗██╔══╝
███████║╚██████╔ ██║  ██║██║
╚══════╝ ╚═════╝ ╚═╝  ╚═╝╚═╝

by shubs @ assetnote

Usage: surf [--hosts FILE] [--concurrency CONCURRENCY] [--timeout SECONDS] [--retries RETRIES] [--disablehttpx] [--disableanalysis]

Options:
  --hosts FILE, -l FILE
                         List of assets (hosts or subdomains)
  --concurrency CONCURRENCY, -c CONCURRENCY
                         Threads (passed down to httpx) - default 100 [default: 100]
  --timeout SECONDS, -t SECONDS
                         Timeout in seconds (passed down to httpx) - default 3 [default: 3]
  --retries RETRIES, -r RETRIES
                         Retries on failure (passed down to httpx) - default    2 [default: 2]
  --disablehttpx, -x     Disable httpx and only output list of hosts that resolve to an internal IP address - default false [default: false]
  --disableanalysis, -d
                         Disable analysis and only output list of hosts - default false [default: false]
  --help, -h             display this help and exit
When running surf, it will print out the SSRF candidates to stdout, but it will also save two files inside the folder it is ran from:
external-{timestamp}.txt - Externally resolving, but unable to send HTTP requests to from your machineinternal-{timestamp}.txt - Internally resolving, and obviously unable to send HTTP requests from your machineThese two files will contain the list of hosts that are ideal SSRF candidates to try on your target. The external target list has higher chances of being viable than the internal list.
Under the hood, this tool leverages httpx to do the HTTP probing. It captures errors returned from httpx, and then performs some basic analysis to determine the most viable candidates for SSRF.
This tool was created as a result of a live hacking event for HackerOne (H1-4420 2023).

NucleiFuzzer is an automation tool that combines ParamSpider and Nuclei to enhance web application security testing. It uses ParamSpider to identify potential entry points and Nuclei's templates to scan for vulnerabilities. NucleiFuzzer streamlines the process, making it easier for security professionals and web developers to detect and address security risks efficiently. Download NucleiFuzzer to protect your web applications from vulnerabilities and attacks.
Note: Nuclei + Paramspider = NucleiFuzzer
ParamSpider git clone https://github.com/0xKayala/ParamSpider.git
Nuclei git clone https://github.com/projectdiscovery/nuclei.git
Fuzzing Templates git clone https://github.com/projectdiscovery/fuzzing-templates.git


nucleifuzzer -hThis will display help for the tool. Here are the options it supports.
NucleiFuzzer is a Powerful Automation tool for detecting XSS, SQLi, SSRF, Open-Redirect, etc. vulnerabilities in Web Applications

Usage: /usr/local/bin/nucleifuzzer [options]

Options:
  -h, --help              Display help information
-d, --domain <domain> Domain to scan for XSS, SQLi, SSRF, Open-Redirect..etc vulnerabilitiesMade by Satya Prakash | 0xKayala \
A Security Researcher and Bug Hunter \

While DLL sideloading can be used for legitimate purposes, such as loading necessary libraries for a program to function, it can also be used for malicious purposes. Attackers can use DLL sideloading to execute arbitrary code on a target system, often by exploiting vulnerabilities in legitimate applications that are used to load DLLs.
To automate the DLL sideloading process and make it more effective, Chimera was created a tool that include evasion methodologies to bypass EDR/AV products. These tool can automatically encrypt a shellcode via XOR with a random key and create template Images that can be imported into Visual Studio to create a malicious DLL.
Also Dynamic Syscalls from SysWhispers2 is used and a modified assembly version to evade the pattern that the EDR search for, Random nop sleds are added and also registers are moved. Furthermore Early Bird Injection is also used to inject the shellcode in another process which the user can specify with Sandbox Evasion mechanisms like HardDisk check & if the process is being debugged. Finally Timing attack is placed in the loader which using waitable timers to delay the execution of the shellcode.
This tool has been tested and shown to be effective at bypassing EDR/AV products and executing arbitrary code on a target system.
Chimera is written in python3 and there is no need to install any extra dependencies.
Chimera currently supports two DLL options either Microsoft teams or Microsoft OneDrive.
Someone can create userenv.dll which is a missing DLL from Microsoft Teams and insert it to the specific folder to
%USERPROFILE%/Appdata/local/Microsoft/Teams/current
For Microsoft OneDrive the script uses version DLL which is common because its missing from the binary example onedriveupdater.exe
python3 ./chimera.py met.bin chimera_automation notepad.exe teams
python3 ./chimera.py met.bin chimera_automation notepad.exe onedrive
Once the compilation process is complete, a DLL will be generated, which should include either "version.dll" for OneDrive or "userenv.dll" for Microsoft Teams. Next, it is necessary to rename the original DLLs.
For instance, the original "userenv.dll" should be renamed as "tmpB0F7.dll," while the original "version.dll" should be renamed as "tmp44BC.dll." Additionally, you have the option to modify the name of the proxy DLL as desired by altering the source code of the DLL exports instead of using the default script names.
Step 1: Creating a New Visual Studio Project with DLL Template


Step 2: Importing Images into the Visual Studio Project
Step 3: Build Customization
Step 4: Enable MASM

Step 5:


Step 1: Change optimization

Step 2: Remove Debug Information's

To the maximum extent permitted by applicable law, myself(George Sotiriadis) and/or affiliates who have submitted content to my repo, shall not be liable for any indirect, incidental, special, consequential or punitive damages, or any loss of profits or revenue, whether incurred directly or indirectly, or any loss of data, use, goodwill, or other intangible losses, resulting from (i) your access to this resource and/or inability to access this resource; (ii) any conduct or content of any third party referenced by this resource, including without limitation, any defamatory, offensive or illegal conduct or other users or third parties; (iii) any content obtained from this resource
https://evasions.checkpoint.com/
https://github.com/Flangvik/SharpDllProxy
https://github.com/jthuraisamy/SysWhispers2
https://github.com/Mr-Un1k0d3r

Upload_Bypass is a powerful tool designed to assist Pentesters and Bug Hunters in testing file upload mechanisms. It leverages various bug bounty techniques to simplify the process of identifying and exploiting vulnerabilities, ensuring thorough assessments of web applications.
Please note that the use of Upload_Bypass and any actions taken with it are solely at your own risk. The tool is provided for educational and testing purposes only. The developer of Upload_Bypass is not responsible for any misuse, damage, or illegal activities caused by its usage.
While Upload_Bypass aims to assist Pentesters and Bug Hunters in testing file upload mechanisms, it is essential to obtain proper authorization and adhere to applicable laws and regulations before performing any security assessments. Always ensure that you have the necessary permissions from the relevant stakeholders before conducting any testing activities.
The results and findings obtained from using Upload_Bypass should be communicated responsibly and in accordance with established disclosure processes. It is crucial to respect the privacy and integrity of the tested systems and refrain from causing harm or disruption.
By using Upload_Bypass, you acknowledge that the developer cannot be held liable for any consequences resulting from its use. Use the tool responsibly and ethically to promote the security and integrity of web applications.
Download the latest version from Releases page.
pip install -r requirements.txt
The tool will not function properly if the file upload mechanism includes CAPTCHA implementation.
Perhaps in the future the tool will include an OCR.
The Tool is compatible exclusively with output file requests generated by Burp Suite.
Before saving the Burp file, replace the file content with the string *content* and filename.ext with the string *filename* and Content-Type header with *mimetype*(only if the tool is not able to recognize it automatically).
How a request should look before the changes:

How it should look after the changes:

If the tool fails to recognize the mime type automatically, you can add *mimetype* in the parameter's value of the Content-Type header.
Options: -h, --help
show this help message and exit
-b BURP_FILE, --burp-file BURP_FILE
 Required - Read from a Burp Suite file
 Usage: -b / --burp-file ~/Desktop/output
-s SUCCESS_MESSAGE, --success SUCCESS_MESSAGE
 Required if -f is not set - Provide the success message when a file is uploaded
 Usage: -s /--success 'File uploaded successfully.'
-f FAILURE_MESSAGE, --failure FAILURE_MESSAGE
 Required if -s is not set - Provide a failure message when a file is uploaded
 Usage: -f /--failure 'File is not allowed!'
-e FILE_EXTENSION, --extension FILE_EXTENSION
 Required - Provide server backend extension
 Usage: -e / --extension php (Supported extensions: php,asp,jsp,perl,coldfusion)
-a ALLOWED_EXTENSIONS, --allowed ALLOWED_EXTENSIONS
 Required - Provide allowed extensions to be uploaded
 Usage: -a /--allowed jpeg, png, zip, etc'
-l WEBSHELL_LOCATION, --location WEBSHELL_LOCATION
  Provide a remote path where the WebShell will be uploaded (won't work if the file will be uploaded with a UUID).
  Usage: -l / --location /uploads/
-rl NUMBER, --rate-limit NUMBER
  Set rate-limiting with milliseconds between each request.
  Usage: -r / --rate-limit 700
-p PROXY_NUM, --proxy PROXY_NUM
  Channel the HTTP requests via proxy client (i.e Burp Suite).
  Usage: -p / --proxy http://127.0.0.1:8080
-S, --ssl
  If set, the tool will not validate TLS/SSL certificate.
  Usage: -S / --ssl
-c, --continue
  If set, the brute force will continue even if one of the methods gets a hit!
  Usage: -C /--continue
-E, --eicar
  If set, an Eicar file(Anti Malware Testfile) will be uploaded only. WebShells will not be uploaded (Suitable for real environments).
  Usage: -E / --eicar
-v, --verbose
  If set, details about the test will be printed on the screen
  Usage: -v / --verbose
-r, --response
  If set, HTTP response will be printed on the screen
  Usage: -r / --response
--version
Print the current version of the tool.
--update
Checks for new updates. If there is a new update, it will be downloaded and updated automatically.
python upload_bypass.py -b ~/Desktop/burp_output -s 'file upload successfully!' -e php -a jpeg --response -v --eicar --continue
python upload_bypass.py -b ~/Desktop/burp_output -s 'file upload successfully!' -e asp -a zip -v
python upload_bypass.py -b ~/Desktop/burp_output -s 'file upload successfully!' -e jsp -a png -v --proxy http://127.0.0.1:8080
PrivKit is a simple beacon object file that detects privilege escalation vulnerabilities caused by misconfigurations on Windows OS.
 Checks for Unquoted Service Paths
 Checks for Autologon Registry Keys
 Checks for Always Install Elevated Registry Keys
 Checks for Modifiable Autoruns
 Checks for Hijackable Paths
 Enumerates Credentials From Credential Manager
 Looks for current Token Privileges
[03/20 00:51:06] beacon> privcheck
[03/20 00:51:06] [*] Priv Esc Check Bof by @merterpreter
[03/20 00:51:06] [*] Checking For Unquoted Service Paths..
[03/20 00:51:06] [*] Checking For Autologon Registry Keys..
[03/20 00:51:06] [*] Checking For Always Install Elevated Registry Keys..
[03/20 00:51:06] [*] Checking For Modifiable Autoruns..
[03/20 00:51:06] [*] Checking For Hijackable Paths..
[03/20 00:51:06] [*] Enumerating Credentials From Credential Manager..
[03/20 00:51:06] [*] Checking For Token Privileges..
[03/20 00:51:06] [+] host called home, sent: 10485 bytes
[03/20 00:51:06] [+] received output:
Unquoted Service Path Check Result: Vulnerable service path found: c:\program files (x86)\grasssoft\macro expert\MacroService.exe
Simply load the cna file and type "privcheck"
If you want to compile by yourself you can use:make all
or x86_64-w64-mingw32-gcc -c cfile.c -o ofile.o
If you want to look for just one misconf you can use object file with "inline-execute" for example inline-execute /path/tokenprivileges.o
Mr.Un1K0d3r - Offensive Coding Portal
https://mr.un1k0d3r.world/portal/
Outflank - C2-Tool-Collection
https://github.com/outflanknl/C2-Tool-Collection
dtmsecurity - Beacon Object File (BOF) Creation Helper
https://github.com/dtmsecurity/bof_helper
Microsoft :)
https://learn.microsoft.com/en-us/windows/win32/api/
HsTechDocs by HelpSystems(Fortra)
https://hstechdocs.helpsystems.com/manuals/cobaltstrike/current/userguide/content/topics/beacon-object-files_how-to-develop.htm
Instagram: TMRSWRR
LFI-FINDER is an open-source tool available on GitHub that focuses on detecting Local File Inclusion (LFI) vulnerabilities. Local File Inclusion is a common security vulnerability that allows an attacker to include files from a web server into the output of a web application. This tool automates the process of identifying LFI vulnerabilities by analyzing URLs and searching for specific patterns indicative of LFI. It can be a useful addition to a security professional's toolkit for detecting and addressing LFI vulnerabilities in web applications.
This tool works with geckodriver, search url for LFI Vuln and when get an root text on the screen, it notifies you of the successful payload.
git clone https://github.com/capture0x/LFI-FINDER/
cd LFI-FINDER
bash setup.sh
pip3 install -r requirements.txt
chmod -R 755 lfi.py
python3 lfi.py
THIS IS FOR LATEST GOOGLE CHROME VERSION
For bug reports or enhancements, please open an issue here.
Copyright 2023
Cake Fuzzer is a project that is meant to help automatically and continuously discover vulnerabilities in web applications created based on specific frameworks with very limited false positives. Currently it is implemented to support the Cake PHP framework.
If you would like to learn more about the research process check out this article series: CakePHP Application Cybersecurity Research
Typical approaches to discovering vulnerabilities using automated tools in web applications are:
Both methods have disadvantages. SAST results in a high percentage of false positives – findings that are either not vulnerabilities or not exploitable vulnerabilities. DAST results in fewer false positives but discovers fewer vulnerabilities due to the limited information. It also requires some knowledge about the application and a security background of a person who runs a scan. This often comes with a custom scan configuration per application to work properly.
The Cake Fuzzer project is meant to combine the advantages of both approaches and eliminate the above-mentioned disadvantages. This approach is called Interactive Application Security Testing (IAST).
The goals of the project are:
Note: Some classes of vulnerabilities are not the target of the Cake Fuzzer, therefore Cake Fuzzer will not be able to detect them. Examples of those classes are business logic vulnerabilities and access control issues.
Drawio: Cake Fuzzer Architecture
Cake Fuzzer consists of 3 main (fairly independent) servers that in total allow for dynamic vulnerability testing of CakePHP allications.
Other components include:
Cake Fuzzer is based on the concept of Interactive Application Security Testing (IAST). It contains a predefined set of attacks that are randomly modified before the execution. Cake Fuzzer has the knowledge of the application internals thanks to the Cake PHP framework therefore the attacks will be launched on all possible entry points of the application.
During the attack, the Cake Fuzzer monitors various aspects of the application and the underlying system such as:
These sources of information allow Cake Fuzzer to identify more vulnerabilities and report them with higher certainty.
The following section describes steps to setup a Cake Fuzzer development environment where the target is outdated MISP v2.4.146 that is vulnerable to CVE-2021-41326.
Run the following commands on your host operating system to download an outdated MISP VM:
cd ~/Downloads # Or wherever you want to store the MISP VM
wget https://vm.misp-project.org/MISP_v2.4.146@0c25b72/MISP_v2.4.146@0c25b72-VMware.zip -O MISP.zip
unzip MISP.zip
rm MISP.zip
mv VMware/ MISP-2.4.146
Conduct the following actions in VMWare GUI to prepare sharing Cake Fuzzer files between your host OS and MISP:
Run the following commands on your host OS (replace MISP_IP_ADDRESS with previously noted IP address):
ssh-copy-id misp@MISP_IP_ADDRESS
ssh misp@MISP_IP_ADDRESS
Once you SSH into the MISP run the following commands (in MISP terminal) to finish setup of sharing Cake Fuzzer files between host OS and MISP:
sudo apt update
sudo apt-get -y install open-vm-tools open-vm-tools-desktop
sudo apt-get -y install build-essential module-assistant linux-headers-virtual linux-image-virtual && sudo dpkg-reconfigure open-vm-tools
sudo mkdir /cake_fuzzer # Note: This path is fixed as it's hardcoded in the instrumentation (one of the patches)
sudo vmhgfs-fuse .host:/cake_fuzzer /cake_fuzzer -o allow_other -o uid=1000
ls -l /cake_fuzzer # If everything went fine you should see content of the Cake Fuzzer directory from your host OS. Any changes on your host OS will be reflected inside the VM and vice-versa.
Prepare MISP for simple testing (in MISP terminal):
CAKE=/var/www/MISP/app/Console/cake
SUDO='sudo -H -u www-data'
$CAKE userInit -q
$SUDO $CAKE Admin setSetting "Security.password_policy_length" 1
$SUDO $CAKE Admin setSetting "Security.password_policy_complexity" '/.*/'
$SUDO $CAKE Password admin@admin.test admin --override_password_change
Finally instal Cake Fuzzer dependencies and prepare the venv (in MISP terminal):
source /cake_fuzzer/precheck.shCake Fuzzer scans for vulnerabilities that inside of /cake_fuzzer/strategies folder.
To add a new attack we need to add a new new-attack.json file to strategies folder. Each vulnerability contains 2 major fileds:Scenarios and Scanners. Scenarios where attack payloads base forms stored. Scanners in the other hand detecting regex or pharases for response, stout, sterr, logs, and results.
Scenarios
To create a payload first you need to have the understanding of the vulnerability and how to detect it with as few payloads as possible.
While constructing the scenario you should think of as most generic payload as possible. However, the more generic payload, the more chances are that it will produce false-positives.
It is preferable to us a canary value such as__cakefuzzer__new-attack_§CAKEFUZZER_PAYLOAD_GUID§__ in your scenarios. Canary value contains a fixed string (for example: __cakefuzzer__new-attack_) and a dynamic identifier that will be changed dynamically by the fuzzer (GUID part §CAKEFUZZER_PAYLOAD_GUID§). First canary part is used to ensure that payload is detected by Scanners. Second canary part, the GUID is translated to pseudo-random value on every execution of your payload. So whenever your payload will be injected into the a parameter used by the application, the canary will be changed to something like this: __cakefuzzer__new-attack_8383938__, where the 8383938 is unique across all other attacks.
Scanners
To create a scanner, first you need to understand how may the application behave when the vulnerability is triggered. There are few scanner types that you can use such as response, sterr, logs, files, and processes. Each scanner serves a different purpose.
For example when you building a scanner for an XSS, you will look for the indication of the vulnerability in the HTML response of the application. You can use ResultOutputScanner scanner to look for canary value and payload. In other hand SQL Injection vulnerabilities could be detected via error logs. For that purpose you can use LogFilesContentsScanner and ResultErrorsScanner.
Scanner regular expressions is generating an efficent regex. Avoid using regex that match all cases .* or .+. They are very time consuming and drasticly increase the time required to finish the entire scan.As mentioned before efficiency is important part of the vulnerabilities. Both Scenarios and Scanners should include as few elements as possible. This is because Cake Fuzzer executes every single scenario in all possible detected paths multiple times. On the other hand, all responses, new log entries, etc. are constantly checked by the Scanners. There should be a lot of parameters, paths, and end-points detected and therefore using more payload or Scanner affects the efficiency quite a lot.
If do not want to scan a specific vulnerability class, remove specified json file from the strategies folder, clean the database and run the fuzzer again.
For example if you do not want to scan your applicaiton for SQL Injection vulnerabilities, do the following steps:
First of all remove already prepared attack scenarios. To achive this delete all files inside of the /cake_fuzzer/databases folder:
rm /cake_fuzzer/databases/*
After that remove the sqlinj.json file from the /cake_fuzzer/strategies
rm /cake_fuzzer/strategies/sqlinj.json
Finally re-run the fuzzer and all cake_fuzzer running proccess without any SQL Injection attack executed.
git clone https://github.com/Zigrin-Security/CakeFuzzer /cake_fuzzer
Warning Cake Fuzzer won't work properly if it's under different path than /cake_fuzzer. Keep in mind that it has to be placed under the root directory of the file system, next/root,/tmp, and so on.
cd /cake_fuzzerEnter virtual environment if you are not already in:
source /cake_fuzzer/precheck.shOR
source venv/bin/activatecp config/config.example.ini config/config.iniConfigure config/config.ini:
WEBROOT_DIR="/var/www/html"         # Path to the tested applications `webroot` directory
CONCURRENT_QUEUES=5                            # [Optional] Number of attacks executed concurretnly at once
ONLY_PATHS_WITH_PREFIX="/"                      # [Optional] Fuzzer will generates only attacks for attacks starting with this prefix
EXCLUDE_PATHS=""                                # [Optional] Fuzzer will exlude from scanning all paths that match this regular expression. If it's empty, all paths will be processed
PAYLOAD_GUID_PHRASE="§CAKEFUZZER_PAYLOAD_GUID§" # [Optional] Internal keyword that is substituted right before attack with unique payload id
INSTRUMENTATION_INI="config/instrumentation_cake4.ini" # [Optional] Path to custom instrumentations of the application.
Warning During the Cake Fuzzer scan, multiple functionalities of your application will be invoked in uncontrolled manner multiple times. This may result issuing connections to external services your application is connected to, and pulling or pushing data from/to it. It is highly recommended to run Cake Fuzzer in isolated controlled environment without access to sensitive external services.
Note Cake Fuzzer bypass blackholing, CSRF protections, and authorization. It sends all attacks with privileges of a first user in the database. It is recommended that this user has the highest permissions.
The application consists of several components.
Warning All cake_fuzzer commands have to be executed as root.
Before starting the fuzzer make sure your target application is fully instrumented:
python cake_fuzzer.py instrument checkIf there are some unapplied changes apply them with:
python cake_fuzzer.py instrument applyTo run cake fuzzer do the following (It's recommended to use at least 3 separate terminal):
# First Terminal
python cake_fuzzer.py run fuzzer                  # Generates attacks, adds them to the QUEUE and registers new SCANNERS (then exits)
python cake_fuzzer.py run periodic_monitors       # Responsible for monitoring (use CTRL+C to stop & exit at the end of the scan)

# Second terminal
python cake_fuzzer.py run iteration_monitors     # Responsible for monitoring (use CTRL+C to stop & exit at the end of the scan)

# Third terminal
python cake_fuzzer.py run attack_queue            # Starts the ATTACK QUEUE (use CTRL+C to stop & exit at the end of the scan)

# Once all attacks are executed
python cake_fuzzer.py run registry                # Generates `results.json` based on found vulnerabilities
Note: There is currently a bug that can change the owner of logs (or any other dynamically changed filies of the target web app). This may cause errors when normally using the web application or even false-negatives on future Cake Fuzzer executions. For MISP we recommend running the following after every execution of the fuzzer:
sudo chown -R www-data:www-data /var/www/MISP/app/tmp/logs/Once your scan finishes revert the instrumentation:
python cake_fuzzer.py instrument revertTo run cake fuzzer again, do the following:
Delete Applications Logs (as an example to this, MISP logs stored /var/www/MISP/app/tmp/logs)
rm /var/www/MISP/app/tmp/logs/*
Delete All Files Inside of /cake_fuzzer/databases folder
rm /cake_fuzzer/databases/*
Delete cake_fuzzer/results.jsonfile (Firstly do not forget to save or examine previous scan resulst)
rm /cake_fuzzer/results.json
Finally follow previous running proccess again with 3 terminals
Attack queue marks executed attacks in the database as 'executed' so to run whole suite again you need to remove the database and add attacks again.
Make sure to kill monitors and attack queues before removing the database.
rm database.db*
python cake_fuzzer.py run fuzzer
python cake_fuzzer.py run attack_queue
This is likely due to the fact that the previous log files were overwritten by root. Cake Fuzzer operates as root so new log files will be created with the root as the owner. Remove them:
chmod -R a+w /var/www/MISP/app/tmp/logs/*
If you use VM with sharing cake fuzzer with your host machine, make sure that the host directory is properly attached to the guest VM:
sudo vmhgfs-fuse .host:/cake_fuzzer /cake_fuzzer -o allow_other -o uid=1000
Cake Fuzzer has to be located under the root directory of the machine and the base directory name should be cake_fuzzer specificaly.
mv CakeFuzzer/ /cake_fuzzerinstrument apply
Instrumentation proccess is a part of Cake Fuzzer execution flow. When you run instrument apply followed by instrument check, both of these commands should result in the same number of changes.
If you get any "patch" error you could apply patches manually and delete problematic patch file. Patches are located under the /cake_fuzzer/cakefuzzer/instrumentation/pathces directory.
While installing or running if you have python dependency error, manuallay install dependencies after switching to virtual environment.
First switch to the virtual environment
source venv/bin/activateAfter that you can install dependecies with pip3.
pip3 install -r requriments.txtThis project was inspired by:
This project was commissioned by: 
jsFinder is a command-line tool written in Go that scans web pages to find JavaScript files linked in the HTML source code. It searches for any attribute that can contain a JavaScript file (e.g., src, href, data-main, etc.) and extracts the URLs of the files to a text file. The tool is designed to be simple to use, and it supports reading URLs from a file or from standard input.
jsFinder is useful for web developers and security professionals who want to find and analyze the JavaScript files used by a web application. By analyzing the JavaScript files, it's possible to understand the functionality of the application and detect any security vulnerabilities or sensitive information leakage.
jsfinder requires Go 1.20 to install successfully.Run the following command to get the repo :
go install -v github.com/kacakb/jsfinder@latestTo see which flags you can use with the tool, use the -h flag.
jsfinder -h | Flag | Description |
|---|---|
| -l | Specifies the filename to read URLs from. |
| -c | Specifies the maximum number of concurrent requests to be made. The default value is 20. |
| -s | Runs the program in silent mode. If this flag is not set, the program runs in verbose mode. |
| -o | Specifies the filename to write found URLs to. The default filename is output.txt. |
| -read | Reads URLs from stdin instead of a file specified by the -l flag. |
If you want to read from stdin and run the program in silent mode, use this command:
cat list.txt| jsfinder -read -s -o js.txt
If you want to read from a file, you should specify it with the -l flag and use this command:
jsfinder -l list.txt -s -o js.txtYou can also specify the concurrency with the -c flag.The default value is 20. If you want to read from a file, you should specify it with the -l flag and use this command:
jsfinder -l list.txt -c 50 -s -o js.txtIf you have any questions, feedback or collaboration suggestions related to this project, please feel free to contact me via:
e-mail